Printable Version of Topic
Click here to view this topic in its original format
914World.com _ 914World Garage _ TO A/C or not to A/C air conditioing
Posted by: jc914 Oct 24 2008, 08:21 AM
I have a 1973 2.0 and it came from the dealership with the a/c unit. it currently does not work. I am planning on restoring the car early next year. My main questions is if i remove the A/C unit will that bring down the value of the car.... The only benefit i have from getting it fixed is that i live in Miami Fl. and i like how my car looks with the silver window tint. 
Posted by: markb Oct 24 2008, 08:33 AM
IMHO, a restoration means you're restoring it to what it came with from the factory. I'd leave it in. You probably will use it. 
Posted by: computers4kids Oct 24 2008, 08:41 AM

IMHO, a restoration means you're restoring it to what it came with from the factory. I'd leave it in. You probably will use it.
Ah yes, but if restoration means you're "restoring it to what it came with from the factory," then you would have to remove it, because 914s did not come from the factory with air...dealership add on.
But Mark is right....you'll need it in Florida...leave it.
Posted by: dlee6204 Oct 24 2008, 08:43 AM
I agree... you should leave it in.
Posted by: heavydriver Oct 24 2008, 09:00 AM
I bought mine from my brother when we lived in Homestead. By all means, keep the a/c. 
Posted by: jc914 Oct 24 2008, 09:12 AM
Thanks guys i am going to fix it it just to hot down here. Just got to save more money. May be christmas might be nice to me this year... 
Posted by: Vacca Rabite Oct 24 2008, 09:29 AM
I took mine out, welded all the holes closed, and replaced the A/C induced rusted front trunk with a good one.
I figure if it is that hot, I just won't drive the 914. But, hot in the MidA is not the same as Florida hot. Florida hot just gets silly.
Zach
Posted by: Bruce Hinds Oct 24 2008, 11:47 AM
If you're gonna leave the A/C in which you'll really use, swap the piston style compressor out for a late model centrifugal model. They run so much smoother and may even take less power to run.
Bruce
Posted by: zambezi Oct 24 2008, 12:55 PM
Not only run the rotary style Sanden compressor, but also first and foremost change out the front condensor fan for a modern more eficient one. Take the front condesor box apart and see how small the fan and motor is. I just changed mine because I was shocked at the wopping 5" fan that was original. Now I have a full 13" Spal fan. I also moved the location of the compressor to on top of the motor for better ease of belt changes and recharging the system. I'll take some pics and post them if anyone is interested.
Posted by: jc914 Oct 24 2008, 12:55 PM
Thanks Bruce Hinds for the informartion where can i buy and what centrifugal model do i need. I do like the idea of using less power to run. When it was working it would just suck power out and overtime work for the alternator
Posted by: southernmost914 Oct 24 2008, 12:56 PM
If you're gonna leave the A/C in which you'll really use, swap the piston style compressor out for a late model centrifugal model. They run so much smoother and may even take less power to run.
Bruce

Dude you live in South Florida, for comfort and resell value, keep your A/C. Yes it did not come from the factory with A/C, but it was delivered by the dealer that way and is a Porsche approved dealer add on. It will cost you to update. Barrier hoses, modern compressor, compressor mount, R134a conversion. Think about comfort and the comfort of your passenger.
Steve
Lobbiest for a cooler cockpit

Posted by: jc914 Oct 24 2008, 12:56 PM
zambezi PLEASE PLEASE post some pics. Thank you!!!!!!!!!!
does anyone know about how much this would all cost. to update the a/c
Posted by: jc914 Oct 24 2008, 01:31 PM
ok i found some post what compressor should i get the sander 508 or the sander 510. what the difference. thanks
Posted by: ClayPerrine Oct 24 2008, 01:35 PM
ok i found some post what compressor should i get the sander 508 or the sander 510. what the difference. thanks
contact IceAC in California and buy the kit for a Type IV from them. It is a true bolt-On replacement.
Posted by: southernmost914 Oct 24 2008, 01:41 PM
ok i found some post what compressor should i get the sander 508 or the sander 510. what the difference. thanks
508 = 8 cubic inches of displacement per revolution
510= 10 cubic inches of displacement per revolution ( more of a load)
I am running a 505 but I have a A/C background and have manipulated the system.
Steve
Posted by: jc914 Oct 24 2008, 01:41 PM
thanks ClayPerrine i am going to start pricing out what i need. for the compressor is it a V BELT OR 7 GROOVE SERPENTINE. i saw this on ebay
http://cgi.ebay.com/ebaymotors/Sanden-508-Compressor-12V134A-small-imperfect-Chromed_W0QQitemZ330280822532QQcmdZViewItem?hash=item330280822532&_trksid=p4506.c0.m245&_trkparms=72%3A727|65%3A12|39%3A1|240%3A1318
sorry for all the questions i am new to air conditioning now that i want to fix it
thanks
Posted by: type47 Oct 24 2008, 01:56 PM
i removed my a/c but since you're in FL, I'd leave it in and "neaten up" the install.
Posted by: jc914 Oct 24 2008, 04:35 PM
I just want to be clear all i need to but to upgrade my ac unit to the new R134a. I saw on ebay they had two types of belts which one do i need
V BELT OR 7 GROOVE SERPENTINE
items needed
1) sanden 508 Compressor
2) new bracket to attache the sanden 508 to the existing york bracket
3) barrier hoses
Posted by: southernmost914 Oct 24 2008, 04:44 PM
You must also replace the reciever/dryer and if you go with a Sanden 508 I would recomend a R134a TXV (metering device).
Steve
 Edit:You have a grooved belt now. Might as well stick with the crank pulley you have now.
Posted by: jc914 Oct 24 2008, 04:49 PM
thanks steve
Posted by: southernmost914 Oct 24 2008, 04:54 PM
thanks steve i do not no much about a/c this might be stupid but what is the reciever/dryer and where is it located.
thanks
Canister in the front trunk with sight glass. It stores extra refrigerant, absorbs moisture and is one tool (the sight glass) to dail the correct refrigerant charge.
Steve
Posted by: Joe Owensby Oct 24 2008, 10:22 PM
Zambezi, I would also love to see your compressor mount.
You may also look at hot rod shops to find AC components. Hotrod air and Sourthern Rods both sell the components. JoeO
Posted by: zx-niner Oct 25 2008, 05:12 PM
I've recently corresponded with Ed at Gillmore Enterprises. He stated he is a couple of weeks away from completing an entire 914 A/C system. Since he already has the compressor part done (compressor, pulley, bracket, belt and hardware) I ordered it to install when I put in my new engine. He has compressor components for both the stock Type IV cooling and Jake Raby's DTM cooling. Before next summer I will pick up the rest of the his system which I can hook up to the aready-installed compressor.
Posted by: southernmost914 Oct 25 2008, 07:26 PM
I've recently corresponded with Ed at Gillmore Enterprises. He stated he is a couple of weeks away from completing an entire 914 A/C system. Since he already has the compressor part done (compressor, pulley, bracket, belt and hardware) I ordered it to install when I put in my new engine. He has compressor components for both the stock Type IV cooling and Jake Raby's DTM cooling. Before next summer I will pick up the rest of the his system which I can hook up to the aready-installed compressor.
What is compressor displacement? Would like to know.
Thanks,
Steve
Posted by: zambezi Oct 25 2008, 10:17 PM
O.K. JC and Joe,
Here are the pics of my A/C project. My car was also bought new with A/C but the engine was changed to a 2 liter and the sheetmetal and all compressor mountings were discarded. So my car then had all the A/C components except the compressor. So I started looking at my options and I did not like the after market's approach. I figured if I could mount the compressor up top with a front mounted pulley like the smog pump set up it would make changing belts and filling with freon much easier. Well I happened to find on ebay a pulley that mounts to the front of the fan. It is cast metal and balanced, so it should work just right. I don't know what it is from. It could be a bus item or maybe a 411 or 412 VW? I don't think it is a Porsche item but it works for what I need. Now with that item found I needed to get a Sanden 508 to test fit for belt alignment. Once I had the compressor I put it where I wanted it be and found that the oil filler is just barely in the way. I could have left it but removing the filler cap and servicing the A/C system would have been tight. So I built a riser for the oil filler with some scrap 1 1/4 pipe I had. I made it so it angles the filler back and up away from the back side of the compressor. Next comes the actual mounting. I wanted an easy adjusting system so I borrowed the idea from the 944, 928 models and used a turnbuckle adjuster. I probably could have stole one from the 944 power steering pump and it might have been the right length, but no time to go looking for one so I made one with a turnbuckle bought from a hardware store. I cut the turnbuckle in the middle and shortened it to the length I needed and welded everything back up (included side gussets to support the turnbuckle). I welded larger nuts on the ends of the threaded portions of the turnbuckle to act as my mounting points. The mount for the fixed end of the compressor is a simple flat plate with 4 ear tabs underneath that bolt through the 4 center mounts of the fan shroud. Welded on top of that plate is the pivot bracket for the compressor.
Now with everything mounted I must say everything clears just fine and there is enough room to work on the system. I don't even have to disassemble the front fan to change any belts now. I also don't have to butcher any of the side tins or the engine shelf. The two holes by the battery box for the hoses were already there and have been there since 1973. I hope this makes sense to you guys.
JIM
Attached image(s)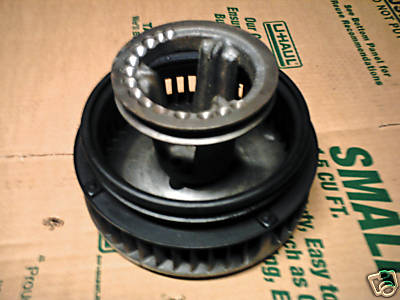
Posted by: zambezi Oct 25 2008, 10:20 PM
Those first two pics show the pulley and what it looks like when mounted. Sorry about the fact that it is in the car. The mock up would have gone much fast out of the car. These next pics show the oil filler riser I had to make.
Attached image(s)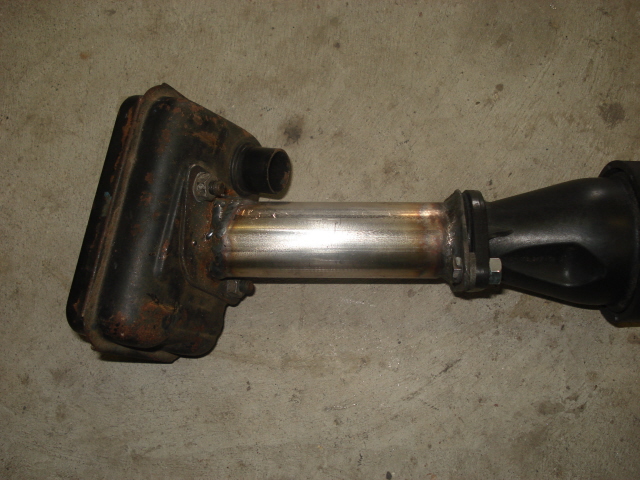

Posted by: zambezi Oct 25 2008, 10:23 PM
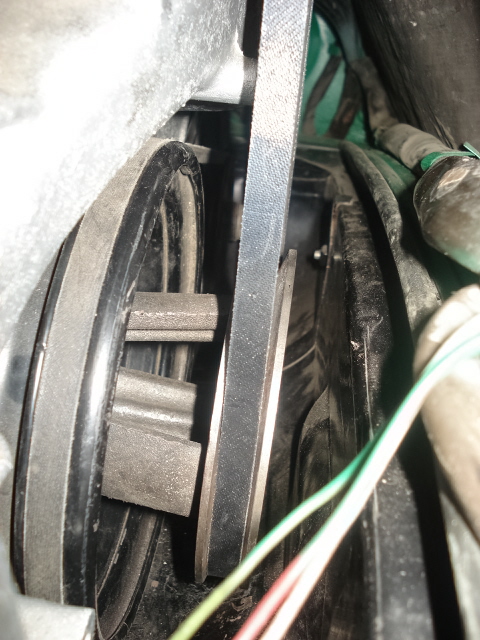
These next pics show the adjuster bracket and the pivot bracket. I don't have a pic of the pivot bracket unmounted but I think you can still see how it is made
Attached image(s)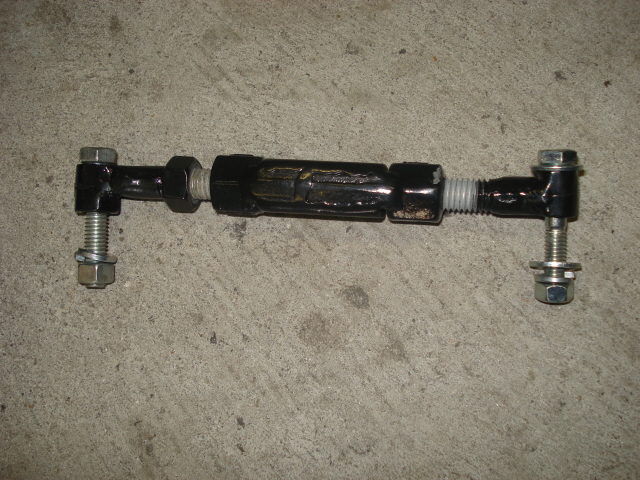
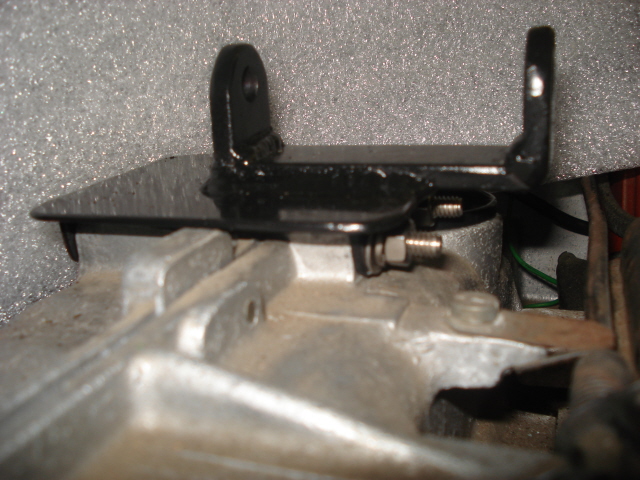
Posted by: zambezi Oct 25 2008, 10:25 PM
another of the pivot bracket
Attached image(s)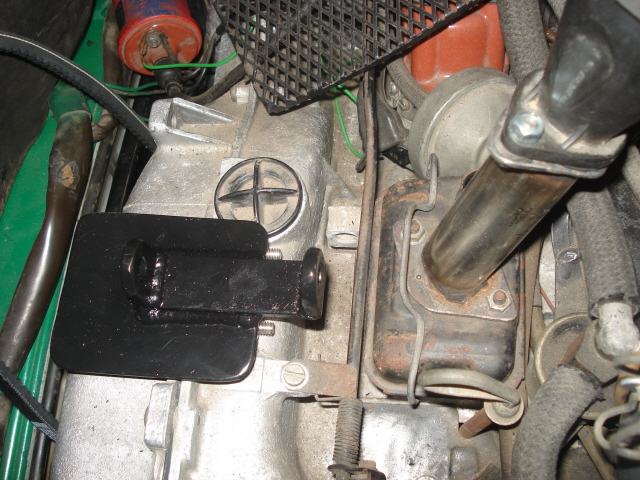
Posted by: zambezi Oct 25 2008, 10:27 PM
Now a couple of the compressor mounted
Attached image(s)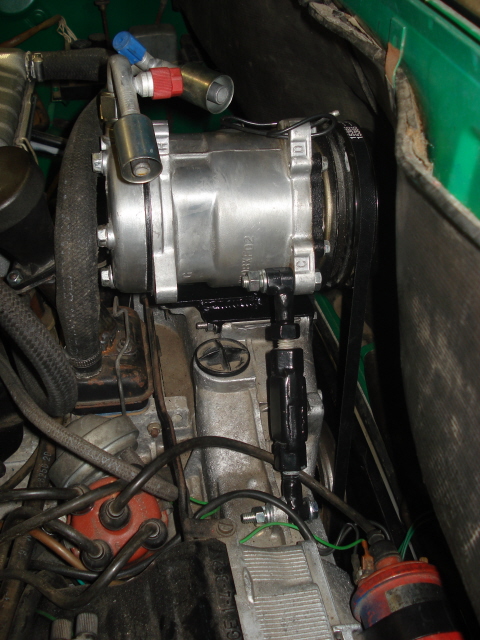

Posted by: zambezi Oct 25 2008, 10:31 PM
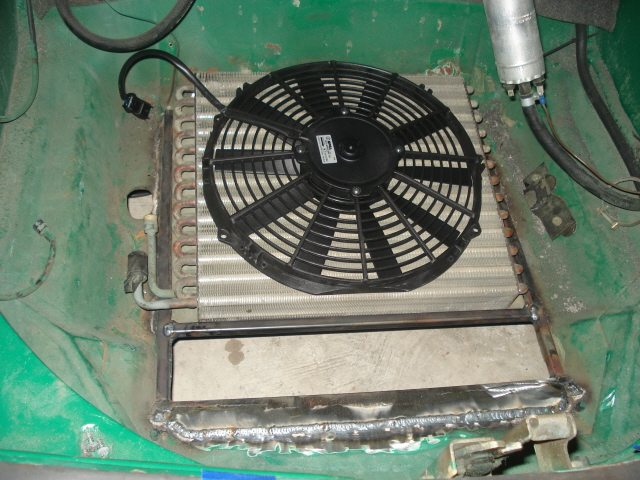
In my earlier post I mentioned also changing the condenser fan. Here is a picture of why and the replacement for comparison. I had said it was a 5 inch fan originally but actually put a tape to it and have to apologize... it is actually a wopping 8 inches. The replacement is 13 inches and pushes a whole lot more air.
Attached image(s)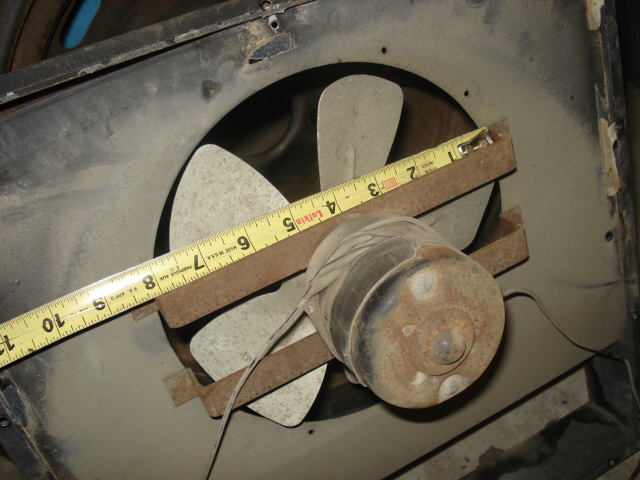
Posted by: zambezi Oct 25 2008, 10:38 PM
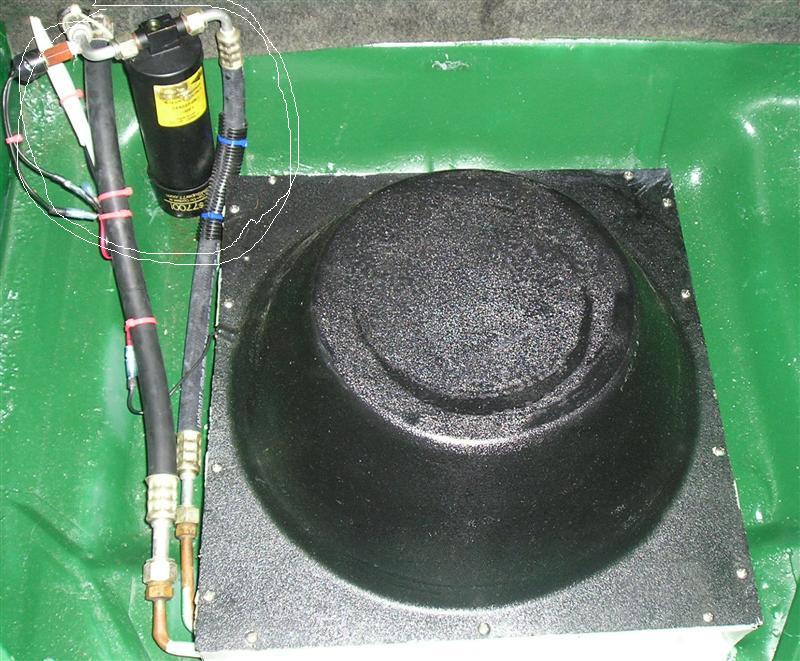
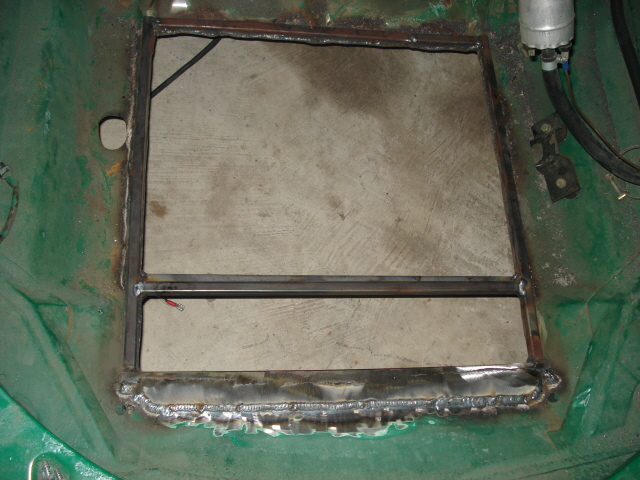
Another area of concern was the hole that was butchered by the dealership upon install of the front condenser. Here is a pic of the butchered hole and the clean cut reinforced hole now up front. The large area in the rear is for the condenser which sits at a slight angle and the small rectangle to the front of the hole is for the air intake. There is a factory scoop which will mount underneath and direct the air up into the box which surrounds the condenser and then the fan will blow down exiting the hot air out the bottom or the car. I have some mesh grill material I will attach to the underside also to prevent any ingress of debris and to prevent rock damage to the condenser. I also put to use the unused space to the right of the condenser box for the forward mounted fuel pump. That area is just dead space so now I have good access to the pump and filter also.
Attached image(s)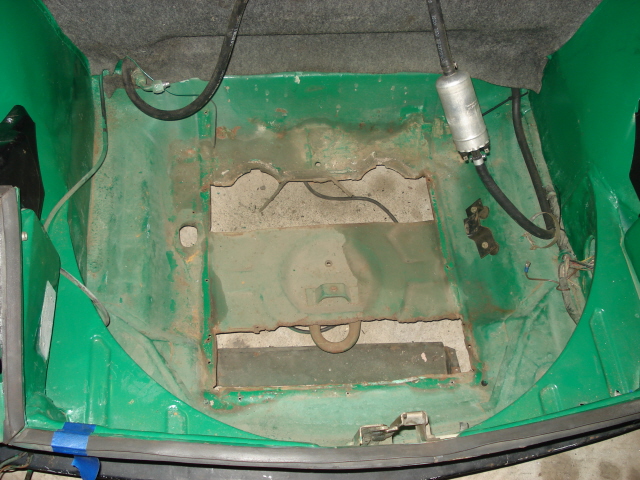
Posted by: zambezi Oct 25 2008, 10:40 PM
My last pic here is the scoop that will go in the front to direct the air into the condenser box. I am still putting the A/C system together so I don't have everything wrapped up yet but I think you can get an idea where it is going.
JIM
Attached image(s)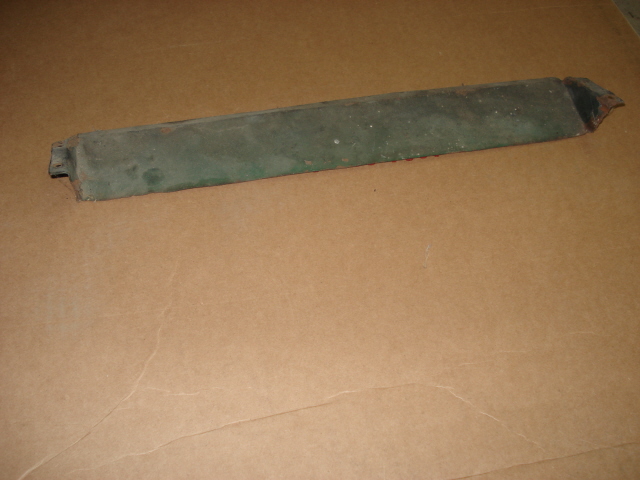
Posted by: Joe Owensby Oct 25 2008, 10:40 PM
Very nice. Thanks for sharing. I may see if I can come up with one of those pulleys and try that type of mounting. JoeO
Posted by: southernmost914 Oct 25 2008, 11:03 PM
Zambezi,
Pretty work. All I am saying is you do not need a large displacement pump for such a small area. I also wanted to mount my compressor like that(912E) but I had what I had. Also , not to be a dick but I will put the fan you have have on the condenser when mine fails and not availble . The pitch of the blades and the factory veturi might have better CFM's Did you have a drop in head pressure? Thats what means something.
Steve
Posted by: retrofit Oct 25 2008, 11:42 PM
I've recently corresponded with Ed at Gillmore Enterprises. He stated he is a couple of weeks away from completing an entire 914 A/C system. Since he already has the compressor part done (compressor, pulley, bracket, belt and hardware) I ordered it to install when I put in my new engine. He has compressor components for both the stock Type IV cooling and Jake Raby's DTM cooling. Before next summer I will pick up the rest of the his system which I can hook up to the aready-installed compressor.
Is he finaly going to get this off the ground? I have heard good stuff about his product and have vbeen lurking in the sidelines to see what develops. I'm in the Central Valley as you are and AC is almost a necessity during our summer.
Thanks for the heads-up!
Allen/retrofit
Turlock, CA
Posted by: retrofit Oct 25 2008, 11:55 PM
ok i found some post what compressor should i get the sander 508 or the sander 510. what the difference. thanks
contact IceAC in California and buy the kit for a Type IV from them. It is a true bolt-On replacement.
Clay
I went to IceAC website and did not see anything mentioned about a kit for the type IV. VW, yes, 911, yes, but no mention of thr type IV. Is this something that I should email them direct about? Or, is this a new product that is not up on their website yet?
TIA
Allen
Posted by: zx-niner Oct 26 2008, 12:20 AM
Is he finaly going to get this off the ground? I have heard good stuff about his product and have vbeen lurking in the sidelines to see what develops. I'm in the Central Valley as you are and AC is almost a necessity during our summer.
Thanks for the heads-up!
Allen/retrofit
Turlock, CA
Yeah, it seems like every few months we get an update and it's getting closer but not quite there. His e-mail from 10/15 states: "I am within couple of weeks of finishing a complete ac system for the 914. I also have a condenser assembly for the system that is last major piece to be tested for the 914 ac." I was optimistic enough to send payment for the compressor so I can mount it on my soon-to-be-installed motor.
Steve in Key West, I'll ask what the capacity is and post it.
Posted by: jc914 Oct 27 2008, 10:28 AM
zambezi Thanks for all the info. great job on the a/c
Posted by: zx-niner Oct 27 2008, 10:01 PM
I've recently corresponded with Ed at Gillmore Enterprises. He stated he is a couple of weeks away from completing an entire 914 A/C system. Since he already has the compressor part done (compressor, pulley, bracket, belt and hardware) I ordered it to install when I put in my new engine. He has compressor components for both the stock Type IV cooling and Jake Raby's DTM cooling. Before next summer I will pick up the rest of the his system which I can hook up to the aready-installed compressor.
What is compressor displacement? Would like to know.
Thanks,
Steve
Steve,
Just heard back from Ed at Gillmore. The compressor is a 7 cubic inch 5 piston rotary type and uses approximately 1.5 hp.
Steve
Posted by: southernmost914 Oct 28 2008, 06:02 AM
[Steve,
Just heard back from Ed at Gillmore. The compressor is a 7 cubic inch 5 piston rotary type and uses approximately 1.5 hp.
Steve
[/quote]
Steve,
Thanks for the follow through. That would be a Sanden 507 wich is a 5 piston swash plate design, not a true rotory. It would be great if some one would develop a type 4 kit with a true rotory similar to that used on Hondas and Toyotas ect.
Thanks,
Steve
Posted by: MBowman325 Oct 28 2008, 12:52 PM
ok i found some post what compressor should i get the sander 508 or the sander 510. what the difference. thanks
contact IceAC in California and buy the kit for a Type IV from them. It is a true bolt-On replacement.
Clay
I went to IceAC website and did not see anything mentioned about a kit for the type IV. VW, yes, 911, yes, but no mention of thr type IV. Is this something that I should email them direct about? Or, is this a new product that is not up on their website yet?
TIA
Allen
You have to call them for it. I talked to them a couple of years ago and the compressor, mounting kit and pully(s) was something like 625. Which isn't too bad when you consider a kit is 1-1.4k, and that's about half of it...
I've slept since then, but that's what I recall. They were pleasant on the phone and took time to answer the questions I had at the time.
Posted by: ClayPerrine Oct 28 2008, 01:36 PM
ok i found some post what compressor should i get the sander 508 or the sander 510. what the difference. thanks
contact IceAC in California and buy the kit for a Type IV from them. It is a true bolt-On replacement.
Clay
I went to IceAC website and did not see anything mentioned about a kit for the type IV. VW, yes, 911, yes, but no mention of thr type IV. Is this something that I should email them direct about? Or, is this a new product that is not up on their website yet?
TIA
Allen
You have to call them for it. I talked to them a couple of years ago and the compressor, mounting kit and pully(s) was something like 625. Which isn't too bad when you consider a kit is 1-1.4k, and that's about half of it...
I've slept since then, but that's what I recall. They were pleasant on the phone and took time to answer the questions I had at the time.
It doesn't list on the website, but they do have the compressor mounting kit. I have bought and installed 2 of them. A true bolt on kit.
Posted by: southernmost914 Oct 28 2008, 05:59 PM
ok i found some post what compressor should i get the sander 508 or the sander 510. what the difference. thanks
contact IceAC in California and buy the kit for a Type IV from them. It is a true bolt-On replacement.
Clay
I went to IceAC website and did not see anything mentioned about a kit for the type IV. VW, yes, 911, yes, but no mention of thr type IV. Is this something that I should email them direct about? Or, is this a new product that is not up on their website yet?
TIA
Allen
You have to call them for it. I talked to them a couple of years ago and the compressor, mounting kit and pully(s) was something like 625. Which isn't too bad when you consider a kit is 1-1.4k, and that's about half of it...
I've slept since then, but that's what I recall. They were pleasant on the phone and took time to answer the questions I had at the time.
It doesn't list on the website, but they do have the compressor mounting kit. I have bought and installed 2 of them. A true bolt on kit.
Clay,
Any photos?
Steve
Posted by: bandjoey Oct 28 2008, 11:18 PM
WOW ZAMBEZI ! That's some compressor mount! Gotta have one and it looks easy to fit. 
Has anyone thought of or using a throttle cutoff switch? i.e. say the gas pedal is pushed hard in first or second gear and there's a contact microswitch somewhere to cut off the compressor?
Happy Cooling Florida! Keep us posted on progress. Bill
Powered by Invision Power Board (http://www.invisionboard.com)
© Invision Power Services (http://www.invisionpower.com)