Printable Version of Topic
Click here to view this topic in its original format
914World.com _ 914World Garage _ Wallys914/8 Conversion and Restoration
Posted by: wallys914 Nov 23 2008, 06:28 PM
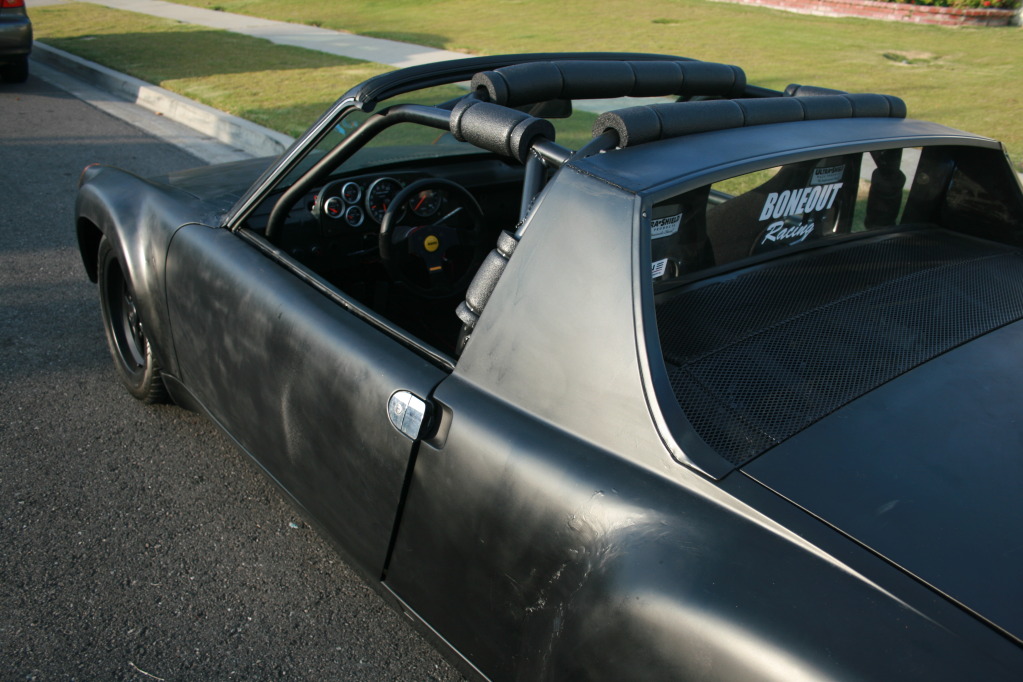
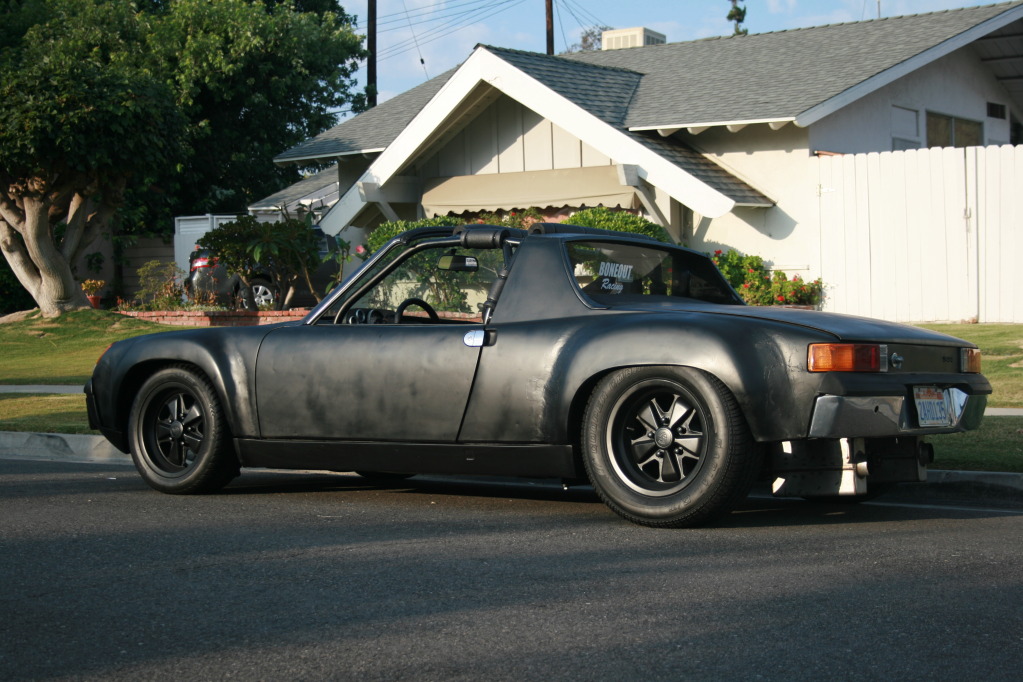
I have had this car since last august, this july the resto/conversion started from the ground up.....Today i stand with the car body work 80% complete and the powertrain build about 20% Complete......Please Critique and Credit, anything you like.....
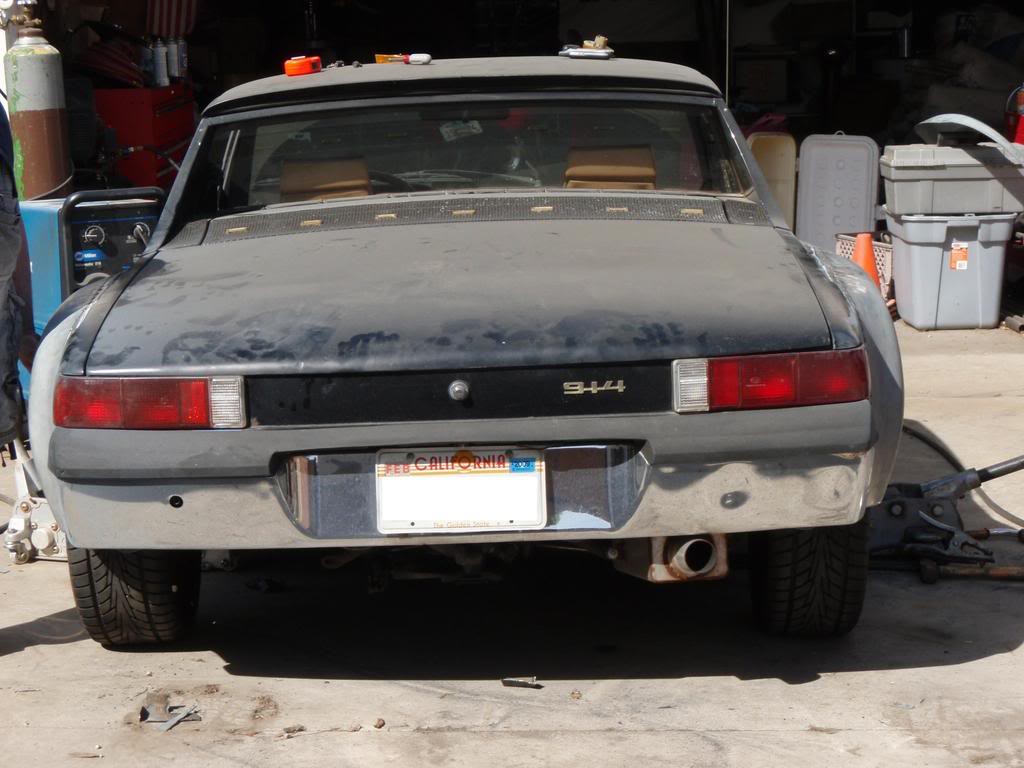
Original Car like a week after purchase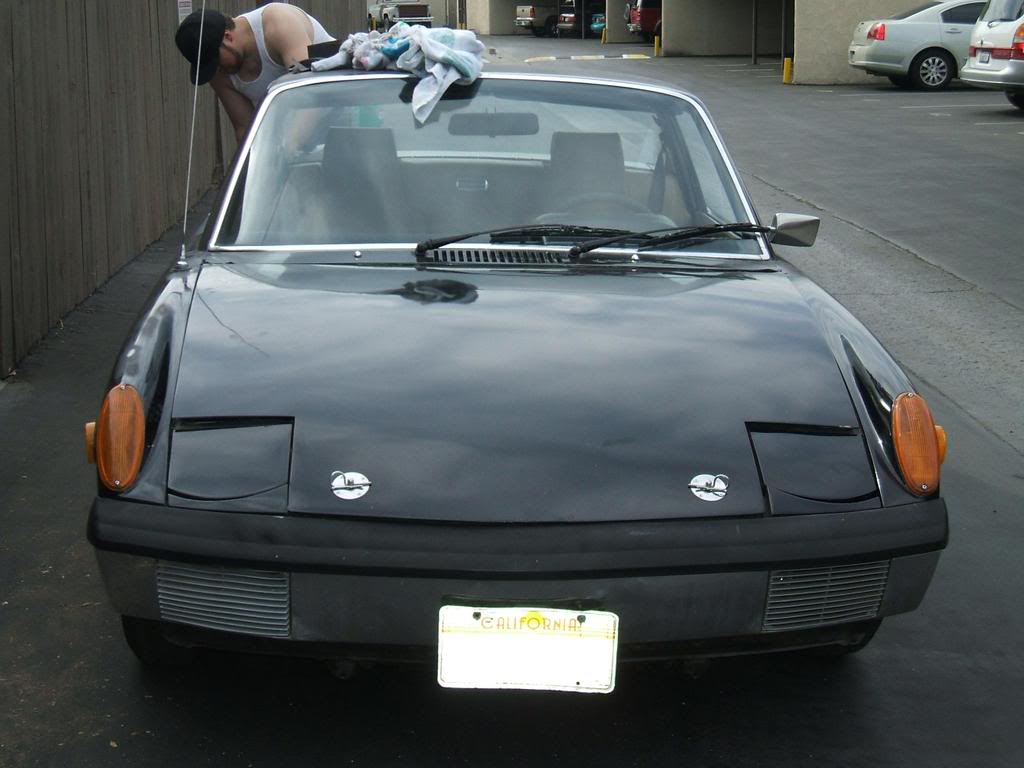
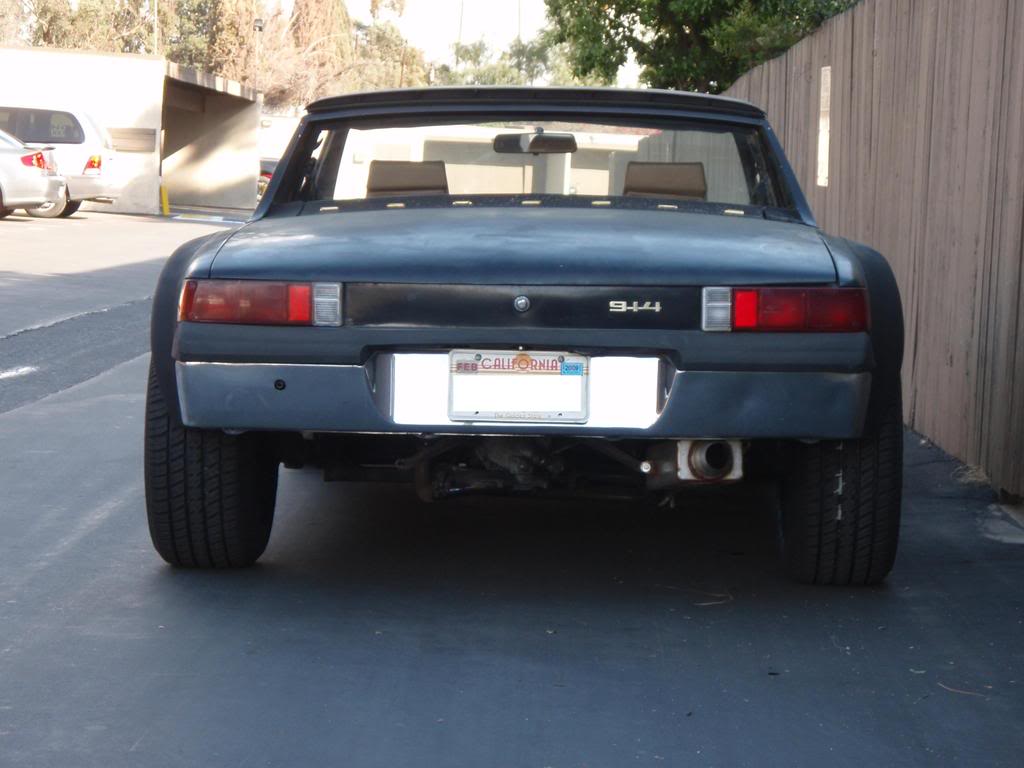
Car after new tires, headers, clutch, carbs from fuel injection, and new muffler.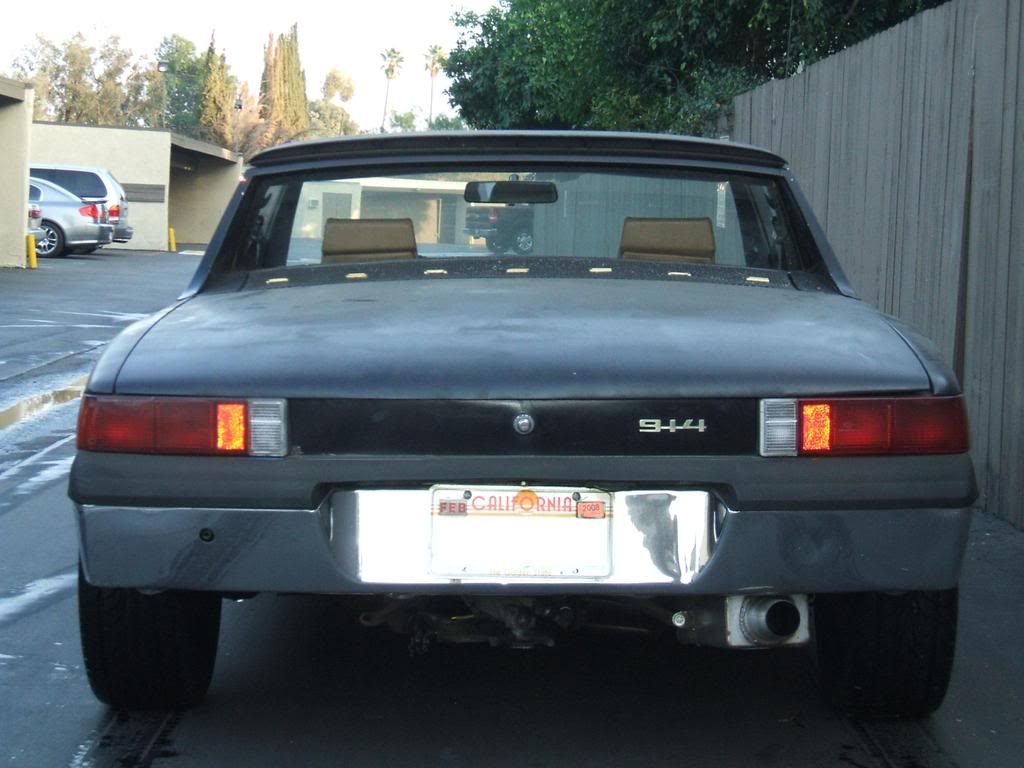
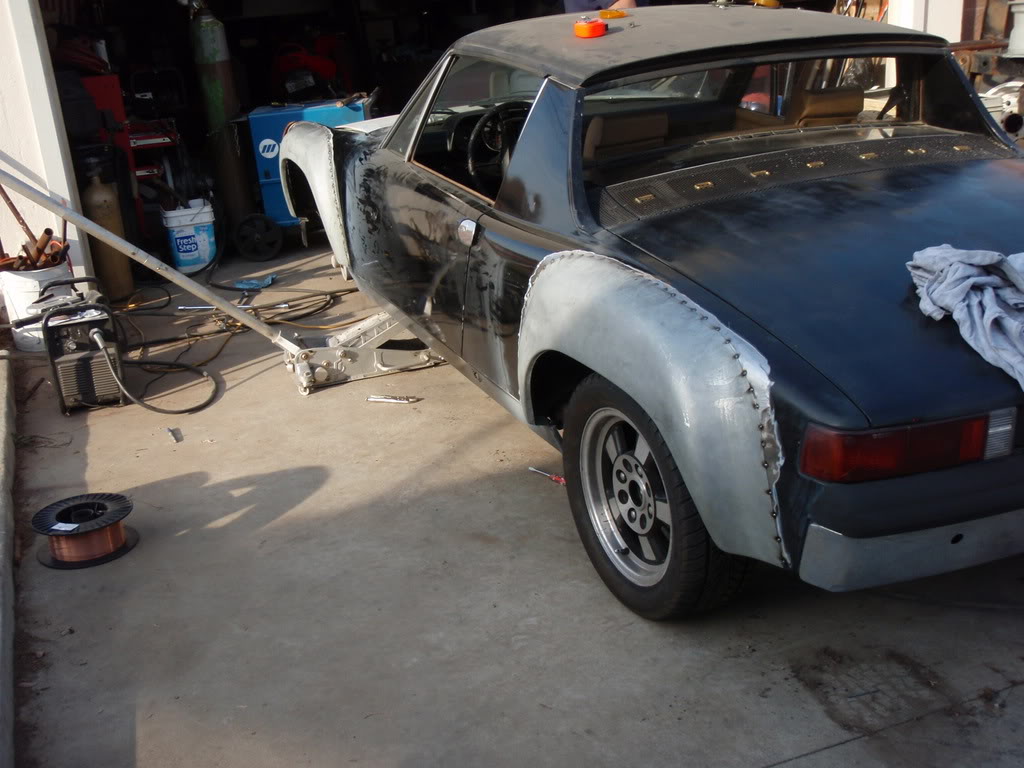
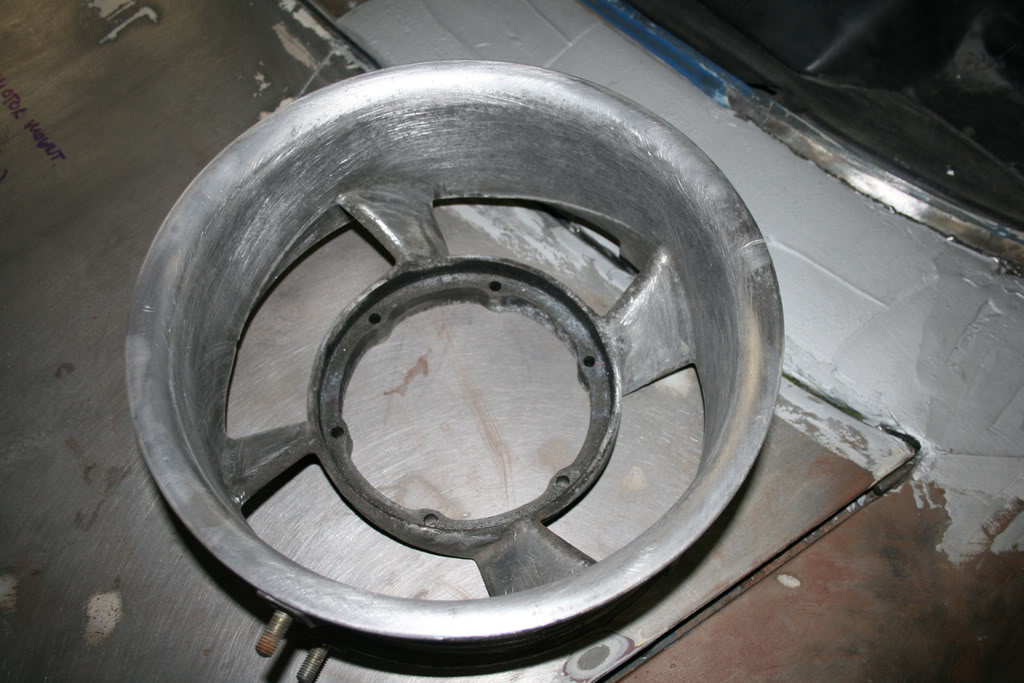
After a lil paint and some New tires and wheel adapters <--- Bad IDEA 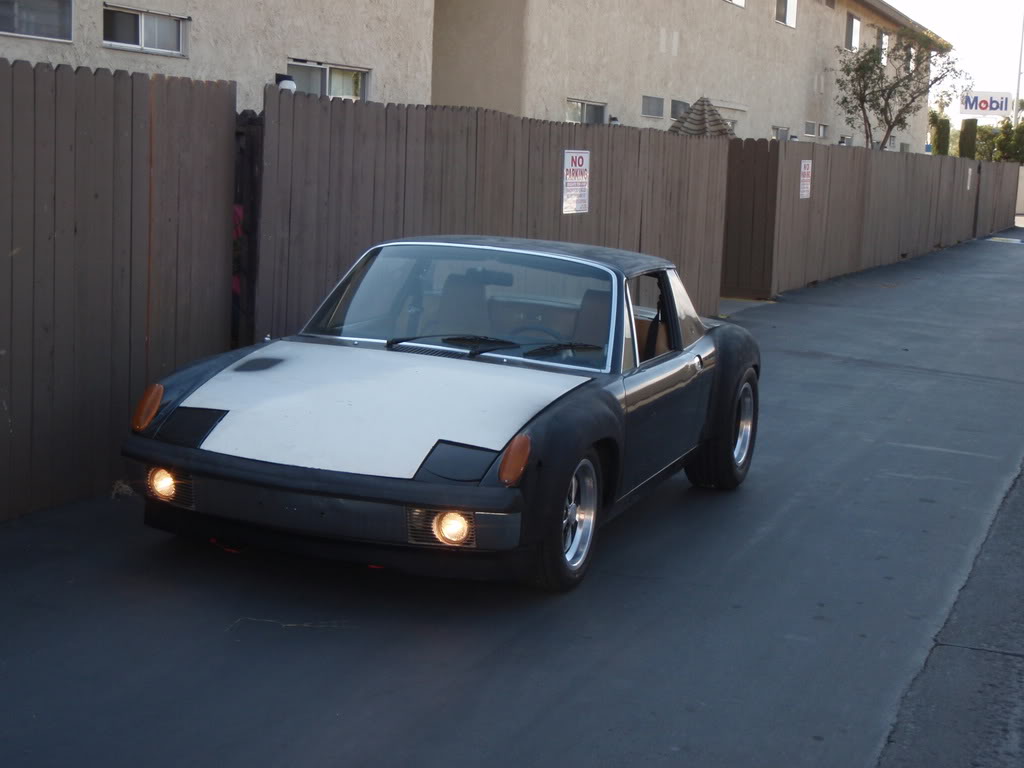
3 day stripping paint
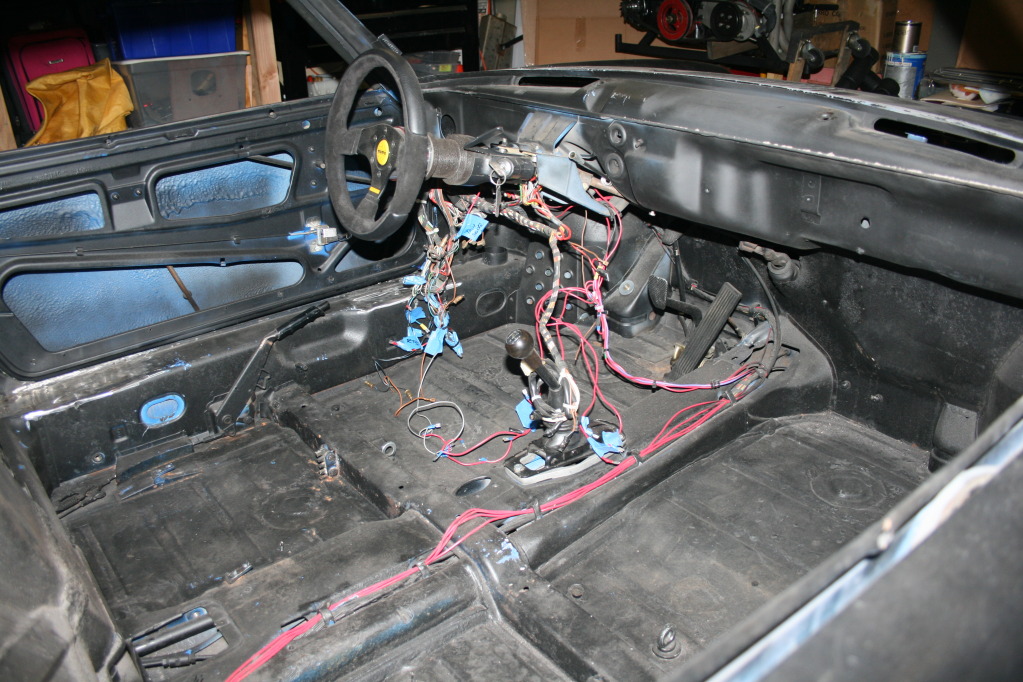
Interior after some stripping...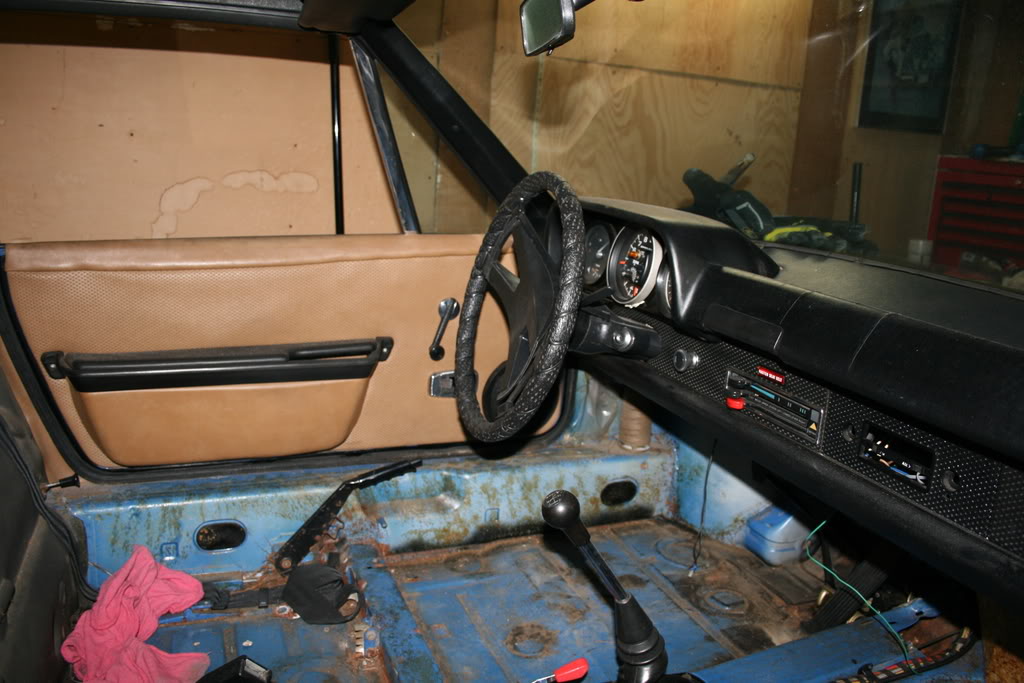
Car after more parts stripping....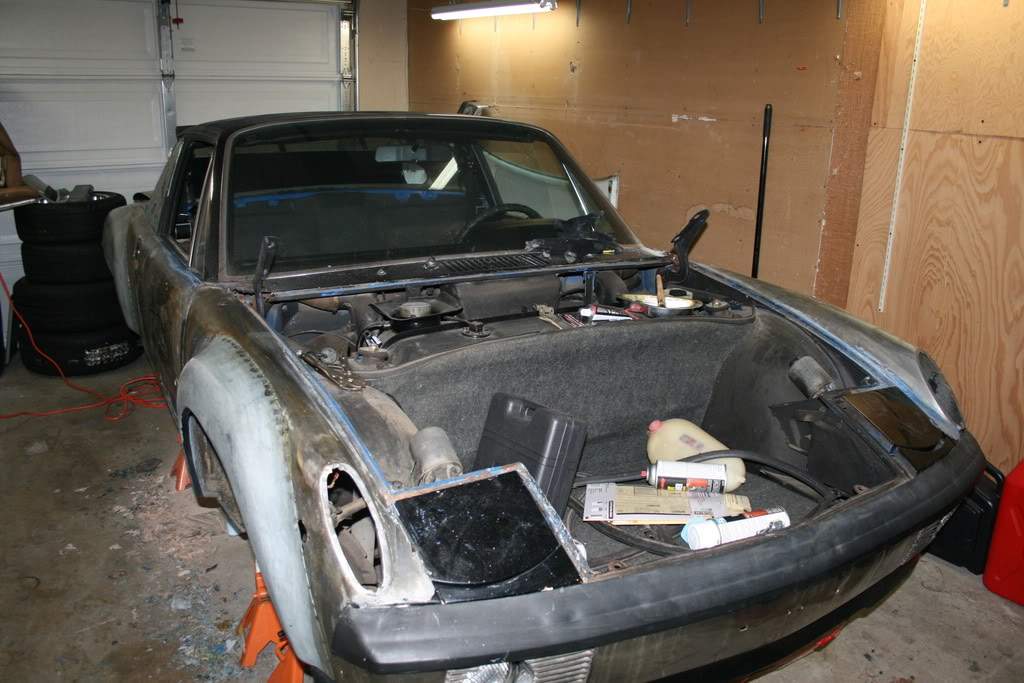
Posted by: wallys914 Nov 23 2008, 06:30 PM
back of car before grinding
still more stripping and grinding
removed the lights, and windows, and door panles today...
after all stripping done....... ![yellowsleep[1].gif](style_emoticons/default/yellowsleep[1].gif)


I am posting this for you all to laugh at, You all know how bad tail shift trannys are, well i got creative because mine wouldnt shift at all, actually this worked well for a while.... 8 zip ties if you cant count....
So Heres what i got so far, i have the car completly stripped 
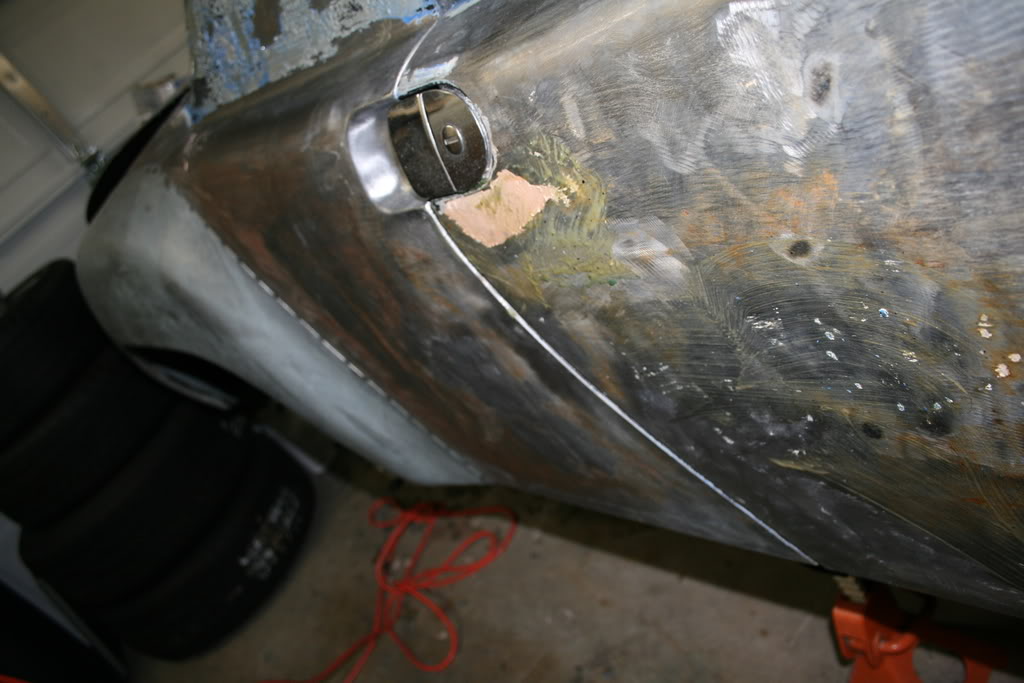
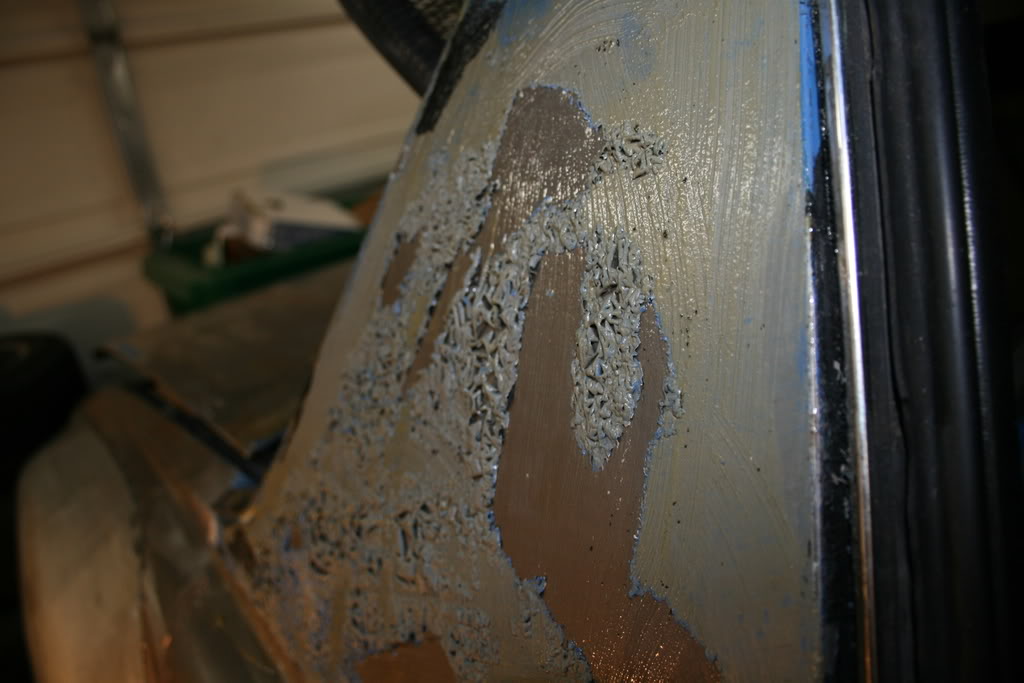
I cut the old f'd up rain tray/wind shield wiper mount out....I guess the previous owner had the hood fly up on him???? but the bondo looks to be from the 80s lol....look like some one has bondo'd the hole front tray on..... Watch....


So I had the wife cut it all out
and after

Posted by: jc914 Nov 23 2008, 06:33 PM
GREAT JOB Keep us all posted. Nice work on the Flares very very nice 


Posted by: wallys914 Nov 23 2008, 06:34 PM
I got the rockers off to find the driver side in great condition with the passenger side in total havoc.....Seeee.... And has any one else had a rats nest in there rockers too?


I got the rest of my kit on the way as well as the engine......Heres the tank
(1000$'s grrrr)
:pics:
I pulled some dents out with my new stud welder.....

So then I noticed some rust in the rear trunk through all the sprayed bedliner that didnt set so i spent the day cutting the piece out...Sorry guys the wife wasnt home....

I also in the spare time i had when air compressor was filling had a chance to wire wheel the front trunk and remove some kind of sprayed on bedliner, who knew the original paint was in great condition.....See....
Before 
After
![popcorn[1].gif](style_emoticons/default/popcorn[1].gif)
I got all of my parts and cleant the back truck out, its amazing what a lil stripper and some elbow grease will do....got the hood on to...doesnt fit rigth though
Parts were....
MotorMount
Acc Linkage
Eng Tin
Behr Oil Cooler
acc cable
rubber seald and roll bar rubber
It was like christmas in August so back to work i go.... :bfh: 


Posted by: wallys914 Nov 23 2008, 06:37 PM
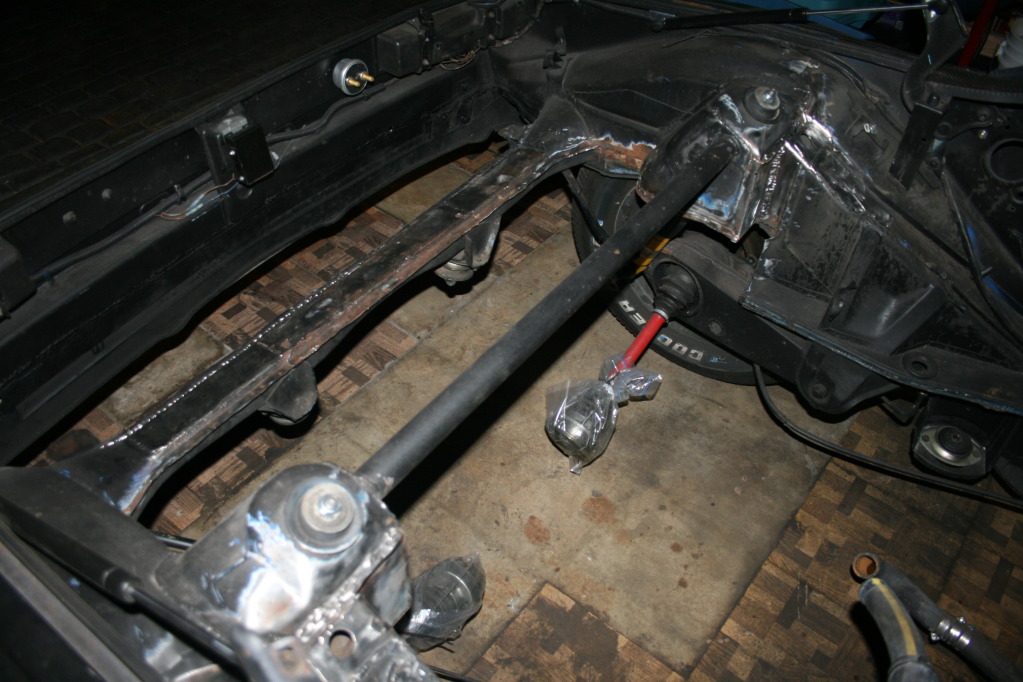
So I got the Front Suspension off this last week I pulled some stuff off it today, along with a buddy got the front man whole covers, antenna whole, and fender welded nicer..... and got to get in the engine bay an remove the battery tray ( OMG ) and the relay mounts....
Beware what you are about to see are scary images and i have no clue how any one let the car get this bad, but i know i have to do something about it.....


And the bad stuff.....BTW Fat GUY in A little Engine Compartment....

Well I got the rear Passenger hole covered up, and the rear fenders welded up as well.


Posted by: wallys914 Nov 23 2008, 06:39 PM
Engine from Canadia 


Well i got more into the Hell hole this week and this is what i got, Do you know what this is? I Do,
It is this......  I know holy shit huh.....
well i got it cleaned and welded up, and then go the sheet metall cut to replace the hole i had to hack out.


Posted by: wallys914 Nov 23 2008, 06:42 PM
So heres the front control arms and the arm mount painted with new bushings,
And heres the 2 pieces of cowl that was put in, I covered the windshield washers cause i thought they were ugly.....
Before
After


And heres that hole in the engine compartment....
Before

After

I had got the front suspension all together, and on the car. all new bushings, balljoints, and new paint.....I also got the seams between the fender and cowl welded up, and i found a solution to the Hood Hinge issue i had with them breaking.....
So 
Driverside cowl before when the hood had flown up and destroyed the cowl
After a few welding sessions....


Difference huh....
Posted by: computers4kids Nov 23 2008, 06:43 PM
Great job on the flares...you're an amazing welder. Had I tried to do that...well, lets just leave that to your imagination. You'll be glad you stripped the car...even though you probaby thought you had opened a can of worms mid stream.
Looking forward to more pics!
Posted by: wallys914 Nov 23 2008, 06:47 PM
I had issue breaking the Hood hinge Bolts, I drilled the hinge and the mount out and then bought a huge bolt and lock nut and welded the bolt to the mount.......Works well..... :bfh: 


Car at this point.....


And i also got some metal fill and Layed that on the cowl, very nice.....

Posted by: wallys914 Nov 23 2008, 06:51 PM
Again after a large amount of work, I got the trunk hole filled in, the rear trunk mounted with the bolt on non binding mounts from JD West, I got some more metal fill on the car and i got some dents pulled out...... The Wifey helped and no Photo OP... Just straight work 
 ... Enjoy...
Wifey using the stud welder..... 


Wifey pulling dents.... :mad: 
Her Welding the trunk hole.....I got her to weld...... ME :sharp: | The Wife :bfh: 


Painted.....
and the back of the car got it oops.....
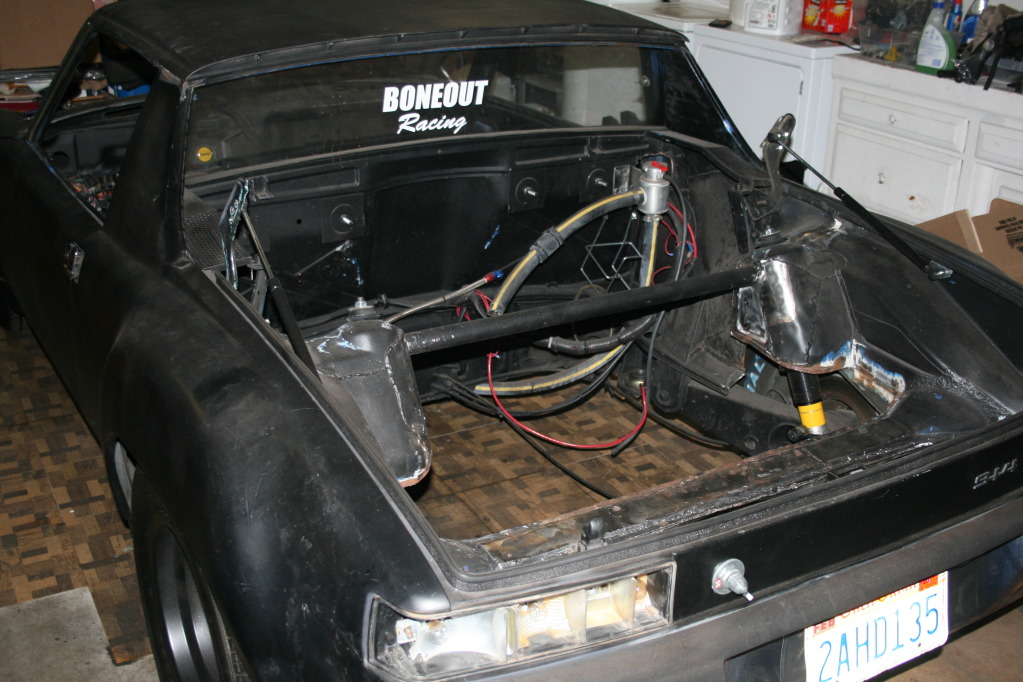
I busted ass and got the sway bar on, and got all the fenders grinded down even with the the orig fender, and then started laying some metal fill..... the blocking starts..... OH Joy..... soon the motor will be in the shop and the fun sh!t begins.....Like cutting the holes for the oil tank and welding the motor mount in......
Sway Bar

Bondo


Posted by: wallys914 Nov 23 2008, 06:54 PM
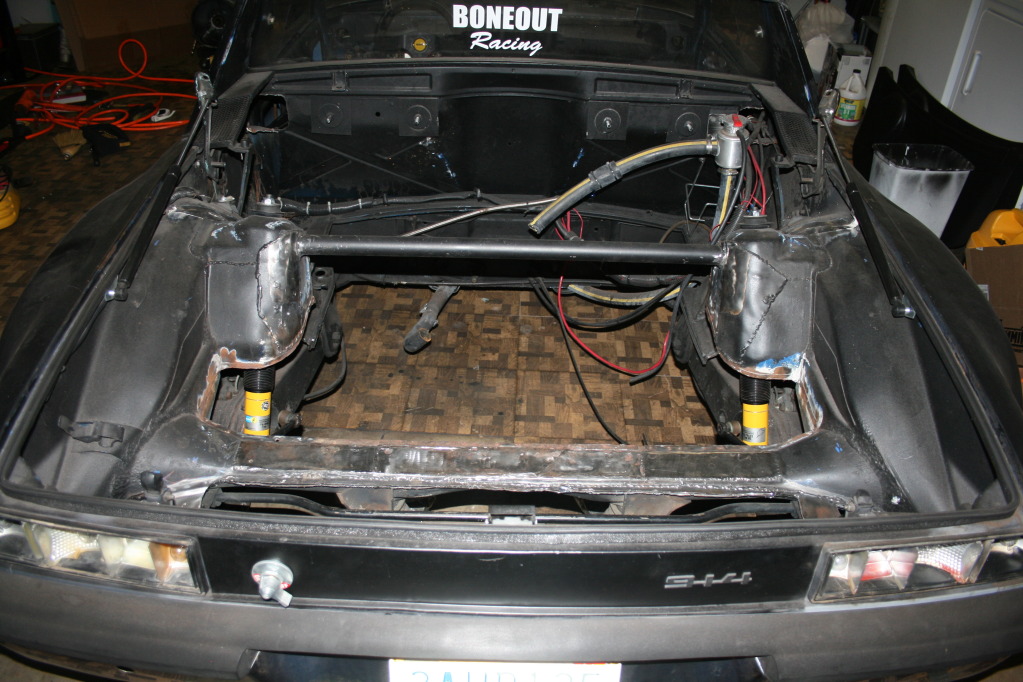
I got the Oil tank in, the 6 Mount in and the the the GT Grill done....
Gt Grill
Oil Tank
6 Mount

So i Got the CIS system off the 2.7 last night and started to look into the heads and places or people to have it rebuilt by.... I think i see a few burnt valves but not sure i will get in to it more this week.....


Got the engine stand working too.....

I got the engine pulled apart more.

So I cleaned the oil cooler duct, and stripped the the Upper Valve Covers and cleaned and stripped, and cleaned the Fan Shroud..... :nails:  Now only if the Car and Engine Could all look this good in One night....Tomorrow night is the cracking off of the Heads


Valves are kind of nasty
Posted by: wallys914 Nov 23 2008, 06:57 PM
I like the stock tensioners with the 25 upgrade i think I will leave that!!!

NoT 
Got the heads off today....Yuck  After I had to heat up the Cam Nut and clamp some vise grips on the sprocket and deadblowed it...
Um I learned you can just man handle it or shit just breaks....Randomly....After Andy Man Handled the Cam nut.....Notice the Right Rocker
Pistons are ehhh, one has marks where it looks like the piston has been rubbing the cylinder.... :doh: 
Got all the other crap off just need to remove the Flywheel and split the case, I unbolted all the bolts and nuts I could find...but no Splitty after some
Tap-Tap-Tap-a-roo
Engine Un-Build Complete....
I also Sanded and painted the Shroud today..... :aah:
Bearings and Crank looks good, didnt see any signs of Carnage, but just the usual wear and tear, Maybe arebuild wont be so much.....


Shroud and such....

This is where i stand today as of 2 hours ago.....More to come over the Next days, weeks, Months.....
Thank you all for your posts....
Posted by: veltror Nov 24 2008, 10:22 AM
Brillinat work!! Wish mine was like yours but mine is significantly worse...
Posted by: jjemg Nov 24 2008, 11:23 AM
OK... Who is the better welder?
She looks like she knows her way arould the MIG.
Posted by: 6freak Nov 24 2008, 01:22 PM

I like the stock tensioners with the 25 upgrade i think I will leave that!!!
NoT
Got the heads off today....Yuck
After I had to heat up the Cam Nut and clamp some vise grips on the sprocket and deadblowed it...Um I learned you can just man handle it or shit just breaks....Randomly....After Andy Man Handled the Cam nut.....Notice the Right Rocker
Pistons are ehhh, one has marks where it looks like the piston has been rubbing the cylinder.... :doh:
Got all the other crap off just need to remove the Flywheel and split the case, I unbolted all the bolts and nuts I could find...but no Splitty after some
Tap-Tap-Tap-a-roo
Engine Un-Build Complete....
I also Sanded and painted the Shroud today..... :aah:
Bearings and Crank looks good, didnt see any signs of Carnage, but just the usual wear and tear, Maybe arebuild wont be so much.....
Shroud and such....
This is where i stand today as of 2 hours ago.....More to come over the Next days, weeks, Months.....
Thank you all for your posts....
do the hydraulic tentioners when your that deep into it...... thats more work then i would ever want to tackle ..nice job keep up the good work ..and you better let the wife drive it after she work so hard on it with you
Posted by: wallys914 Nov 24 2008, 11:26 PM
I think I may have some issues..... 


Posted by: wallys914 Nov 29 2008, 11:05 PM
So i was playing with the hood this evening, and i could not get the hood lined up for the life of me, and I found this.....Damnit i knew it was hit some where just couldnt tell (Or maybe I did and i didnt want to think about it) Any one had these issues and is there an easy resolution.....HELP!!!!.....
Inside the Trunk
Then this....(Small People helped me take these pictures....)
But the Hoods aligned as far back as it can go
But...


So in the end im stuck with 2 bad things, 1) Hood latch that is catching the front lip and 2) Hood that's hitting the front Lip....
HELP
Also is there an easy way to cut out the Original Motor Mounts....I dont want to run them and I want to make sure that the area is well supported (E.G.- New Plating).....Your Thoughts anyone....
Posted by: Wilhelm Nov 30 2008, 02:50 AM
Getting the motor mounts off not so hard. Find the spot welds and drill them. Then get a flat thin chisel or heavy duty scraper behind it and it will tap right off. On my car http://www.914world.com/bbs2/index.php?showtopic=87896 I made carboard template of the long under the motor mount area than transfered it to a plate of 1/8" steel. Multiple bung welds and the perimeter welded as well.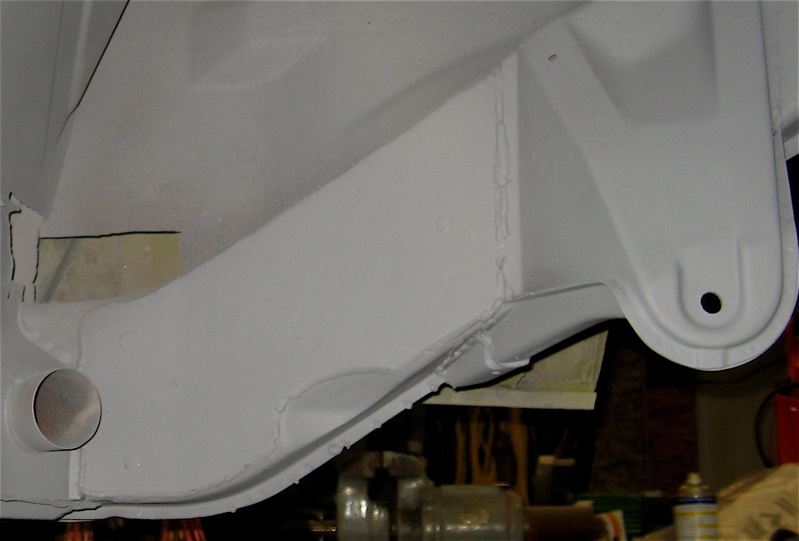
Gonna hang my engine off this and doubt it will rip off, unlike the original mount whose lack of strength was pretty scary.
Posted by: wallys914 Dec 3 2008, 05:40 PM
I wanted to know if the barrels above can be cleaned up, and re-honed? I was just wondering cause i have a great deal from a friend for an incomplete set that looks good and are matching numbers for the pistons. He has 4 barrrels and 5 pistons, i was going to use some of mine mine but i wanted to make sure i can reuse it all...or the majority.
Anybody give me some hints?
sorry you have to scroll up.......! LOL
Posted by: rfuerst911sc Dec 3 2008, 06:15 PM
I wanted to know if the barrels above can be cleaned up, and re-honed? I was just wondering cause i have a great deal from a friend for an incomplete set that looks good and are matching numbers for the pistons. He has 4 barrrels and 5 pistons, i was going to use some of mine mine but i wanted to make sure i can reuse it all...or the majority.
Anybody give me some hints?
sorry you have to scroll up.......! LOL
I'm no expert but there are a few things to know before this can be answered. First is to figure out if they are Nikasil or Alusil cylinders. It is my understanding that if they are Alusil they might be scrap. Like anything else there is a acceptable tolerance for wear limits. You need to find out what those are for your cylinders and then see if they are within spec or not. I'm sure someone like EBS Racing can help you out. They refurbish / resell cylinders and I believe can re-apply the Nikasil coating but it won't be cheap.
Posted by: Lavanaut Dec 4 2008, 11:08 AM
Damn, it must be fun to have these kinds of skills in your arsenal. Keep up the work, I can't wait to see how this thing turns out. Oh and thank you for multiple pics per post...much easier to read that way. 
Reid
Posted by: jaybird840 Dec 5 2008, 10:51 PM
Welcome to the world of the 2.7! I'm about six months into a rebuild of a 2.7 (weekend warrior). If you don't have much experience with these motors, a lot of the conventional stuff you know about motor rebuilding doesn't apply. Find a copy of Wayne Dempsey's book "how to rebuild and modify Porsche 911 engines" and read it about a dozen times. You'll go nutz deep on the rebuild, and if you don't have the case properly prepped (case savers, etc) you'll flush several grand. The magnesium cases are notoriously soft (ask me how I know...I just pulled a stud out of the case bolting the oil pump in yesterday). For your machine work, find CGarr on the Pelican board. He did my heads and case for not much $$ and his work is top notch. I could write for days on stuff to watch out for. Spend some time on the Pelican site in the 911 engine rebuilding forum and you'll learn a ton quickly. Here's the link to my 2.7RS spec motor build.....
http://forums.pelicanparts.com/showthread.php?t=407637
Keep up the great work!!!!
--Jaybird
Posted by: wallys914 Dec 25 2008, 01:03 AM
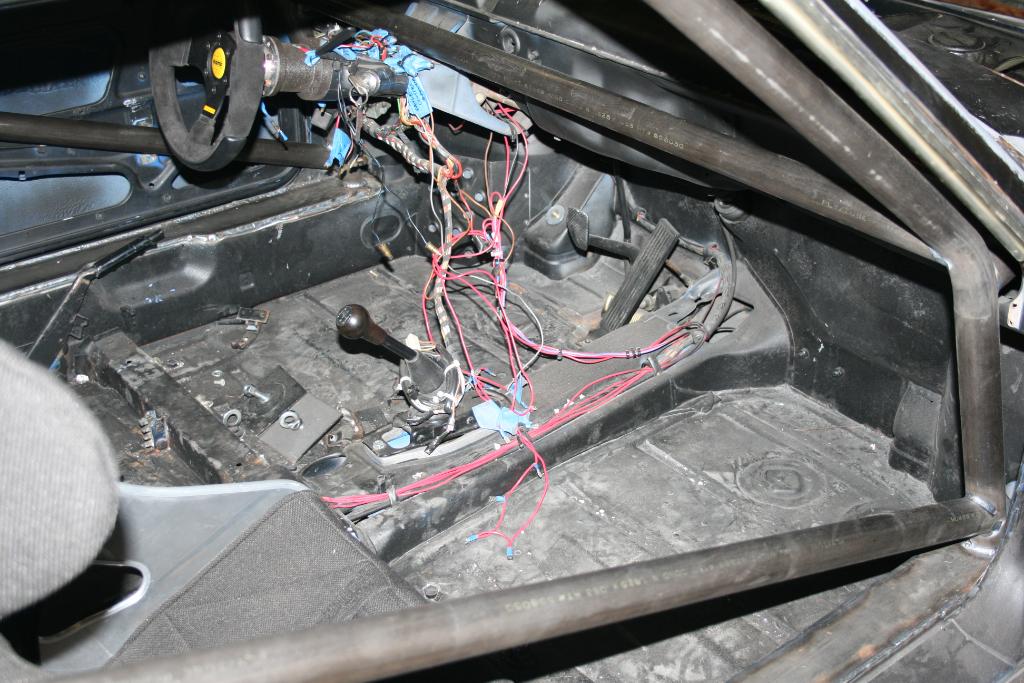
So it has been a few weeks since I updated this post, so far the passenger motor mount has been removed and the holes and have been filled. I got my trans, from a fellow worlder, for 300 with shift linkage and this last week has been spent setting up the cage and getting a tube bender.
In the mean time I cleaned and painted my new 11 blade fan.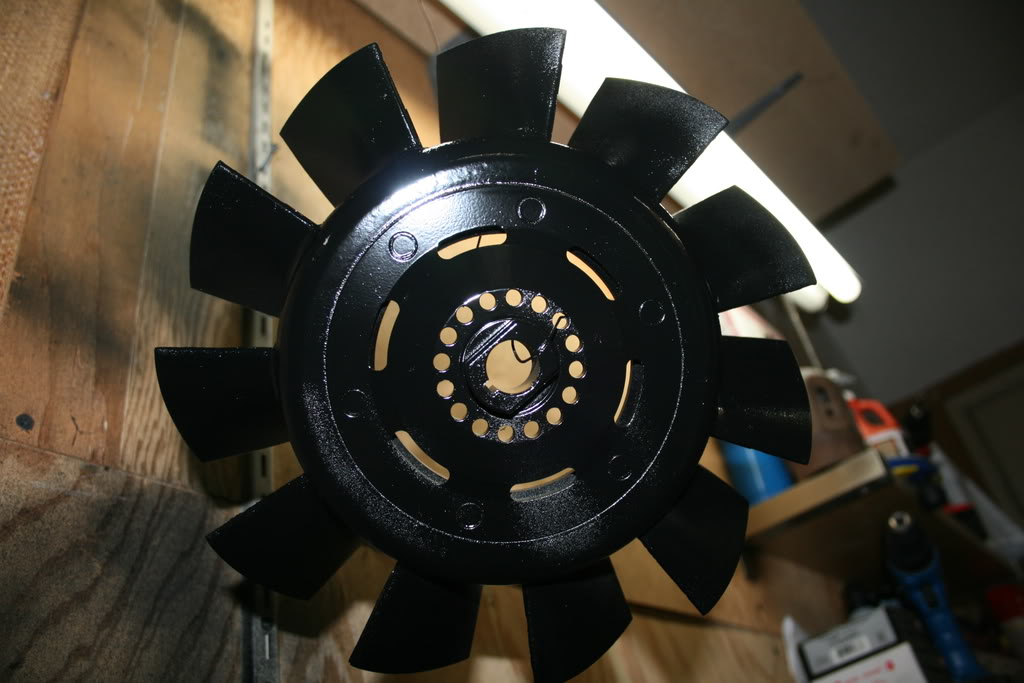
Dont have a white board use a hood...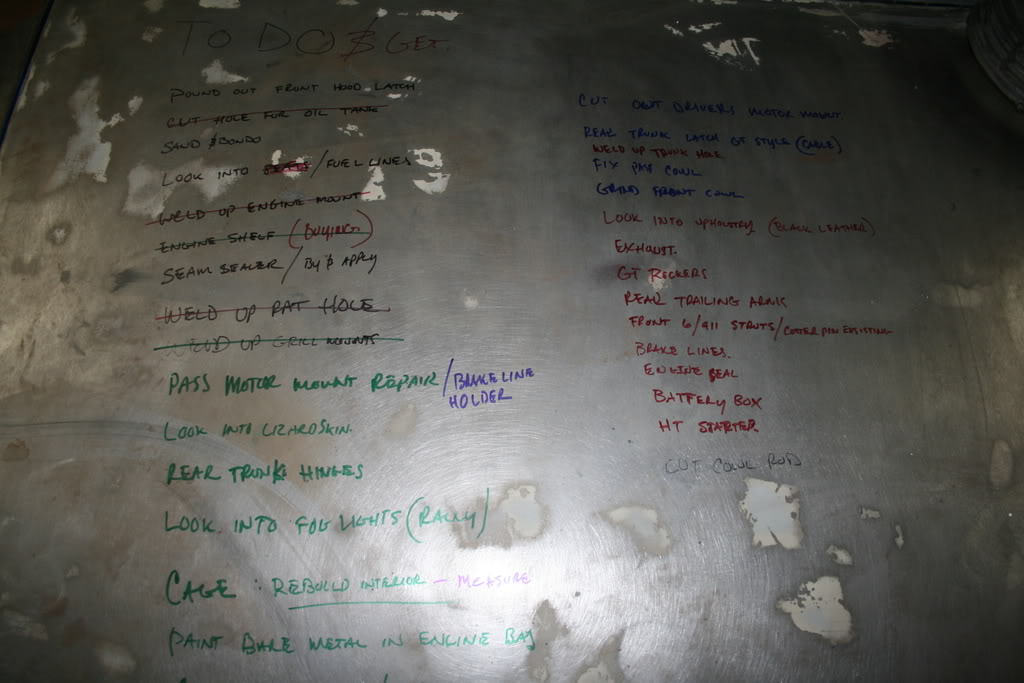
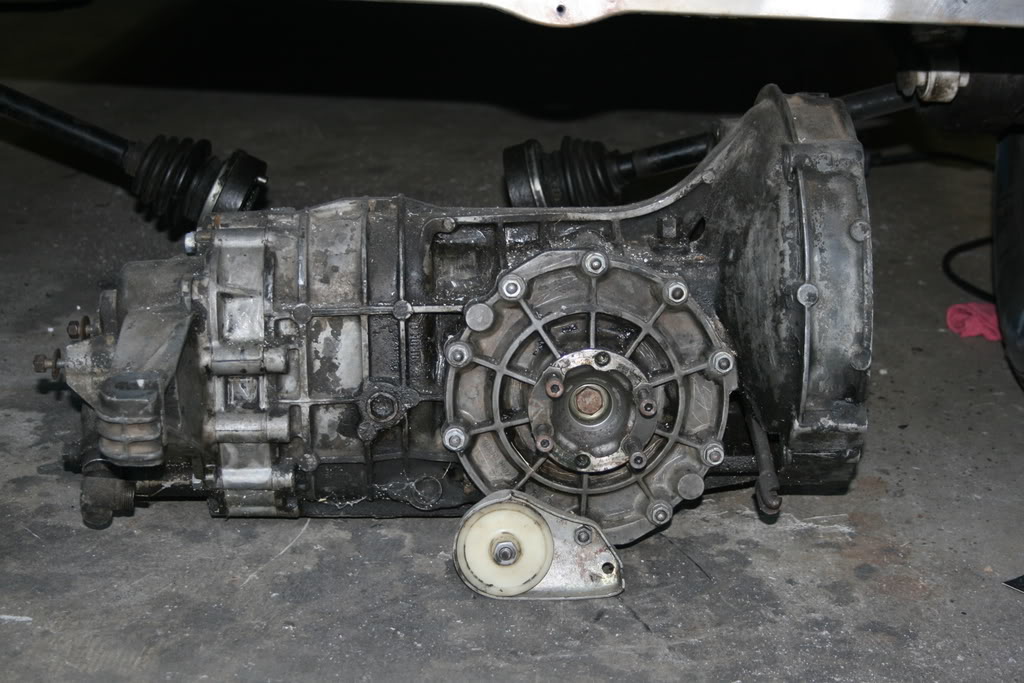
Trans...Supposedly rebuilt we will see...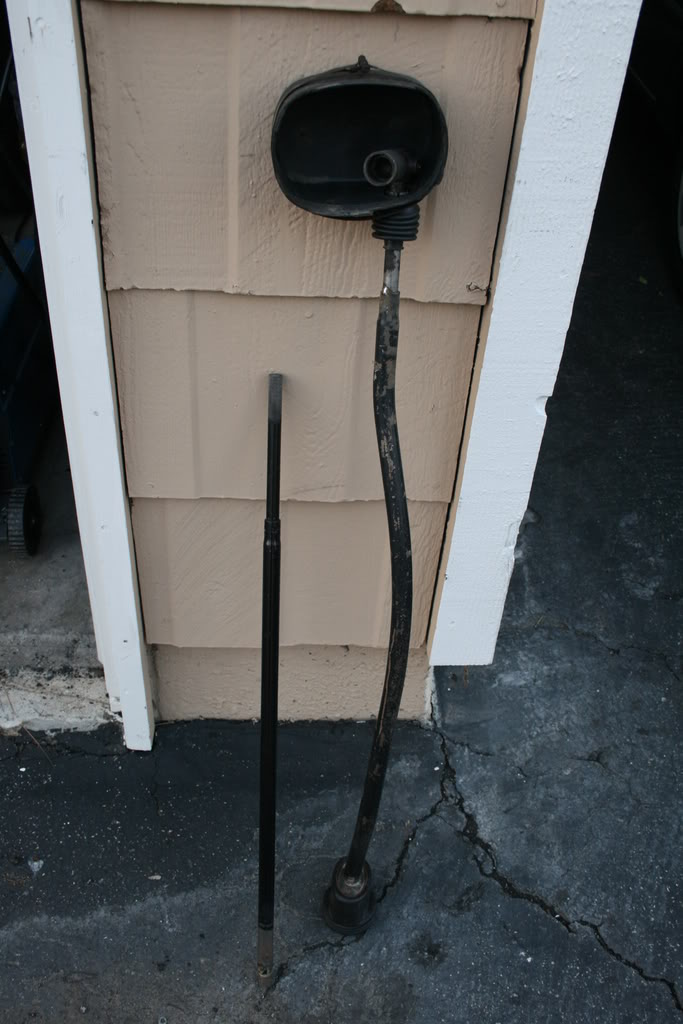
Posted by: wallys914 Dec 25 2008, 01:04 AM
So after the cleaning and the welding time to get creative.
Cage started...


Got the tube bender which works well....
So where i stand today is i have the main hoop bent and all the footprints for the cage welded in, this weekend will be the getting the new engine shelf in, welding, in the hoop and the rest of the cage will be bent and welded in. Got some early Christmas presents.
Posted by: FourBlades Dec 25 2008, 11:33 AM
I love this thread! Great work. Your welding is really awesome.
Can you show some pictures of bending tubes and how you make your
roll cage???
Thanks...John
Posted by: J P Stein Dec 25 2008, 11:49 AM
In no particular order:
There are better rust conversion products available than POR-15. Rust Mort is one.
Light colors for the engine room and trunks make for better vision & inspection.
Doublers for a cage should (IMO) wrap down around to the side of the longs.....bout 3/16 thick also.
The bar you've put in twixt the towers is usless unless you plan to remove the trunk sheet metal...not a good idea in a sreet car.
If you feel the need to weld, all the seams from the fire wall back to the trans mount cry out for it.....same up front. All that caulking does is hide rust/seam failures.
The suspension ears can use this treatment also.....but you seem to have other problems in that area.
Straight & 90 deg air powered die grinders are a boon to body work of all kinds.
There are a multitude of attachments from carbide rotory cutters to scotchbrite style discs for all kinds of metal prep.....and everything in between.
I'll do some pix if you wanna see how they work. I have a wire wheel or 2......somewhere...good for removing seam sealer.
A pic
Attached thumbnail(s)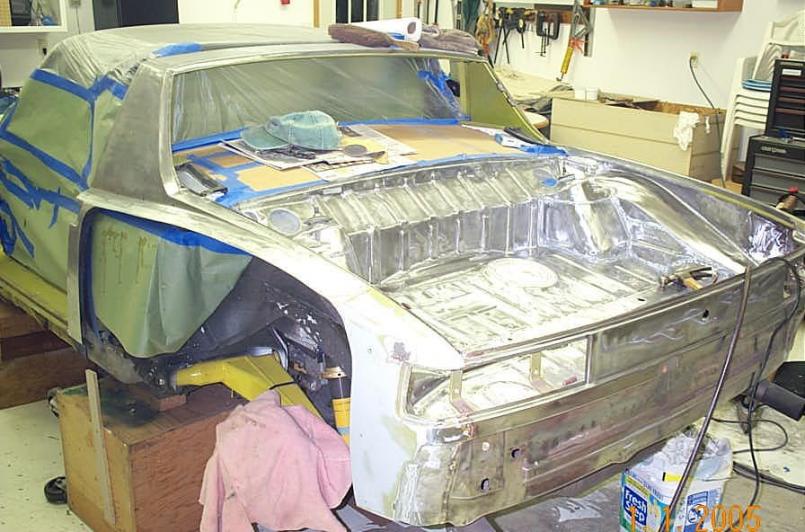
Posted by: J P Stein Dec 25 2008, 11:52 AM
Another. There are a lot more where these came from.
Attached thumbnail(s)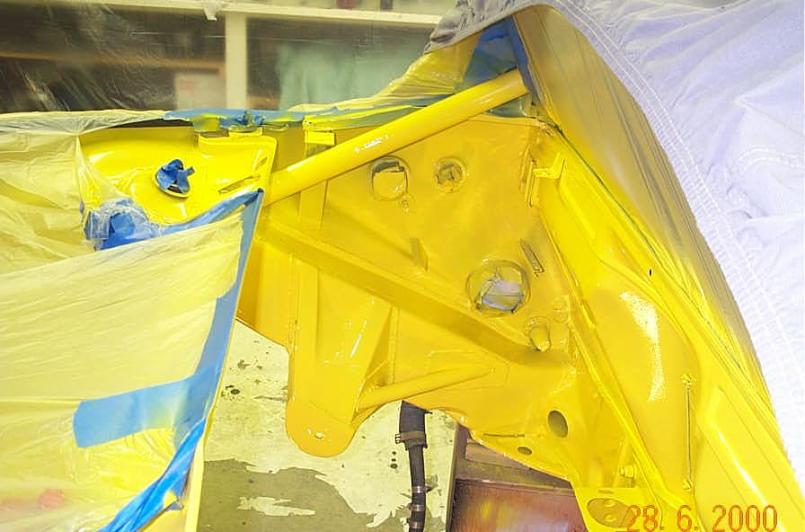
Posted by: J P Stein Dec 25 2008, 12:04 PM
You may find this thread interesting.
http://forums.pelicanparts.com/showthread.php?t=199326
Posted by: wallys914 Dec 25 2008, 12:05 PM
Another. There are a lot more where these came from.
Thank you, and i will get some more pics of the cage making process it will continue tomorrow evening, santa dumped a new clutch kit today and some other ish....
Thanks Again Guys
Posted by: J P Stein Dec 25 2008, 12:23 PM
A drill press, vice, & hole saws are good for the fishmouth cuts needed for a cage.
Posted by: wallys914 Dec 25 2008, 11:33 PM
so today I got some work done on the cage, i got the upper door bar bent and the rest of the cages footprints welded down with the wifeys help.


I had this extra piece maybe i can make a cow pushing bumper, well wait it would only hit their knees....
Well tomorrow after work I will get this all welded in... Wish me luck!
Posted by: LarryR Dec 26 2008, 12:07 AM
Nice bending work. However I think I would get another piece of tubing and push that rear hoop a lot higher. You want it as far away from your head as possible and it looks like you left about 3" on the table...
Very nice progress.
Posted by: LarryR Dec 26 2008, 12:16 AM
Here is a pic of a 914 cage by one of the best in the bay area TC Design: 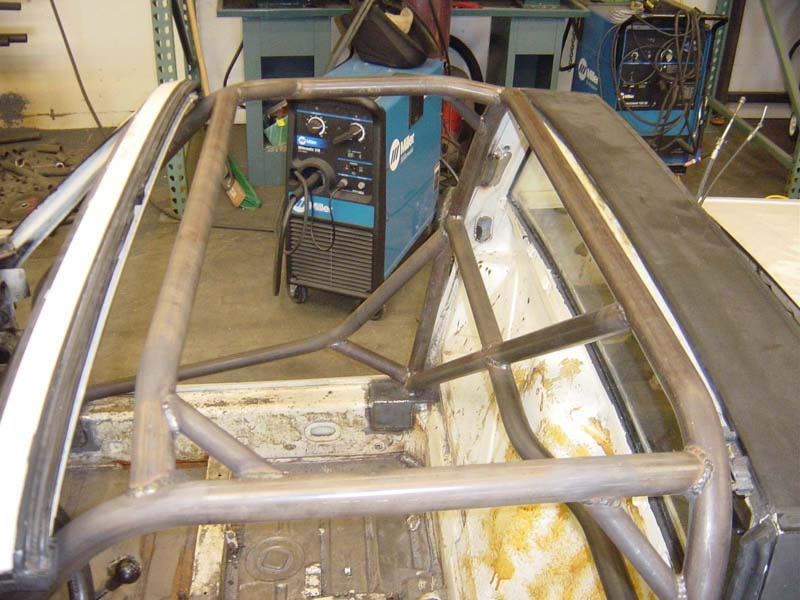
Note how much further up the cage is. Mine was done by them and the top will still go on even with the bars up there.
Posted by: wallys914 Dec 26 2008, 12:40 AM
Well it is up about 4 inchs from the top of the seat, and it is going back under the sail about 2 inches, so far enough back and up that it is out of my way even with a helmet on, Im big, but not that big (Tall, No Offense to big fat guys, I'm one too ). Plus I still want to have the full interior, I believe it will pass SCCA tech, I hope in case someday I want to take it on the track.
Thank you for the pic and the advice though.
Posted by: J P Stein Dec 26 2008, 07:03 AM
Go to the SCCA website and read the rules on helmet clearance to the top of the cage.....otherwise known as the broomstick rule.
Posted by: wallys914 Dec 26 2008, 03:01 PM
So you're all right, it should be about 2-3 inches taller. Now can i add that to the bottom if the pieces are sleeved together? reading this form the SCCA rules it looks like it. Let me know if any one knows for sure.
Appendix G. 2007 Roll Cage Rules
General
The following procedures are approved for modification to roll bars/cages
that do not meet the two (2) inch required minimum: The old main hoop
may be cut off near the chassis mounting and a new main hoop of equal
tube size or a section of equal tubing size may be added, and inner tube(s)
must be used to mate all sections together. All braces must be minimum
distance from top of hoop per Section 9.4. All welding for this modification
must be arc welded (min.). The inner tube(s) must be rosette welded
three (3) places near top and bottom, see figure 21.
Attached image(s)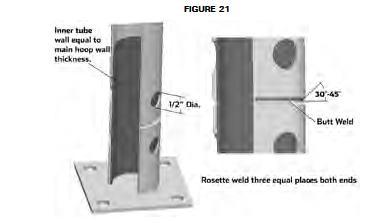
Posted by: J P Stein Dec 26 2008, 06:03 PM
So you're all right, it should be about 2-3 inches taller.
Why of course we're right.....we are 914 internet exspurts.

Do it "by the book".
Posted by: wallys914 Dec 27 2008, 03:04 PM
So Last night, I added 2 1/2 inches to the main hoop by sleeving it. 


And today I started to notch the door bars. We will see what I get wrong on those....
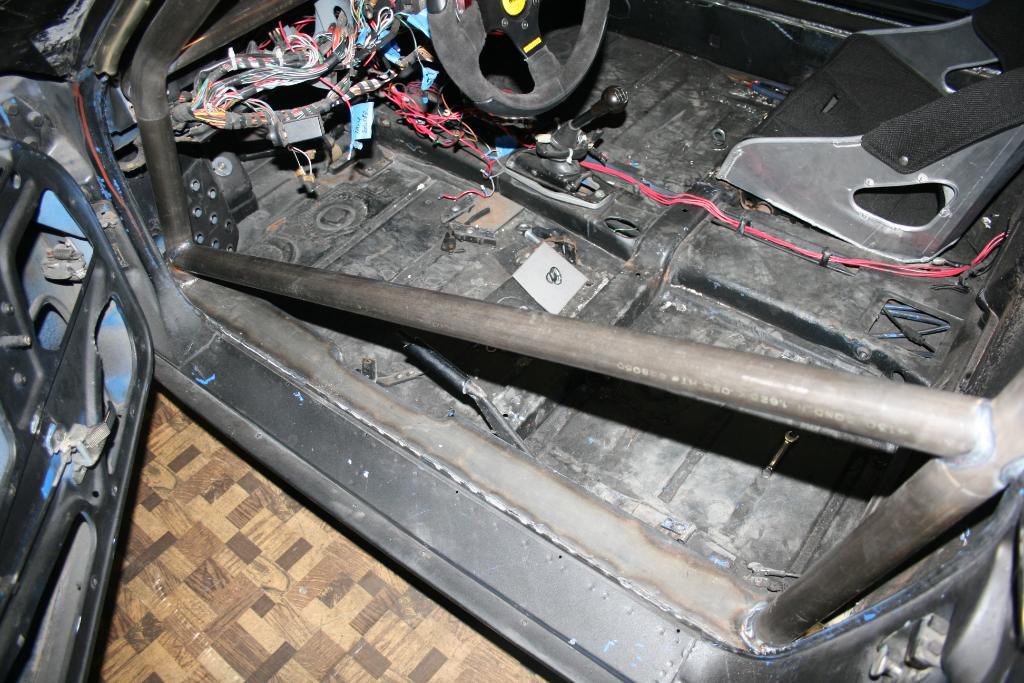
Posted by: wallys914 Dec 28 2008, 08:49 PM
Door Bars got bent and got tacked in today, Progress is Great, would have finished the front crossbar but ran out of straight tube.... tomorrow i will pick up some more and git-er-dun! 


Posted by: wallys914 Jan 3 2009, 01:46 PM
Got the last piece of the halo in,

Seems kind of far back i know, but i couldnt get the latches for the roof to work other wise.....
So back it has to go, but looking at some other cages it seems to be the norm if running all stock interior.
Last one....
and I got the top of the Halo Tacked in, the door bars are bent, fit, and tacked in, Finishing up the X in the trunk, and then the complete welding starts tomorrow along with triangulation of the rear hoop, and gusseting.


Posted by: bam914 Jan 3 2009, 02:04 PM
Is the tubing ERW or DOM? If it is ERW hopefully SCCA will not know. DOM is the only thing legal.
Posted by: wallys914 Jan 11 2009, 03:03 PM
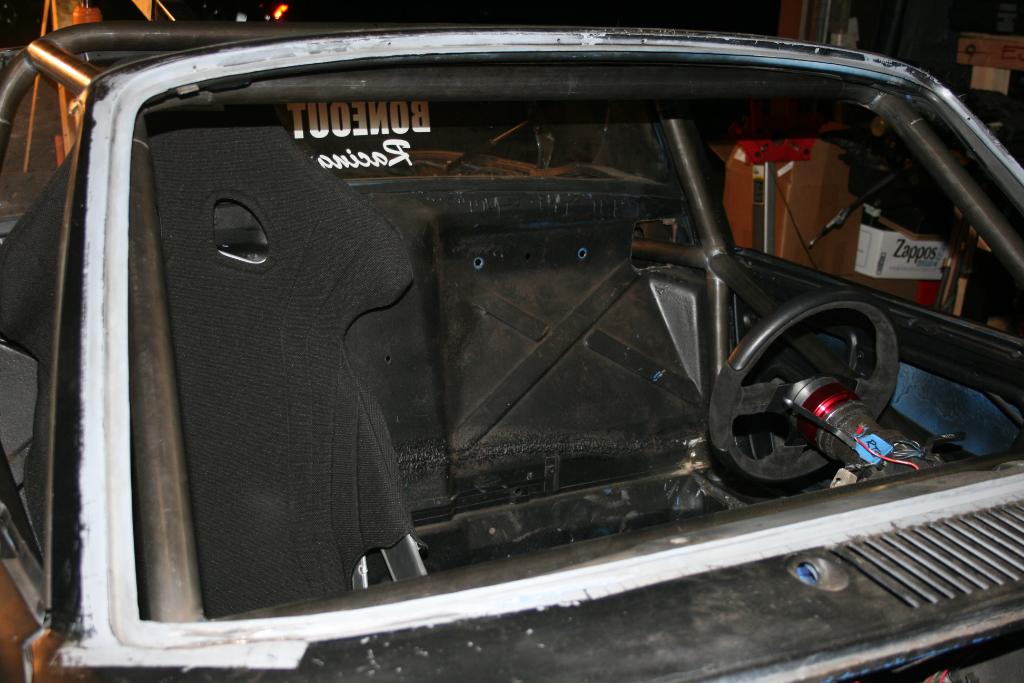
Cage is welded in, Last week.....


Well this weekend it will be finished and moved away, Stupid Association Rules!!!! 


Association:No vehicle that's looks to be non-operational can be on the premises,
Me: Even in my F-ing Garage, Get a life Dick W Ears!!! 
and then... this weekend....I got the cage 90% Complete 1 step Closer to getting it to paint... 
I added a 1/4" steel rod between the long and the rear strut towersand spooged it up, and I added a plate for the 5th and 6th points 


Posted by: J P Stein Jan 11 2009, 06:25 PM
Well......see attached pic.
The problem is not where you welded to the rear bulkhead but on the other side where the bulkhead attaches to the long.....basically, it doesn't.....well, maybe a little bit. All is not lost, however. Extend your upper doubler plate thru the bulkhead and tie it into the tower. Obviously you'll have to cut the bulkhead away to get at it.
You are not doing anything that others here haven't done. For your own sake, ask questions.....or you can just tell me to piss off and I won't bother you nomo.
Attached thumbnail(s)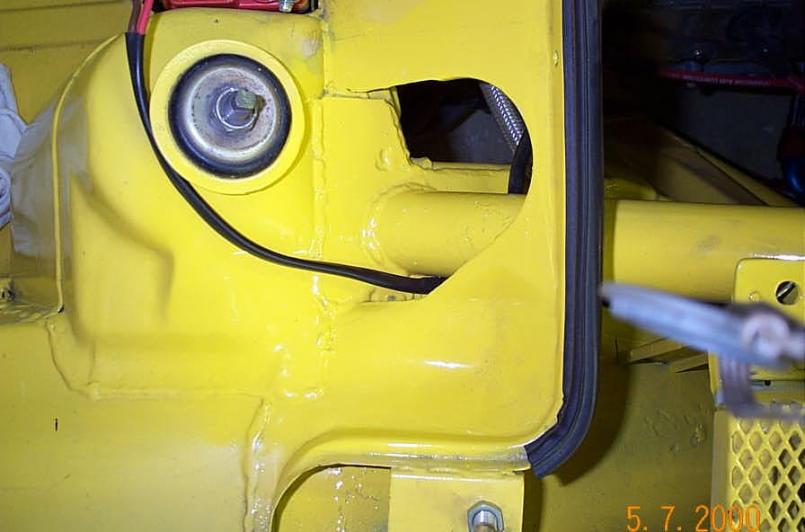
Posted by: Solo914 Jan 11 2009, 06:52 PM
Go to the SCCA website and read the rules on helmet clearance to the top of the cage.....otherwise known as the broomstick rule.
This cage has really come together....keep it going!!!
Where are you going to move the car if the Association won't let you work on it there?
JP,
Just to clarify for others, isn't the SCCA helmet clearence rule/broomstick rule for open top cars running without a windshield? Basically if you lay a broomstick on the front dash bar to the main hoop the driver should have 2" of clearance to his helmet. I do not believe that this applies to enclosed cars or cars running with a full interior cage. When I built my Spec Miata and was poring over the GCR I did not remember this being the case. Or is their another clearance rule that I don't remember?
Kyle
Posted by: J P Stein Jan 11 2009, 07:30 PM
Go to the SCCA website and read the rules on helmet clearance to the top of the cage.....otherwise known as the broomstick rule.
This cage has really come together....keep it going!!!
Where are you going to move the car if the Association won't let you work on it there?
JP,
Just to clarify for others, isn't the SCCA helmet clearence rule/broomstick rule for open top cars running without a windshield? Basically if you lay a broomstick on the front dash bar to the main hoop the driver should have 2" of clearance to his helmet. I do not believe that this applies to enclosed cars or cars running with a full interior cage. When I built my Spec Miata and was poring over the GCR I did not remember this being the case. Or is their another clearance rule that I don't remember?
Kyle
You are right, the broomstick rule applies to open cars, but......
18.4.1. Main and Front Hoops
A. Main Hoop: The main hoop (behind the driver) shall be full width of
the cockpit. The main hoop shall be as near to the roof as possible
on closed automobiles and not less than two (2) inches above
the driver’s helmet on open automobiles, with the driver seated
normally and restrained by seat belt/shoulder harness. Low front
hoops shall be cowl height, or at a minimum, a straight line drawn
from the top of the main hoop.
It also goes on to say that the top of the drivers helmet cannot extend past a straight line from the tops of front & rear hoop in a caged car.
Posted by: wallys914 Jan 12 2009, 12:24 AM
Well i know i didnt Tie it in where you wanted it JP, its never good enough for you 
Thanks Again JP, I did look at your thread to, just didnt sink in enough i think!
but if i ever decide the car is going to be torn apart for racing, then I will make that fix, but for a street car it is finefor now....I think....
Cage is 99.9% done, some final welds need to be thrown in, but all and all good to go, rhino lining is next...


Posted by: Solo914 Jan 12 2009, 01:32 PM
Go to the SCCA website and read the rules on helmet clearance to the top of the cage.....otherwise known as the broomstick rule.
This cage has really come together....keep it going!!!
Where are you going to move the car if the Association won't let you work on it there?
JP,
Just to clarify for others, isn't the SCCA helmet clearence rule/broomstick rule for open top cars running without a windshield? Basically if you lay a broomstick on the front dash bar to the main hoop the driver should have 2" of clearance to his helmet. I do not believe that this applies to enclosed cars or cars running with a full interior cage. When I built my Spec Miata and was poring over the GCR I did not remember this being the case. Or is their another clearance rule that I don't remember?
Kyle
You are right, the broomstick rule applies to open cars, but......
18.4.1. Main and Front Hoops
A. Main Hoop: The main hoop (behind the driver) shall be full width of
the cockpit. The main hoop shall be as near to the roof as possible
on closed automobiles and not less than two (2) inches above
the driver’s helmet on open automobiles, with the driver seated
normally and restrained by seat belt/shoulder harness. Low front
hoops shall be cowl height, or at a minimum, a straight line drawn
from the top of the main hoop.
It also goes on to say that the top of the drivers helmet cannot extend past a straight line from the tops of front & rear hoop in a caged car.
Cool. I just recieved my 2009 GCR in the mail.... how fortuitous.
Chris,
Everything is looking good. If you ever decide to go road racing or even track your car you are probably going to make plates to bolt in you top anyway, and when you do that it will give you plenty of room to move windshield cross bar. Your build is getting me rev'd up, maybe its time to build a caged 914. Honey, where is the checkbook?
kyle
Posted by: wallys914 Feb 23 2009, 12:05 AM
Long Time no Chat. Nothings been going on here much, after a trip with my wife, I realized that a six is not an option at this time (too much money), even with the new job I have just got, and start on 3/2.... I thought how can I get the car up and running and not have to wait till im 37....lol. So VEighting was the only solution....So here it is, my new Power Plant stripped cleaned and Ready to go in, well almost I need the kit, but im half way therrrr....

Its Going to ghet done now....
Posted by: al weidman Feb 26 2009, 10:51 PM
Chris, I was wondering when the V8 part was going to come in. I have a couple of questions. What stripper are you using and what guage sheetmetal are you using to make body repairs? I think it's great that you just get after it and do it. My wife used to help me paint but now I can't even get her to come to the garage, unless it's for coffee. I hope that association doesn't slow you down too much. The association is just another example of how we are losing our freedom. Little by little.
Posted by: VOX Feb 27 2009, 03:05 AM
sweet project, i'm planning on putting a roll bar with some side protection into mines, figuring that a full cage would be too dangerous for a DD. anyways i was wondering where do you buy the pipes? and any recommended designs?
Posted by: wallys914 Apr 4 2009, 11:13 PM
So the Porsche Gods were with me this week, so I started my new job all is good in Wally Land!
Wow, times I get lucky I GET lucky!
So Today I got everything From Scott. ThanX Scott....
So the Project will be moving forward as planned and ahead further than planned thanks to Scott.


WOW I need to clean my garage, this is after 3 hours of sorting and looking through boxes, figuring what I need and what I could part with. I can't Part with much! LOL
Posted by: So.Cal.914 Apr 4 2009, 11:42 PM
I could come and help you clean out that garage Chris, I'll bring my truck.
Congrats on the new Job.
Thanks again.
Posted by: wallys914 Apr 13 2009, 12:12 AM
So here are some pics of the RH kit on the motor, I know I need the 90's for the water pump, hose, some clean correct hardware, and a water pump gasket.
A couple of questions:
1 Is there anything that anyone can see that I am missing besides the above?
2 The water pump does not have a gasket on it, are these easy to come by or difficult and has anyone run into this?


Posted by: Andyrew Apr 13 2009, 01:06 AM
Awesome build! Looks like you sorted your cage issue out! Also your welds have greatly improved since the start!
Good job!
Posted by: computers4kids Apr 13 2009, 08:17 AM
The water pump is a big block V-8 Chrysler water pump. The gasket should be a Fel-Pro 11730.
You may have an issue with the front of the driver's side valve cover hitting the firewall behind the driver's seat. Very tight. Mine is extra tight because I am also running an engine pad. A lot of the guys have to dent the wall in a bit. I chose to run a mid height valve cover.
Before you install the motor, decide how you going to time the motor and rig-up a new TDC mark that you will use that will be more easily visible either below or above the engine. Some time it through a trunk hole using the flywheel mark.
Look at some of the V-8 theads on throttle linkage. Some buy a longer cable and run it under the engine and up the front on the driver's side...some even up the passenger's side. Renegade has you use the stock cable and come up the firewall. It works fine but it's quite a sharp turn both upwards and again to face the carb arm.
Good Luck,
Posted by: wallys914 Apr 14 2009, 10:56 AM
Any one know where I can get the water pump 90 degree fittings above, seems like mine are not clean enough. I know I saw them on someones post but cant remeber where or who.... Damn im Forgetful.... 
Thanks Andrew
Thank you for the WP gasket info Mark...
Posted by: wallys914 May 3 2009, 08:50 PM
So its been awhile!
I got Scott's Built Trans from Thomas! Pretty Aint it! 1st locked out with a H gear and the itemediate plate! ![]()

I also stopped by Gann to get the 66E 3/4" water pump fittings and I am Sad to say they do not make them anymore. I ended up with the 1" 86E Fittings, Figured Bigger and Cooling should be 2 words that work well together. Gann Folks were the best and very helpful, I wish them all the Best! 
Well we are moving soon and I will have the car back to my place and working on getting it together in No Time! Next step is to get the Motor to a dyno!
Posted by: wallys914 Jul 12 2009, 05:03 PM
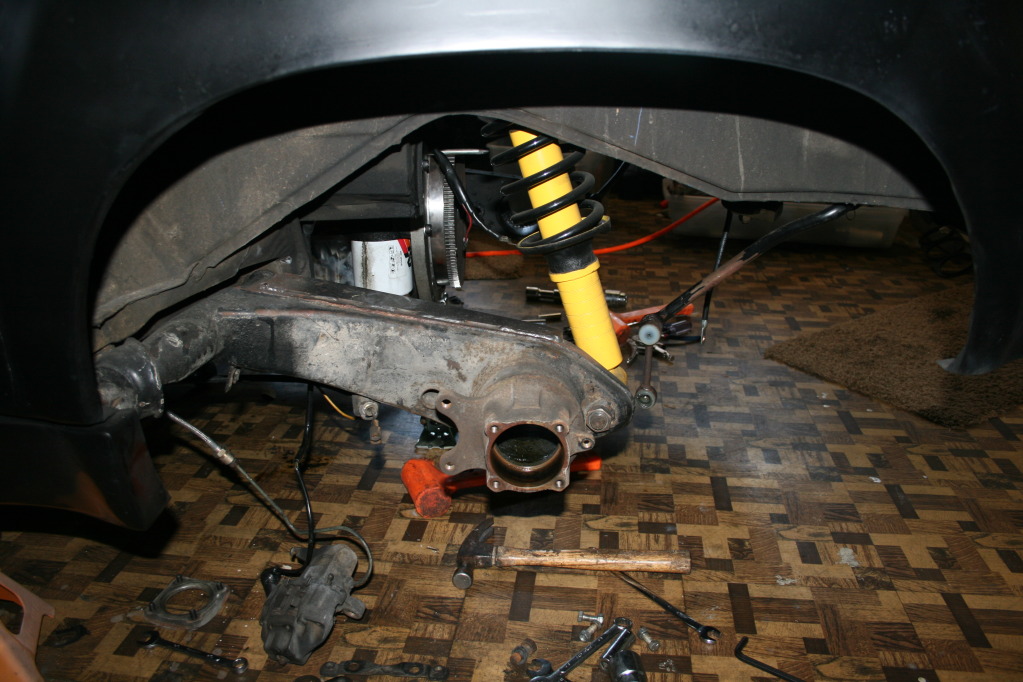
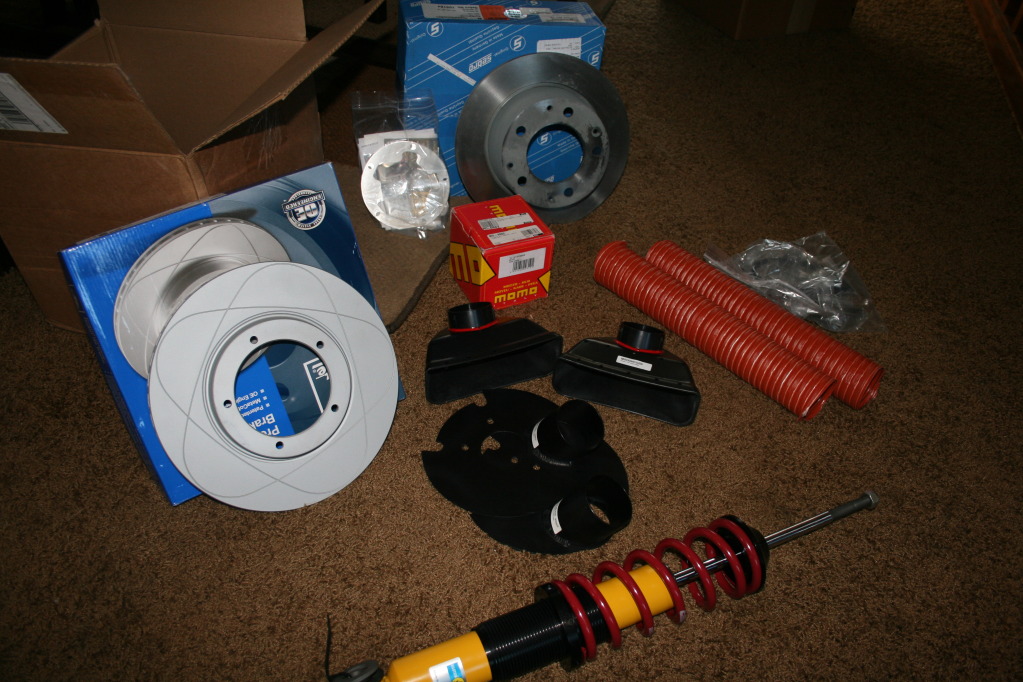
So its been a while since i moved and got the car to the new place, i finally got to go through everything I purchased from scott, and I really got the deal of a century. So far I have on the:
Front
cleaned and painted
added the Nitrious Bottle
911 struts and Brakes,
added the 19mm MC,
Added the Radiator,
molded together the front valance and bumper.
added the new steering wheel
fixed the front suspension
bought harnesses
Rear
cleaned and painted the rear trunk cleaned the engine compartment
added the 5 lug rear arms
added new bushings
added bilstein shocks on 200# springs
did the trailing arm stiffening
and pieced together the rear sway bar
Bought
Nitrious kit,
500 hp axles
last of the renegade stuff
all the v8 goodies i needed
rockers
and so much more
I still have alot todo but I have the money i need to finish it. So i just have to find the time to put it all back together.


Posted by: Zaney Jul 12 2009, 08:42 PM
Love the GT bumper and valance combo!
Will this opening provide enough airflow to the radiator?
I would like to go this route with my suby conversion.
Looks great!
Nate
Posted by: wallys914 Dec 12 2009, 09:05 PM
The Car moved on it's own will today!  Forward and Back about 10 feet either way, Yeah!!!!
The Gas tank is out getting welded, cleaned in/out and painted, the engine runs, the starter starts and the NOS isn't hooked up yet.
The Brakes need bleeding, I need the tank to get back, I need to install my windshield, and 4th and 5th have to be found in the mysterious linkage issue.
All and all I would say I'm ready to sell it...LOL
Progress shots:


Posted by: wallys914 Dec 26 2009, 08:45 PM
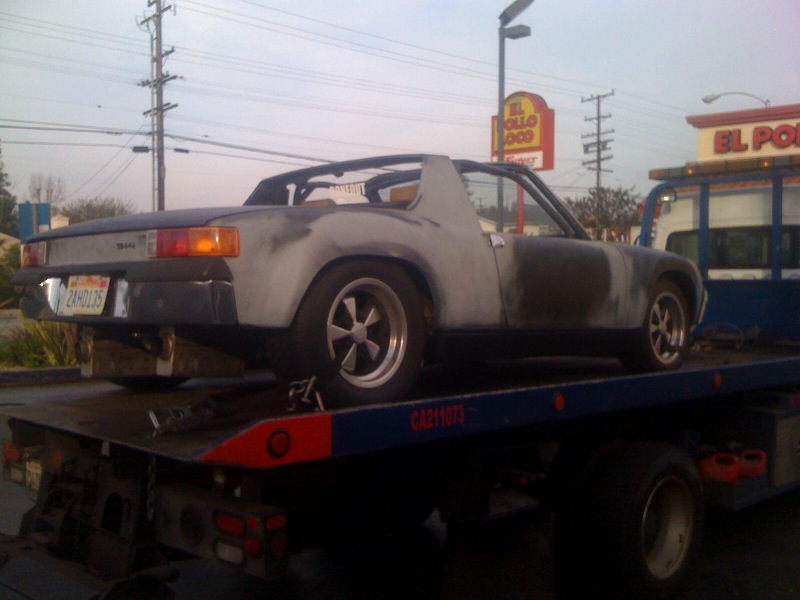
Today I took her out on her maiden voyage and made it 5 miles before the Bottom end of the motor took a  ....
....
Some popping though the carb, some loud banging from the drivers side bank...  Tearing into it tomorrow and will start with a fresh bottom end. That's what i get when a buddy tells you that the motor was able to "just drop right in" I will post the carnage here....
Here's some pics of the infamous tow truck and the 914 that was on it today....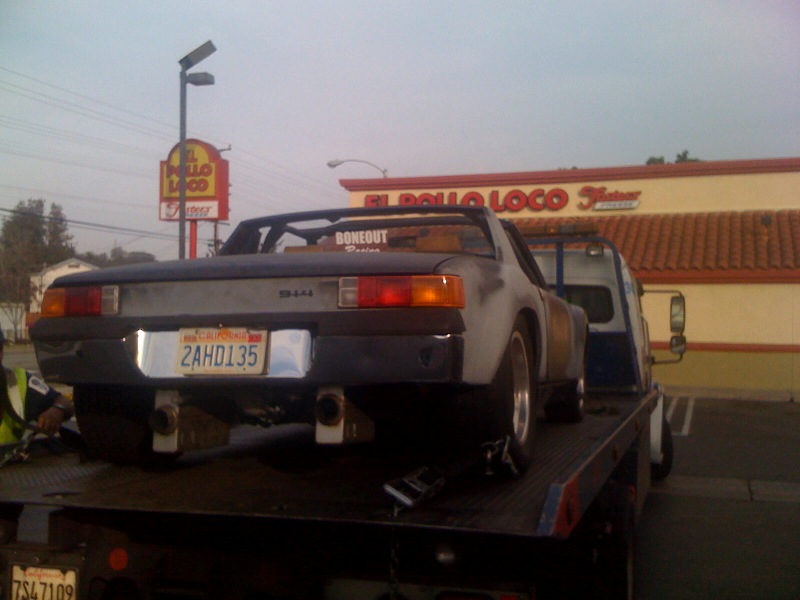
Posted by: Travis Neff Dec 26 2009, 10:37 PM
Sorry to hear about the enigne troubles. They always look majestic riding upon the mighty chariot...
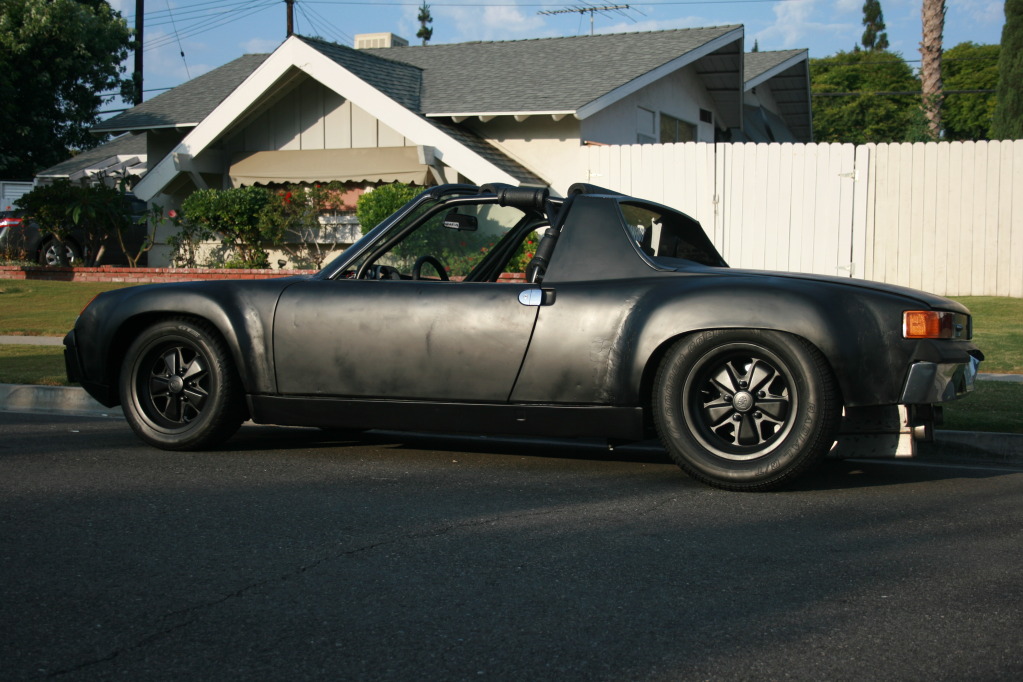
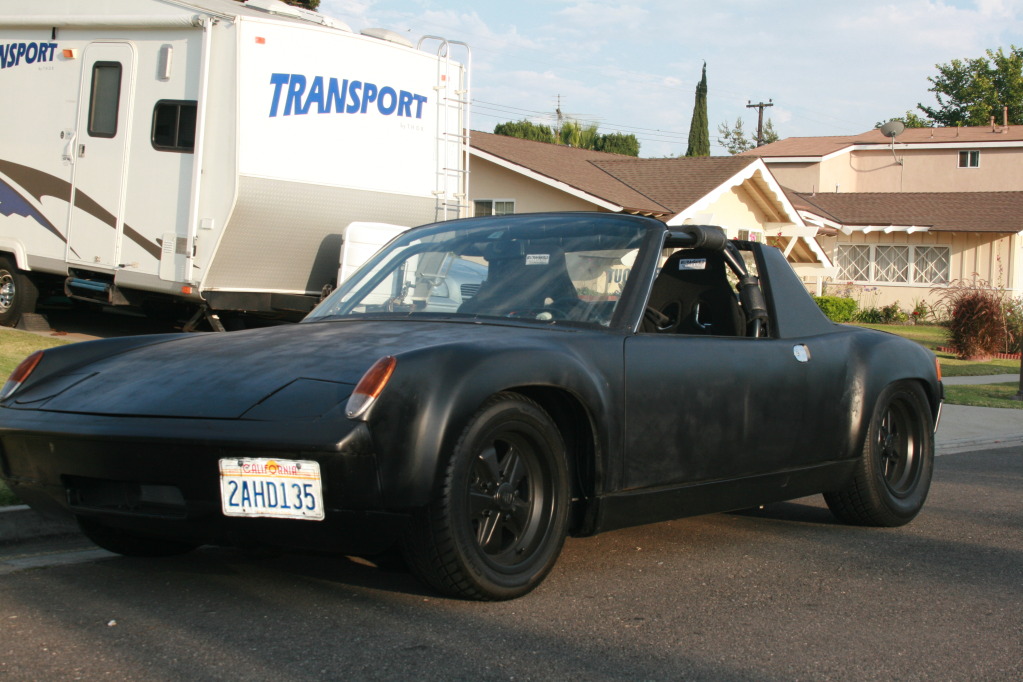
Posted by: wallys914 Jun 18 2010, 08:29 PM
So it's been a while, the car got all the bugs worked out, I put about 2000 miles on it, It got new seats, the GT grill installed everything was perfect and running fine until the axle (Drag Racing) incident. The car has gone under the knife, the clutch got rebuilt, it was slipping due to the wrong throw out bearing. I ordered all new brake parts, all new bearings, brake cooling kit, new 250# rear coilovers, welded up the axle snubs and half shafts. I will start the rebuild this weekend and hopefully have it at Cars and Coffee for 4th of july weekend.

I will start posting progress again over my vacation that's coming in 1 week.
Posted by: Andyrew Jun 18 2010, 08:34 PM


Posted by: wallys914 Jan 6 2011, 10:46 PM
I guess I never posted any progress, all new parts got installed with new seats and the car was running like a dream, and then the insanity happened. A head gasket failed so the motor came out to get built then I decided to upgrade the entire top end, and then decided to do a new cage and get rid of my dinky shitty weak ass cage ....
So here it was before the motor took a 
and here it is now 2 days before it leaves to get the cage installed... 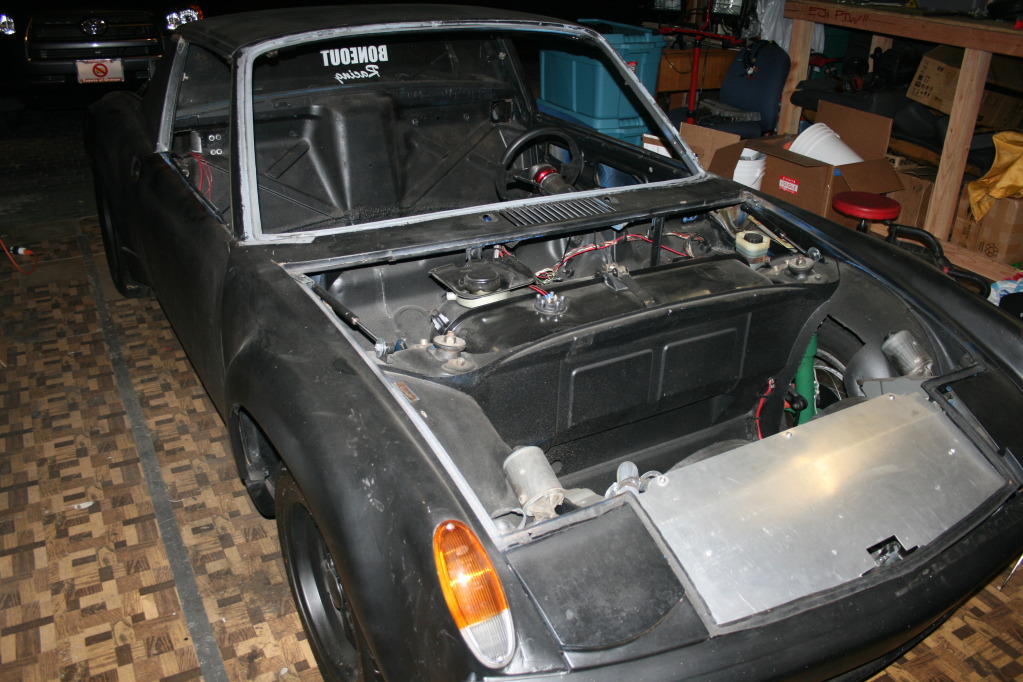
Posted by: wallys914 Mar 23 2011, 08:13 PM
And now its back from the shop motor in, and away it goes back to the shop for finishing touches...
1" 5/8 Tubing and 3/16 plate for the longs, all tig welded, the seats still have to be mounted along with some extras... 

Posted by: Andyrew Mar 24 2011, 09:36 AM
Awesome stuff!!!!
I like the treatment to the longs, However I think the strength there lies in the vertical portion of the longs and it could have been stronger if that was reinforced instead of the horizontal portion. Regardless, the cage provides all the strength you need in this instance and that reinforcement is just "extra"
Are you going to triangulate the rear sway bar backet to prevent flex? Or are you removing the rear sway? 250 AND a rear sway is quite a bit of rear spring.
Powered by Invision Power Board (http://www.invisionboard.com)
© Invision Power Services (http://www.invisionpower.com)