Printable Version of Topic
Click here to view this topic in its original format
914World.com _ 914World Garage _ Home made tools
Posted by: Bartlett 914 Jan 8 2009, 09:21 AM
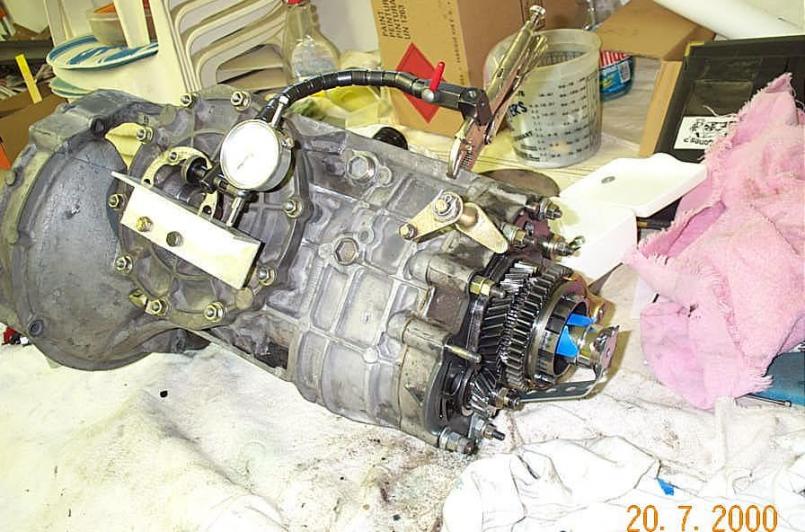
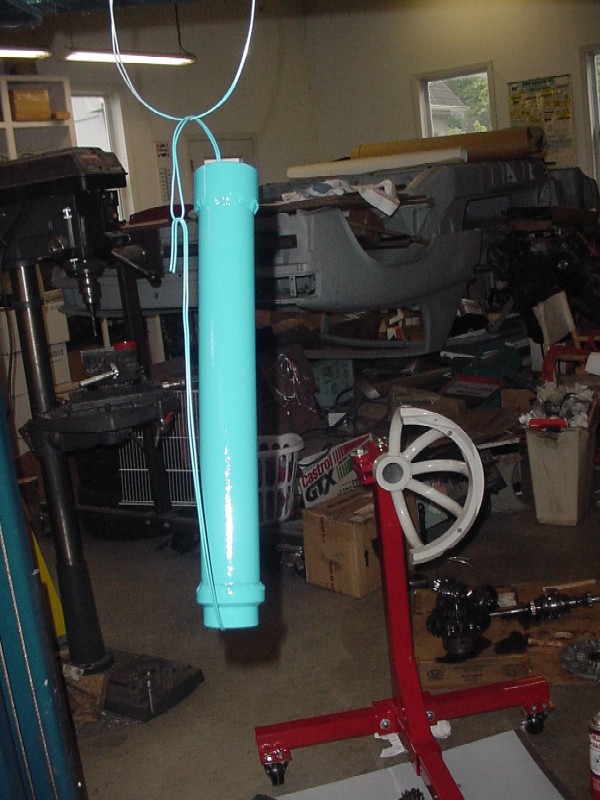
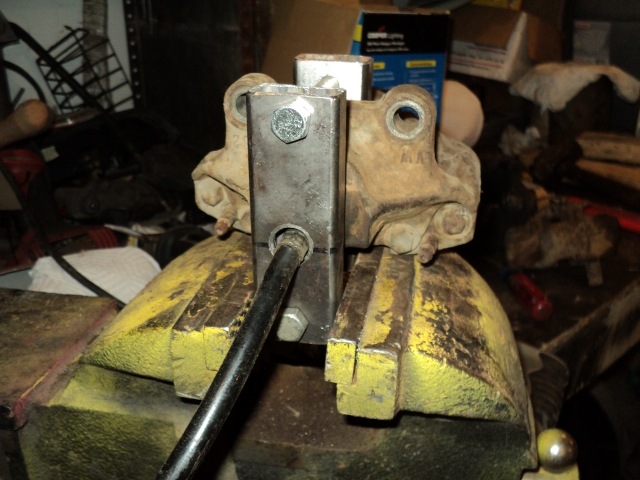
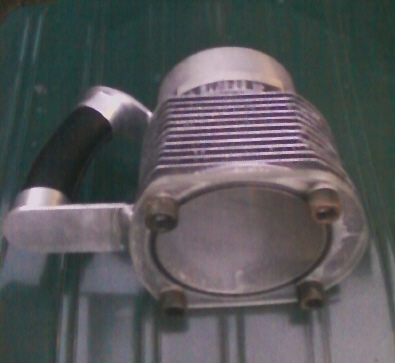
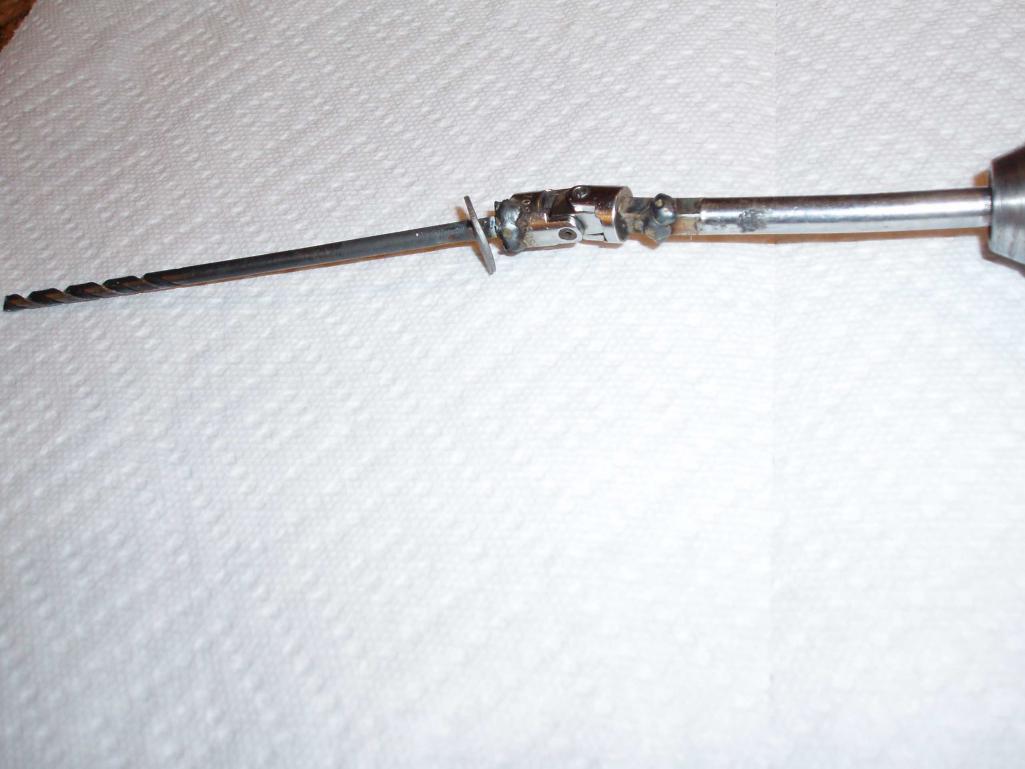
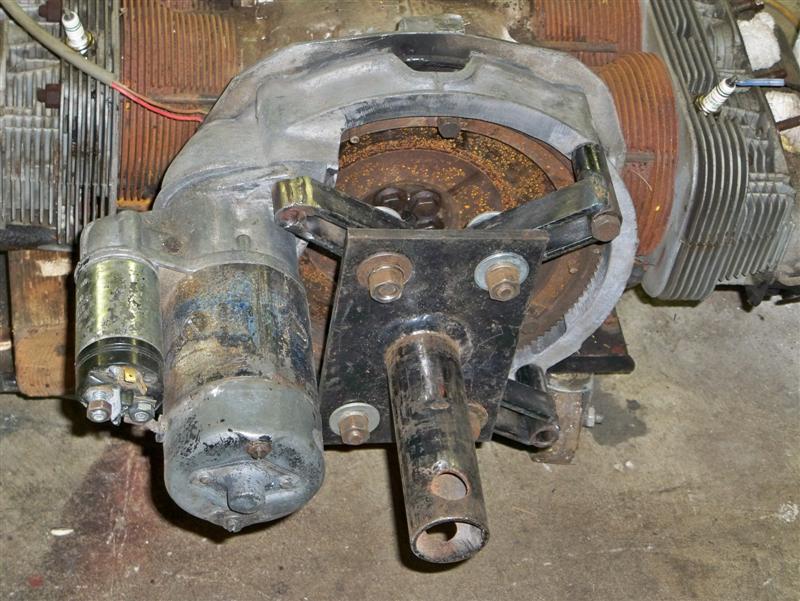
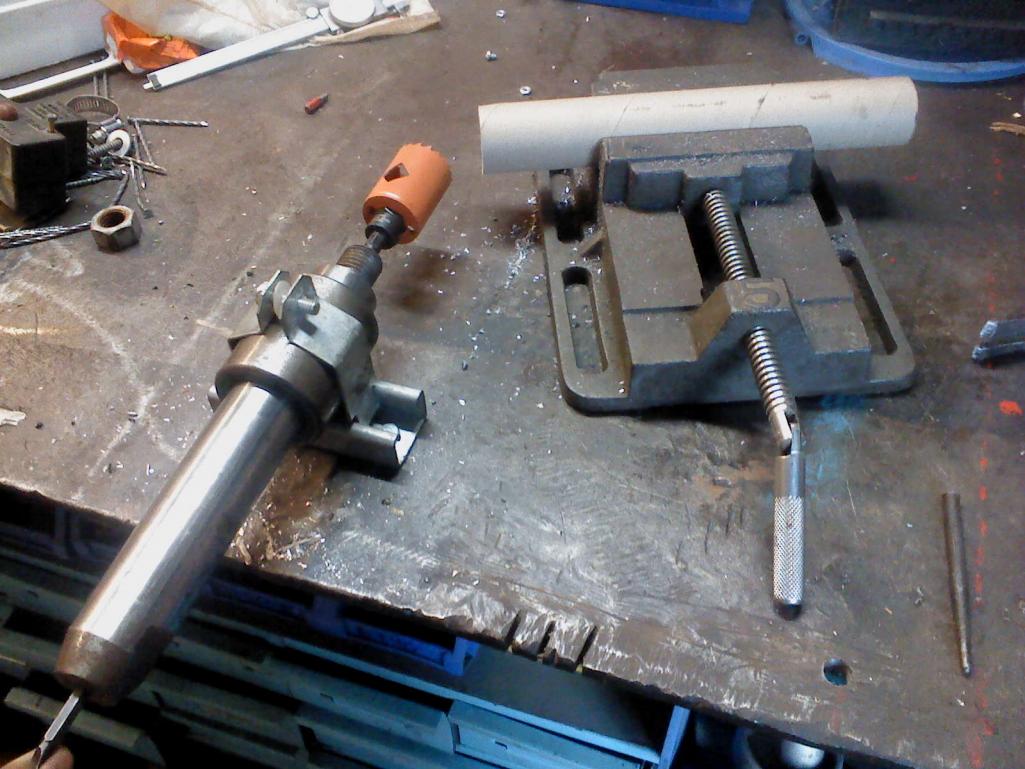
We all do it. We sometimes need a tool for a special use. It sometimes makes the difference in how well a job comes out Earlier this year, just for the heck of it, I removed the shaft from the bushings in an old trailing arm. I ended up using heat. I did get it out but what a an awful stinky mess! Yesterday Glenn (gms) stopped by with 2 trailing arms he was cleaning up. He wanted to know if I had a press for the job. With a little scrap metal some machining and welding we came up with a simple tool to remove the shaft. Here are a couple pictures of what we came up with. The tool worked really nice. I think if wanted, this would also work with the trailing arm in the car.
So how about posting some of the special tools you have made.
Attached image(s)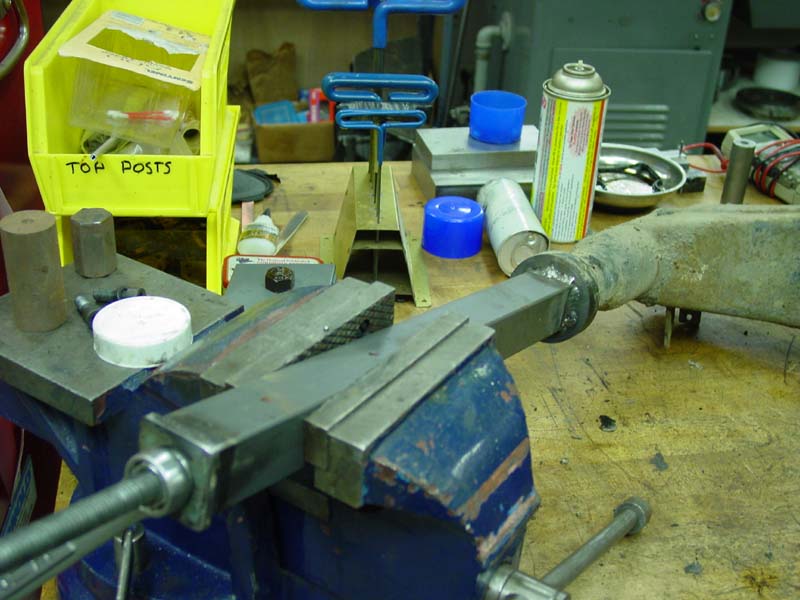
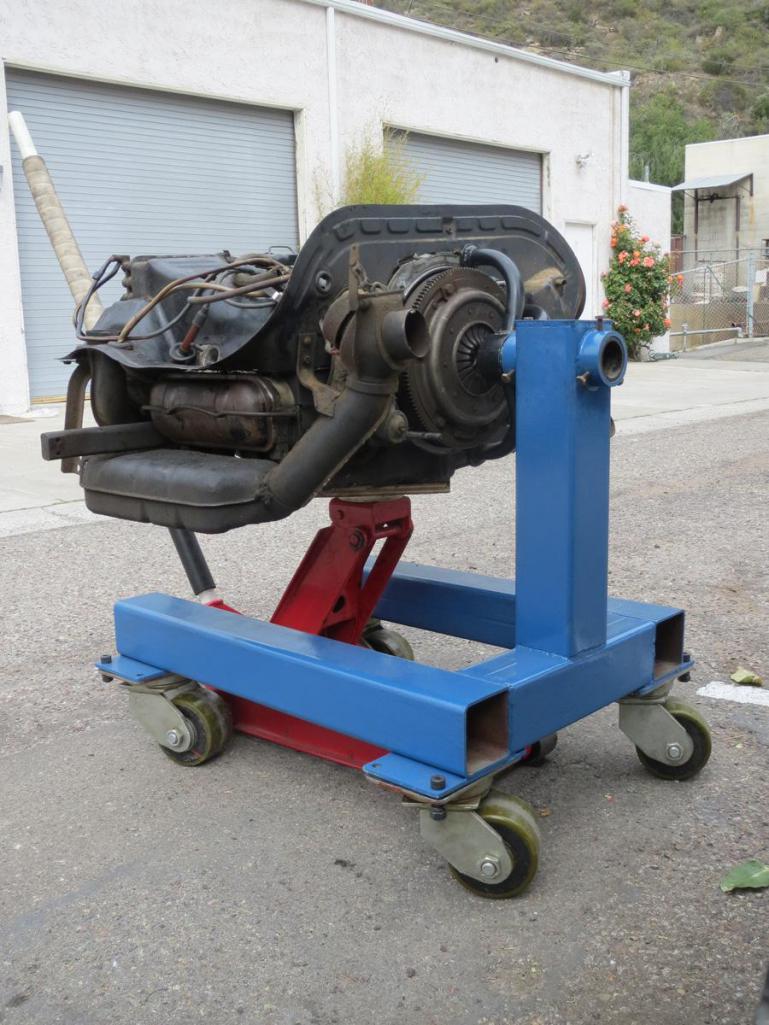
Posted by: URY914 Jan 8 2009, 09:44 AM
I kinda like by engine crossbar wheels. It's not something you use everyday but they sure are easy to use. No trying to balance the engine on a jack or dolly.
Attached image(s)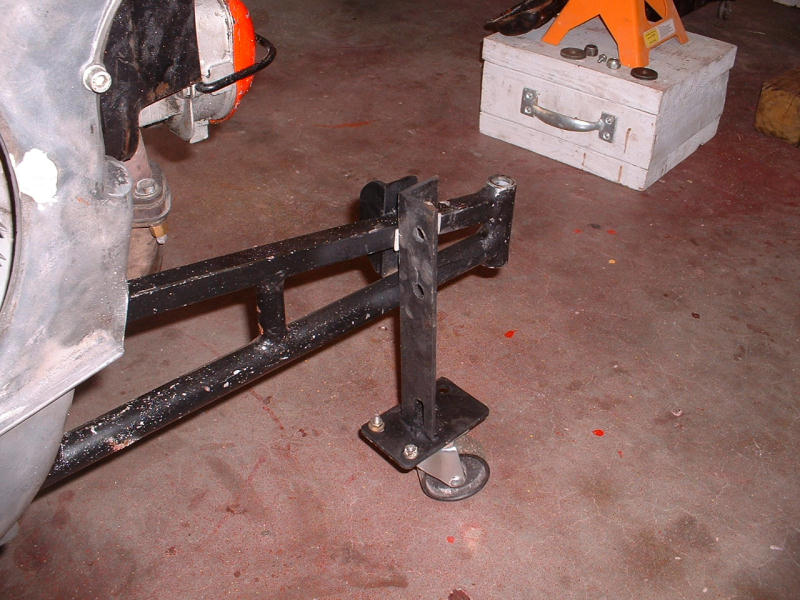
Posted by: Bartlett 914 Jan 8 2009, 09:52 AM

I kinda like by engine crossbar wheels. It's not something you use everyday but they sure are easy to use. No trying to balance the engine on a jack or dolly.
Hi Ury
That looks good. I did something similar once. I used only 1 wheel on each side. On mine the bar folded over while I was moving the motor and I broke a motor mount (or maybe it folded over because the mount was broken) . On the next one, I will use 2 wheels per side in an effort to keep the bar from folding over.
Posted by: marks914 Jan 8 2009, 10:48 AM
Here is my version of the engine installation tool. Jack up the car and slide it in! Well woth the hour of "fab" work
Mark
http://rides.webshots.com/photo/2172091620057582025zjFLug
Posted by: Dr Evil Jan 8 2009, 10:56 AM
I removed my /6 and tranny together last night and just used a furniture dolly. Works good, cost $15, last long time 
Posted by: aircooledtechguy Jan 8 2009, 11:13 AM
Here's a couple things:
The first is a super cheap and effective http://www.aircooledtech.com/tools-on-the-cheap/soda_blaster/
The other is just a couple http://www.aircooledtech.com/tools-on-the-cheap/spark_plug_tools/ that make changing the plugs easier
Posted by: Bartlett 914 Jan 8 2009, 11:22 AM
Here's a couple things:
The first is a super cheap and effective http://www.aircooledtech.com/tools-on-the-cheap/soda_blaster/
The other is just a couple http://www.aircooledtech.com/tools-on-the-cheap/spark_plug_tools/ that make changing the plugs easier
I like your soda blaster. For cleaning the carburetor you showed, how much soda did you end up using?
Posted by: SGB Jan 8 2009, 11:27 AM
Yeah Nate, that extended plug socket is good. I did something similar but had interference from the intake manifolds (tall dual weber manifolds), so I just drilled a couple of holes in the socket so I can hook 'it with a stiff wire handle after I put a new plug in. It will always disconnect from the extension, but stays on the plug until I hook it and pull.
Posted by: aircooledtechguy Jan 8 2009, 01:50 PM
I like your soda blaster. For cleaning the carburetor you showed, how much soda did you end up using?
For that pair of 356 carbs, I think I used around 2 pounds. I bought a large box (I think it was 3 pounds) and had around 1/3 box left. 'Course @ $1.00 or so for a 1 pound box, it's ridiculously cheap. It's one time use media so no need to splash-out for the "boutique" Arm & Hammer brand, the generic stuff is all you need. . .

Posted by: Jeff Bowlsby Jan 8 2009, 02:30 PM
My D-Jet break-out box:
Attached image(s)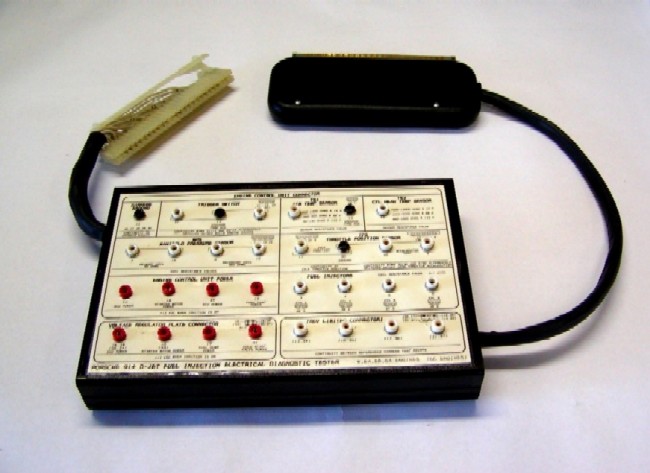
Posted by: Bartlett 914 Jan 8 2009, 03:19 PM
My Brake bleeder. Probably the simplest of tools but a great help. I use a bicycle pump to add pressure so I do not accidentally add too much pressure. Makes bleeding the brakes a snap.
Attached image(s)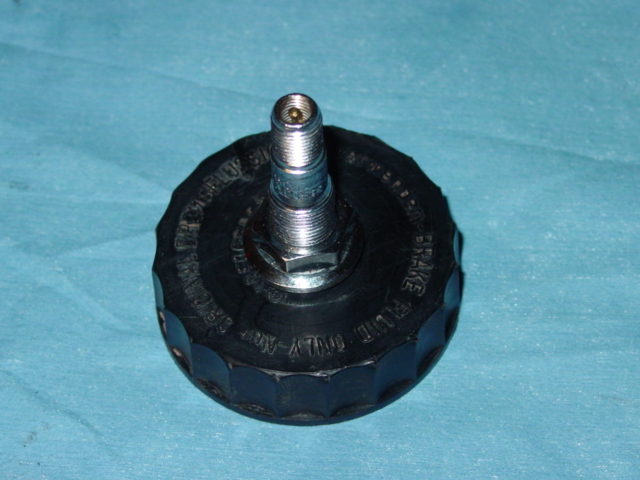
Posted by: HAM Inc Jan 8 2009, 04:06 PM
Those are some neat tools! I really like the arm shaft puller. I've been using heat and yes it does make a stinky mess!
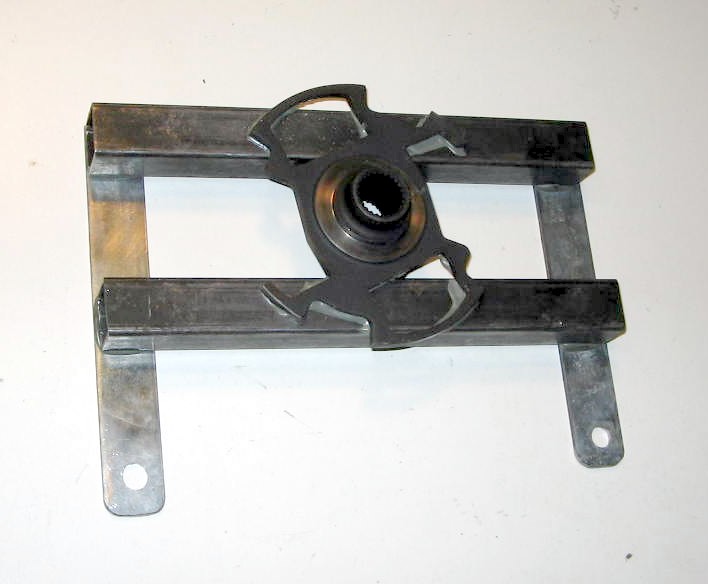
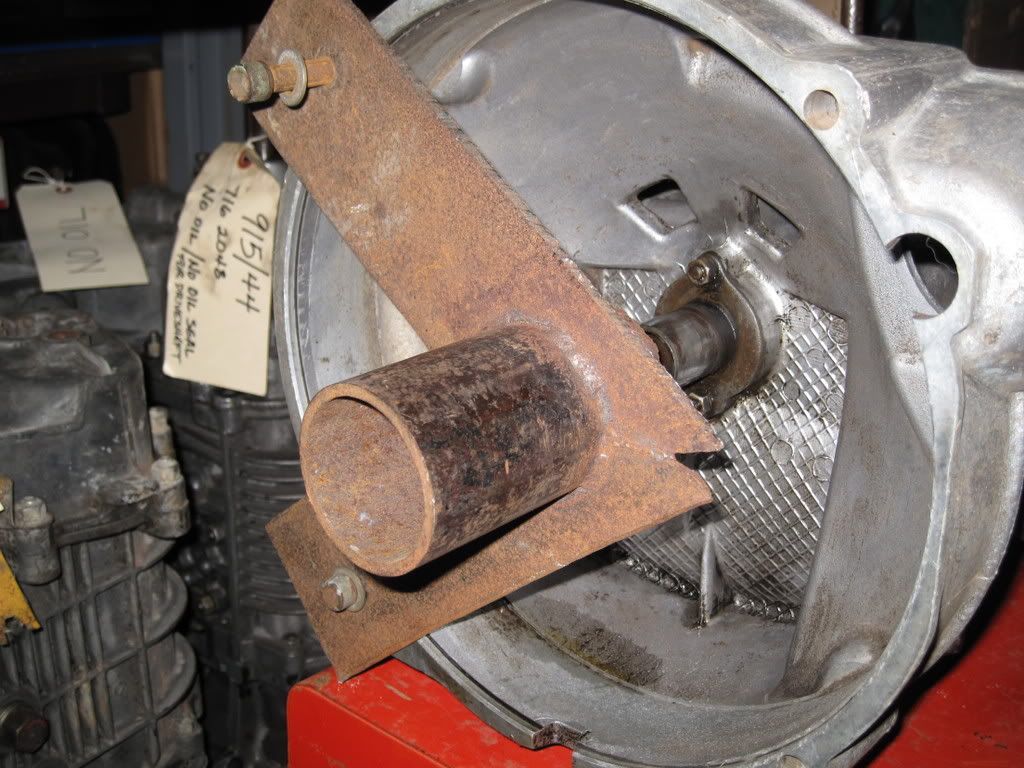
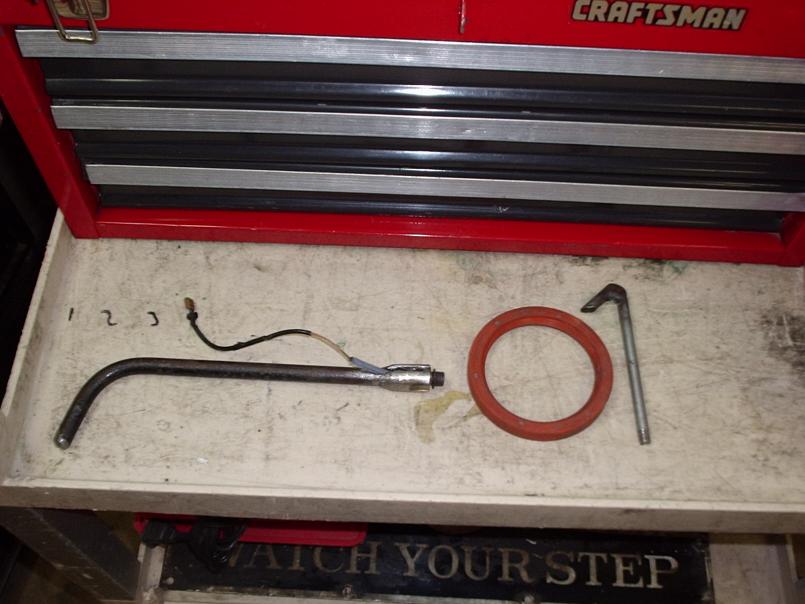
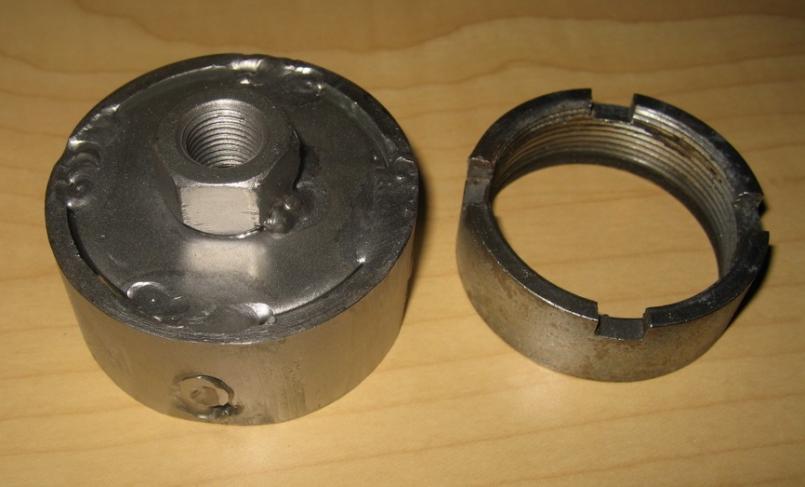
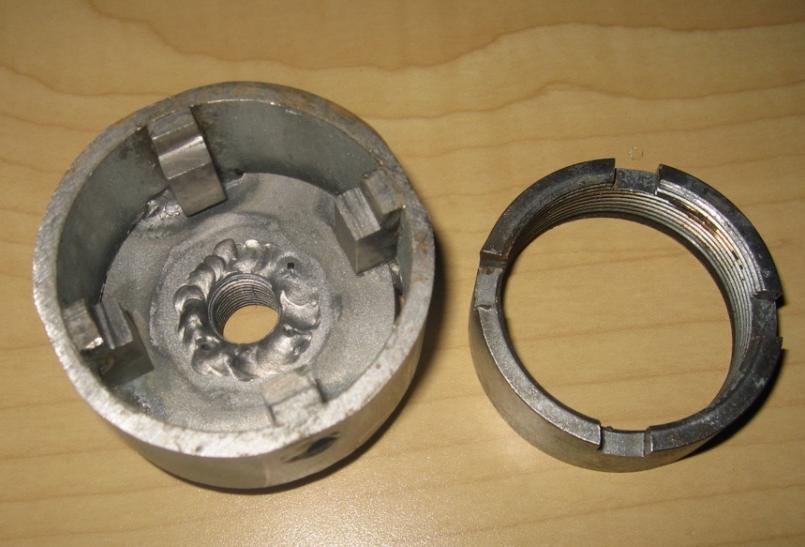
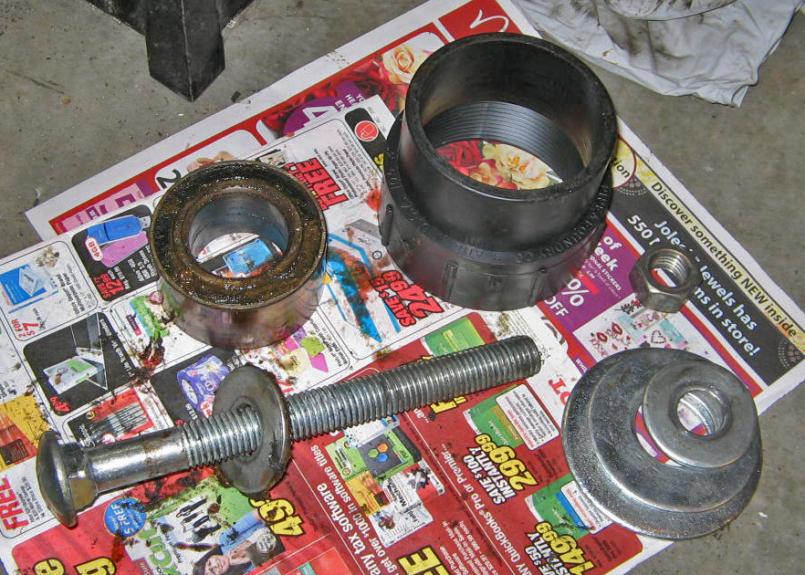
I came up with this cobbled together piece for pressing out stub axles while the arm is still in the car. Had to beat one out at the track last year and it made me want to throwup. Fortunately all of the beating didn't hurt anything or change my toe, but I decided that was the last time a hammer would be involved in that operation!
It works great! An old brake disc, a few minutes on the mill (could have been done without the mill) and a few welds. The giant three jaw puller was given to me years ago so the whole apparatus was damn near free.
I lke this thread. Hope more homemade tools follow.
Attached thumbnail(s)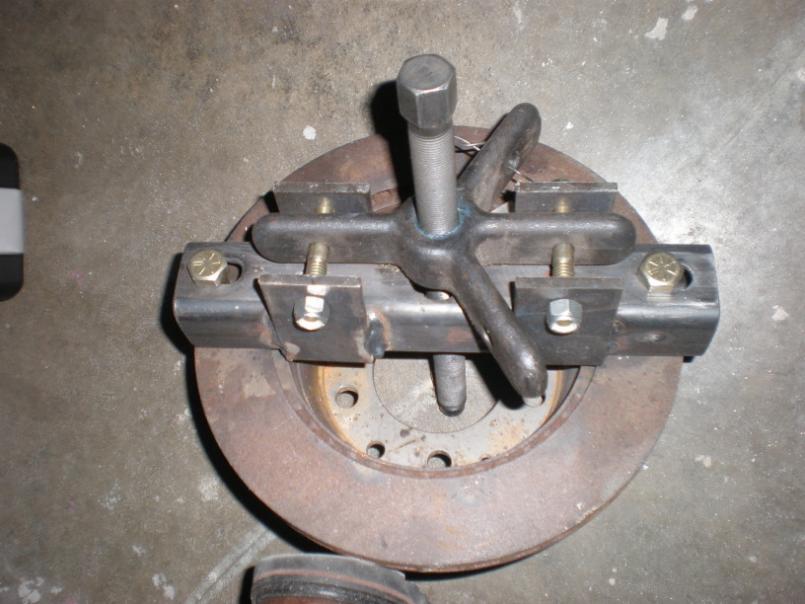
Posted by: scotty b Jan 8 2009, 06:54 PM
My English wheel and my shrinker / stretcher I converted to be pneumatic
Attached image(s)
Posted by: URY914 Jan 8 2009, 07:09 PM
I made an extension for my floor jack. When I jack up my car I get it up high and adding wooden blocks under the car would get scary after awhile.
Attached image(s)
Posted by: URY914 Jan 8 2009, 07:10 PM
I welded a old socket on the bottom of it to go in the hole in the jack.
Attached image(s)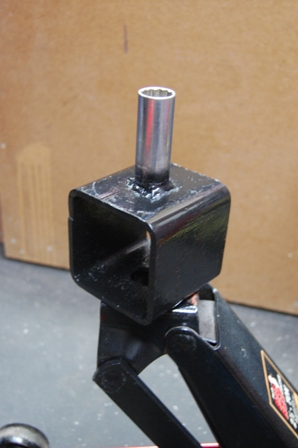
Posted by: URY914 Jan 8 2009, 07:12 PM
I also get comments on the jack stand blocks. Who would have thought you could improve on a jackstand.
Attached image(s)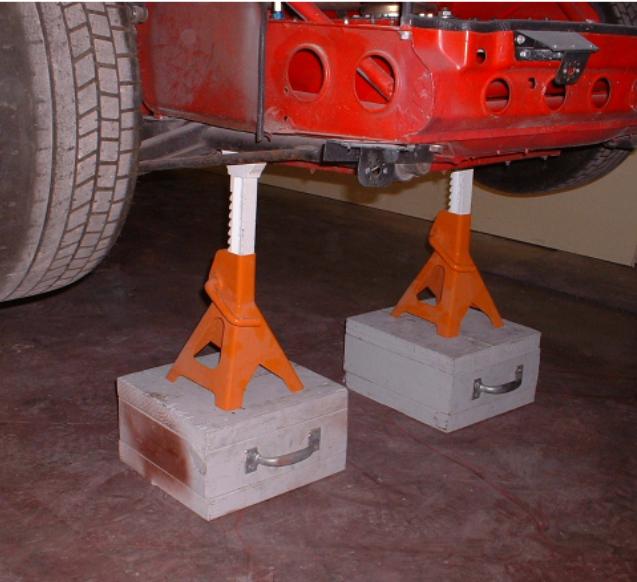
Posted by: URY914 Jan 8 2009, 07:16 PM
I build this tool box/welding cart too...
Attached image(s)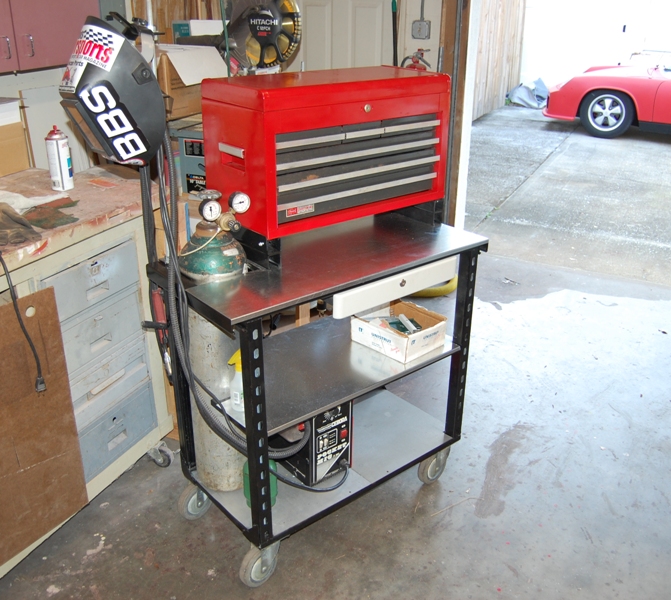
Posted by: URY914 Jan 8 2009, 07:19 PM
The frame in made of scrap Unistrut steel from a job site. I bought the tool box at a garage for $50 full of tools...
Attached image(s)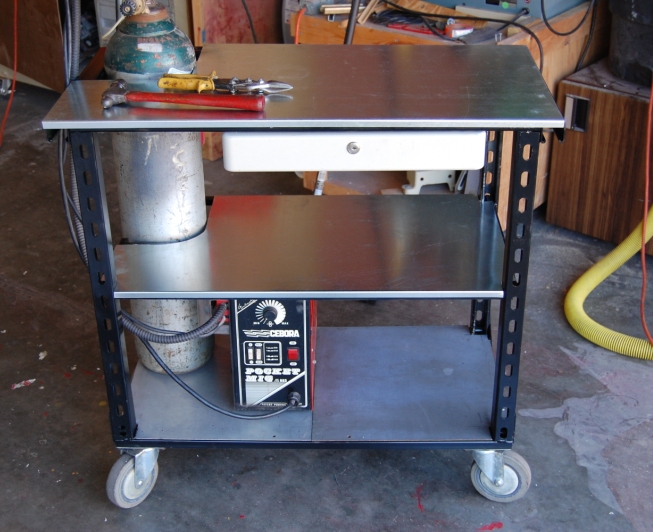
Posted by: URY914 Jan 8 2009, 07:23 PM
I found these bad boys at a auto show and really wanted them but I was afraid you guys would laugh at me....
Attached image(s)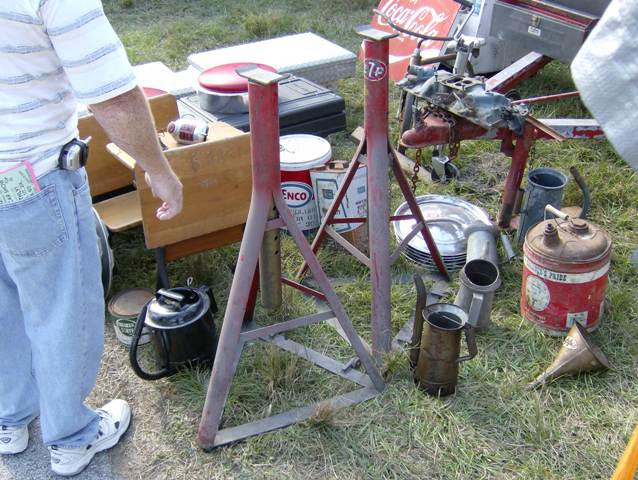
Posted by: smontanaro Jan 8 2009, 07:37 PM
Can we just skip the obligatory waiting period and make this a Lapuwali classic thread?
Posted by: 911quest Jan 8 2009, 07:45 PM
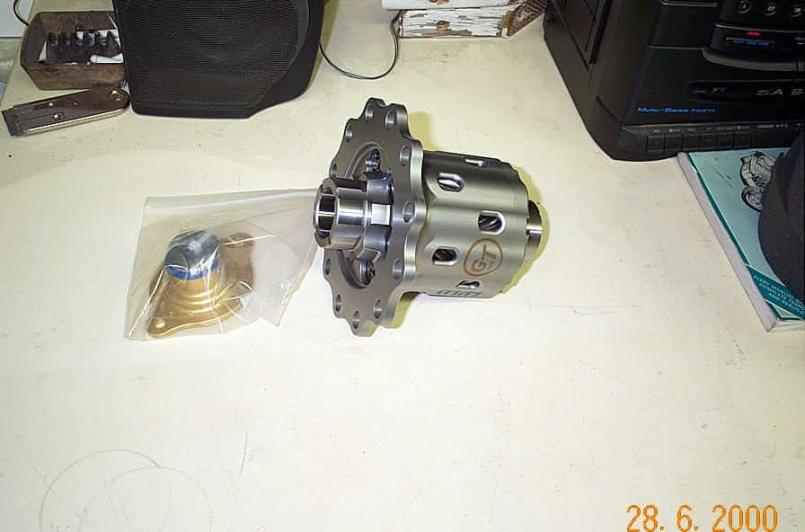
Here is my work in progress a P258c for seting pinion depth.
Attached image(s)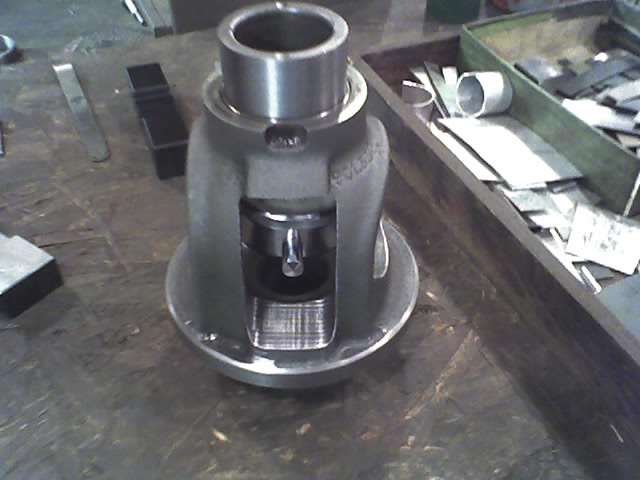
Posted by: Dr Evil Jan 8 2009, 07:46 PM
Here is my work in progress a P258c for seting pinion depth.
Ooooooo, interesting
Posted by: Todd Enlund Jan 8 2009, 07:59 PM
Can we just skip the obligatory waiting period and make this a Lapuwali classic thread?
Seconded.
Posted by: r_towle Jan 8 2009, 08:12 PM
My English wheel and my shrinker / stretcher I converted to be pneumatic
I like the english wheel.
So, where did you buy the wheels?
Rich
Posted by: scotty b Jan 8 2009, 08:17 PM
some guy on E-bay seveal years ago. I really don't remember who he was. Wish I did, they are very well done. I have gotten some nice bead roller dies and a KILLER hammer from hoosier pattern ( sells on e-bay ).
Posted by: r_towle Jan 8 2009, 08:20 PM
I want a plasma cutter...my head hurts thinking about cutting all the plate steel...
Did you end up putting any bracing inside the english wheel frame?
Rich
Posted by: scotty b Jan 8 2009, 08:24 PM
Yeah most likely overkill as I used 3/8 plate for the outside but I wanted to make sure it didn't flex. Yes German overengineering at werk. Thank my grandparents........
Attached image(s)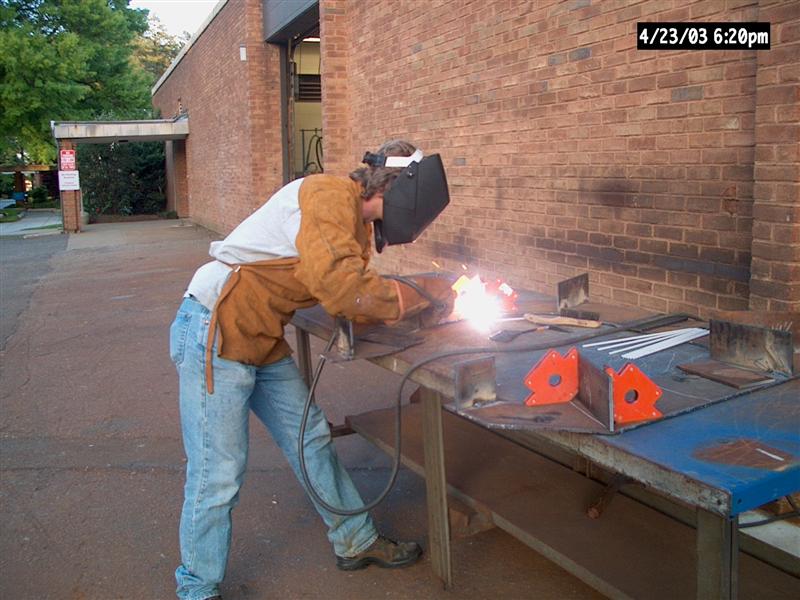
Posted by: RJMII Jan 8 2009, 11:53 PM
http://good-times.webshots.com/photo/2593686280101286046KTCxEI
I took two rear rotors, and two threaded rods and fashioned a spring compressor for the rear shocks. A washer and a nut at each end, and then a couple of turns on one, then a couple of turns on the other... back and forth between the two threaded rods keeping them moving at a constant rate as to keep the pressure even across the brake rotors.
Posted by: wertygrog Jan 8 2009, 11:57 PM
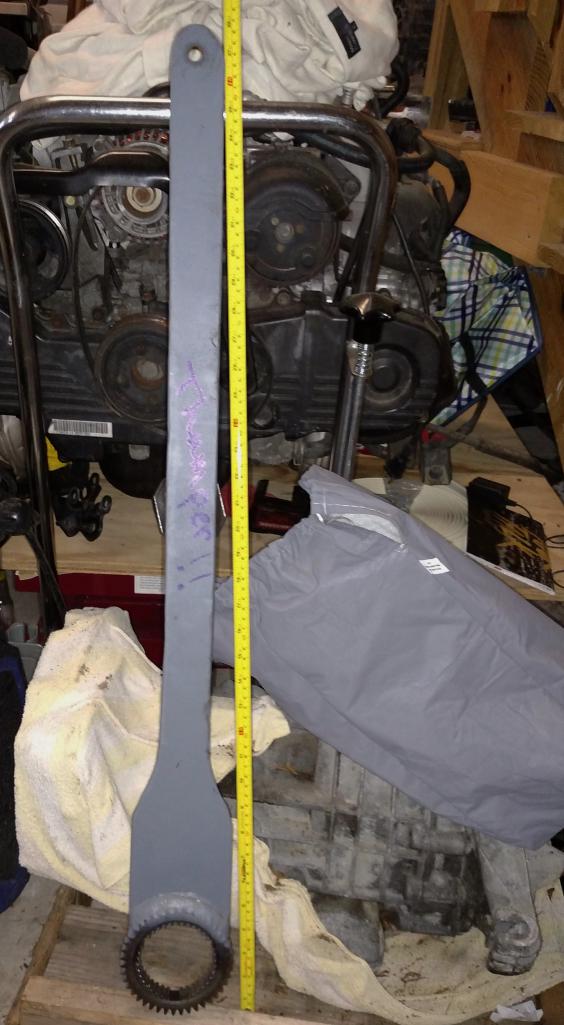
here's a super flat 22mm wrench for tensioning a 944 timing belt...made out of a spare e brake handle lol. 
Attached image(s)
Posted by: zambezi Jan 9 2009, 01:18 AM
Heres an engine stand I built for storing and running our 356 engines. Would also work for vw engines, just change the starter if its 12Volt. There is a Harley oil tank converted for a fuel tank in the differential space of the trans, and where the gear sets would be is the fuel pump and filter. LED lights on top of the trans are for oil pressure and ignition (so as not to leave the key in the on position if not running the engine).
Attached image(s)
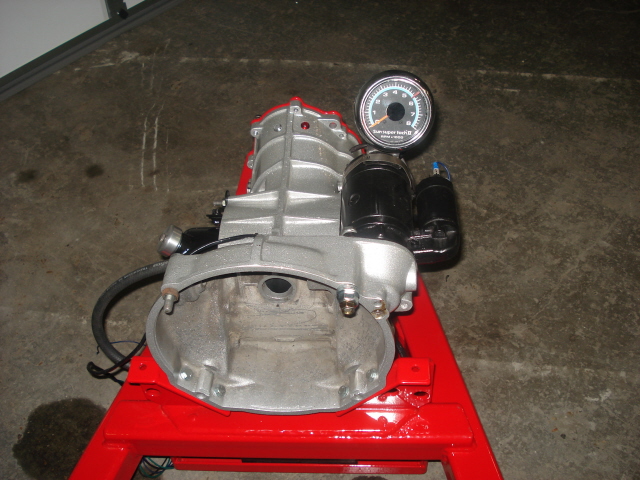
Posted by: Bartlett 914 Jan 9 2009, 08:51 AM
Heres an engine stand I built for storing and running our 356 engines. Would also work for vw engines, just change the starter if its 12Volt. There is a Harley oil tank converted for a fuel tank in the differential space of the trans, and where the gear sets would be is the fuel pump and filter. LED lights on top of the trans are for oil pressure and ignition (so as not to leave the key in the on position if not running the engine).
Very nice! The lower frame looks like it may have come from an old engine hoist.
Posted by: michelko Jan 9 2009, 08:58 AM
My Engine Test stand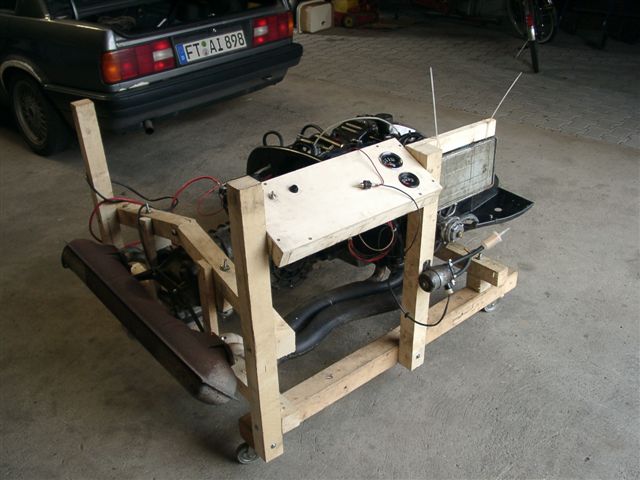
and the tool to check fuellevel in zenith carbs

Posted by: aircooledtechguy Jan 9 2009, 11:25 AM
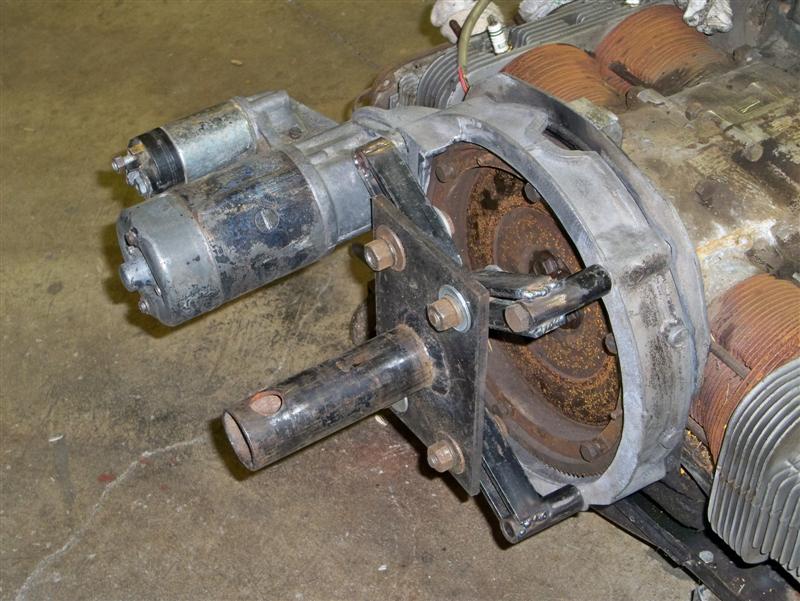
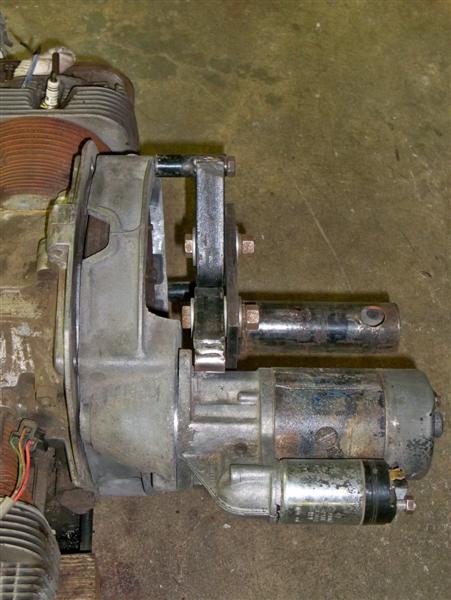
Here's my engine run stand and the starter box. The stand fits into my engine stand and uses a VW bus bell housing and starter. I welded up an aluminum 1 gallon fuel tank that's plumbed through an electric pump and pressure regulator.

The starter box just has a oil pressure light and ignition switch and start button. I added a friction throttle so I can hold the RPM I want w/o standing in one place during break-ins. I need to have a mobile box that allows me to cut power and move with me during break-ins as I check for leaks and such because I work alone at my shop. I'd like to re-do it some day and add oil pressure, tach and a CHT gauges. 
Posted by: Todd Enlund Jan 9 2009, 12:50 PM
and the tool to check fuellevel in zenith carbs
That's cool!
Posted by: andys Jan 9 2009, 02:56 PM
I've got several custom jigs and fixtures, but as far as tools go this is the cheapest, most used, and get the most comfort level from knowing the car won't readily slip off the jackstands.
Andys
Attached thumbnail(s)
Posted by: MrKona Jan 9 2009, 03:19 PM
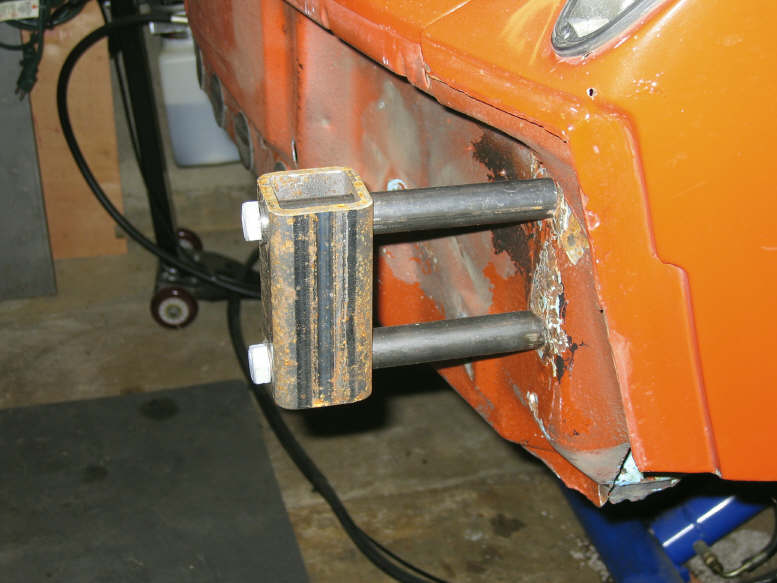
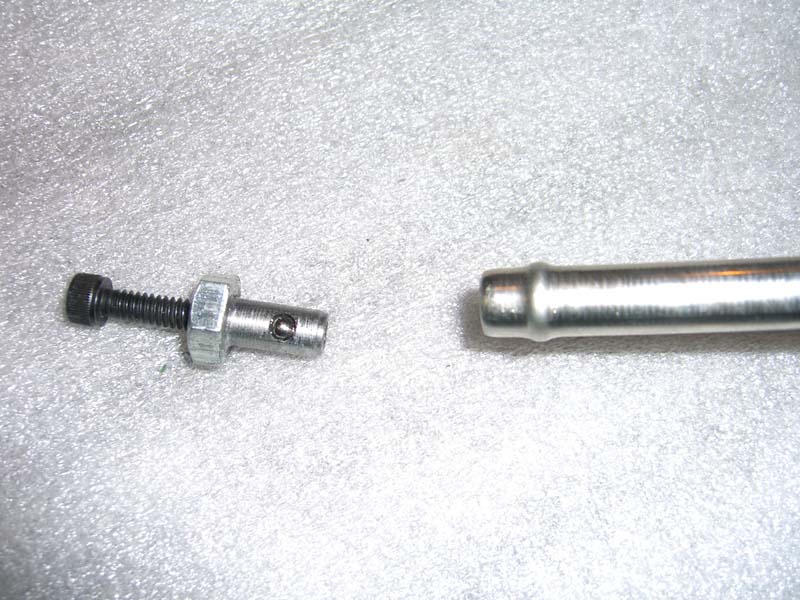
Here's my transaxle driveshaft holder tool. Keeps the drive shaft from turning so that you can loosen the castle nut without having to engage two gears at once. Scrap metal, JB Weld, and the serrated inner piece from an old clutch disk. (picture was taken on an empty case, no driveshaft on this one.)
Replaces Porsche tool #P37.
Haven't ever used it, but someday...
Attached image(s)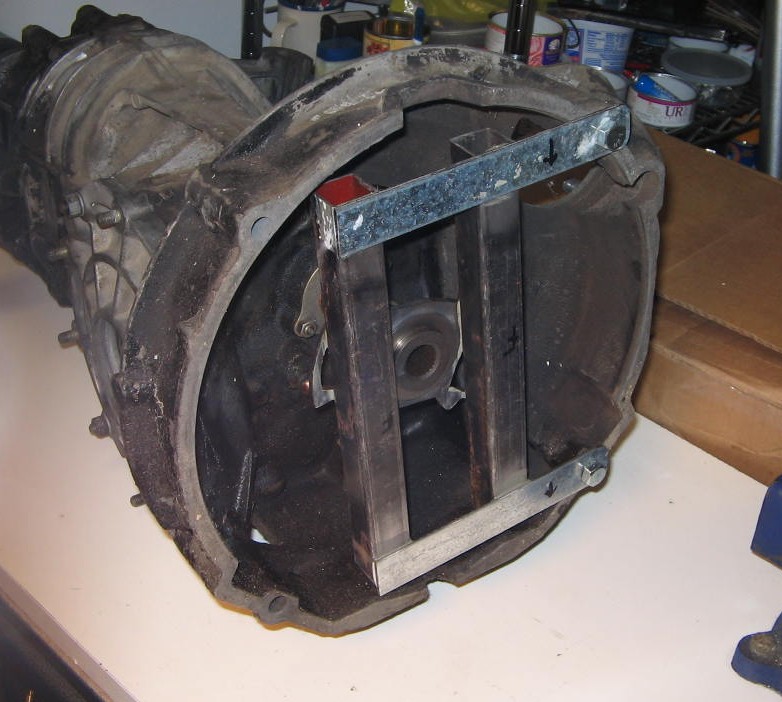
Posted by: roadster fan Jan 9 2009, 04:16 PM
I've got several custom jigs and fixtures, but as far as tools go this is the cheapest, most used, and get the most comfort level from knowing the car won't readily slip off the jackstands.
Andys
 I'm gonna make me some of those this weekend....Brilliant!
Jim
Posted by: roadster fan Jan 9 2009, 04:37 PM
Here is one that I made after having to remove the rear brake calipers and reset the venting clearance about a dozen times. It is just an old flea market wrench and socket welded together so it is easy to hold the ouside adjuster allen bolt while tightening the 13mm nut. I use my ratchet with the allen socket but I have also used a regular "L" shaped allen wrench also.
There is probably a way the pros use but I came up with this.
Jim
Posted by: 914dave Jan 9 2009, 05:15 PM
[attachmentid=164683]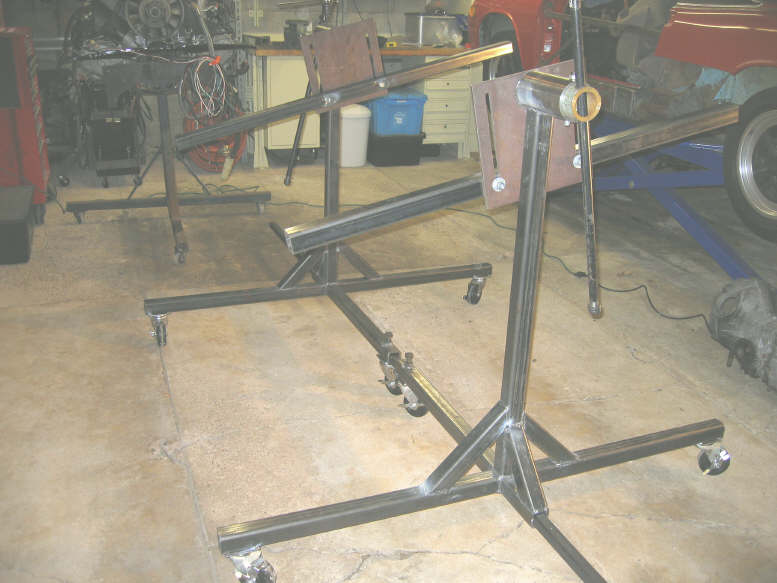
Here's the rotisserie pix's
Attached image(s)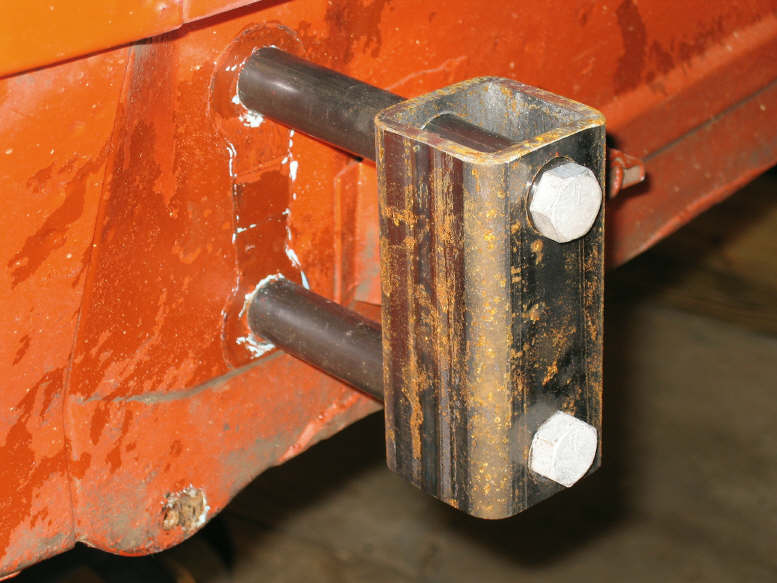
Posted by: J P Stein Jan 9 2009, 07:34 PM
Wanna check backlash on the R&P of your 901? Hold the crank when installing rods?
Attached thumbnail(s)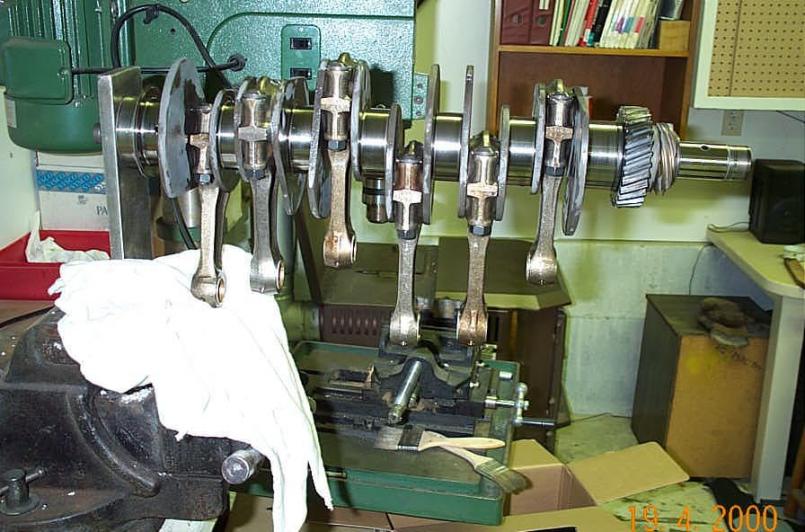
Posted by: Zimms Jan 9 2009, 08:36 PM
Here is my work in progress a P258c for seting pinion depth.
Nice, Tony!
So are you on your own now?
http://www.stuttgartspecialists.com
Posted by: carr914 Jan 9 2009, 09:32 PM
This thread would not be complete without FourBlade's RockingChair Rotisserie

T.C.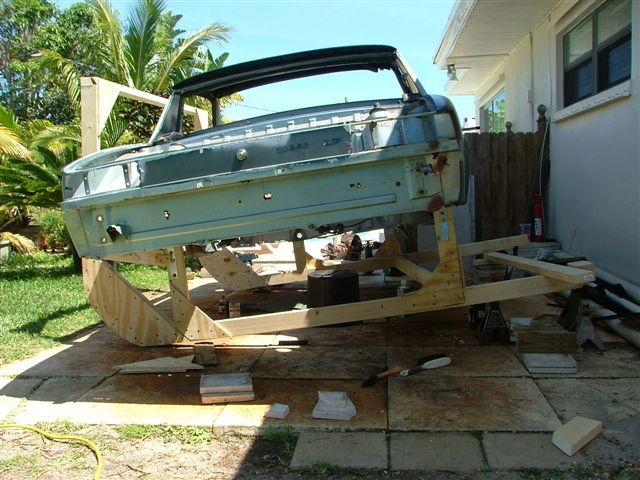
Posted by: MrKona Jan 9 2009, 10:23 PM
Wanna check backlash on the R&P of your 901? Hold the crank when installing rods?
I have the 4 cyl version of the crank holder.
I like the backlash measurement set up. Do you have another picture of the piece holding your pinion shaft?
Attached thumbnail(s)

Posted by: sean_v8_914 Jan 10 2009, 10:09 AM
suspension bushing reamer
Attached image(s)
Posted by: J P Stein Jan 10 2009, 10:47 AM
I like the backlash measurement set up. Do you have another picture of the piece holding your pinion shaft?
Here's another pic. Note that this is "Rev 0" in the development phase.
The blue tape sucked. Rev 1 was the use of JB weld. I coated an extra 30mm bolt with grease for a release agent then fitted it into the 30mm socket slathered with JB weld....then let it cure. This produced a "no slop" fit to the bolt. Since you are looking for around .015 (IIRC) backlash, no slop is imperative. The dail indicator is mounted at about the same radial dimension as the contact point of the R&P....tho I'm told it's not required.
As you can see, the holding strap is a pretty high tech piece of hurricane strap that is supposed to hold your roof on.....
I had to do some quick learnin' to install this sucker.....to include the pre-load on the ring gear shaft bearings...I had expert verbal instructions and a shop manual.
After running it for a season I'm gonna take the trans apart for some gear changes. The first look will be on the magnetic drain plug.....fuzzies are bad.
Attached thumbnail(s)

Posted by: rick 918-S Jan 10 2009, 01:57 PM
I made these for doing large deep shrinks. You slip them over the panel and give them a twist. This gathers the metal. Then...  carefully shape the curve. I'm sure you can buy them someplace.
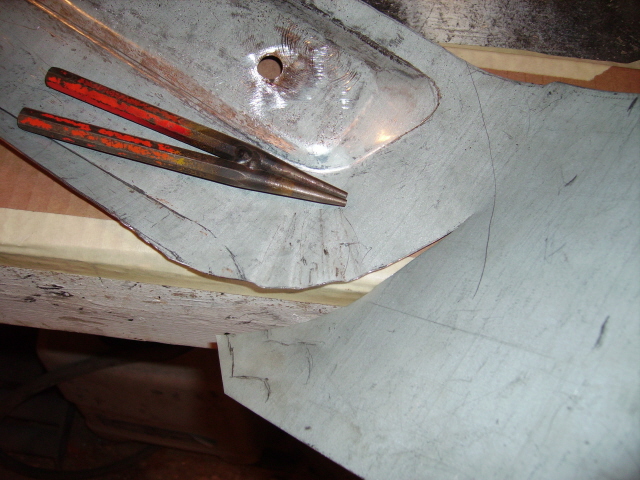
Posted by: rick 918-S Jan 10 2009, 01:57 PM
Here is the result or close to it.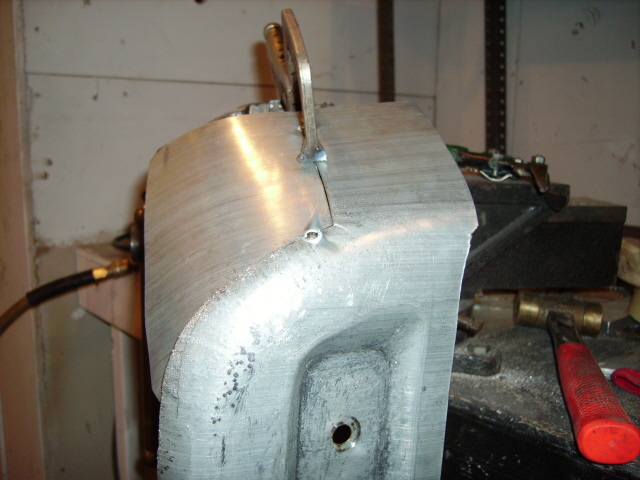
Posted by: 911quest Jan 10 2009, 09:31 PM
Here is my work in progress a P258c for seting pinion depth.
Nice, Tony!
So are you on your own now?
http://www.stuttgartspecialists.com
Yeah we have been going for a few months now....Sebing again this year?
Posted by: Zimms Jan 10 2009, 11:22 PM
Here is my work in progress a P258c for seting pinion depth.
Nice, Tony!
So are you on your own now?
http://www.stuttgartspecialists.com
Yeah we have been going for a few months now....Sebing again this year?
Definitely. Outside turn one, RV this year. Building a barn in the spring for projects. I'll post a picture of the white car. Nothing more than stripped at this point, waiting for rust repair and flares.
Good luck!
Sorry for the hijack everyone.
Posted by: zambezi Jan 11 2009, 12:26 AM
Heres an engine stand I built for storing and running our 356 engines. Would also work for vw engines, just change the starter if its 12Volt. There is a Harley oil tank converted for a fuel tank in the differential space of the trans, and where the gear sets would be is the fuel pump and filter. LED lights on top of the trans are for oil pressure and ignition (so as not to leave the key in the on position if not running the engine).
Very nice! The lower frame looks like it may have come from an old engine hoist.
Nope its all new construction. I made it a three wheeler so its stable on eneven surfaces. The 3rd wheel is a lockable caster.
JIM
Posted by: McMark Jan 19 2009, 09:53 PM
Revival!
I found a tool I made awhile ago. 901 Transmission pilot shaft seal installer: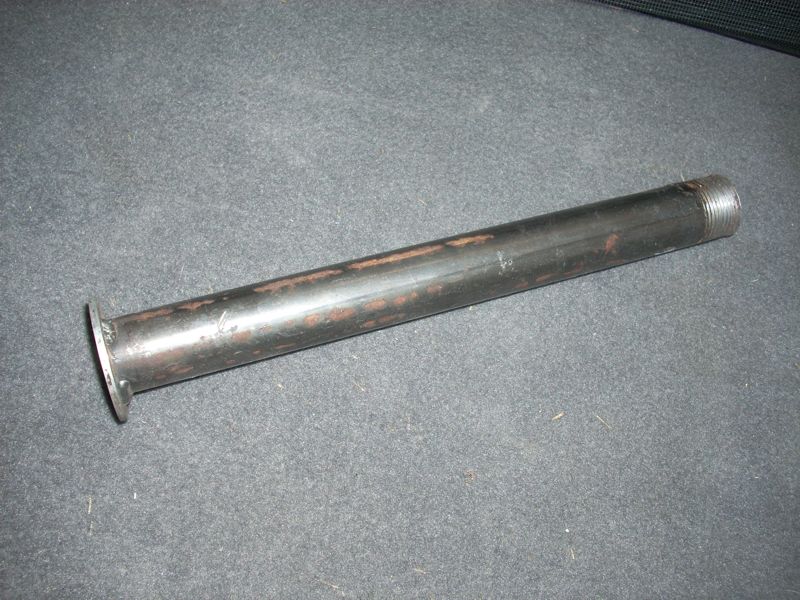

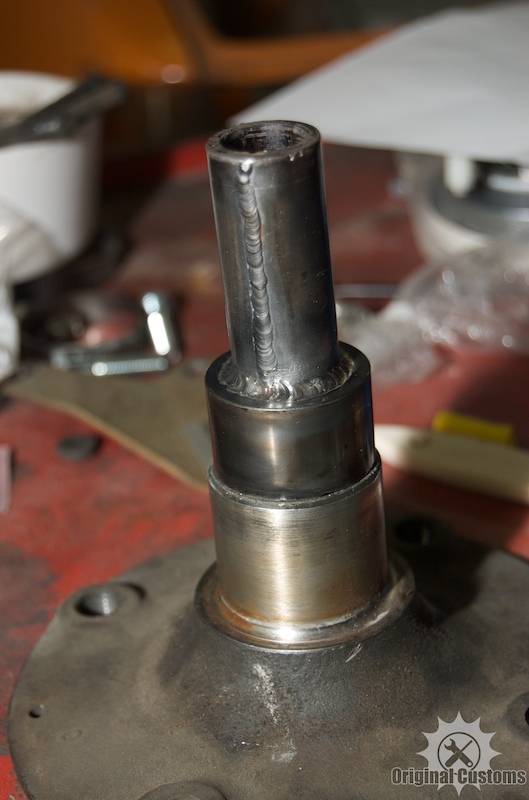
And today I made another tool. Turbo tie rod installation wrench. Donor 4mm thick metal from some squareback swing axle spring plates that I shortened to install IRS.  Works like a charm!
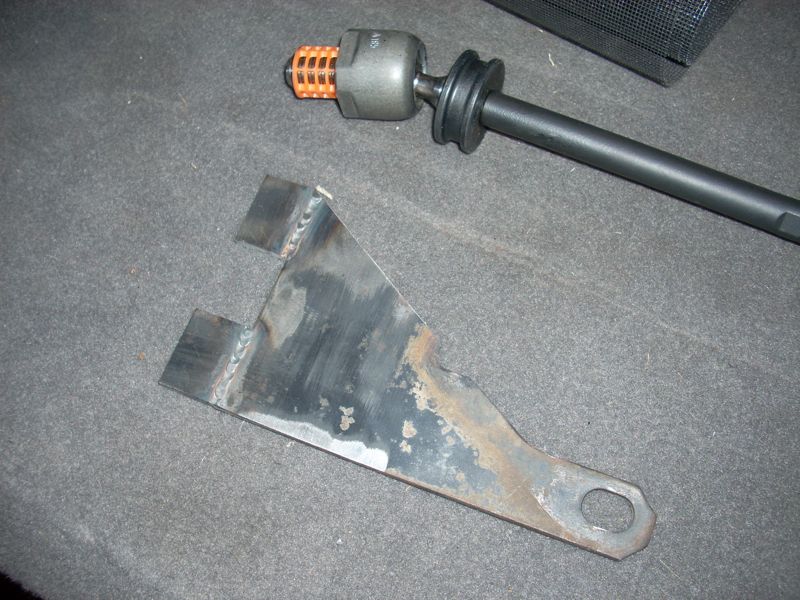
Next time I send out some zinc plating, I'm going to include some of these babies to make them pretty.
Posted by: highways Jan 20 2009, 03:49 AM
Here's my favorite 'found object'. My 914 Road Tool Kit. It's a Thompson Cigar Sampler case. Found mine at a swapmeet for cheap. First you must spend about 2 weeks removing the Cuban Cigars to make room for the tools... 

you can get yours here:
http://www.thompsoncigar.com/default.aspx?sid=usrytj55bigr13uj5kftvr55&uid=1287&CategoryID=115&page=product
once the cigars are removed, you are left with a 231mm X 259mm X 53mm aluminum case.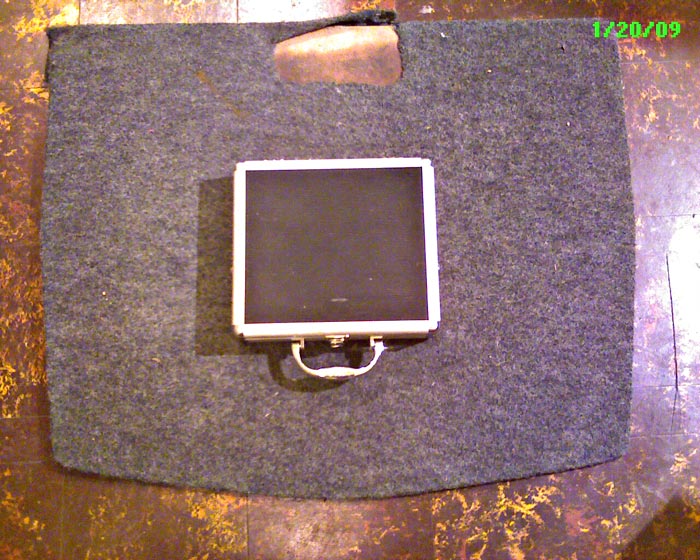
now choose your favorite 'don't leave home without'em' 914 tools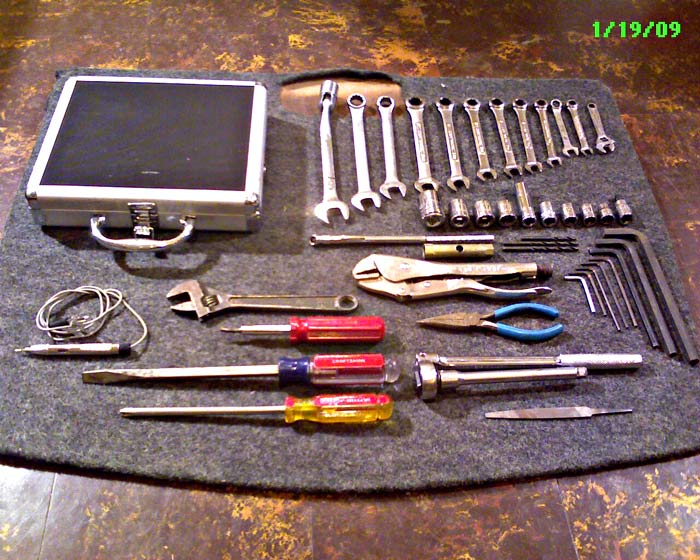
In my kit for example I have Craftsman ratcheting wrenches 8mm, 10mm, 11mm, 12mm, 13mm, 14mm, 15mm, 16mm, 17mm, 18mm, and 19mm. Socket Wrench with Variable Angle Head and 6" extension, Sockets 10mm, 11mm, 12mm, 13mm, 13mm extended, 15mm, 16mm, 17mm, 18mm, 22mm, CV joint star key, Craftsman 12" flat head screwdriver, Stanley 10" philips screwdriver, Full size 6 in 1 screwdriver, Proto Cresent wrench, Tire Pressure Gauge, Set of metric Allen Keys, OEM 10/13mm porsche wrench, Metal file, Hella Test Light, Needle Nose Pliers, and my favorite full size Craftsman Visegrips.
personalized variations are encouraged and may earn extra credit
packing requires a little practice and a methodology... 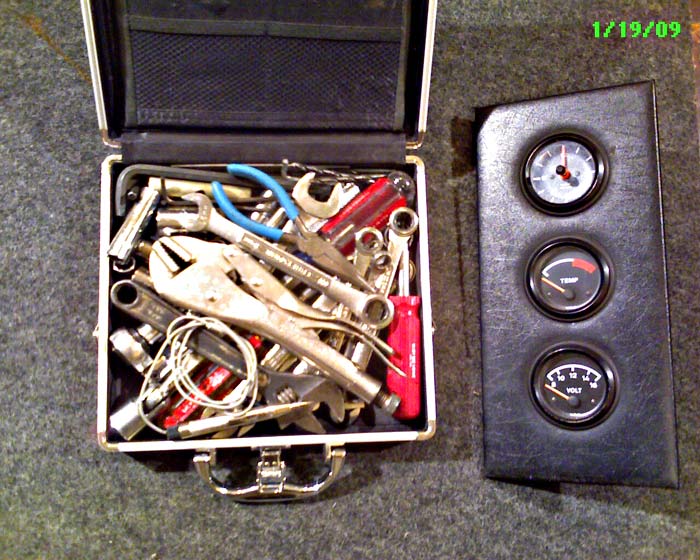
and yes the latch closes fully and the 914 Road Tool Kit just barely fits behind one of these....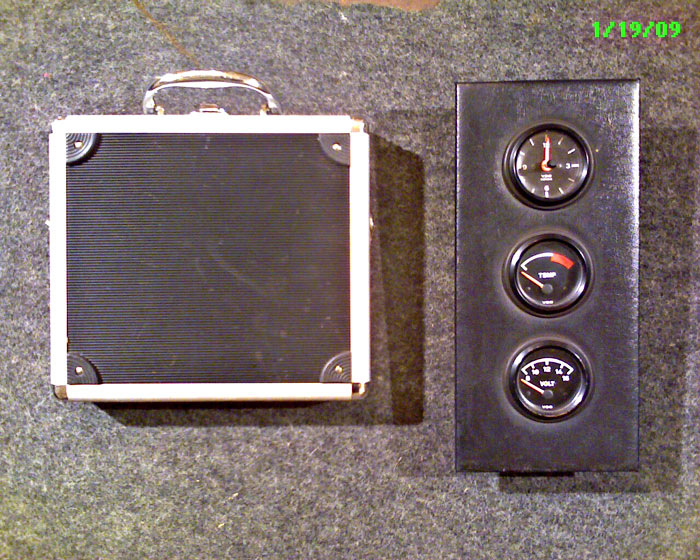
Posted by: McMark Jan 20 2009, 08:46 PM
That's a cool kit!
Posted by: URY914 Jan 20 2009, 09:23 PM
No, it's a TOOL kit.
Posted by: MrKona Jan 28 2009, 01:13 AM
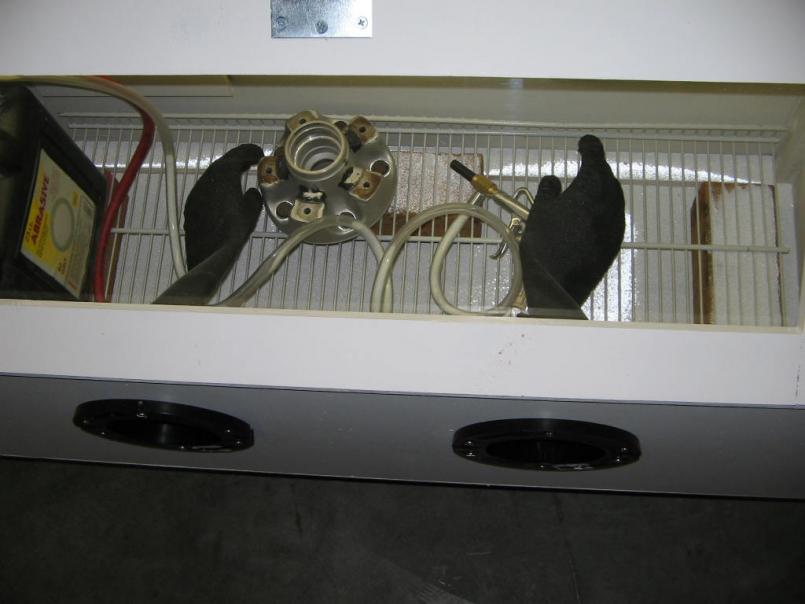
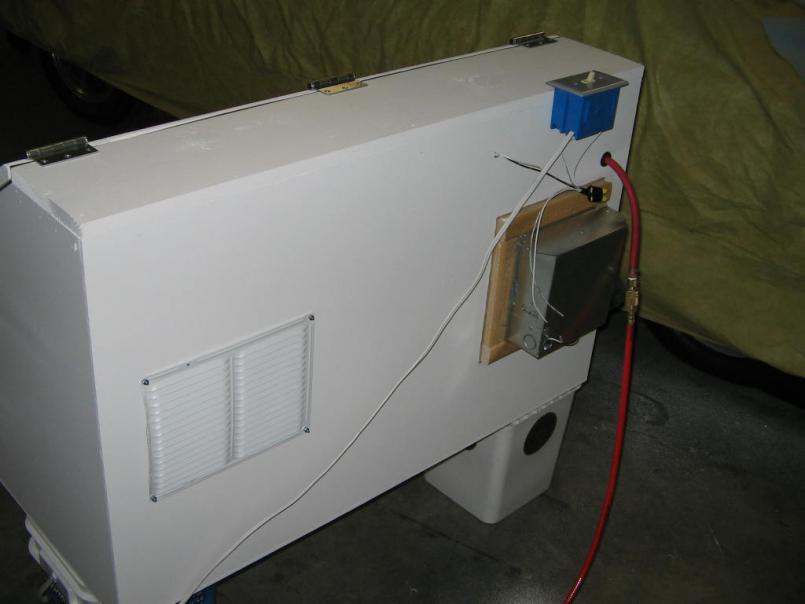
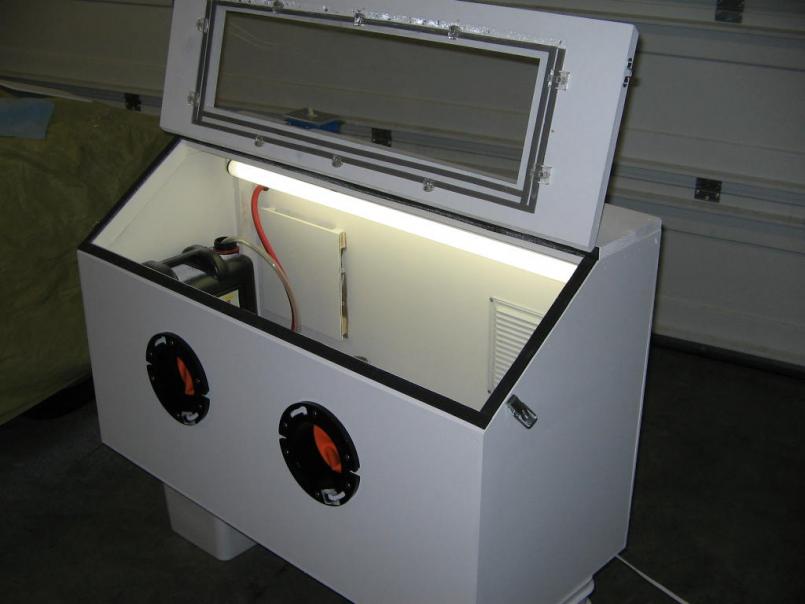
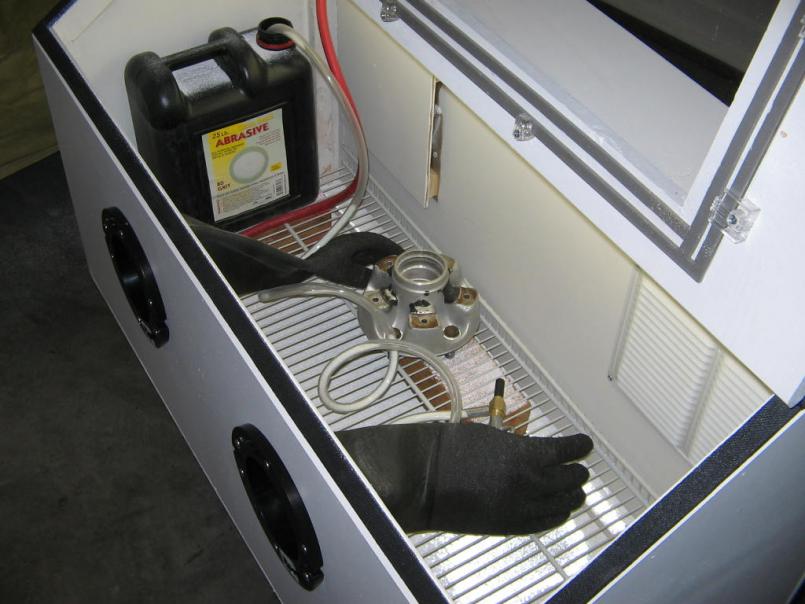
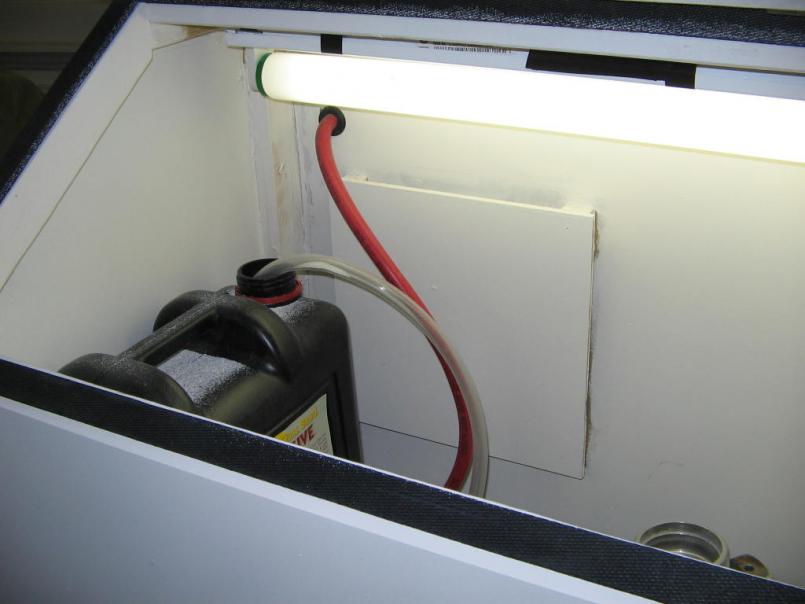
Here's my home made blasting cabinet. I just finished it tonight.
I'd been wanting one for awhile. I recently bought an original muffler that has surface rust, so I wanted a cabinet that would be long enough to fit an entire muffler. $$$
I went ahead and made one with materials from Home Depot, Ace Hardware, and a cheap gun from Harbor Freight. I tried it out tonight and it works great! Obviously, it has no hopper, so I'll have to stop after awhile and shovel out the used media. On the back is an inlet and a bathroom fan for an exhaust. I have a filter in the inlet so no dust escapes. The exhaust fan makes for a nice negative pressure atmosphere in the box. I will hook up a hose and exhaust the dust outside. If it's a lot of dust, I will run the hose to a home made filter box. I realize that dust may shorten the life of the exhaust fan, but it's cheap and replaceable.
There is a 36" fluorescent light inside. I have it wired so that the light and exhaust fan come on together. I can't wait to do some more blasting!
Next step is to build a stand for it this weekend.
Attached thumbnail(s)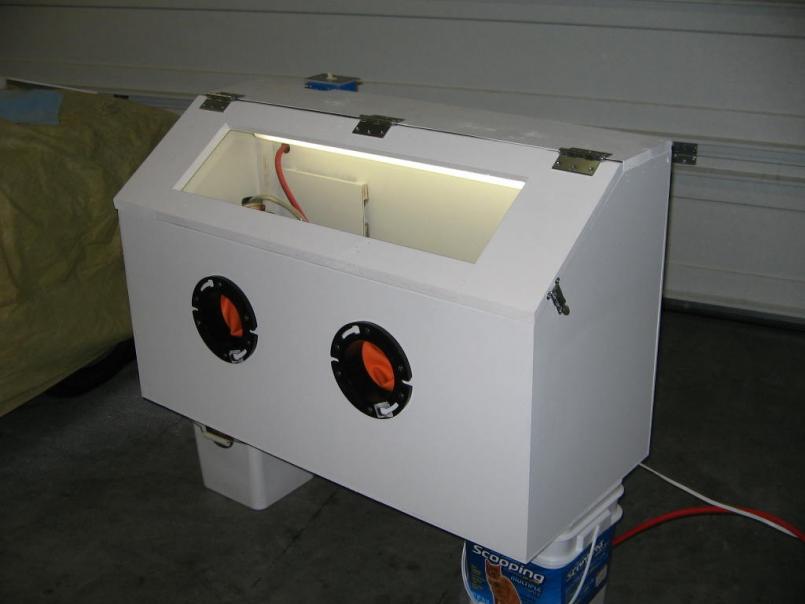
Posted by: cwpeden Jan 28 2009, 01:41 AM
I made my own blasting cabinet too and used my shop vac as the ventilation. I just used one of the filters for drywall dust and it worked like a charm
I think nextime I will get a bag.
Posted by: Dr Evil Jan 28 2009, 04:46 PM
Here's my favorite 'found object'. My 914 Road Tool Kit. It's a Thompson Cigar Sampler case. Found mine at a swapmeet for cheap. First you must spend about 2 weeks removing the Cuban Cigars to make room for the tools...
you can get yours here:
http://www.thompsoncigar.com/default.aspx?sid=usrytj55bigr13uj5kftvr55&uid=1287&CategoryID=115&page=product
once the cigars are removed, you are left with a 231mm X 259mm X 53mm aluminum case.
now choose your favorite 'don't leave home without'em' 914 tools
In my kit for example I have Craftsman ratcheting wrenches 8mm, 10mm, 11mm, 12mm, 13mm, 14mm, 15mm, 16mm, 17mm, 18mm, and 19mm. Socket Wrench with Variable Angle Head and 6" extension, Sockets 10mm, 11mm, 12mm, 13mm, 13mm extended, 15mm, 16mm, 17mm, 18mm, 22mm, CV joint star key, Craftsman 12" flat head screwdriver, Stanley 10" philips screwdriver, Full size 6 in 1 screwdriver, Proto Cresent wrench, Tire Pressure Gauge, Set of metric Allen Keys, OEM 10/13mm porsche wrench, Metal file, Hella Test Light, Needle Nose Pliers, and my favorite full size Craftsman Visegrips.
personalized variations are encouraged and may earn extra credit
packing requires a little practice and a methodology...
and yes the latch closes fully and the 914 Road Tool Kit just barely fits behind one of these....
I couldnt resist this deal on the cigars, but be warned. They were relentless in calling my cell and trying to up sell me on other options and packages
 I finally called them back and asked them not to call me anymore....then when they called me I made the request again.....lets see how many more times they call me
Posted by: scotty b Jan 28 2009, 06:44 PM
Yeah you really can't beat Thompsons prices buy they are damned irritating. I get an e-mail DAILY and I've only bought from them 3 or 4 times I think. that's where I got that newest pipe and Zach's cigars from.
Posted by: rick 918-S Jan 30 2009, 08:39 AM
I'm not sure if you would classify 2" masking tape as a tool but here's a method for keeping track of you terminal ends while rewiring your car, boat, or what ever your working on.
I was recently rewiring the Healey. I had a HotRod Wires generic harness with no terminal ends. I was working on the dash and needed several different terminal ends. I have a big nut and bolt assortment drawer with different sizes and types. Rather that bring the bulky drawer over to the car and chance knocking the thing over in the tight quarters, I stuck several of the connectors to a strip of 2" masking tape and stuck it to the kick panel next to where I was working. Notice the tape in the left of the photo. It worked for me... 
Attached image(s)
Posted by: highways Jan 30 2009, 06:51 PM
I couldnt resist this deal on the cigars, but be warned. They were relentless in calling my cell and trying to up sell me on other options and packages
I finally called them back and asked them not to call me anymore....then when they called me I made the request again.....lets see how many more times they call me Oh, sorry about that! I had no idea. Like I said I found mine at a swap meet. Maybe you can use your inlaw's address for placing the order next time?
 It just seemed like a cheap alternative to dropping the doe on one of those aluminum breifcases.. and mine is holding up fine after 2 years.
Posted by: zig-n-zag Jan 31 2009, 07:48 PM
tranny nut buster.... 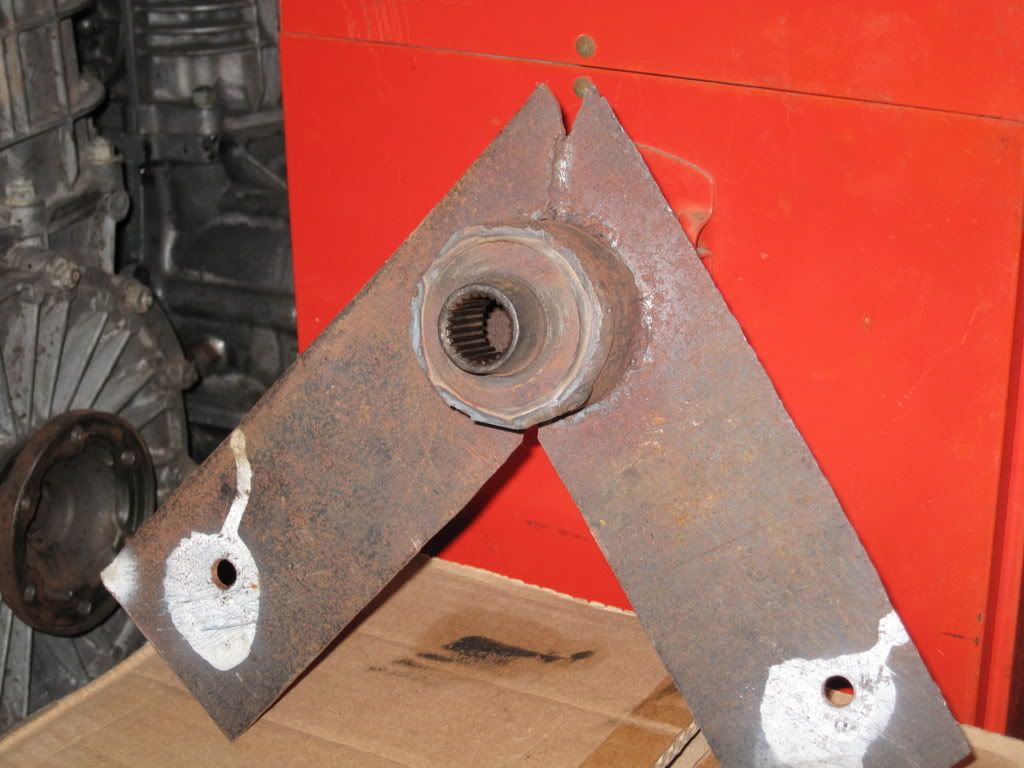
Posted by: majkos Feb 1 2009, 09:59 AM
I'm suprise no one made a Engine Head Sensor tool.
Let's step over to the tool box 
Posted by: majkos Feb 1 2009, 10:20 AM
Simple 13mm socket, 914 jack handle, cut at a certain length,
(to fit in engine compartment.)
Welding, grinding, cut off tool makes slot for wire.
No need to remove intakes.
The other tool is a "Short" Engine seal removal.
Can't remember why I was in tight quarters,
but 5 minutes,Fabing and welding, seal removed and moved on.
Think I was getting ready for some AX'ing, the next day 
Posted by: Sleepin Feb 1 2009, 11:15 AM
......and I am missing your Superbowl party.... 
Judging by your cooler, I may need to stop by one of these days Kevin!
Posted by: Gint Feb 1 2009, 11:22 AM
You've never been to Kevin's?!?! You need to move.
Posted by: Todd Enlund Feb 1 2009, 11:35 AM
Here's my home made blasting cabinet. I just finished it tonight.
That's pretty sweet!
Posted by: majkos Feb 1 2009, 02:16 PM
You've never been to Kevin's?!?! You need to move.


Posted by: Wilhelm Feb 2 2009, 10:11 PM
Posted by: McMark Feb 3 2009, 12:49 AM
Nice work.
Posted by: Racer Chris Feb 5 2009, 09:23 AM
Delrin rear bushing cutting tools
Top: Sleeve that fits an already reamed bushing
Center: Reamer with long shaft and sleeve that fits the unreamed bushing in the opposite end of the trailing arm. At the left end a socket is welded to the shaft to turn the reamer.
The rosette welds hold short pins that capture the square end of the reamer but allow it to be removed as needed.
Bottom: Face cutting tool to precisely adjust the end play of a pivot shaft in the bushings
Attached image(s)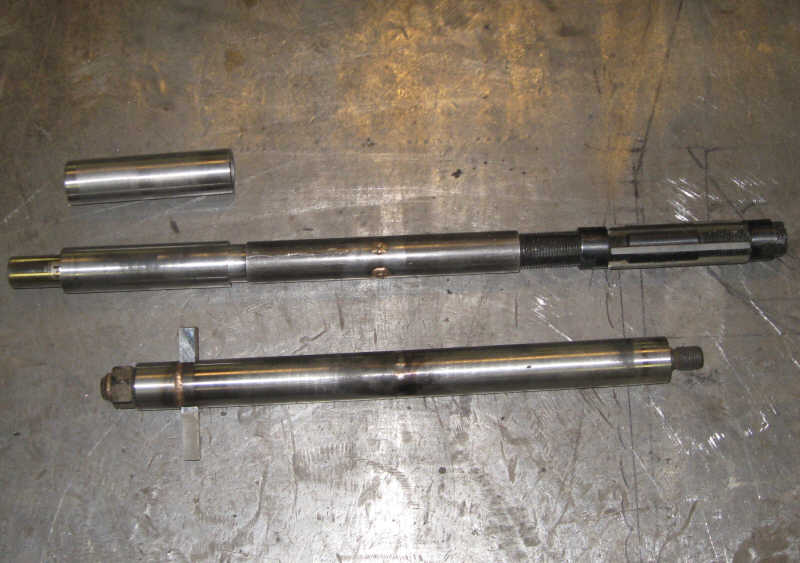
Posted by: larss Sep 22 2009, 01:15 AM
Rear boot torsion bar tool
Made this tool for fitting of (fighting with!) the torsion bars to the rear boot hinges, there is a picture of it in the Haynes manual, need a R and L version, this is the R one...still with this tool I did not like fighting with the bar (talk about mouse trap!), is there another way of fitting the bars?
/Lars S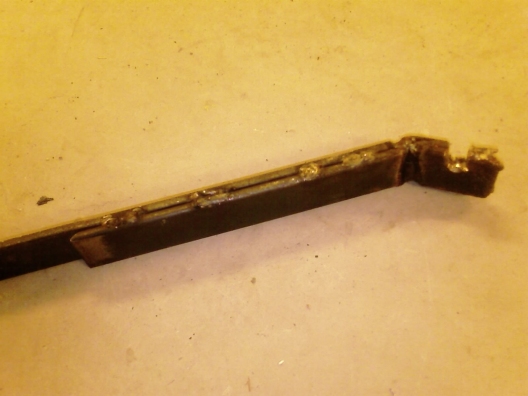
Posted by: charliew Sep 22 2009, 08:24 AM
I don't remember where I saw it but the fiero has similiar springs and there is what seems like a pretty good tool available maybe you could copy it if you can find a picture. I need to adjust one of my fieros now. One has been sitting in my shop with the trunk open for about 7 years so maybe it will be okay when I get around to using it again. It also has a lighter trunk than the gt I'm having problems with. I use a cresent wrench with a notch cut in it for my purposes.
Posted by: jimkelly Apr 28 2010, 07:21 AM
bearing removal tool - not mine
see thread
http://www.914world.com/bbs2/index.php?showtopic=92681&hl=Interesting+find
text from designer...
I added a couple extra washers on top of the large washer as you can see from the pics. This really wasn't necessary. Only needed if the nut is too small for the hole in the large washer.
Also, If I really wanted to get fancy and avoid holding the threads with a Vice grip, I could have added two additional nuts and cinched them tight to one another, then held one with a wrench to avoid gnarling up the threads.
Attached image(s)
Posted by: McMark Jul 28 2010, 02:01 PM
Made another tool today. This piece fits tightly on the inside of the rear hub. A slide hammer goes through the middle and a few swings later, the hub is out. Quick, easy and safe. 
Attached image(s)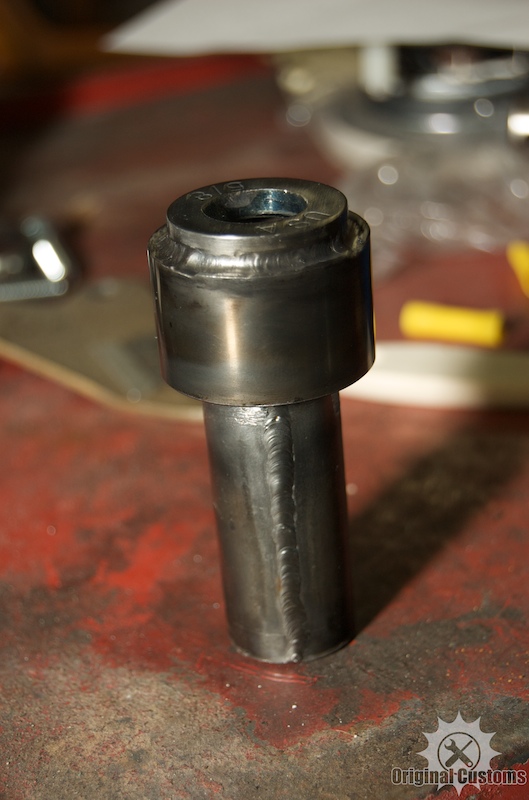
Posted by: rdauenhauer Jul 30 2010, 09:35 PM
Here is one that is surprisingly simple but I find I use it the most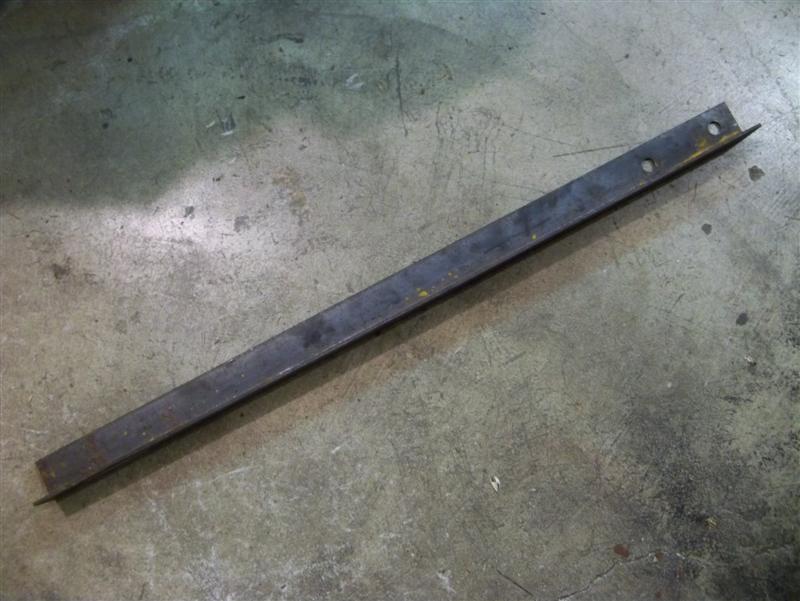
It bolts to the rear hubs w/o wheel using the stock lugs & prevents
turning even when busting off then stub nut.
Posted by: rdauenhauer Jul 30 2010, 09:37 PM
here is THE tool for unlocking the rear boot 

Posted by: charliew Jul 31 2010, 01:05 PM
A picture of you using that tool would be interesting. Do your feet reach the ground?
Posted by: larss Aug 12 2010, 02:50 AM
Handle made when fitting the rear window, one in each end, found it hard to manouvre the glass into its final position without handles.
Yes I know there are vaccum lifters but I did'nt have any... 
/Lars S
Posted by: McMark Aug 12 2010, 11:22 AM
 Love it, Lars! That's awesome.
Posted by: Jeff Bowlsby Aug 12 2010, 01:07 PM
here is THE tool for unlocking the rear boot
This looks interesting Rich. How does it fit through the targa latch cup hole when its so long? Can you post a photo of how it works to unlock the latch?
Posted by: Richard Casto Aug 12 2010, 01:13 PM
Love it, Lars! That's awesome.The simplicity of the duct tape handle is perfect.
Posted by: Phoenix-MN Aug 12 2010, 06:23 PM
Let's kick it up a notch This isn't 914 specific but it can be used with any Porsche. I always wanted a set of scales for corner balancing but couldn't quite justify ~$1500,00 to buy a set. So I set out last winter to design and build a set. Using Ax-Man surplus store parts and Digikey I came up with this They're not "gnats-ass" perfect but will do the job. Total investment was about $275.00.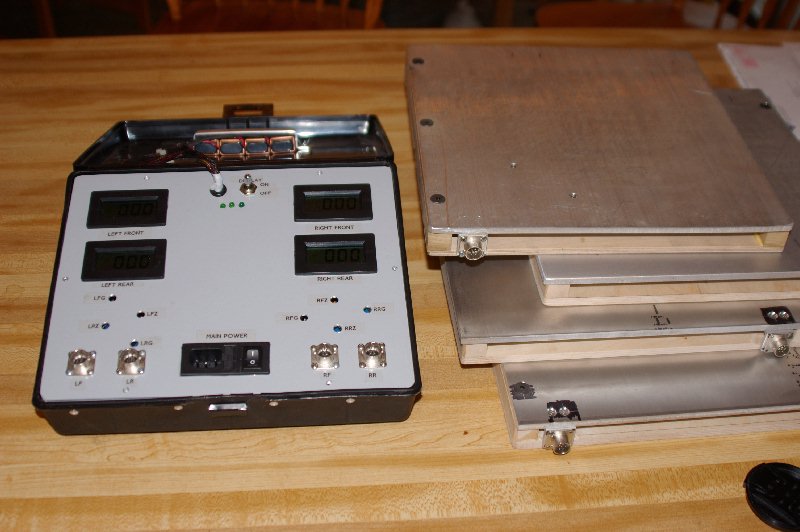
Posted by: charliew Aug 13 2010, 05:27 PM
That is neat but it would take me three days to build the electronics box and three more to make the scales. I think I bought a thousand lb shipping scale on ebay for 49.95 + shipping. Couldn't I just use four of those?
Posted by: Bartlett 914 Aug 13 2010, 05:33 PM
That is neat but it would take me three days to build the electronics box and three more to make the scales. I think I bought a thousand lb shipping scale on ebay for 49.95 + shipping. Couldn't I just use four of those?
Yes ....But not nearly as cool!
Posted by: charliew Aug 13 2010, 05:34 PM
here is THE tool for unlocking the rear boot
This looks interesting Rich. How does it fit through the targa latch cup hole when its so long? Can you post a photo of how it works to unlock the latch?
That was the first kaizan I did to my 75 when I saw it had a electric solenoid. It now has a ss wire hanging down under the floor with a loop in it.
Posted by: Phoenix-MN Aug 14 2010, 02:31 PM
That is neat but it would take me three days to build the electronics box and three more to make the scales. I think I bought a thousand lb shipping scale on ebay for 49.95 + shipping. Couldn't I just use four of those?
Yes, that would work also but I enjoy a good engineering problem. Designing and building stuff is therapy to me. Besides 4 industial scales would probably take up more storage space and when and if my scales break I will know how to fix them.
Now for some other therapy
Paul
Posted by: qa1142 Aug 14 2010, 02:40 PM
That is neat but it would take me three days to build the electronics box and three more to make the scales. I think I bought a thousand lb shipping scale on ebay for 49.95 + shipping. Couldn't I just use four of those?
Yes, that would work also but I enjoy a good engineering problem. Designing and building stuff is therapy to me. Besides 4 industial scales would probably take up more storage space and when and if my scales break I will know how to fix them.
Now for some other therapy
Paul
I could be first inline - you could add them to member vendor section say $300 for a set
Posted by: rick 918-S Aug 14 2010, 02:42 PM
That is neat but it would take me three days to build the electronics box and three more to make the scales. I think I bought a thousand lb shipping scale on ebay for 49.95 + shipping. Couldn't I just use four of those?
Yes ....But not nearly as cool!

Posted by: rudedude Aug 14 2010, 03:00 PM
I'd even pay you something for your time 
Posted by: qa1142 Aug 14 2010, 03:06 PM
that is the $25
I would even add a paypal fee
Posted by: charliew Aug 14 2010, 03:09 PM
I would think 300.00-500.00 might cover the labor
Posted by: Phoenix-MN Aug 14 2010, 05:15 PM
I would think 300.00-500.00 might cover the labor
That would be the low side
 There's a reason off the shelf systems cost what they do
Posted by: qa1142 Aug 14 2010, 05:22 PM
I would think 300.00-500.00 might cover the labor
That would be the low side
There's a reason off the shelf systems cost what they do But we are saving you thousands on therapy

Posted by: sixnotfour Aug 28 2010, 05:56 PM
Towing aid without removing axles.
Attached thumbnail(s)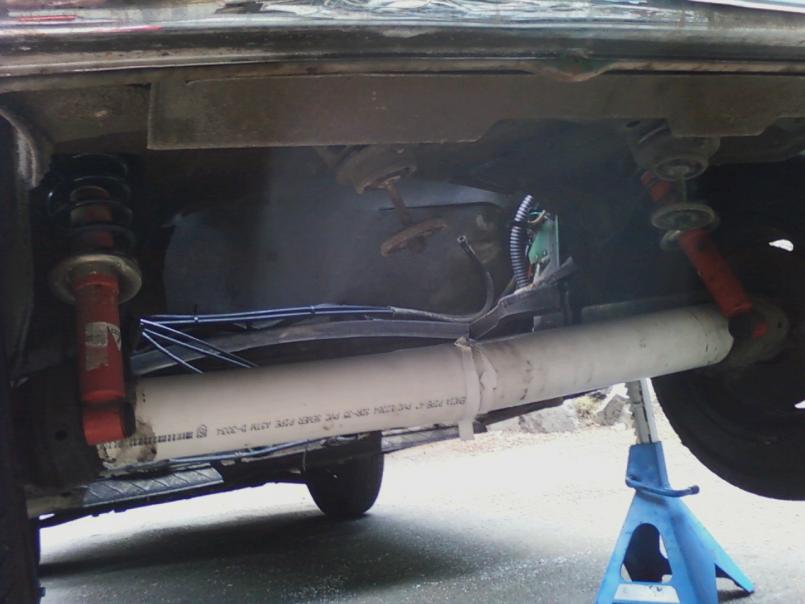
Posted by: Dr Evil Aug 28 2010, 07:03 PM
That looks dangerous
Posted by: John Aug 28 2010, 09:06 PM
First pic shows:
914 Rotisserie
Engine stand
My really really deep socket for torquing the nut on the mainshaft of a 915 trans.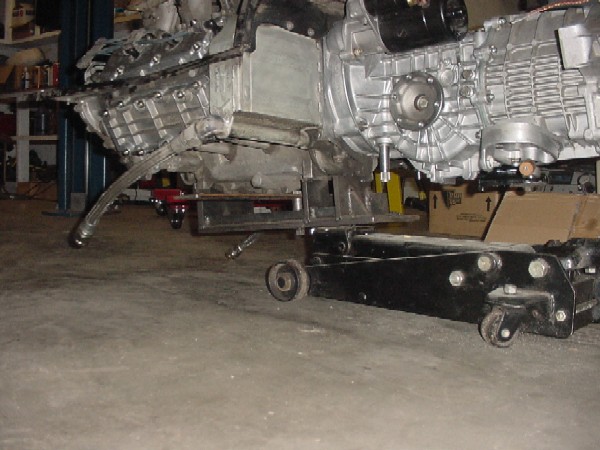
Second pic shows:
My engine support to fit my jack.
When the jack dies, I grind off the receiver pin and weld a new one to accept the new jack..... The engine and transmission are stable on this. I can also remove the trans and it remains stable enough to remove the flywheel without fear of it tipping or rolling over.
Posted by: rick 918-S Sep 21 2010, 10:43 PM
I had a very rusty caliper I made this clamp with a hole through it for a grease gun
Attached image(s)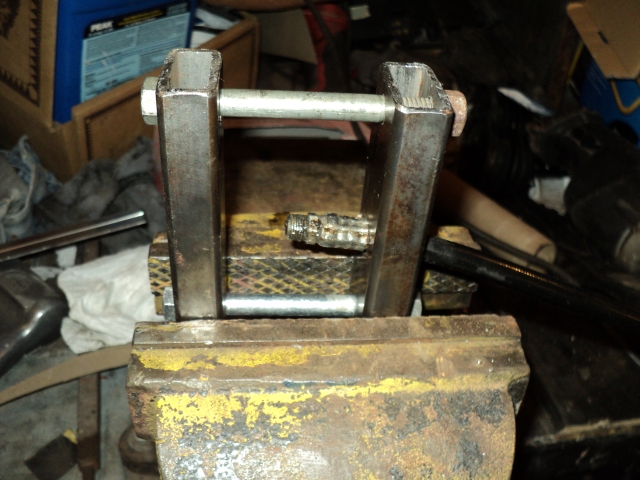
Posted by: rick 918-S Sep 21 2010, 10:44 PM
Attached image(s)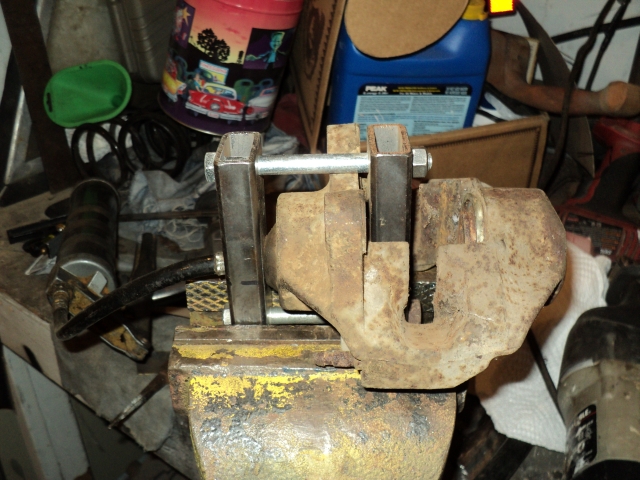
Posted by: rick 918-S Sep 21 2010, 10:46 PM
Posted by: rick 918-S Sep 21 2010, 10:48 PM
Attached image(s)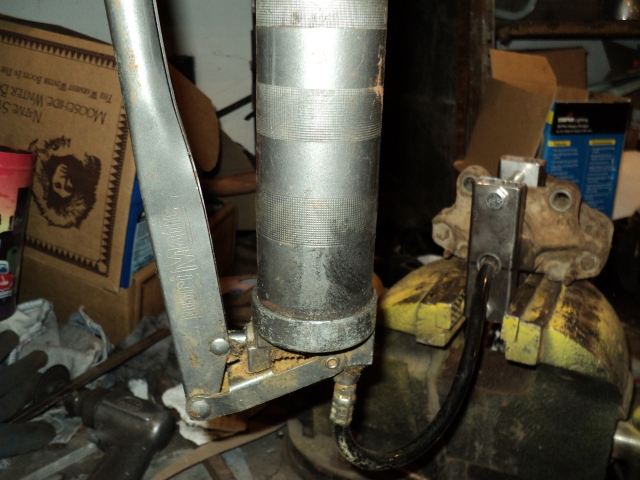
Posted by: rick 918-S Sep 21 2010, 10:49 PM
Attached image(s)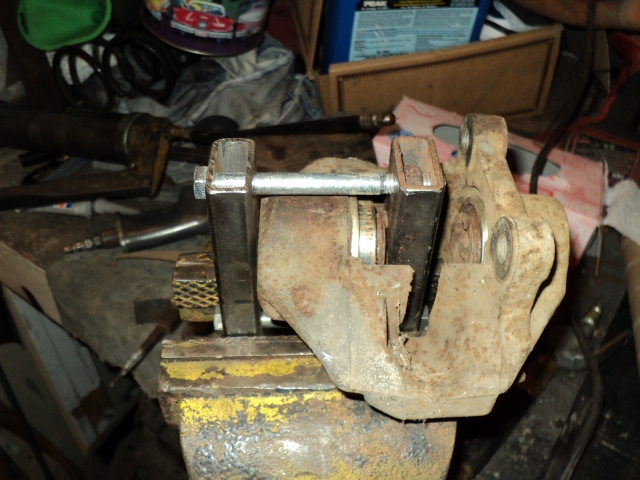
Posted by: pete Sep 22 2010, 07:05 AM
Here's a couple things:
The first is a super cheap and effective http://www.aircooledtech.com/tools-on-the-cheap/soda_blaster/
The other is just a couple http://www.aircooledtech.com/tools-on-the-cheap/spark_plug_tools/ that make changing the plugs easier
I like your soda blaster. For cleaning the carburetor you showed, how much soda did you end up using?
I made up a soda blaster last weekend and used it on my transaxle. I spent about an hour blasting. Worked great. I positioned a fairly large fan behind me to blow the soda across the back yard. Looked like it snowed LOL. 20 gal Craftsman shop compressor did the trick. 5lb bag of soda from Costco was $5. I used maybe half the bag. I noticed when I was done that the soda basically blasted off the end of the hose though.
Posted by: sean_v8_914 Sep 22 2010, 07:44 AM
home made hot jet wash cabinet. 170 deg water, 200psi spray thru 50+ jets spraying top, side and bottom
damn near eveything came out of the trash the surplus store or HD racing.
turntable can hold 1000 lbs, spins 10 rpm, chain driven, gear reduction motor. the chain was the most expensive part bought from mc master carr about $50 for the cogs and chain. motor drive w reduction $10 K-surplus
pump was thrown away from Croc center community pool filter that failed (they thought) I re-bushed it and re-packed the shaft gland, added pump cooling line(HD racing $5)
relays were from the trash outside the recycling center
thermal couple and time sw were on some machine at the dump...I dont know what
HD racing heater elements 2ea 220v 4000w
220v 40 amp plug was on some machine thing at the metal scap yard
220 to 110 transformer was in the back of the scap mans truck
I bought the steel cabinet in irvine. I be its 50 yrs old
Attached thumbnail(s)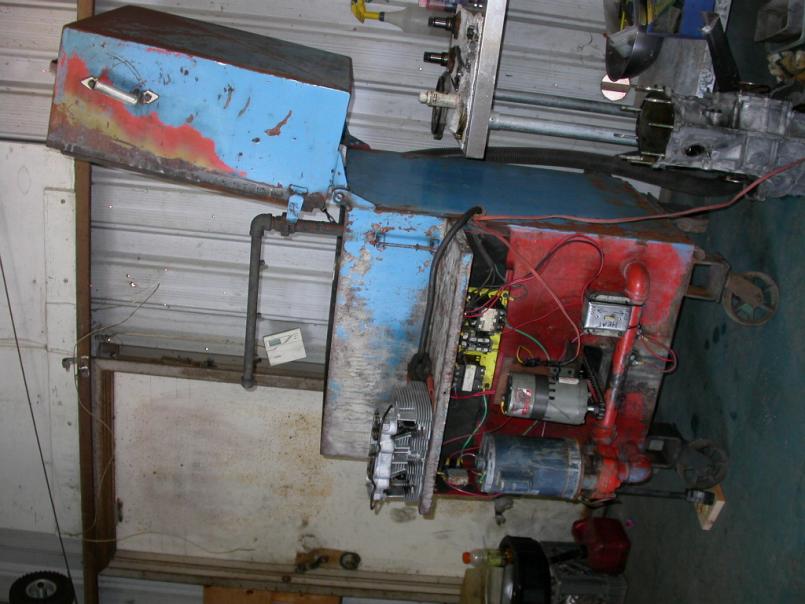
Posted by: sean_v8_914 Sep 22 2010, 07:47 AM
cut and paste trash and leftover paint and some shelves that Sue thought I should make something with
Attached thumbnail(s)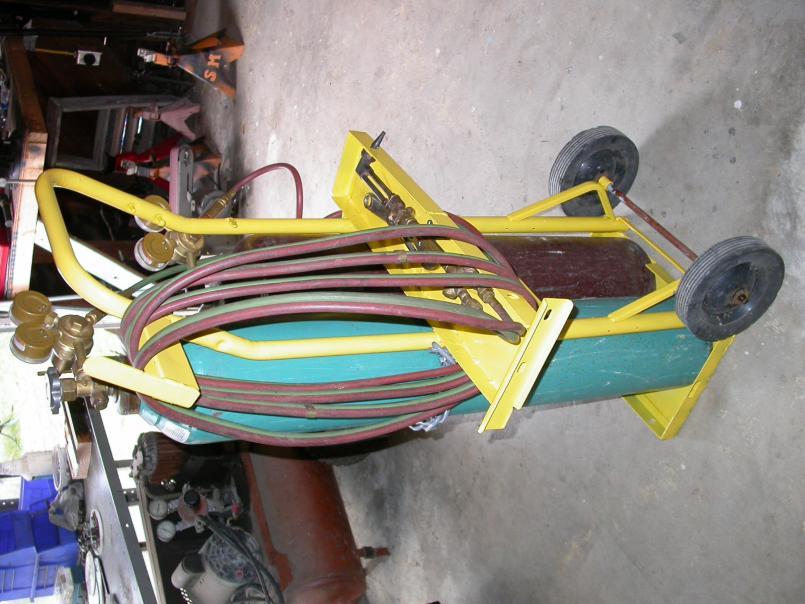
Posted by: sean_v8_914 Sep 22 2010, 07:51 AM
adjustable door bars . they slide in and out. the clamp is just to provide extra hold because the turn buckles are weak
Attached image(s)
Posted by: larss Oct 26 2010, 05:13 AM
Low profile (2") engine trolley with swing wheels. I use it for engine drop/lift with threaded bars in the front (for security and engine guidance) and a jack in the front and one jack at the rear.
/Lars S
Posted by: jimkelly Mar 3 2011, 09:15 PM
just making sure someone else's genious is included here.
http://www.914world.com/bbs2/index.php?showtopic=116303
jim
Attached image(s)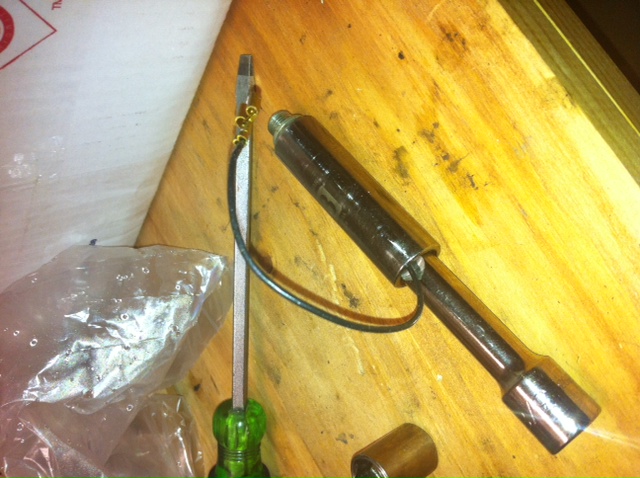
Posted by: URY914 Mar 3 2011, 09:24 PM
I made this slide hammer to drive out rear bearings. 
Posted by: Hontec Mar 4 2011, 11:11 AM
Does this contraption qualify as a home made tool for the 914? 
Posted by: ppetion Mar 4 2011, 11:18 AM
Does this contraption qualify as a home made tool for the 914?
I think that this contraption shows that you are in the making of a 914 manufaturing plant.. you are getting close... let the world know if you need extra help.
Nice piece of equipment
Posted by: majkos Mar 4 2011, 11:20 AM
sorry, Hontec, you'are way overqualify
and your "Home made" contraption was built by over100 engineers
working all together at once.
Hell yes! this count!
Can I borrow it when you're done? 
Posted by: Jeffs9146 Mar 4 2011, 11:35 AM
OK, We like credit!!
http://www.914world.com/bbs2/index.php?showtopic=114707&st=0 Its in post #19!
I think Brad or Andy told me that one back in the begining 2003 or 2004 before World at that other place!!
just making sure someone else's genious is included here.
http://www.914world.com/bbs2/index.php?showtopic=116303
jim
Posted by: smontanaro Mar 4 2011, 12:48 PM
Does this contraption qualify as a home made tool for the 914?
What is it, a homemade Celette+914 fixtures?
S
Posted by: Hontec Mar 4 2011, 01:37 PM
Does this contraption qualify as a home made tool for the 914?
What is it, a homemade Celette+914 fixtures?
S
jep, that's it....
Posted by: rick 918-S Mar 6 2011, 10:31 AM
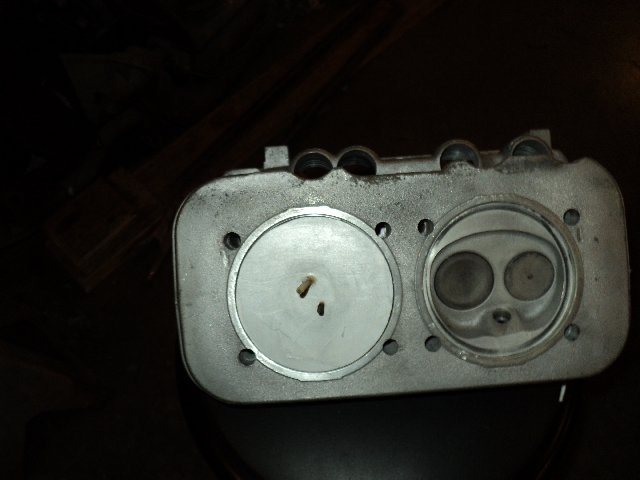
I had the chevy guys install new valve guides in this set of otherwise perfect 2.0 heads. Let's face it. Any shop that has ever worked on a set of aluminum heads which are very common now can preform basic head work. Some shops charge more for the mystery of machine work.
They couldn't fly cut them though. They didn't have the machine for it. Hey their chevy guys and know their limit. I looked closely at these heads and it appeared they were more stained than had any real issue that would require machine work.
So I thought about it for a while and decided to try to dress these myself. I took a piece of melamine and cut out a circle. The stuff is very flat. 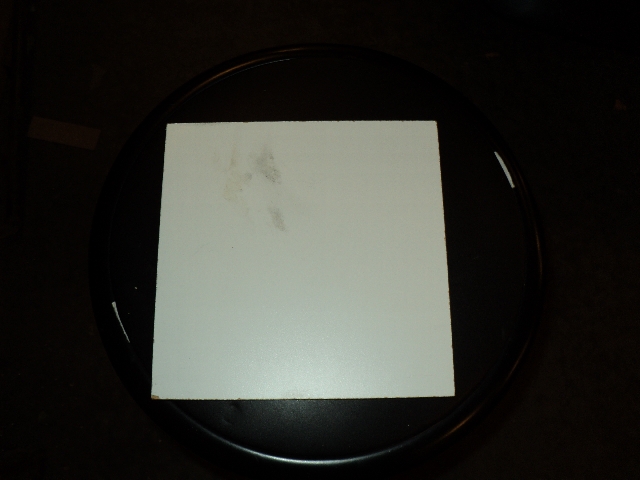
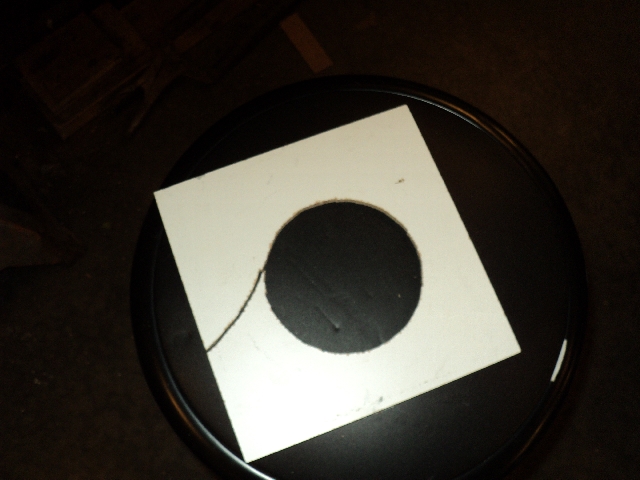
Posted by: rick 918-S Mar 6 2011, 10:37 AM
I ran a couple of screws through it to use as a twisting handle. I used 240 grit sand paper.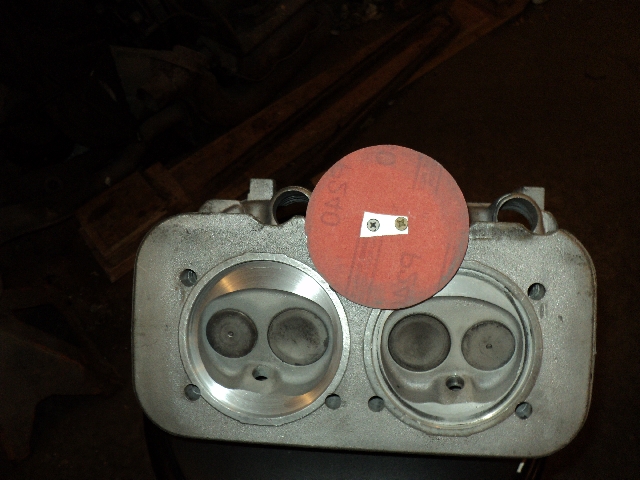
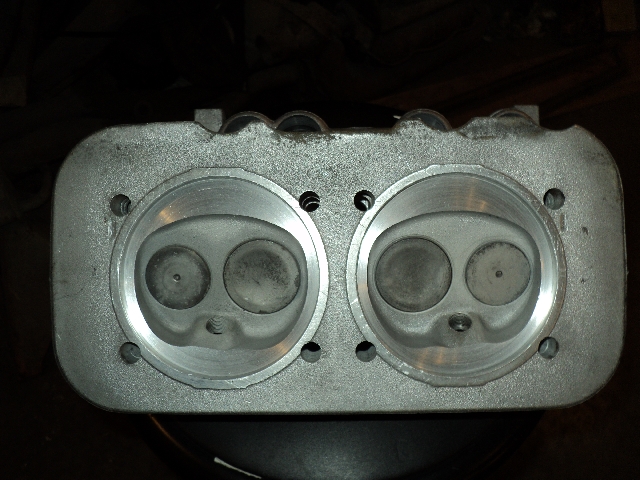
Posted by: rick 918-S Mar 6 2011, 10:41 AM
This is after a few minutes of work. I used a twisting motion holding pressure on the disc. Seriously, it took me longer to resize the photos and make this post than to dress this head. This most likely isn't Jake and Len approved but I knew there was no good reason to cut a bunch of material off these heads. 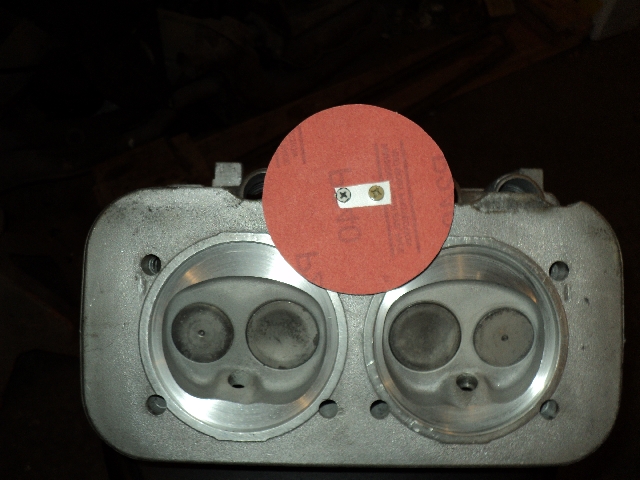
Posted by: URY914 Mar 6 2011, 05:25 PM
Nice job, Rick.
Posted by: Andyrew Mar 6 2011, 05:41 PM
Thats pretty trick Rick!
Posted by: recko911 Mar 6 2011, 10:31 PM
I am having trouble installing the rollers for the torsion bars for the rear deck lid. I've seen the pelican parts article but does anybody have picture of the tool to make installation easier.
Posted by: rick 918-S Mar 6 2011, 10:39 PM
I am having trouble installing the rollers for the torsion bars for the rear deck lid. I've seen the pelican parts article but does anybody have picture of the tool to make installation easier.
I made one. I have it here someplace. It was kind of a sideways pickle fork thing. But really a box end wrench works. I've used a vise grip too.
Posted by: recko911 Mar 6 2011, 10:43 PM
I am having trouble installing the rollers for the torsion bars for the rear deck lid. I've seen the pelican parts article but does anybody have picture of the tool to make installation easier.
I made one. I have it here someplace. It was kind of a sideways pickle fork thing. But really a box end wrench works. I've used a vise grip too.
A pic would be great
Which side do you install first I've had lots of trouble
Posted by: rick 918-S Mar 6 2011, 11:01 PM
I am having trouble installing the rollers for the torsion bars for the rear deck lid. I've seen the pelican parts article but does anybody have picture of the tool to make installation easier.
I made one. I have it here someplace. It was kind of a sideways pickle fork thing. But really a box end wrench works. I've used a vise grip too.
A pic would be great
Which side do you install first I've had lots of trouble
I'll see if I can find the tool tomorrow. It shouldn't make any difference which side you do first. All you have to do is flex the spring enough to slide the roller past the spring rod.
Posted by: euro911 Mar 6 2011, 11:57 PM
A lot of great tools you guys have come up with! I'm gonna build some of them
Here's a 911 engine run stand I built back in the 70's. Bus transaxle bell housing and a hefty V-8 stand (as others here have also done)
... and another run stand I started building a few years ago ... and still need to finish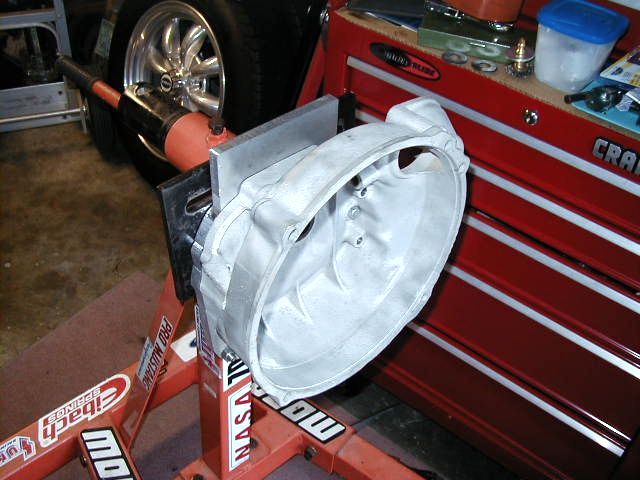
Posted by: Bartlett 914 Aug 26 2011, 03:10 PM
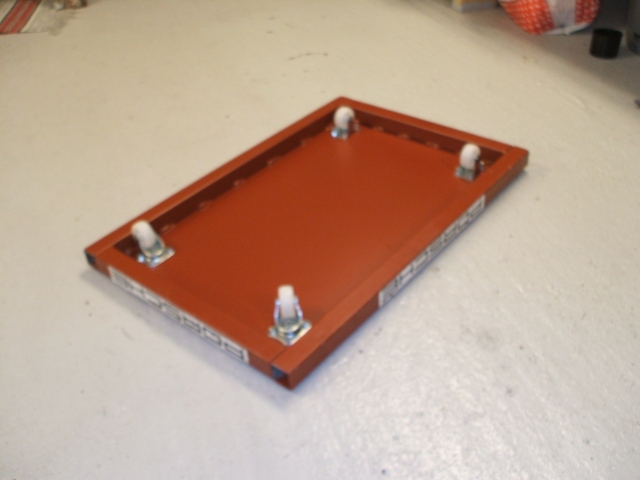
Here is my latest addition to my tool stash. Camber measurement tool.
Attached image(s)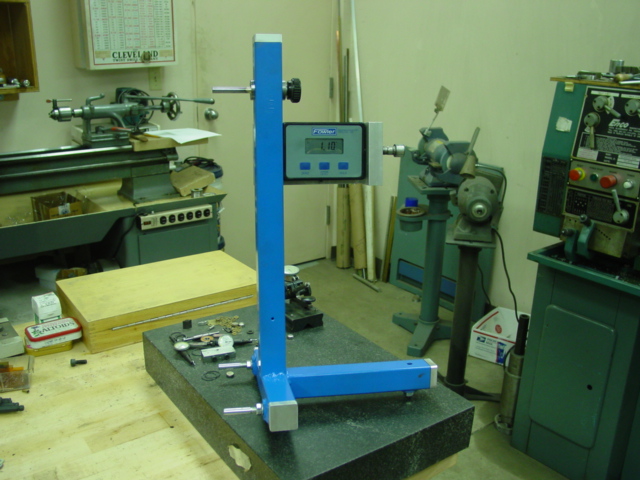
Posted by: Andyrew Aug 26 2011, 05:15 PM
That doesnt look very home made...
Posted by: Bartlett 914 Aug 26 2011, 06:08 PM
That doesnt look very home made...
Thanks!
Posted by: Elliot Cannon Aug 27 2011, 04:49 PM
This one is home made, just not for the car. I got tired of falling on my old medicare ass pulling the airplane out of the hangar. Powered tugs are $2000 to $6000, so I made this one for $250. I bought a 12 volt hoist from Shanghai Tool Supply, (Harbor Freight) removed the cable and cable drum, welded on a sprocket. Bought the wheel, tire and hardware and welded it out of 1 inch square tubing. It moved the car OK but I haven't actually tried it with the plane yet. Hope the damn thing works.
Cheers, Elliot
Attached image(s)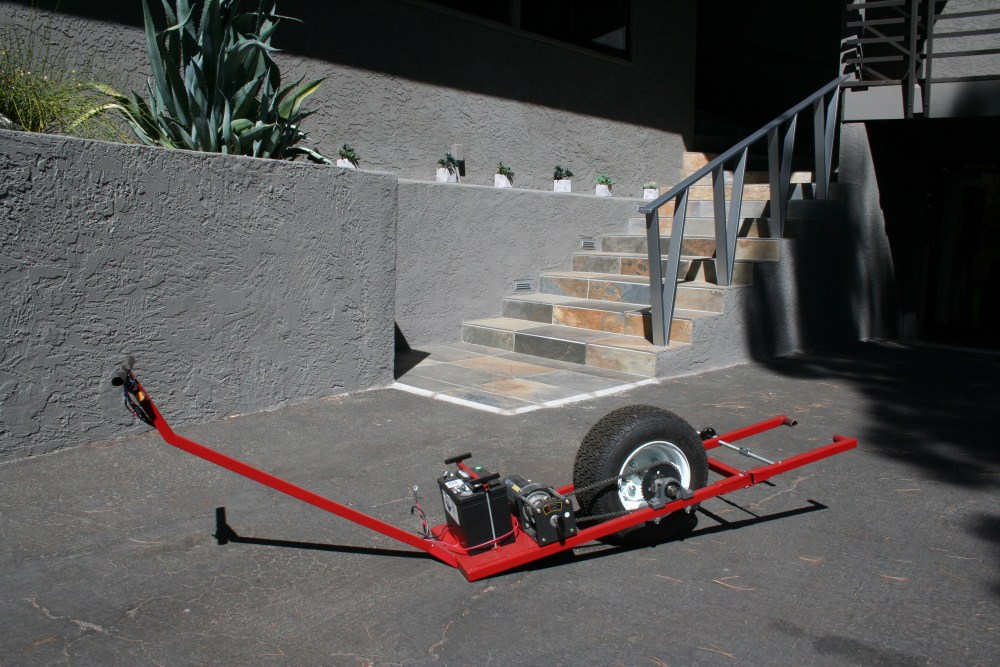
Posted by: Andyrew Aug 27 2011, 05:25 PM
Thats pretty darn cool!!
Posted by: sixnotfour Aug 27 2011, 09:17 PM
Upon completion of a job well done--- Here is an essential tool------The Jug Mug
Attached image(s)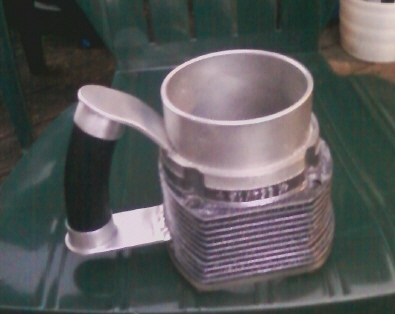
Posted by: rnellums Aug 28 2011, 10:11 AM
Upon completion of a job well done--- Here is an essential tool------The Jug Mug
That thing is sick!
Posted by: McMark Aug 28 2011, 11:20 AM
Exhaust 'leakdown' tester. I grabbed a Jim-Cap from the hardware store, drilled and tapped a piece of scrap metal, and threaded in the air connector. You have to pull the rockers so all valves are closed, but you can really lock down any exhaust leaks with this setup.
BTW, this pic is a 912E which has our same Type4 engine.
Attached image(s)
Posted by: 76-914 Aug 28 2011, 11:35 AM
Exhaust 'leakdown' tester. I grabbed a Jim-Cap from the hardware store, drilled and tapped a piece of scrap metal, and threaded in the air connector. You have to pull the rockers so all valves are closed, but you can really lock down any exhaust leaks with this setup.
BTW, this pic is a 912E which has our same Type4 engine.
Cool. BTW, they're Gem Caps.
Posted by: kconway Aug 28 2011, 11:44 AM
Upon completion of a job well done--- Here is an essential tool------The Jug Mug
This one is badass! Let me know if this ever goes into production mode!
Posted by: kconway Aug 28 2011, 11:44 AM
Upon completion of a job well done--- Here is an essential tool------The Jug Mug
This one is badass! Let me know if this ever goes into production mode!
I like it so much I guess I had to say it twice?
Wonder if it's my provider or is the site a little slow on the replies?
Posted by: TargaToy Aug 28 2011, 02:11 PM
Two-way feeler gauge for adjusting both intake or exhaust valves simultaneously on a 16V Honda V4 motorcycle.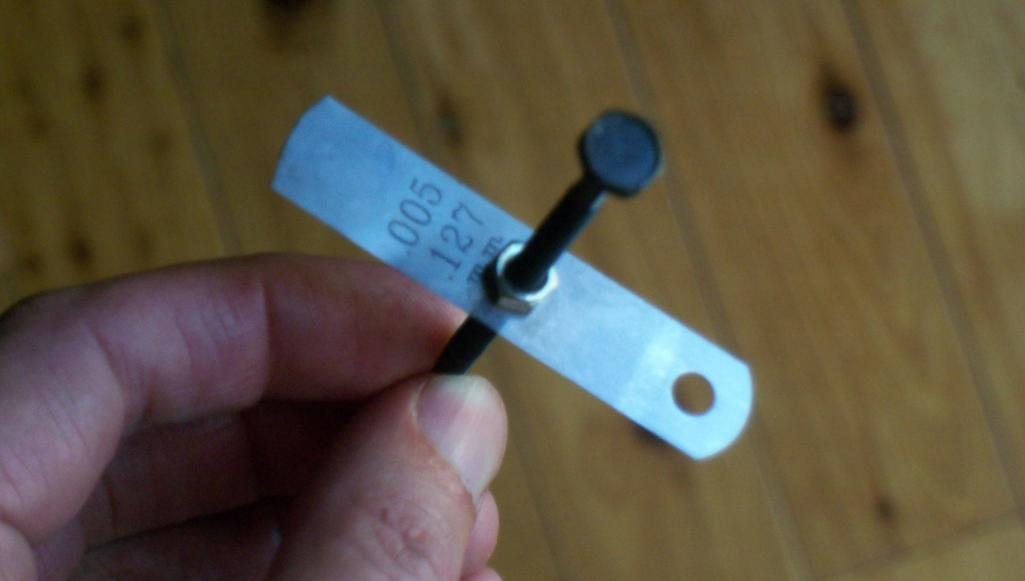
Posted by: Jeffs9146 Oct 4 2011, 08:31 PM
Had to make a new tool today!!
My accelerator cable was sticking at about 7" into the back of the tube and I couldn't get the new cable through. After 10-15 different attempts to unblock the tube with stuff welded onto cables I came up with this!
It took about 30 seconds and now the cable slides in!! 
Here is one of the early attempts and the final version!
Attached thumbnail(s)
Posted by: gms Oct 7 2011, 05:01 PM
I had to remove some 66mm wheel studs so i could install 100mm studs.
the hex head screw pushed the stud out of the back of the hub with out removing the hub! I had to keep welding more reinforcement because it was bending.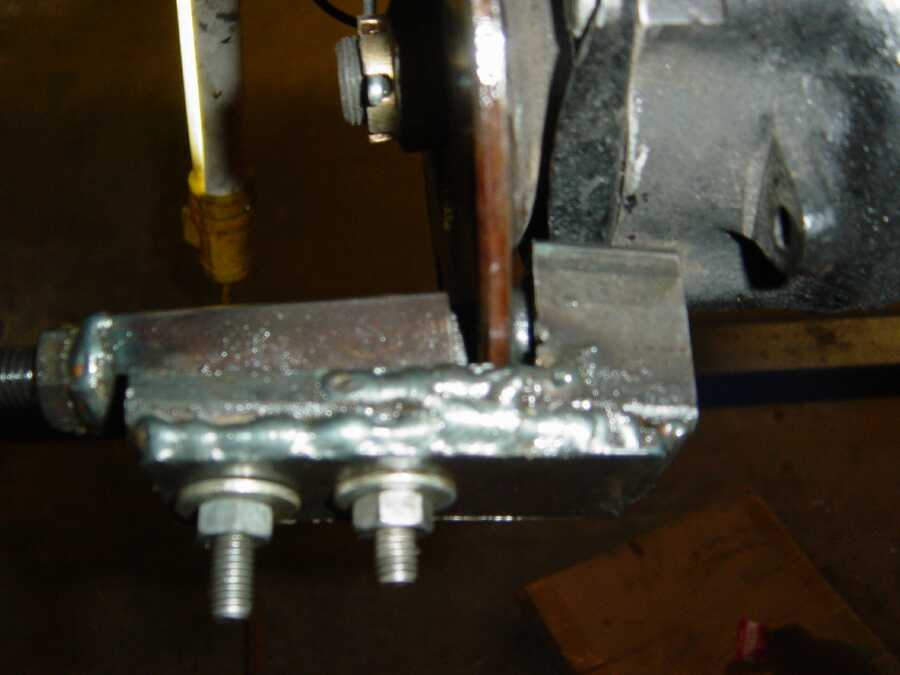
and the new 100mm stud installed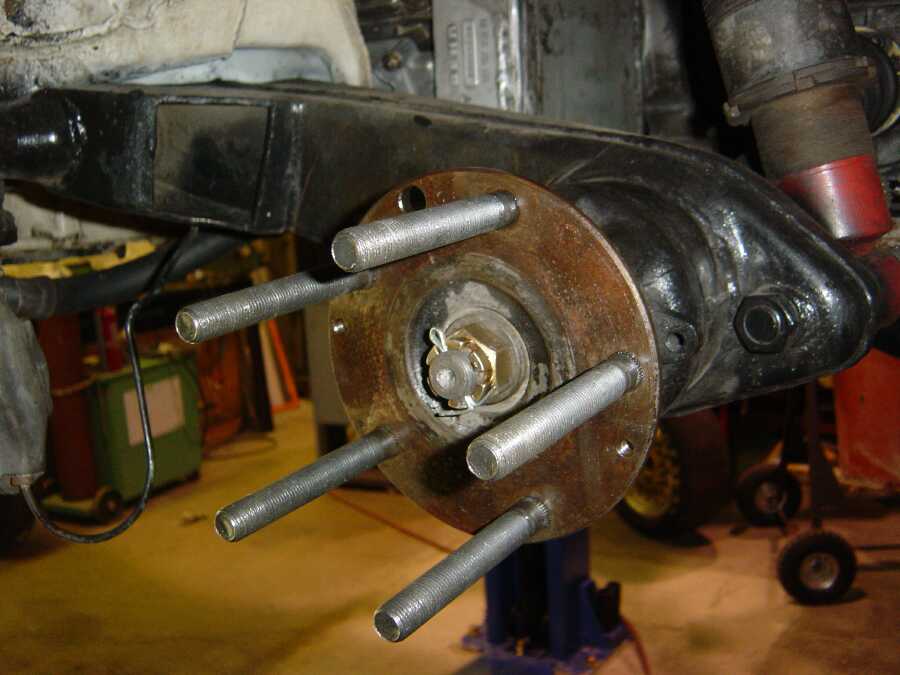
Posted by: bigkensteele Oct 7 2011, 10:08 PM
I did steel railing on my deck, and this was a scrap piece, but it worked perfectly for removing CV bolts and stub axle nuts. I happened to have this as scrap, but a similar tool could be made plate or steel bar. Hell, a broom handle might work.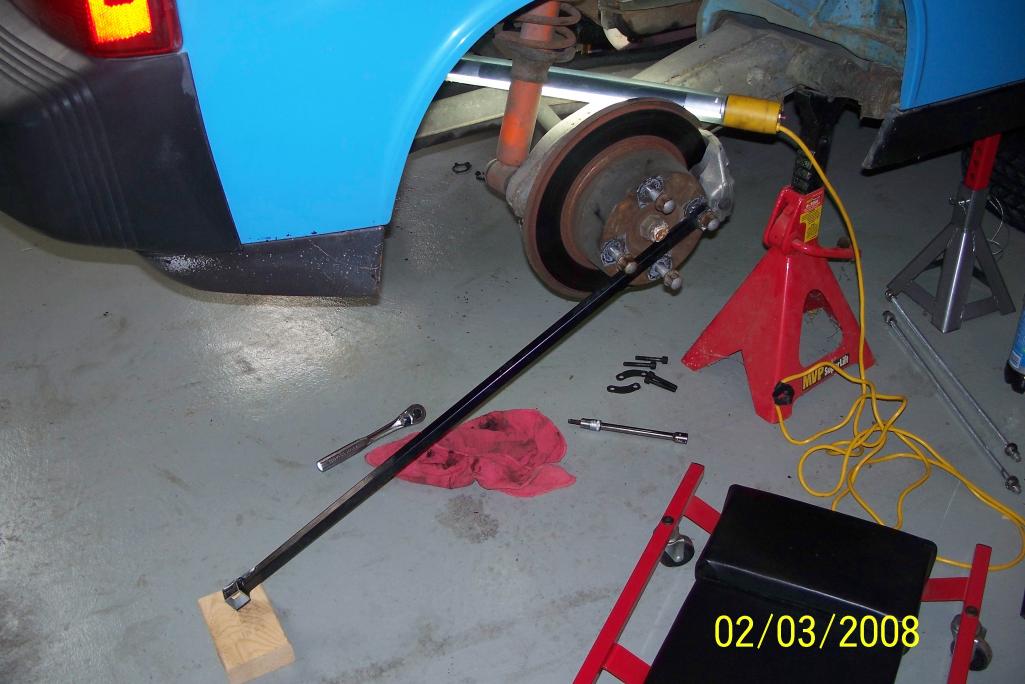
Posted by: carr914 Oct 8 2011, 04:49 AM
I had to remove some 66mm wheel studs so i could install 100mm studs.
the hex head screw pushed the stud out of the back of the hub with out removing the hub! I had to keep welding more reinforcement because it was bending.
and the new 100mm stud installed
Glenn, you want to rent that out?
T.C.
Posted by: gms Oct 8 2011, 03:27 PM
T. C.
It is all yours, just shoot me your address.
it is not pretty but it worked... however the 20 page users manual is $68.99 
Posted by: majkos Oct 8 2011, 05:43 PM
T. C.
It is all yours, just shoot me your address.
it is not pretty but it worked... however the 20 page users manual is $68.99
In German
Posted by: rdauenhauer Jan 13 2012, 01:47 PM
I was doing some work in the Garage last night
Fabbed up a couple of tools: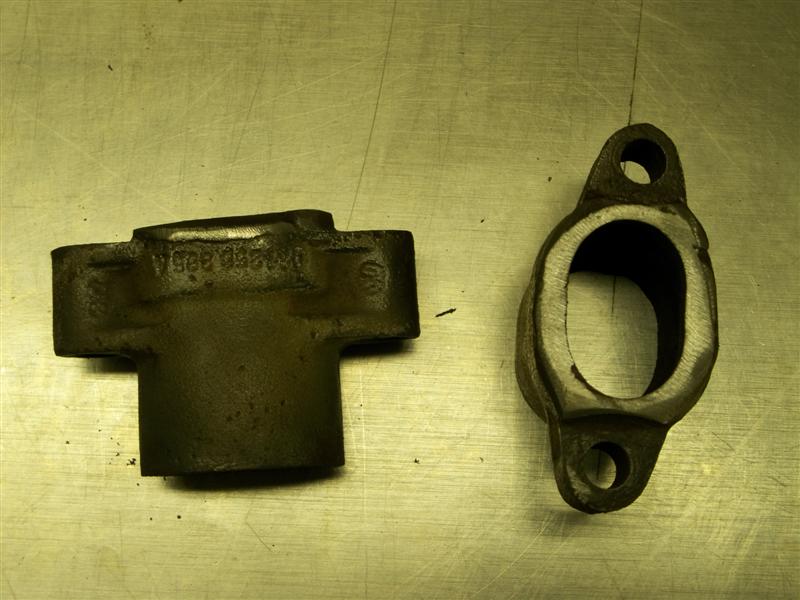
Posted by: ClayPerrine Jan 13 2012, 02:16 PM
I am having trouble installing the rollers for the torsion bars for the rear deck lid. I've seen the pelican parts article but does anybody have picture of the tool to make installation easier.
There is a classic thread on that very subject....
http://www.914world.com/bbs2/index.php?showtopic=39320&hl=torsion+bar
The wrench idea is credited to Wes Hildreth at H&H in Plano Texas.
Posted by: rdauenhauer Mar 1 2012, 11:07 PM
Attached thumbnail(s)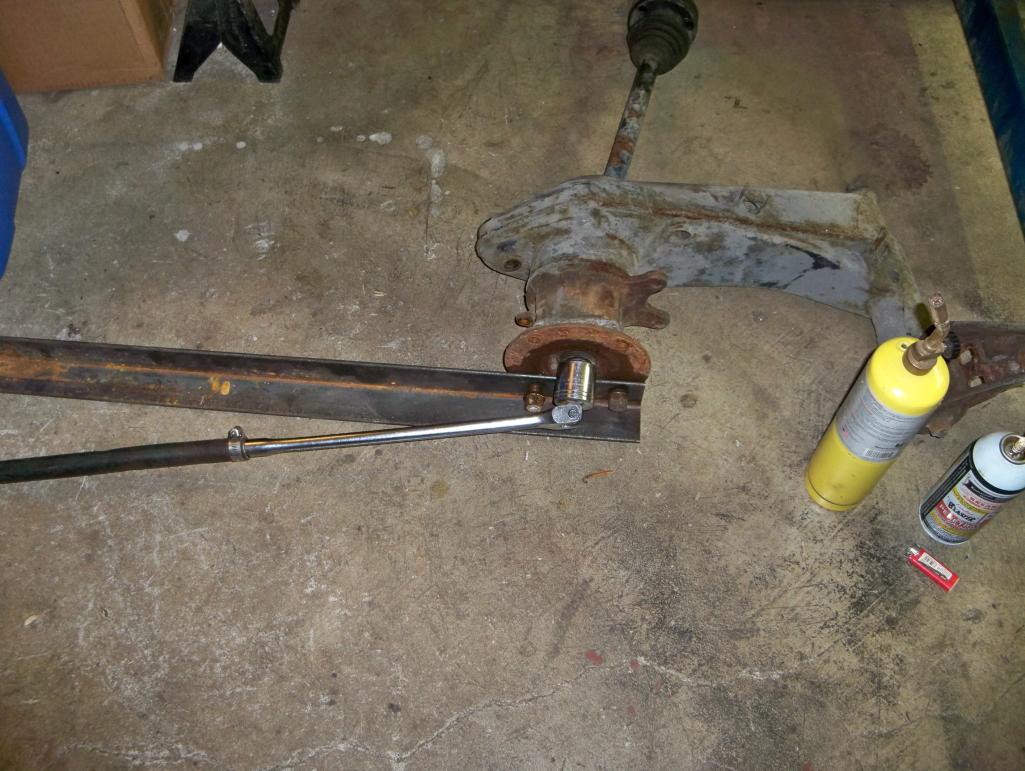
Posted by: rdauenhauer Mar 1 2012, 11:08 PM
Like Butta...
Posted by: ThePaintedMan Mar 2 2012, 07:11 AM
Upon completion of a job well done--- Here is an essential tool------The Jug Mug
That thing is cool as hell!
Posted by: carr914 Mar 2 2012, 10:41 AM
T. C.
It is all yours, just shoot me your address.
it is not pretty but it worked... however the 20 page users manual is $68.99
Glenn, I'm still gonna need to borrow that, I just forgot
T.C.
Posted by: gms Mar 2 2012, 11:10 AM
T. C.
It is all yours, just shoot me your address.
it is not pretty but it worked... however the 20 page users manual is $68.99
Glenn, I'm still gonna need to borrow that, I just forgot
T.C.
Sorry I forgot about that, just email your address and I will get it out to you
Posted by: Mr.242 Mar 2 2012, 02:00 PM
Upon completion of a job well done--- Here is an essential tool------The Jug Mug
Oh my...imagine that mug coming out of a freezer and an ice cold beer!
Oh yea....HEAVEN.
Posted by: carr914 Mar 2 2012, 03:06 PM
Your tongue would stick to it like Victor Christmas in "Dumb and Dumber"
Posted by: SLITS Mar 2 2012, 06:09 PM
Someone asked ....... Torsion Bar Tool

Posted by: sixnotfour Mar 2 2012, 06:10 PM
:lol4:Your tongue would stick to it like Victor Christmas in "Dumb and Dumber"
Attached image(s)
Posted by: clow Apr 9 2012, 06:07 PM
Here is my homemade tube notcher. There is a piece of shafting with a linear rail bearing. I am not sure how it will hold up to the rotation so time will tell. Just so happens the vice centers my 1.5" tubing to the hole saw perfectly. The hole saw is replaceable of course.
Bolts down to the table and the vice is slotted so I can get it on any angle. 
Posted by: Valy Apr 16 2012, 07:42 PM
Case Splitter:
I had a hard time splitting cases. First one was a PITA and the second one just didn't want to part. I was about to order an oil pump case splitter but didn't want to wait to get it.
Inspired from the classic VW oil pump case splitter, I made a short trip to Home Depot an got:
1. One 2 1/2 PVC pipe coupler
2. 3/8x2" bolt
3. 3/8 nut
4. Washer
5. 3/8x1" spacer
Total $3.50
I cut a 1 1/2" slice of the PVC part and then cut a slit into it.
Installed it and voila!
Works like a charm!!
Posted by: euro911 Apr 16 2012, 08:04 PM
Nice ... 
Posted by: Andyrew Apr 16 2012, 08:48 PM
Here is my homemade tube notcher. There is a piece of shafting with a linear rail bearing. I am not sure how it will hold up to the rotation so time will tell. Just so happens the vice centers my 1.5" tubing to the hole saw perfectly. The hole saw is replaceable of course.
Bolts down to the table and the vice is slotted so I can get it on any angle.
Sure look like it'll do a great job on that cardboard roll!
Posted by: Valy Apr 16 2012, 09:02 PM
I hate to admit it but I just spent $2.50 too much.
The shortest bolt with nut that holds the case and a small socket are a perfect substitute for the hardware. You'll just need the PVC pipe coupler.
Case Splitter:
I had a hard time splitting cases. First one was a PITA and the second one just didn't want to part. I was about to order an oil pump case splitter but didn't want to wait to get it.
Inspired from the classic VW oil pump case splitter, I made a short trip to Home Depot an got:
1. One 2 1/2 PVC pipe coupler
2. 3/8x2" bolt
3. 3/8 nut
4. Washer
5. 3/8x1" spacer
Total $3.50
I cut a 1 1/2" slice of the PVC part and then cut a slit into it.
Installed it and voila!
Works like a charm!!
Posted by: stewteral Apr 16 2012, 09:51 PM
Let's kick it up a notch This isn't 914 specific but it can be used with any Porsche. I always wanted a set of scales for corner balancing but couldn't quite justify ~$1500,00 to buy a set. So I set out last winter to design and build a set. Using Ax-Man surplus store parts and Digikey I came up with this
They're not "gnats-ass" perfect but will do the job. Total investment was about $275.00.Hey Paul,
I'm running my 914 V8 at open track events and have been adjusting corner-weight with a big lever arm and a bathroom scale. It's a bunch of work and accuracy is uncertain.
So I'm over the moon about your 4-scale system. Can you share what all is involved in reproducing what you have? I'm guessing you're an E.E. and have designed this yourself. Any chance you have a schematic & Parts list?
Thanks,
Terry
Posted by: ape914 Apr 17 2012, 10:11 AM
a foot long screw driver with the last inch of the tip bent at a 30 degree angle makes a great valve cover remover tool.
Posted by: arkitect Apr 17 2012, 11:30 AM
This thread would not be complete without FourBlade's RockingChair Rotisserie
T.C.
I like this rocking chair idea for working on the bottom side of the car. I wanted to make one out of steel, but it would be big cost. This is probably only a one or two time use before the weather starts taking it apart.
Dave
Posted by: arkitect Apr 17 2012, 11:36 AM
Don't know what happened to the attached picture. 
Posted by: Valy May 15 2012, 02:44 PM
El cheapo torque wrench calibration method
I fixed the wrench head in a vice so it can rotate up-down. Set the wrench at an angle parallel to the floor. Then I stepped on my old mechanical bathroom scale holding the wrench handle exactly 1 foot from its head (this is to offset the weight of the wrench). Note the reading on the scale.
Now I pushed down on the handle until it clicked and subtracted my new weight from the previous reading. This is the torque in foot*lb that the wrench is set to.
All I had to do is adjust the scale to that value and test again at different values.
BTW, I anticipate that some will claim the bathroom scale precision is sh**t. That's partially true since the total reading might be wrong but the delta between the two readings is pretty accurate.
Posted by: gothspeed Sep 30 2012, 10:03 AM
After buying bulk 3/8" stainless fuel line from Jegs and not knowing how much work it would be ...... I bought a double flare tool to create a 'bubble' on the ends of the lines ........ that did not work, apparently the stainless was too rigid as it was just getting squashed and slid through the clamp with no resultant bubble .....
Knowing eventually I wanted to go with fuel injection, I needed to have some sort of 'bead' on the lines for the higher pressure. I looked online and found bead rollers ......... but none sold locally and I was in the midst of doing this job and did not want to stop until I was completed ....... after seeing the bead roller pics online, I thought I'd try making one ....... I went to the local hardware store and got a 5/16" bolt ..... some loose bearings, a heat treated 10-24 allen bolt and a tap ....... I put the 5/16 bolt on the lathe and drilled a hole through the head and tapped it for the allen bolt ...... selected one of the 1/8" dia. bearings and drilled a hole for it on the side of the bolt and put the bearing into the side hole .... I cut the threaded portion of the 5/16" bolt off ......... I used steel for the 5/16 bolt to prevent the 'stainless on stainless' galling possibility and of course some lube.
I then tapered the tip of the allen bolt on my sander while chucked and spinning it with a drill ....... the taper would force the bearing out when screwed in. The 5/16 bolt needed to be reduced in diameter a bit to fit into the fuel line ....... because when the line was cut with the tubing cutter it reduced the line diameter a bit.
Looking back now, I should have just bought some pre-made lines from the available sources ........ nonetheless I got it done and am happy with the result
Attached image(s)
Posted by: McMark Sep 30 2012, 10:11 AM
That's great thinking!
Posted by: euro911 Sep 30 2012, 12:18 PM
Very ingenious
Posted by: bulitt Sep 30 2012, 12:53 PM
Nice! If I remember correctly you can only put a single flare on stainless as it is too brittle for double.
Posted by: jimkelly Sep 8 2013, 04:36 PM
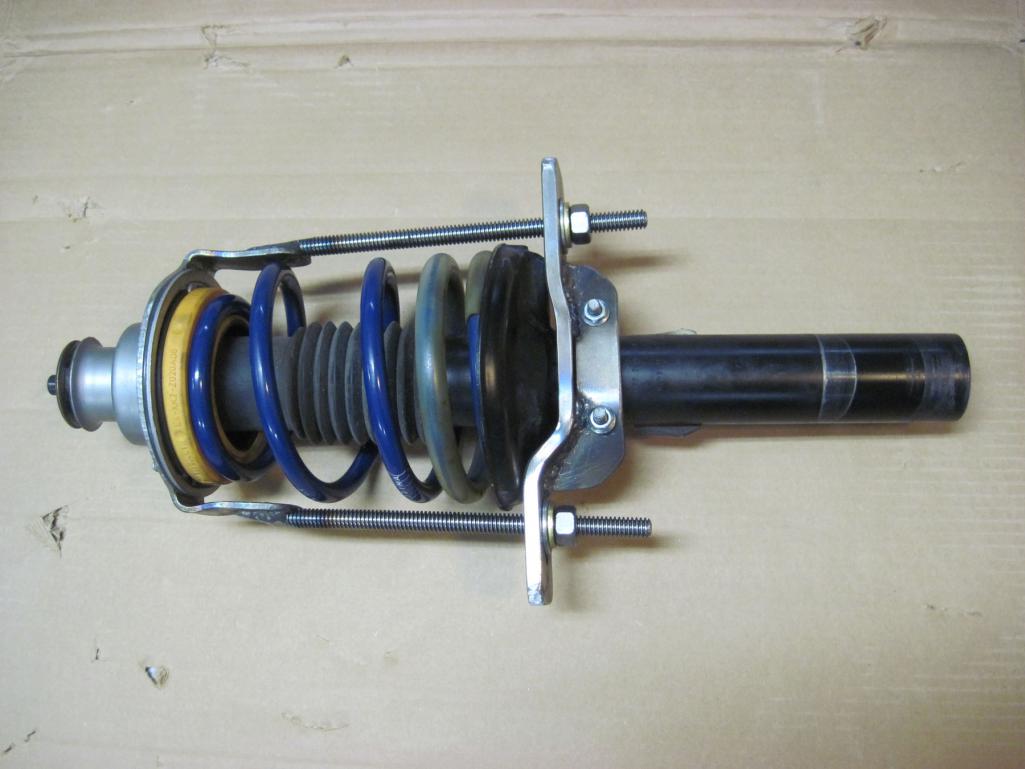
wanted to add this tool - helpful for alignments maybe?
Solid shock replacements.
http://www.914world.com/bbs2/index.php?showtopic=76791&st=500
Attached image(s)
Posted by: Jeff Hail Sep 9 2013, 08:47 AM
wanted to add this toll - helpful for alignments maybe?
Solid shock replacements.
http://www.914world.com/bbs2/index.php?showtopic=76791&st=500
Those look familiar. Not only are those dummy shocks they are also my hub/bearing pullers. Two tools in one!
Posted by: bshounen Apr 16 2014, 08:19 PM
i like what is c
Posted by: wingnut86 Aug 23 2015, 06:11 PM
I call my "Tool", THUMPER
I was using one of Dr. Evil's videos (shameless plug for the Doc), and after the 2nd trany rebuild I decided I had to have an easier tool like I spotted in one of his feeds 
"THUMPER"is just over 3' tall and just a bit wide at the business end. Too much weld had me using the torch and some files to get it to fit the 1st time - now it works PERFECT!
Posted by: forrestkhaag Oct 5 2015, 10:08 AM
While changing my sparkplugs yesterday I discovered a multi-use tool of great simplicity.
As ya'll are aware, cylinders 1 & 3 sparkplugs are slanted toward the rear of the car and sometimes make insertion of a plug difficult to get a start on when threading in.
This is usually due to carb linkage interference and/or the interference from the maze of tubes, wires, fittings, hoses, cables, and cable housing retainers (if injected).
Simply pluck the cap off of a Sharpie and push it on to your sparkplug / voilà! Just long and snug enough to not lose the plug assuring no stripped threads and easy removal of the "tool" after use.
Further: While replacing my newly turned vented rotors/hubs to the spindles (which requires removal of the caliper bolts) I used the other end of the sharpie to locate the top bolt holes and to make a tight alignment so as to allow easy location of the bottom bolt hole and threads (first) with the bolt and washer. No more thrashing around fighting the brake line resistance and weight of the caliper while searching for the receiving threads.
A spent sharpie is now in the tool pouch.......
Attached image(s)
Posted by: BillC Nov 24 2015, 04:57 PM
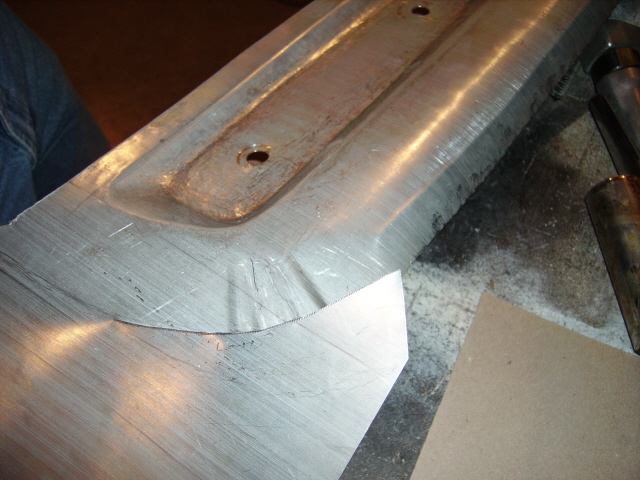
It's not a 914 tool, but it is for a mid-engine Porsche. This is the rear strut compressor I made for my old 987, which lets you remove the rear struts without disassembling virtually the entire rear suspension and having to get a full alignment afterward. Turns a nasty all-day job into a fairly easy 2-hour job.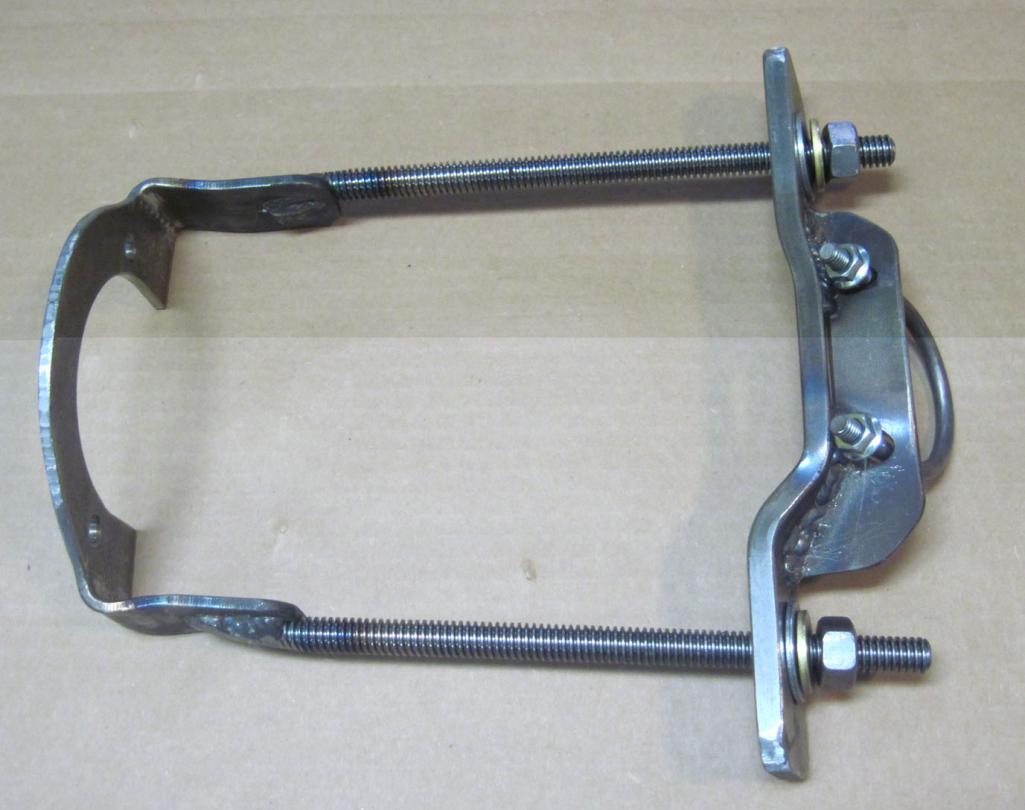
Posted by: 914werke Jan 23 2020, 08:52 PM
it been a while since this was updated 
Posted by: Mark Henry Jan 24 2020, 10:59 AM
Here's the tools I've made for building/repairing 996/7 engines.
Attached image(s)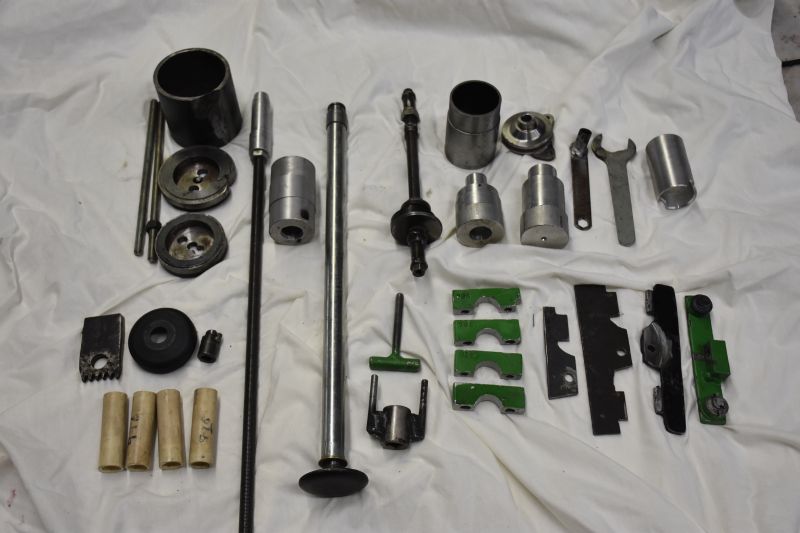
Posted by: IronHillRestorations Jan 24 2020, 03:59 PM
@http://www.914world.com/bbs2/index.php?showuser=697 Henry - dude, you are a beast! Nice work!!
Posted by: rbzymek Jan 30 2020, 03:44 PM
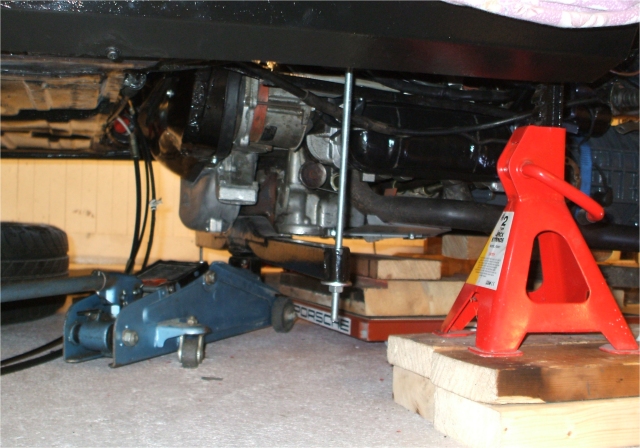
So when I did my first engine swap I thought a lot about having a very stable
method of supporting the car. The small footprint of jack stands at that height was a concern. I came up with 4 inch by 6 inch wood blocks that are 13 and 19 inches long. The blocks are interleaved at the point where they support the car. The set up is incredibly stable; the body will not budge even if you try to push it hard. If you want to make a set you will need (3) 8 foot timbers that are each cut into (3) 19 inch lengths and (3) 13 inch lengths. The folks at Home Depot are happy the make the cuts.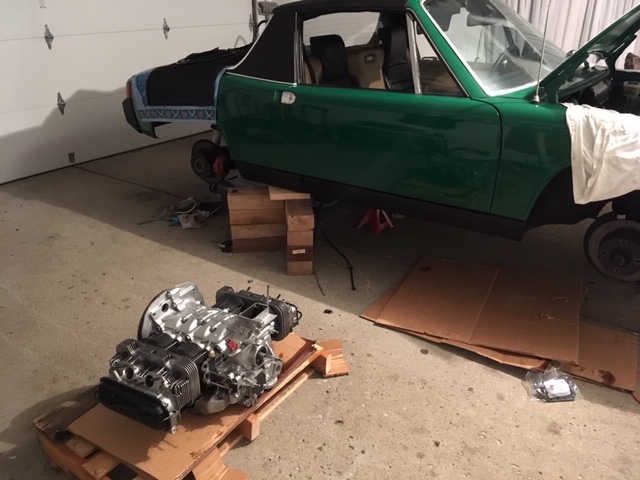
Posted by: nathanxnathan Jan 30 2020, 04:49 PM
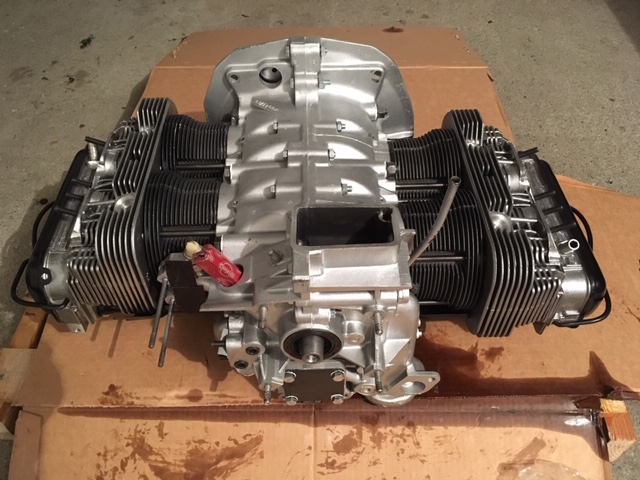
Sort of a tool, an engine stand I made for the specific purpose of being able to lift a motor onto it directly from my 3 1/2 ton jack that I use to drop motors. I didn't make the yoke, just the rest. There are 3 bronze bolts that act as adjustable bearings in the yoke pivot. Shown with a bus type 4 motor here.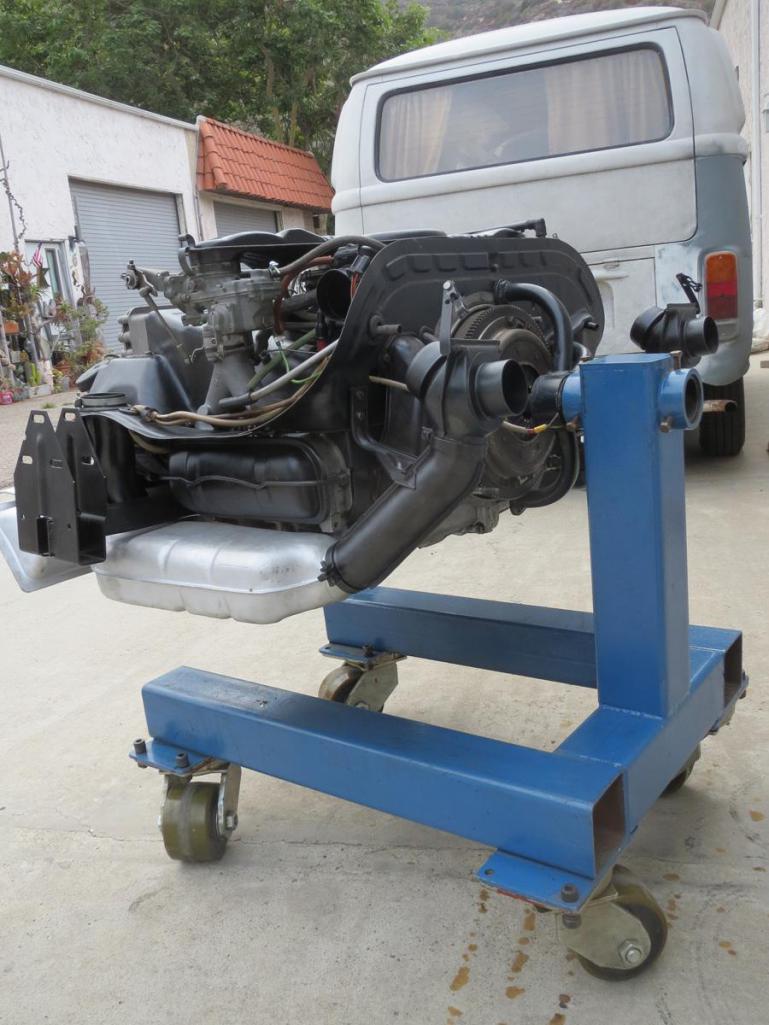
Posted by: Olympic 914 Jan 30 2020, 05:20 PM
rough but it works . used it to open the oil pump 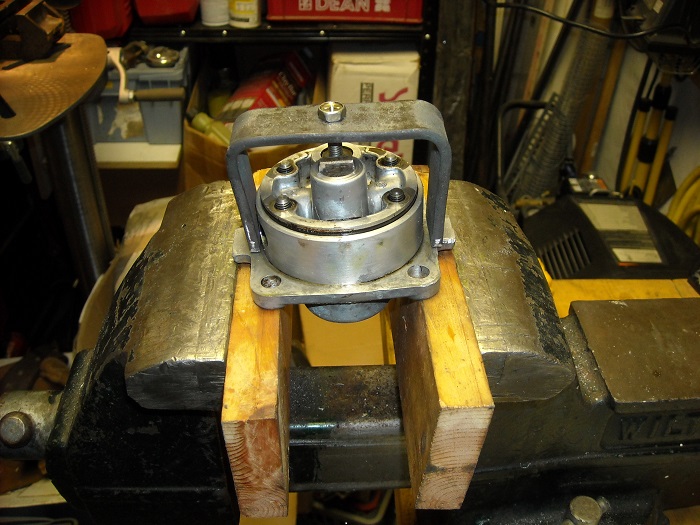
Posted by: FourBlades May 31 2021, 08:35 PM
Reviving this old but good thread. This thread is worth reading if you have never seen it
before.
I needed to weld up 15 holes in the firewall of my car. The metal is paper
thin there so a copper backer was needed. There being no way to reach both sides
at once, I made up this "prop" to hold the copper backer:
It has a piece of copper pipe flattened out into the shape you see. Bolted to a piece of
1/8 by 1 inch steel, tight enough to not flop around but loose enough to pivot as needed.
The other piece of steel has a vacuum cap with the top cut off and wired to one end
using thin welding wire. The prop works like this: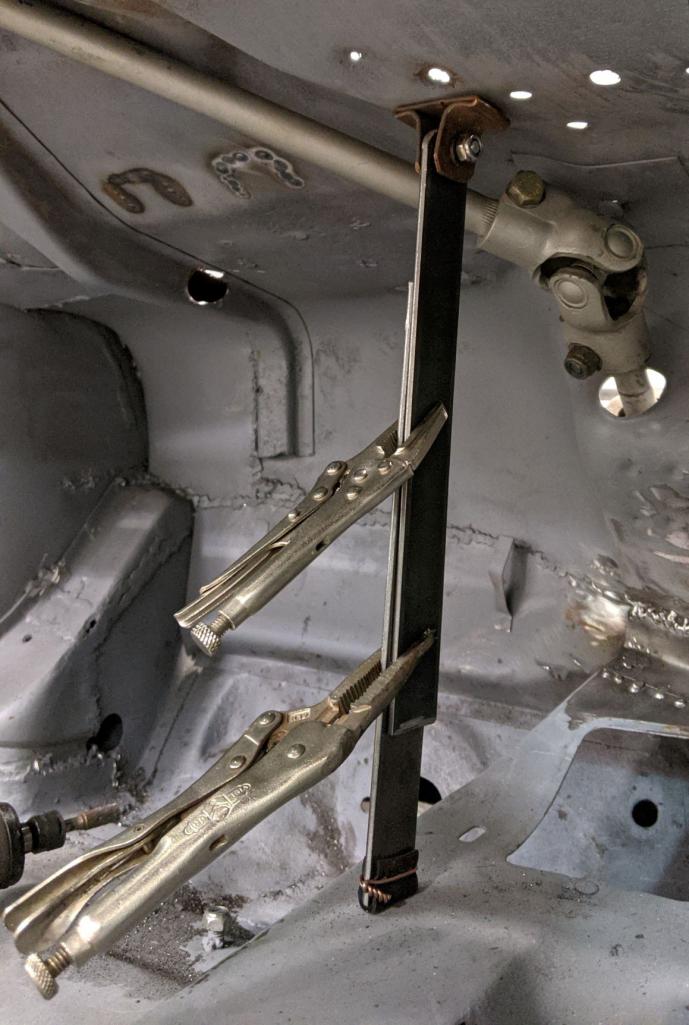
This worked great, allowing me to weld all these unneeded holes closed.
John
Posted by: 930cabman Jun 1 2021, 05:50 AM
Can we call this "American Ingenuity"?
Great job to all
Posted by: Mike D. Jun 1 2021, 09:27 PM
Flat head screw driver for doing valve adjustments. You can actually hold the adjuster in place while tightening the lock nut!
Attached thumbnail(s)

Powered by Invision Power Board (http://www.invisionboard.com)
© Invision Power Services (http://www.invisionpower.com)