Printable Version of Topic
Click here to view this topic in its original format
914World.com _ 914World Garage _ LED gauge lighting
Posted by: marks914 Jan 11 2009, 02:41 PM
OK,
Here is the DIY kit prototype. We may change the wiring pass-through at some point, but this was the best way to keep the costs minimum. For those of you who missed it, a couple of weeks ago I posted some info on the LED lighting.
Here is the basic kit for each gauge. It is the LED strip, which can be cut down to size, with a adhesive isolator strip (2-way tape) and the wiring harness.
http://rides.webshots.com/photo/2381509640057582025noliOS
this is how the LEDs go in the can, just pull the tape once they are positioned and aim the LEDs away from the can sides. Shown is the speedo and tach cans, the fuel gauge strip can be cyut shorter, or left long for combo gauges.
http://rides.webshots.com/photo/2723826740057582025MStNKc
http://rides.webshots.com/photo/2946524130057582025uVyuzk
This is how the back connection is wired to the stock harness. One spade goes to the stock light wire, the other to a ground.
http://rides.webshots.com/photo/2278606970057582025RRgvah
The gauges do need to be dis-assembled, trim rings and all, then the lighting is like this:
http://rides.webshots.com/photo/2554238570057582025ULISwA
http://rides.webshots.com/photo/2643126480057582025ohkOZU
Pricing? If there is enough interest, they will be $65.00 per set of 3 gauges. You can leave the old bulbs in the can to seal up the back. 911 gauge prices slightly higher, the clock is the tricky one on the 911 set.
The kit includes 3 light strips with adhesive isolator, 3 harnesses with pass-through spade connectors and instructions. We have warm white, cool white, red, green and blue.
OR, now that you know how to do it, just give it a try.
Or we can install them here in our shop.
Let me know what you think. We will probably order the light strips as needed, so delivery time will be a few days.
Mark
Posted by: So.Cal.914 Jan 11 2009, 02:47 PM
Cool idea, should be a nice touch.
Posted by: pktzygt Jan 11 2009, 06:22 PM

Cool idea, should be a nice touch.
Can they be dimmed with the factory dimmer? If so, I'm all over those.
Posted by: pktzygt Jan 11 2009, 06:22 PM
Cool idea, should be a nice touch.
sorry, my computer froze and i hit reload.
Posted by: Cevan Jan 11 2009, 06:54 PM
I'm thinking the factory dimmer won't work as it doesn't dim mine, which are the LED replacement bulbs. I am in if you sell those.
Posted by: FourBlades Jan 11 2009, 07:00 PM
Very nice...Is the top photo the white and the bottom the blue?
Do you have photos of the others?
How hard is it to open the guages? I have never tried it.
I want a set, but not sure which color.
John
Posted by: nein14 Jan 11 2009, 08:03 PM
Mark, they look great!
Posted by: wertygrog Jan 11 2009, 08:20 PM
Interested! Is that top picture the warm white or cool white?
Posted by: charliew Jan 11 2009, 08:41 PM
I'm watching for the one that I can switch from white to red or blue so I can have some bling.
Posted by: GeorgeRud Jan 11 2009, 10:59 PM
Generally, LEDs can't be dimmed like conventional incandescent bulbs. I believe there is some special circuitry that does allow it, but it's pretty much on or off with LEDs.
I do love the idea of having brightly illuminated guages, but I don't know if I'd feel all that comfortable removing the front bezels. I know they can be removed by carefully prying along the circumference, but it would be nice to have this done properly. I'm sure the VDO people have a special tool that is unaffordable for casual use.
Are there any electronic geeks on the list that have the specific knowledge on dimming LEDs?
Posted by: GeorgeRud Jan 11 2009, 11:07 PM
Actually, I found a source for a LED dimmer: www.ledtronics.com/products/ProductsDetails.aspx?WP=C264K1687
Not cheap, but it probably works.
Posted by: charliew Jan 11 2009, 11:14 PM
I think I read that Mark is also working on the dimmit deal.
Posted by: Gary Jan 11 2009, 11:20 PM
Very nice. I'll be in for a set for 5 911-style gauges when you're up and running. I'd love to see how red looks, as I have white gauge faces.
LEDs, being current devices, drop a constant voltage, a property of the "diode" in light-emitting-diode. You can't vary the power draw or intensity with a resistor in series as with an incadescent bulb. There are jillions of PWM dimmers you can use with lots of circuits on line. May even be some you could purchase - I haven't looked really hard. If you knew the resistance range of our dimmer, you could do up a 555-based dimmer without too much fuss.
Posted by: TC 914-8 Jan 12 2009, 01:05 AM
Mark,
Looks good I installed some of the blue LED's that replace the factory lights but don't look anything like your LED strip.
I would be in for a set of 3 when you have them ready.
The big question is.... how hard is it to open and reseal the gauges?
Or how much to have you do it if we ship our gauges to you ?
My Tach is modified to accmodate the V-8, so I want to keep my same gauges.
Tony
Posted by: pktzygt Jan 12 2009, 07:18 AM
I found http://www.fixthisride.com/showproductdetail.jsp?prod_id=38279. I'm not sure if it works, but it seems to be about the same thing as the one posted above for about half the price.
Posted by: marks914 Jan 12 2009, 08:06 AM
There are a few LED dimmers out there. The autometer seems to be the best value. The stock dimmer does allow for some dimming, but once it reaches 9V the LEDs turn off. We have aslo installed a inline resistor with success to dim them down.
The next step is to write up some instructions and get some light strips in stock to show the different colors. Give us a few weeks and we can get all of this done and add to our online store.
For those who can't wait, we can start making these now, but no instructions.
To answer the question on how hard is it to take apart the gauges:
Pelican rates it as a 4 out of 10 in difficulty level. Its not that hard, it does take some paitence. I have ruined many trim rings before I found a technique that works.
We can install the LEDs for $55.00 per gauge, unless you are having other work done, then its $35.00 per gauge.
More pics and info on our website, espescially in the later pages in the gallery section:
http://www.newvintageusa.com
We also have some new products coming in a week or so:
Temperature gauge overlays, gauge modules and oil pressure extensions, NLA from VDO.
Mark
Charlie:
I can get some RGB strips, the only issue is that the leds will point inside the gauge, the emitters are on the side of the strip. maybe that is not a problem, maybe it will work fine, If someone is willing I will give it a try.
The real problem here, for me at least is time and money. We are in the midle of a major product launch, so we are leaking money like a sive, with out a whole lot coming in, plus we rare in the development stage of another product that has a high tooling charge, so it needs to be right the first time. No cash to re-do a a set of stamping dies.
Posted by: SGB Jan 12 2009, 08:56 AM
This looks really, really good.
The only problem I have opening a gauge is getting something under the edge of the ring to get started. I just could not get a strong enough blade between the body abd the ring to start the process.
I used a very small drill bit on the back side of the trim ring in order to get a tiny screwdriver in there, then just went round and round and round slowly bending the edge back. That in itself is about a 1 beer job.
I'm hoping one of those modules in the works is a temp readout to go in place of the big red flashing brake light lke a non-console car?
Posted by: marks914 Jan 12 2009, 09:11 AM
We have more screened parts for the temp modules coming this week. Here is what the look like:
http://rides.webshots.com/photo/2117910870057582025hQwmLr
http://rides.webshots.com/photo/2604022690057582025pvkLJK
I have soem images of some converted 914 fuel gauges at home, I will post them when I get back. They have the lamp removed and a temp gauge installed.
Mark
Posted by: seanery Jan 12 2009, 09:11 AM
These look cool. When you offer a turn key system with proper dimming I'm in! 

Posted by: TedK Jan 12 2009, 10:53 AM
I would love to see the red in action. Always liked the way BMW guages were lit at night.
Posted by: marks914 Jan 13 2009, 07:41 AM
I found a local supplier that makes LEDs and dimmers. I am going to meet with him this week to see if tyhere is a better way to skin this cat. Hopefully the pricing will get even better.
He has 2 dommers, one that comes with a mounting bracket and one is a panel mount, and the price is really good, under$20.00
Anyhow, I will get some samples and see what we can do.
Mark
Attached image(s)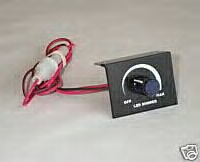
Posted by: charliew Jan 13 2009, 08:17 AM
I have extra 914 gauges to practice on and I am in no hurry. I will wait till you try the rgb strip and if it's good then that and some kind of dimmer is for me.
Posted by: bperry Jan 13 2009, 02:03 PM
It might be useful to think "motor speed control" rather than LED dimmer.
The PWM circuit is exactly the same.
--- bill
Posted by: marks914 Jan 18 2009, 04:40 AM
The manufacturer that is going to be building the dimmers for the LEDs can sell them cheaper to me than I can build them myself, so that works out pretty good. We will be able to offer the dimmer for $19.95.
He is also working on a manual controller for the RGB lighting. We are working on RGB/million color light pipes for another project and we wanted to build a economical light tuner/dimmer. Basically, its 3 dimmers in one unit that dimes eace color led so that the color/light level can be infinitley (sp?) tuned.
I will get some RGB strips when I get the controller, so for now the kits are complete. We also figured out how to make a connector that "plugs" into the old bulb hole, so no drilling or permanant damage to the gauge cans.
Mark
Posted by: marks914 Jan 26 2009, 04:14 PM
Well,
We have some LED dimmers finally. They work really well. They are $19.95 with the LED lighting kits. I will finish up the instructions hopefully by the weekend. The dimmers can be panel or under-dash mounted, and they are made in the USA
Mark
Attached image(s)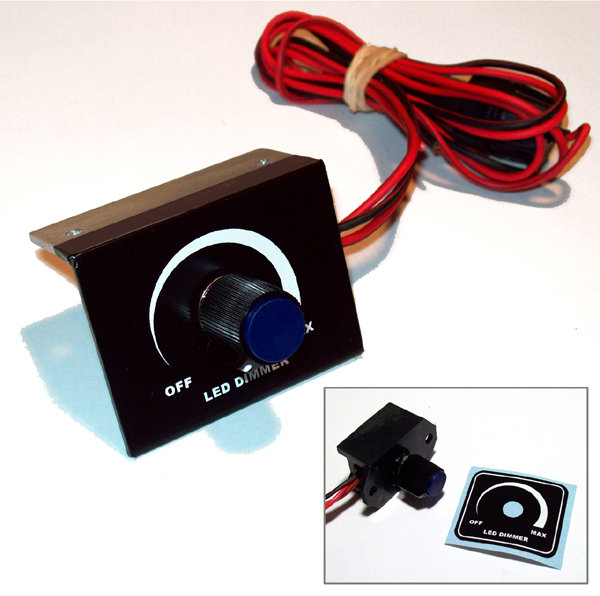
Posted by: bperry Jan 26 2009, 05:41 PM
Well,
We have some LED dimmers finally. They work really well. They are $19.95 with the LED lighting kits. I will finish up the instructions hopefully by the weekend. The dimmers can be panel or under-dash mounted, and they are made in the USA
Mark
Mark, I'm assuming that like most LED dimming circuits that this is a PWM circuit.
Most PWM circuits use either a voltage controlled oscillator or a fixed oscillator
that feeds a voltage comparator that is used to create the PWM pulses.
A potentiometer is typically used to vary the reference voltage either way.
Since several people have been asking if the stock dimmer could be used,
I guess what I'm wondering is why couldn't the circuit/kit be altered so that
instead of having this additional potentiometer with this new knob
that an additional wire be added in place of the
potentiometer in this module/kit to get the reference voltage from the
existing factory dimmer circuit so that the stock dimmer could be used.
What I'm talking about is not using the factory potentiometer to replace
the potentiometer in this circuit (which also could be done),
I'm talking about modifying this module to allow connecting it to
tap into any existing factory dimmable bulb wire and using the
variable voltage controlled by the factory
potentiometer as the reference voltage for this circuit.
With this modification you would eliminate the potentiometer in place
of one wire that would need to be hooked to the + side of any
bulb that is currently dimmable by the factory dimmer.
Depending on the circuit design of this module it could be as simple as
desoldering/removing the potentiometer from this module
and adding a new wire to one of the existing potentiometer solder pads
on the circuit board.
Might be worth considering. It is a very simple modification that might
actually reduce the cost as the potentiometer and knob could be eliminated
in the final production version.
--- bill
Posted by: marks914 Jan 26 2009, 06:12 PM
Yes, it could be done, but this part is already tooled up. We can get the guts loose from the supplier as well. The cost would not be in parts, but labor to put it together (by me) and we are using this in other applications besides porsche gauges (ambient lighting, color mixing, etc) I see it as more of a set it amd forget it kind of thing, keep it out of sight, but within reach. Besides, the closest competitor is $29.00 and its a big unit (autometer)
Mark
Posted by: charliew Feb 14 2009, 02:28 PM
Mark Hi, today I went to your new site and didn't see a diy rgb dimming three gauge kit. Is one available yet? I am in no hurry just checking.
Posted by: marks914 Feb 14 2009, 04:29 PM
We are still working with our electronics supplier who is working on the prototype for the color mixer. Hopefully we will have them soon. We have been pretty busy with custom work and launch of the Woodward series sets. Not to mention my day job has been insanely busy, I just got back from Chicago for the Ram Heavy Duty reveal
Mark
Posted by: charliew Feb 14 2009, 06:49 PM
I hope you didn't have to pay some politican off.
Posted by: marks914 Feb 21 2009, 11:00 AM
Didn't have to pay anyone off, that is another department's job.
Had a little bit of timne to mess around with the RGB lighting. I got a RGB controller from another supplier while ours is in development. It has several color changing modes as well as a static feature and a dimmer. I think we ned to put a few more LEDs in the can, but it looks like it works pretty well.
Mark
There are some videos here, I can't seem to be able to post one:
http://community.webshots.com/album/558336473KkVazr?start=180
http://rides.webshots.com/photo/2350859390057582025crUttL
http://rides.webshots.com/photo/2550078340057582025VuVMNJ
http://rides.webshots.com/photo/2261570630057582025lhXkRb
http://rides.webshots.com/photo/2444056870057582025MtRAHz
http://rides.webshots.com/photo/2128471180057582025CAoODS
http://rides.webshots.com/photo/2496709460057582025RDZMHc
http://rides.webshots.com/photo/2663958710057582025AHkafw
Posted by: Cevan Feb 21 2009, 09:35 PM
When will you be selling these? My gauges are barely readable at night.
Posted by: marks914 Feb 22 2009, 06:46 AM
When will you be selling these? My gauges are barely readable at night.
We do the instalations right now. We can sell the kits now as well, but I have not been able to write up instructions. If you are leery about taking your gauges apart, let us do it. If you think you can get the gauges apart, then the LED installation is really easy. Basically some peel and stick tape with LEDs on it.
Here is a set we just finished up. The customer wanted a stock appearance so we used the warm white LEDs. No tricks in the photos or high ISO camera work, they ligt that well.
http://rides.webshots.com/photo/2411922510057582025iJRIMx
Mark
Posted by: Cevan Feb 22 2009, 08:39 AM
When will you be selling these? My gauges are barely readable at night.
We do the instalations right now. We can sell the kits now as well, but I have not been able to write up instructions. If you are leery about taking your gauges apart, let us do it. If you think you can get the gauges apart, then the LED installation is really easy. Basically some peel and stick tape with LEDs on it.
Here is a set we just finished up. The customer wanted a stock appearance so we used the warm white LEDs. No tricks in the photos or high ISO camera work, they ligt that well.
http://rides.webshots.com/photo/2411922510057582025iJRIMx
Mark
I have some spare gauges that I can practice on. How much for that kit in the photo? I also just want the stock appearance only brighter.
Do you also have smaller units for the center console gauges?
Posted by: marks914 Feb 22 2009, 01:01 PM
The LED kits are $35.00 per gauge. A kit includes:
1 19 inch light strip with 30 side emitting LEDs with self-adhesive backing. The strip can be cut into 3 LED segments. You don't need the last 3 leds for the speedo and combo gauge, so you should have enough extra for at least 2 console gauges. Once the strips are cut, you would need to solder 2 wired to the now cut part. the strips come pre wired, however.
2 plugs for the old bulb holes
1 grommett for the wiring to pass through.
The dimmers are 21.95 and will work for up to 10 gauges.
They are $65.00 installed per gauge.
Mark
Posted by: charliew Feb 22 2009, 01:14 PM
A little brighter and the multi color looks great to me. Let me know when you can make up a kit for the three dash gauges. I guess I could just send the parts back to get you to put in the elect. speedo when I figgure it out for the suby tranny.
Posted by: marks914 Feb 22 2009, 03:15 PM
Charlie,
We have done a few electronic speedos for 914s. We use a VDO programmable speedo. All it needs is a signal and you are off and its very easy to program. We are also workingf with a supplier to install GPS speedo internals into other gauges (its a bit pricey though)
When you are ready to go, just send all of them to us and we will write up a package price.
Mark
Posted by: estwing Feb 23 2009, 02:54 PM
Is there a source or way to use translucent gauge needles so that they glow as well?
Posted by: marks914 Feb 23 2009, 07:57 PM
I have been using a reflective orange. I have been looking at back-lit pointers, but nothing really fits the look of the gauges or seems to be long enough for the tach. These lit up really well with the paint:
http://rides.webshots.com/photo/2643126480057582025ohkOZU
http://rides.webshots.com/photo/2792715690057582025VryixL
They look backlit
Mark
Posted by: jsayre914 Feb 23 2009, 10:16 PM
these look awesome... i want mine to shine too. 
I have been using a reflective orange. I have been looking at back-lit pointers, but nothing really fits the look of the gauges or seems to be long enough for the tach. These lit up really well with the paint:
http://rides.webshots.com/photo/2643126480057582025ohkOZU
http://rides.webshots.com/photo/2792715690057582025VryixL
They look backlit
Mark
Powered by Invision Power Board (http://www.invisionboard.com)
© Invision Power Services (http://www.invisionpower.com)