Printable Version of Topic
Click here to view this topic in its original format
914World.com _ 914World Garage _ How do I clean my 2.0 dizzy?
Posted by: Cevan Apr 3 2009, 05:54 PM
While it rains for the next 36-48 hours, I figured I would eliminate some of the potential causes of my high idle ('74 2.0 D-jet motor). I had read that advance plates don't move freely could cause issues so I pulled the dizzy and proceeded to try and clean it.
I removed the two screws that hold the trigger points in place. I tried to pull them out but they only come out so far. I don't want to yank them out if something inside is holding them in.
Also, I'm not sure how to proceed in cleaning the advance plates. It looks like I need to remove the small circlip that holds the arm that extends from the vacuum advance. Then there is the wire that appears to be soldered between two pieces. Can the dizzy be cleaned and lubed without disassembling all of this or can I test the advance plates to see if they move freely.
I did hook up a vacuum gauge to the vacuum advance port and the arm did move slightly when I introduced some vacuum.
Here is a picture. Btw, the dizzy is a 039 905 205A, which I believe is correct for the '74 2.0 motor.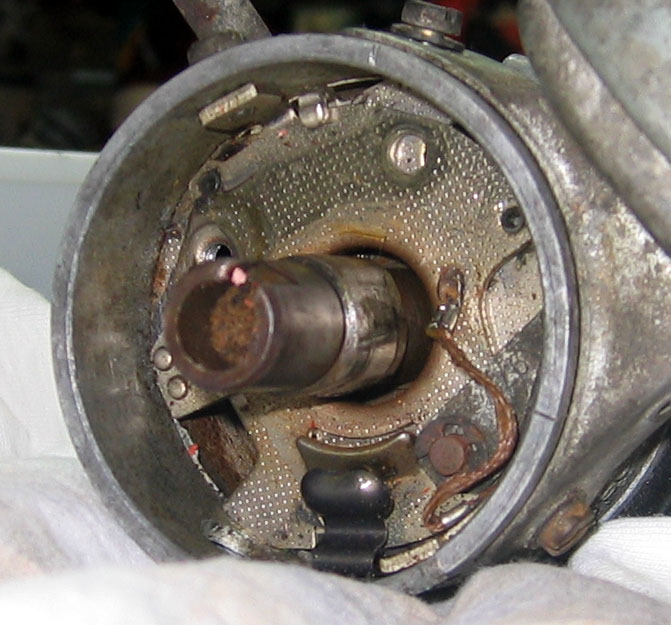
Posted by: r_towle Apr 3 2009, 05:57 PM
The plates are held in by screws from the outside of the body...remove those and pull up both plates together.
Once you remove the funky clip that hold in the fast, little, and easy to loose ball, the plates fall apart..
With old grease they dont fall apart. you need to wiggle them back and forth.
Just be gently with the ground strap, DO NOT remove it...just leave it there...
Rich
Posted by: r_towle Apr 3 2009, 06:10 PM
DUDE...
Answer the phone....when it rings..pick it up.
Rich
Posted by: Cevan Apr 3 2009, 07:13 PM
With Rich's help I got it all apart. Ever want to know what's inside your distributor??
Here is what it looks like under the vacuum advance plates: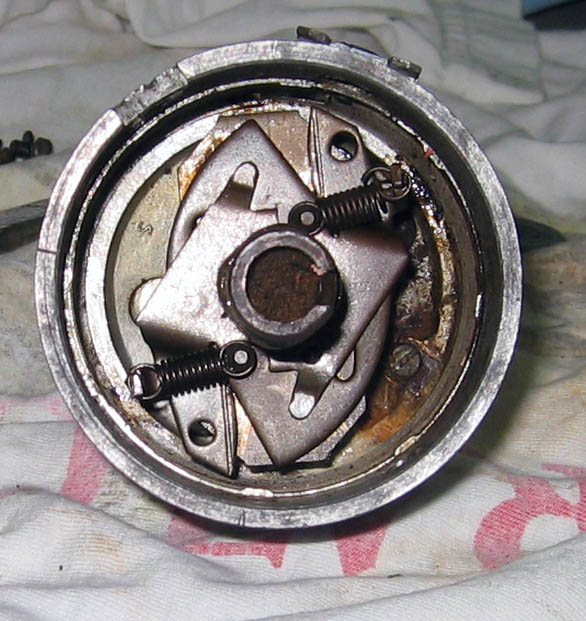
Here are all the parts. 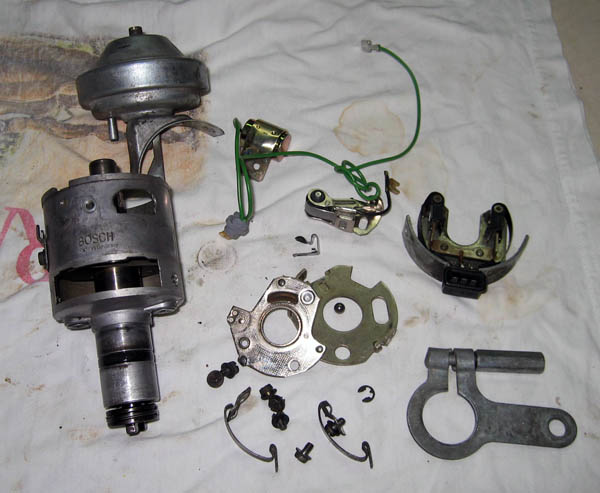
Everything looked really clean to begin with. I cleaned up the advance plates, the ball bearing, trigger points and lubed the cam lobes for the trigger points and regular points and the two advance plates. There are three raised areas on the top plate that ride on the bottom plate. Here it is all back together. What better way to spend a Friday night.
Posted by: r_towle Apr 3 2009, 08:28 PM
LOL...I was on the phone with Rick(918) when you called.
I figured I would call you back...to funny, you got it all done while we talked....and talked...
Suck on the vacuum cansiter, see if it (a) holds a vacuum...its a potential leak...and B moves the plates correctly...you have to spin the unit by hand while you put a vacuum on the canister to overcome the mechanical issues...but it should spin the top plate...bottom one stays put.
Rich
Posted by: ejm Apr 4 2009, 04:47 AM
It's not all apart yet  The upper part of the shaft rotates on the lower allowing the mechanical advance to work. Pull out the felt pad and you'll see a hard to remove circlip often with some rust. Proper maintance includes an occaisonal drop of oil on the felt but that was rarely done. And if it was it's sure to be gummed up be now. When you get it apart post a pic of the crap that's in there.
Posted by: Cevan Apr 4 2009, 05:56 AM
Ed, is there any reason I need to remove the upper shaft and the mechanical advance plates? I hate to see those springs go flying. That area appears very clean.
Btw, I'm hoping to actually drive my car to your house to return the seal tool.
Posted by: ejm Apr 4 2009, 06:04 AM
The springs have very little tension. At the least pull the felt and let some PB Blaster flow down the shaft. Use brake cleaner and compressed air to clean everything then light oil (atf works good) to lightly lube things.
Powered by Invision Power Board (http://www.invisionboard.com)
© Invision Power Services (http://www.invisionpower.com)