Printable Version of Topic
Click here to view this topic in its original format
914World.com _ 914World Garage _ Airbox installation is complete
Posted by: PanelBilly Jul 6 2009, 07:50 PM
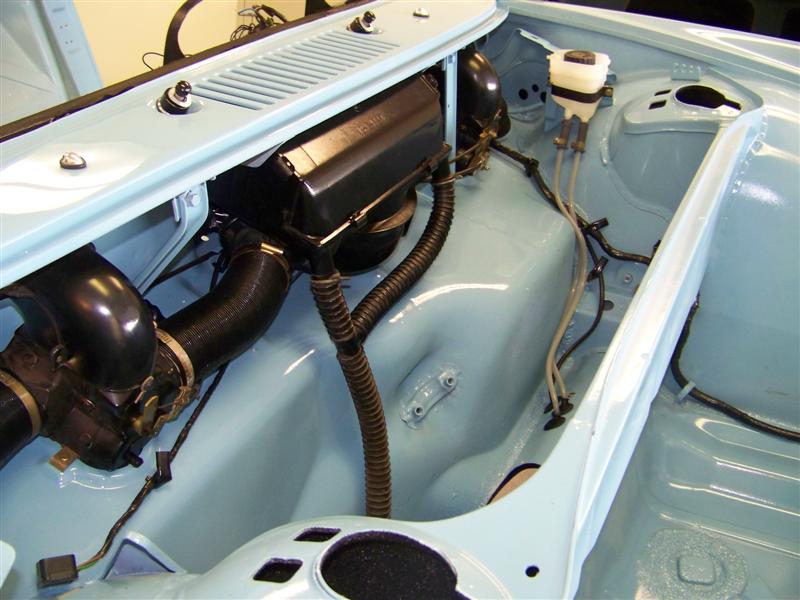
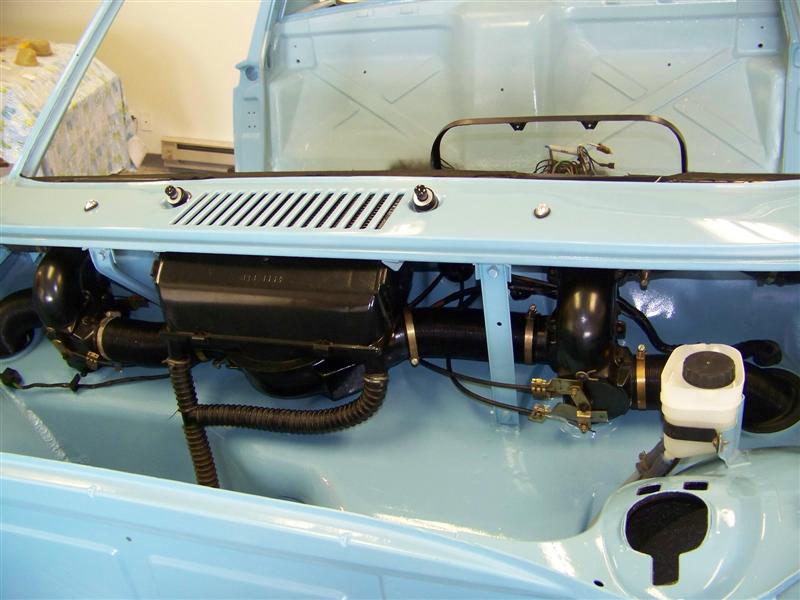
New tubes really add to the general fresh look to the front trunk. I had to make a bolt to hold the back of the winshield wiper assembly in place, but I got everything bolted up this weekend. Next comes the wiring in the dash I guess.
The wire mess looks a bit overwelming. Any advice is welcome. And yes I know the light switches are out of order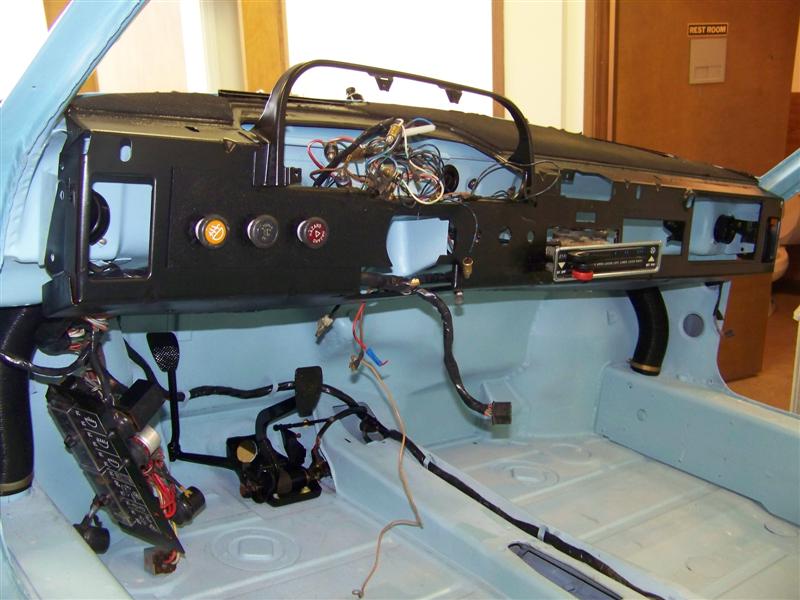
Posted by: racunniff Jul 6 2009, 07:56 PM

The wire mess looks a bit overwelming. Any advice is welcome. And yes I know the light switches are out of order
Did you label the wires before you removed the harness? Or is this a new harness?
Regardless - my advice on hooking everything back up is "one step at a time." Hook up the fuse panel. And then, one gadget at a time. Identify where you think something should plug in. Ideally, verify your choice with a voltmeter (if you have the switches hooked up). Hook up your gadget. Look/listen/smell for burning wires and blown fuses. Turn the switch on to your gadget. Look/listen/smell for burning wires and blown fuses. Verify proper operation. Move on to the next gadget.
On the "burning wires" front - you should probably have quick access to the 12V battery during all this - so you can quickly disconnect if you start overheating something. I kept mine outside the car hooked up via jumper cables. Most of the wires are *not* fuse-protected (especially grounds) and they can smoke very very quickly.
Posted by: 914Sixer Jul 6 2009, 07:56 PM
Work being done the right way !!!!! Very clean and neat. 
Posted by: racunniff Jul 6 2009, 07:58 PM
The wire mess looks a bit overwelming. Any advice is welcome. And yes I know the light switches are out of order
...my advice on hooking everything back up is "one step at a time."
One more thing - sand all the paint and primer off of all the ground points before attaching ground wires. If you are worried about corrosion, drop a bit of dielectric grease on each one before plugging in the wire.
Posted by: Cap'n Krusty Jul 6 2009, 08:18 PM
Very nice! The factory wiring diagrams are in color, and each terminal on every electrical component is numbered and/or lettered, both in the diagram and on the parts thenselves. Makes it easy! Color diagrams are available on the Pelican Parts website.
Brown is ALWAYS ground, and brown with a stripe is a switched ground. All the rest of the stuff is pretty self explanatory.
The Cap'n
Posted by: FourBlades Jul 6 2009, 08:21 PM
I found that laying out the wiring in the car gives you a general idea what
device the wires should go to. The wires are all about the right length to get
where they need to be without a lot of extra length. Get a color diagram from
Prospero's Garage. It is easier to read than the hanes B&W pictures and it is laminated and sweat proof. I think I got mine on ebay.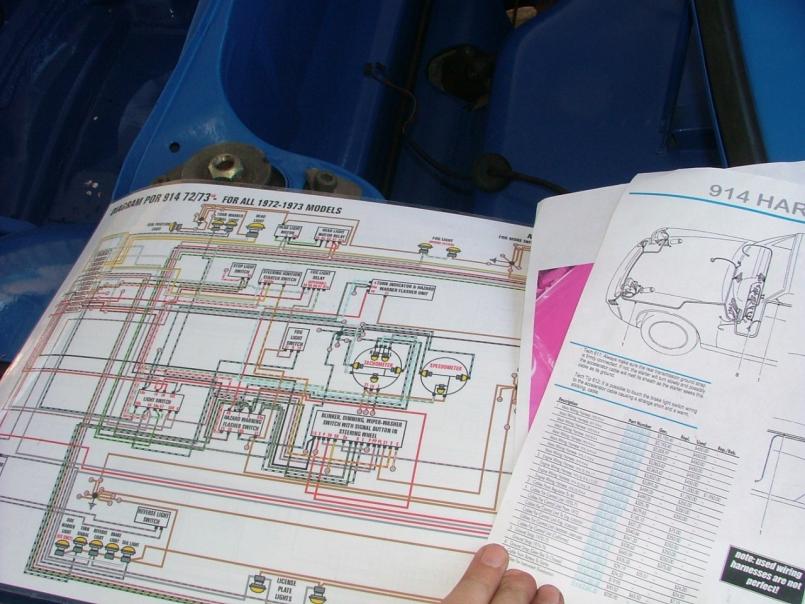
Here's some tips from an OLDE WORLDE mechanic that I plan to use pretty soon
when I finally hook up a battery to the car.
Put a 3 amp fuse between your battery and the positive wires. That way
the fuse will blow if you have a short instead of cooking your wiring.
Take all the fuses and relays out except the one for the circuit you are debugging.
Add them back one at a time as you work through the systems.
I have nearly all my wiring hooked up so we'll see soon how I did.
John
Posted by: racunniff Jul 6 2009, 08:31 PM
I found that laying out the wiring in the car gives you a general idea what
device the wires should go to. The wires are all about the right length to get
where they need to be without a lot of extra length. Get a color diagram from
Prospero's Garage. It is easier to read than the hanes B&W pictures and it is laminated and sweat proof. I think I got mine on ebay.
Here's some tips from an OLDE WORLDE mechanic that I plan to use pretty soon
when I finally hook up a battery to the car.
Put a 3 amp fuse between your battery and the positive wires. That way
the fuse will blow if you have a short instead of cooking your wiring.
Take all the fuses and relays out except the one for the circuit you are debugging.
Add them back one at a time as you work through the systems.
I have nearly all my wiring hooked up so we'll see soon how I did.
John
All excellent advice - I wish I had thought of the 3 amp fuse trick!
Note that many of the wiring diagrams are available online - 1974 at Pelican Parts http://www.pelicanparts.com/914/914_electrical_diagrams.htm and I've scanned & colorized the 1975 diagram at http://volt914.blogspot.com/2007/07/1975-color-wiring-diagram.html (you'll need the Haines manual to make sense of mine, I did not want to scan the *whole* thing because of copyright issues).
Posted by: watsonrx13 Jul 7 2009, 05:49 AM
I found that laying out the wiring in the car gives you a general idea what
device the wires should go to. The wires are all about the right length to get
where they need to be without a lot of extra length. Get a color diagram from
Prospero's Garage. It is easier to read than the hanes B&W pictures and it is laminated and sweat proof. I think I got mine on ebay.
Here's some tips from an OLDE WORLDE mechanic that I plan to use pretty soon
when I finally hook up a battery to the car.
Put a 3 amp fuse between your battery and the positive wires. That way
the fuse will blow if you have a short instead of cooking your wiring.
Take all the fuses and relays out except the one for the circuit you are debugging.
Add them back one at a time as you work through the systems.
I have nearly all my wiring hooked up so we'll see soon how I did.
John
John, I've been looking for these large laminated print outs for awhile....
Anyway, here's the http://www.colorwiringdiagrams.com/ to Prospero's Garage, unfortunately they only have the diagrams from 70-73 for now....
BTW, the installation of the fresh air system looks great....

-- Rob
Posted by: aircooledtechguy Jul 7 2009, 04:14 PM
Billy, your work is really nice!! You're making good progress. Keep these updates coming ![popcorn[1].gif](style_emoticons/default/popcorn[1].gif)
Posted by: BarberDave Jul 7 2009, 04:23 PM

When you get done you will be required to change your screen name , from
"Panel Billy " to Cool 914 Billy.
Great job so far , be proud of it and your work!! Dave 
Posted by: Tom Jul 10 2009, 06:15 PM
Billy,
That is sure looking nice. Those cool wiring diagrams are sure nice too, too bad I'm color blind!  . But I have had years of experience tracing wires with an ohm meter.
Tom
Powered by Invision Power Board (http://www.invisionboard.com)
© Invision Power Services (http://www.invisionpower.com)