Printable Version of Topic
Click here to view this topic in its original format
914World.com _ 914World Garage _ Damn it! Suspension ear broken
Posted by: JRust Jul 15 2009, 10:33 PM
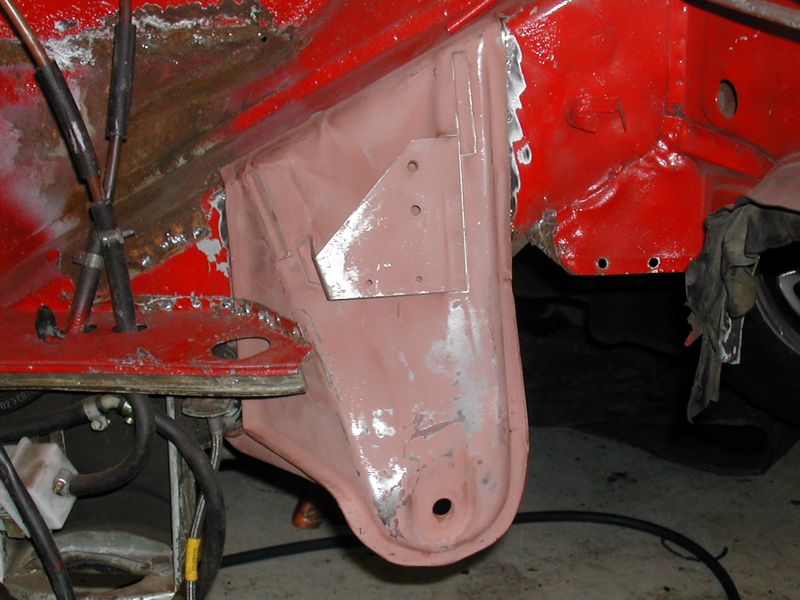
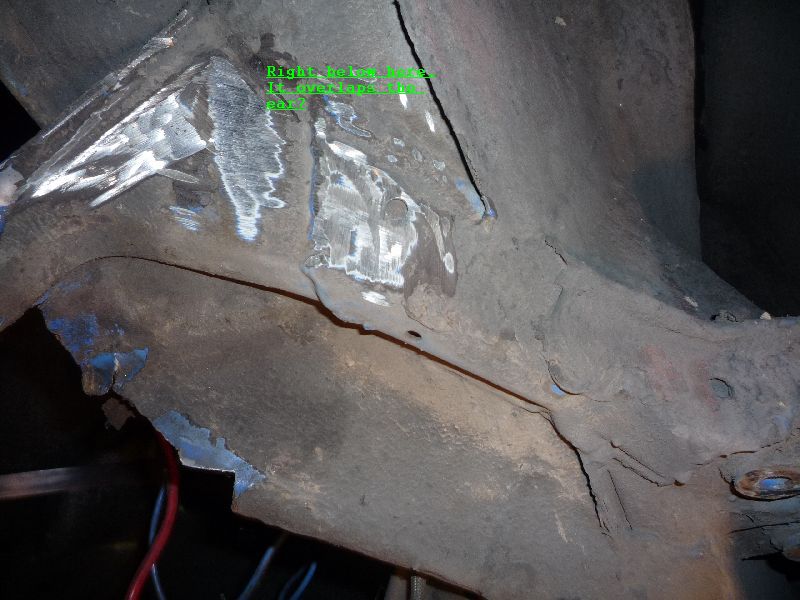
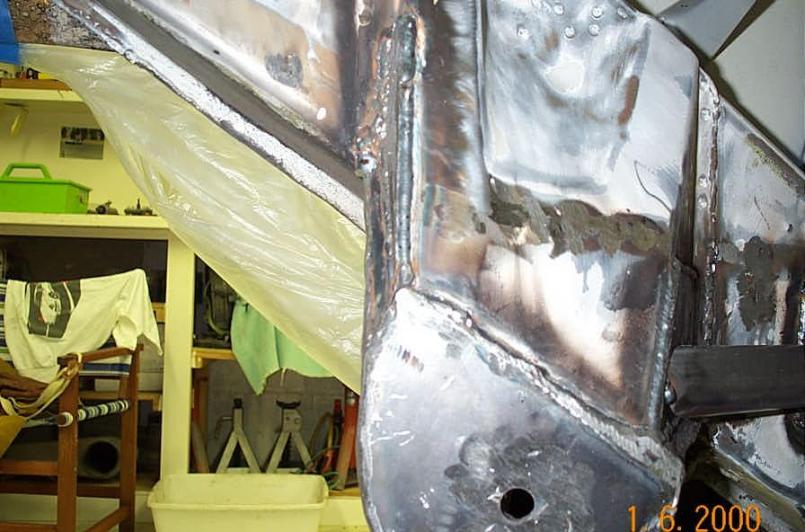
So I notice my passenger rear wheel camber was way off. That side of the car was sagging a little bit. I figured something came loose. I jack up that side of my car 
Take a look at my suspension ear 
Attached image(s)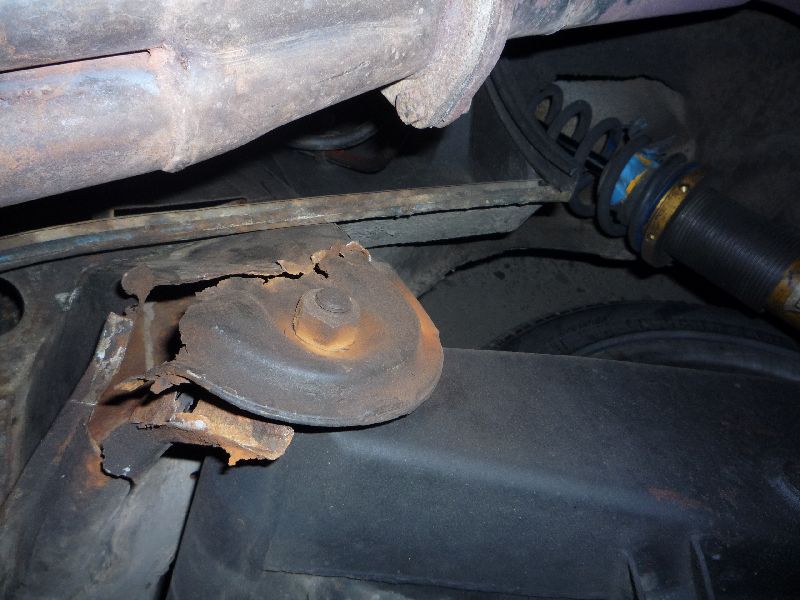
Posted by: McMark Jul 16 2009, 12:42 AM
Which will be better for this? Fiberglass or JB Weld? 
Sucks. There's no patching that one.
Posted by: JRust Jul 16 2009, 01:07 AM
What is the proper way to fix it? How much do I need to cut out?
Posted by: lotus_65 Jul 16 2009, 05:25 AM
seems to be a lot of this right now,
there was at least one other thread when mine was active a couple weeks ago.
http://www.914world.com/bbs2/index.php?showtopic=96575&hl=
it's a pita, and if you have any hp at all you need to reenforce.
it looked to me like this is the last spot for the acid dosed rainwater to have collected all those years.
thefleur
Posted by: Joe Ricard Jul 16 2009, 06:00 AM
Unfortunately you will need to remove the whole damn thing and replace it with a new one. Drill out the spot welds, and fit up a new one. get some measurements from a known good car.
If you are putting in a big motor and sticky tires you can just go ahead a put the plate on now.
Posted by: mikez Jul 16 2009, 09:10 AM
Joo need to reepace everyting, Loosey....joo lookey it doan brake when joo be dryben it....
Posted by: dr914@autoatlanta.com Jul 16 2009, 10:43 AM

So I notice my passenger rear wheel camber was way off. That side of the car was sagging a little bit. I figured something came loose. I jack up that side of my car
Take a look at my suspension ear
Tremendously worthwhile project. We make that part of course and have many in stock
Posted by: JRust Jul 16 2009, 04:05 PM
Unfortunately you will need to remove the whole damn thing and replace it with a new one. Drill out the spot welds, and fit up a new one. get some measurements from a known good car.
If you are putting in a big motor and sticky tires you can just go ahead a put the plate on now.
What do you mean by plate? Is that part of a reinforcement kit? Who makes the kit? Or anyone have a link to a thread that replace this whole deal? Thanks
Posted by: JazonJJordan Jul 16 2009, 04:12 PM
 Yowch(!!) -sorry JR~

Posted by: markb Jul 16 2009, 04:33 PM
![shocked[1].gif](style_emoticons/default/shocked[1].gif) And you tracked that at WCR? Musta been the sticky tires that did it.
And you tracked that at WCR? Musta been the sticky tires that did it.  Wow, lucky it held to get you home.
We also have the replacement piece in stock.
Posted by: JRust Jul 16 2009, 04:54 PM
And you tracked that at WCR? Musta been the sticky tires that did it. Wow, lucky it held to get you home.We also have the replacement piece in stock.
It's possible the starting crack happened there. I really don't know. I also did an AutoX in Bremerton WA. It's a good 4 1/2 hour drive for me. I did it with no problem & had none on the drive home. I can't think of a time where it happened. I can remember driving one afternoon & takin a semi sharp left turn. Felt a little squirly but just thought my tire was low. Checked when I got home but tire seemed fine. I think the crack was there & just getting worse each time I drove it. Having a v8 probably didn't help it much

Hey Mark where is it listed on your site? I couldn't find it

Posted by: kwales Jul 16 2009, 05:51 PM
That's a combo rust/fatigue crack and has been happening for awhile...
Notice that a lot of the crack is rusty which means it happened a while ago which is consistant with mild steel. High temeper materials would snap with a clean unrusted break surface, and with the the mild steel, the crack would march along the part allowing old breakage areas to rust, and the new break to look shiney.
Which is exactly what happened here.
I'm just glad that it happened with no damage to you, and with minimal parts damage (broken ear).
Posted by: JRust Jul 16 2009, 08:57 PM
Believe me I am very thankful it did not break loose completely while driving. Seeing where it was at I am sure it would have come completely off. If I had not caught it
Posted by: r_towle Jul 16 2009, 10:55 PM
The plate would be put on after you install the new suspension ear.
Chris Foley makes the overlay plate.
You may also want to add a brace to the firewall like Brant/JP...
Rich
Posted by: Justinp71 Jul 17 2009, 12:12 PM
The plate would be put on after you install the new suspension ear.
Chris Foley makes the overlay plate.
You may also want to add a brace to the firewall like Brant/JP...
Rich

I just did this aswell when I had my engine out... Chris (at CFR) sells a very nice adjustable heimrod brace that goes from the ear to the firewall.
Sorry to hear about this... thats a very nice car you have.
http://www.tangerineracing.com/chassis.htm
Posted by: Phoenix 914-6GT Jul 17 2009, 12:30 PM
Jamie, Chris actually has a setup that is very nice. That would mean doing both sides but I would think that may wise to do anyway. Not wanting to take any business from GPR but Chris's system really does look like the way to go here.
Posted by: Phoenix 914-6GT Jul 17 2009, 12:37 PM
Never mind... I looked and I was thinking of his raised rear pickup points... The hiem joint dos look like a good idea though when you do fix your ear.
Posted by: McMark Jul 17 2009, 12:42 PM
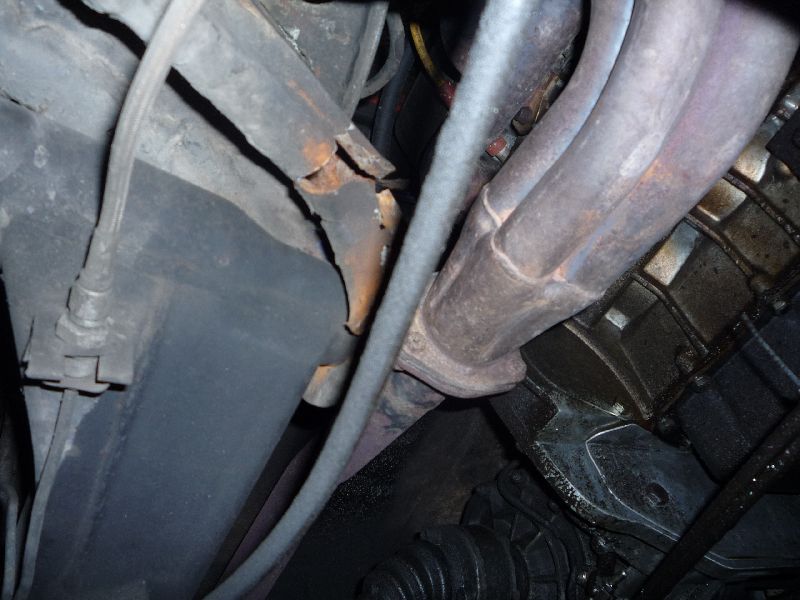
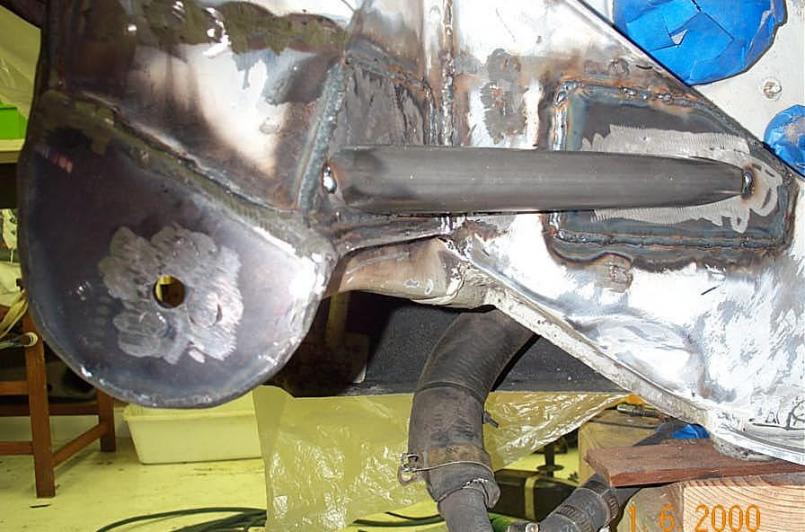
Pics from a replacement. It's a quite a PITA on the underside.
Attached image(s)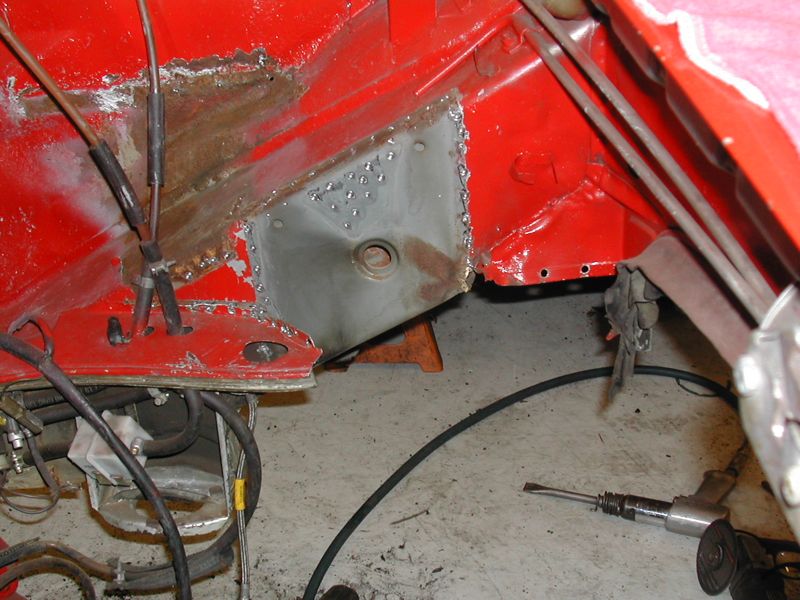
Posted by: JRust Jul 17 2009, 04:58 PM
I got it Mark  . How about I bring you a front clip for your pheonix. Along with me & my car. We spend the weekend fixing mine. I leave the clip
  . Piece of cake
Posted by: McMark Jul 17 2009, 07:51 PM
Hmmmm, I'll consider the front clip extremely partial payment.  It could be done in a day if the motor is already out.
Posted by: JRust Jul 17 2009, 08:15 PM
Hmmmm, I'll consider the front clip extremely partial payment.
It could be done in a day if the motor is already out.Yeah there was some sarcasm there. I really don't want to load all that up on my trailer & drive 9 hours one way. Make for a very long weekend to say the least. Not looking forward to the repair but I do have a buddy close by that welds. I'll start getting things prepped & go from there. I really have no plans to head south to CA anytime soon. Be nice to have ready for the 914Shootout next month but will be tough. I have to many things I want to do to my drivetrain. If I'm pulling it I may as well start my list
. We shall see though
Posted by: McMark Jul 17 2009, 09:19 PM
I got your sarcasm. Mine was even dryer than yours.  I just thought you were in love with I-5.
Posted by: brant Jul 17 2009, 09:44 PM
I did this twice (on the same car)
it was not rusty either time....
much less rusty than yours
I'd recommend a brace. Obviously you are pushing the limits of the stock frame.
I braced my first racer (the one that tore out twice) about 12 years ago and never had a problem since. I braced my 2nd racer as I was building it and never had a problem at all........
Posted by: JRust Jul 17 2009, 10:03 PM
I ordered the brace & if not sent out today hopefully on monday. I'm pulling the drivetrain tommorow. Anyone have a step by step & pics for what to cut out?
Posted by: sww914 Jul 18 2009, 12:37 PM
I don't drill spot welds often anymore. I grind them out with a 3M #1991 disc in a die grinder. Much much faster and after you peel the junk metal off the good metal underneath is seconds away from ready to weld to instead of left with a bunch of holes or little round pads left behind.
http://www.shopping.com/xPO-3M-1991-3M-Green-Corps-3-X-3-16-X-3-8-Reinforced-Weld-Grinding-Wheels-5-Pack
Posted by: strawman Jul 18 2009, 02:58 PM
with SW914. I only use the spot weld drills if I need to reuse a part that I'm cutting off...
Geoff
Posted by: JazonJJordan Jul 18 2009, 10:24 PM
That's a combo rust/fatigue crack and has been happening for awhile...
Notice that a lot of the crack is rusty which means it happened a while ago which is consistant with mild steel. High temeper materials would snap with a clean unrusted break surface, and with the the mild steel, the crack would march along the part allowing old breakage areas to rust, and the new break to look shiney.
Which is exactly what happened here.
I'm just glad that it happened with no damage to you, and with minimal parts damage (broken ear).
Well said-
Posted by: JRust Aug 10 2009, 11:46 PM
Okay so I'd still like to see a how to thread. I am fairly confident I can do it with a friend welding it for me. I am a little worried about getting it in the proper position. I was thinking maybe drilling a few guide hole on around the one I am taking off . What did you do? Thanks
Posted by: SirAndy Aug 10 2009, 11:52 PM
Okay so I'd still like to see a how to thread.
Brad posted a pictorial a few years back. If you're lucky, he didn't delete the pictures
Might have been on Sean's old white car?
Andy
Posted by: JRust Aug 11 2009, 12:20 AM
Okay so I'd still like to see a how to thread.
Brad posted a pictorial a few years back. If you're lucky, he didn't delete the pictures
Might have been on Sean's old white car?
AndyFound it in the tech articles but no pics
Posted by: strawman Aug 11 2009, 08:48 PM
See posts 29 & 30 of http://www.914world.com/bbs2/index.php?act=ST&f=2&t=83031 for the jig I built prior to replacing the inner passenger console on my teener. You'll definitely want to tie the jig into at least two planes to be sure you can place the new console in the correct place.
I obtained my replacement console from Auto Atlanta. Since I constructed my own upper/rear long replacement pieces, I had to massage the replacement console to correctly align the jig.
Best of luck!
Geoff
Attached image(s)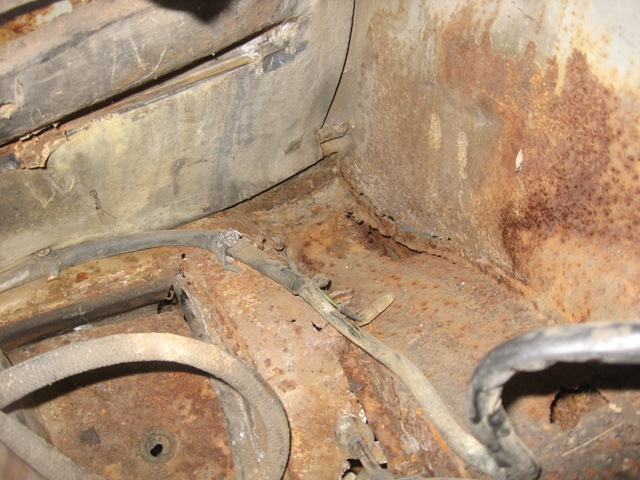
Posted by: r_towle Aug 11 2009, 09:16 PM
Okay so I'd still like to see a how to thread.
Brad posted a pictorial a few years back. If you're lucky, he didn't delete the pictures
Might have been on Sean's old white car?
AndyFound it in the tech articles but no pics
Think in 3D
All you care about is the final location of the hole...the hole that holds the inner suspension bolt.
Now...measure forward to the firewall.
That gets you in position front to back.
Measure from one hole to the other...
That gets you at the right width.
Lastly you need to measure down from the longitudinal to the hole.
This gives you the three measurements that you need.
Rich
Posted by: Racer Chris Aug 12 2009, 07:54 AM
In my experience, if the long is in good shape the console only fits well in one place, therefore pretty hard to get it wrong.
Since your console is broken already use the left side for the measurements that Rich suggested.
Posted by: Shade Tree Aug 12 2009, 02:18 PM
Hey Jamie, I do have that part but it sounds like it's too late. Also, as far as getting it centered properly. Old man Joe, who has a v8 914 about 3 blocks from my office, had a machinist make a jig to get the ear in the right place. He'd let you borrow it. He used it once while building his car and now it sits waiting for somebody else to have a rusty suspension ear. Anyway, you have my number. I can introduce you to Joe and you'll have the stuff you need to get it right without a struggle.
Rich.
Posted by: roadster fan Aug 12 2009, 09:07 PM
Hey Jamie,
When the new part arrives it will be pretty obvious what you have to remove to make it work. Just measure the one that is in there in a couple of spots and record them. The new one will really only fit right where your damaged console is but just double check with the measurements.
You can drill out the spot welds if you want (about 50 on the engine bay side alone, more on the bottom) or just cut and grind the old one out. I would mark the old one's position with a sharpie and go to town.
You are lucky since you dont have to save the cooling tin shelf that goes around the ear. Is yours still there or already removed? That is the piece that gets in the way. Oh and the area around the motor mount on the long also, but that is easier than the engine tin shelf. Hope this helps, maybe you can do the tutorial and they will make it a classic! 
Jim
Posted by: JRust Aug 13 2009, 12:46 AM
Hey Jamie, I do have that part but it sounds like it's too late. Also, as far as getting it centered properly. Old man Joe, who has a v8 914 about 3 blocks from my office, had a machinist make a jig to get the ear in the right place. He'd let you borrow it. He used it once while building his car and now it sits waiting for somebody else to have a rusty suspension ear. Anyway, you have my number. I can introduce you to Joe and you'll have the stuff you need to get it right without a struggle.
Rich.
Hey that sounds great Rich. I'll give you a call. I need to meet a couple of the guys you were telling me about down there. Talk to you soon
Posted by: JRust Aug 13 2009, 11:01 PM
I got my new suspension ear today. Thanks GPR (HWGunner) for getting it out so quick. I only ordered it monday. You guys are quick 
I am going to pull my drivetrain satuday. The get to grinding off the many spot welds. May do a mixture of drill/grind depending on location. I hope to get it out & prepped for the new one. I will see if I can get the jig Rich mentioned too. Then I just need to bribe on of my buddies to come by & for me
Posted by: JRust Sep 15 2009, 02:43 PM
Okay so an update is in order. Have my drivetrain all out & am ready to grind the welds. I've got EyeTrip (Cory) coming down saturday to weld the new one in place for me. Swapping him a transmission for welding for me. Love trade .
I am hoping to get it all ready & do the falling leaf tour next month. Had more stuff I wanted to do with the motor out but I'll settle for shifting my drivetrain back the 1" 1/2. That will help me get my firewall back a little more. The remote Electric pump will wait till winter . After the PNW Tranny clinic I just want to drive my 914 again. Also excited to see how much difference the "h" gear will make on the hwy
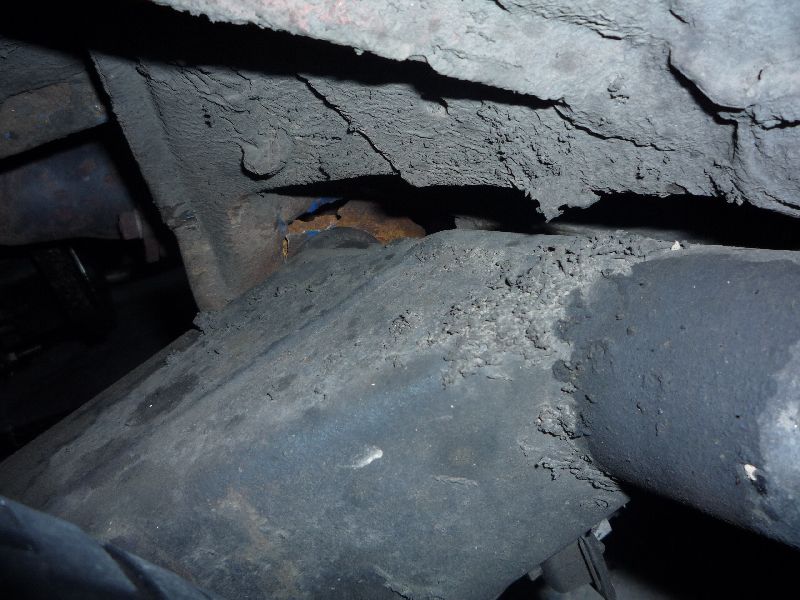
Posted by: JRust Sep 17 2009, 11:05 PM
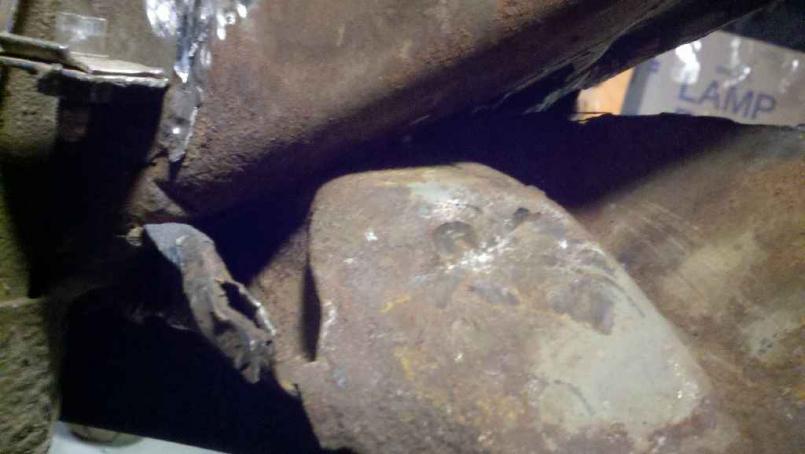
Okay so eI went to start grinding welds. Looks like there was some metal added below. There is a piece that overlaps where the replacement goes underneath? SO I am not sure how much to take off. Not sure if my picture will show it that well
Attached thumbnail(s)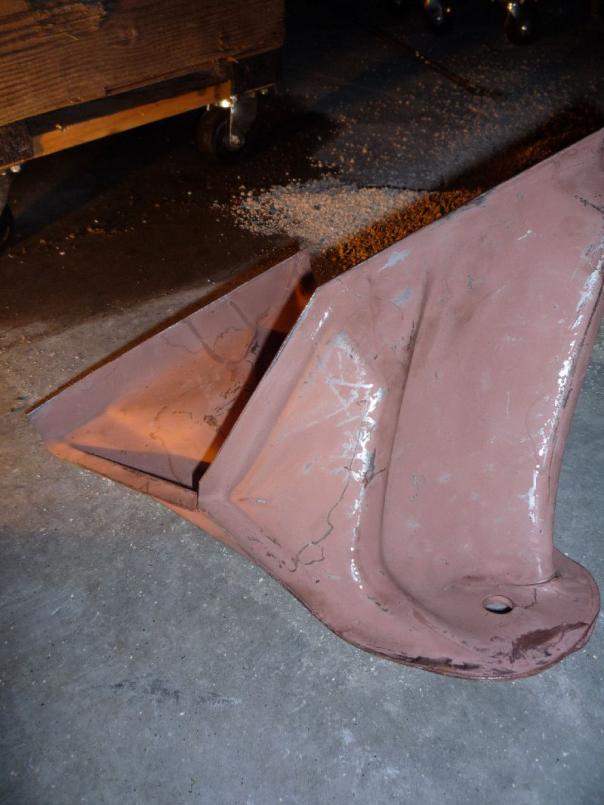
Attached image(s)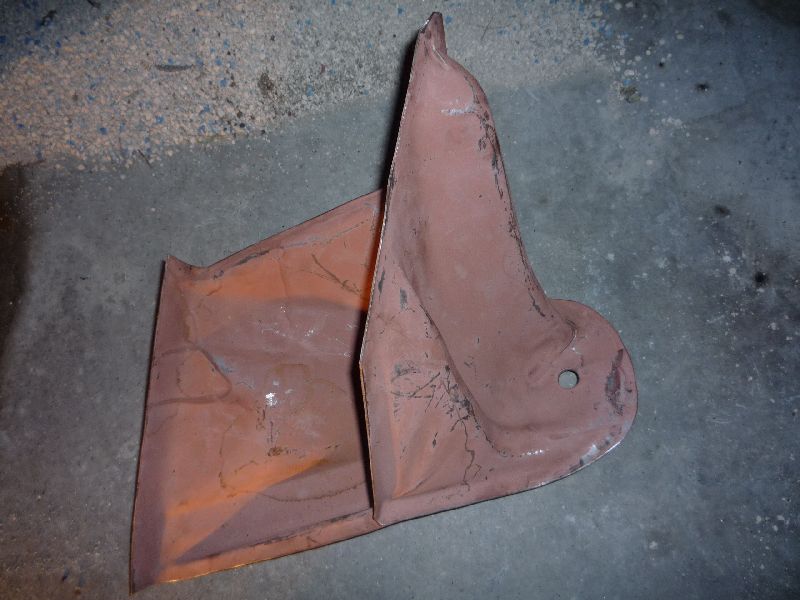
Posted by: 914_teener Sep 17 2009, 11:25 PM
This is a great post. Keep the pics coming. I was looking at this part yesterday. ![popcorn[1].gif](style_emoticons/default/popcorn[1].gif)
Posted by: JRust Sep 17 2009, 11:40 PM
I'll put a wire brush attatchment on my grinder tommorwo to see how large the piece is. Just hoping someone would chime in with the info
Posted by: FourBlades Sep 18 2009, 06:32 AM
The inner and outer suspension points are connected after they are put on using
a plate of 14 guage overlapping and bent over both. Around the middle pages
of my 73 restoration I have pictures of how I put my console on and put on
the overlapping reinforcement. I just made one out of scrap metal and welded
and bent it progressively over the parts.
http://www.914world.com/bbs2/index.php?showtopic=79106&hl=starting%201973%20restoration&st=100
John
Posted by: Beanie Boy Sep 18 2009, 07:55 AM
"Project 6" did a recent complete suspension console replacement. He did some pics and has some input.
Posted by: JRust Sep 18 2009, 11:14 AM
The inner and outer suspension points are connected after they are put on using
a plate of 14 guage overlapping and bent over both. Around the middle pages
of my 73 restoration I have pictures of how I put my console on and put on
the overlapping reinforcement. I just made one out of scrap metal and welded
and bent it progressively over the parts.
http://www.914world.com/bbs2/index.php?showtopic=79106&hl=starting%201973%20restoration&st=100
John
That is perfect thanks for the link & explanation. I figured it was just a plate but didn't want to take the chance of screwing up another part. It would have been obvious had I got all the undercoating off before asking. Was just limited in my time in the garage last night. I'll get it all cleaned up tonight. Welding in the new ear tommorow with some help from EyeTrip from the world. I also have CFR's reinforcement piece to weld on both ears. I didn't get the brace but do plan to do that eventually too. I'll post some more pics as I go. Going to document each piece & make a consise tech article on it. That way it will be a brief & not involve someone going thru a whole thread. Just to find the info they want on replacement. How well it turns out remains to be seen
Posted by: JazonJJordan Sep 18 2009, 02:31 PM
So I notice my passenger rear wheel camber was way off. That side of the car was sagging a little bit. I figured something came loose. I jack up that side of my car
Take a look at my suspension ear
Tremendously worthwhile project. We make that part of course and have many in stock

Posted by: JRust Mar 23 2011, 09:57 PM
Okay so fast forward a year & a half. I am now getting to my suspension ear again. Spent some time grinding off the reinforcement plate under the suspension ear off. What a PITA! I stopped after getting a little overagressive & going through my frame. . Not alot but I couldn't see for  with all the sparks & I was frustrated it was going so slow. So I bailed last night pissed off for being an idiot (not a first ). I will be working on it more this weekend. A friend was going to come down tommorow night to weld the new one in. I had to put it off until next week to be sure I would be ready.
Some of the suspension ear welds I can't get to with the grinder either? Guess maybe a dremel with the right tip. I will drill out the rest of the pinch welds up top this weekend. Then I'll tackle the underside with the top done. Should be a little easier doing the bottom with the top off & out of the way. Grinding effectively is an art I need to get much better at though  (I thought my head might last night)
Posted by: Eric_Shea Mar 23 2011, 10:54 PM
You should have driven 9 hours to McMarks back in 2009. I woulda been done a couple years ago! 
Posted by: sean_v8_914 Mar 24 2011, 07:52 AM
sarch my screen name. I have posted a few replacements (I hope it was not on 914club)
these things rust inside, get weak then break. brace it up only if you track it with fat sticky tires. HP has nothing to do with it. grip is what determines this.
add spot welds to the inside seams
Posted by: sean_v8_914 Mar 24 2011, 07:53 AM
I attach the replacement with screws, then do a mock-assembly to check toe adjustment
Posted by: JRust Mar 24 2011, 10:01 AM
I attach the replacement with screws, then do a mock-assembly to check toe adjustment
I was planning on doing that to make sure everything is in the right spot. I sure as hell don't want to do this twice
. It's about time I get to it. I've let to many projects leap frog this one. Pretty pitiful as none of them are working yet. I could have fixed this a year ago & been driving this 914 again . I guess better late than never. 
Posted by: JRust Apr 1 2011, 11:20 PM
Made some progress tonight. I got the upper half of the suspension ear off. I'll be finishing up the bottom half tommorow. Damn it took a while to do the top. I've got quite a bit of the bottom allready. Getting a little better feel for my grinder now. My battery tray had some rust on it & I cut it off. There is some on the wall there also. The hell hole is solid but I have some surface in that hole area I need to clean up. I still need to get off the small section of battery tray attatched to the side. I'll get that off tomorrow too. Then clean up, prime & paint the area. Well not paint yet. I need to get my new ear welded on first.
Overall I had a much better night working on it that the last time  .
.
Attached thumbnail(s)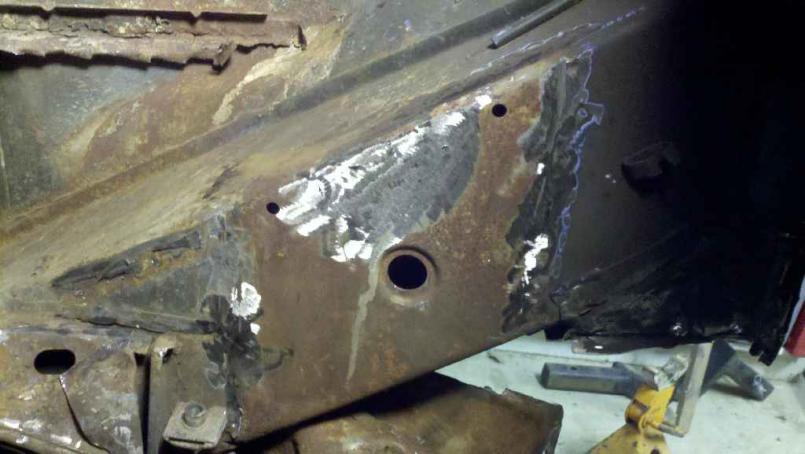
Posted by: computers4kids Apr 2 2011, 08:53 AM
Made some progress tonight.
Jamie,
This is good news. I just don't know how you can go between 3 projects, financially or energy. Although, I do have project envy thinking about all of them. I'm especially fascinated with the suby conversion...I guess because its so different. Hopefully my job will give me some freedom this Summer. If I get to go to the WCR, it would be nice to come early by your place and give you a hand if you want on whatever project you need help with.
I would like to see you get your LE on the road, or your V8. Not having a teener to drive would totally suck. In a perfect world, at least for me, I would like to have a fun teener to drive daily and a project in the garage that I can take my time with.
Posted by: J P Stein Apr 2 2011, 01:18 PM
It's kinda late now but.....it's better to fix it before it breaks.....easier too.
If one side goes, the other is probably close behind, me thinks.
There are a few things can do that (I believe) help "things" along without turning it into a major project. Seam welding everything in the area ....both sides, including the pinch seam around the perimeter of the ear itself. I did that long ago and it never broke.....but it didn't have my total trust.
So, I made a major project of it.
The "since I'm here" scenario can be a good thing.
Attached thumbnail(s)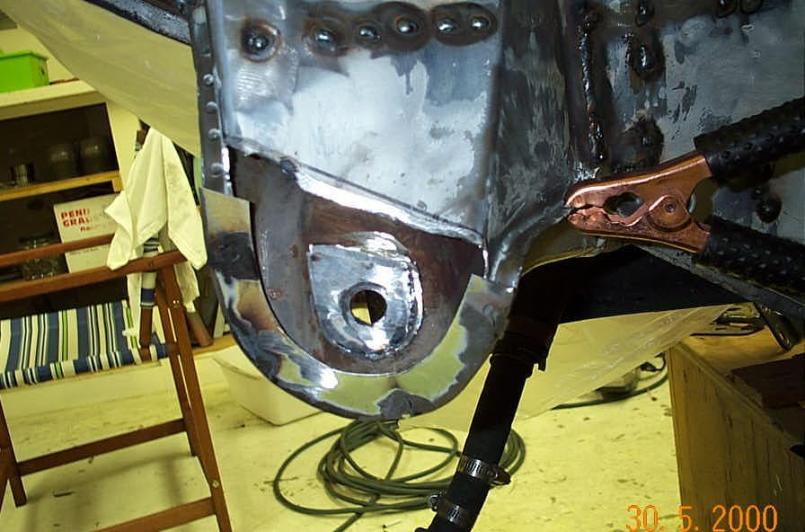
Posted by: JRust Apr 16 2011, 10:55 PM
Made great progress today! Ian came down to weld my new ear in place. I needed to clean the metal up more in prep. Then did alot of measuring to make sure we got it set in place. Always nice having another 914 there handy to measure off of. Anyway the new ear is in & nice & solid. I can't wait to get my v8 off the stand & get a tranny bolted up. Although with the clinic coming in a few week probably not much point to that. I do need to finish cleaning the battery tray area. It was rusted but the hell hole is in good shape. Still there is some on the wall I need to clean up. So I'll spend some time in there with a wire wheel. Then repaint it before the motor get's back in place.
Huge thanks to Ian for coming down & for me. Don't worry I will be hooking you up with plenty of parts during your build
Attached thumbnail(s)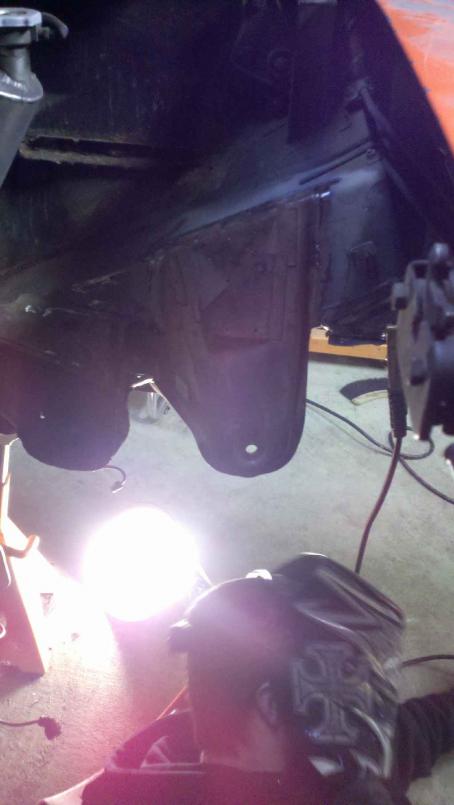
Posted by: IM101 Apr 16 2011, 11:58 PM
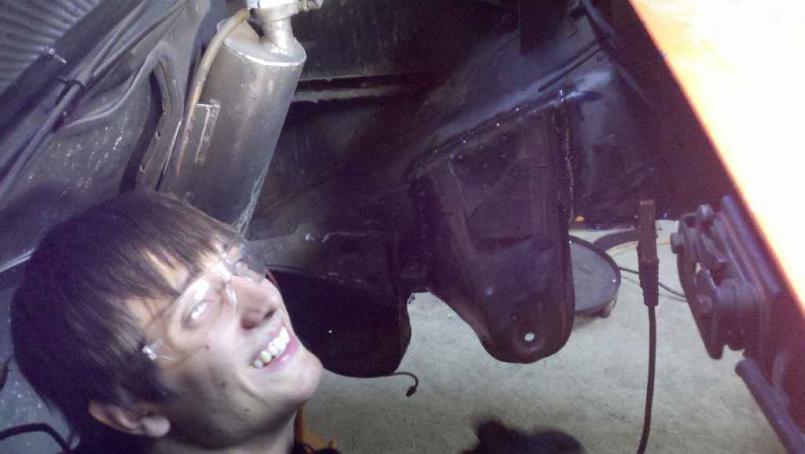
Wow that is a nice angle on the photo, that picture was taken right as i was about to attack and bite Jamie thus enabling me to control him with my vampire powers and make him give me parts from his stash,  evidence:
but in all seriousness no problem man it was great fun hanging and working on a 914
and I'm looking forward to helping you get your flock ready for the wcr!!
Posted by: PeeGreen 914 Apr 17 2011, 12:10 AM


Posted by: JRust Apr 17 2011, 09:11 AM
Wow that is a nice angle on the photo, that picture was taken right as i was about to attack and bite Jamie thus enabling me to control him with my vampire powers and make him give me parts from his stash,
evidence: but in all seriousness no problem man it was great fun hanging and working on a 914
and I'm looking forward to helping you get your flock ready for the wcr!! You funny man .I have to admit I woke up more excited than I was last night. Just thinking baout getting that puppy back on the road. I may just start getting all the pieces out today. Well I need to clean up the battery tray area first. So I'll tear into that this afternoon. Yeah progress
 .
.Not to mention I have my glass flares to install on this car. I think for my first try I am just going to use rivets. If I like it & plan to keep the glass flares. I'll get the dzus fasteners for it.
Posted by: montoya 73 2.0 Apr 17 2011, 04:02 PM

Posted by: JRust Apr 18 2011, 10:42 PM
I went out tonight & got the rest of the old battery tray out. Cleaned up the whole area of surface rust. Primed it all & emailed restoration design. I need a new battery tray & support. I'm hoping they can get it out quick so I can get it this weekend.
Posted by: IM101 Apr 18 2011, 11:37 PM
I went out tonight & got the rest of the old battery tray out. Cleaned up the whole area of surface rust. Primed it all & emailed restoration design. I need a new battery tray & support. I'm hoping they can get it out quick so I can get it this weekend.
sounds like i will have a couple welding jobs to do when im down next, while I'm at it hit me with a measurement from the firewall to the ear and i can bring some tubing and plates to do some cfr style supports.
Posted by: JRust Apr 19 2011, 05:37 PM
sounds like i will have a couple welding jobs to do when im down next, while I'm at it hit me with a measurement from the firewall to the ear and i can bring some tubing and plates to do some cfr style supports.
Done deal Ian! Restoration design was able to get my parts out today. Hopefully I will see them by friday. Things are looking great but I think I will hold off on installing the motor. I will be rebuilding the tranny at the clinic in 2 weeks. May as well just wait until I get back.
The suby914 is a different story. I think I am going to put it back in my car with the shift rod in place. Then tow it to the local muffler shop to get the exhaust done. That way I can actually have everything ready for it.
Posted by: hot_shoe914 Apr 19 2011, 07:22 PM


Posted by: JRust Apr 22 2011, 12:17 PM
So here is a pic with the battery tray gone. All the surface rust cleaned off. Then everything primed. I've still got a couple small pieces to grind off I missed. Basically ready to install my new support & tray. I also have the CFR suspenion ear stiffening support to go on. Along with the extra piece welded to the firewall & the ear for extra support.
Thanks to Restoration Design for the battery support & tray. I should have them soon
Attached thumbnail(s)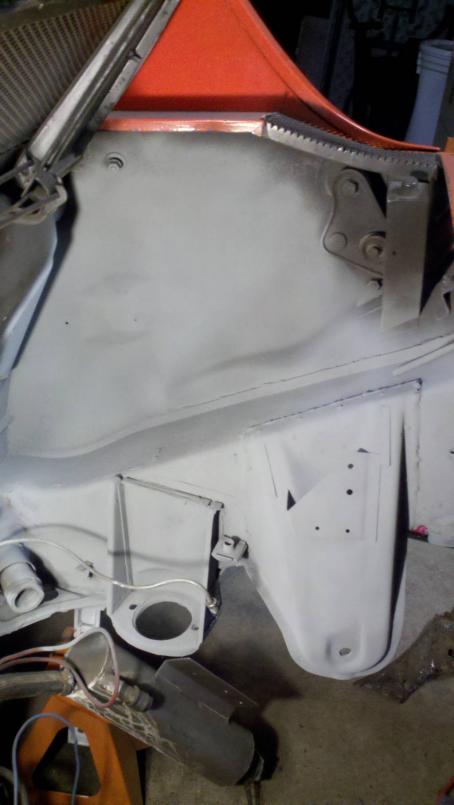
Posted by: PeeGreen 914 Apr 22 2011, 12:24 PM
Or you could take this excellent time to relocate the battery 
Posted by: JRust Apr 22 2011, 12:51 PM
Or you could take this excellent time to relocate the battery
Yeah I know but I have never been a huge fan of putting the battery in either trunk. So I doubt I will move it. I'm good with it in the stock spot
Posted by: JRust May 1 2011, 05:36 PM
Battery tray installed & one CFR reinforcement piece for the suspension ear. Passenger side is on at least. We'll add the support bar to the firewall next time. Along with doing the driver side. Thanks again for the help Ian 
Attached thumbnail(s)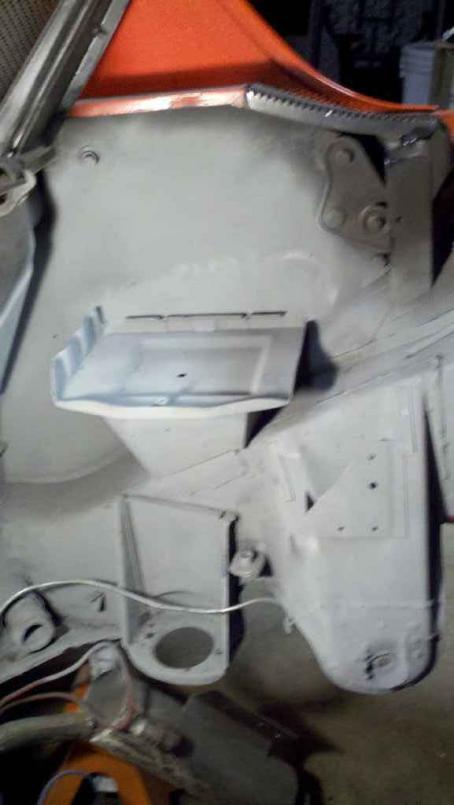
Posted by: JRust Jun 3 2011, 08:26 AM
Thanks to Ian my suspension ear is all finished. We added the CFR reinforcement to both ears. Then added a plate on the firewall. Then cut & welded a bar from the ear to the firewall. Really turned out nice.
Ian stayed until midnight welding it up for me last night. I know he had a busy week & I really appreciatted all the welding he has done for me. Next time he's down I am going to get some welding lessons too. You rock Ian
Attached thumbnail(s)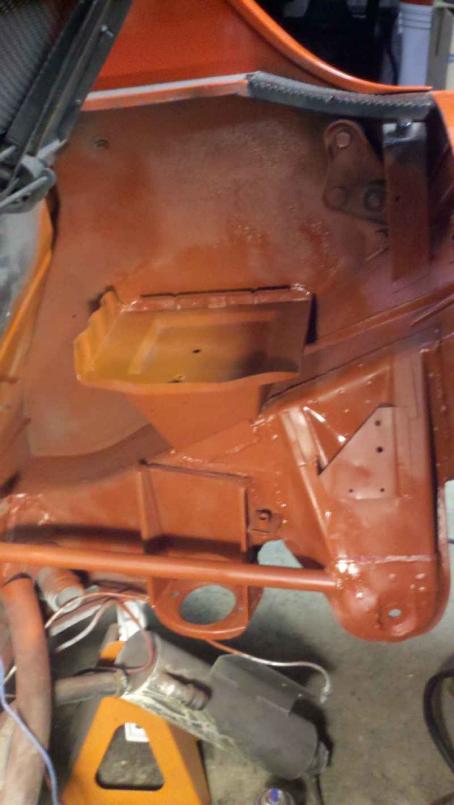
Attached image(s)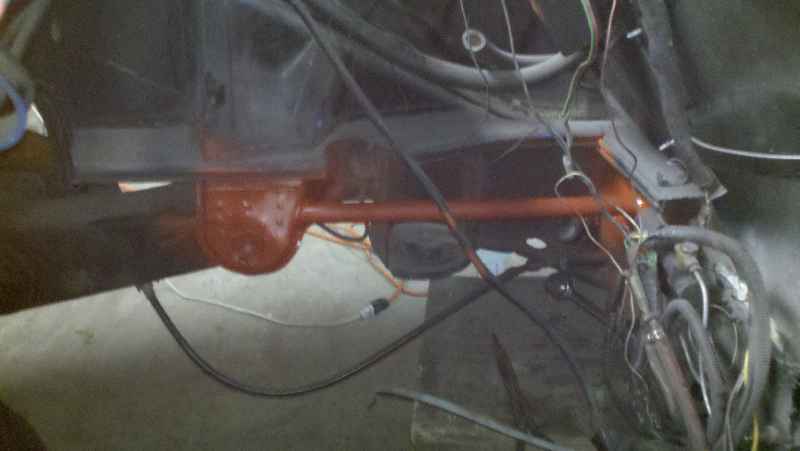
Posted by: sawtooth Jun 3 2011, 08:39 AM
That's looking great Jamie!
Posted by: IM101 Jun 3 2011, 08:03 PM
Hey no problem man. Happy to help we have to get that thing done for wcr!!
Posted by: Steve Jun 3 2011, 08:13 PM
Looks great!!
Just curious does that CFR brace still allow for the heater tube?
Posted by: JRust Jun 3 2011, 11:27 PM
Hey Steve I think you can do the setup & still allow for it. I only used CFR's suspension ear reinforcement. There adjustable brace bar is a much nicer setup. I just went with a straight bar. MY v8 conversion doesn't use the ehater tubes anyway. So I really didn't worry about if it sat in the way of that.
Powered by Invision Power Board (http://www.invisionboard.com)
© Invision Power Services (http://www.invisionpower.com)