Printable Version of Topic
Click here to view this topic in its original format
914World.com _ 914World Garage _ Bringin Sexy Back-
Posted by: ellisor3 Aug 15 2009, 01:43 PM
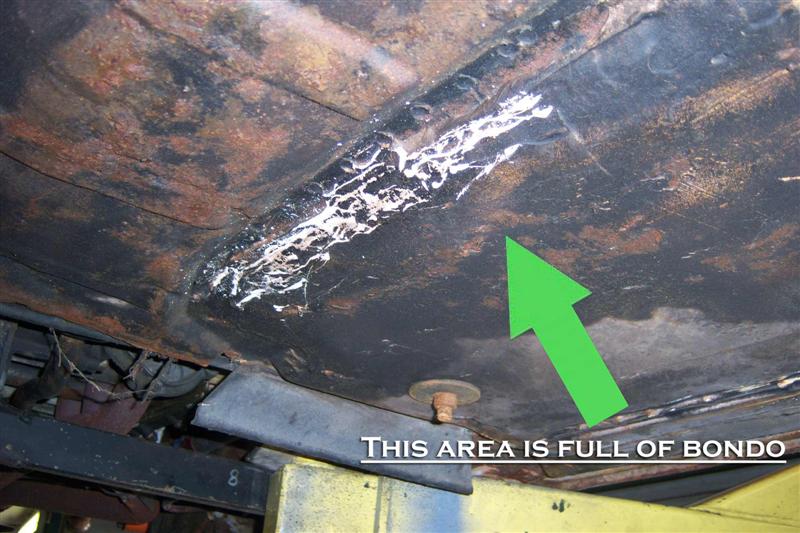
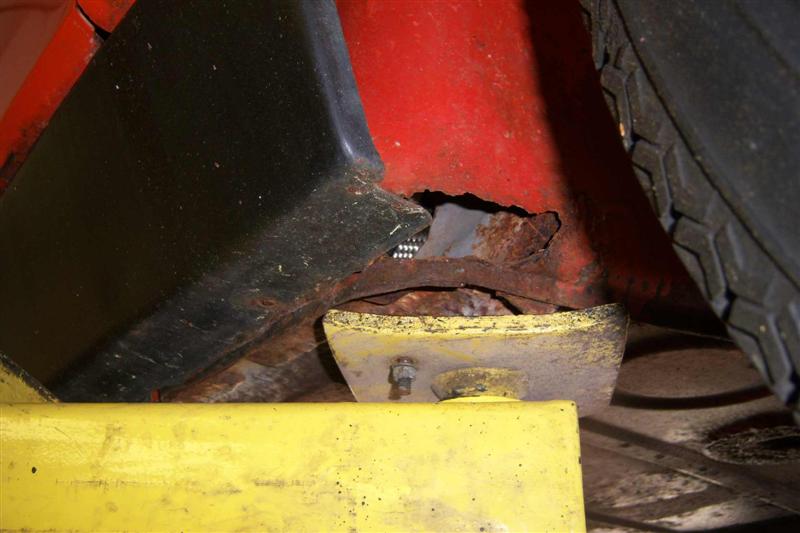
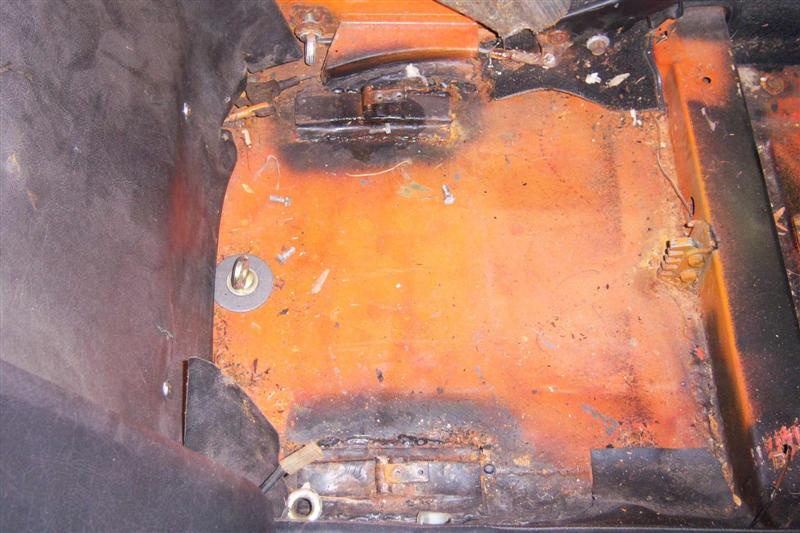
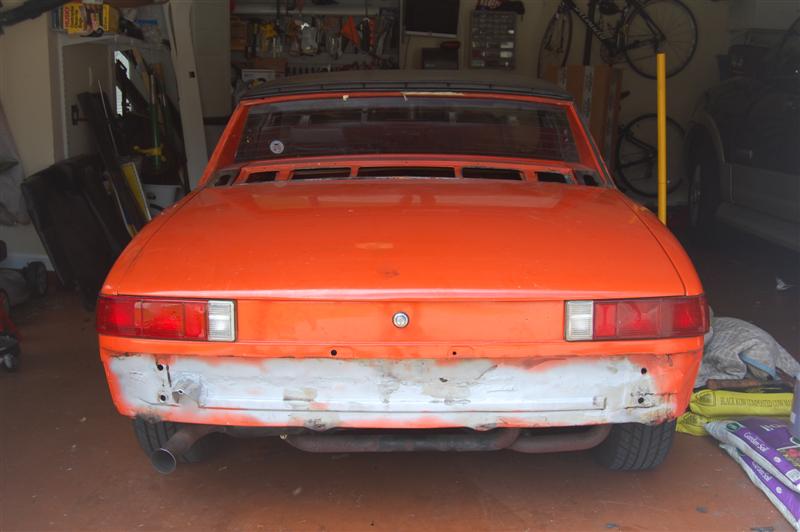
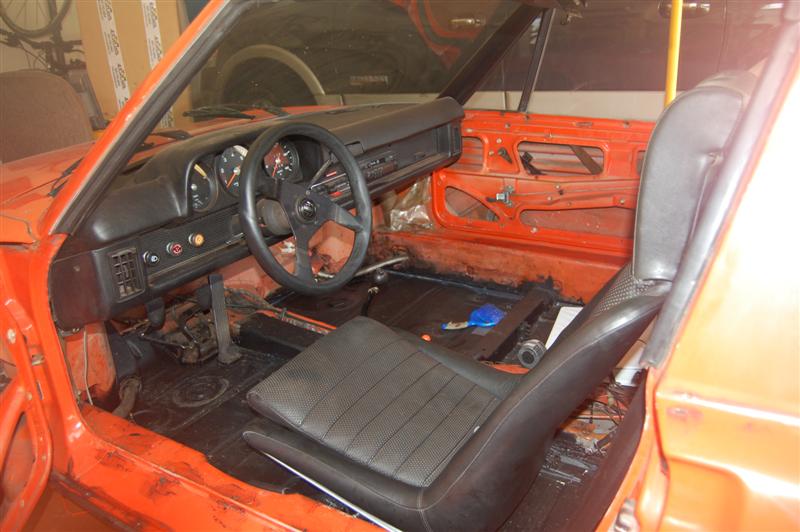
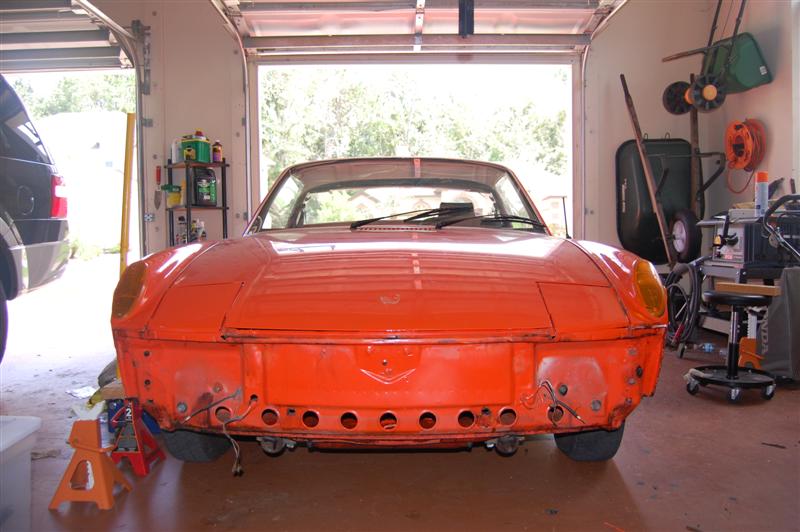
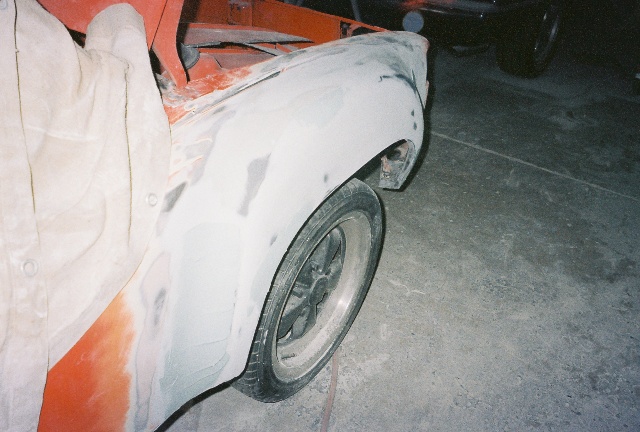
I have not posted the progress of my 73 six conversion, so I thought before I got it to paint I should post some pics. The car was purchased from a guy in Ohio as a "Virtually Rust Free Car". He provided photos and did point out some of the rust spots. He neglected to point out that the car had once been wrecked in the rear and there was no rust from the wreck because they used 40 lbs of bondo to cover it. The entire trunk had to be cut out to fix it, as well as part of the passenger floor panel.
Anyway it is about to go to the painter to get GT Flares, GT Rocker Panels, GT Rear Valence and some new color. All in all this car is in great shape, all things considered. Any way here you go.
Attached image(s)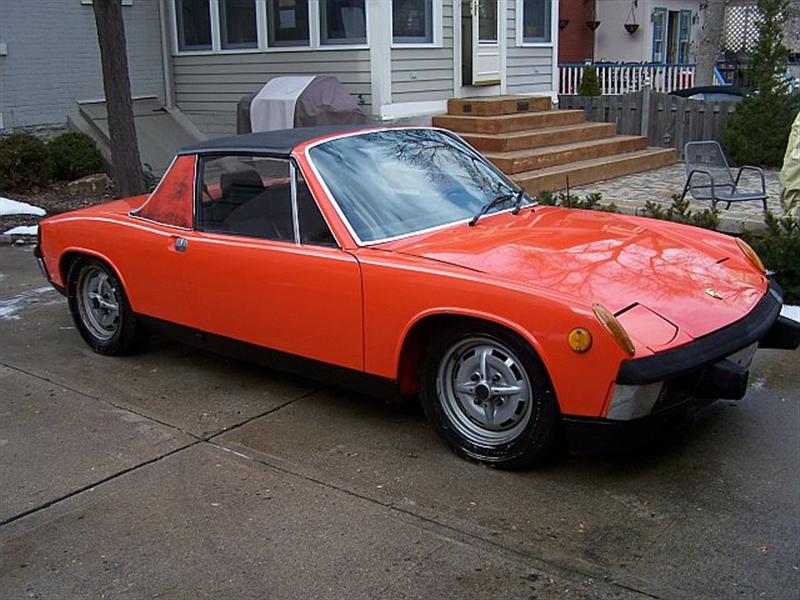

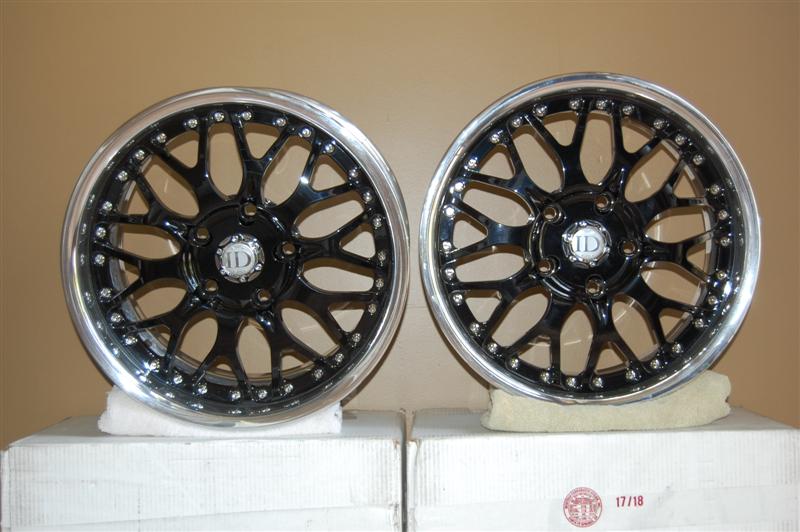
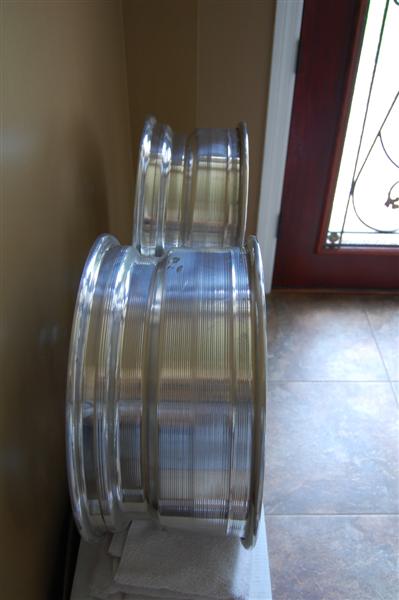
Posted by: ellisor3 Aug 15 2009, 01:48 PM
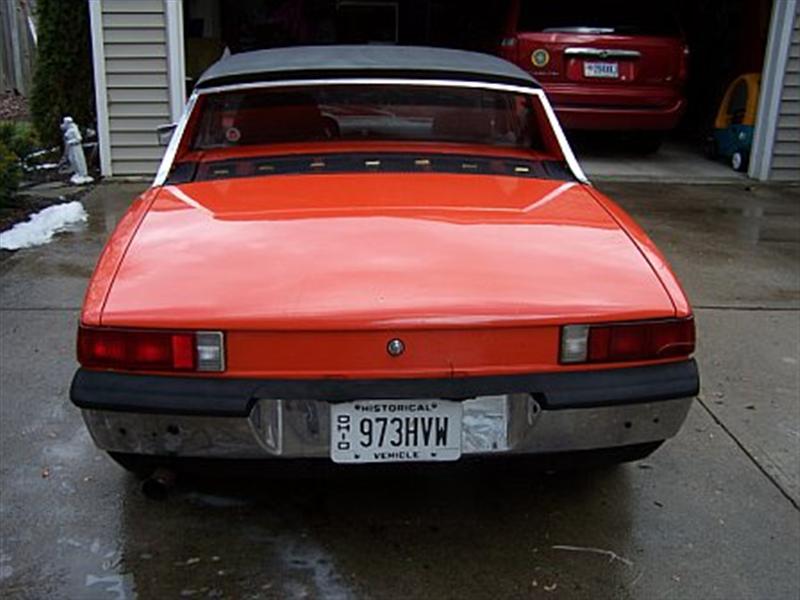
Here are a few more, just got back my chrome from the Bumper Shop. They did a great job. Looks wavy in the photo but not in person.
And I got new wheels. Pretty?????
Attached image(s)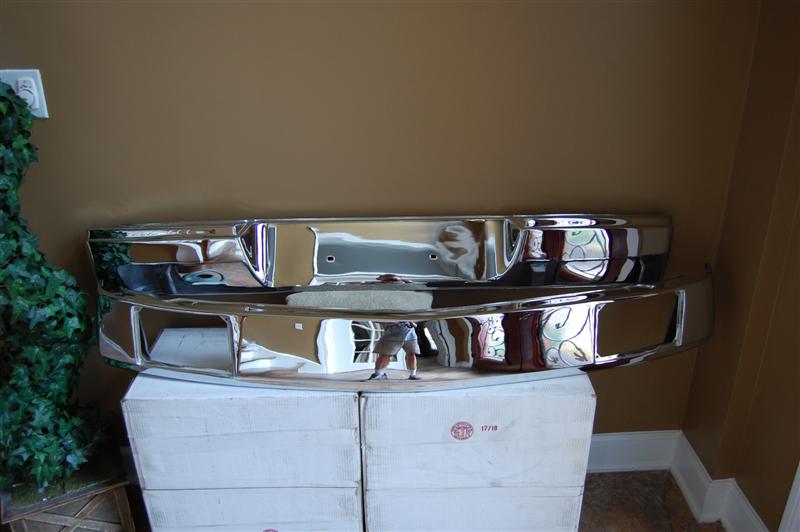

Posted by: rick 918-S Aug 15 2009, 07:35 PM
Nice start! I like the wheels!
Posted by: tat2dphreak Aug 15 2009, 10:48 PM

Nice start! I like the wheels!
 why don't they make those bastards in 4 lug?
those bumpers are sweet!
Posted by: ellisor3 Aug 16 2009, 10:47 AM
Nice start! I like the wheels!
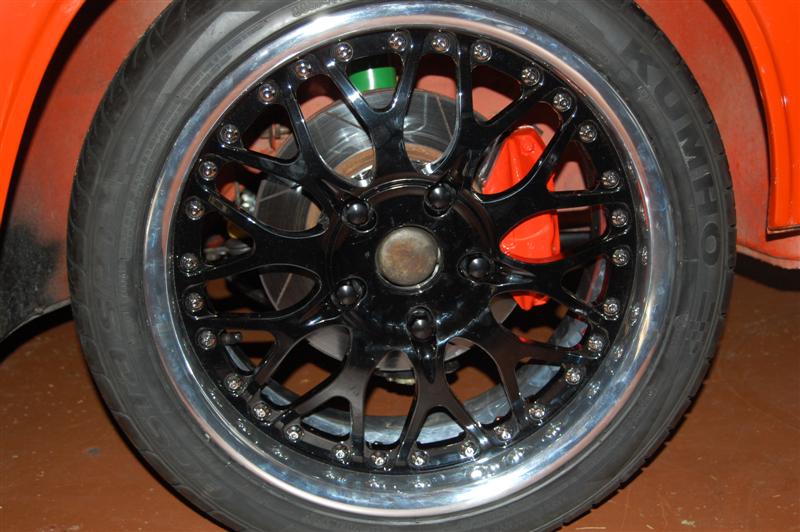
why don't they make those bastards in 4 lug? After a few months of research I did find a wheel company that will do custom offsets an unusual bolt patterns including 4 lug and 5X130. They are not cheap but as you can see they are sweet. I wanted a more modern wheel and this fit the bill.
http://www.introwheels.com/wheels_1.shtml
Posted by: ellisor3 Nov 10 2009, 07:11 PM
Here is another update. I have been slow to post but here is what has been accomplished:
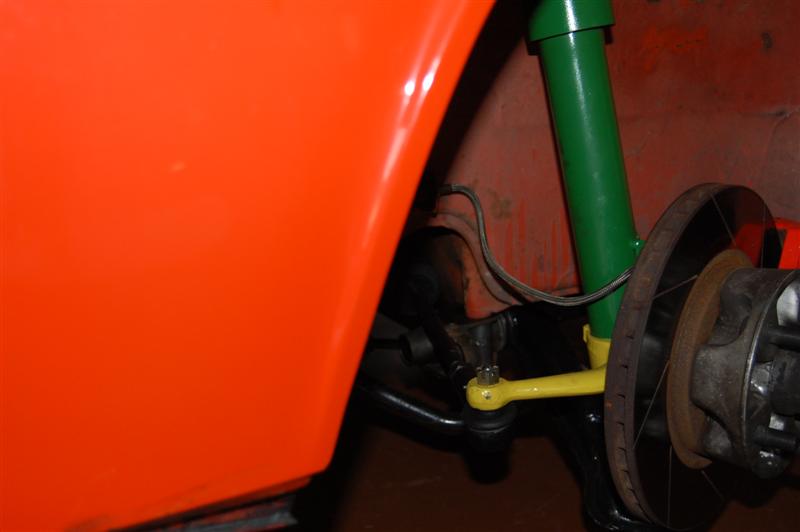
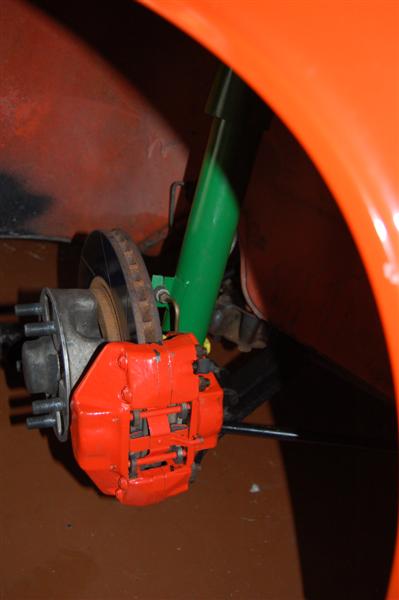
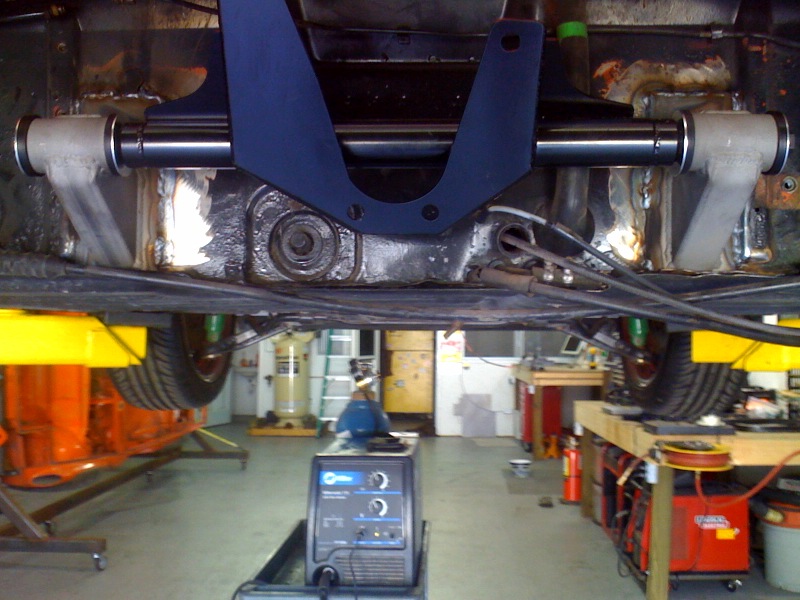
1.)Switched out the front suspension to 5 lug and 911 front end. New steering rack, sway bar, struts, brakes,ect
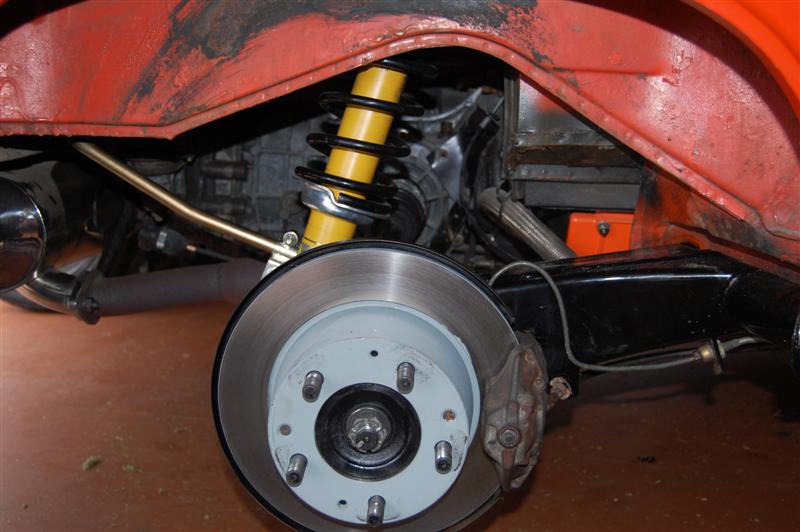
2.) Put in rear sway bar, powder coated the rear suspension, new bearing, new coil overs new 5 lug rotors, thanks eric.
3.) New M&K muffler and prefitting of the rear valence (pic coming)
Since I do not have the GT flares on yet, I shot a couple of photos with it jacked up slightly to see how the new wheels look.
Should be ready to go to paint next week.
Some have asked about the offset for the wheels. Here are my measurements and a crude drawing of the measurements:
Attached image(s)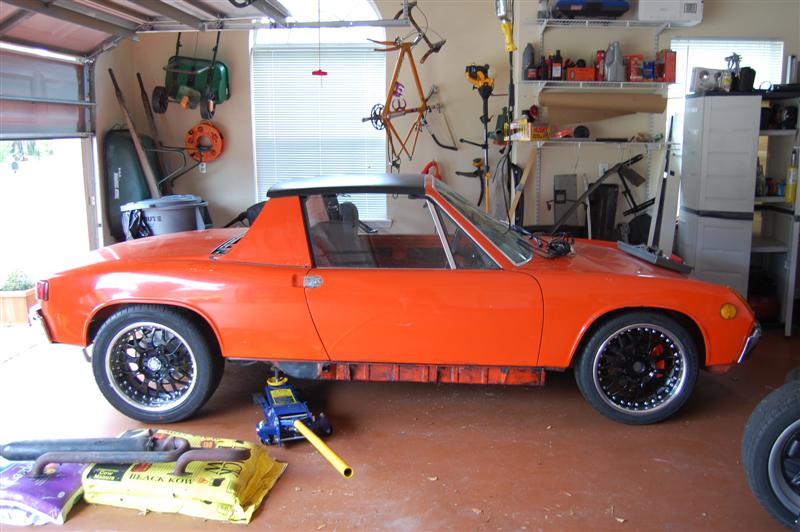
Attached File(s) Rear_Back_Space_Measurements.pdf ( 251.36k )
Number of downloads: 220
Rear_Back_Space_Measurements.pdf ( 251.36k )
Number of downloads: 220
Posted by: rohar Nov 10 2009, 08:07 PM
Looks hot, but I can't read the tire. What size rubber?
Posted by: ellisor3 Nov 11 2009, 06:57 AM
Looks hot, but I can't read the tire. What size rubber?
205/45/17 fronts
245/45/17 rears
Posted by: ellisor3 Oct 27 2010, 04:28 PM
I have gotten WAY behind posting progress on this project. Since I posted last I decided to junk the 3.0 engine and purchase a newly rebuilt 3.2. I will post the new photos from the last year so it seems I am making lightning progress. Here are a few for today. 
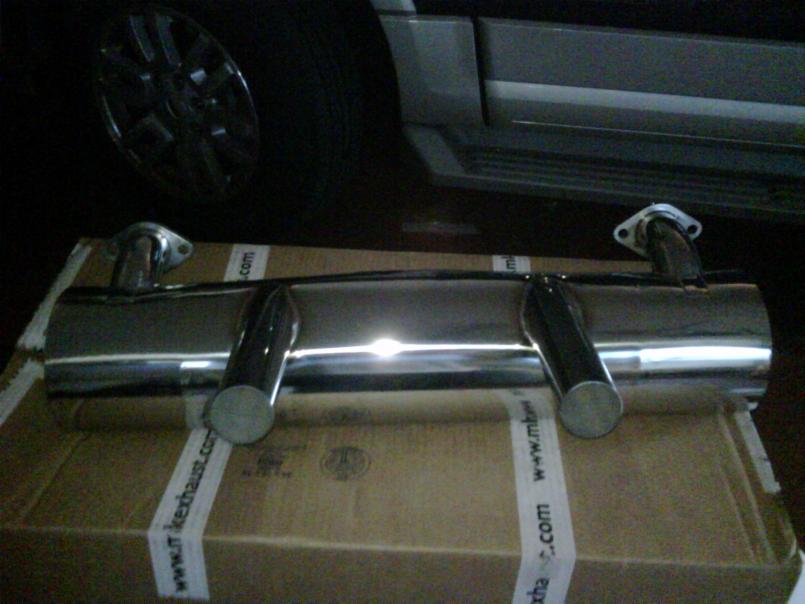
New M&K 2 in 2 out exhaust.
Posted by: markb Oct 27 2010, 05:40 PM
Pictures! I want more pictures! 
Posted by: ellisor3 Oct 27 2010, 06:05 PM
A Few More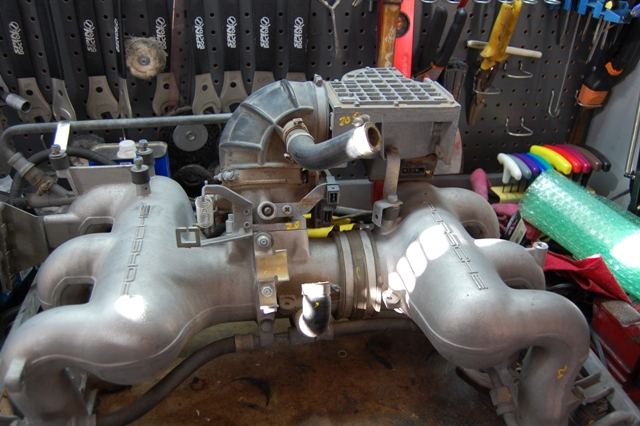
New Fuel Injection for the 3.2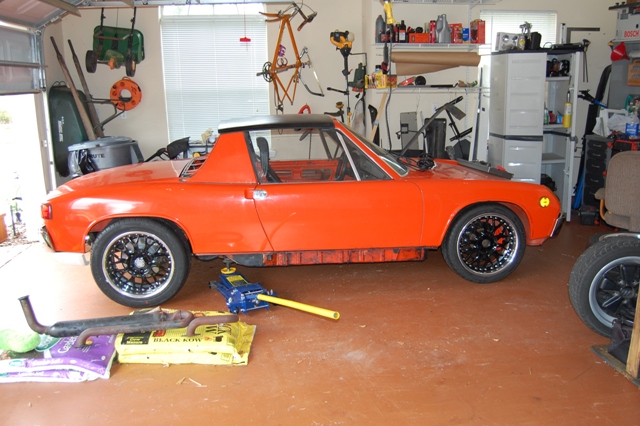
Trial Fit of the new wheels
Posted by: ellisor3 Oct 27 2010, 06:09 PM
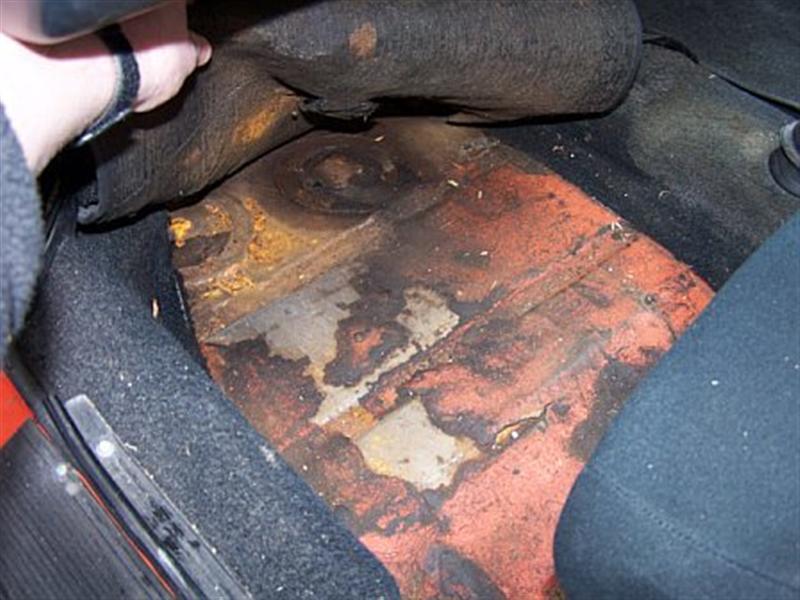
Ok Two More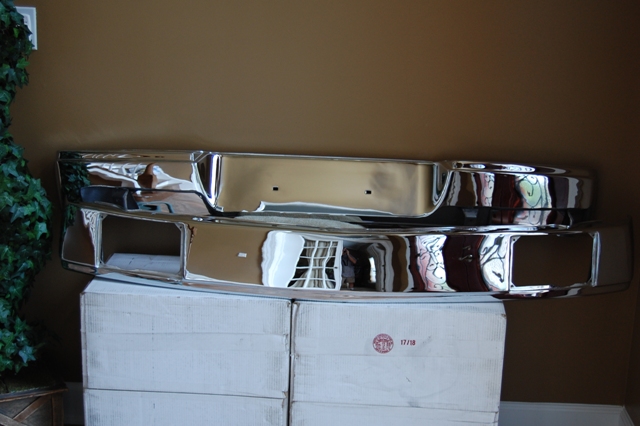
New Chrome Bumpers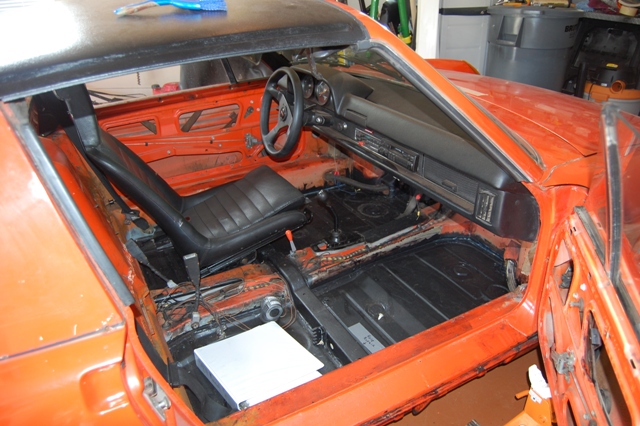
Floor pan tar and rust removed/sealed
Posted by: tod914 Oct 27 2010, 06:45 PM
Looking real good James. Love the way the bumpers turned out.
Posted by: jcambo7 Oct 27 2010, 08:15 PM
Looking great man!
![popcorn[1].gif](style_emoticons/default/popcorn[1].gif)
Posted by: ellisor3 Oct 28 2010, 06:21 AM
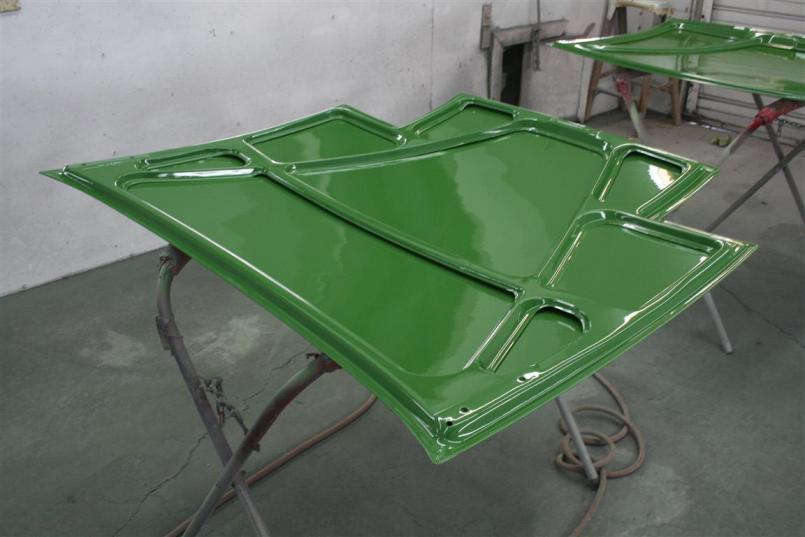
Here are a few more of the items I have collected for the project: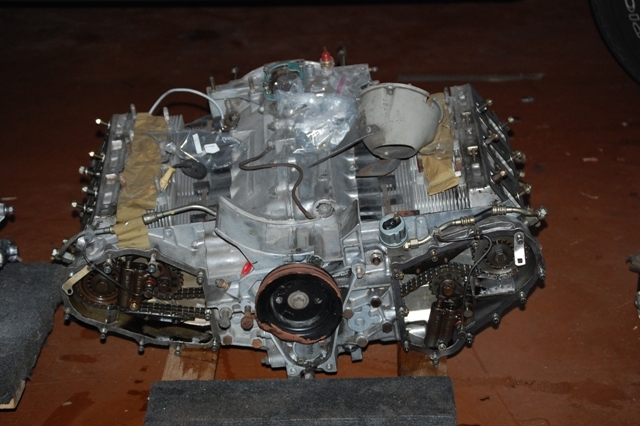
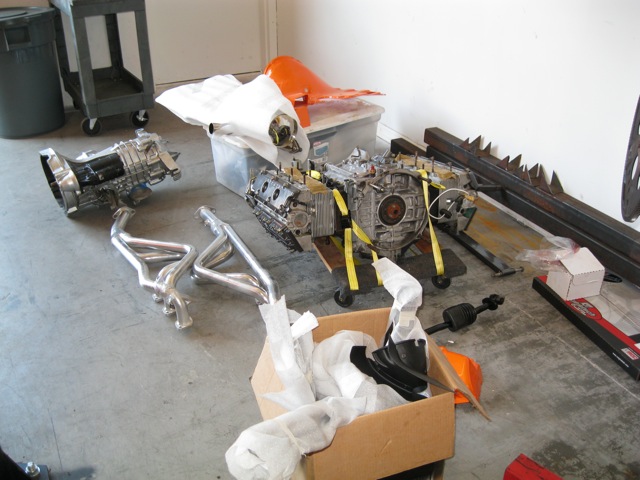
New 3.2 engine, the pulley was damaged in shipping but it is not a problem since it will have a different pulley for the ECU. I originally had a 3.0 engine that came with the car. It had Solex Carbs. I spent the better part of a year trying to get them to run correctly in the car. I eventually decided it was a lost cause and sold the engine and carbs at a huge loss and bought a rebuilt 3.2. This was a huge setback in time and money. Good lesson learned.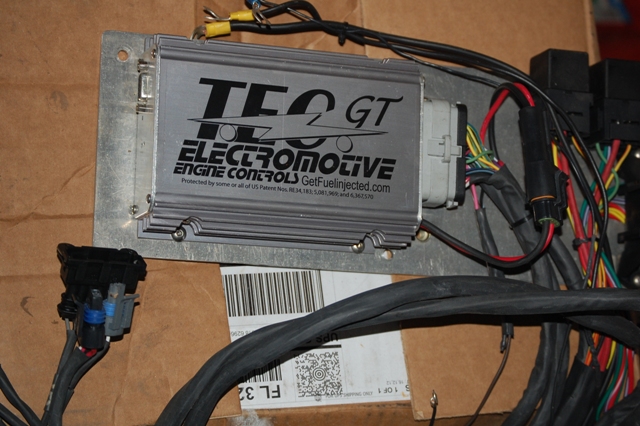
TEC-GT Unit from Clewett Engineering
Posted by: ellisor3 Oct 28 2010, 06:26 AM
A couple more: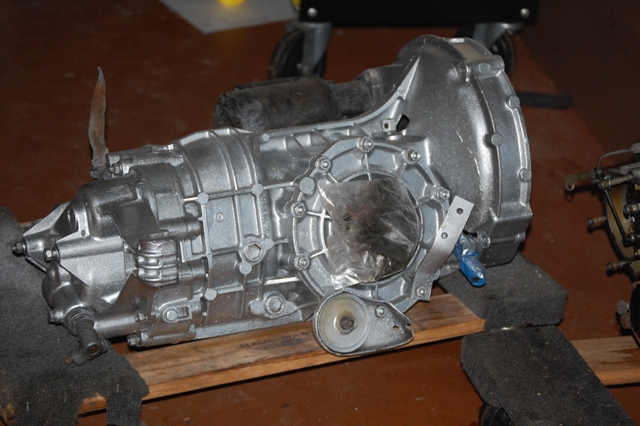
I cleaned and repainted the transmission. Considering how dirty it was, came out pretty good.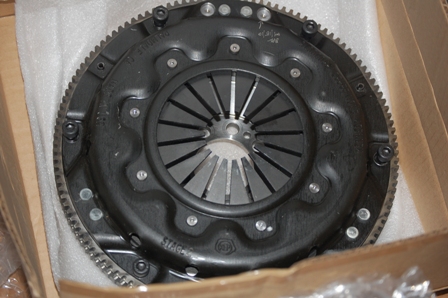
New Clutch Package from Patrick Motorsports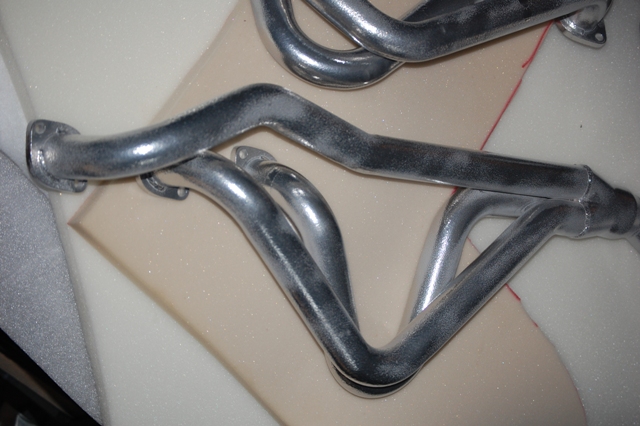
Sent the headers out to get ceramic Jet Coated. If anyone else does this, you need to make sure you clean them up pretty good before you send them, the ceramic does not cover like powder coat would. The color came out a little uneven, but it will even out once heated.
Posted by: mojorisen914 Oct 28 2010, 08:09 AM
Looking good. It's going to turn out great.
Posted by: Drums66 Oct 28 2010, 11:41 AM
.....Smokin 


Posted by: Vysoc Oct 28 2010, 06:44 PM
Nice project, exactly what I will be trying to accomplish in my next life/project.
Great stuff
Good Luck....keep the pictures coming.
Vysoc 

Posted by: ellisor3 Oct 29 2010, 05:34 AM
Ok let's pretend it has been about 3 months since I posted progress. Here are a few more thing I have collected for the project, next week I will post the progress on the paint, it is pretty cool: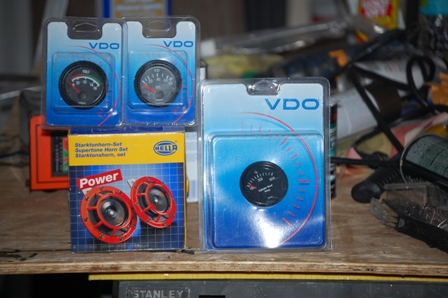
New VDO gauges, head temp, voltage, and pressure plus a pair of Supertones
New Dynamat for the floors and doors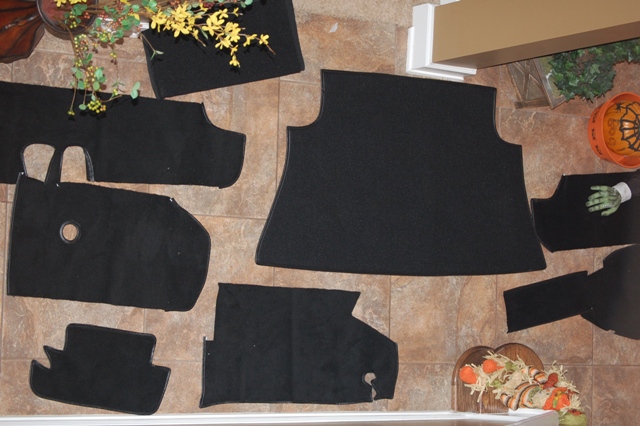
New Carpet kit from Auto's International. I decided not to go with the OEM carpet, I just thought it had a more industrial look/feel. My goal with this project was to take a 914 and bring it forward about 20 years and build it as though price point was not as much a concern, with more modern components. Therefore I wanted a more plush carpet, this is from about '89.
Posted by: ellisor3 Oct 29 2010, 05:39 AM
One More before I get to the paint next week.
I sent out the sun visors to Interior Auto Sunvisors based on a recommendation from someone here. http://www.autosunvisors.com/index.html
They did a fantastic job on the sun visors, the only issue is that they will not be able to reinstall the make-up mirror, so don't let Boy George in your car. 
Attached image(s)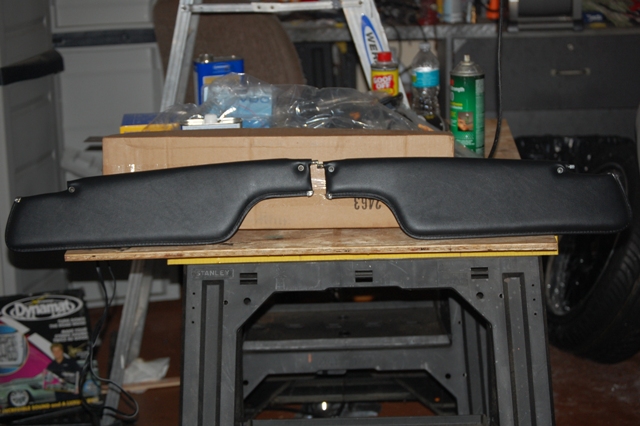
Posted by: ellisor3 Nov 4 2010, 05:41 PM
Ok let's pretend it has been several months since my last post. I have been busy doing some upholstrey (later post), but also getting on the flares and getting some paint on this bitch.
Attached image(s)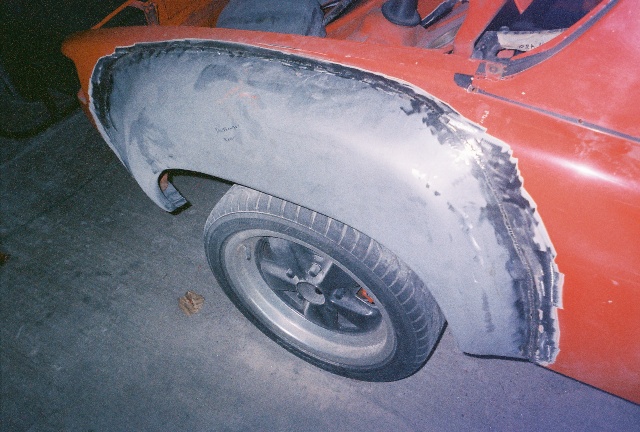

Posted by: ellisor3 Nov 4 2010, 05:49 PM
A couple more
Attached image(s)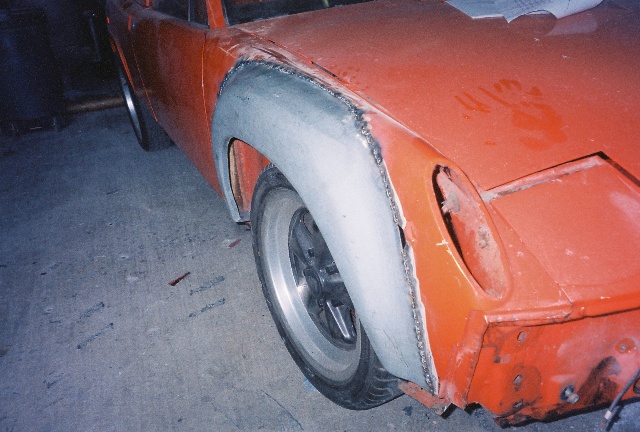

Posted by: ellisor3 Nov 4 2010, 05:53 PM
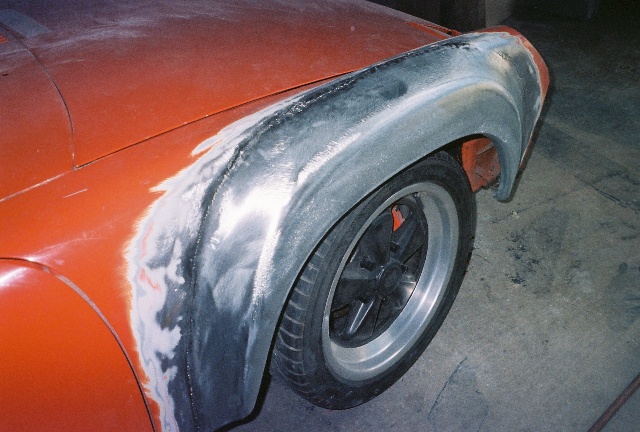
Last Prep before Paint 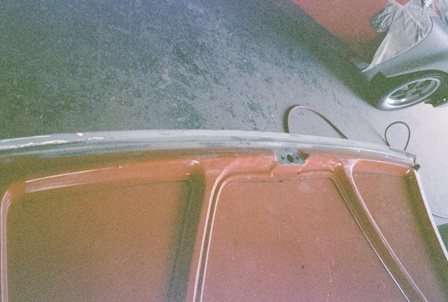
The entire lip of the rear trunk was toast, so we had to rebuilt it, we have the technology
Attached image(s)
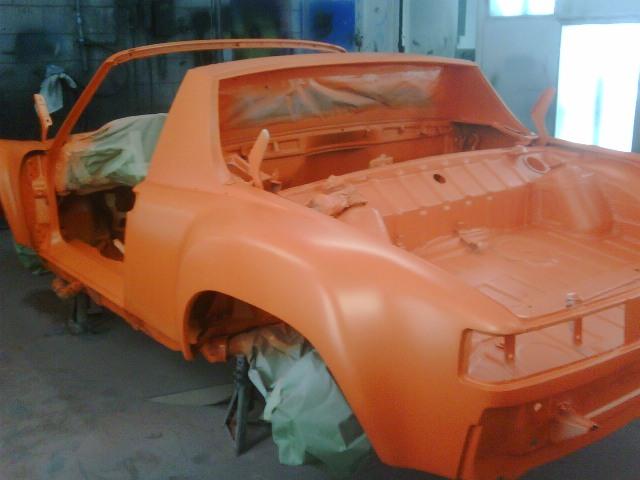
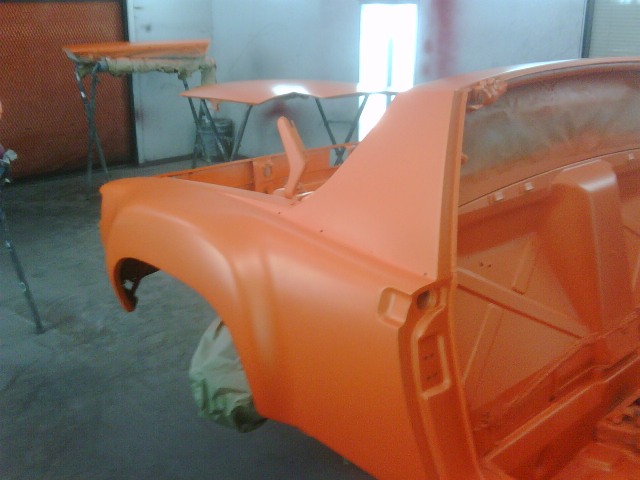
Posted by: ellisor3 Nov 4 2010, 06:00 PM
OK Who Is Ready For Paint????
I did something with the paint I have never seen before in a 914. I really struggled on what to do with the paint. I wanted a "Modern 914" but keep the original heritage. My options were to paint it the original Phoenix Red or do something different. I will show it without the clear to see if anyone can guess.
Attached image(s)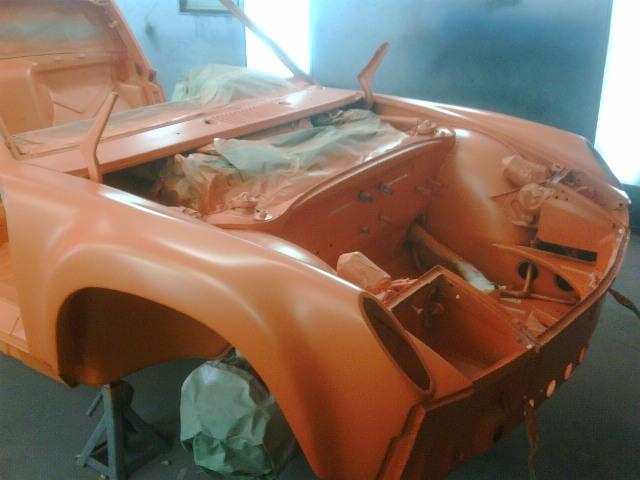
Posted by: Krieger Nov 4 2010, 06:13 PM
I don't know what color it is but leave it like that...no clear just matte, or flatten the clear. It looks really good!
Posted by: Travis Neff Nov 6 2010, 09:33 PM
Looks like you might have some pearl in the paint?
Posted by: ellisor3 Nov 7 2010, 07:16 AM
Looks like you might have some pearl in the paint?
WE HAVE A WINNER !
I have never seen a 914 in Pearl. As soon as I get the trunks and doors on I will post some more photos. All I can say is it came out way better than I expected.
Here was the inspiration:
Attached thumbnail(s)

Posted by: seebobgo Nov 7 2010, 07:43 AM
I have gotten WAY behind posting progress on this project. Since I posted last I decided to junk the 3.0 engine and purchase a newly rebuilt 3.2. I will post the new photos from the last year so it seems I am making lightning progress. Here are a few for today.
New M&K 2 in 2 out exhaust.
I got the two in one out...I want to know how this one sounds.
Looks sweet
Posted by: smg914 Nov 7 2010, 07:50 AM
Looking good!!!!!!
Who did you get to rechrome your bumpers?
Posted by: ellisor3 Nov 7 2010, 08:05 AM
I have gotten WAY behind posting progress on this project. Since I posted last I decided to junk the 3.0 engine and purchase a newly rebuilt 3.2. I will post the new photos from the last year so it seems I am making lightning progress. Here are a few for today.
New M&K 2 in 2 out exhaust.
I got the two in one out...I want to know how this one sounds.
Looks sweet
When I get the engine in, I will let you know. I did test it on the old 3.0 I had and it sounded super.
Posted by: ellisor3 Nov 7 2010, 08:08 AM
Looking good!!!!!!
Who did you get to rechrome your bumpers?
There was a group price from "The Bumper Shop" in LA that was set up by members here. I think they were about $250 each.
Posted by: Kansas 914 Nov 9 2010, 10:39 AM
Your paint shop look a lot like the shop mine is at....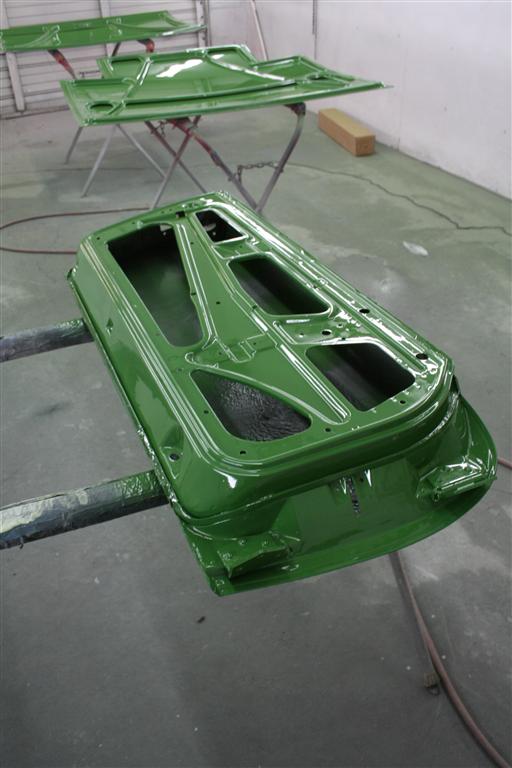
Posted by: ellisor3 Nov 9 2010, 04:27 PM
She is out of paint, starting to put it back together. My camera simply freaks out every time I try to photo this color. Not sure if that is good or bad. Anyway here it is.
Attached image(s)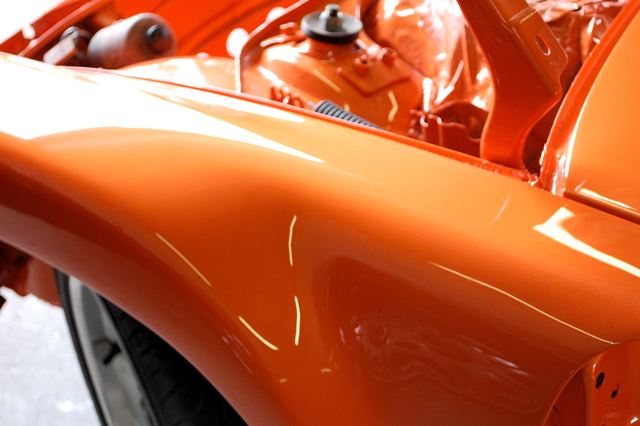
Posted by: ellisor3 Nov 9 2010, 04:30 PM
Your paint shop look a lot like the shop mine is at....
It is like dueling painters.
Posted by: abayer1969 Nov 9 2010, 04:30 PM


Posted by: Travis Neff Nov 9 2010, 10:22 PM
That's dead sexy!
Posted by: Series9 Feb 26 2011, 08:04 PM
With James' permission, I'm pleased to announce that Series 9 will be completing the build of this project. We've scheduled delivery to my shop for mid-March.
Standby....
Posted by: rick 918-S Feb 26 2011, 08:23 PM
Nice!
Posted by: watsonrx13 Feb 27 2011, 03:44 PM
With James' permission, I'm pleased to announce that Series 9 will be completing the build of this project. We've scheduled delivery to my shop for mid-March.
Standby....
Fantastic decision. I know Joe will get it done...

-- Rob
Posted by: Rod Feb 27 2011, 04:04 PM
With James' permission, I'm pleased to announce that Series 9 will be completing the build of this project. We've scheduled delivery to my shop for mid-March.
Standby....
Great news, because I, want to see this...
![shocked[1].gif](style_emoticons/default/shocked[1].gif)
Finished!!!

Posted by: ellisor3 Feb 27 2011, 06:26 PM
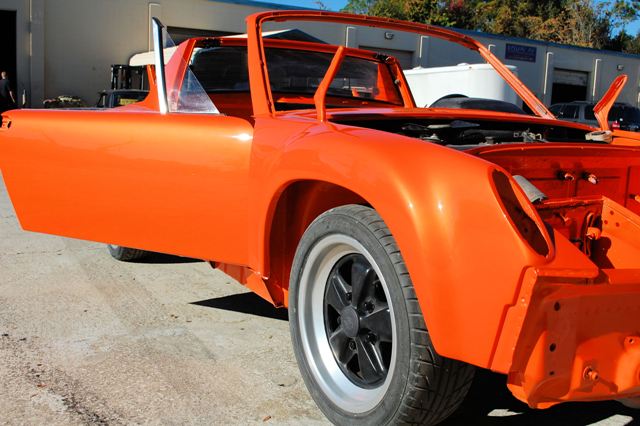
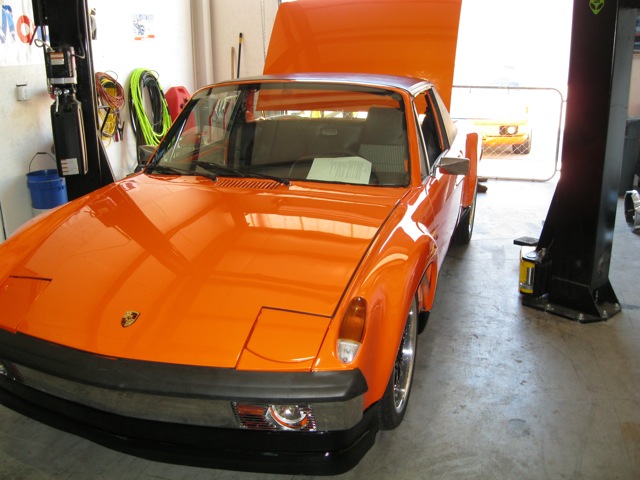
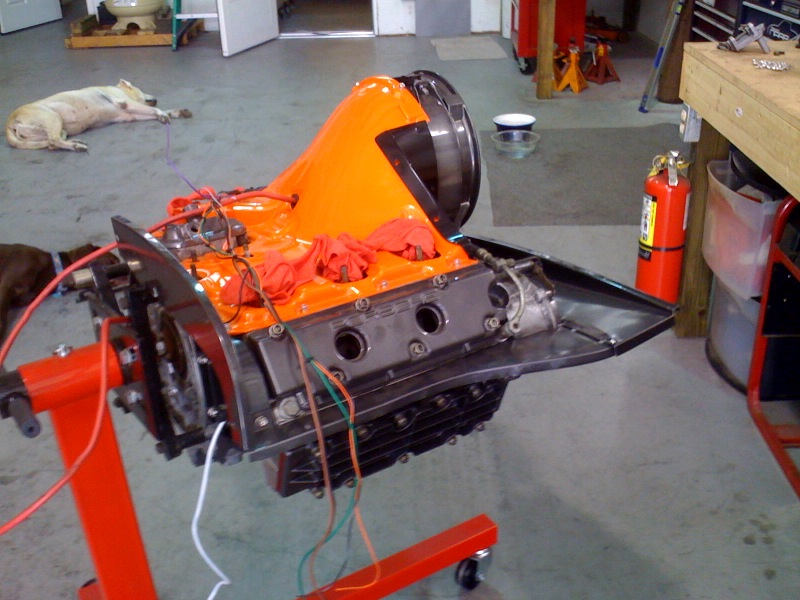
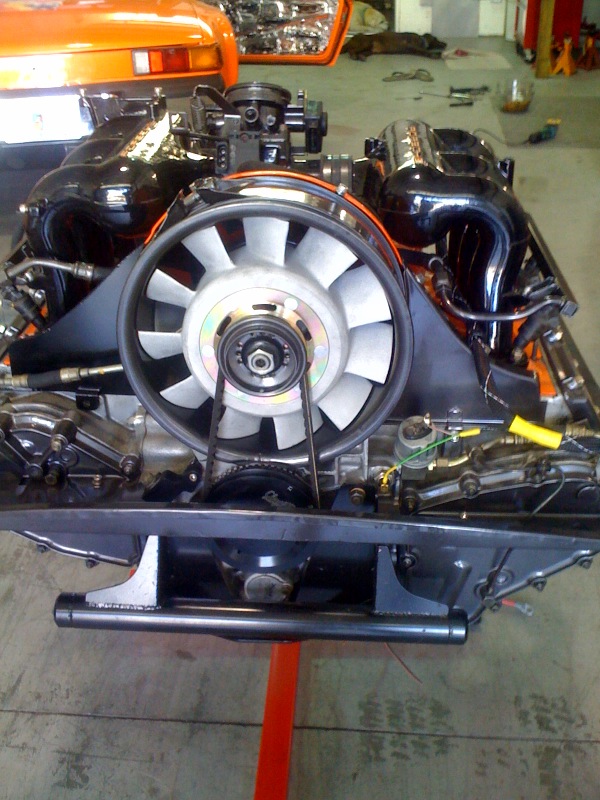
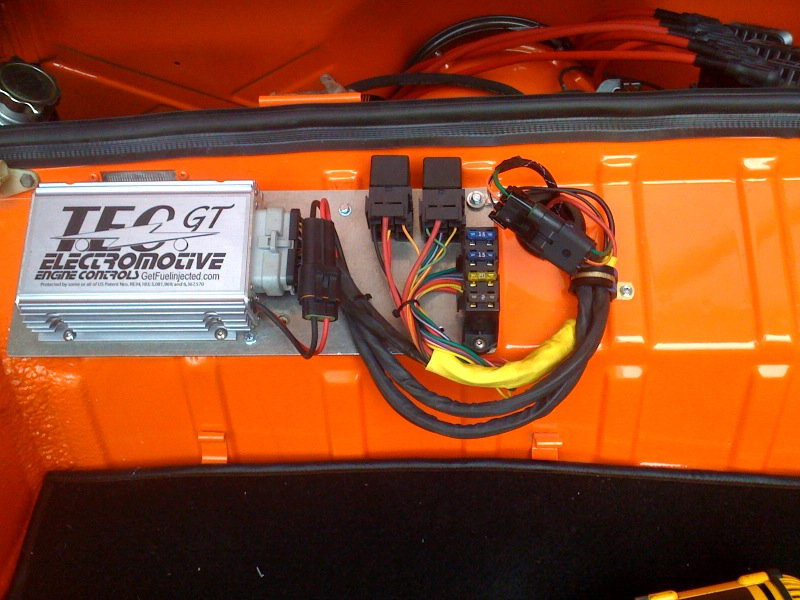
Here are a few photos in its' almost finished state. Joe is going to get the 3.2 engine back in, set up the Tec-GT system, and install some oil coolers and get her tuned. I can't wait. Almost there. I am about finished with the interior. I hope to post some photos of it next week.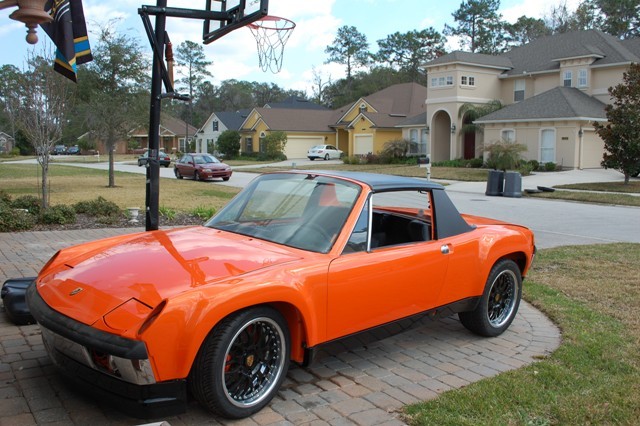
Out in the Sunlight- Very Sparkley 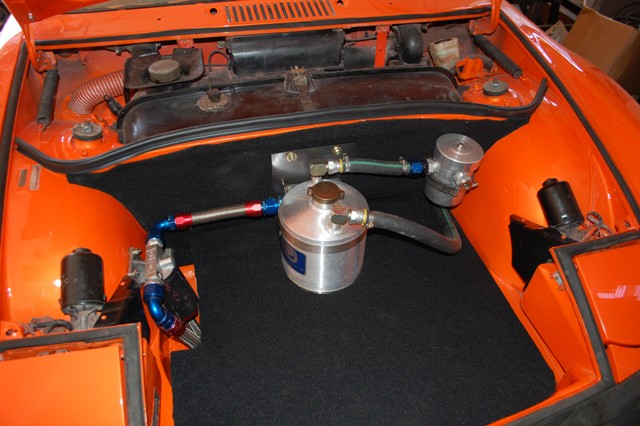
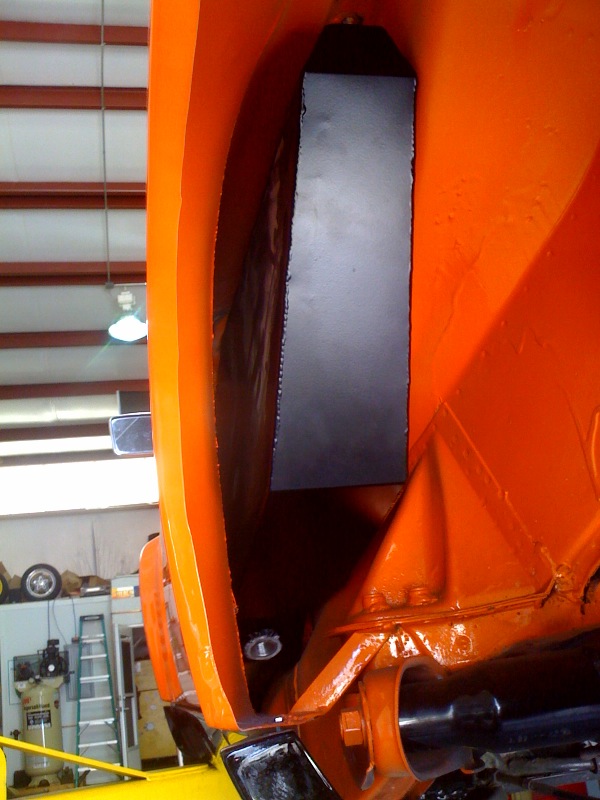
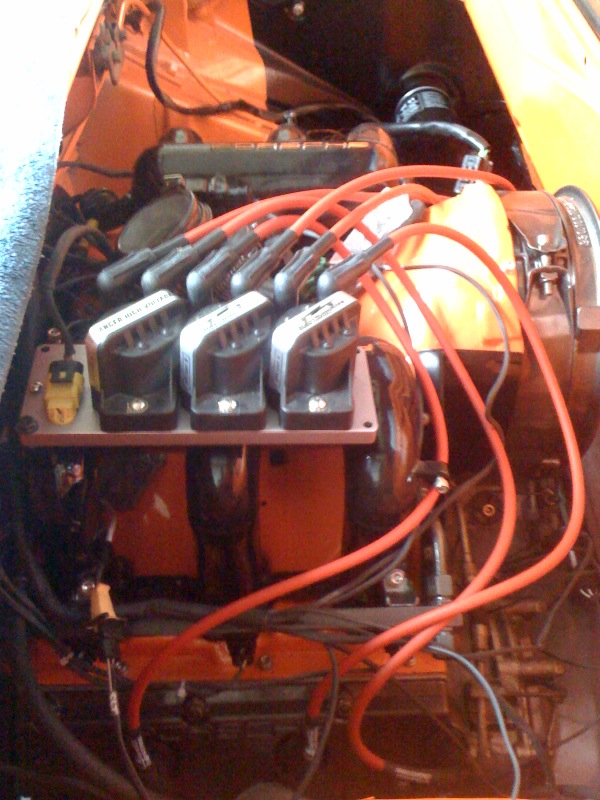
Finished Front Trunk with Sump System.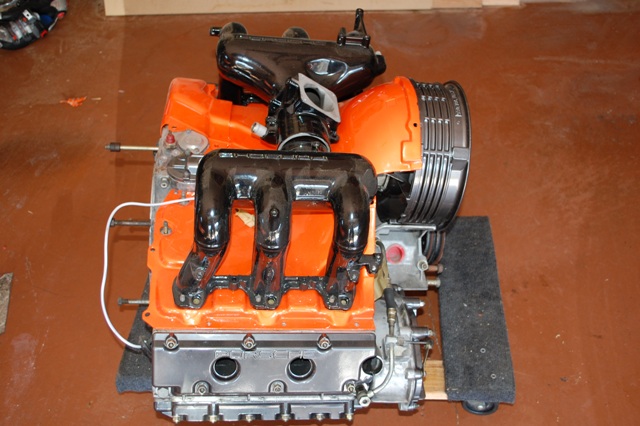
Engine Porn 
Attached image(s)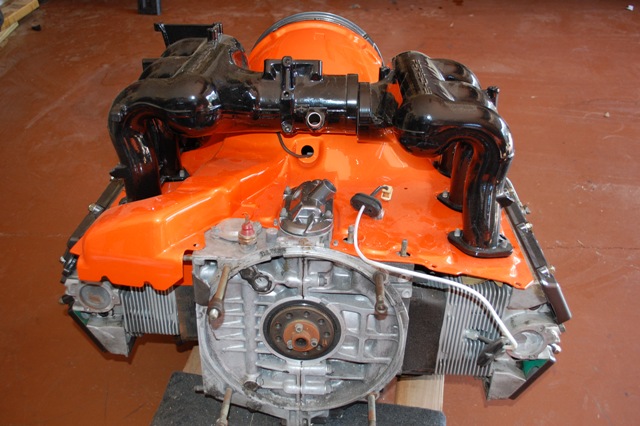
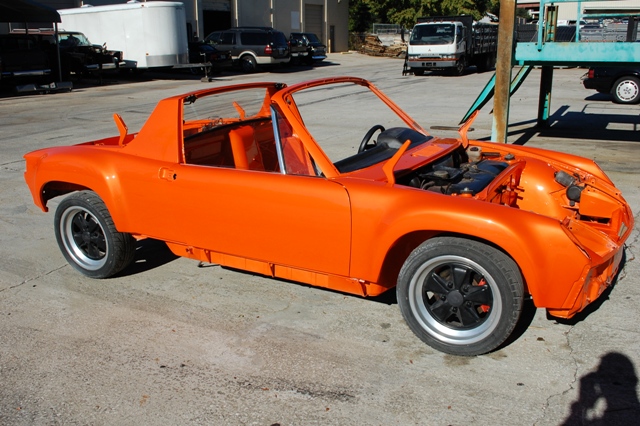
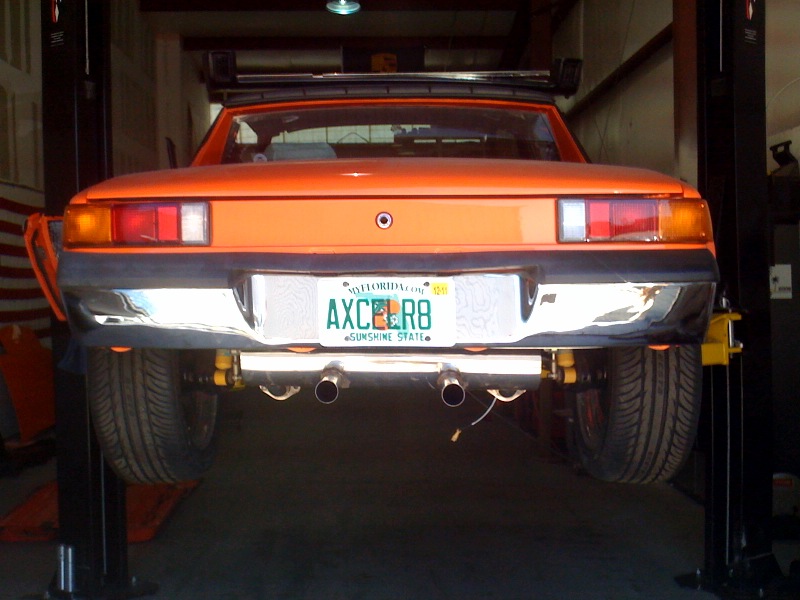
Posted by: ellisor3 Feb 27 2011, 06:28 PM
One More 
Custom wheels from Intro.
Posted by: tscrihfield Feb 27 2011, 06:54 PM
One More
Custom wheels from Intro.
This car looks fantastic all the way around! Great choice on the wheels! Probably the best "New" wheels I've ever seen on one! Cant wait to see the ending on this sweet ride!
Posted by: ellisor3 Mar 20 2011, 07:36 AM
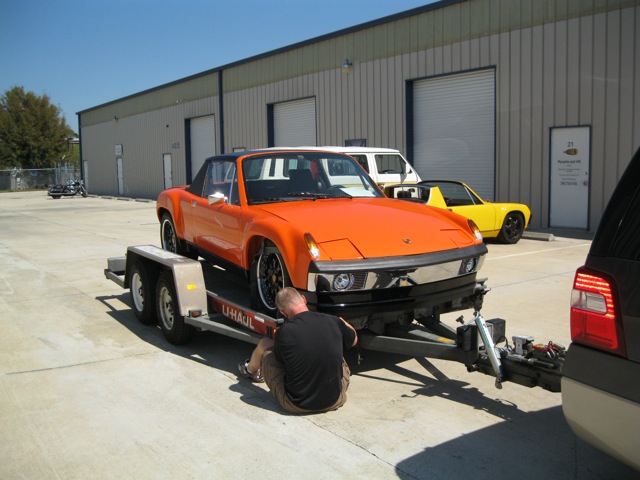
Look a threesome
I trailered it down yesterday to Joe at Series 9 and it is ready to get its' heart, a 3.2. I am really happy Joe took on this project. I am so close to finally finishing, I can't stand it. Joe is a great guy and I can't wait for the finished project.
Joe gave me a spin in his 3.6 RS. Not sure my testicles have dropped back yet. That thing should be illegal. Here is a clip:
http://s23.photobucket.com/albums/b370/seriesnine/?action=view¤t=PICT0032.mp4
Posted by: AZ914 Mar 20 2011, 08:15 AM
Beautiful car!
Looks like Joe needs a bigger shop!
Posted by: Cairo94507 Mar 20 2011, 08:29 AM
I am very happy that your car is getting finished. I am not so happy to see the donuts in the residential court with a small kid standing there watching. I am sure the neighbors just love that crap.
Posted by: Madswede Mar 20 2011, 12:37 PM
This is awesome to see in the Series9 garage. I was trying to figure out what the color your car was, James. (I'm severely color-deficient and the webcam made it look orange to me ... guess I was close). The other pics you have of her look awesome. Nice wheels too!
And yeah, the RS is ... well, the RS. 'nuff said.
- Nelson
Posted by: porsche_dreamer Mar 20 2011, 01:38 PM
Looks awesome!
Posted by: smj Mar 20 2011, 03:32 PM
Nice car, nice thread. Inspiration to get to work on my -6... 
Posted by: Series9 Mar 20 2011, 03:46 PM
I have an unexpected day off tomorrow.
I'll be conducting a thorough inventory of the parts. After a cursory review, many little things appear to be missing. I'll know better soon.
I'll have some pictures tomorrow.
Thanks James. 
Posted by: MoveQik Mar 20 2011, 05:02 PM
James, you will be thrilled with Joe's work. Best money I ever spent. Congrats!
Posted by: Madswede Mar 21 2011, 12:20 AM
Yeah what Wills said. And just wait until mine's done! (I've had a hard time thinking of a year out, but it will be worth it)
Posted by: Series9 Mar 21 2011, 05:00 PM
Pictures from yesterday. It's like Christmas, but some assembly required:
Attached image(s)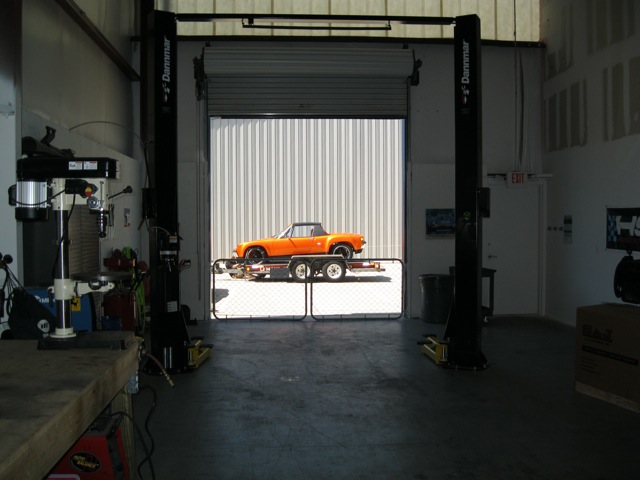

Posted by: Series9 Mar 21 2011, 05:03 PM
Today, the engine is on the stand and the camshaft reference sensor is installed:
Attached image(s)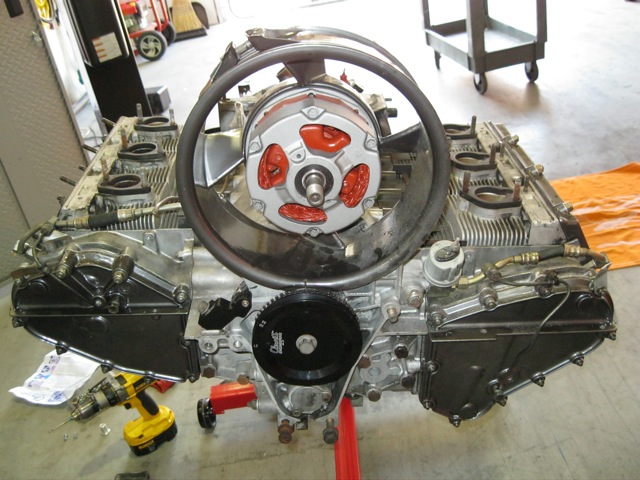
Posted by: mepstein Mar 21 2011, 06:23 PM
I've never heard of a camshaft reference sensor. What is it and will I need it for my 3.2 conversion?
Posted by: echocanyons Mar 21 2011, 06:27 PM
I think he is using the 3.2 manifold with a tech-gt injection system instead of the DME. If you are using the stock injection you shouldn't need it, the sensors for the stock system are near the flywheel.
Posted by: mepstein Mar 21 2011, 06:29 PM
Thanks
Posted by: Sleepin Mar 21 2011, 07:35 PM
That paint!!!!
Posted by: Series9 Mar 21 2011, 07:45 PM
I think he is using the 3.2 manifold with a tech-gt injection system instead of the DME. If you are using the stock injection you shouldn't need it, the sensors for the stock system are near the flywheel.
That's correct. This sensor is for use of the TEC gt in sequential mode.
Posted by: racerbvd Mar 21 2011, 11:11 PM
Look a threesome
I trailered it down yesterday to Joe at Series 9 and it is ready to get its' heart, a 3.2. I am really happy Joe took on this project. I am so close to finally finishing, I can't stand it. Joe is a great guy and I can't wait for the finished project.
Joe gave me a spin in his 3.6 RS. Not sure my testicles have dropped back yet. That thing should be illegal. Here is a clip:
http://s23.photobucket.com/albums/b370/seriesnine/?action=view¤t=PICT0032.mp4
If you needed a trailer, all you had to do was ask, I'm just up the road from you..
Posted by: Series9 Mar 24 2011, 08:44 PM
Many parts ordered.
Nelson's car needs a few days of attention.
Stand-by.
Posted by: Series9 Mar 29 2011, 09:02 PM
The first parts have arrived. Not much, but all-important.
The -12AN scavenge adapter.
The 14-pin male electrical plug, so I can build an engine harness.
Intake and exhaust gaskets for the 3.2.
More are on the way.
I'm working on the engine tomorrow. Pictures to follow.
Attached image(s)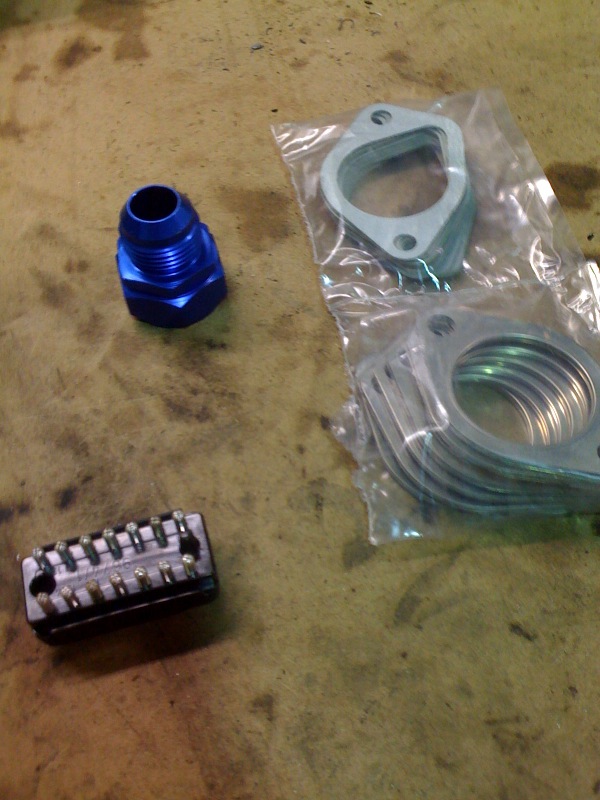
Posted by: MoveQik Mar 29 2011, 10:24 PM
The first parts have arrived. Not much, but all-important.
The -12AN scavenge adapter.
The 14-pin male electrical plug, so I can build an engine harness.
Intake and exhaust gaskets for the 3.2.
More are on the way.
I'm working on the engine tomorrow. Pictures to follow.
Joe, that looks awesome!!!!!!!!!
Posted by: Eric_Shea Mar 30 2011, 08:40 AM
Down boy.
Posted by: MoveQik Mar 30 2011, 08:52 AM
Down boy.
Twas a joke from another thread.
Posted by: tomeric914 Mar 30 2011, 09:37 AM
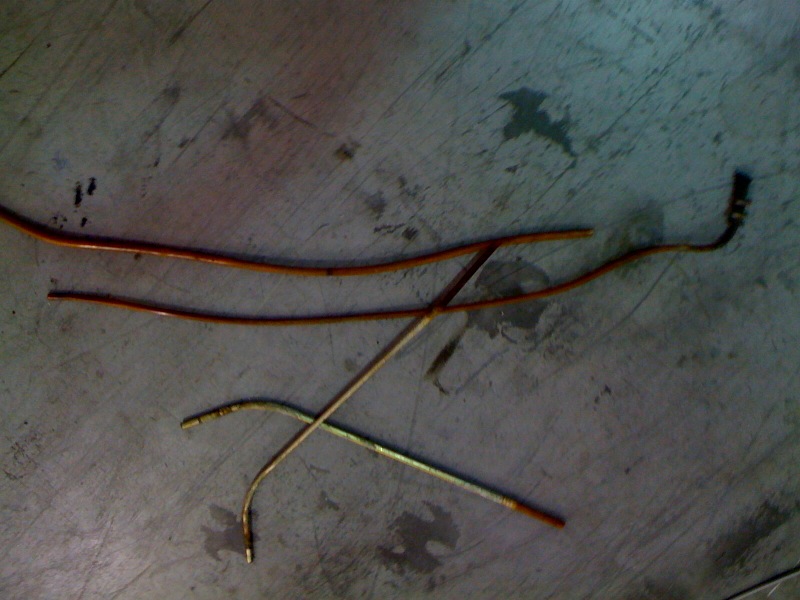
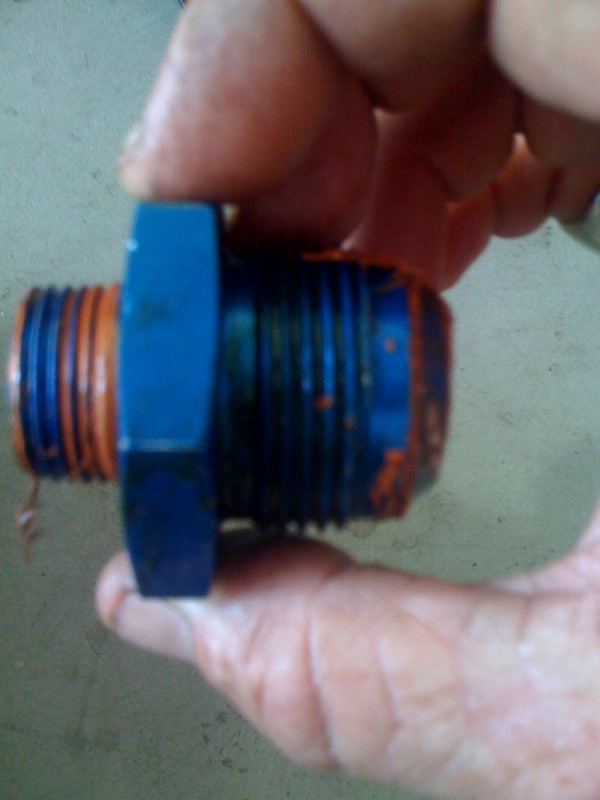
The -12AN scavenge adapter.
Minor threadjack...
I'm curious and a week from plumbing my 3.0 oil system. Why use the 30mm to -12AN adapter when the factory fitting could be removed and replaced with a 22mm to -12AN from someone like Smart Racing? Using the 30mm adapter puts the hose another inch closer to the exhaust. ...or maybe the 3.2 factory adapter isn't removable?
What about using a Setrab 22mm threaded hose end?

Posted by: Series9 Mar 30 2011, 09:33 PM
Down boy.
Twas a joke from another thread.
Don't make me angry, your won't like me when I'm ........
Posted by: Series9 Mar 30 2011, 09:37 PM
Today:
I have to build an engine harness from scratch.
Attached image(s)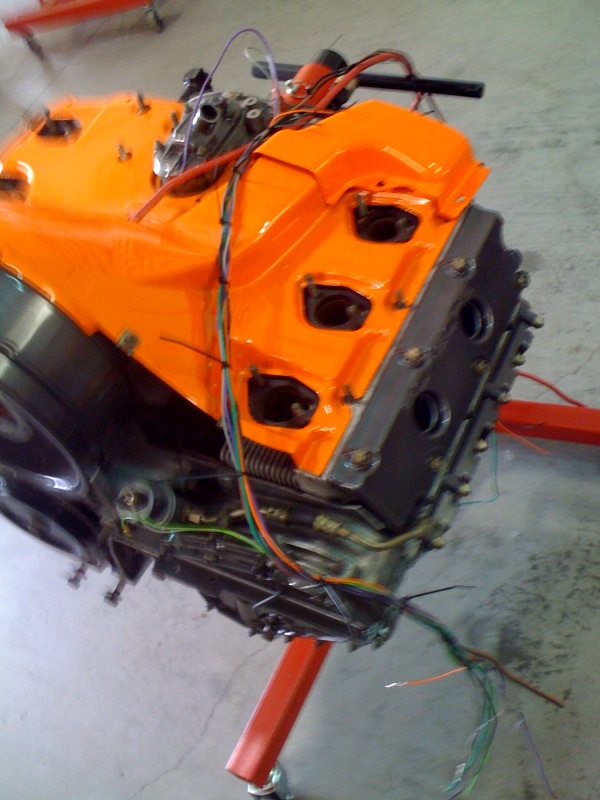
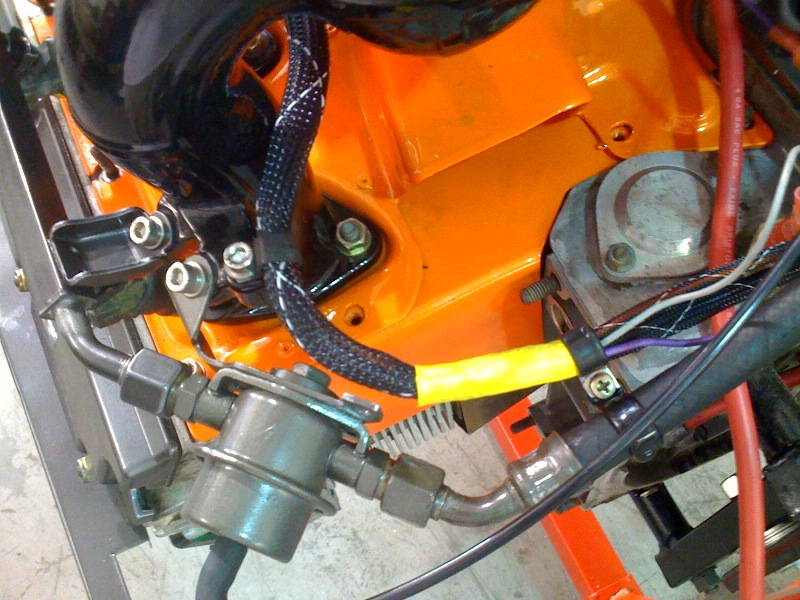
Posted by: Series9 Mar 30 2011, 09:38 PM
Next:
Attached image(s)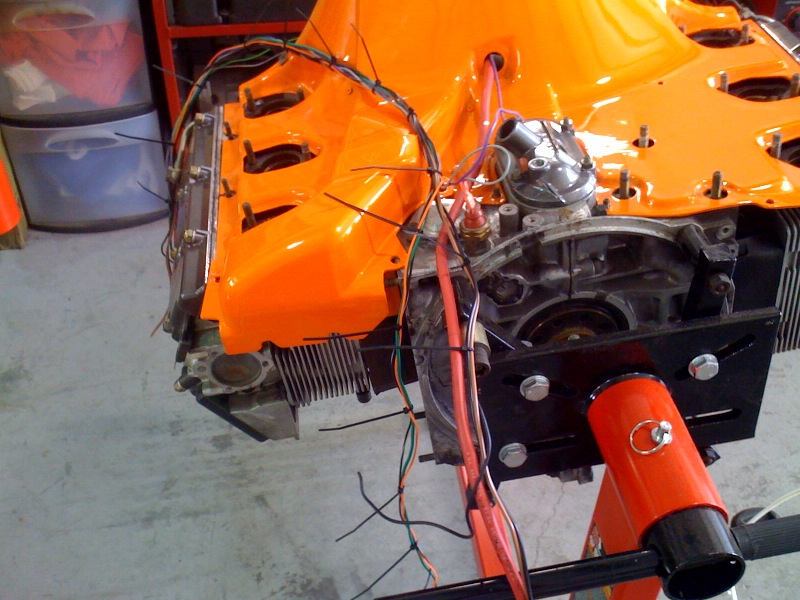
Posted by: Series9 Mar 30 2011, 09:40 PM
Next:
Attached image(s)
Posted by: Series9 Mar 30 2011, 09:42 PM
This supply line freaks me out. -16 supply, but probably only -10 in flow:
Attached image(s)
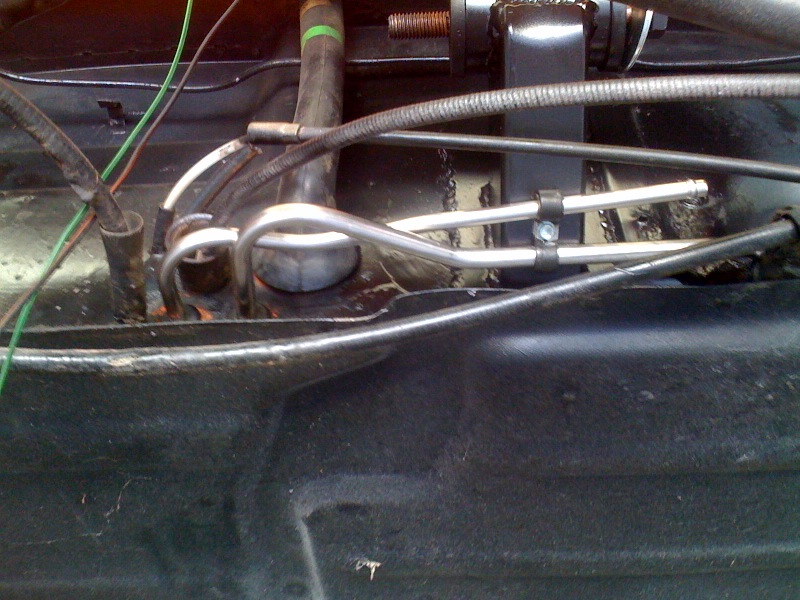
Posted by: Series9 Mar 30 2011, 09:45 PM
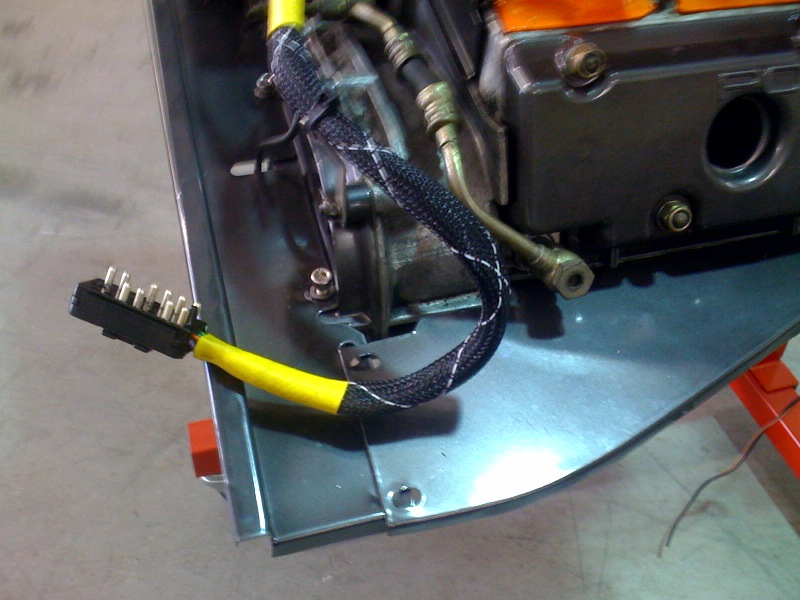
Stock 14-pin connector:
Attached image(s)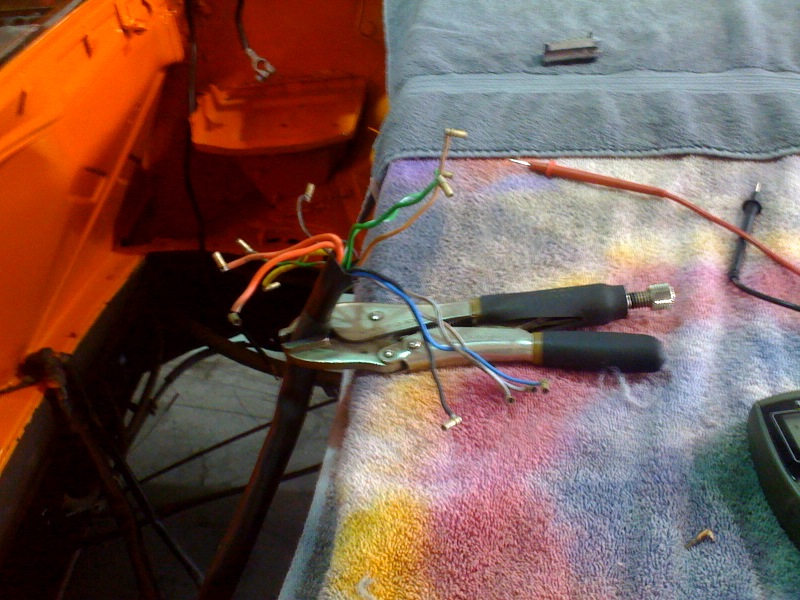
Posted by: Series9 Mar 30 2011, 09:49 PM
Tank out to remove the old oil lines:
Attached image(s)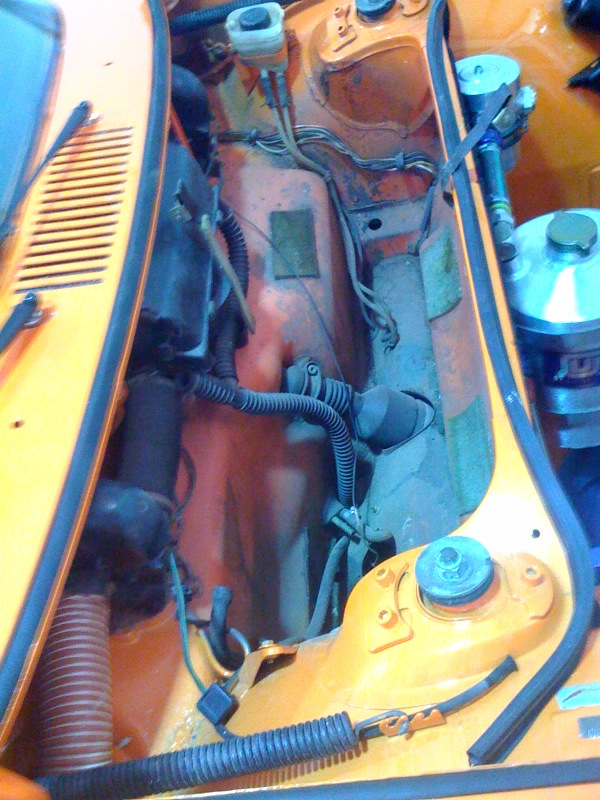
Posted by: Series9 Mar 31 2011, 07:38 PM
Solve the puzzle:
Attached image(s)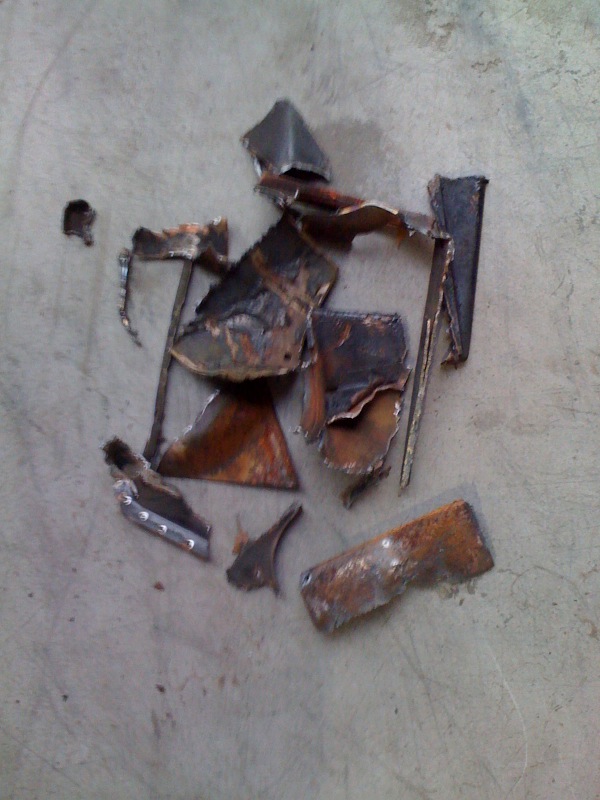
Posted by: Series9 Mar 31 2011, 07:42 PM
The -12AN scavenge adapter.
Minor threadjack...
I'm curious and a week from plumbing my 3.0 oil system. Why use the 30mm to -12AN adapter when the factory fitting could be removed and replaced with a 22mm to -12AN from someone like Smart Racing? Using the 30mm adapter puts the hose another inch closer to the exhaust. ...or maybe the 3.2 factory adapter isn't removable?
What about using a Setrab 22mm threaded hose end?
To be honest, this is the way I've always done it. I'll look into different fittings. Thanks.
Posted by: Series9 Apr 1 2011, 07:11 AM
Remember that picture of the blockage in the oil supply line?
I cut the end of that hose off and opened it up to have a look. I'm not sure the source of this hose, but this makes me wonder if it's compatible with the fitting that was installed on it (Earl's -16 straight).
The lining was detached. Very scary for the engine if this stuff came off. Now I'm going to have to pull the other end off the oil tank to see if it looks the same.
For a car that was previously running a /6, I'm having to almost start from scratch on the conversion stuff because it was either under-done or done incorrectly.
Whatever. It'll be right when it leaves here.
Attached image(s)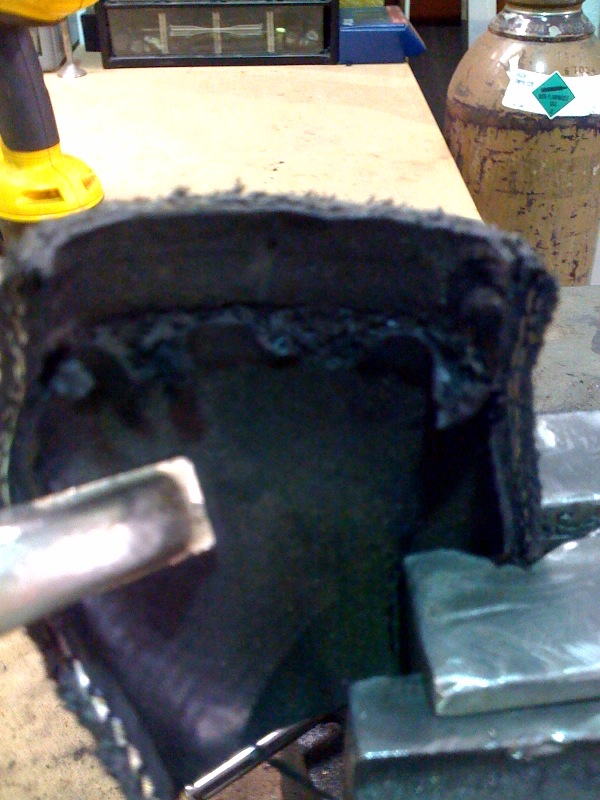
Posted by: Series9 Apr 1 2011, 07:14 AM
When I went through the parts to see what I had, I said "intake boot, check".
However, this is either off another car or it's extremely stretched out.
All stop. Order a new one for a 3.2.
Attached image(s)
Posted by: tomeric914 Apr 1 2011, 07:22 AM
Solve the puzzle:
Battery support and tray
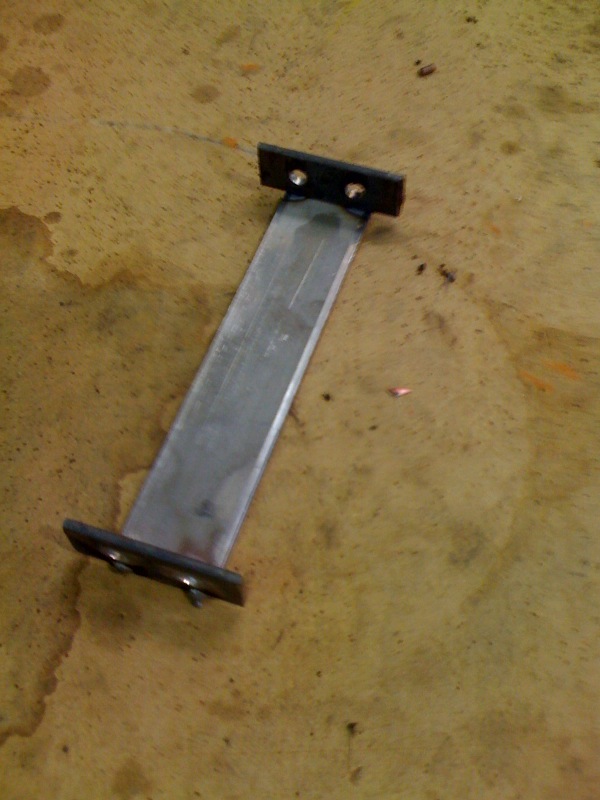
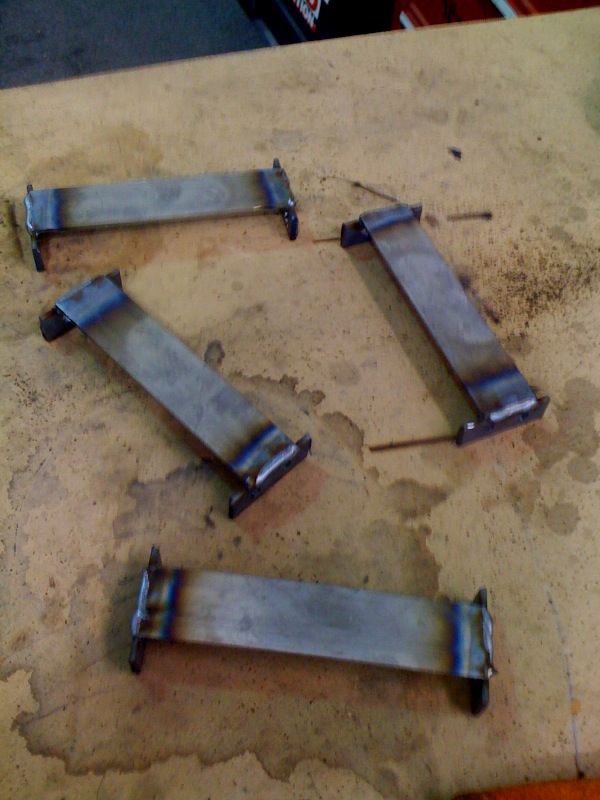
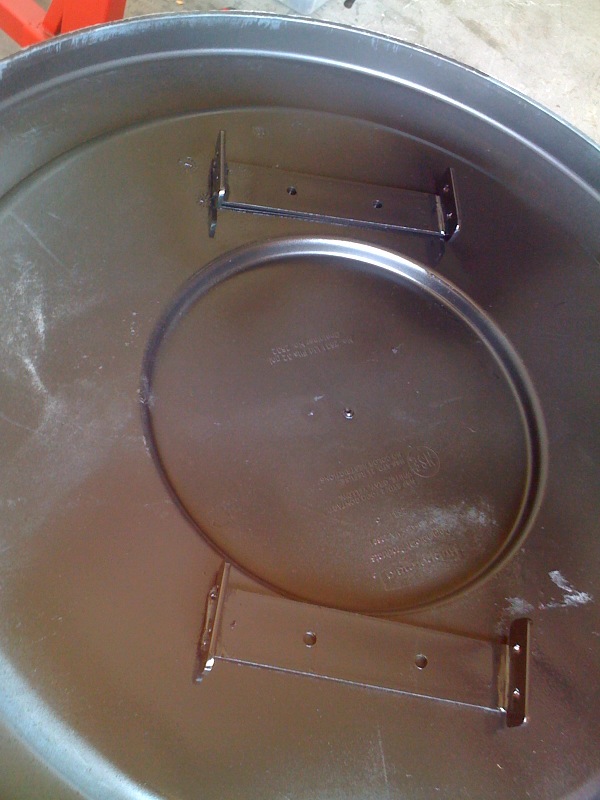
Posted by: Series9 Apr 1 2011, 07:25 AM
Solve the puzzle:
Battery support and tray
BUZZER. Incorrect. Try again.

Posted by: mepstein Apr 1 2011, 07:55 AM
motor mounts from a 4 cylinder
Posted by: MDG Apr 1 2011, 08:00 AM
Solve the puzzle:
Battery support and tray
BUZZER. Incorrect. Try again.
Engine shelf carnage?
Superb work by the by.
Posted by: Series9 Apr 1 2011, 08:06 AM
motor mounts from a 4 cylinder
Ding ding. Winner.

Wanna sticker?
Posted by: mepstein Apr 1 2011, 08:08 AM
motor mounts from a 4 cylinder
Ding ding. Winner.
Wanna sticker?
Just met with Scotty B on Wed and removing the mounts on my car was on the list.
Posted by: MDG Apr 1 2011, 09:56 AM
motor mounts from a 4 cylinder
Ding ding. Winner.
Wanna sticker?
Even though my guess was wrong, I did say your work was superb . . . can I have a sticker?

Dave (yes, THAT Dave) told me he has a collection of them and has been selling them at his kid's school.
Posted by: Series9 Apr 1 2011, 10:28 AM
motor mounts from a 4 cylinder
Ding ding. Winner.
Wanna sticker?
Even though my guess was wrong, I did say your work was superb . . . can I have a sticker?
Dave (yes, THAT Dave) told me he has a collection of them and has been selling them at his kid's school.

PM me your address.
Posted by: MDG Apr 1 2011, 10:51 AM
PM sent. I'm getting a sticker, I'm getting a sticker That Joe is the best.
Oh, and paging Mr. Balljoint? I've instructed that if this is some cruel April Fools joke and I'm not getting a sticker . . . to send the box of monkey poo to you
Posted by: balljoint Apr 1 2011, 11:52 AM
That reminds me I am sold out of Series9 Stickers...and monkey poo.
Posted by: Eric_Shea Apr 1 2011, 01:18 PM
(just here checking to see if I can ban Dave for anything)
Posted by: balljoint Apr 1 2011, 01:27 PM
Eeep!
-runs back to sandbox
Posted by: MDG Apr 1 2011, 01:56 PM

Dave, stop messing with Joe's thread. Some of us are trying to learn from a master. And seeing as how Scotty, Mark, Dana, Eric, etc., etc., etc., et al, etc., aren't posting anything everybody has no choice but to hang out here 
Posted by: mepstein Apr 1 2011, 02:28 PM
Joe - What are you doing for oil cooling? GT style cooler in the front trunk?
Posted by: ellisor3 Apr 1 2011, 03:58 PM
Joe - What are you doing for oil cooling? GT style cooler in the front trunk?
I will answer that on for Joe. We are going to do 2 Setrab's behind the engine, plus a sump tank in the front trunk. I did not want to cut up the front of the car. I like the clean look. I am sure Joe will post some photos of the install when he gets to that point. I carried this ball as far as I could carry it and it is time for a
 and watch Joe carry it over the line.
I tried to check out Joe's progress on the web cam. Apparently whoever Joe has working for him has been sweeping that corner for 3 days. Probably should get rid of them. http://www.914rs.com/webcam.html
Plus, I have never seen a guy get so much done without ever putting anything on his work bench. http://www.914rs.com/webcam2.html

Posted by: MDG Apr 1 2011, 04:44 PM
I carried this ball as far as I could carry it and it is time for a
and watch Joe carry it over the line. You've put it in very capable hands. I'm liking this oil cooler set up. Is it along the lines of what Joe did in Mike Wills car? Always thought that was a great idea. For a street car I like hiding as much of the extra bits as possible too.
I'll be watching with interest - may use it for mine too.
Posted by: tat2dphreak Apr 1 2011, 06:53 PM
joe, you are amazing... you make it look so easy!
Posted by: Madswede Apr 1 2011, 07:40 PM
James, now that I've been through this thread, I gotta say I love the paint and wheel combo! But with all due respect, damn you! Now I can't do that without copying you.
Actually I'm still deciding, but the look I've been after is a bit more period-correct I think - I'm thinking a CanAm 914 that never was but should've been ... So I'm probably gonna go Fuchs on mine (don't tell Wills).
Lookin' good!
- Nelson
Posted by: tomeric914 Apr 1 2011, 09:54 PM
motor mounts from a 4 cylinder
Hangs head in shame and slinks back to corner

Do the /4 mounts really need to be removed? What if I want to change back to a /4 some day?
Posted by: ellisor3 Apr 2 2011, 05:03 AM
James, now that I've been through this thread, I gotta say I love the paint and wheel combo! But with all due respect, damn you! Now I can't do that without copying you.
Actually I'm still deciding, but the look I've been after is a bit more period-correct I think - I'm thinking a CanAm 914 that never was but should've been ... So I'm probably gonna go Fuchs on mine (don't tell Wills).
Lookin' good!
- Nelson
Don't worry about copying me, I have copies a lot of people on this board. Don't tell them.
The great thing about these cars is that you can make each your own and in the end you still have great performance.
Posted by: ellisor3 Apr 2 2011, 05:04 AM
joe, you are amazing... you make it look so easy!
Stop patting Joe on the head, he is charging by the pat.

Posted by: mepstein Apr 2 2011, 07:46 AM
motor mounts from a 4 cylinder
Hangs head in shame and slinks back to corner
Do the /4 mounts really need to be removed? What if I want to change back to a /4 some day?
Removal isn't nessasary but I am doing it because:
They are rusted out.
There is more room in the engine compartment with them gone.
This car will never go back to a 4.
I think one of the GT reinforcement plates fits over where the mounts are located.
I can pay Scotty B more money.
Posted by: Series9 Apr 2 2011, 09:36 AM
... you make it look so easy!
That's because the webcam only shows 1/8 of what really happens and there's no audio, so you can't hear me cuss.
Posted by: Series9 Apr 2 2011, 09:39 AM
....And seeing as how Scotty, Mark, Dana, Eric, etc., etc., etc., et al, etc., aren't posting anything everybody has no choice but to hang out here
Ummm.....thanks, I think.
Posted by: Series9 Apr 2 2011, 09:44 AM
[
I tried to check out Joe's progress on the web cam. Apparently whoever Joe has working for him has been sweeping that corner for 3 days. Probably should get rid of them. http://www.914rs.com/webcam.html
Plus, I have never seen a guy get so much done without ever putting anything on his work bench. http://www.914rs.com/webcam2.html
We had some bad weather. Every time the power blinks, I have to go reset the cameras. Ooops.
Posted by: Eric_Shea Apr 2 2011, 09:48 AM
Yes it is. They were all "suppose" to have -6's
Posted by: MDG Apr 2 2011, 11:36 AM
....And seeing as how Scotty, Mark, Dana, Eric, etc., etc., etc., et al, etc., aren't posting anything everybody has no choice but to hang out here
Ummm.....thanks, I think.
c'mon . . . .
 Besides, none of those guys have shop cams . . . oh sure, they can look clever when the camera is snapping pics . . but what really happens when no one is looking?
 No Joe, YOU are the man.
Posted by: J P Stein Apr 2 2011, 12:25 PM
Yes it is. They were all "suppose" to have -6's
Besides, it makes room for some useful stuff.
Attached thumbnail(s)

Posted by: Series9 Apr 5 2011, 01:17 PM
PMS engine mount arrived today.
I was supposed to be finishing Luckie's 986 today, but UPS dropped the ball on the flywheel bolts.
It's raining outside, so I'm kinda stuck for the day.
Attached image(s)
Posted by: Cupomeat Apr 5 2011, 02:01 PM
motor mounts from a 4 cylinder
Ding ding. Winner.
Wanna sticker?
Sure I wanna sticker, but I hardly know her...
Posted by: Series9 Apr 9 2011, 11:18 AM
These were on back-order, but the Setrab 119 fanpacks have arrived:
Attached image(s)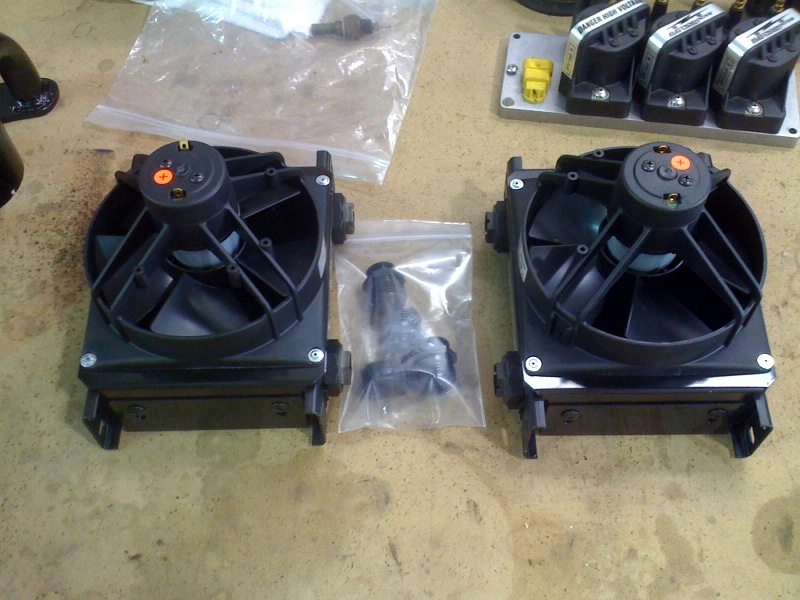
Posted by: Series9 Apr 9 2011, 11:24 AM
Grind and clean for welding in the new engine mount.
Attached image(s)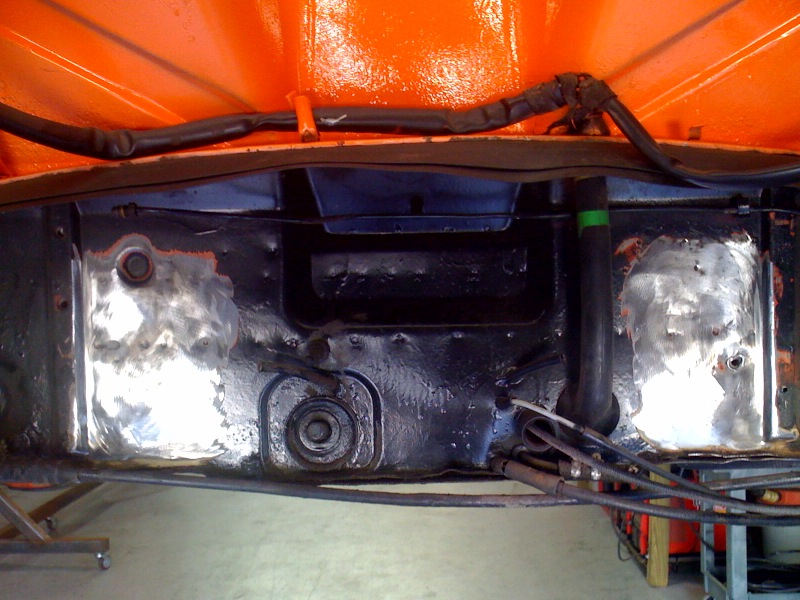
Posted by: Series9 Apr 9 2011, 11:26 AM
I'm going to use these PMS mounts from now on.
Very nice:
Attached image(s)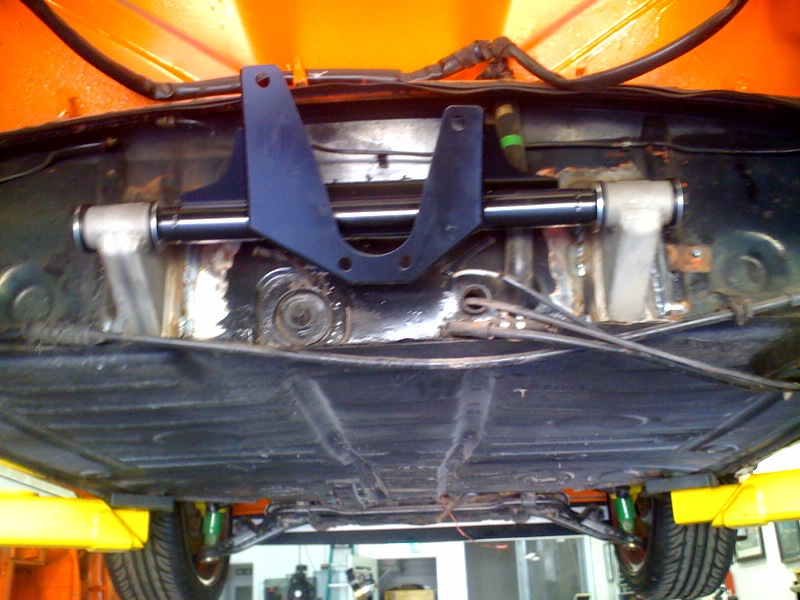
Posted by: PeeGreen 914 Apr 9 2011, 11:35 AM
I have to agree. I really liked my PMS motor mount on my 6. Very nice.
Posted by: Series9 Apr 9 2011, 02:08 PM
Painted:
Attached image(s)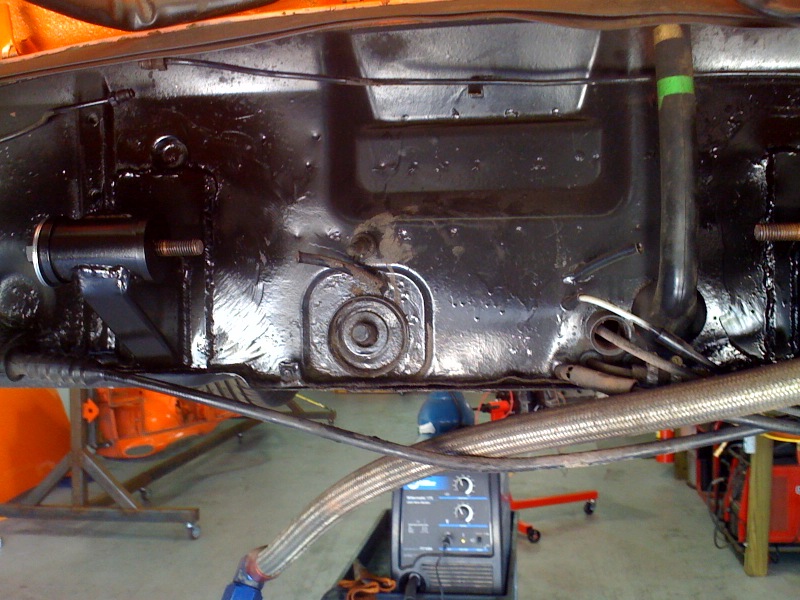
Posted by: Series9 Apr 9 2011, 02:10 PM
It's nice to have an 'extra' 3.2 in the shop.
Remember that bellcrank bushing I was trying to source?
I pulled the console off Nelson's engine today and look.....the bushing is cast into this one. I don't remember that from 3.2s in the past.
Attached image(s)
Posted by: Series9 Apr 9 2011, 02:13 PM
If your powder coater doesn't plug the threaded holes, get out your tap:
Attached image(s)
Posted by: Series9 Apr 9 2011, 02:15 PM
Let this be a lesson.
Test fit before you paint and powdercoat:
Attached image(s)
Posted by: Series9 Apr 9 2011, 02:18 PM
Otherwise, you have to pay your mechanic to paint.
It turned out fine:
Attached image(s)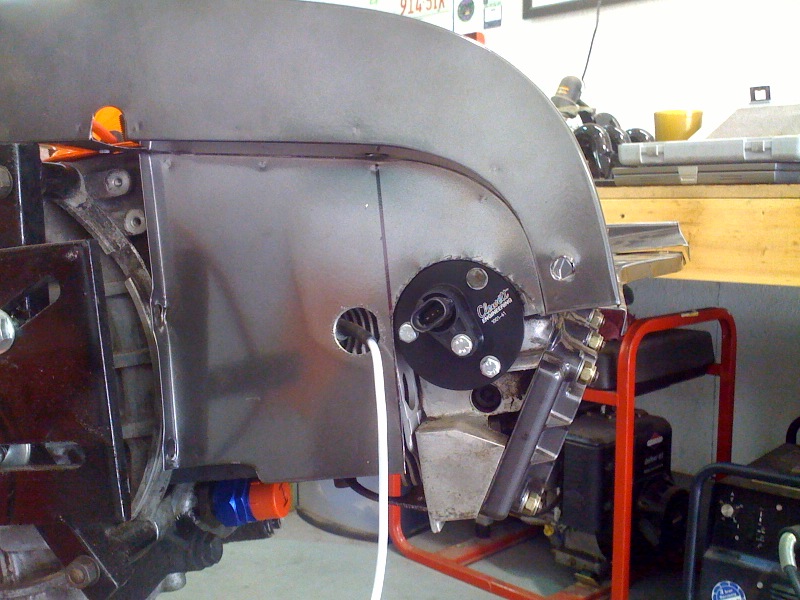
Posted by: Series9 Apr 9 2011, 02:20 PM
Here it is on the engine with a grommet installed:
Attached image(s)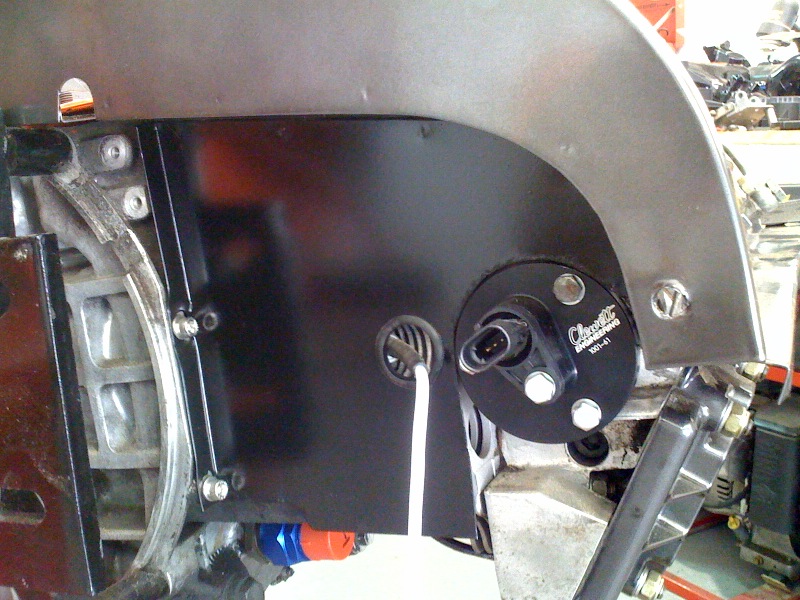
Posted by: Gint Apr 9 2011, 02:23 PM
Down boy.
Don't make me angry, your won't like me when I'm ........
Dude, that paint is SIK! Love the pearl. Nice looking 914.
Hey Mike, those wheels look good sitting still.
Posted by: Series9 Apr 9 2011, 02:24 PM
Here is the state of the engine today. Once I get a few more pieces, the manifolds will go on.
I'm pushing to get the engine built up, so I can put it in the car. The oil system can't really move forward until that happens.
My flying schedule is full for the next ten days. Stand by.
Here's where I finished today:
Attached image(s)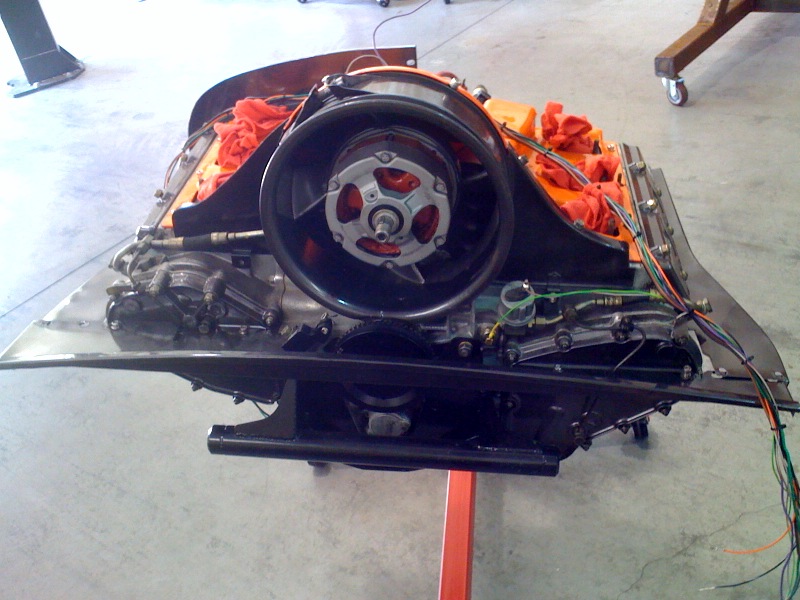
Posted by: Series9 Apr 15 2011, 08:02 PM
Bad weather is bad for flying, but good for projects in the shop.
I got the seals I was waiting for and had some unplanned hours in the shop.
Because the fuel hoses had their ends powder coated, I'm worried about pressurizing this engine.
I'm not too sure about baking powder coat with rubber hoses attached. We'll find out soon. I'm not putting the engine in the car before I put 80psi through the lines.
It's starting to look like a 3.2:
Attached image(s)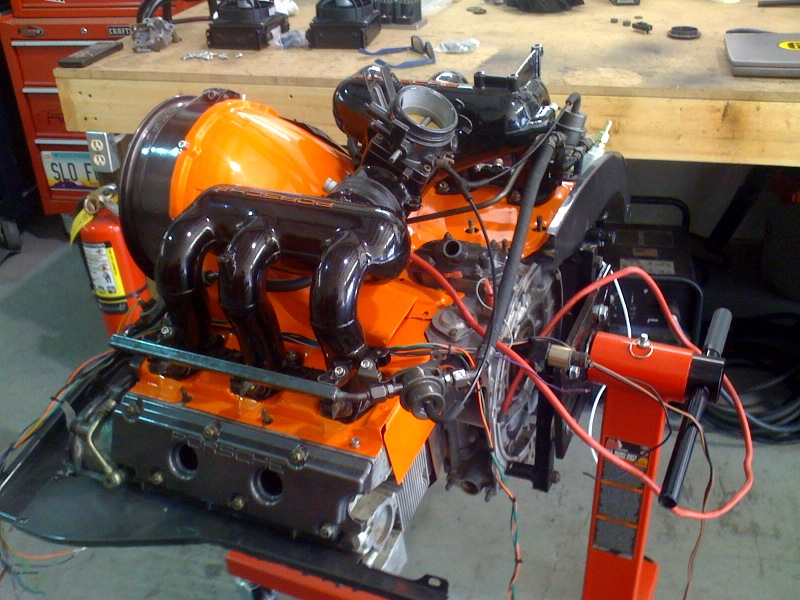
Posted by: Series9 Apr 15 2011, 08:05 PM
Do you think the pressure regulator and damper should be baked in a powder coating oven? I don't know, but the engine looks nice at the moment:
Attached image(s)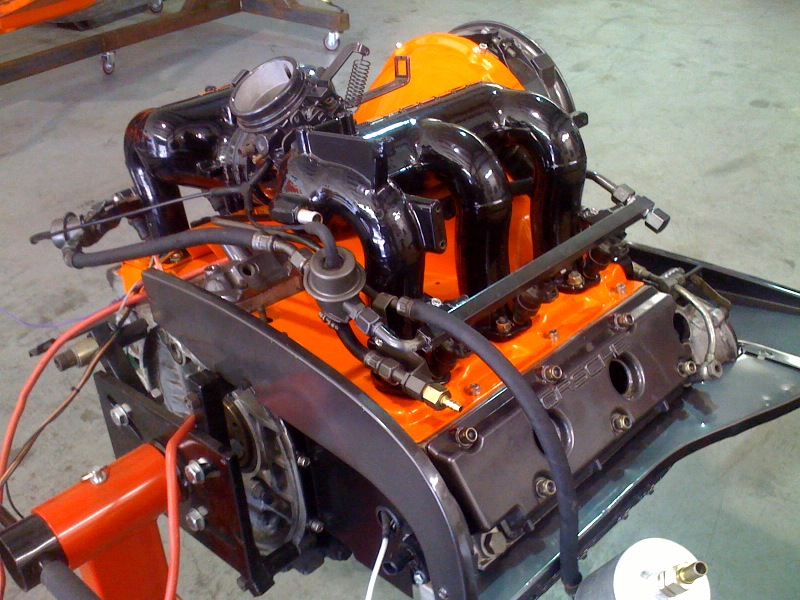
Posted by: AZ914 Apr 15 2011, 08:07 PM
Yeah... I dunno. I'd bake the shroud and a stripped intake but not everything. It does look beautiful though!
Posted by: ellisor3 Apr 15 2011, 08:21 PM
Looks super Joe, BTW none of the fuel lines or regulators were powder coated. I found the paint to match the powder coating. I would still check the lines. I just hope for more bad weather.
Posted by: Series9 Apr 15 2011, 08:35 PM
Looks super Joe, BTW none of the fuel lines or regulators were powder coated. I found the paint to match the powder coating. I would still check the lines. I just hope for more bad weather.
That's good news. I'll put some fuel through and let you know.
Posted by: Series9 Apr 21 2011, 05:57 PM
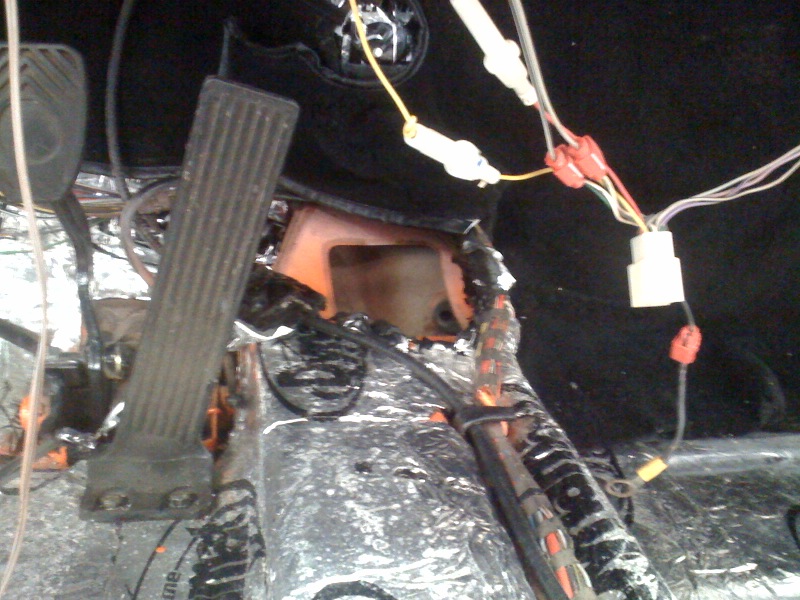
The new fuel lines came today.
I had to remove the center console, storage tray, subwoofer, knee trim and carpet to get the access I wanted.
The front tunnel access was dynamatted in and the rear was "enlarged":
Attached image(s)
Posted by: Series9 Apr 21 2011, 06:00 PM
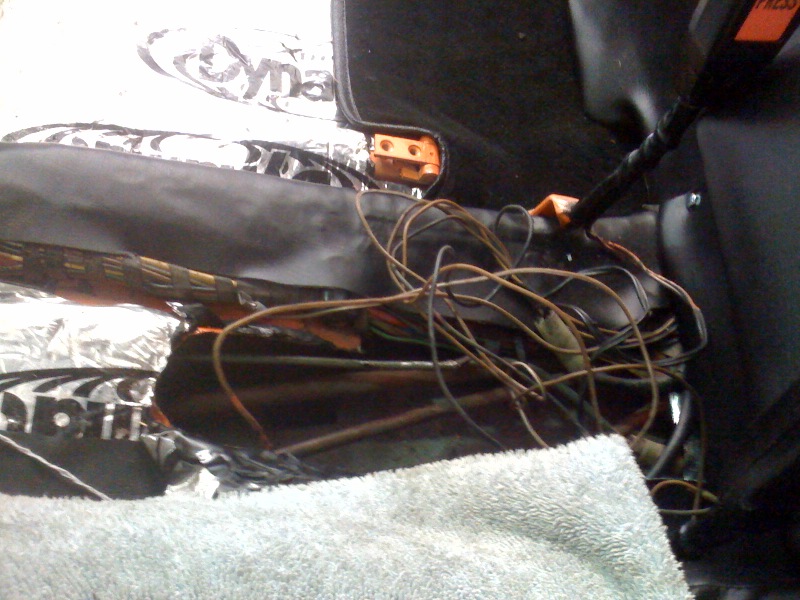
Interior out.
Old fuel lines out:
Attached image(s)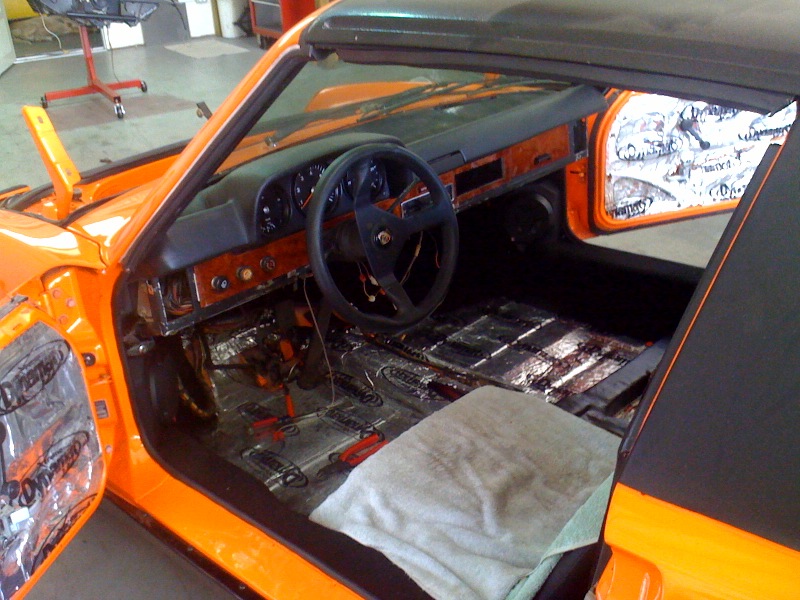
Posted by: Series9 Apr 21 2011, 06:09 PM
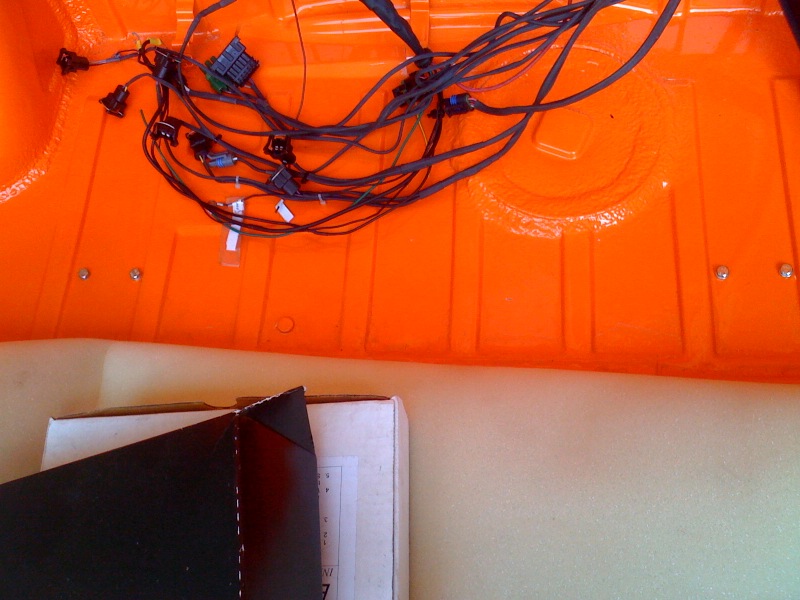
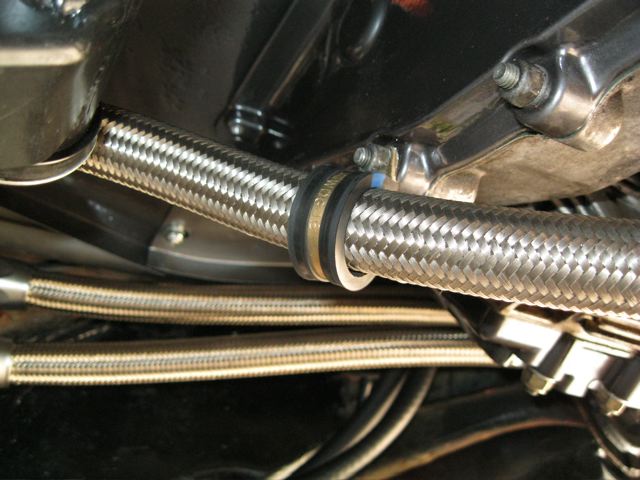
After a test fit of the SS lines, I discovered that the return line would need a little reshaping on the engine end due to the PMS engine mount. I pulled out the tubing bender and massaged it a little. Now it fits. It's no ding on the manufacturer, I recommend these nice pieces by Rotary'14.
I stupidly forgot to order new firewall grommets and don't have any that fit, so on to other matters.
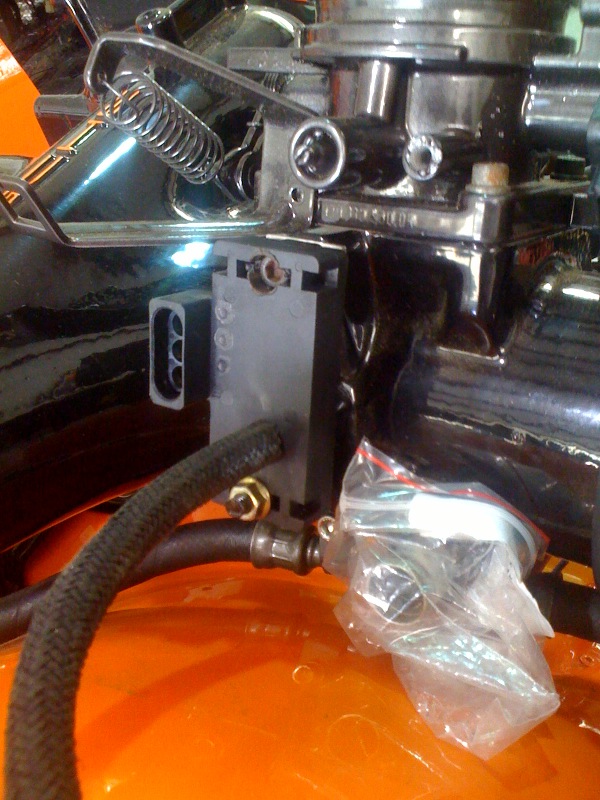
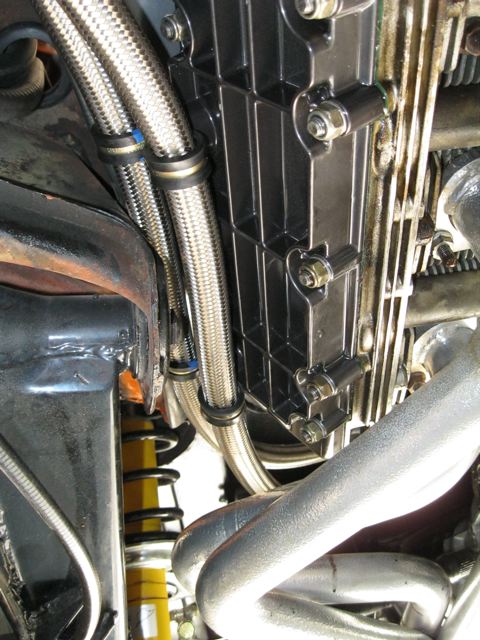
The engine harness is almost complete. Here are some detail pictures including the new 14-pin male connector that will hook directly to the 14-pin female on the car. The relay board has been deleted:
Attached image(s)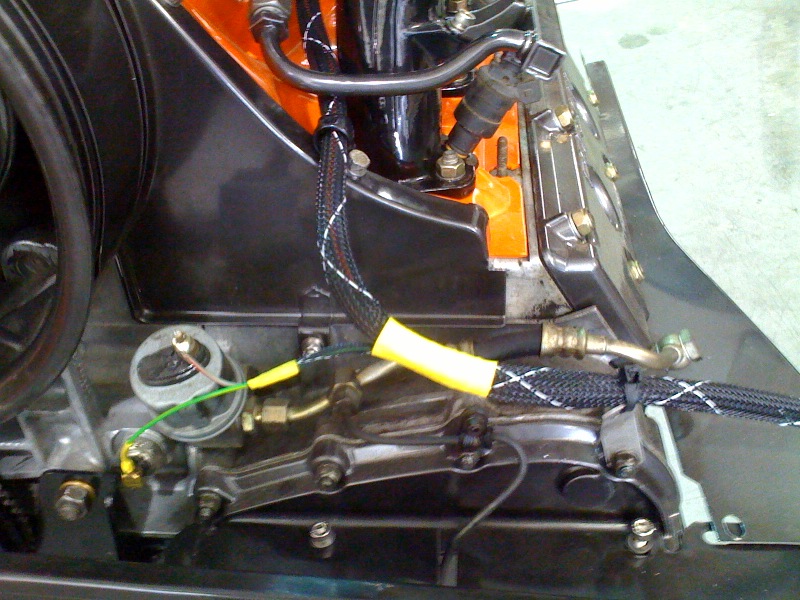
Posted by: Series9 Apr 26 2011, 07:32 PM
Made some serious progress today.
Two of the oil return tubes were damaged in shipping. Here are the new ones in place:
Attached image(s)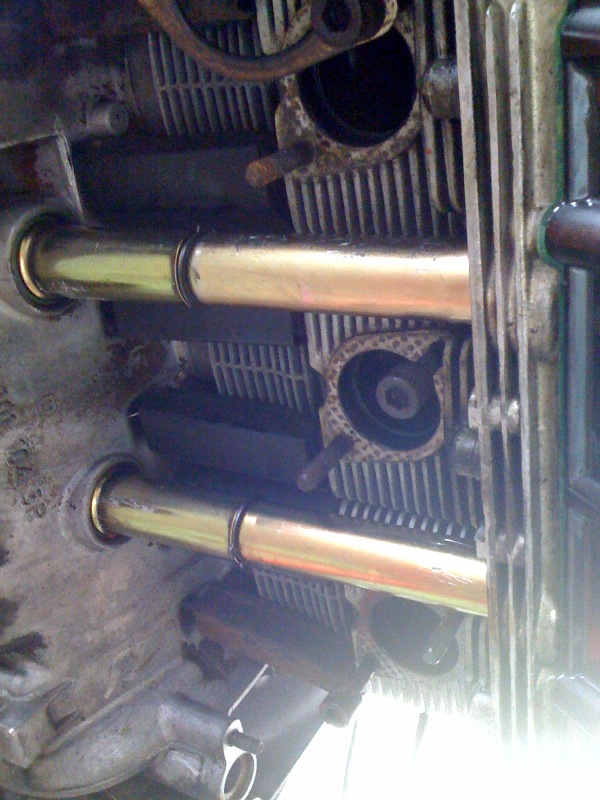
Posted by: Series9 Apr 26 2011, 07:36 PM
Headers on. This should be pretty quick, but missing studs and other difficult hardware made it take a while:
Attached image(s)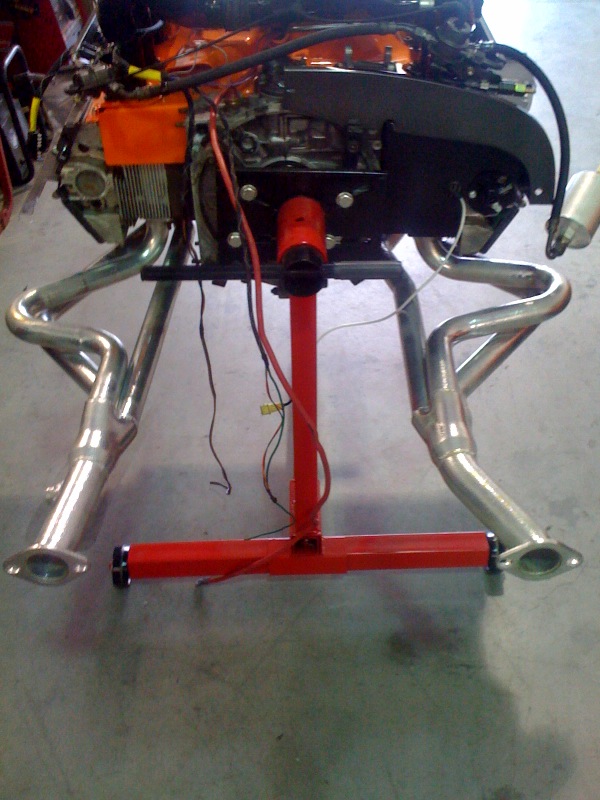
Posted by: Series9 Apr 26 2011, 07:38 PM
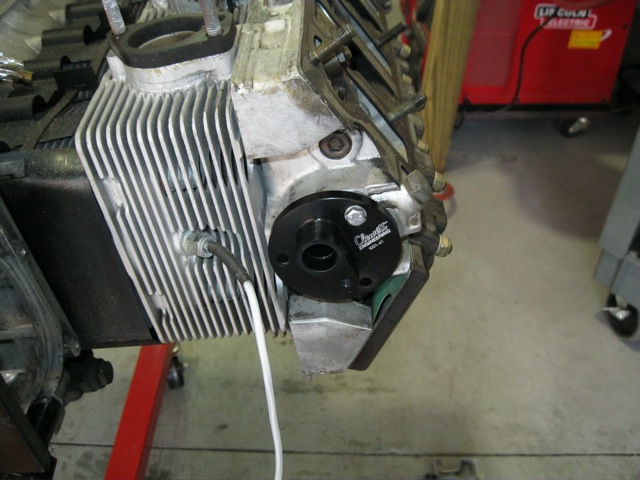
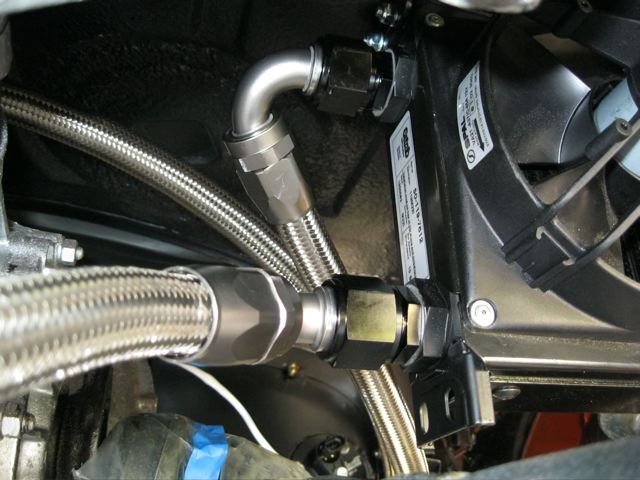
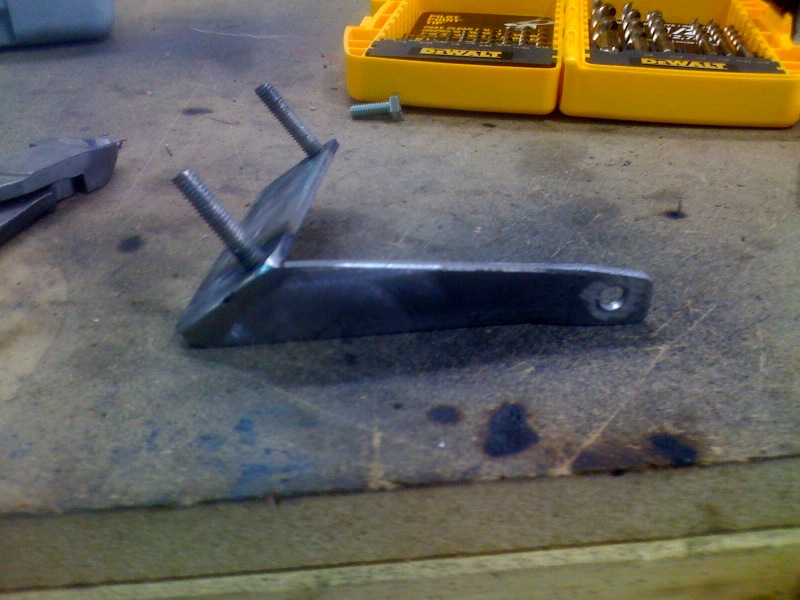
MAP sensor for the TECgt.
Bracket fab and installed:
Attached image(s)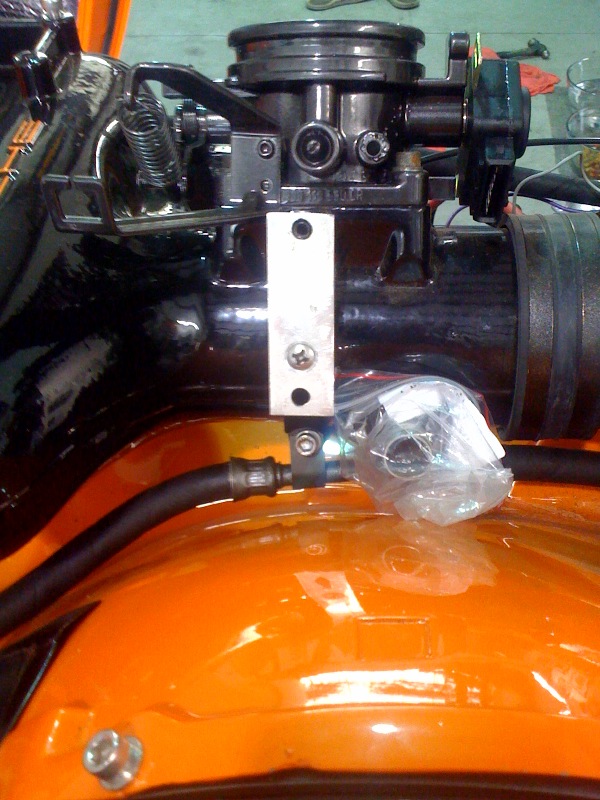
Posted by: Series9 Apr 26 2011, 07:41 PM
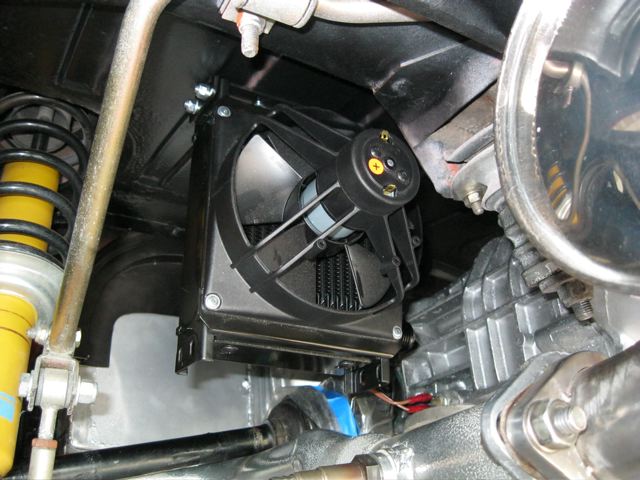
Both the fans supplied had to be rejected. Here's a new one:
Attached image(s)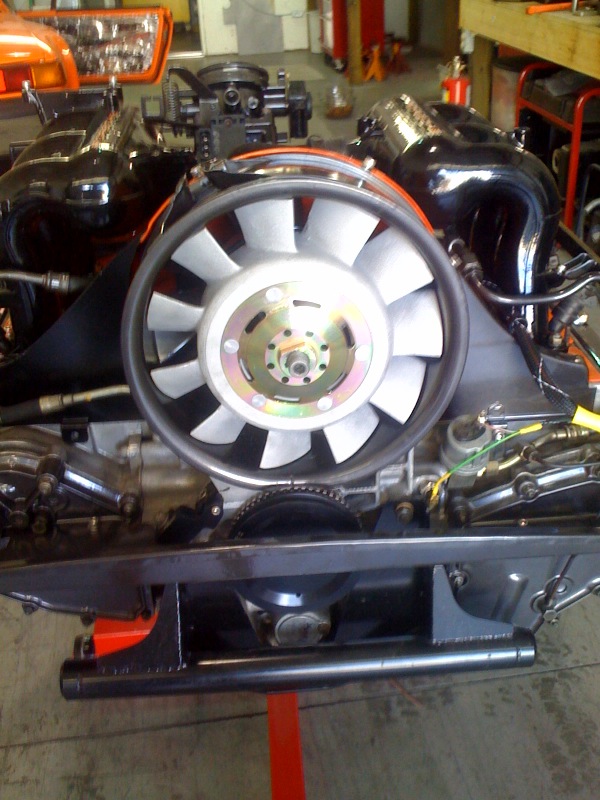
Posted by: Series9 Apr 26 2011, 07:49 PM
Since we're putting the coolers in the back, James was kind enough to see the logic in putting the tank in the stock location.
DWD tank install will proceed this week.
Here's the old system out. James gets his front trunk back and I'm really glad we did this to get the hot oil lines out of the cockpit.
Unbelievably, the supply line fitting had a -10 (or smaller) orifice.
Attached image(s)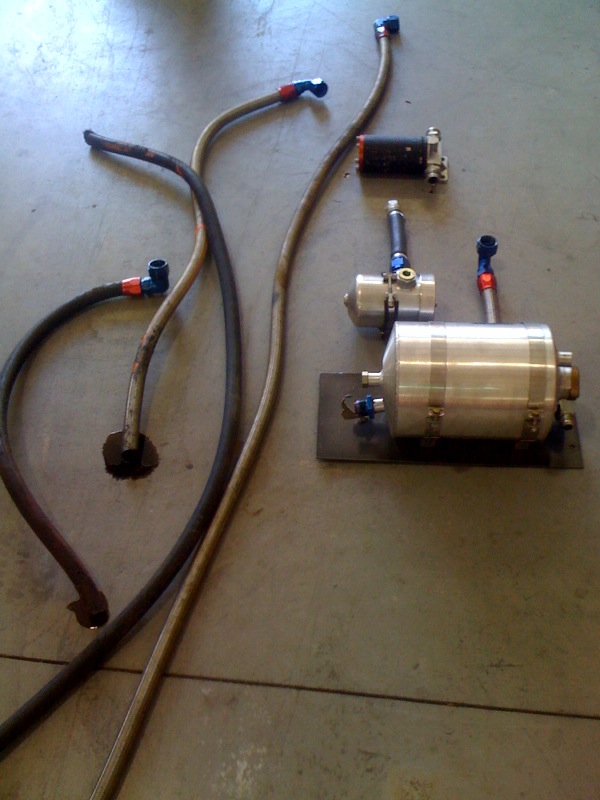
Posted by: Series9 Apr 26 2011, 07:53 PM
On the other side of things, the scavenge side also had -16 line.
Pointless. -12 is fine, but look at this neck-down at the oil filter.
It's a good thing we decided to look at everything:
Attached image(s)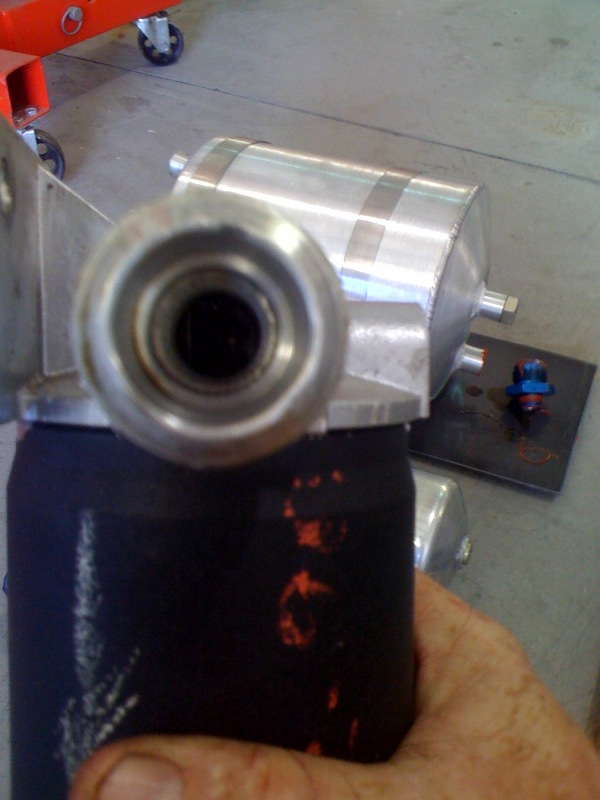
Posted by: Series9 Apr 26 2011, 07:57 PM
The last one from today.
I guess I forgot to take a picture of the very nice PMS/KEP flywheel and clutch arrangement, but this is looking pretty well.
Super nice muffler:
Attached image(s)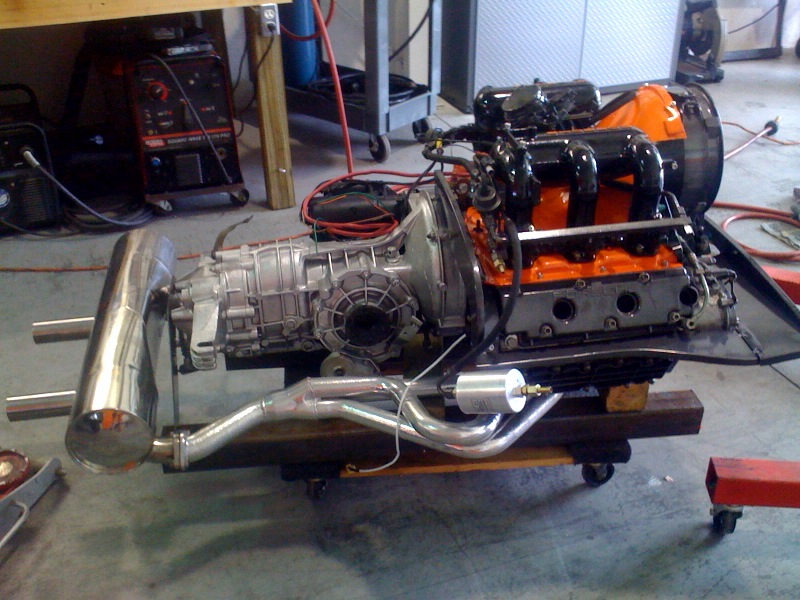
Posted by: Series9 Apr 26 2011, 08:41 PM
For those of you who remember the obstructed supply-line picture. I cut the hose at the other end today. Same thing:
Attached image(s)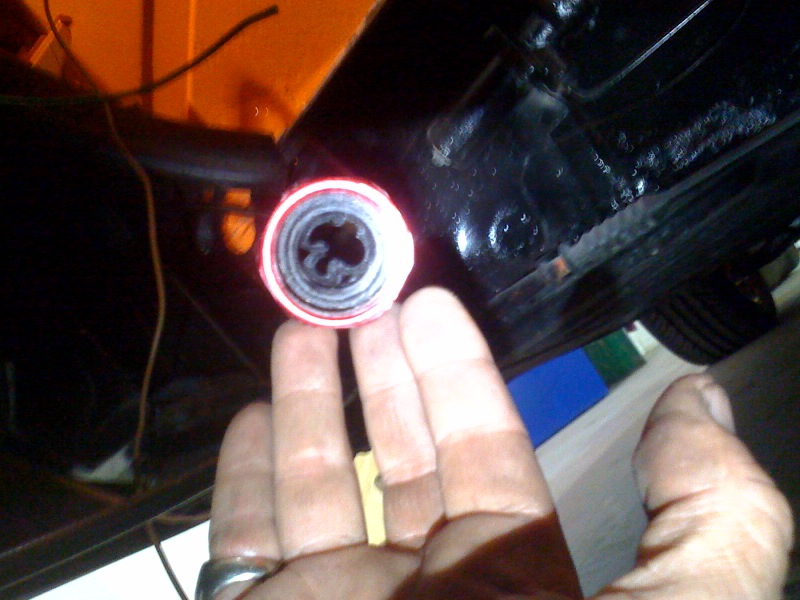
Posted by: Eric_Shea Apr 26 2011, 08:49 PM
Joe... any theories on what caused it?
Posted by: Series9 Apr 26 2011, 09:06 PM
Joe... any theories on what caused it?
Incompatible hose/fitting?
Posted by: MoveQik Apr 26 2011, 09:29 PM
Since we're putting the coolers in the back, James was kind enough to see the logic in putting the tank in the stock location.
DWD tank install will proceed this week.
Best tank on the market.
Posted by: McMark Apr 26 2011, 09:49 PM
Love those 119 cooler fan packs. 
Posted by: Series9 Apr 28 2011, 07:08 AM
More progress.
Fuel lines installed:
Attached image(s)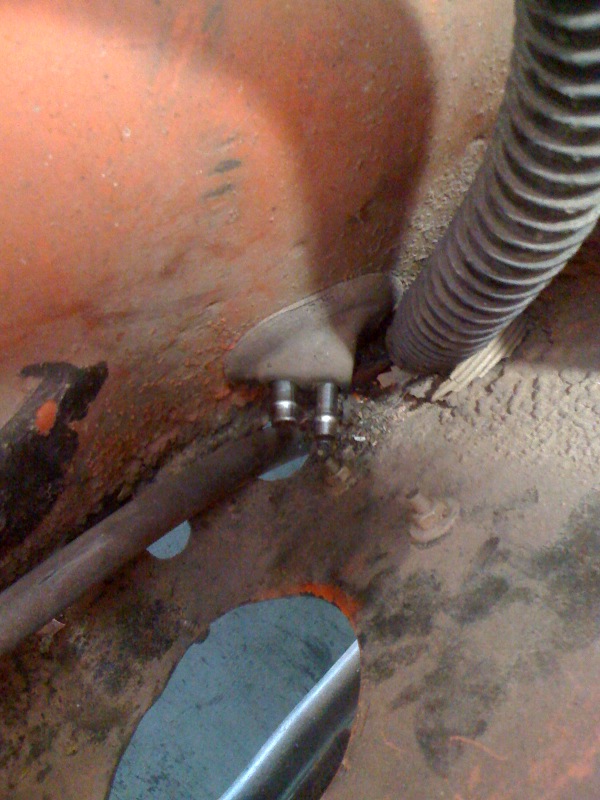
Posted by: Series9 Apr 28 2011, 07:12 AM
Oil tank test fit after cutting.
The scavenge hole is big because there was already a hole there for a breather line from the old engine.
Attached image(s)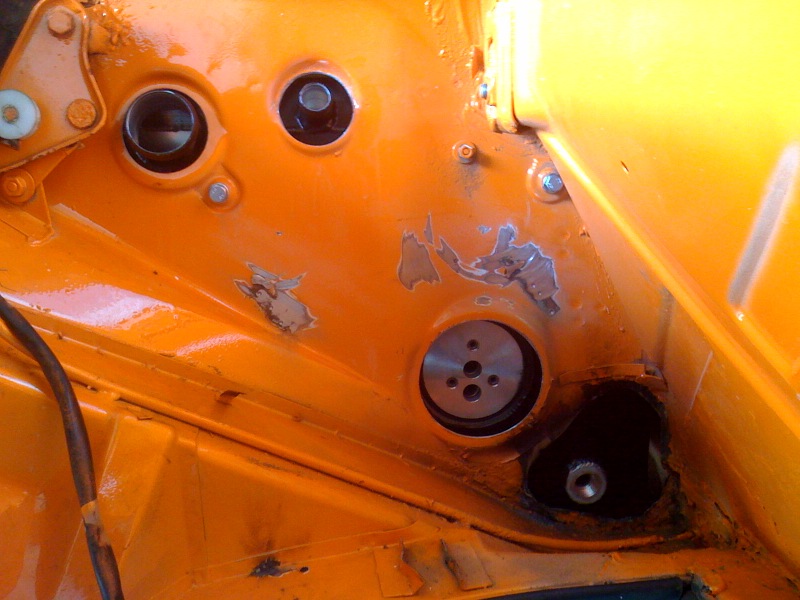
Posted by: Series9 Apr 28 2011, 07:14 AM
Put the filter console remnant on the wall and throw the rest away:
Attached image(s)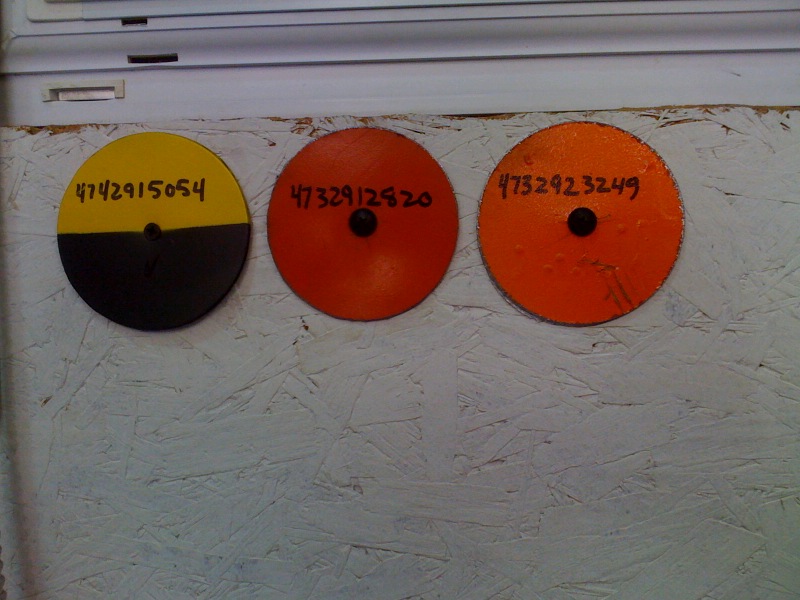
Posted by: Series9 Apr 28 2011, 07:16 AM
Mask and paint. Don't worry about the black paint. It'll be a little oily around here:
Attached image(s)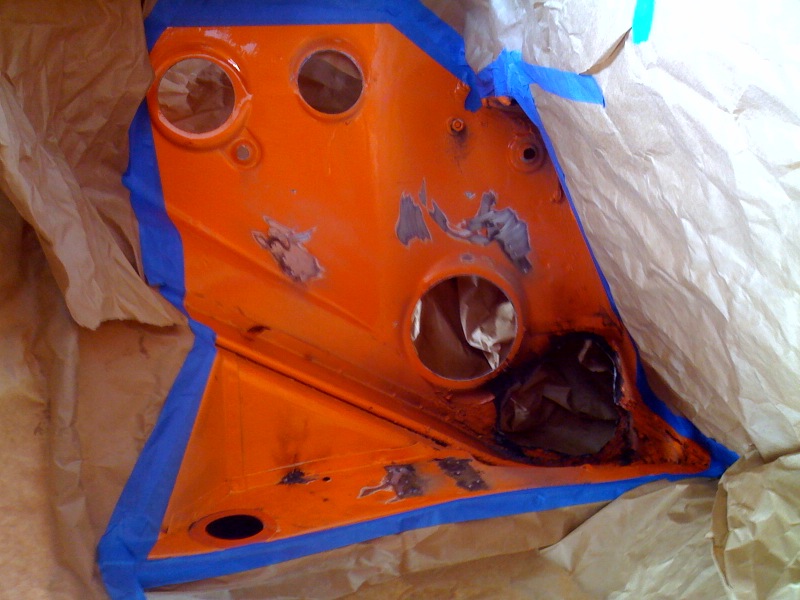
Posted by: Series9 Apr 28 2011, 03:30 PM
It looks like I only took one picture today.
The fuel plumbing on the engine passed with no leaks.
The other work consisted of running a couple of wires from the engine bay into the main harness in the tunnel, getting the fuel pump wire to its appropriate location up front, finished the last grinding of the passenger-side /4 engine mount and got that area painted, rewrapping the wiring harness in the engine bay, etc.
I'm trying to make sure I get everything that is easier to do with the engine out done so the engine can go in.
Nelson's 914 needs a couple days of work, so I'll get back on this next week.
The engine will be in the car shortly.
Attached image(s)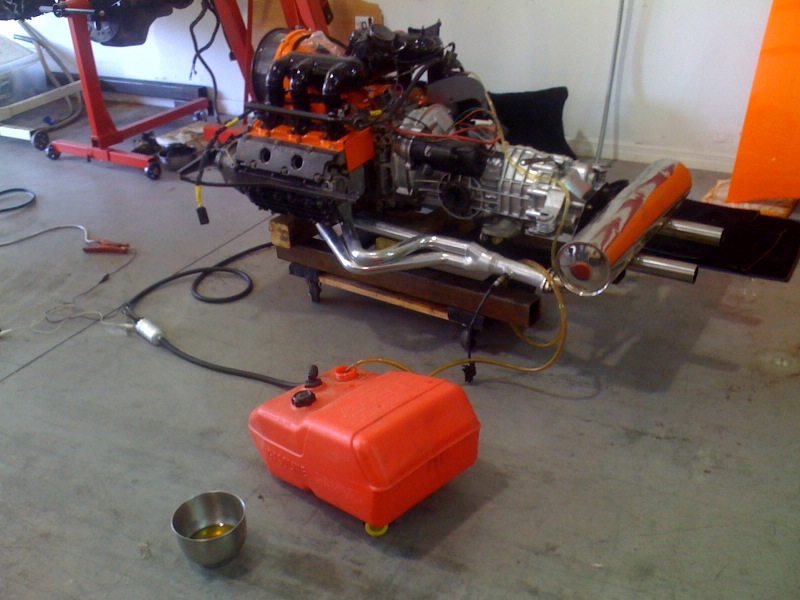
Posted by: JmuRiz Apr 28 2011, 07:06 PM
Looking good, makes me wish I had the money and lived closer...I'd just have you do my conversion
Posted by: Series9 Apr 30 2011, 05:23 PM
Oil tank installed:
Attached image(s)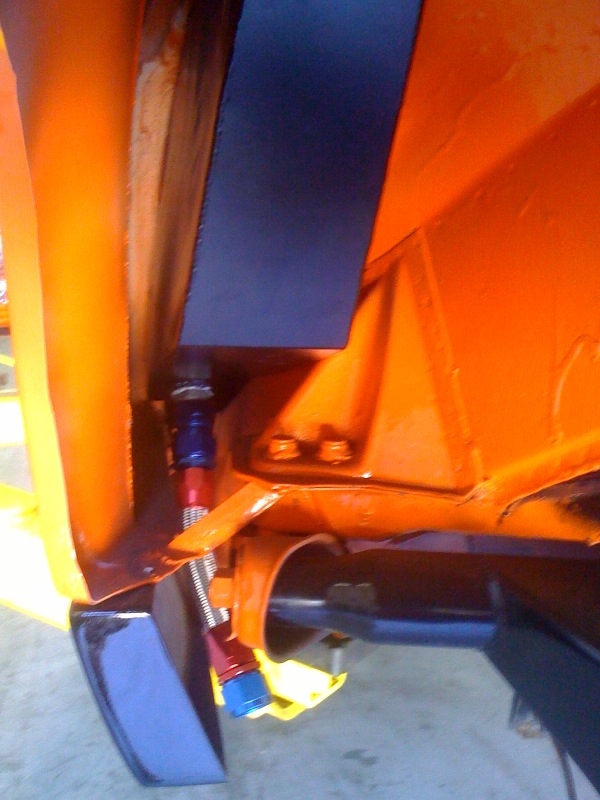
Posted by: Series9 Apr 30 2011, 05:27 PM
We'll call this a test-fit for now. I may not have to take it back out, we'll see.
The muffler is a little crooked. It was a lot crooked until I removed the muffler hanger. I'll have a make another one that will hold it straight.
Attached image(s)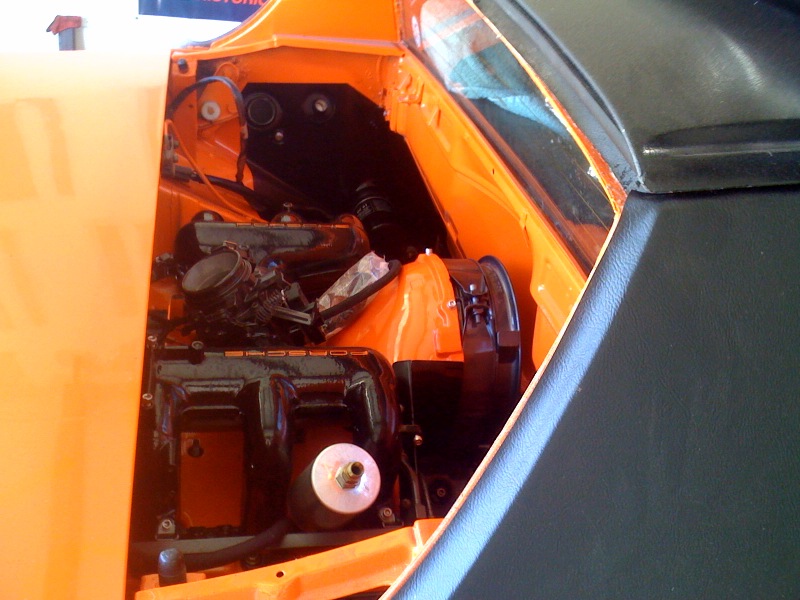

Posted by: MDG Apr 30 2011, 05:47 PM
 Beautiful, Joe.
I may have missed this in an earlier post - what muffler is that?
Posted by: tomeric914 Apr 30 2011, 06:44 PM
Hey Joe,
I don't like how close the scavenge line adapter is going to be to the exhaust. I found a better alternative to the Setrab fittings for my application at a local hydraulics shop for $8. This screws right into the case and replaces the factory M22 to M30 adapter. The orifice diameter is no different than the factory adapter.
Part number 9068-12-22 3/4" Male JIC x M22x1.5 Male Metric (Steel) which comes with a sealing washer.
Also found here: http://www.discounthydraulichose.com/9068_JIC_x_Metric_p/9068.htm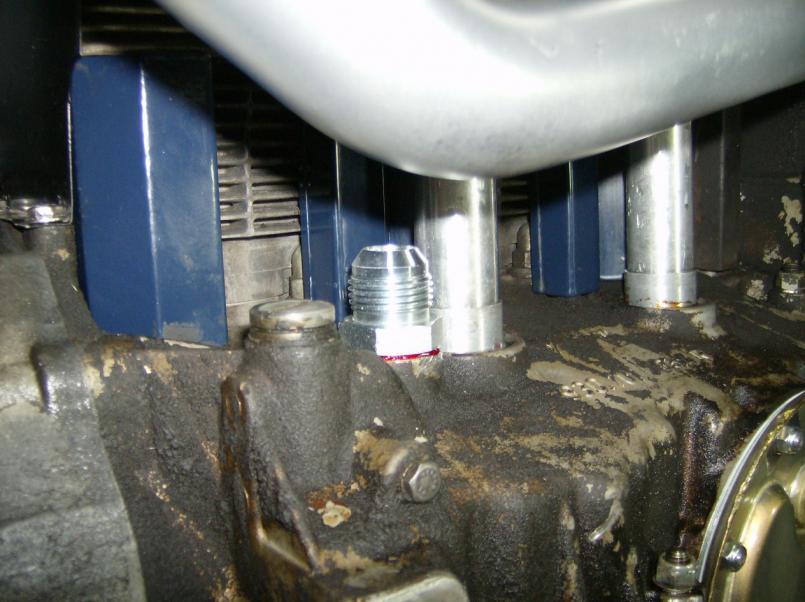
YES, I know my engine case is dirty. It matches the transmission!
Posted by: ellisor3 Apr 30 2011, 07:46 PM
Beautiful, Joe.I may have missed this in an earlier post - what muffler is that?
It is a M&K sport muffler
http://www.mkexhaust.com/products/911s.html
Posted by: racerbvd Apr 30 2011, 09:08 PM
Beautiful, Joe.I may have missed this in an earlier post - what muffler is that?
It is a M&K sport muffler
http://www.mkexhaust.com/products/911s.html
I have one of those for my GT clone too....
Posted by: Series9 May 1 2011, 04:51 AM
Hey Joe,
I don't like how close the scavenge line adapter is going to be to the exhaust.....
I'm looking at those, but I have done it like this a bunch of times. I put a 120 degree fitting on the adapted outlet and run the scavenge line either forward or back to the driver's side, depending upon the thermostat arrangement.
Posted by: MDG May 1 2011, 06:01 AM
It is a M&K sport muffler
http://www.mkexhaust.com/products/911s.html
I have one of those for my GT clone too....
Thanks, guys. How neighborhood friendly are those?
A: "Wow that car sounds great!"
B: "Nice car but it's kinda loud."
C: "If that A-hole from down the road drives past here one more time I'm gonna throw a brick at him."
Posted by: 396 May 1 2011, 08:41 AM
Keep it up Joe, good to see your making head way with your ‘hobby’ business
Posted by: ellisor3 May 1 2011, 10:04 AM
It is a M&K sport muffler
http://www.mkexhaust.com/products/911s.html
I have one of those for my GT clone too....
Thanks, guys. How neighborhood friendly are those?
A: "Wow that car sounds great!"
B: "Nice car but it's kinda loud."
C: "If that A-hole from down the road drives past here one more time I'm gonna throw a brick at him."
I ran the muffler for a short time in the old 3.0 and it sounded great. Not loud at all. It has that low bellow sound, like a tiger.
Posted by: mepstein May 1 2011, 11:55 AM
It is a M&K sport muffler
http://www.mkexhaust.com/products/911s.html
I have one of those for my GT clone too....
Thanks, guys. How neighborhood friendly are those?
A: "Wow that car sounds great!"
B: "Nice car but it's kinda loud."
C: "If that A-hole from down the road drives past here one more time I'm gonna throw a brick at him."
I ran the muffler for a short time in the old 3.0 and it sounded great. Not loud at all. It has that low bellow sound, like a tiger.
I have one on the list for my build but in an "R" version. I live non developement so no neigbor issues anyway.
Posted by: MDG May 1 2011, 12:27 PM
I ran the muffler for a short time in the old 3.0 and it sounded great. Not loud at all. It has that low bellow sound, like a tiger.
Thanks. The only other 3.2 914 up here I know of has a twin pipe but I think it's a 911 sport muffler - Dansk probably. He may have even made it himself from an old single out banana. It is LOUD - like race track loud.
I'd love to hear your impressions of the M&K when Joe has finished your 3.2
Posted by: Series9 May 6 2011, 09:50 AM
Turns out that this is the same size as the adapters for the Setrab oil coolers. M22x1.5:-12AN Male.
Is this better?
Attached image(s)
Posted by: Bee Jay May 6 2011, 11:13 AM
Suscribed. Lot of good info for a novice like me. Thanks.
Bee Jay
Posted by: mepstein May 6 2011, 11:45 AM
Suscribed. Lot of good info for a novice like me. Thanks.
Bee Jay
X10 If Bee Jay is a novice, I'm just clueless!
Posted by: Series9 May 6 2011, 12:10 PM
Thermostat location and the first line finished.
Now I have to leave for dinner at my mother-in-law's birthday.
Attached image(s)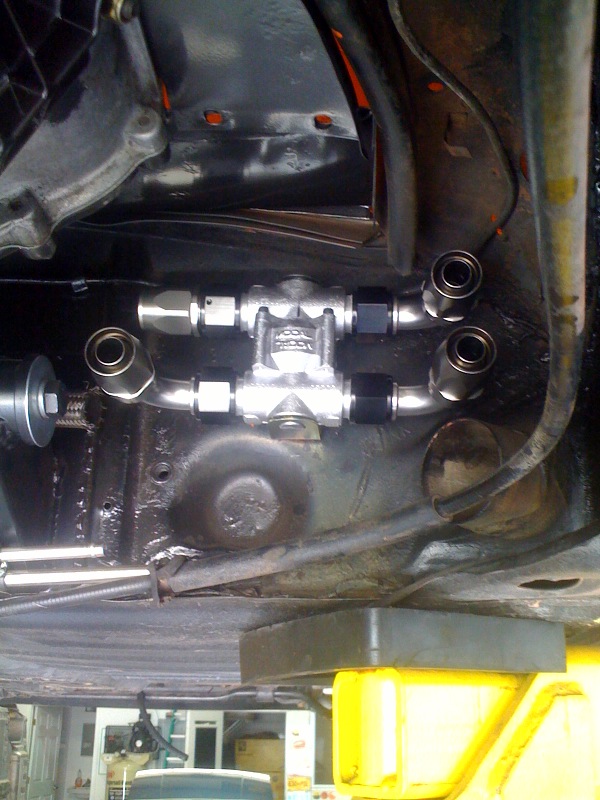
Posted by: racerbvd May 6 2011, 09:33 PM
Posted by: Series9 May 24 2011, 04:21 PM
Thanks for your patience. I'm back from a much-needed vacation.
The fuel pump is in:
Attached image(s)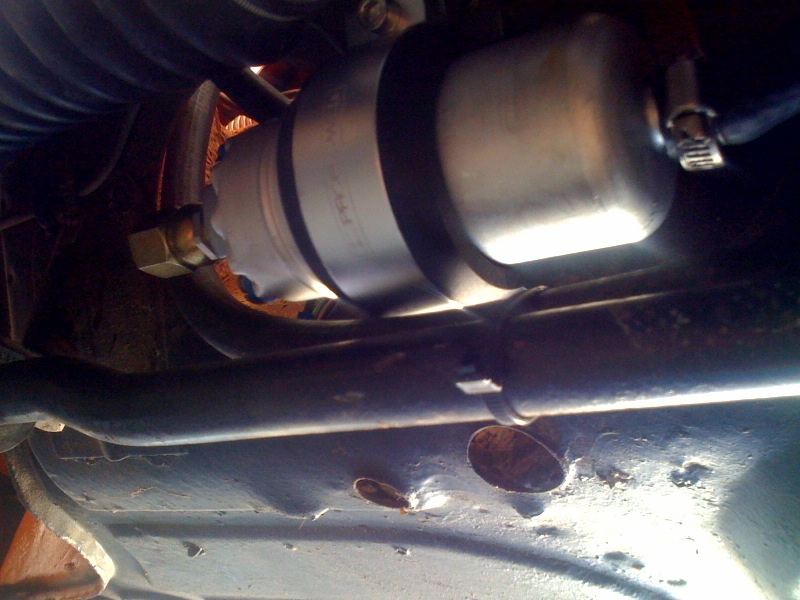
Posted by: Series9 May 24 2011, 04:31 PM
I didn't really want to take the engine back out, but it was only bolted in, not hooked up.
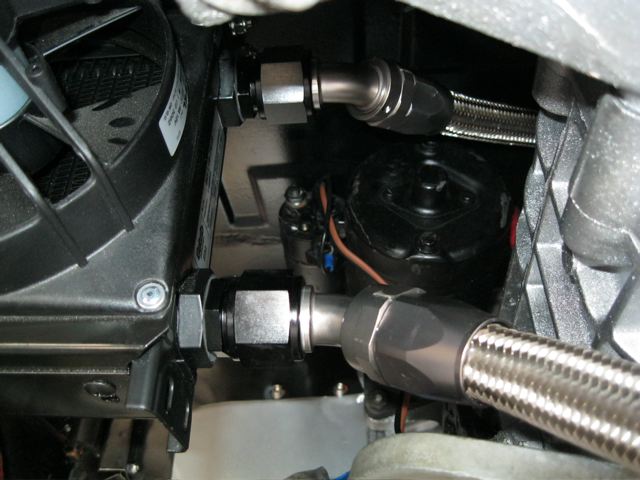
The fifteen minutes it took to pull it back out is already saving time elsewhere.
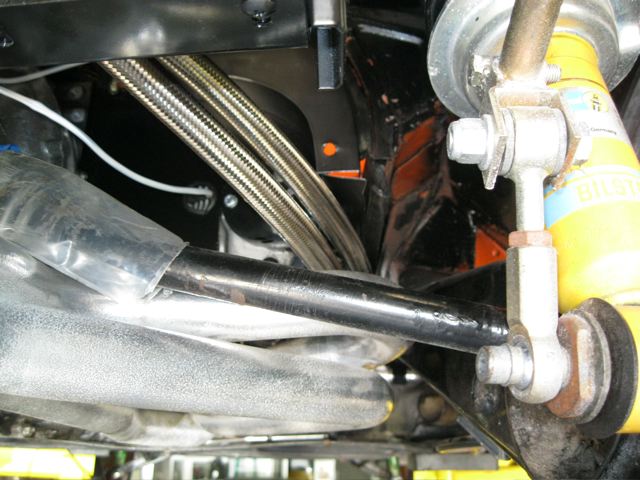
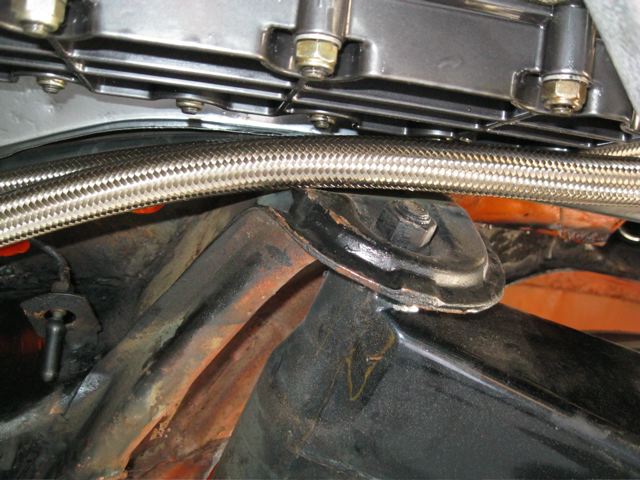
You can see the new supply line on the cooler. The cooler only recently arrived after being modified for a 914, so having the engine out made it much easier to install. The rest of the tin is on and the wiring is all terminated on the transaxle and starter.
Then I moved on to the scavenge line from the thermostat to the tank. Also much easier with the engine out.
I tested the starter today. It worked fine.
Oil coolers go in next.
Attached image(s)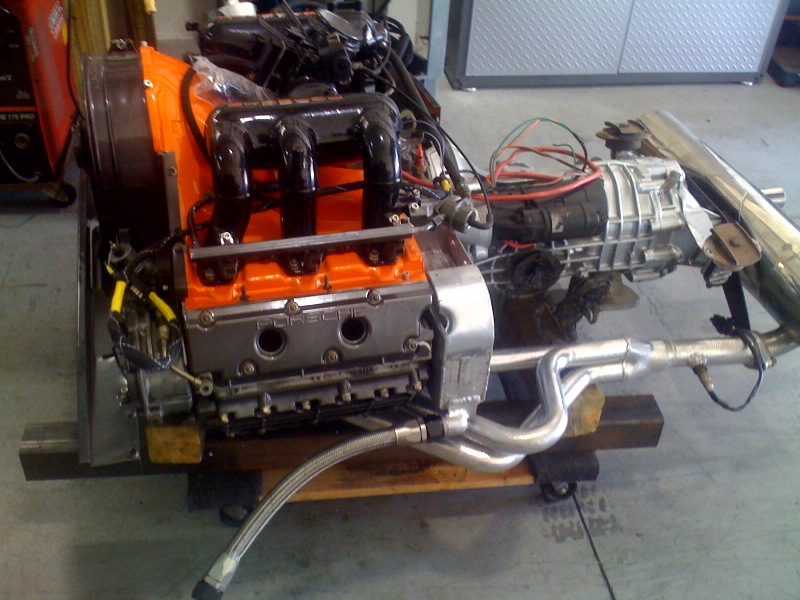
Posted by: MDG May 24 2011, 04:56 PM
Excellent, Joe. I'll be watching the install of the Setrabs with interest.
Posted by: ellisor3 May 24 2011, 06:07 PM
Looks great Joe. Hope you had a great vacation.
I'm ready to go Zoom-A-Zoom Zoom and Poom Poom
Posted by: Series9 May 25 2011, 02:24 PM
Fabrication of the brackets for the oil coolers:
Attached image(s)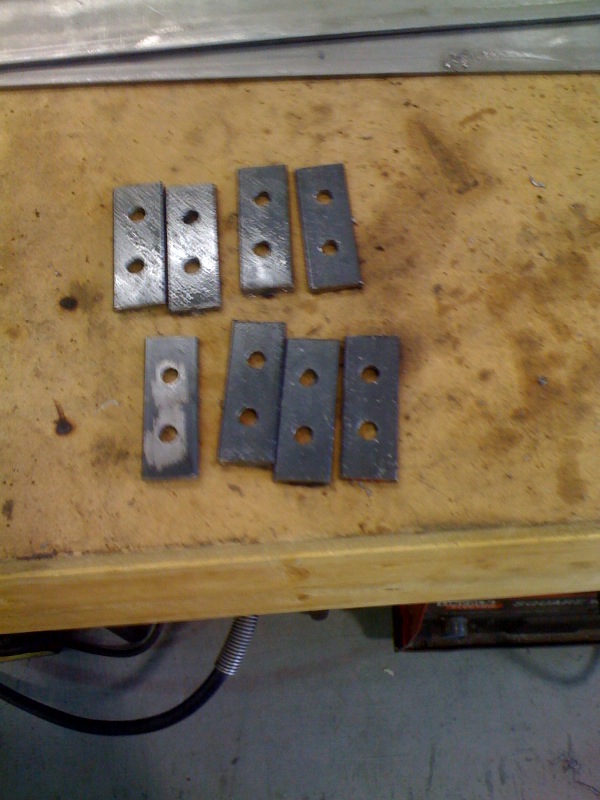
Posted by: Series9 May 25 2011, 02:29 PM
The two brackets for the top of the coolers are now drying after paint. The bottom brackets will have to wait until everything is done and the muffler hanger is on straight because they get secured to the same bolt as the muffler/header/hanger junction.
I will have to weld a strut between that point and the bottom hangers, but it's all got to be finished and squared up before I can make that weld.
Attached image(s)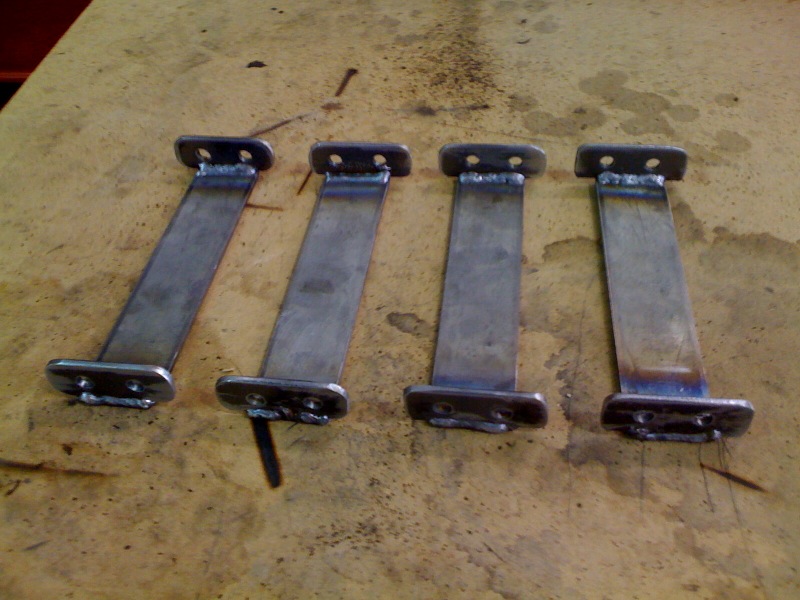
Posted by: Series9 May 25 2011, 02:33 PM
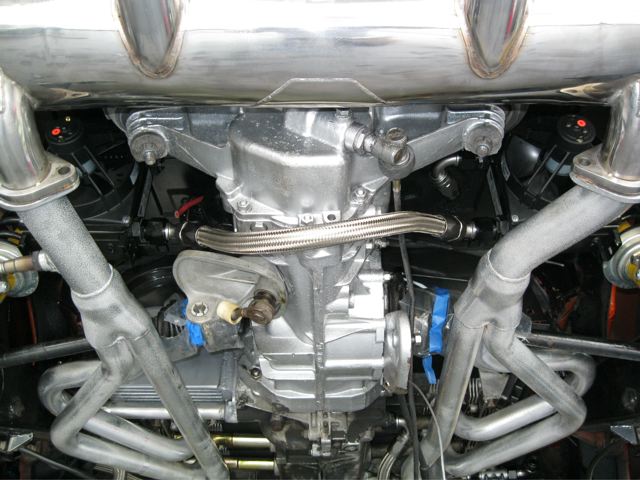
The engine is back in. That should be the last installation for the engine.
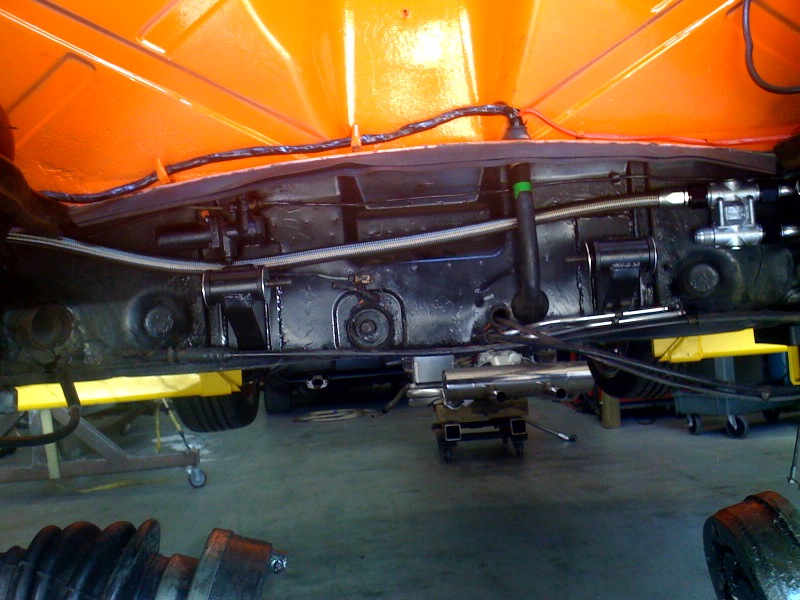
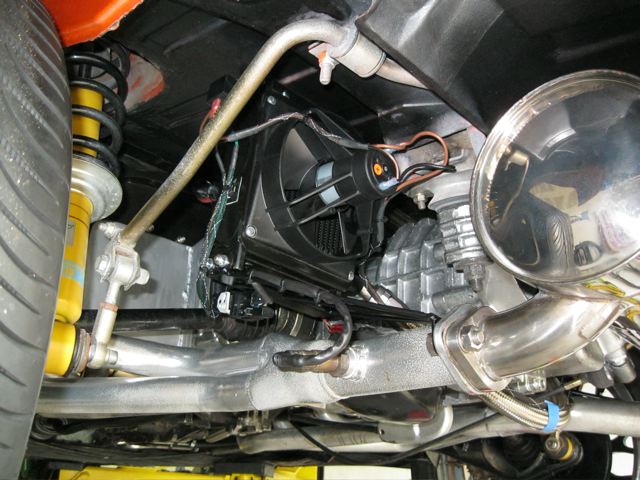
James chose rear coolers because he didn't want to cut the front of the car. These four holes are the extent of the body modifications for the rear cooler arrangement.
I'll bolt the coolers in tomorrow.
Attached image(s)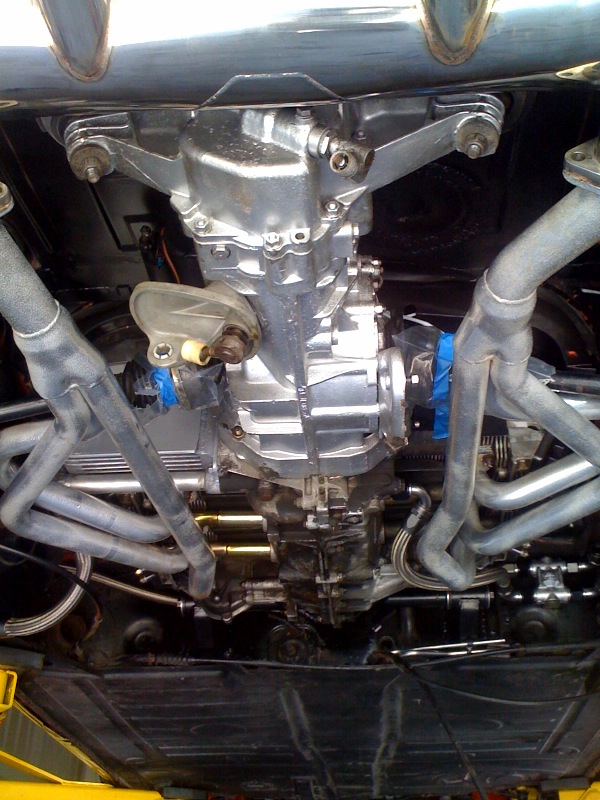
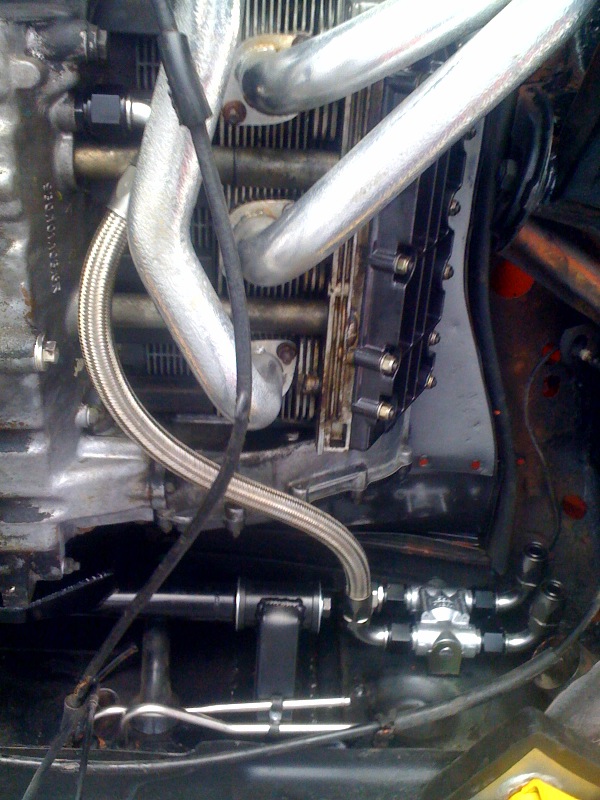
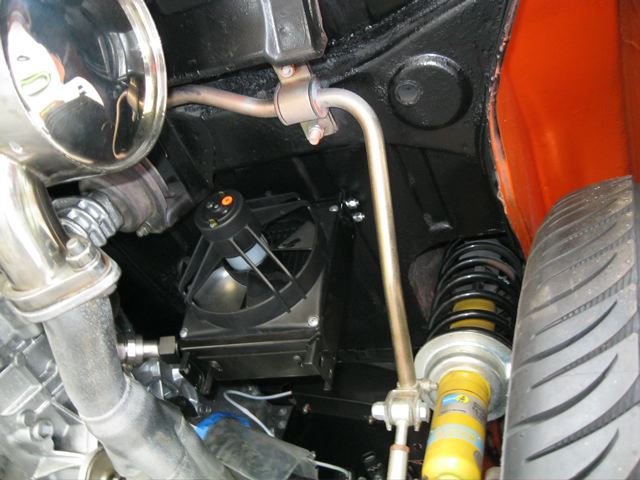
Posted by: Series9 May 26 2011, 11:17 AM
Yesterday was slow, but all the prep work produced some serious results today.
Here goes the oil cooler install and plumbing.
Don't worry, Adel clamps are on the way. Everything will be well secured. I'm just trying to get oil in the thing so I can finish the wiring and try to start it. Once it's running, it'll be down hill from there.
Here we go....
Attached image(s)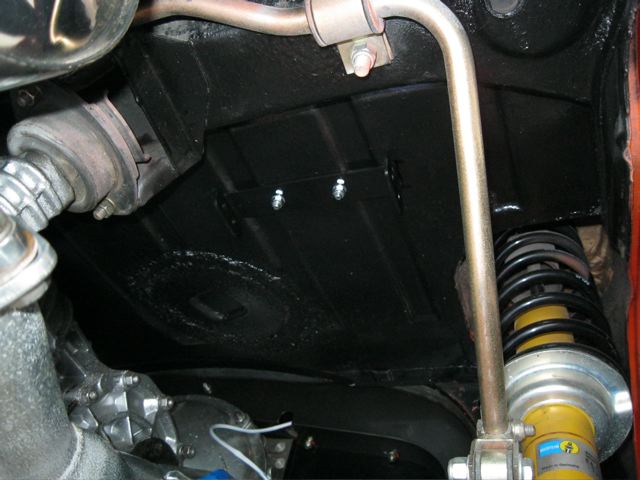
Posted by: Series9 May 26 2011, 11:20 AM
More:
Attached image(s)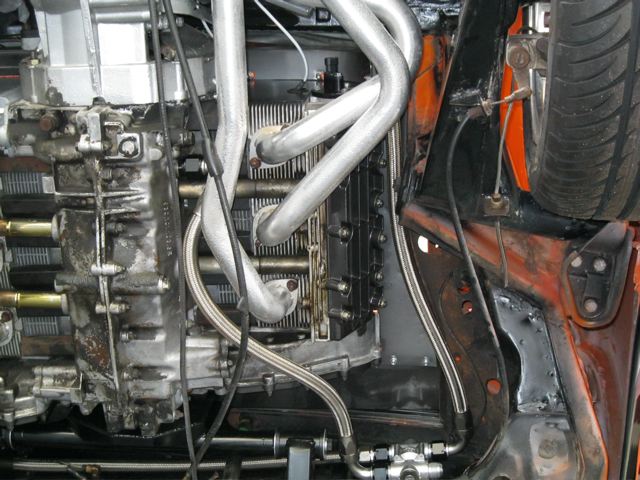

Posted by: Ferg May 26 2011, 11:39 AM
Posted by: JmuRiz May 26 2011, 12:42 PM
Very nifty, I like it.
Posted by: skota May 26 2011, 12:43 PM
nice nice work.
Posted by: AZ914 May 26 2011, 02:07 PM
Joe,
May I ask where you buy your oil lines and fittings?
More importantly, may you answer? 
Posted by: Series9 May 26 2011, 02:35 PM
Joe,
May I ask where you buy your oil lines and fittings?
More importantly, may you answer?
I have a commercial account with BAT Inc in Sarasota.
Posted by: SirAndy May 26 2011, 04:36 PM
Y'all forgot the big cup-washers on the transmission mounts ...
Posted by: ellisor3 May 26 2011, 04:38 PM
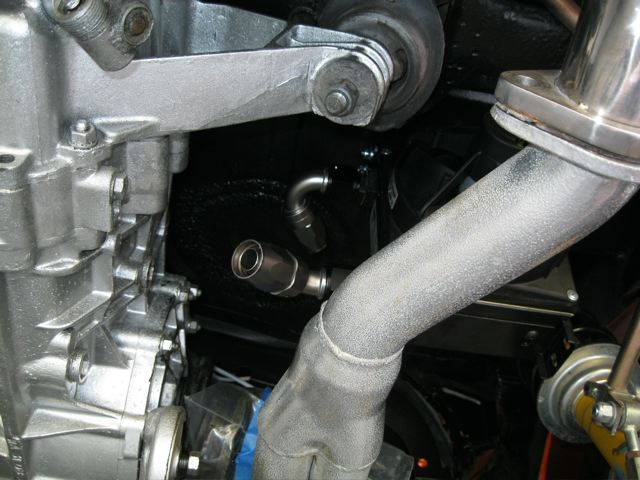
Very Clean Joe. It is only a guess but with that dual Setrab, I would think that you would get more cooling than if you had only one that was twice the size. I am curious to see what the running temp will be in the middle of summer. That is a much better set up than what I had, thanks for the suggestion. I am beginning to think you know what you are doing
Posted by: Series9 May 26 2011, 05:27 PM
Y'all forgot the big cup-washers on the transmission mounts ...
Hmmm. Let me see if I can find some. They're not in the parts box from the owner.
Posted by: Series9 May 26 2011, 05:27 PM
Very Clean Joe. It is only a guess but with that dual Setrab, I would think that you would get more cooling than if you had only one that was twice the size. I am curious to see what the running temp will be in the middle of summer. That is a much better set up than what I had, thanks for the suggestion. I am beginning to think you know what you are doing
I'm glad you feel that way.
Posted by: ventedrib May 26 2011, 06:13 PM
Are those wheels 3piece or 2.
Posted by: ellisor3 May 26 2011, 08:45 PM
Are those wheels 3piece or 2.
3 piece from Intro Wheels
Posted by: tomeric914 May 28 2011, 07:33 PM
Here goes the oil cooler install and plumbing.
I know you're just getting everything in to get it up and running, but I'm curious as to how you are controlling the fans. I skipped the oil thermostat altogether with my cooler out back and plan on triggering the fan from an 18 x 1.5 radiator fan switch set to turn on at 85 deg C mounted in the old idiot light switch location on my 3.0. Not sure if the 3.2 has the same idiot light switch location though.
Posted by: Series9 May 28 2011, 07:43 PM
Here goes the oil cooler install and plumbing.
I know you're just getting everything in to get it up and running, but I'm curious as to how you are controlling the fans. I skipped the oil thermostat altogether with my cooler out back and plan on triggering the fan from an 18 x 1.5 radiator fan switch set to turn on at 85 deg C mounted in the old idiot light switch location on my 3.0. Not sure if the 3.2 has the same idiot light switch location though.
The fans will be started by a relay that is triggered by the fuel pump relay. Basically, the fans will run when the engine is running, but they will only cool oil when it's flowing to be cooled. The oil thermostat will control flow to the coolers.
Posted by: Series9 Jun 1 2011, 02:14 PM
The plan for the day was to put power on the car and see if I can talk to the TECgt.
Everything went great until I tried to start the engine. It spins like it has no compression. I put a gauge on three of the cylinders and they make 140 psi.
I was able to talk to the ECU and load a base program. The spark plugs are sparking.
I dumped some fuel in the intake manifold and it doesn't even sputter.
I pulled the intake valve covers to make sure the valves aren't too tight. They're not.
Anyway, the TECgt seems to be working fine. When my laptop is hooked up, you can read all the sensor values. If you put vacuum on the MAP sensor, it shows on the laptop instantly. The same with the TPS, etc. It's cool.
However, I'm having some doubts about the internal condition of this engine. Let me sleep on it. 
Attached image(s)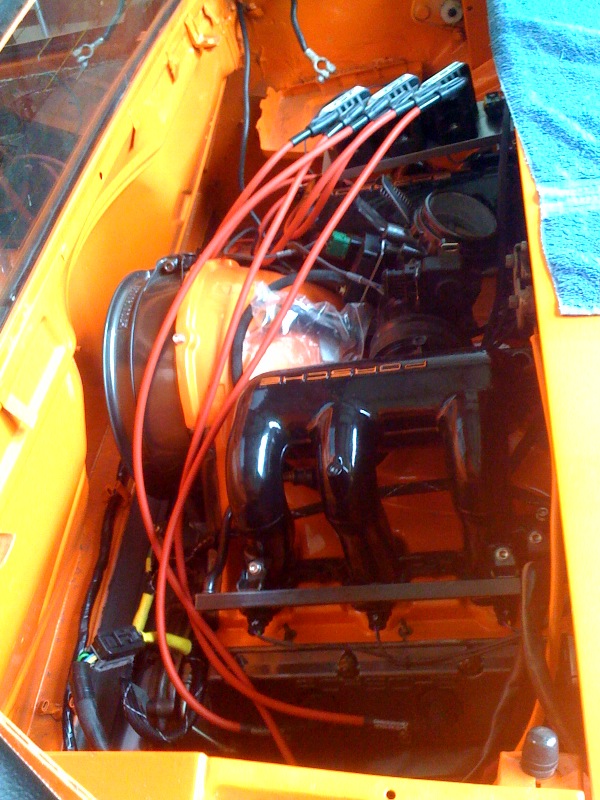
Posted by: Series9 Jun 1 2011, 02:18 PM
A couple more:
Attached image(s)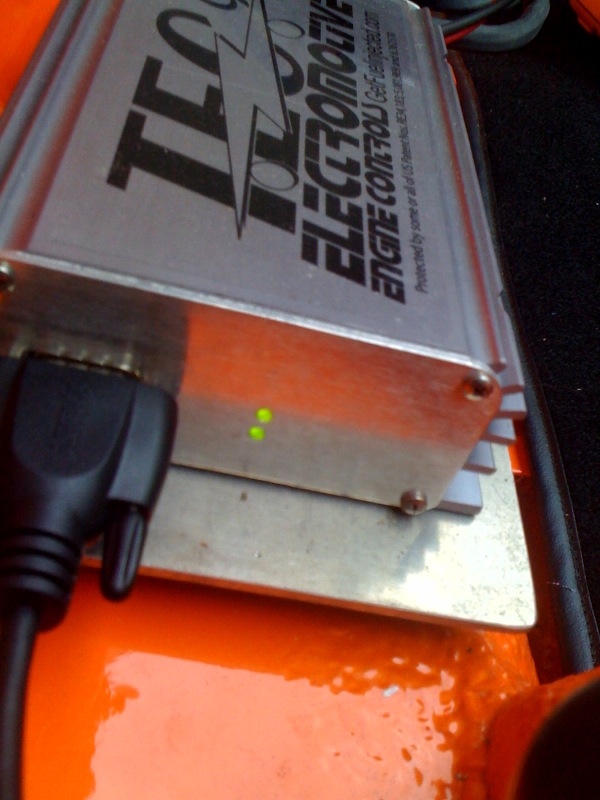
Posted by: ellisor3 Jun 2 2011, 06:49 AM
Hey Joe,
The engine was purchased from DC Auto. According to Robert (the owner) the engine was rebuilt in March of 2009 by Bruce Abbott aka East Coast Bruce. I do not know him but I did check around and he seemed competent. According to Robert the engine has about 100 miles on it. After I bought the engine from them I had some sketchy dealing with DC on subsequent purchases. Parts were sent that were not up to par (ie fuel pump and impeller x2) I will be really pissed if there is a problem with that engine.
The compression test seems about right at 140 on a cold engine though. The installation looks great.
Posted by: racerbvd Jun 2 2011, 07:44 AM
Ouch, hope that it doesn't need to be opened up..
Posted by: Series9 Jun 2 2011, 08:37 AM
Stand by.....I'm doing a leak-down on 1 and 4 in the next hour.
Posted by: MoveQik Jun 2 2011, 08:42 AM
Hey Joe,
Any advantage in the way you are splitting up the coolers on this one versus the set up you did on mine? Seems like they might get air flowing a little more freely this way. I like it.
Posted by: Series9 Jun 2 2011, 09:25 AM
OK. It's pretty difficult to argue with these numbers.
1 and 4 were both the same and returned very healthy numbers. 94 and 95 over 100.
I'm going to install the gas tank and get some fresh gas.
Attached image(s)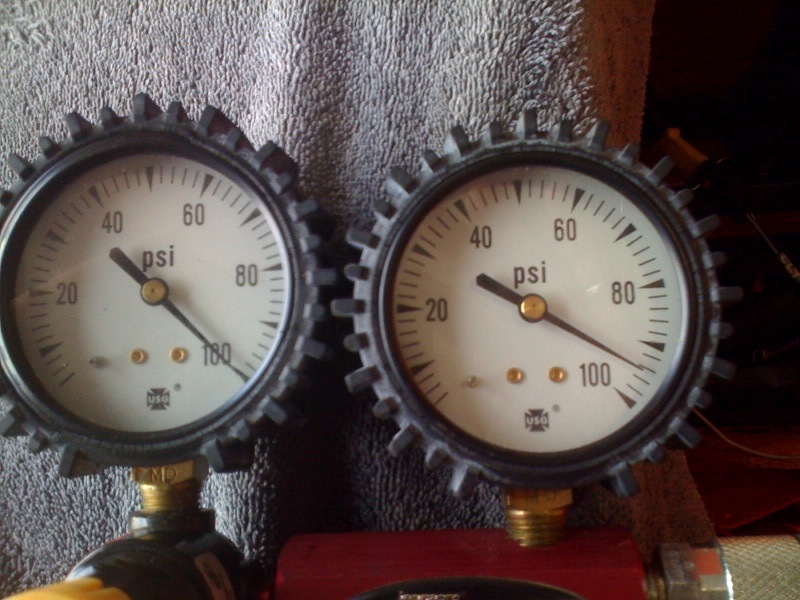
Posted by: Series9 Jun 2 2011, 09:28 AM
Hey Joe,
Any advantage in the way you are splitting up the coolers on this one versus the set up you did on mine? Seems like they might get air flowing a little more freely this way. I like it.
Better air flow is the reason I went to this arrangement. So, yes.
Posted by: Ferg Jun 2 2011, 09:29 AM
FWIW my injectors caused 2 days of headache when trying to get my 3.2 going for the first time after it's rebuild and having sat for a year.
Posted by: Series9 Jun 2 2011, 11:47 AM
It made noise!!!!
No idle yet........
Posted by: Series9 Jun 2 2011, 11:58 AM
It runs!!!!
Interestingly, the ignition key doesn't shut the engine off. I had to unplug the harness to the computer.
That's probably a back-feed from the fuel pump relay. I'll find it.
F'in A.
Posted by: Ferg Jun 2 2011, 12:12 PM
Posted by: Series9 Jun 2 2011, 12:43 PM
Now that we've passed the biggest hurdle in this build, I stopped to make a list of things that have to be done to deliver the car:
Fix the ECU relay wiring (so it shuts off with the key)
Drive shafts
Tranny linkages
Adel clamps on the oil lines
Tie up all the FI and other wiring
Fab a DFU bracket
Wire the oil cooler fans
Fab a muffler hanger
Finish the bottom bracket for the coolers
MAP to intake manifold adapter
Front decklid
Interior
Air cleaner and piping
Install the MAT sensor
TPS bracket
Breather tubing
Breather filter
Main power wire to the ECU
Oxygen sensor module and wiring
Tachometer
Crap. Back to work. 
Posted by: Madswede Jun 2 2011, 12:45 PM
Rawk! Now I wanna hear it.
Posted by: ellisor3 Jun 2 2011, 01:32 PM
Rawk!
Now I wanna hear it. Me Too. Kick Ass Joe.

Posted by: Series9 Jun 2 2011, 02:03 PM
Rawk!
Now I wanna hear it. Me Too. Kick Ass Joe.
It sounds very serious. It's low and grumbly.
I just went to start it again and it wouldn't. The fuel pump seized. It's brand new.
Compared to the rest of it, this is nothing. I'll return it. Whatever.
Posted by: Madswede Jun 2 2011, 04:21 PM
I like the advice you gave me a long time ago: Hit it with a hammer. (I know, the 3.2 isn't a low-P pump for a carburetor set up, but hey at this point ...)
Posted by: tomeric914 Jun 2 2011, 07:24 PM
I just went to start it again and it wouldn't. The fuel pump seized. It's brand new.
That's luck. Better it seized now than after you delivered it.
Posted by: Series9 Jun 9 2011, 04:38 PM
Working through the list.
I pulled the fuel pump and cleaned it out. I think a little debris stopped it from running. It's working now
The TPS is finished.
I found the wiring problem that was not allowing the engine to be turned off with the key. I was getting 4 volts across the alternator light (field) that was just enough to keep the ECU power relay closed. I moved the gauge power to another switched terminal and that fixed it.
I fabbed the DFU brackets today:
Attached image(s)

Posted by: Eric_Shea Jun 9 2011, 06:28 PM
Looking good Joe 
Posted by: Series9 Jun 10 2011, 04:42 PM
So I'm hooking up the drive shafts and I find this (anyone see something wrong?):
Attached image(s)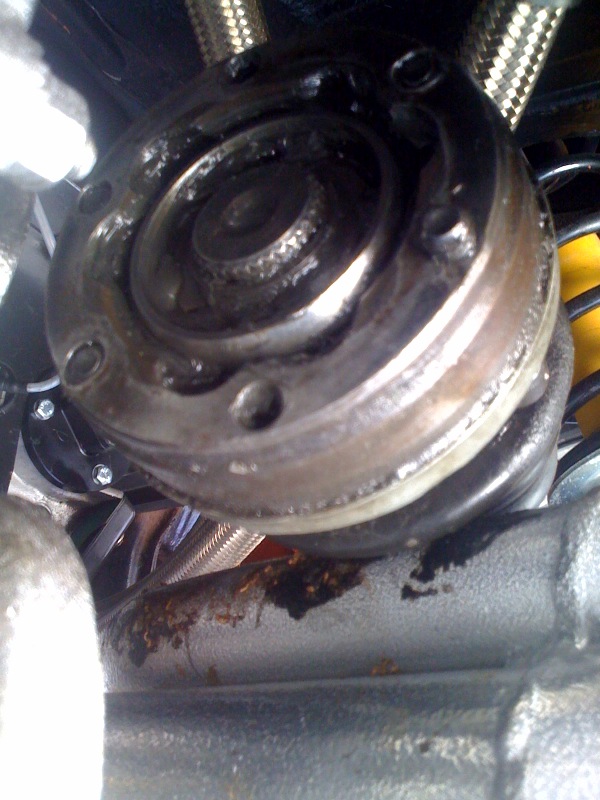
Posted by: Series9 Jun 10 2011, 04:43 PM
There's no way to get that axle out without:
Attached image(s)
Posted by: Series9 Jun 10 2011, 04:45 PM
/4 muffler hanger modified for this job.
I also finished the MAP sensor manifold adapter, but it's not exciting enough to warrant a picture.
Attached image(s)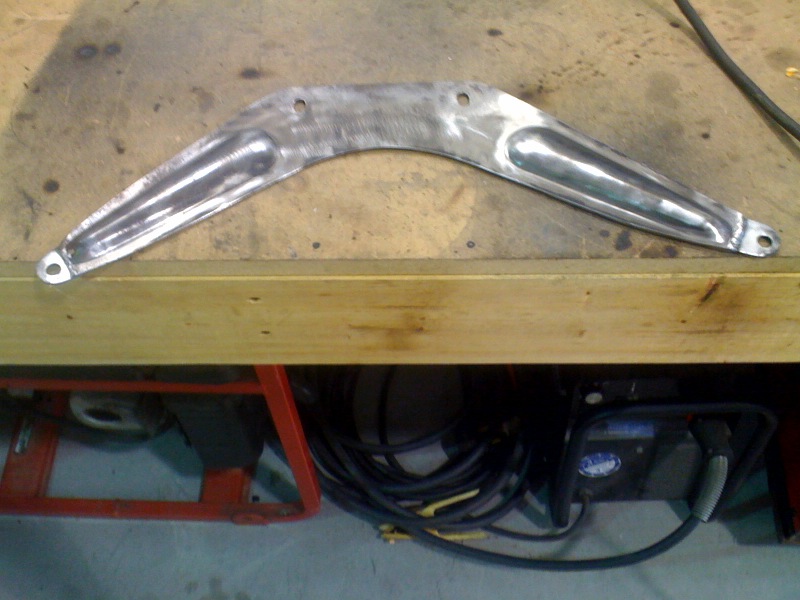
Posted by: Eric_Shea Jun 10 2011, 05:47 PM
Missing pins or is it a 6-bolt?
Posted by: Series9 Jun 10 2011, 08:48 PM
Missing pins or is it a 6-bolt?
6-bolt w 4-bolt boot so you wouldn't notice if it were installed.
Posted by: Eric_Shea Jun 10 2011, 09:50 PM
Probably common I'm afraid. 930 (6-bolt) 108mm CV's are the only 108's available right now...
Either pin that one with larger (12mm?) pins or drill the bosses on the flange and stub axled to accept the 10x1.5 fastener (my choice). Be careful though, both pieces are hardened and it will cost you or your machinist a "bit" or two. If you pin it you'll still have to widen the holes in the stub and flange.
Posted by: Series9 Jun 11 2011, 06:41 AM
Probably common I'm afraid. 930 (6-bolt) 108mm CV's are the only 108's available right now...
Either pin that one with larger (12mm?) pins or drill the bosses on the flange and stub axled to accept the 10x1.5 fastener (my choice). Be careful though, both pieces are hardened and it will cost you or your machinist a "bit" or two. If you pin it you'll still have to widen the holes in the stub and flange.
I found a new Lobro 914 CV on eBay. It's on the way.
Posted by: ellisor3 Jun 11 2011, 09:42 AM
Probably common I'm afraid. 930 (6-bolt) 108mm CV's are the only 108's available right now...
Either pin that one with larger (12mm?) pins or drill the bosses on the flange and stub axled to accept the 10x1.5 fastener (my choice). Be careful though, both pieces are hardened and it will cost you or your machinist a "bit" or two. If you pin it you'll still have to widen the holes in the stub and flange.
Eric or Joe,
Could you explain in a little more detail what the issue is, I am not sure I understand what I am looking at.
Posted by: Series9 Jun 11 2011, 03:54 PM
Probably common I'm afraid. 930 (6-bolt) 108mm CV's are the only 108's available right now...
Either pin that one with larger (12mm?) pins or drill the bosses on the flange and stub axled to accept the 10x1.5 fastener (my choice). Be careful though, both pieces are hardened and it will cost you or your machinist a "bit" or two. If you pin it you'll still have to widen the holes in the stub and flange.
Eric or Joe,
Could you explain in a little more detail what the issue is, I am not sure I understand what I am looking at.
914 CVs have four bolts and two pins. This one is a six-bolt CV, so it's not possible to pin them. Your 3.2 would break that arrangement. I have the correct one on the way.
I got some more done at the end of the day when I was finished with Byron's 951.
Adel clamp fun. I'm very happy with the oil lines attached to the lower valve cover. They were a bitch to install, but all is very secure and nothing will be rubbing.
I also spent some time getting started on tidying up the wiring in the engine bay:
Attached image(s)

Posted by: Eric_Shea Jun 11 2011, 10:18 PM
You're using 914 CVs in there?
Posted by: Series9 Jun 23 2011, 03:01 PM
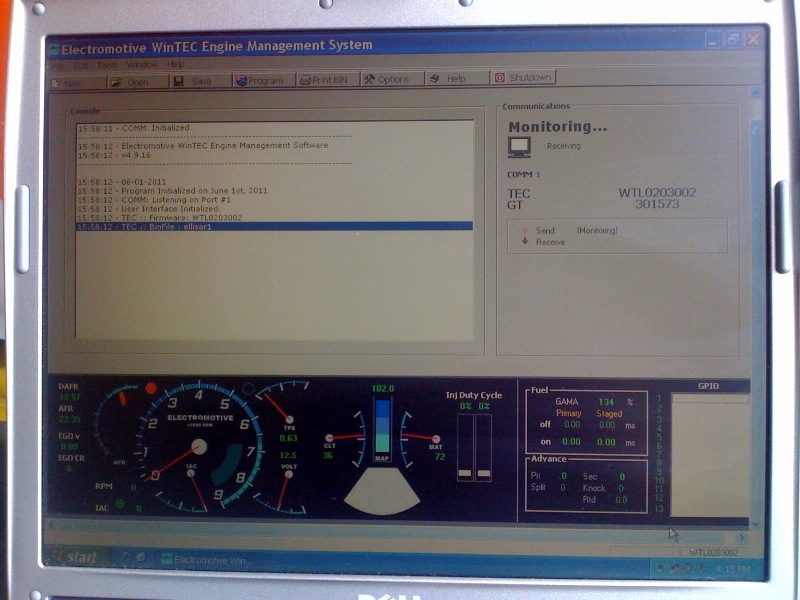
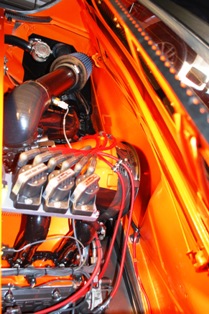
Many little things are being accomplished randomly, but today I made the intake with the MAT sensor installation and I made HUGE progress in the tuning of the engine.
If I had the last pieces it would be very drivable. I should be able to run it around the block next week!
My eyes are friggin' burning from the exhaust fumes.
We are very close to completion.
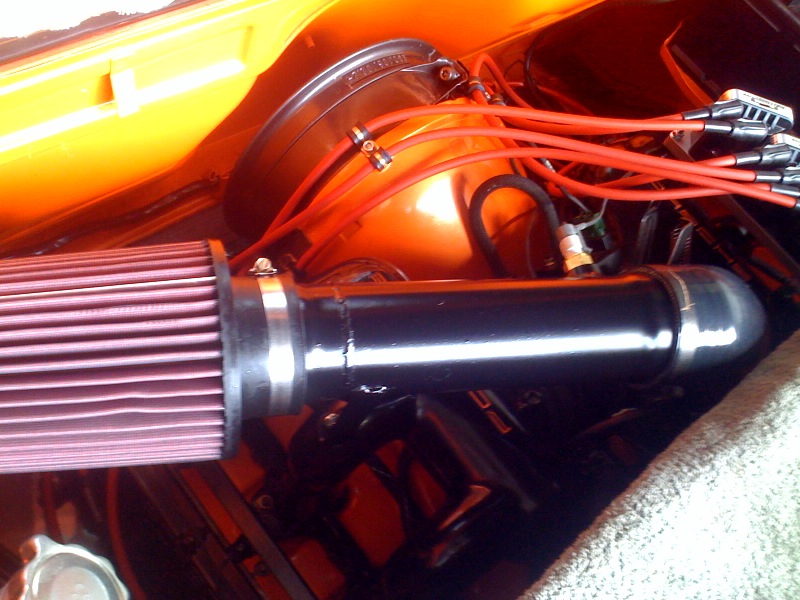
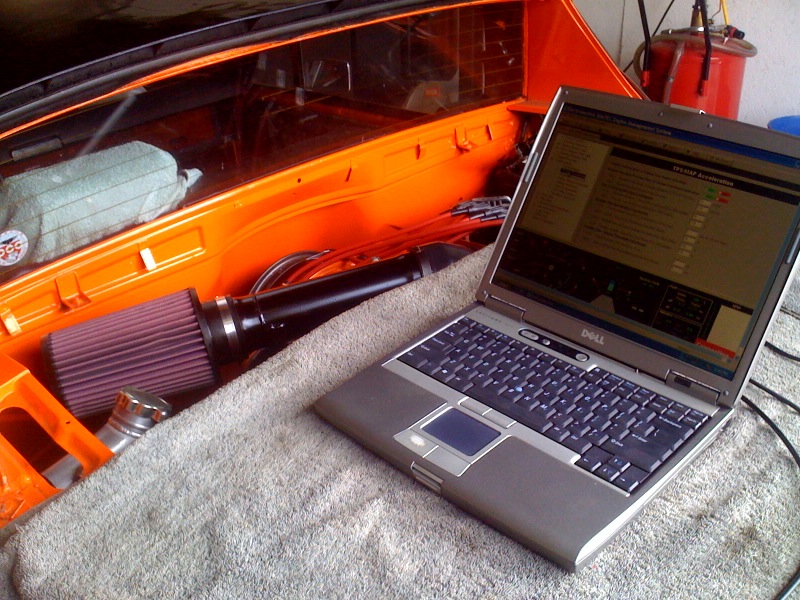
Here are pictures of the intake fab, finished intake and tuning workstation:
Attached image(s)
Posted by: racerbvd Jun 23 2011, 03:35 PM
sweet, if you are going to be around tomorrow, I may sneak down to drop off the 951 seats, anything else you need me to drop else off??
Posted by: ellisor3 Jun 23 2011, 08:15 PM
Joe, I know you had some reservations about the Tec GT system. What are your thoughts, good and bad?? When can we see some #'s
Posted by: Series9 Jun 23 2011, 08:31 PM
I didn't and don't have reservations about the product. I had reservations about the amount of money and time it would cost to set up and tune on a stock engine, when we could use a stock Motronic DME that would make it run perfectly right out of the box.
The ignition portion of the system is excellent. At this point, distributors should be obsolete. Now you get to enjoy a virtually maintenance-free ignition.
As for the fuel side, it should be drivable now. I'll have to put some miles on it and tweak it some more. The file that was sent to me for this engine was basically unusable. It would neither reliably start nor accelerate the engine off idle. On the up side, this has caused me to have to dig deeply into programming and work it out on my own.
Also, if you decide to modify the engine in the future, I will be able to adapt the engine management to accept the changes. In that way, it could pay you back some of what you've spent.
The cool-factor is high. You're going to like it.
I'm gonna next week. I'll take some video for you.
Posted by: Series9 Jun 24 2011, 11:00 AM
I'm not really working on James' car today, but I like to start it at different times of the day to see how I'm doing on the programming for different situations, hot, cold and otherwise.
This morning, it stumbled, but didn't start.
Then I noticed the TPS voltage (on the screen on the laptop) was 0.00.
That's wrong.
Hmmmm. What's this?
Teething pains:
Attached image(s)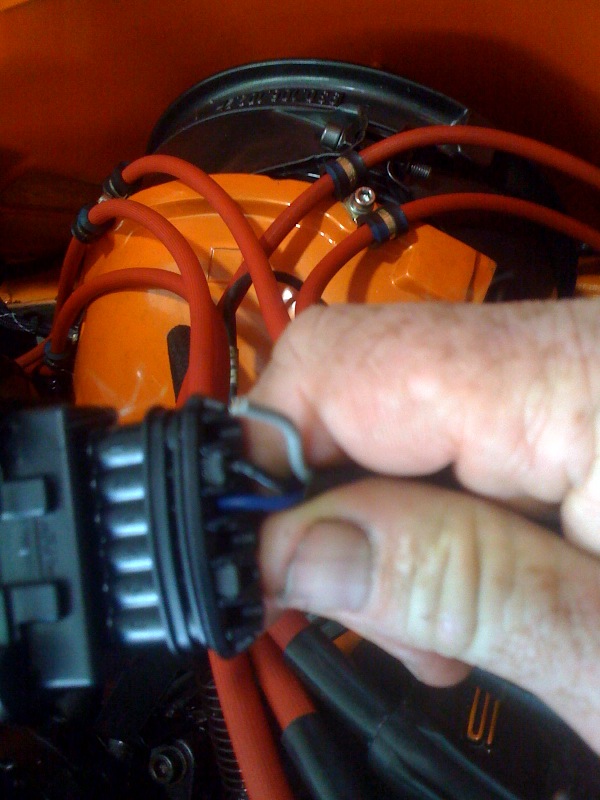
Posted by: racerbvd Jun 24 2011, 10:09 PM

Can't make it tomorrow, the Pod didn't show up, so the guys drying out my house couldn't load it so the Plumber could strt working on my slab leak..
So I need to make it Wed or after, correct, and if I need to bring anything for that car, let me know..
Posted by: Series9 Jun 28 2011, 02:39 PM
Lots of stuff got crossed off the list today.
No pictures, but the interior is back in, the shifter is installed and working, the INTERIOR LIGHT is wired and functional, the oxygen sensor wiring and module were permanently installed, the new CV is in and I proceeded with some more tuning with the lap top.
Unfortunately, I'm still waiting on one more piece before I can run it around the block.
It's getting very close.
Posted by: racerbvd Jun 28 2011, 03:05 PM
Lots of stuff got crossed off the list today.
No pictures, but the interior is back in, the shifter is installed and working, the INTERIOR LIGHT is wired and functional, the oxygen sensor wiring and module were permanently installed, the new CV is in and I proceeded with some more tuning with the lap top.
Unfortunately, I'm still waiting on one more piece before I can run it around the block.
It's getting very close.
What are you missing?? Depending on the weather, I'll be down tomorror or Thurs, to pick up the Turbo "S", still dealling with plumbing issues from the slab leak & water damage..
Posted by: Series9 Jun 29 2011, 03:07 PM
Today was the last day of fabrication. I'll be getting the last part on Friday. I'll drive it that afternoon.
Here are the bottom cooler brackets and fan/O2 sensor wiring:
Attached image(s)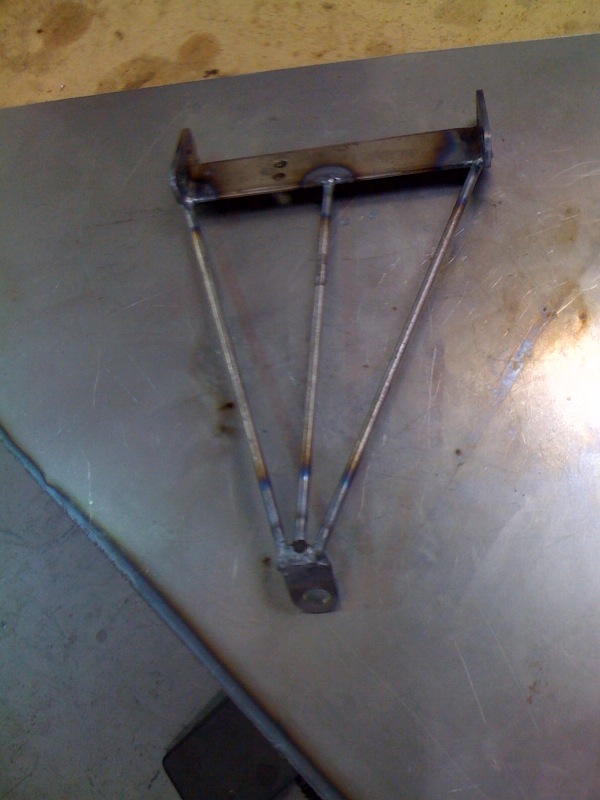

Posted by: ellisor3 Jun 29 2011, 06:29 PM
Alright!! Let's drive it
Posted by: Series9 Jun 29 2011, 07:58 PM
Alright!! Let's drive it
Friday........
Posted by: racerbvd Jun 30 2011, 04:50 PM
Good seeing you today Joe and thanks for Lunch....
Posted by: Series9 Jun 30 2011, 08:02 PM
Good seeing you today Joe and thanks for Lunch....
I'm already looking forward to the JAX visit next month. Everyone, stand by for pics......
Posted by: Series9 Jul 1 2011, 11:46 AM
I drove it!!
It's fast.
Video is coming once I figure out how to make it smaller.
Posted by: racerbvd Jul 1 2011, 11:58 AM
I drove it!!
It's fast.
Video is coming once I figure out how to make it smaller.
But does it stop???
Posted by: Rand Jul 1 2011, 12:08 PM
I drove it!!
It's fast.
Nice work Joe. Congrats ellisor3, you must be stoked about now.Posted by: Bee Jay Jul 1 2011, 12:47 PM
I drove it!!
It's fast.
Video is coming once I figure out how to make it smaller.
Music to my ears. I hope to use those exact words in about a month.
Congratulations.
Bee Jay
Posted by: ellisor3 Jul 1 2011, 12:56 PM
I drove it!!
It's fast.
Video is coming once I figure out how to make it smaller.
Kick ass Joe. Fast, well that sounds----Fast. Let's go get a ticket!!!
Posted by: Series9 Jul 1 2011, 06:13 PM
I'm working on the video. It's 195 MB for three minutes.
Stand by.......
Posted by: Series9 Jul 1 2011, 06:22 PM
I was waiting on the throttle linkage from Rich.
It came today. When I started to install it, I noticed that something was wrong.
It looks like this tranny has an intermediate plate from a REAL 6.
I screwed the bellcrank shaft into the transmission and modified the RJ bracket to do the rest:
Posted by: Series9 Jul 1 2011, 06:23 PM
I was waiting on the throttle linkage from Rich.
It came today. When I started to install it, I noticed that something was wrong.
It looks like this tranny has an intermediate plate from a REAL 6.
I had to remake the cross-over oil line between the coolers because the 45 on the passenger side was in the way of the throttle linkage.
I screwed the bellcrank shaft into the transmission and modified the RJ bracket to do the rest:
Attached image(s)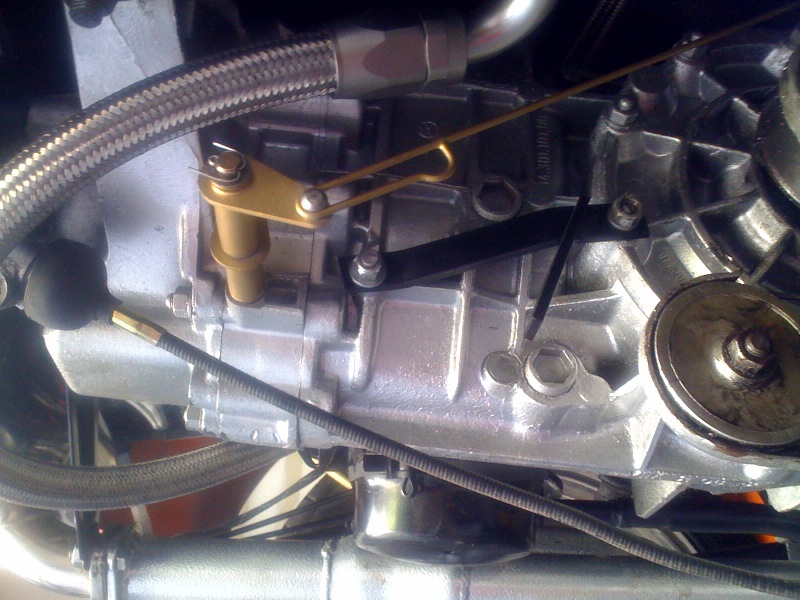
Posted by: Series9 Jul 1 2011, 06:35 PM
http://s23.photobucket.com/albums/b370/seriesnine/?action=view¤t=ellisorvideo1.mp4
Posted by: Series9 Jul 1 2011, 06:39 PM
http://s23.photobucket.com/albums/b370/seriesnine/?action=view¤t=ellisorvideo1.mp4
Click on the picture.....
Posted by: 396 Jul 1 2011, 06:44 PM
wow:)
Posted by: ellisor3 Jul 1 2011, 06:49 PM
That is awesome Joe. I have already made out my check to the Tax Collectors Office, I will fill in the blank when I actually get the ticket. I will have them set me up a tab.
Posted by: Series9 Jul 1 2011, 06:50 PM
That is awesome Joe. I have already made out my check to the Tax Collectors Office, I will fill in the blank when I actually get the ticket. I will have them set me up a tab.
You better make out a few checks. It's effin' fast.
Posted by: Series9 Jul 1 2011, 07:12 PM
James,
It runs great, but it's too rich. Basically, the programming will continue on a line that supports an incremental reduction in fuel delivery.
I doubt you want 12 MPG.
Just wait. It'll be perfect.....
Posted by: Series9 Jul 2 2011, 06:50 PM
Today, I put down the video camera and took the car for a real drive.
I don't know if it's just the muffler's sound making me think this thing is faster than a normal 3.2, or if it really is.
Either way, it's very quick.
On a slightly negative note, we have a substantial oil leak from somewhere around the breather outlet on top of the engine. It could be one of the O rings in the oil thermostat or a bad seal in the idiot light switch. I'm going to have to clean the area up and figure out where it's coming from. At least it's not one of the cam towers....
I also have yet to see a working tachometer. I've tried two different units that should work with the signal this computer outputs, but no dice.
I'll be back on it on Wednesday.
Posted by: Elliot Cannon Jul 2 2011, 07:12 PM
Today, I put down the video camera and took the car for a real drive.
I don't know if it's just the muffler's sound making me think this thing is faster than a normal 3.2, or if it really is.
Either way, it's very quick.
On a slightly negative note, we have a substantial oil leak from somewhere around the breather outlet on top of the engine. It could be one of the O rings in the oil thermostat or a bad seal in the idiot light switch. I'm going to have to clean the area up and figure out where it's coming from. At least it's not one of the cam towers....
I also have yet to see a working tachometer. I've tried two different units that should work with the signal this computer outputs, but no dice.
I'll be back on it on Wednesday.
I had a nasty leak in my 3.2 a few years ago. My worst fear was a leak in the cam tower. It turned out to be the oil pressure switch. An easy fix. I was told it is not unusual for that switch to leak.
Posted by: tomeric914 Jul 2 2011, 08:54 PM
At least it's not one of the cam towers....
Gaaahhh, yeah I was just there...

http://www.914world.com/bbs2/index.php?s=&showtopic=109664&view=findpost&p=1500608
Posted by: Series9 Jul 6 2011, 07:53 PM
I think I found the leak.
When the engine arrived at S9, I noticed the crankcase vent was put on backwards.
I removed the four nuts, turned it around and bolted it back up. What I didn't notice was that the gasket isn't symmetrical, so it should have been turned around too.
Long story short, it's a bitch to get to with the engine in the car and the FI installed, but I fixed it.
James, that one's on me.
Now I need to clean up all the oil and hope we don't see much more. Trying to get a six to be completely drip-free can be a tall order, but I don't think we should need a beach towel to clean up the oil under the car after each drive.
Posted by: racerbvd Jul 9 2011, 04:40 PM
James, head up to Whitey's tonight, I'm getting ready to head down, after the long day I have had, I can use it..
Yea, about Sexy....
Posted by: racerbvd Jul 9 2011, 04:40 PM
James, head up to Whitey's tonight, I'm getting ready to head down, after the long day I have had, I can use it..
Yea, about Sexy....
Posted by: KELTY360 Jul 9 2011, 05:17 PM
James, head up to Whitey's tonight, I'm getting ready to head down, after the long day I have had, I can use it..
Yea, about Sexy....
Really hope there's no leak from the crankcase vent.

Posted by: Series9 Jul 9 2011, 05:19 PM
I had some major break-throughs on the programming today. Over the past few days, I've done a huge amount of reading. Today, I started data logging with each programming change I made.
The engine runs out to redline in under full load and I'm getting good O2 sensor readings almost across the board. There are a few tweaks to be made, but I think I'm very close.
I think I've got this one by the nuts.
I'm trying to become a recommended tuner for Clewitt Engineering, so when I think it's finished, I have to submit the data file for approval. Hopefully that will go well.
I'm planning delivery by August 1st.
Posted by: ellisor3 Jul 16 2011, 01:35 PM
James, head up to Whitey's tonight, I'm getting ready to head down, after the long day I have had, I can use it..
Yea, about Sexy....
Sorry I missed your post, I have been on vacation. If that photo is represenative of the kind of game you have, I am not sorry I missed it.

Posted by: Series9 Jul 16 2011, 01:54 PM
More tuning and detail work today. August 1st is still the target delivery date.
James, I'd like to have you down next week for a pre-delivery meeting and drive.
Posted by: racerbvd Jul 16 2011, 03:16 PM
James, head up to Whitey's tonight, I'm getting ready to head down, after the long day I have had, I can use it..
Yea, about Sexy....
Sorry I missed your post, I have been on vacation. If that photo is represenative of the kind of game you have, I am not sorry I missed it.
I'm not into big game, but there will be a mini Blues concert the 22nd at the Gazebo in Fleming Island, part of their free out door summer concert series. Joe, you still heading this direction soon??
Posted by: Series9 Jul 22 2011, 06:07 AM
Good news!
The FI programming is finished and has been approved by Mr. Clewett himself.
James, I hope you're coming down on Saturday. Your car is ready for you to drive it. If you don't show, I may have to offer test drives to drum up some more business.
As of last night, Nelson committed to converting his engine to this system as well.
James, I'm going to offer you "royalties" on the programming I have for your engine. We'll work out some service credits or something like that for each time I pass on the data.
Posted by: mikelsr Jul 22 2011, 09:35 AM
Beautiful job Joe. It's nice to see someone who really cares about what they do.
Mike
Posted by: ellisor3 Jul 24 2011, 12:16 PM
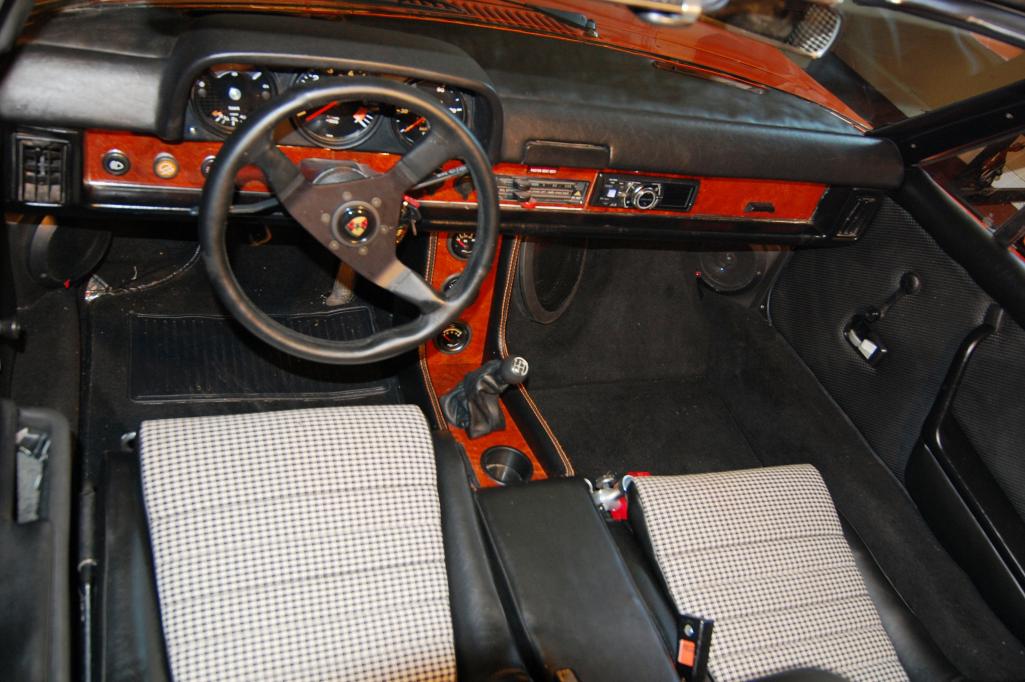
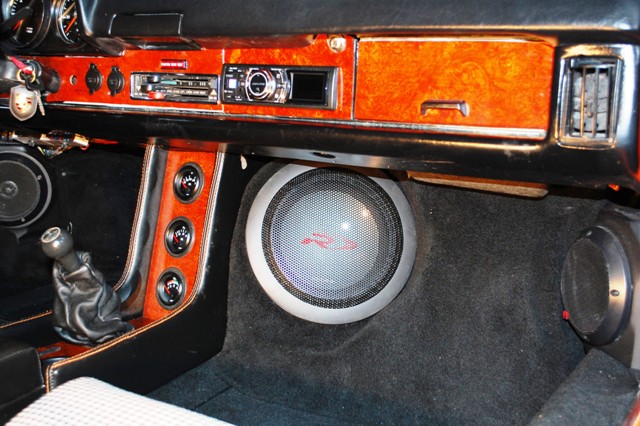
I am backtracking a little on some updates that I some how forgot to do. In this issue:
Custom Subwoofer box, Dynamat results and Modified Center Console and Real Inlaid Burl Dash Plate-No Plastic for me.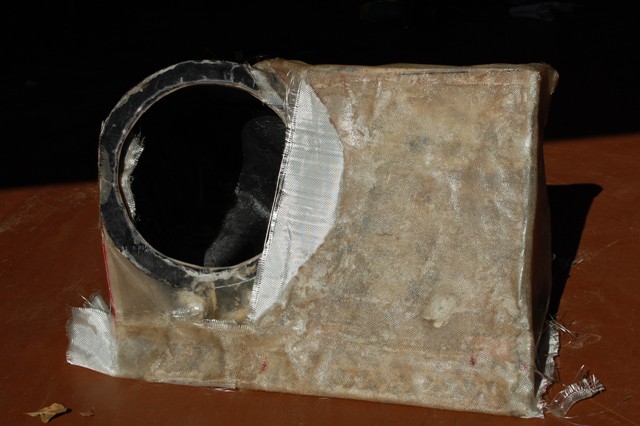
I made a custom subwoofer box to get a 10" Sub in the floor and still have room for feet.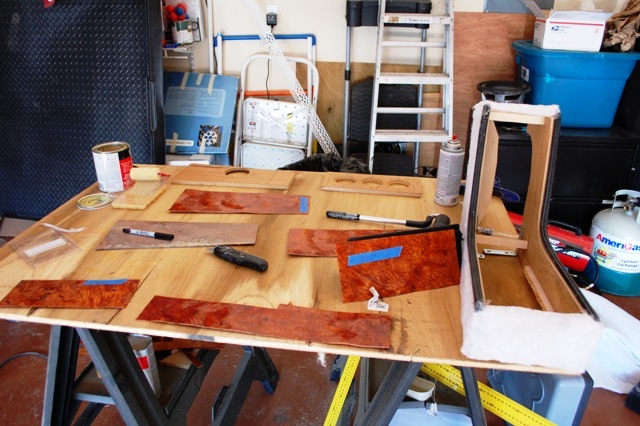
I also made a real Burl faceplate and trim for the center console. Not a platic kit.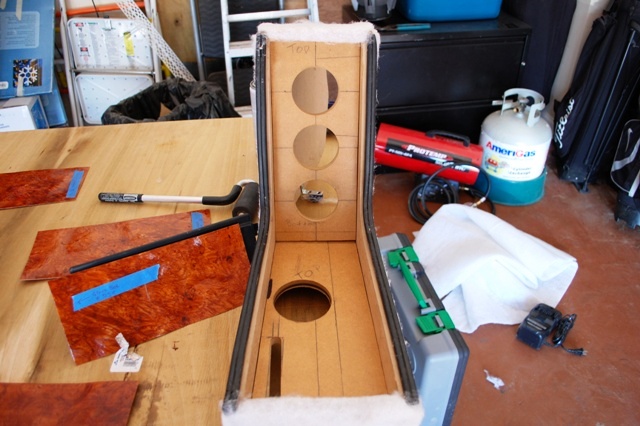
I had to build a new modified center console to accept the new sub box. I decided to add a cup holer after I took this picture-I know Blasphemy.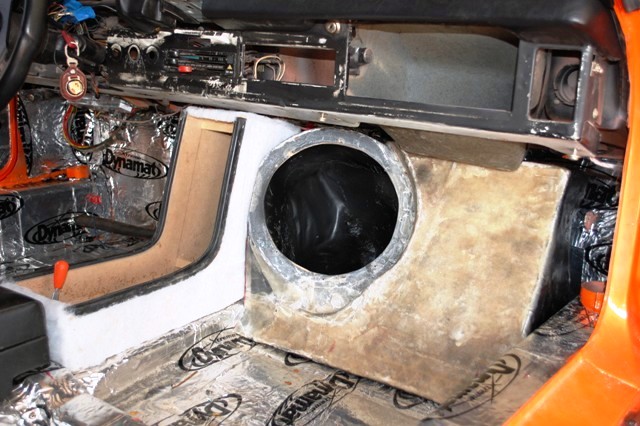
Finished the mock up and ready to be covered.
Posted by: ellisor3 Jul 24 2011, 12:23 PM
Here are a few more finished items: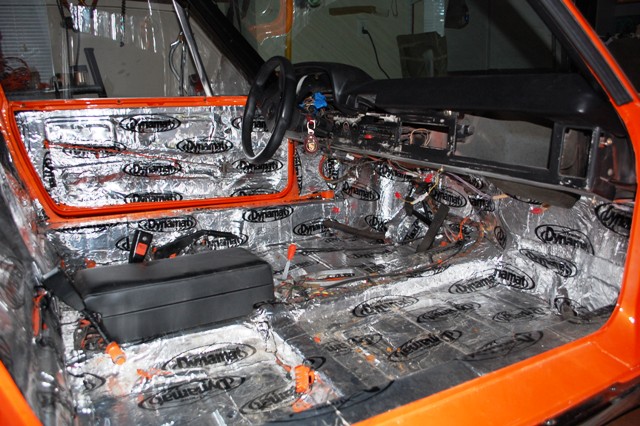
Dynamat is in, boy is that stuff heavy.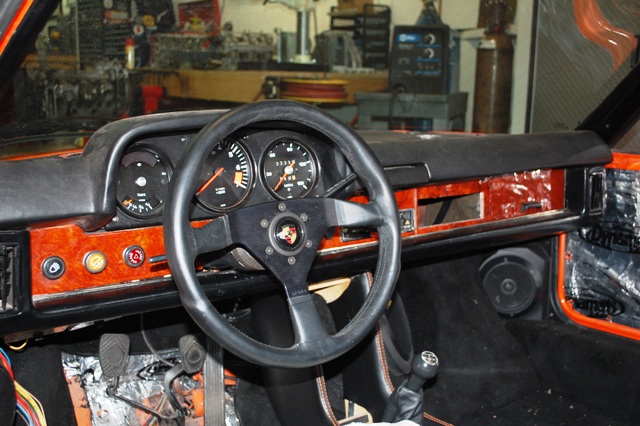
Here is the completed face plate. 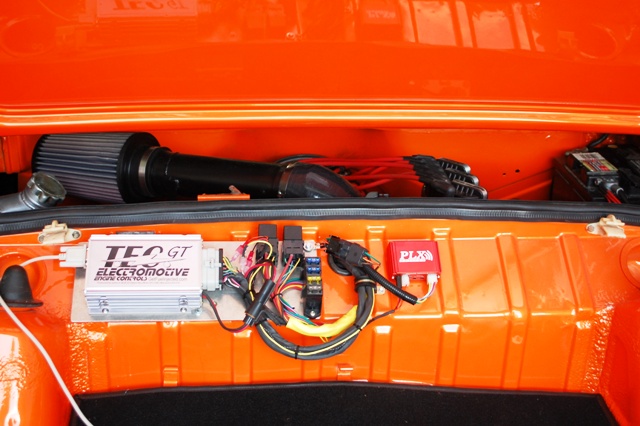
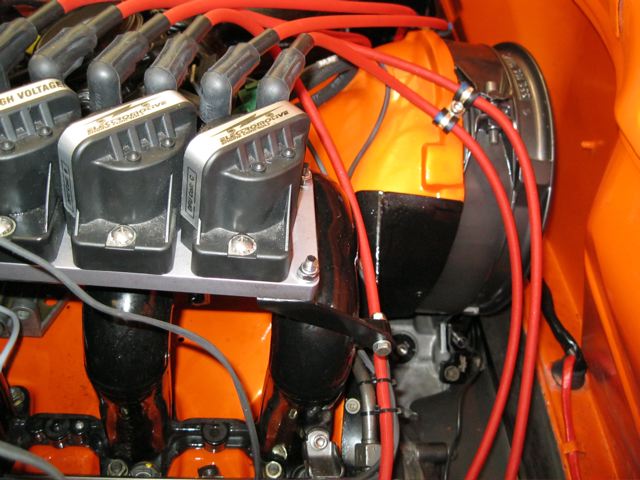
Here is the installed Tec Gt Unit and O2 module. Very Nice Joe!
Posted by: ellisor3 Jul 24 2011, 12:29 PM
These are a couple photos as it sat at Joe's yesterday. Just a few things to finish up, but really close. It needs a little cleaning up but that is the easy part. I will post the final photos when everything is back together. 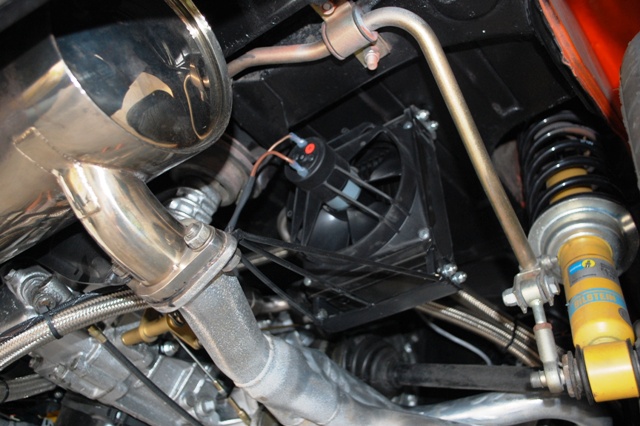
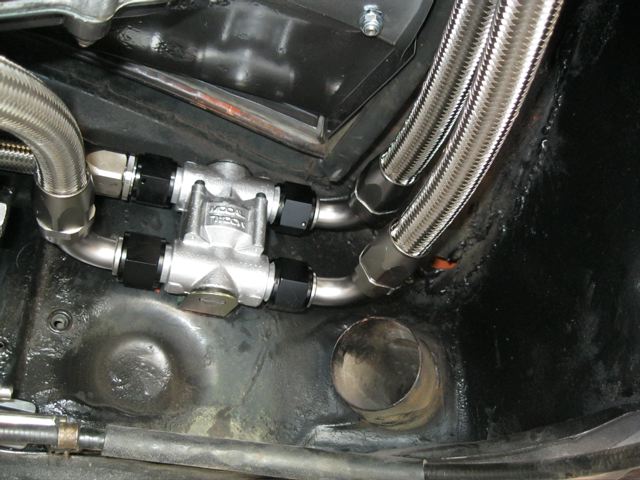
This is a shot of one of the two oil coolers. I was really impressed how well Joe got these to fit in the space available. The supports Joe made hold them in place, rock solid. Very Smooth.
Attached image(s)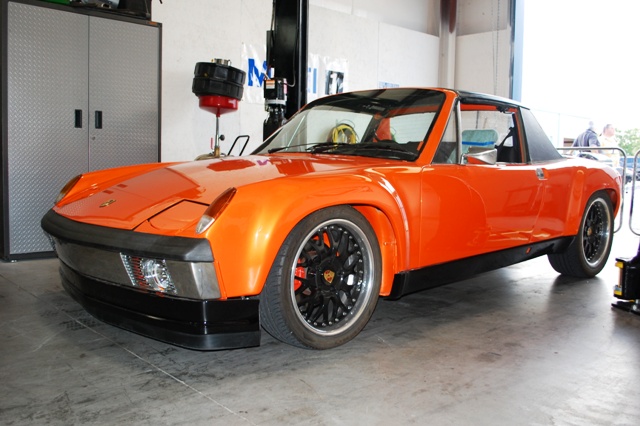
Posted by: ellisor3 Jul 24 2011, 12:34 PM
I got to drive it yesterday and it pulls like a freight train. I pulled the shifter knob off changing gears it was so fun. Joe still has a few minor adjustments to make but I am very happy with the project. Joe has been super. As many issues as I have had with this project, it was about time for things to come together.
It was great having the Florida gang at Joe's yesterday. It is great having that kind of knowledge around, I feel smarter already.
Posted by: AZ914 Jul 26 2011, 11:42 AM
Hey Joe!
Could you let me know where you found the following 2 parts:
1. 14 x 1.5mm to hose adapter on the motor (fuel return side)
2. the banjo fitting to hose adapter on the fuel pump (what size is that thing)
I'll be running 9.5mm fuel hose on delivery and 8mm on return and am having a hard time finding these pieces (or perhaps my search effort sucks).
Posted by: Series9 Jul 26 2011, 11:44 AM
Hey Joe!
Could you let me know where you found the following 2 parts:
1. 14 x 1.5mm to hose adapter on the motor (fuel return side)
2. the banjo fitting to hose adapter on the fuel pump (what size is that thing)
I'll be running 9.5mm fuel hose on delivery and 8mm on return and am having a hard time finding these pieces (or perhaps my search effort sucks).
Both at Patrick.
Posted by: AZ914 Jul 26 2011, 11:53 AM
Hey Joe!
Could you let me know where you found the following 2 parts:
1. 14 x 1.5mm to hose adapter on the motor (fuel return side)
2. the banjo fitting to hose adapter on the fuel pump (what size is that thing)
I'll be running 9.5mm fuel hose on delivery and 8mm on return and am having a hard time finding these pieces (or perhaps my search effort sucks).
Both at Patrick.
That was fast, thanks Joe.
Posted by: ellisor3 Aug 4 2011, 12:50 PM
Since Mikey has not gotten around to making the Targa Chrome J's yet (slacker). I tried something different with the chrome trim. I had it powder coated. I did the windshield and all the targa trim. It was done in a product called Ultimate Chrome from powderbythepound.com. I actually looked more like chrome before the clear coat was added. The clear coat was necessary for UV protection. Had this been under the car, and would not have needed the clearcoat, it would have looked exactly like chrome. It has a lot of reflectivity, and until you are up close you really can not tell. 
Inside view (one is OEM and the rest are powdercoated)
Sunlight View
Posted by: Series9 Aug 4 2011, 05:26 PM
Delivery is set for Saturday.
Today, I sorted out all the gauge lighting, turn signal indicators, etc.
I then moved on to the license plate lights. Sounds simple, but some of the wiring wasn't there and one of the lights has an internal short.
Whatever. After four and a half months, we're there.
Posted by: Series9 Aug 7 2011, 06:49 AM
Delivered.
It was a long build, but I'm very satisfied with the result.
Posted by: ellisor3 Sep 2 2011, 02:47 PM
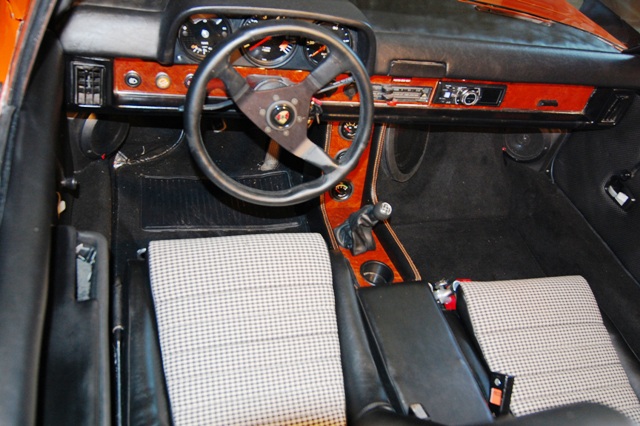
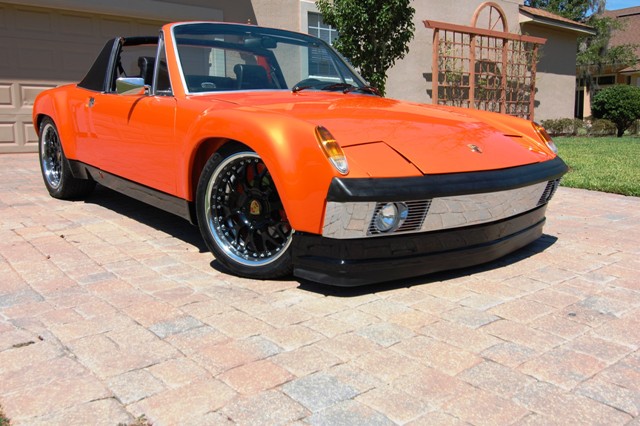
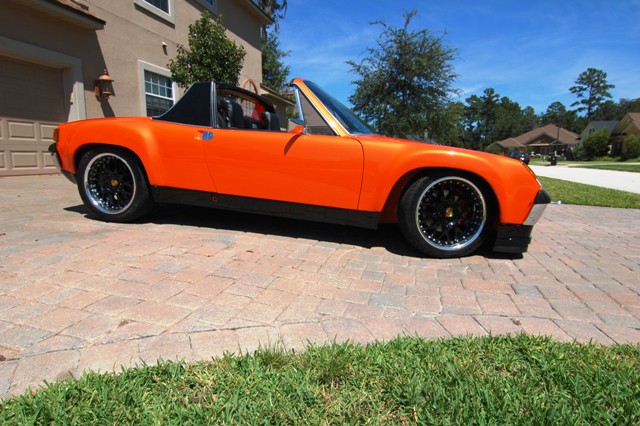
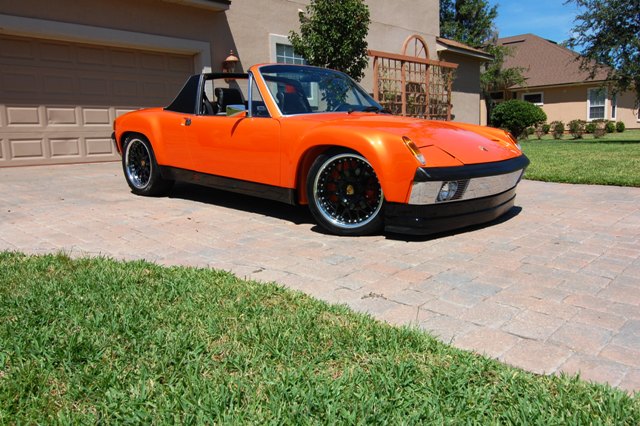
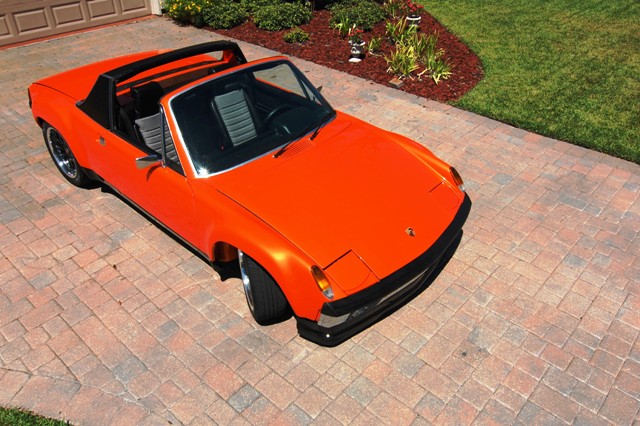
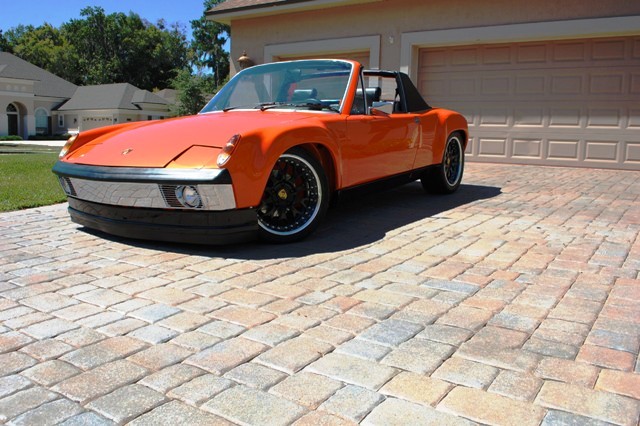
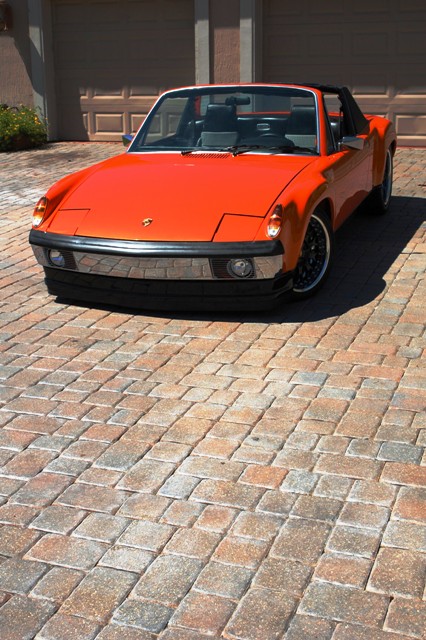
Well, she is finally done. After a week or so of putting her back together and wrapping up a few loose ends it is time for some pictures and some final thought on this project. Here are some observations and challenges I encountered during this project for those who might want to do this for the first time themselves:
1.) Find a car that is in really good shape. This one was in relatively good shape, with the exception of the 30 pounds of bondo that covered a rear end collision. See the early photo
2.) Create a budget, and a timeframe, you will go way over it, but do it just for the hell of it, that is what you are supposed to do, right. I projected to have this project done in 18 months. I only missed it by 18 months.
3.) Tell your wife you are divorcing her, then tell her you are restoring a 914, the first statement will then come as a relief.
4.) Don't take shortcuts. I tried using some used parts that were supposed to be good. By the time I made them good, I could have just bought new ones.
5.) If you are going to paint. Have the car blasted down to bare metal, no matter how it looks from the outside. I ended up spending more money on body work I didn't expect than I did on the entire first quote.
6.) Get the engine you want, and make sure it is in good shape, don't take anybody's word for it. Get a leak down test, or don't buy it.
7.) If there is work you do not feel comfortable doing, find the right guy to do no just someone who can do it. I have several people help me with this project, a few of them did the job to get a pay check and it showed. I ended up paying twice and even three times by Joe to get it right.
8.) This board has been envaluable in not only asking questions, but inspiration to keep the project going and not get discouraged. Many people on here have been there and done that before. I only wished I had asked more questions. There are not dumb questions, only dumb people who do not ask them.
9.) I made some good decisions on this project and I made some poor ones. One of the best decisions I made on the recommendation of T.C., was to get Joe O'brien at 914 RS to complete the engine install and finish up all the loose ends. I may not be acomplished enough to complte this job, but I know good work when I see it. Joe can not only do the work, he has a passion for it and that made all the difference. (See #7). The more I have gone over Joe's work after having it back, the more impressed I am. We again did not stay on budget, but Joe's suggestions improved the project and made the end result better. Thanks again Joe.
One final note: Instead of using carbs, or the factory EFI, I did my research and chose the TEC-GT system from Distributorless.com. This unit is fantastic, it eliminates so many problems with the other options. It is somewhat more difficult to tune, but once you are there, you are done. You can have different set ups for street and track. Different track set ups, whatever you want. It is not a cheap system, but I really like it.
Here are the final shots:
Attached image(s)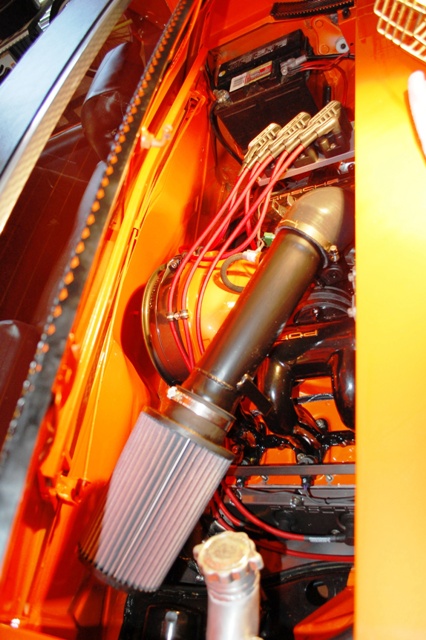
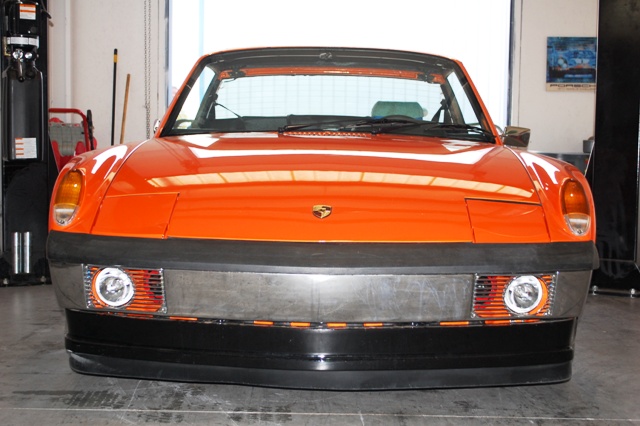
Posted by: ellisor3 Sep 2 2011, 02:53 PM
Here are a few more.
Attached thumbnail(s)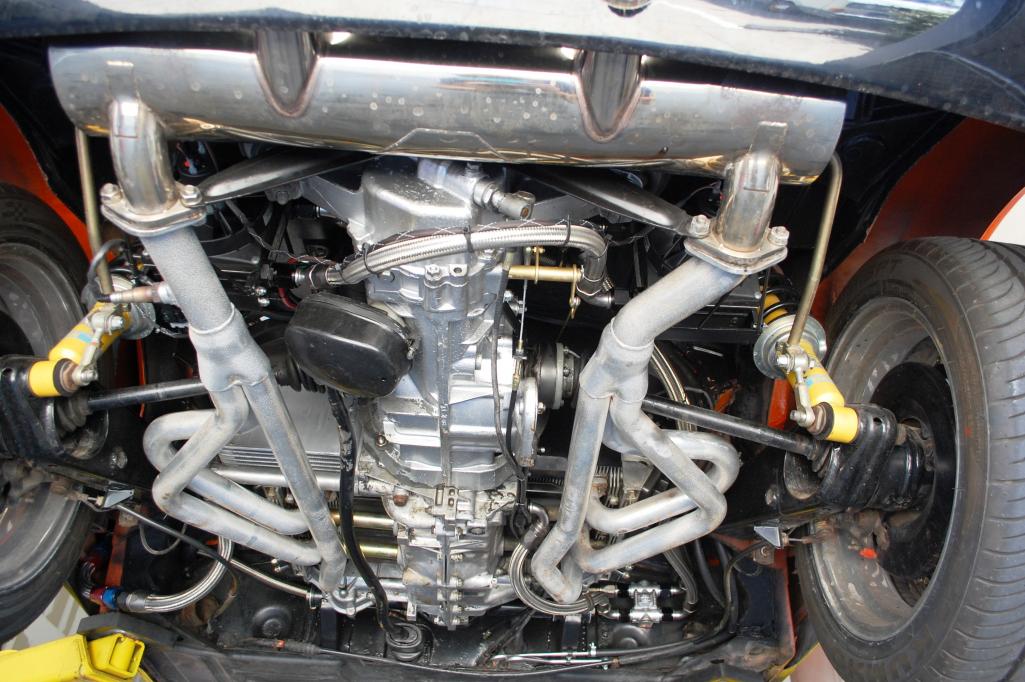
Attached image(s)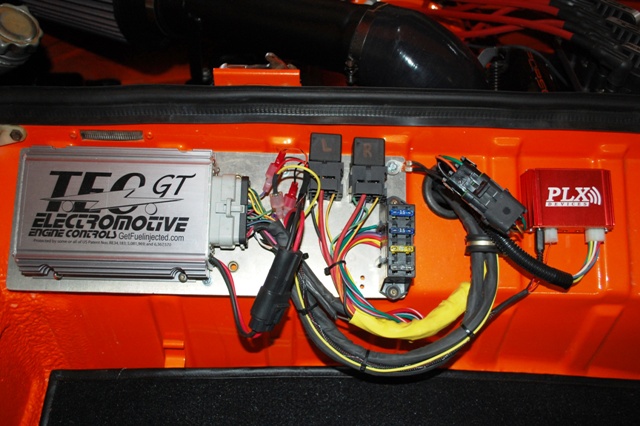
Posted by: mepstein Sep 2 2011, 03:02 PM
Outstanding!!!
Posted by: Eric_Shea Sep 2 2011, 03:26 PM
Posted by: AZ914 Sep 2 2011, 05:58 PM
Great write up! Your thread has been invaluable to my conversion. Thx!
Posted by: jcambo7 Sep 2 2011, 06:00 PM
Very nice!
Posted by: Cairo94507 Sep 2 2011, 06:06 PM
What a beautiful car with top notch work. Enjoy that car.
Posted by: dlee6204 Sep 2 2011, 08:28 PM
Saweeet looking car! Enjoy it!
Posted by: bcheney Sep 3 2011, 07:17 AM
James,
It's was great meeting you at S9 for the BBQ a while back. Seeing your project complete is very cool. Glad you got what you've always wanted with this
-6 conversion. Truly a beautiful custom ride that you will enjoy for many years to come. Well done Joe!!
Posted by: porbmw Sep 3 2011, 09:10 AM
Outstanding
And great thread.
Posted by: Series9 Feb 3 2012, 10:42 AM
James' car is back at Series 9 for some metal work in the usual area.
Exploratory surgery yesterday shows the extent of the necessary repairs.
The engine is coming out and I'll get started:
Attached image(s)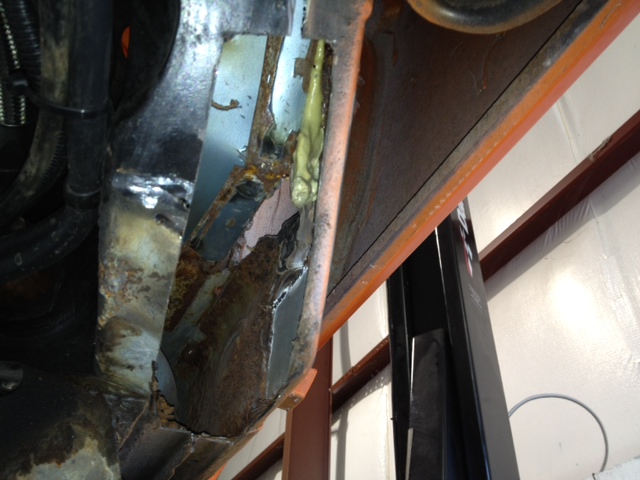
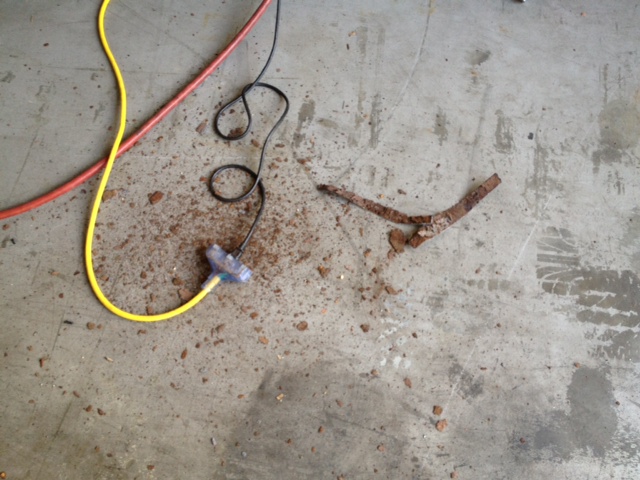
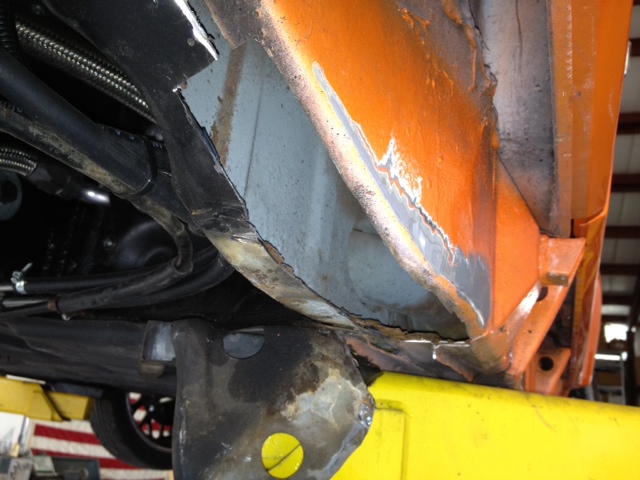
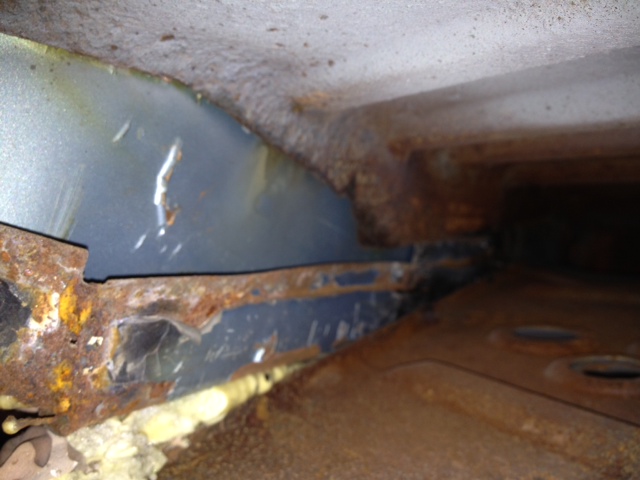
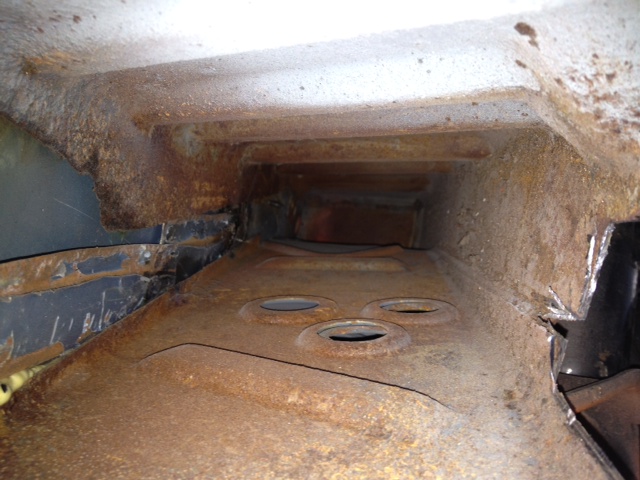
Posted by: mepstein Feb 3 2012, 11:36 AM
Did something happen to set this in motion?
Posted by: ellisor3 Feb 3 2012, 12:20 PM
Did something happen to set this in motion?
We knew there were some issues when Joe installed the engine but they did not look that bad. Once Joe did some exploratory surgery it became clear that engine would tear the car in half is it was not corrected. Probably should have been done prior to paint, but luckily it will never be seen from the outside.
I guess the sad part is that another shop did extensive repairs to the floor panels and the trunk panels but never mentioned the longs several years ago. Anyway Joe has a new project again.
Posted by: ellisor3 Feb 3 2012, 12:23 PM
James' car is back at Series 9 for some metal work in the usual area.
Exploratory surgery yesterday shows the extent of the necessary repairs.
The engine is coming out and I'll get started:
BTW Joe also does Proctology exams on the side if anyone is interested
Posted by: sean_v8_914 Feb 3 2012, 12:40 PM
who did the hell hole cover up without regard to structure or rust passivation?
Posted by: falconfp2001 Feb 3 2012, 12:40 PM
Here are a few more, just got back my chrome from the Bumper Shop. They did a great job. Looks wavy in the photo but not in person.
And I got new wheels. Pretty?????
How much were the bumpers?
Very Nice
Frank
Posted by: ellisor3 Feb 3 2012, 01:18 PM
who did the hell hole cover up without regard to structure or rust passivation?
Not sure, way before me.
Posted by: ellisor3 Feb 3 2012, 01:21 PM
Here are a few more, just got back my chrome from the Bumper Shop. They did a great job. Looks wavy in the photo but not in person.
And I got new wheels. Pretty?????
How much were the bumpers?
Very Nice
Frank
They were $250 each plus I had them remove the tow hook and the liscense plate holes. Total cost was about $700.00
Posted by: SUNAB914 Feb 3 2012, 02:18 PM
That car looks mean and fast! great job.
Posted by: Madswede Feb 3 2012, 04:33 PM
James' car is the fastest 914 (and quickest car) I've yet driven ... and it was teasing me the whole time, "that's all YOU got?! *I* got more'n that, c'mon floor it and see!"
I'm glad to see you guys are working on this repair, but sad that the car needed it so bad.
Posted by: Series9 Feb 3 2012, 07:30 PM
BTW Joe also does Proctology exams on the side if anyone is interested
That makes me uncomfortable.......
Posted by: Madswede Feb 3 2012, 07:36 PM
BTW Joe also does Proctology exams on the side if anyone is interested
That makes me uncomfortable.......
I was gonna say.
Well, as long as you wash your hands before working on my car, it's your business.
Posted by: Series9 Feb 3 2012, 07:38 PM
BTW Joe also does Proctology exams on the side if anyone is interested
That makes me uncomfortable.......
I was gonna say.
Well, as long as you wash your hands before working on my car, it's your business.
Fair enough.....
Posted by: Series9 Feb 25 2012, 12:43 PM
I started the dissection today.
I'm warning you now, IF YOU HAVE A WEAK STOMACH, DO NOT LOOK AT THIS!
After doing this much.....
Attached image(s)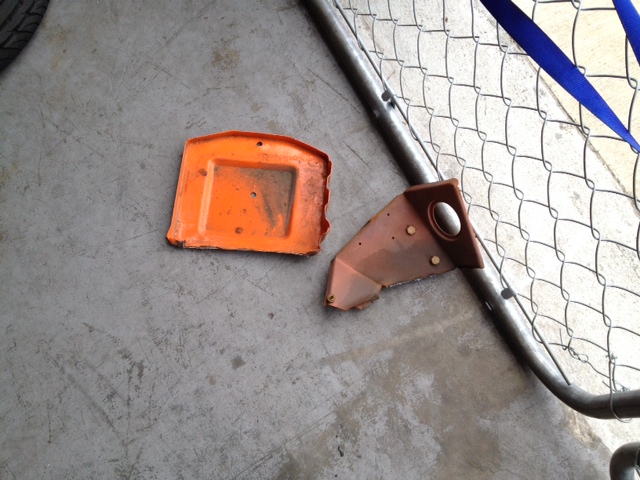
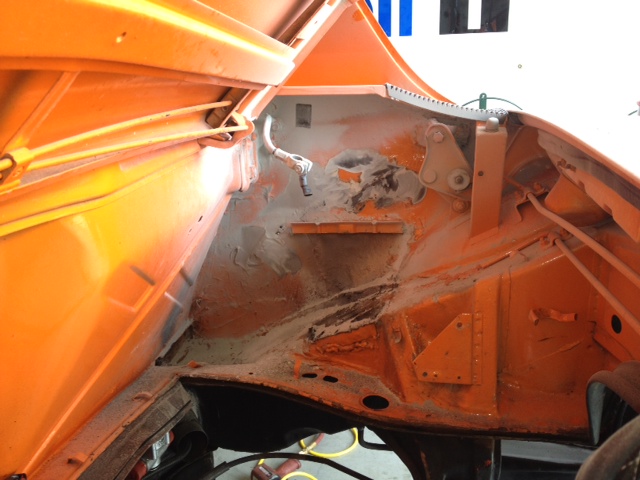
Posted by: Series9 Feb 25 2012, 12:45 PM
....it became apparent that I was going to have to have access to the other side to do the repair correctly.
Well, there's no sense in putting it off any longer.
COVER YOUR EYES:
Attached image(s)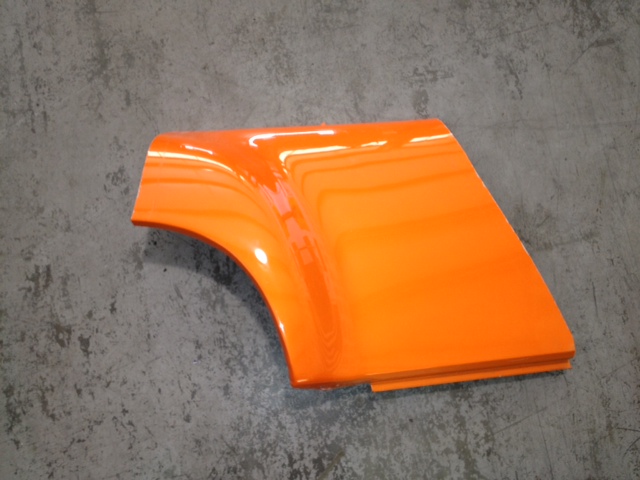
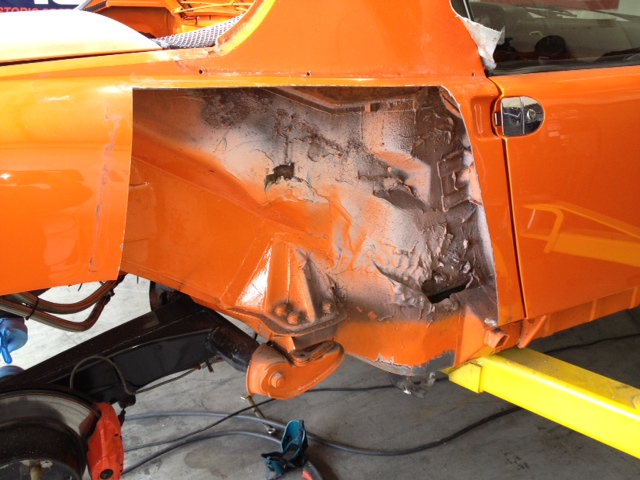
Posted by: Series9 Feb 25 2012, 01:20 PM
After removal of the expanding foam and Bondo:
Attached image(s)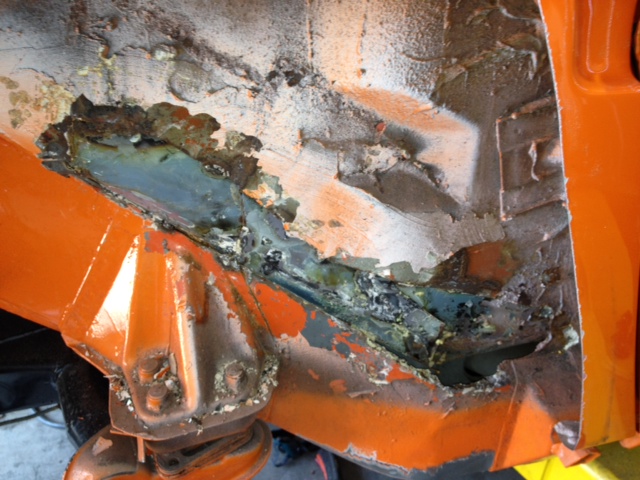
Posted by: Eric_Shea Feb 25 2012, 01:37 PM
Doing it right is the only way to do it. Good thing Joe's on the job.
Posted by: sixnotfour Feb 25 2012, 01:43 PM
Big Pucker..... Better now than later.
Posted by: Series9 Feb 25 2012, 01:58 PM
Big Pucker..... Better now than later.
I'm accustomed to having to do what's necessary, but I still took a deep breath when I was standing there with the jig saw in my hand.
Posted by: dlee6204 Feb 25 2012, 02:17 PM

Posted by: ellisor3 Feb 25 2012, 03:43 PM
Joe,
I realize everyone just got Cass's book, but you didn't have to prove anything.
Just threw up in my mouth. Send completed photos only next time.
Posted by: Series9 Feb 25 2012, 04:02 PM
The bad metal is out. It looks a lot nicer to me now.
Attached image(s)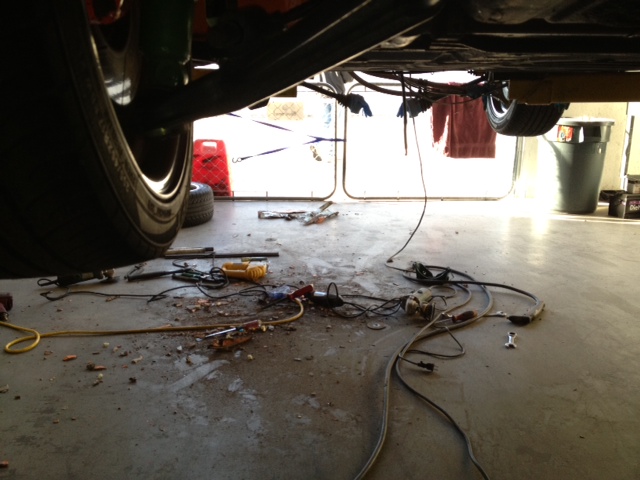
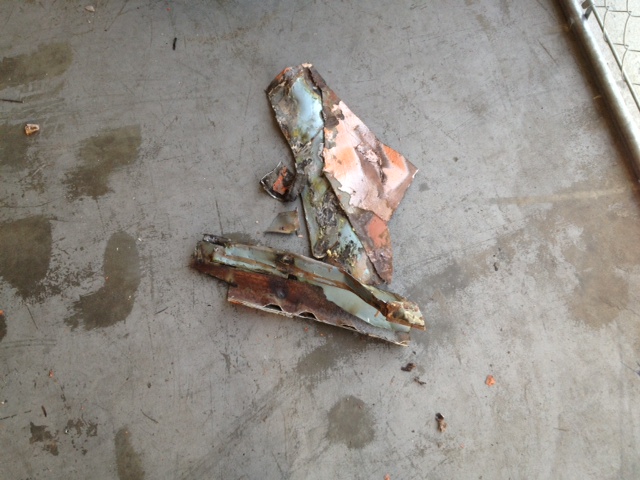
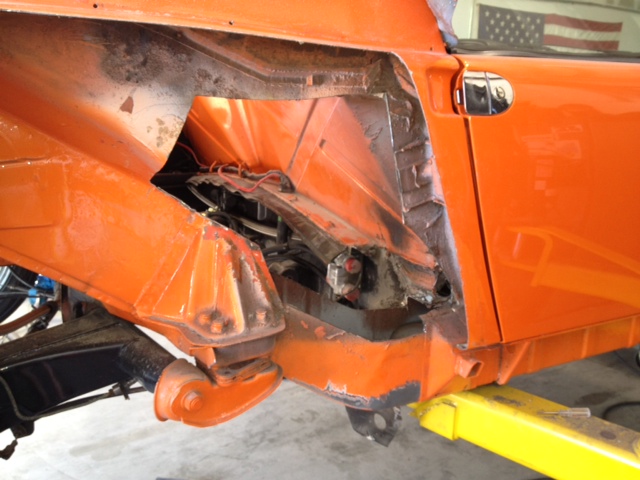
Posted by: Series9 Feb 25 2012, 04:05 PM
Joe,
I realize everyone just got Cass's book, but you didn't have to prove anything.
Just threw up in my mouth. Send completed photos only next time.
I had a conversation with myself this morning that went like this: "I need to call James to talk about cutting the fender"............."No, I better not do that..It'll be better if he just gets shocked once."
Posted by: ellisor3 Feb 25 2012, 04:10 PM
Soooooo you're still going to get the painter to take care of that 1/4' scratch on the rear fender we talked about, right??
I've gone through a lot of underwear during this build!!
Posted by: Series9 Feb 25 2012, 05:02 PM
Soooooo you're still going to get the painter to take care of that 1/4' scratch on the rear fender we talked about, right??
I've gone through a lot of underwear during this build!!
The painter was over today. He said "Wow. That's a committed repair." We're mixing a quart of paint anyway.
I'm going to need that code.....
Posted by: SirAndy Feb 25 2012, 05:48 PM
That's an awful lot of alignment shims there. 
I'd check the trailing arm to see if it's bend.
Posted by: ellisor3 Feb 25 2012, 06:55 PM
House of Kolor PBC32.Q01
http://shop.houseofkolor.com/hok/store/productDetail.html?productId=4280
Not sure which clearcoat was used, I will check.
Posted by: sixnotfour Feb 26 2012, 02:57 PM
That is the best quote to date...sad but true and frigging hilarious

the camber shim stack , you can probably twist the whole body section. At this point.
Posted by: Series9 Feb 26 2012, 04:55 PM
Metal has been ordered from Restoration Design.
I'm going to have to create some of it. More next week.
Posted by: Series9 Mar 24 2012, 01:12 PM
After more than three weeks of moving the shop, it's time to get back to Porsche work.
Here are James' pieces from Restoration Design:
Attached image(s)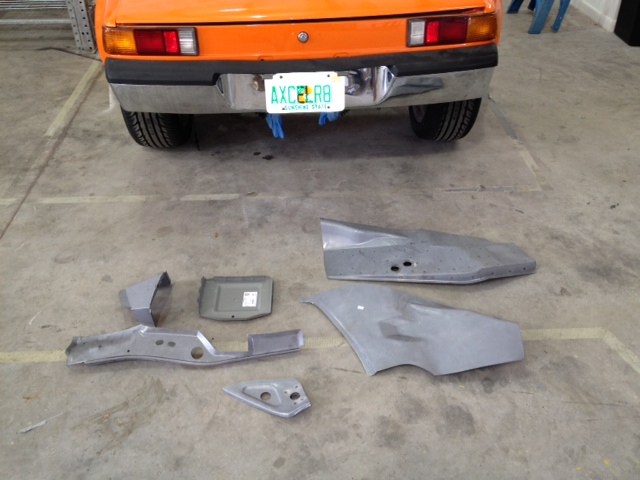
Posted by: Series9 Mar 24 2012, 02:35 PM
I stabilized the car and removed a little more metal.
Attached image(s)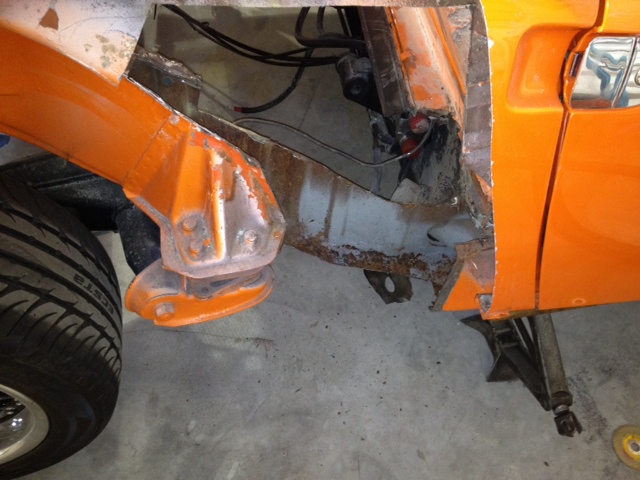
Posted by: Series9 Mar 24 2012, 02:37 PM
I then started to make the rough cuts on the replacement piece. This takes time to make the patterns to get it right. It's now roughed in. Tomorrow, I'll start making the little trims that will get it in place.
Attached image(s)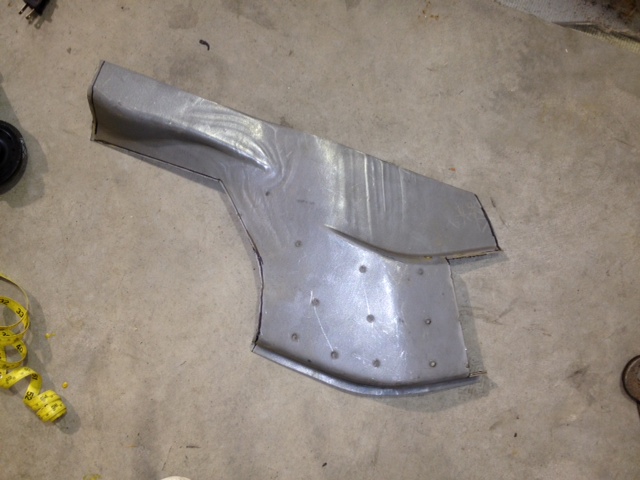
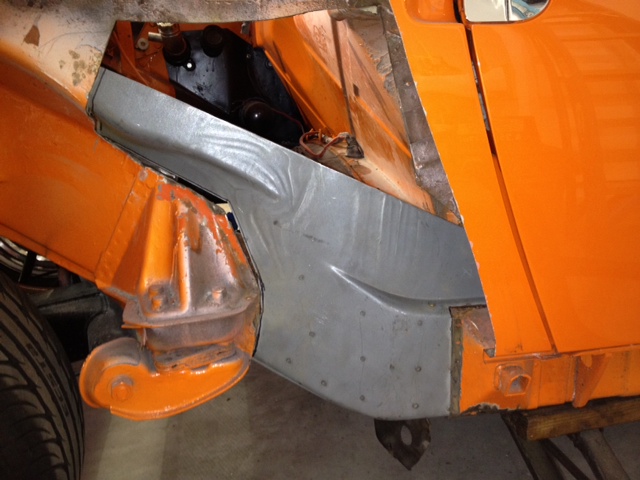
Posted by: Madswede Mar 24 2012, 04:27 PM
Major surgery to remove cancerous rust ... looks like it's going well, prognosis is optimistic at this stage. 
Posted by: ellisor3 Mar 24 2012, 07:29 PM
Major surgery to remove cancerous rust ... looks like it's going well, prognosis is optimistic at this stage.
My ulcer says otherwise.
Posted by: FourBlades Apr 1 2012, 12:31 PM
Wow that is a drag to have to open that all up.
Better to do it this way than find out at Daytona on the banking...
Joe will have it better than new.
John
Posted by: Series9 Apr 5 2012, 09:59 AM
Look, metal where there was previously none. Because the top is open, I will be able to run beads inside the long as well.
This makes me happy:
Attached image(s)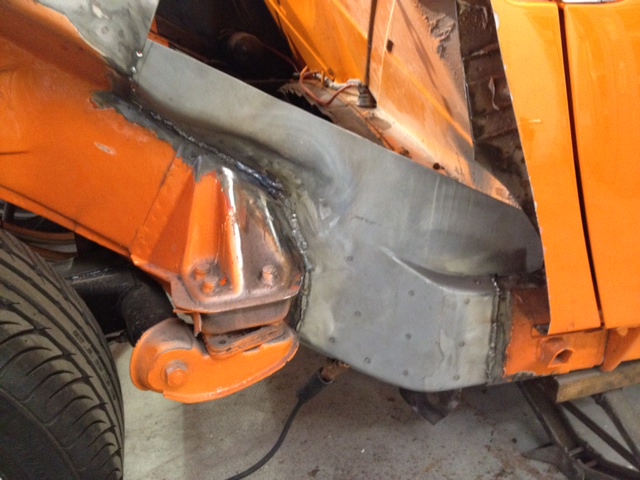
Posted by: Series9 Apr 5 2012, 11:52 AM
Welding the back of the seams wasn't too easy, but I got it done.
This picture shows the extent of the remaining work. I have to fabricate the top of the longitudinal. However, the piece that's finished is the foundation for everything else and I think it will end up being the hardest.
Attached image(s)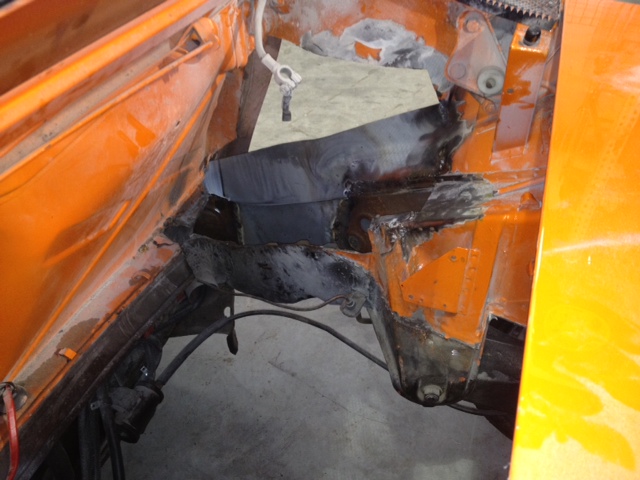
Posted by: Series9 Apr 5 2012, 12:10 PM
I put the car down and rolled it around to let it settle.
Here are a couple of interesting observations.
The door will have to be adjusted, but the gap is much better.
Look at the back. It's now higher on the right. I think there was so much compliance in the body previously that someone installed all those alignment shims on the right just to level the car. There are no shims on the left. I'll pull the shims out and send the car for alignment.
Attached image(s)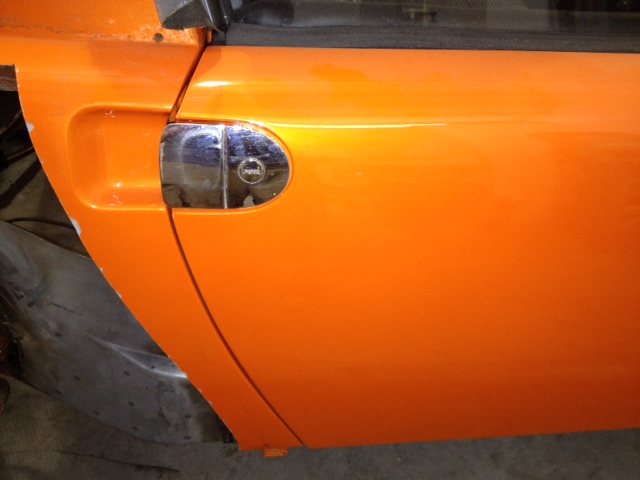
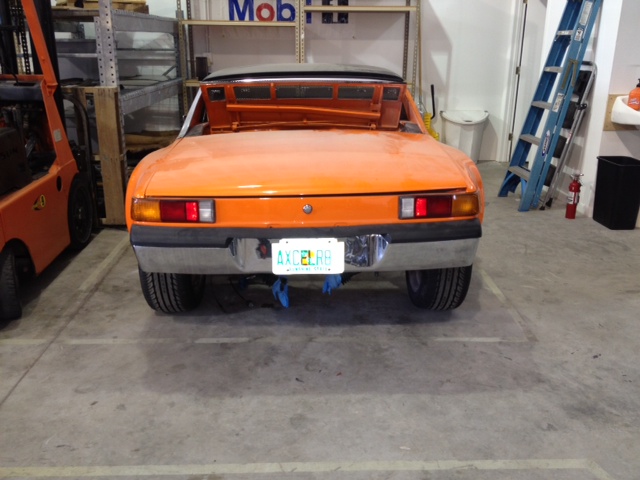
Posted by: ellisor3 Apr 5 2012, 12:17 PM
I put the car down and rolled it around to let it settle.
Here are a couple of interesting observations.
The door will have to be adjusted, but the gap is much better.
Look at the back. It's now higher on the right. I think there was so much compliance in the body previously that someone installed all those alignment shims on the right just to level the car. There are no shims on the left. I'll pull the shims out and send the car for alignment.
Funny you should say that Joe, I had a hell of a time getting the ride height even on the front. I adjusted one side on the front almost all the way up and the otherside almost all the way down. Everytime I bounced the car, it was wrong again.

The back did not need much adjustment once the front was correct. I am sure all those shims and the compliance were the problem. I guess I will have to start with the ride height again.
Looks great Joe
Posted by: Series9 Apr 6 2012, 08:59 AM
Rough-in on the upper wheel house metal:
Attached image(s)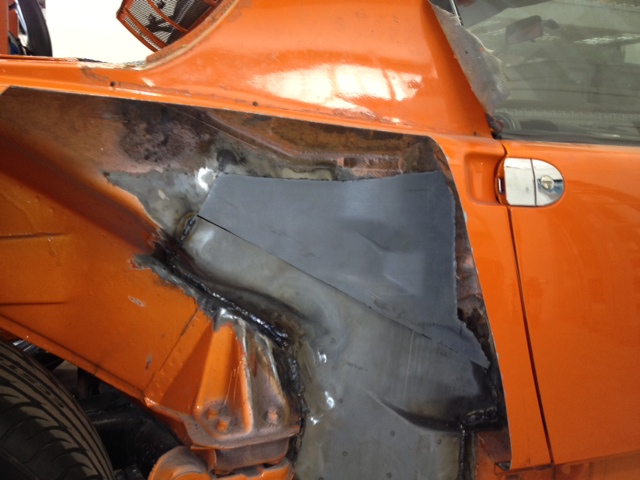
Posted by: Series9 Apr 8 2012, 01:06 PM
The upper wheel house trimming is finished and it's tacked in. Friends came over and made me have a beer, so that's all for today.
Attached image(s)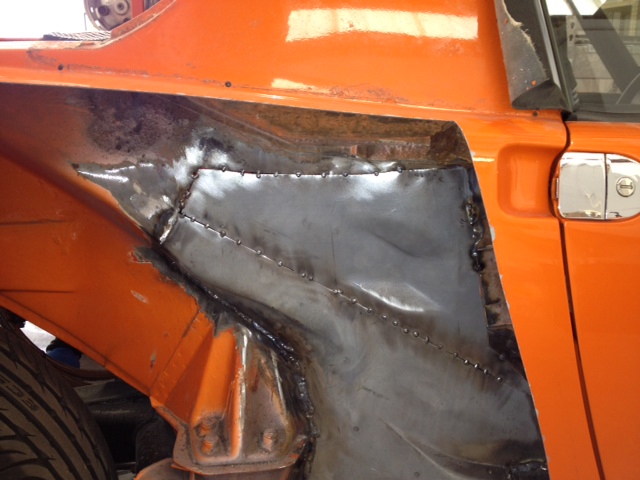
Posted by: effutuo101 Apr 8 2012, 03:17 PM
Very nice work!
Posted by: Series9 Apr 13 2012, 09:29 AM
The wheel house is a single piece again.
Attached image(s)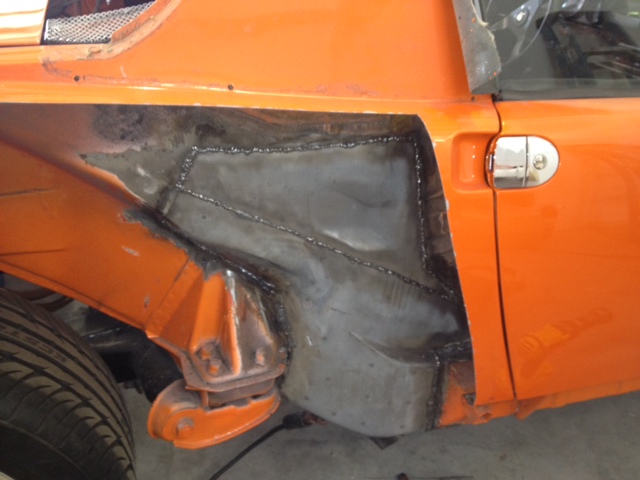
Posted by: effutuo101 Apr 13 2012, 09:36 AM
So pretty!
Posted by: Series9 Apr 13 2012, 10:29 AM
So pretty!
I'm pretty happy with how things are going:
Attached image(s)
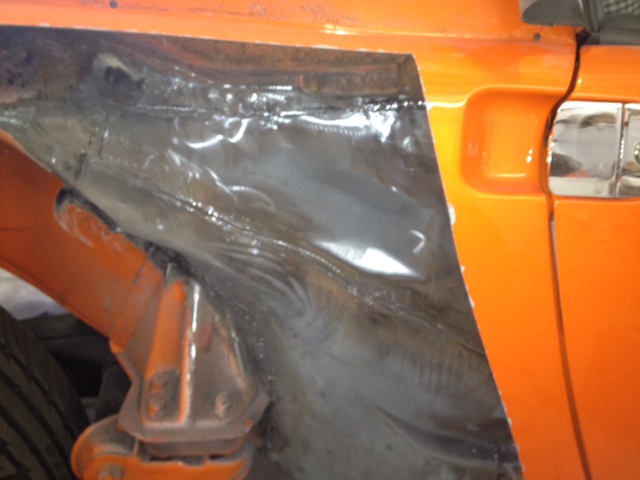
Posted by: Series9 Apr 14 2012, 01:08 PM
Here is the first of about four pieces that have to be made from scratch to repair the top on the longitudinal.
This single piece took four hours.
Attached image(s)
Posted by: ellisor3 Apr 14 2012, 01:25 PM
Very nice Joe. A lot more work than you thought. Huh?
Posted by: Series9 Apr 14 2012, 02:11 PM
Very nice Joe. A lot more work than you thought. Huh?
Yes, but I'm going to honor your original labor estimate +metal + paint.
Posted by: Series9 Apr 14 2012, 05:22 PM
Here's where we are tonight.
The top piece is cut and welded and the bottom piece is mocked up:
Attached image(s)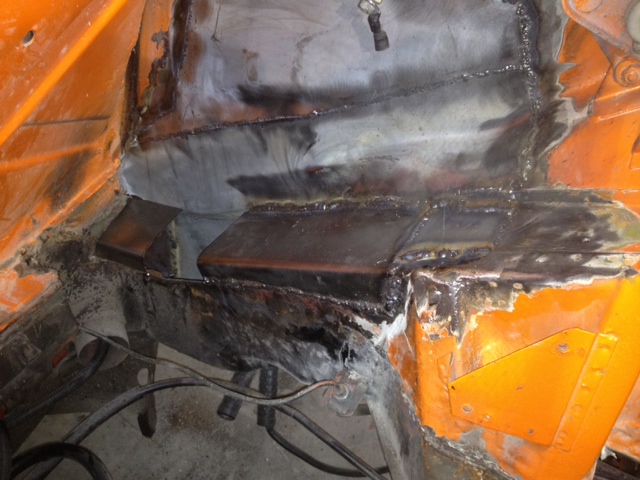
Posted by: Series9 Apr 18 2012, 11:36 AM
First time on the lift after installation of the new wheel house.
The door gap used to become ugly when this chassis was in the air.
No longer:
Attached image(s)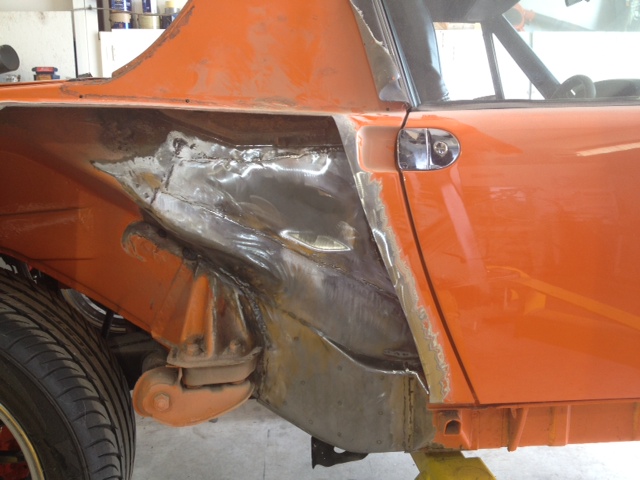
Posted by: JmuRiz Apr 18 2012, 12:24 PM
Nice!
Posted by: Mr. 5150 Apr 18 2012, 04:20 PM
Clean repair!
Posted by: Series9 Apr 21 2012, 10:12 AM
The longitudinal is whole again:
Attached image(s)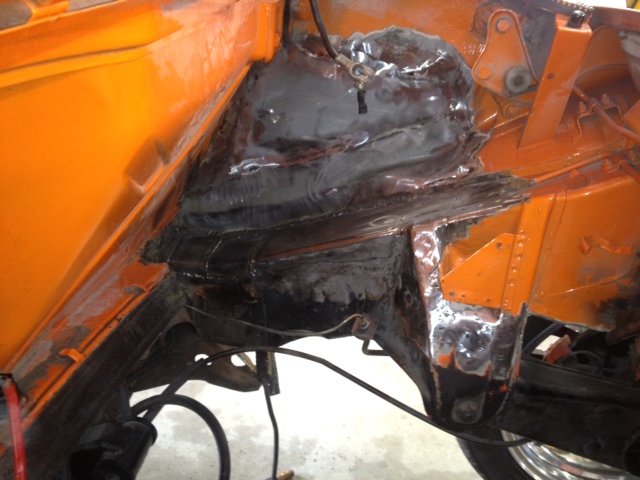
Posted by: Chris H. Apr 21 2012, 10:16 AM
Nice work Joe you have incredible talent.
You make that look easy... having attempted something much less complicated I've learned IT'S NOT!
Posted by: Series9 Apr 21 2012, 10:48 AM
Test fitting the engine shelf.
Since the top of the long was hand made, this is taking some massaging to get it fit up.
Attached image(s)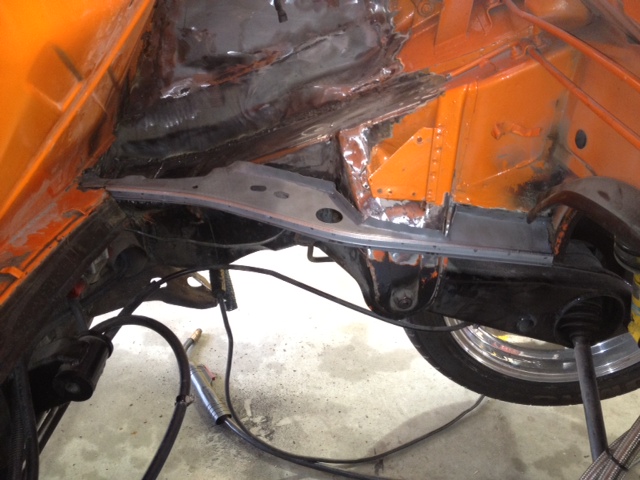
Posted by: Series9 Apr 21 2012, 10:50 AM
Nice work Joe you have incredible talent.
You make that look easy... having attempted something much less complicated I've learned IT'S NOT!
Thanks Chris. You just have to really take your time to trim and fit the pieces.
Posted by: sixnotfour Apr 21 2012, 11:02 AM
good work !!
Joe there is a thread somewhere and we alerted Restoration Design that they should make the piece, your pics I will add to the thread.
Posted by: Series9 Apr 21 2012, 01:01 PM
The shelf is welded and seam sealed:
Attached image(s)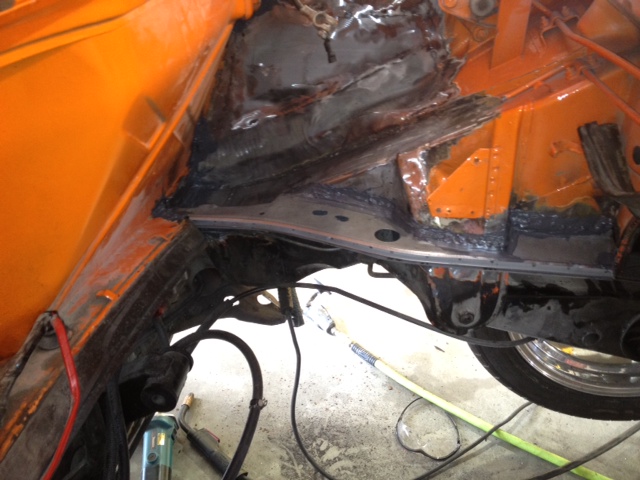
Posted by: Series9 Apr 21 2012, 01:28 PM
This one's for James.
I'll have it fully welded by the end of the day:
Attached image(s)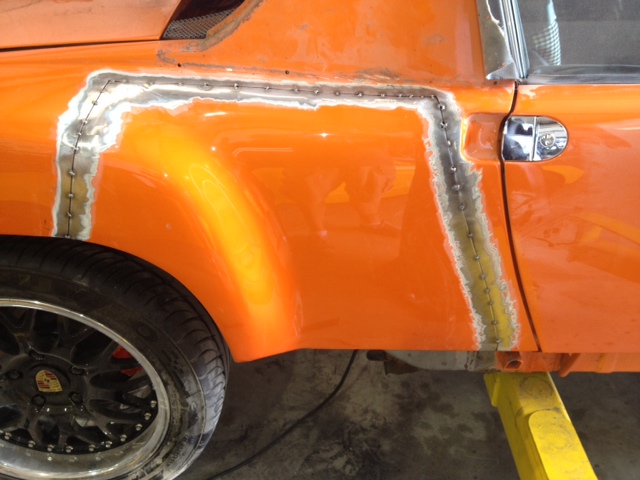
Posted by: tomeric914 Apr 21 2012, 02:13 PM
Nice work Joe. It takes a lot of hours to make it right. 
Posted by: Series9 Apr 21 2012, 02:44 PM
I'll grind it tomorrow. I'm tired.
Only the battery tray and one bottom piece to go. I'm giving it to the painter in 24 hours.
My plan is to deliver it at the Cinco de Mayo party.
Attached image(s)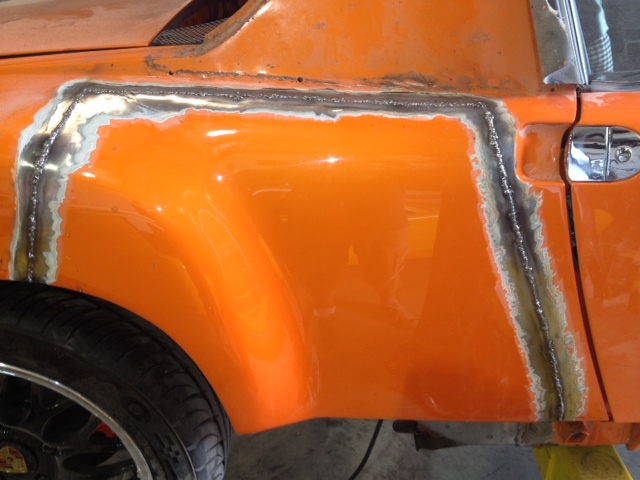
Posted by: ellisor3 Apr 21 2012, 10:46 PM
Looks fantastic Joe, to bad most of your hard work will never be seen again.
Posted by: Series9 Apr 22 2012, 11:00 AM
I'm in the home stretch now.
Attached image(s)

Posted by: sixnotfour Apr 22 2012, 12:00 PM
Don't forget to take off the stupid -4 mount on the suspension console.
Unless you are using it ?
Posted by: Series9 Apr 22 2012, 12:28 PM
Don't forget to take off the stupid -4 mount on the suspension console.
Unless you are using it ?
They've been gone since I did the engine conversion.
That's how I initially found the weak metal in this area.
Posted by: sixnotfour Apr 22 2012, 12:44 PM
I meant the one on the inside of engine compartment on the inner ear.
triangle shaped.
Posted by: Series9 Apr 22 2012, 01:59 PM
Done.
It's already been moved to the paint shop.
Attached image(s)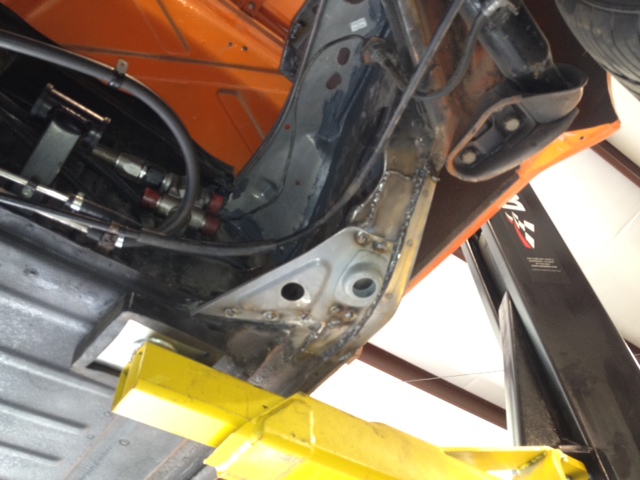
Posted by: ellisor3 Apr 22 2012, 02:50 PM
Sooo that repair will stop that crunching noise when I use that jackpoint???
Posted by: Series9 Apr 22 2012, 02:52 PM
Sooo that repair will stop that crunching noise when I use that jackpoint???
Yes, it will.Posted by: Series9 May 3 2012, 07:12 AM
Here she is back from the painter:
Attached image(s)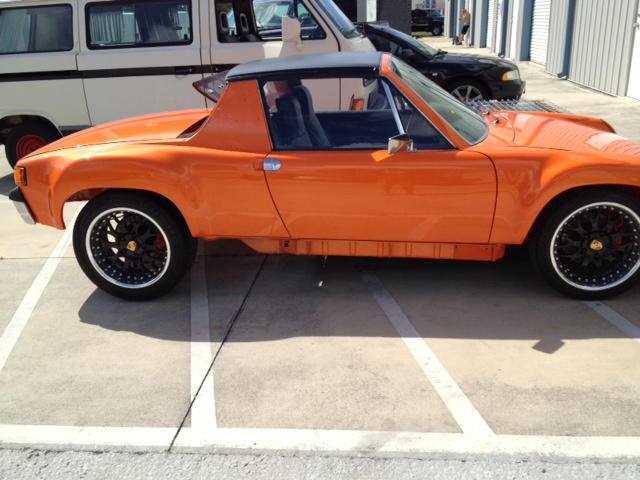
Posted by: JmuRiz Nov 5 2012, 09:38 AM
I know this is an old thread, just wondering how that oil cooler setup is working in the real world?
Joe, how much would a setup like that cost?
Posted by: MoveQik Nov 5 2012, 01:38 PM
I know this is an old thread, just wondering how that oil cooler setup is working in the real world?
Joe, how much would a setup like that cost?
I have a similar set up on my car that Joe installed. I have one cooler instead of two smaller ones but the surface area is the same, with two fans installed as well. It has always worked just fine even in our AZ heat.
Posted by: ellisor3 Nov 5 2012, 04:30 PM
I know this is an old thread, just wondering how that oil cooler setup is working in the real world?
Joe, how much would a setup like that cost?
It has worked very well. Temps get to about 220f in the dead of summer driving on asphalt. I don't remember the cost, I try not to, but it seems like the fans were about $180 each plus pluming and the oil tank.
Powered by Invision Power Board (http://www.invisionboard.com)
© Invision Power Services (http://www.invisionpower.com)