Printable Version of Topic
Click here to view this topic in its original format
914World.com _ 914World Garage _ Introducing "Dirty Penny" - Former $2010[$2012] GRM Project
Posted by: jpnovak Sep 22 2009, 10:09 PM
I wanted to introduce myself as a new member to the World. I am new to the 914 but not new to air-cooled. I have two 1971 911s; a T - soft-window targa and an ST-replica track car. I am sure I have seen many of you on Pelican. With the 911 I have done it all, rust repair, paint, engines, transmissions and chassis setup. I felt it was time for something new.
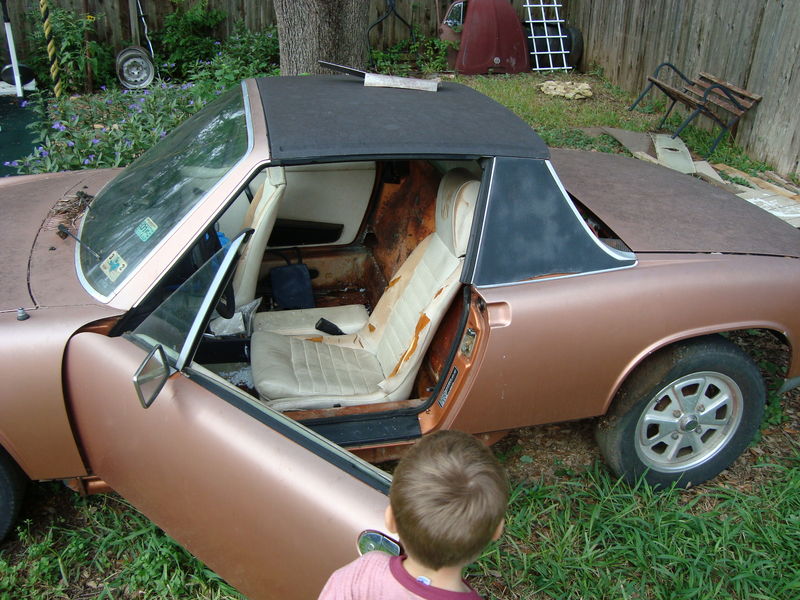
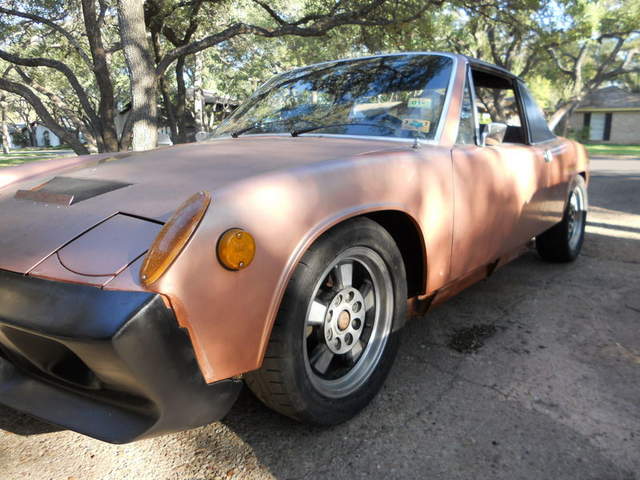
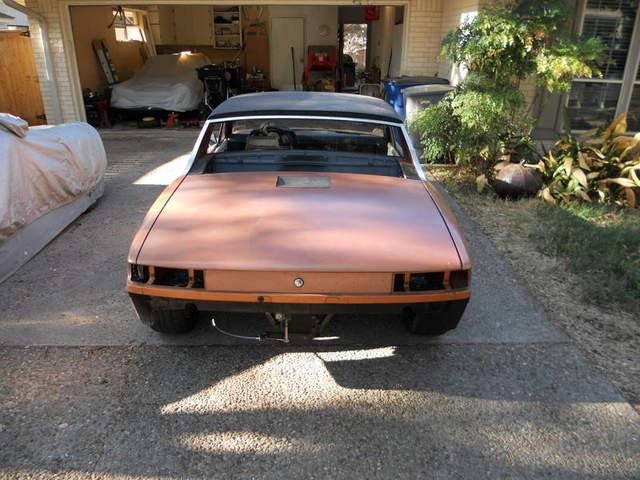
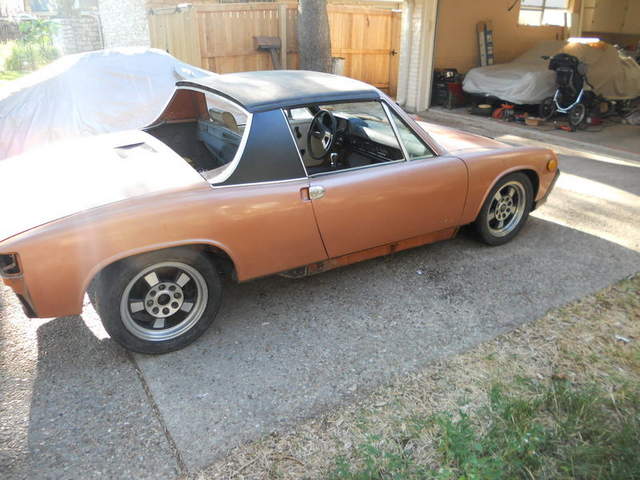
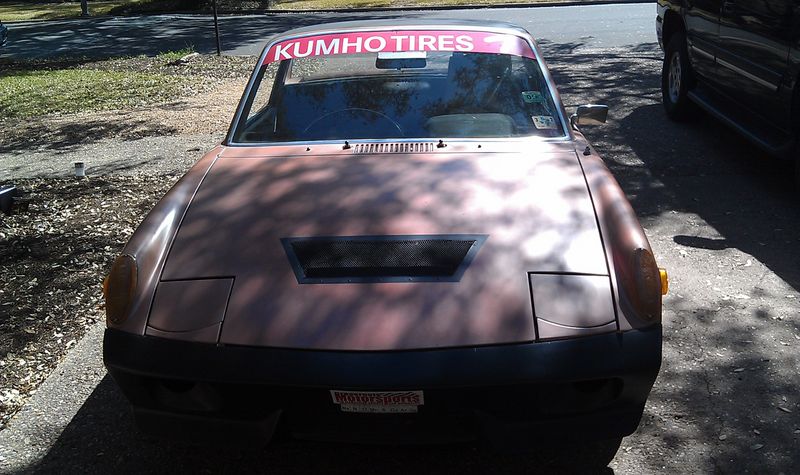
Introducing my new project. "Dirty Penny"
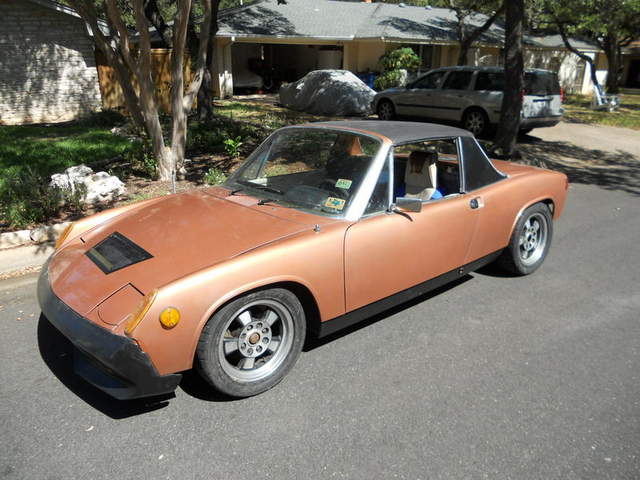
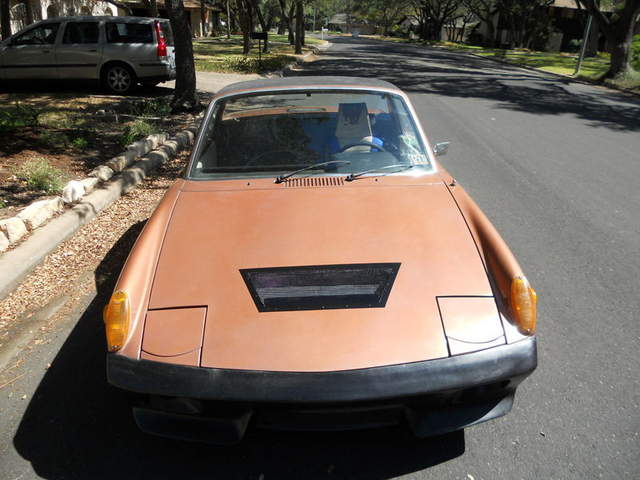
Penny is a 1975 Porsche 914. She has been sitting unattended for a while. I found her at a friends house under the old oak tree. Penny is wearing copper metallic paint and had a white interior. Penny arrived without a heart. I am going to give her new life.
Penny will be built as a Grassroots Motorsports $2010 Challenge car. For those not familiar that means you have $2010 to build a car where it competes in a concours, drag race and autocross. The prize? Notoriety in GRM and ridicule from those who already think you are nuts and cheap. My wife doesn't affectionately call me Fred Sanford for nothing. 
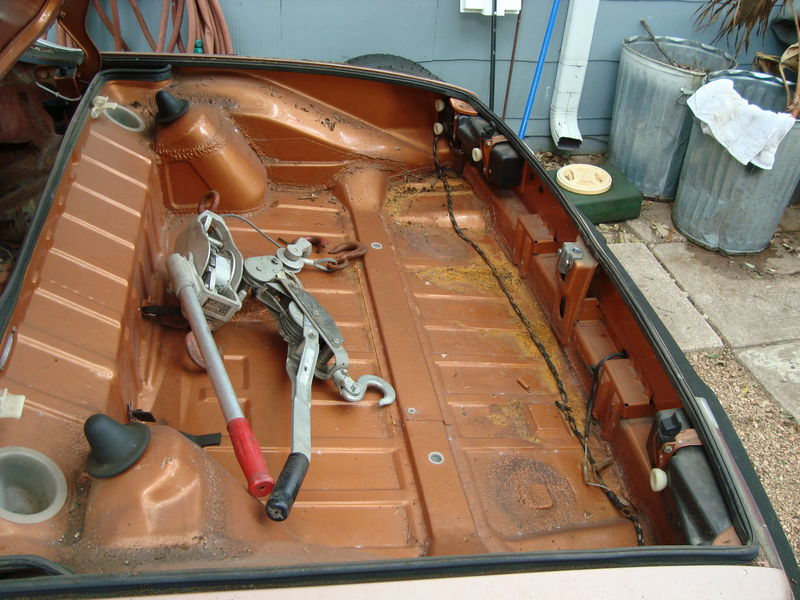
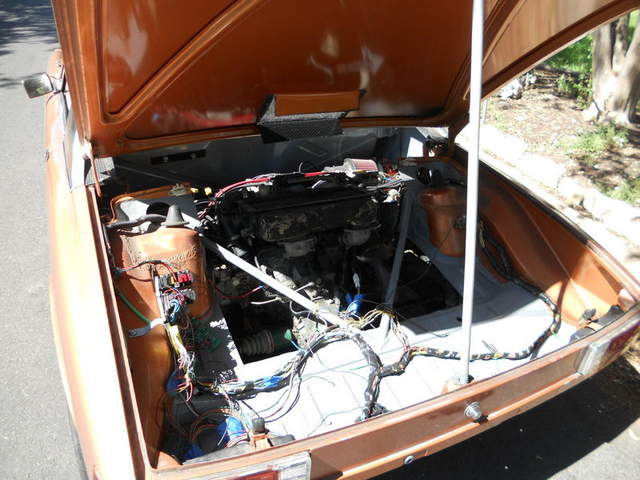
Here are a few pictures of Penny being unearthed from her previous home. The TX sun has not been kind to the paint, nor the interior. However, the dry climate has left her remarkably rust free. There is rust in the Hell Hole that has been previously cut out yet never welded back in. Rot is almost non-existent. 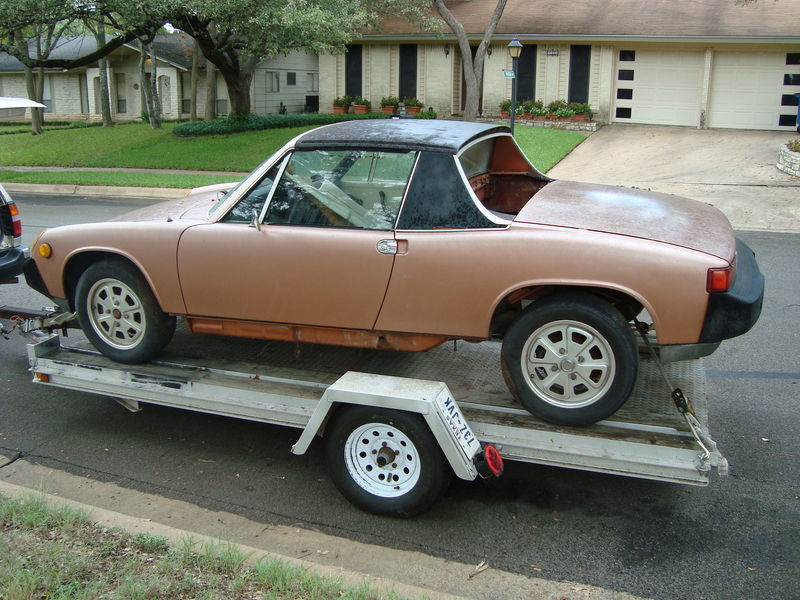
How much money I have left to spend on the project.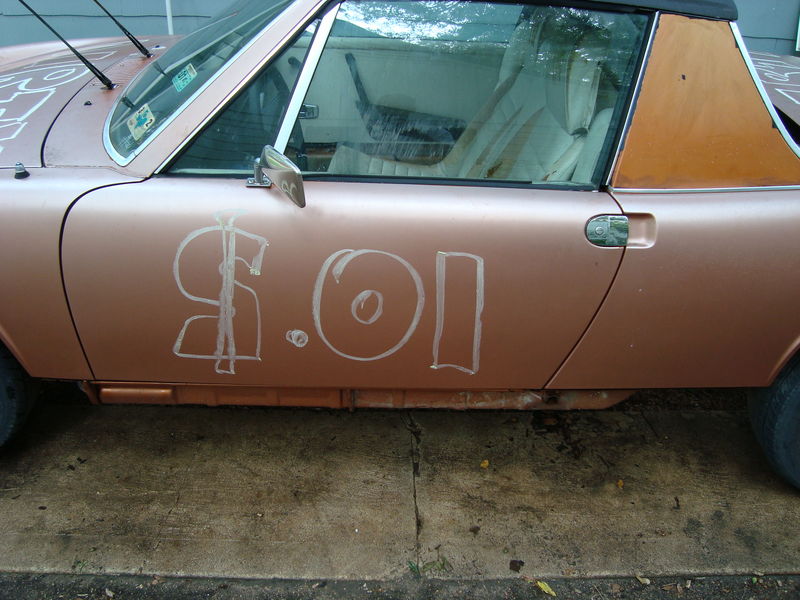
The plan is simple to do well at the Challenge. Get a car that handles well. Strip the weight out of it. give it some extra HP. Let's see... A 914 handles well. they are already pretty light. but the Type IV doesn't lend itself to high HP without major $$$.
A bit of late night ebay browsing and I came across a JDM Subaru EJ20G drivetrain. Yes, that's what I need. ITs still a flat-4 - yet has to be water cooled and makes 140+ HP/L in stock trim. I like it. The vendor was in Dallas which means reduced shipping costs. Yep, that's the rule. you must account for ALL purchases.
The new heart and soul... Oh yeah it will have soul!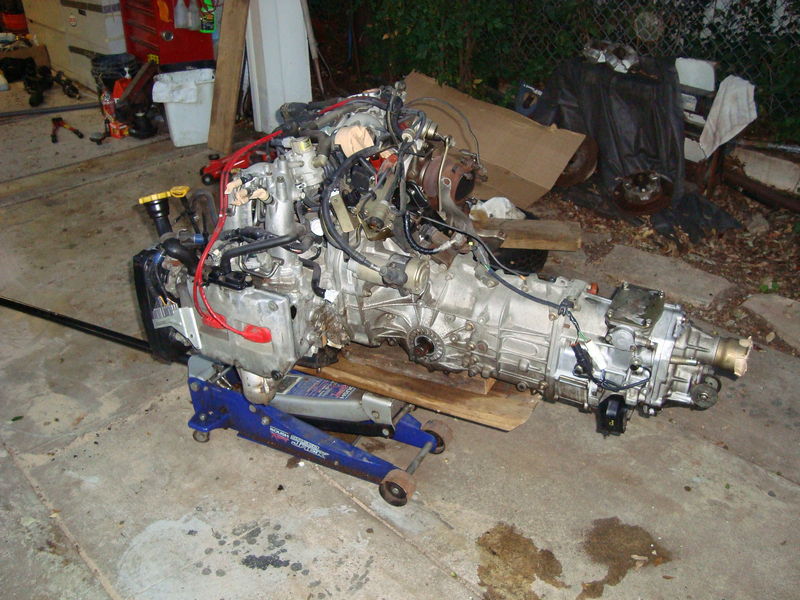
to be honest, work has been crazy and I have 13 months to build the car. Progress won't be fast. I am excited to make this go forward. The challenge of swapping the entire drivetrain begins with connections. The engine mounts are easy. Trying to get the shift linkage, clutch linkage and throttle cable done on the cheap is not so easy. I know there is a wealth of information on this site. Thanks to all those who have traveled this road before me.
Until the next update...
Now I have to figure out how to post images on this site rather than link external.
Posted by: Justin Fischer Sep 22 2009, 10:14 PM
Hey Jamie,
Been a while since I last saw you in DC. Always loved your work on the ST and soft window targa. Good Luck and 
-Justin
Posted by: jpnovak Sep 22 2009, 10:19 PM
Hey Justin, It has been a while. For some reason, I thought you sold your -6. btw, thanks for the welcome. This will be a bit of a diversion from the other projects. Nah, who am I kidding. They are all the same. Find something interesting and make it my own.
Of course, my wife doesn't think I am going to keep it. When the mechanicals are all done I have to at least take it to the track. And then I need to maximize the suspension... And then...
Ahh the slippery slope.
Posted by: Travis Neff Sep 22 2009, 11:09 PM
This should be a great thread! ![popcorn[1].gif](style_emoticons/default/popcorn[1].gif)
Posted by: Todd Enlund Sep 23 2009, 01:21 AM
Sweet! That's two 914s for the $2010 Challenge!
http://www.914world.com/bbs2/index.php?showtopic=91445
Posted by: jpnovak Oct 27 2009, 07:02 AM
I mocked up the engine mount in CAD. The package all fits together within the measured dimensions of the engine bay. Here is the model engine mount. There are two vertical struts that will bolt to the rear shock tower cross member. Two engine mounts connect to the flat four. The Suby engine has engine mounts on the backside next to the bell housing connection. These are angled at 22 deg per side. Two forward extending struts will connect to the stock engine mount locations. This effectively ties the rear of the car together. Triangulated bracing is not shown for simplicity. The design also clears the up and down pipe on the turbo. 
Enough with the design. Let's start cutting metal. I started by supporting the car on jack stands. Then I cut out all the mounting channels for the air seal. This car will never need these again. 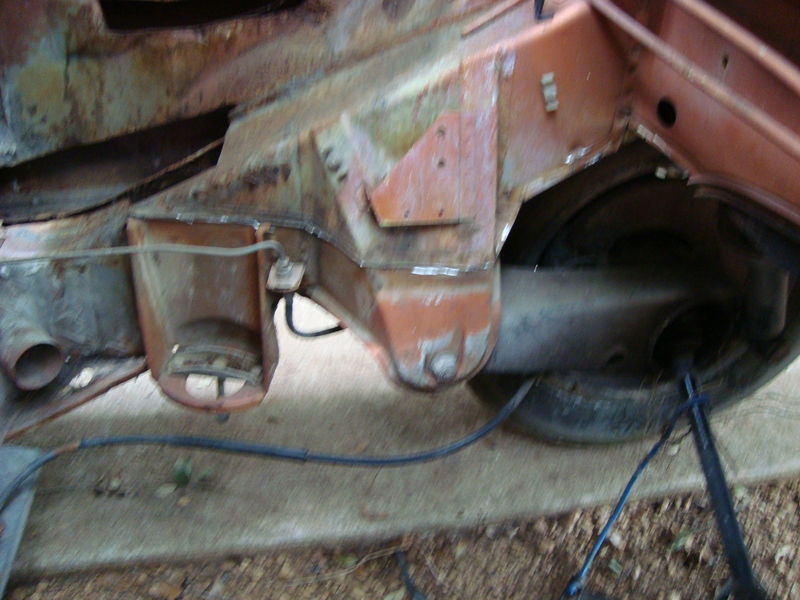
The next step is to cut an opening in the rear tray/cross member for a little chassis reinforcement. It is well known that high g-loads can cause separation of the shock towers from the longitudinals. The problem lies in the fact that the rear shock towers are not actually welded to the ends of the longitudinals. One side of the cross member mounts to the shocktower and the front side of the cross member mounts to the longitudinal. cutting an opening followed by some welding can easily solve the problem. 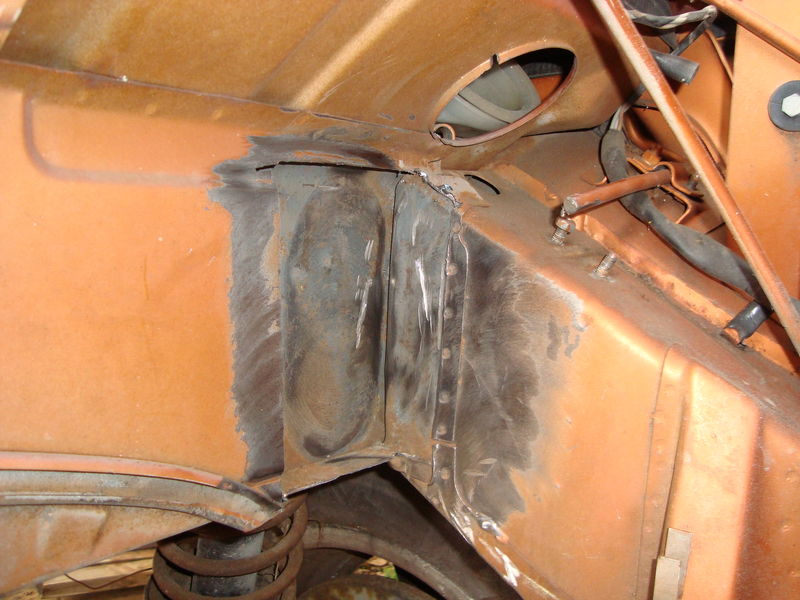
Once the access hole is opened, I simply seam welded the two sections. 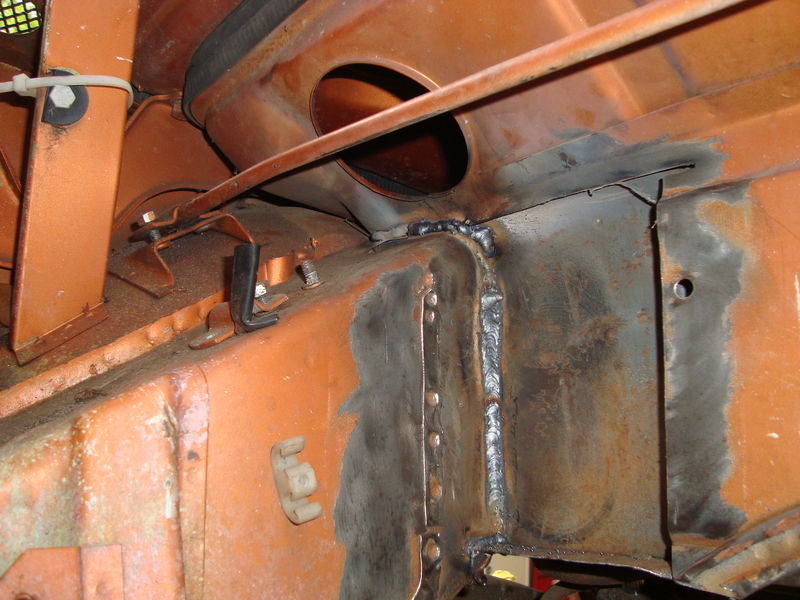
I also welded up the top section to further connect the shock tower to the longitudinal. 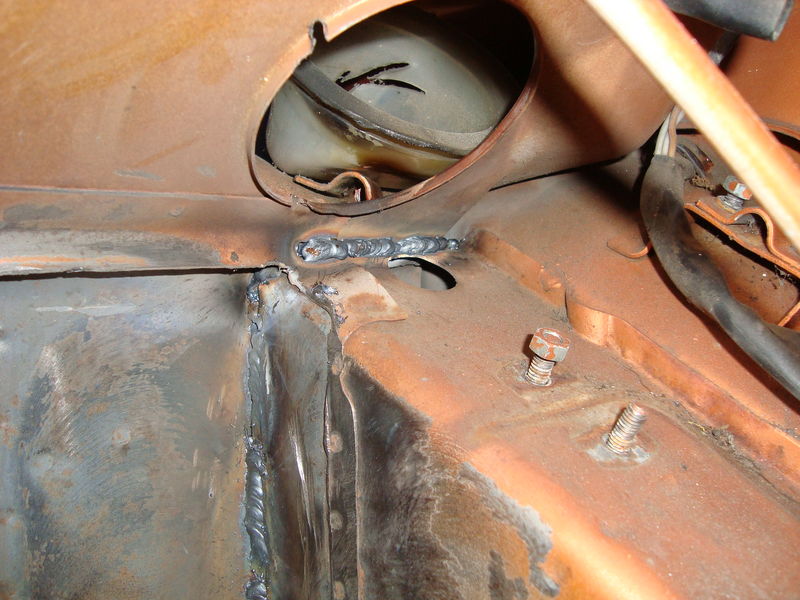
Next, I fabricate the reinforcement sections for the corners. These will serve as the mounting points for the engine yoke/cradle. These are simply cut from scrap 3/16" flat stock. good thing scrap steel can be had for free if you know where to look. 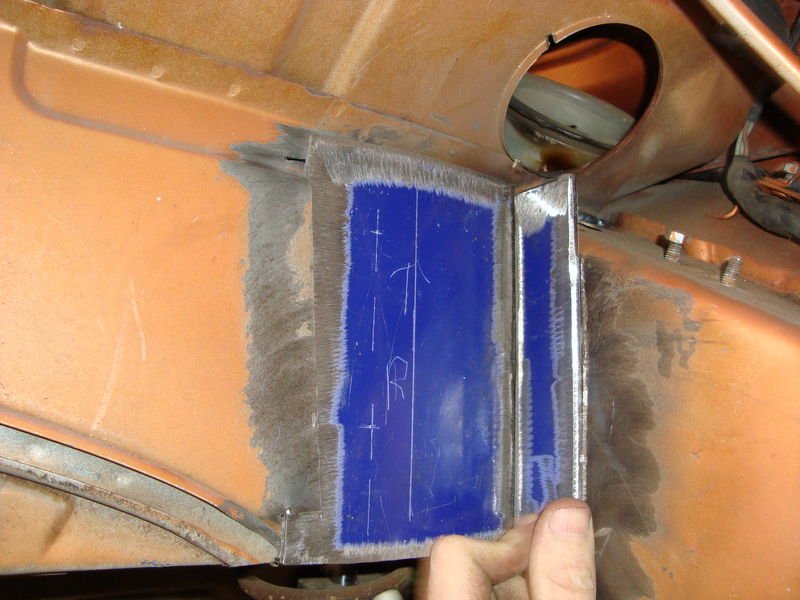
Here are the two corner sections installed. I also drilled and tapped holes and then welded nuts on the backsides. These blind nuts will serve as the upper mounting holes for the engine yoke. Two bolts on each side of the vertical struts pictured above. 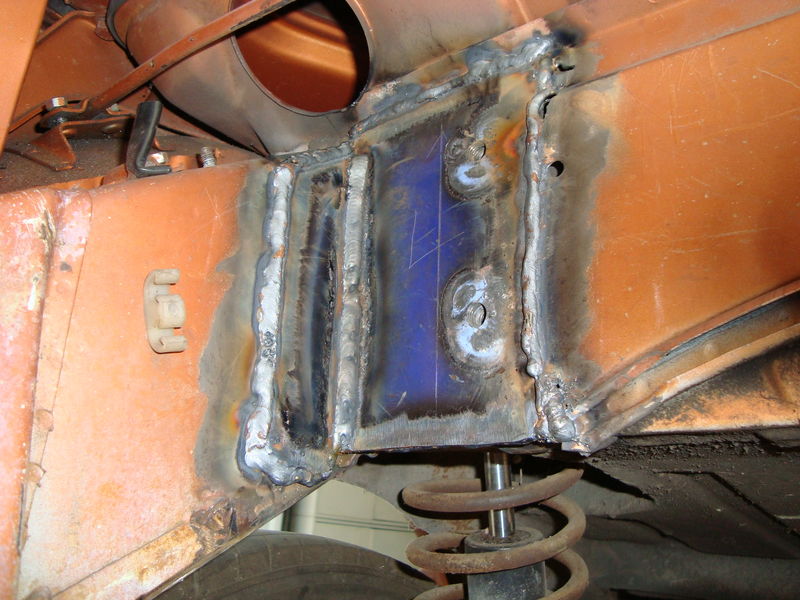
Posted by: jpnovak Oct 27 2009, 07:03 AM
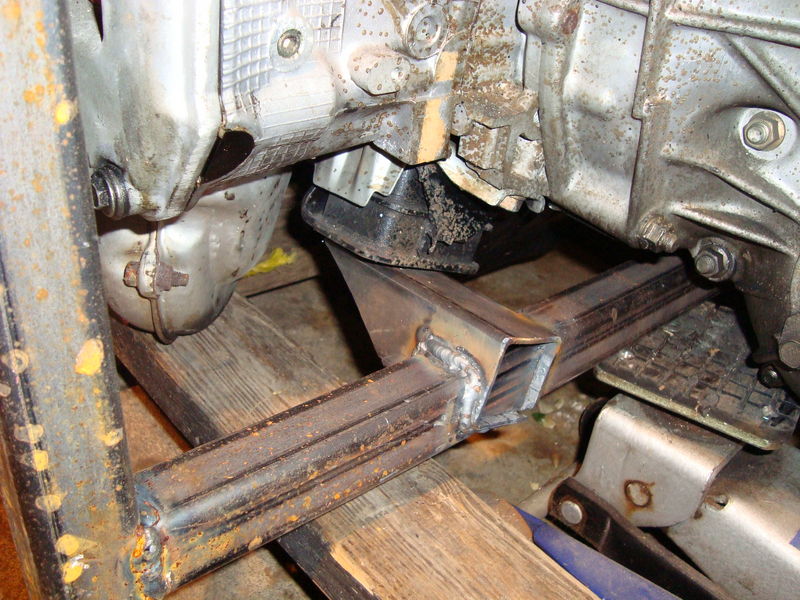
Next I had to start work on the engine yoke. Up until this point I have not spent any money. I did make a shopping trip to my local metal supplier. They are actually cheaper than Metalmart.com and I can easily get items cut to length. Sales tax on $24 in steel is cheaper than shipping any day.
The main loop is fabricated from 1.5" square tubing. The two engine mount sections are mitered from 2" square tubing. The forward locating struts are made from 1" square tubing. I thought that this was the best application of cost and strength.
First I welded up the main hoop. This is the U shape with two vertical struts and one horizontal cross member. This will support most of the weight of the motor. Next I miter cut the engine mounts. These are angled to the proper 22 degree and have relief cuts to access the engine mounting bolts. 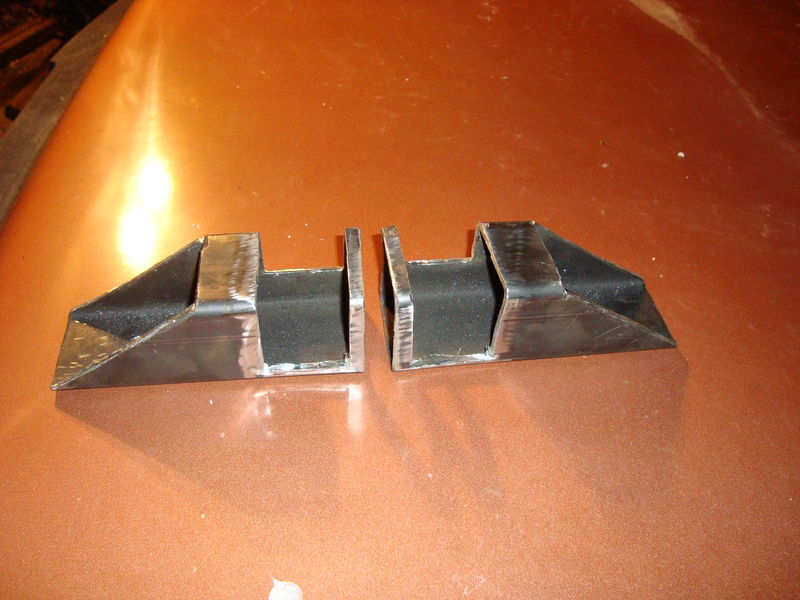
The mitered cuts were then installed on the main hoop. 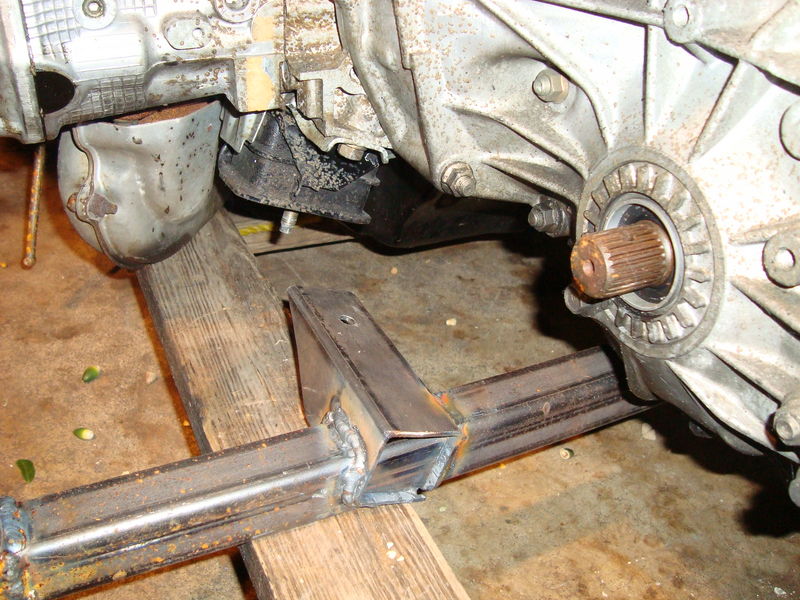
As you can see it fits up nicely. 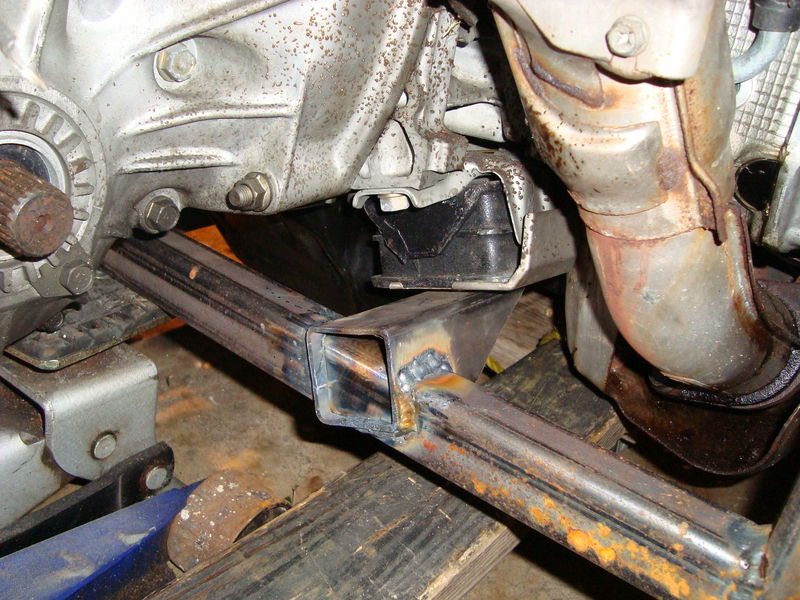
The next step is to raise the engine in the car and make cutouts for the turbo in the rear trunk. I will need to remove about a 2" segment of the floor to clear the turbo downpipe. The renegade kit mounts the motor more forward to avoid cutting the car. I did not want to do this since it puts a strained angle on the CV axles. My drivetrain is setup with perfect alignment of the axles and the hubs.
Once the engine is raised I can get a final height on my engine yoke and drill the pass through holes. After that I will fab tranny mounts in the car to support the backside of the drivetrain. This might make me cut the whole trunk out and tube the rear of the car. Nah! too much money in replacement steel for that.
Ahh its good to be back working on a project. Maybe I can get the motor installed and fired before the end of the year.
Until next time...
Posted by: ConeDodger Oct 27 2009, 10:22 AM
Hey! I lived on the same block as a "Dirty Penny". She went to Catholic school but we all knew her... 
So, I am thinking this one has a lot of 2010 Challenge potential... How can we help? Are donations allowed as $0 or do you have to valuate them and enter it in the accounting" Perhaps a little 914World Sponsorship...
Posted by: strawman Oct 27 2009, 10:35 AM
Kewl, another Suby swap! My swap is chronicled at:
http://www.914world.com/bbs2/index.php?act=ST&f=2&t=83031
See post #83 for my Suby trans mount solution. That would work well for your trans, too, since your trans also has the removable rear/top plate. I am doing my swap on the cheap, too, using as much surplus and used components that I am able to scrounge.
For me, the project build is more than half the fun. In the past 15 years, I've built a bunch of VWs (Bugs, Vans, Fastback, dune buggy, etc.), a couple of IH Scouts, a Samurai-based rockcrawler, RX7 and MR2 autocrossers, a 125cc shifter kart, RD400-based cafe racer, etc. I swapped a '94 Suby Legacy engine into a Westy Syncro Vanagon, and have owned a couple of Subies, so I know these engines well.
Best of luck. I'll keep an eye on your build... keep the pics coming!
Geoff
Posted by: jpnovak Oct 27 2009, 01:35 PM
Rob, I am not sure of your connotation. I truly believe that the car looks like a discarded coin, not something that may not be the prettiest to look at but has something special under the skirt. java script:emoticon(':shades2:',%20'smid_45')
I would love to have free parts. However, I have to account for all parts. This means assigning "fair market value" to all additions on the car. Of course, this could be up for interpretation as to the true market value and corresponding condition of said parts.
Geoff, Sounds like a great project list. I have checked out your build. The tranny mount seems like a good one. I was planning to triangulate down to the lower isolation mount . This would give a slightly better angle of attack on the tubing. I also thought that I might make the rear diff cover be the mount. Then I could have a visual reference to a 908/917 in the rear. Would be easy if planned properly.
I have a solution such that I do not have to buy the Bremar parts. I will keep everyone posted. I think they make a great part but I need to have that budget on my build. Good thing for cutting and welding tools. java script:emoticon(':welder:',%20'smid_59')
Posted by: 9146986 Oct 27 2009, 07:47 PM
That is one of my favorite color combinations. Metallic copper and white interior looks awesome!
Posted by: grouperalley Oct 28 2009, 09:22 PM
great car for $2010. You've read the rules, so you know liberal inteptations of trading parting out are allowed. Ive got a 76 parts car a set of riverias, some other stuff that might help when you get to the details, and surely some shop space. So if as your plans develop you might want to come to Orlando, 50 miles south of gainesville ( the site of most $2010) and borrow misc parts you might need. Good luck
Posted by: camaroz1985 Feb 2 2010, 02:22 PM
Looking good. How's the progress coming?
My progress has stalled for the winter again (I need a heated garage). Hopefully there will be at least 2 914s at the $2010 challenge.
Posted by: jpnovak Feb 2 2010, 03:47 PM
The motor and tranny mounts are done. I am currently fitting the cooling system. Once I have water I will wire it up and fab an exhaust.
Progress has been really slow the past 2 months due to other commitments.
Posted by: jpnovak Jul 5 2011, 11:47 AM
I thought I would bump this thread since I finally moved on to get some progress completed.
The car and project goals are still alive. Just delayed a year or so. Life, family and work got in the way. Now I am committed to getting Penny to the Challenge! Hey, I have an extra dollar to spend this year.
I will update some pictures later tonight but thought I would give a brief description of my progress (and lack of).
1. The cooling system is in. I bought some EPDM heavy wall hose from McMaster Carr. This 1.25" ID/2"OD hose runs under the car through the floor stamping recess that outlines the center tunnel. Like others before me I snake the hose between the front suspension cross member and steering rack. In the rear I machined adapters that step from 1.25" up to 1.5" using scrap aluminum. This mates to the factory Suby inlet/outlet. Looks clean and is leak free.
Interesting note: Red hose is $0.40/ft cheaper than black hose. Guess what color my radiator hose is. Besides, red is faster right?!
2. Shifting system. I used Evinrude boat control cables I found on eBay for $5. These mate to welded adapters on the shift-select rod.
In the car I installed a manual shifter from a Nissan Versa. I know its not the same as most other builds but there are a few notable differences. First the shift cables exit the front and then loop down through the tunnel. Worked perfectly with my long boat cables. SEcond the shift position is fantastic. The shifter knob is located to the right about 6", back about 3" and middle of the wheel for height. My hand naturally drops of the steering wheel and onto the knob. The throw is about 3" front-to-back and about 2" side-to-side.
Oh, I was the one with he DIY Bremar kit. Shifting works great now.
3. Fuel system. I pulled the tank and cleaned it out. Then I made my own rust etch and ended up with a nice, internally clean tank. I used a Ford Crown Vic fuel pump. Also used on the 98 F150 and a bunch of other Ford cars. Fuel pressure spec is up to 50psi and plenty of delivery volume. Best of all it was $30 delivered.
The stock fuel lines were cleaned and connected to the subaru fuel inlet/outlet using a bridge fuel hose. my 75 had the poly lines through the tunnel. The OD is the same as the ID of the stock Subaru hose. A simple clamp made the connection. Simple, cost nothing and is leak free.
4. Wiring and electrical. This is where I have had the most trouble. I bought a JDM 98 Forester turbo drivetrain. Great except that the wiring diagrams are one-year only and really do not exist. Thankfully all of the GC-X (X = 1-8) series EJ20 motors have similar pin-outs even if the wiring colors are vastly different. It litterally took me 2.5 months to trim the factory subaru harness down to the engine controls. I have traced every wire coming out of the ECU and verified the colors were correct. This was difficult considering that 80% were different colors compared to the wiring diagrams I was using. I found that the UK version of the 1998 WRX had the best match for a wiring diagram.
Once I had the ECU wired in the car I started to make connections to the 914 wiring. Where do I start?
ON a car that sat for 12 years it was an exercise in frustration the first time I connected the battery. Nothing worked. First I cleaned the ignition switch. Then the main relay. Then the light switch. Then all of the grounds. Finally, the lights, starter, fuel pump and most of the gauges work.
Someone please answer this question. Why did the factory switch wire colors from Black/Red to green in the middle of the wiring harness under the dash for the fuel pump 12V supply? I spent hours tracking that down and only found it by splitting the harness and pulling out the wire to find the change in color. This change was not noted in ANY 914 wiring diagram I could find.
Yesterday I was very excited to finally reach the point of starting the motor. I bought some oil late yesterday afternoon and filled the sump. Next I primed the fuel system and turned the key. Spins and spins yet, no spark/no injector pulse. HMM. Time to start tracking signals starting with the crank sensor.
Hopefully, I will get this car started soon. Then it is off to more important things like building axles, figuring out the clutch and rebuilding the brake system. First, it must run.
Posted by: SirAndy Jul 5 2011, 12:09 PM


Posted by: camaroz1985 Jul 5 2011, 12:39 PM
Congrats on getting this far. Life got in the way of my GRM project before I even got the engine in. The remnants are still for sale 
Posted by: jpnovak Jul 6 2011, 12:48 PM
yes, life has a way of getting in the way. My wife (who I love dearly) said - get the car running and make the Challenge or get rid of it. the line was drawn in the said and I decided to finish the car.
I now have a copy of the 98 factory manual. It has all the output signals I need to troubleshoot the ECU and see what ails it. I have verified all power and ground connections. Now I need to start tracking down signals starting with the crank sensor. Hopefully it will be something simple.
If I can't get the ECU working I will probably Megasquirt it. - I will have to make concessions on the seats and other items but a running car is worth it.
Posted by: jpnovak Jul 7 2011, 09:18 AM
Still no start on the ECU. I used the O-scope last night and tracked a nice input signal off the cam and crank sensors. However, no output signals to the injectors or coil.
today I took apart the ECU case and checked the board. I found a few bad solder joints on the main chip and so I reflowed the two main chips and all of the power transistors/driver circuits. Hiopefully, this will solve the problem.
If there is still no output I will abandon the factory ECU and install a MS system. I bought a used one on CL and it is already accounted for in my budget as a backup.
Posted by: jpnovak Jul 8 2011, 07:41 AM
I am GO for MS.
The factory ECU is dead. I don't know if it got zapped or just lost its firmware from sitting unpowered for so long. Usually the ROM data is good for at least a few years. There is no telling how long the motor has been sitting. I do no think I can reflash it.
At this point it would be easier for me to wire in the MS unit.
Posted by: jpnovak Jul 24 2011, 04:00 PM
Penny is alive!! Despite the triple digit heat I was in the garage this morning.
The car runs despite lack of TPS, MAP and coolant signals. WooHoo!
Now I will finalize the wiring and finalize the injection system.
Next step is to fabricate axles and put a clutch connection.
Posted by: clow Jul 24 2011, 04:45 PM

Penny is alive!! Despite the triple digit heat I was in the garage this morning.
The car runs despite lack of TPS, MAP and coolant signals. WooHoo!
Now I will finalize the wiring and finalize the injection system.
Next step is to fabricate axles and put a clutch connection.
This is a very neat concept. Nice to hear the car is running, congrats! Do you mind me asking what you have into it so far?
Posted by: jpnovak Jul 24 2011, 08:33 PM
Currently, I am almost to ~$1900. Of course, almost $1450 is in the drivetrain. I bought the roller for $300. The difference is for steel tubing to build the engine cradle and fix rust. I will post a full detailed list once I am done.
I am going to have to swap my interior budget (seats and "carpet") to convert to hydraulic clutch. Just the parts will be close to $75 for a used MC/hose and banjo fittings. Thank goodness fabrication is free.
The only thing i will not count in the build budget is for a few safety items. Mostly this is new brake hoses and caliper rebuild kits. I will not take a car out without going through the braking system with a fine tooth comb. I might even replace the MC. First I will just pull it apart and check for pitting/wear on the bore/piston. Yes, this is within the rules. I will also replace the stock belts with a harness.
Posted by: jpnovak Sep 8 2011, 10:10 PM
FYI, I just moved a work trip and am now clear for the tow from TX to FL for the event. I have less than 4 weeks to complete the car. There will not be much time for updates but I will try to mark off the list.
I will follow up with a complete build post once this is all over.
Tonight I finalized my hydraulic clutch setup. I just have to make final connections to the pedal cluster and connect a supply line off the brake reservoir. Rock and Roll!
Brakes are completely rebuilt with new rubber lines.
I have to connect a throttle cable and put rubber on the car and I should be able to drive it within the next week. I am getting really close now.
After the car is running I need to sort the suspension (align and corner balance) then install a seat and my "special" interior. Really, there is nothing special about it. Just some lightweight carpet to hide bare panels.
Posted by: SirAndy Sep 9 2011, 12:47 AM
Posted by: rick 918-S Sep 9 2011, 05:04 AM

Posted by: jpnovak Sep 12 2011, 08:28 AM
22 days left! That's it to complete a long list of stuff.
Weekend progress.
1. Hydraulic clutch is completely plumbed. fluid flows with no leaks
2. Hydraulic clutch is connected to pedal cluster - pedal actuates MC
3. Hydraulic clutch does not work - needs to bleed!
4. Brakes are full of fluid - No leaks after the rebuild. (well there was two lines I forgot to tighten on the passenger side front.
5. rocker panels are painted.
6. Front bumper screen is epoxied into place to protect the radiator. John, thanks for the aluminum screen from the satellite. It works perfectly.
7. Front bumper is blocked and painted. Unfortunately I will need to repaint. I did not know it was so hot yesterday afternoon. The paint was drying as I was brushing. Usually Rustoleum flows really well to level itself. However, it does not flow when its 104. I did not realize it was so hot until late last night.
Next up
1. Must get tires mounted
2. get throttle cable connected -
3. Waiting for final plugs for radiator. Still "in transit"
4. Connect, fill and leak check cooling system.
5. Determine seat/harness arrangement -
6. Install Harness
7. Weld final struts on motor mount to prevent fore/aft swing and rock of engine under power
8. weld cable mounts for shifter on tranny mount
9. Paint tranny and engine mounts
10. remake shifter to cable stop mount (I don't like the current one - holes are too big; too much slop)
11. Make connection to alternator
12. Find alternator belt that fits.
13. Carpet interior
Posted by: jpnovak Sep 20 2011, 07:31 AM
Crossing things off the list...
14 days and counting.
1. Must get tires mounted2. get throttle cable connected -3. Waiting for final plugs for radiator. Still "in transit"4. Connect, fill and leak check cooling system.
5. Determine seat/harness arrangement -
6. Install Harness
7. Weld final struts on motor mount to prevent fore/aft swing and rock of engine under power8. weld cable mounts for shifter on tranny mount
9. Paint tranny and engine mounts10. remake shifter to cable stop mount (I don't like the current one - holes are too big; too much slop)11. Make connection to alternator12. Find alternator belt that fits.13. Carpet interior
the clutch is still not working. I am having problems getting it to bleed properly. Tonight I will pull out the vacuum bleeder and get to work.
My cable shifter is awesome! It shifts with a simple, authoritative snick that my friend compared to a motorcycle. The positioning of the shifter is in perfect relationship to the steering wheel. I can't wait to get seats in place and test drive. Maybe tomorrow night.
Posted by: jpnovak Sep 21 2011, 04:00 PM
The competition has just been announced. Compare and Contrast!
Lots of interesting cars. It will be fun to check out what is unique about each one. From previous event coverage the small hondas and such have big turbos and turn quick 1/4 mile times. Same can be said for the big V8 cars.
I might have the only mid-engine turbo car there. Of course, people relocate drive trains and there are many creative builds. I can't wait to see what happens.
Condor Speed Shop Carlos Mendez 1975 BMW 2002
Gary Wyatt 1987 Chevrolet Corvette
Hendricks Motorsports James Hendricks 1983 Jaguar XJS
Mickler Motorsports Philip Mickler 1980 Ford Fiesta
Nelson Family 1
SDAC Patrick Culkin 1988 Dodge Arries
Roadcat Racing Doug Qualls 1985 Mazda RX-7
Shane Samuels Go Fast or Die Trying 1975 Datsun 280z
Nanoman's Garage James Novak 1975 Porsche 914
Evil Ducky David Melton 3000 Mach 1.5
O-Town 350s Joseph Thompson 1974 Datsun 280Z
OMGWTFBBQ Edwin Rodriguez 1991 Eagle Talon
Git R Dun Mattew Wojtkowiak 1994 Pontiac Firebird
El Diablo Speedshop Marc Griswold 1986 BMW 325e
Milton Robert Branch 1988 Toyota Supra
Erroneous 1 Sammy Shams 1985 Nissan 300zx
Backyard Bessie Kevin Sweeney 1998 Saturn SC2
3 Guys from Canada Jonathan McCreery 1997 Honda Civic CX
Hello Kitty Spinout Lasota 1975 Triumph TR7
Black and sTan Adam Baskin 1992 Mazda Miata
Roadstein Racing Jason Stanford 1994 Mazda Miata
Busted Knuckle Racing Brian McGarvey 1988 VW Scirocco
Sparkly Unicorn Farts Scott Evans 1991 Honda Civic Nelson Family 2
BURP Trip Ferrer 1992 Honda Civic
Hong Norrth Les Burchett 1986 Honda CRX
Hong Norrth Les Burchett 1985 Dodge Omni GLHT
Project: Parts Bin Bryce Nash 1972 Honda N600
Whim Racing Greg Voth 1977 Triumph Spitfire
Uranus Mike Guido 1986 Mitsubishi Uranus
wreck racing Team Gimp John Hooper 1987 Dodge Charger
Erroneous 2 Thomas Jaeger 1989 BMW 325is
CH Racing Tim Spellman 1987 Pontiac Firebird
The Killer Team
Time Racing Chris Simmons 1984 Chevrolet Corvette
Andrew Neuman 1990 Honda Civic Si
Dorsey Brothers Stan Dorsey
Westside Brian Dimont 1992 Eagle Talon
Karl Lafollette
Karl Lafollette
FOAB Ben Berusch 2001 Mazda Miata
Posted by: rick 918-S Sep 21 2011, 05:30 PM
Cool! Be sure to post pics of your competition! 
Posted by: jpnovak Sep 25 2011, 06:21 PM
9 days and Counting...
It appears that this project kept going despite my life's best attempt at keeping me from completing it. 9 days from now I will load up and two to FL for the GRM $2011 Challenge.
The car drove on its own for the first time in 10+ years. Runs a little rough but all systems are working. I just have to start sorting the car in the next week, get it cleaned up and ready for action.
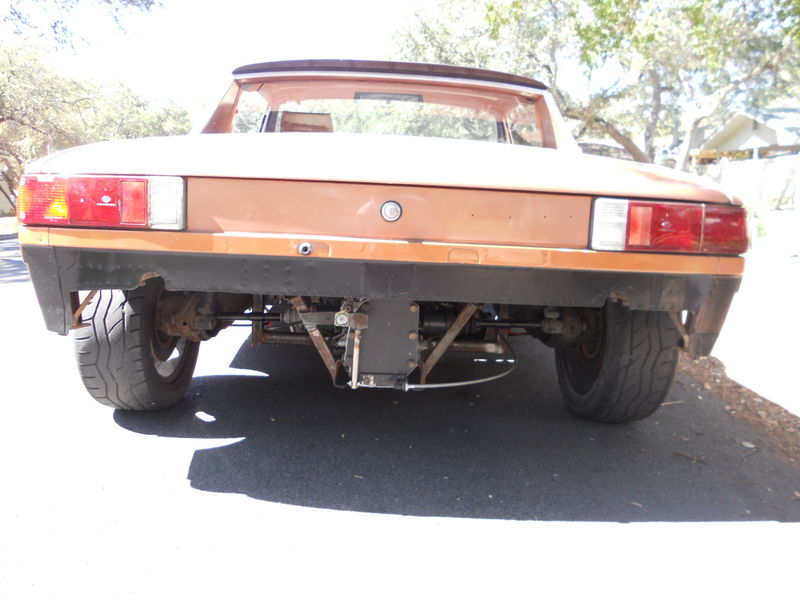
A few pictures of the car back on four wheels. 
Here is a short list of the project.
1975 914
1998 Subaru EJ20G 2.0T engine
Subaru 5sp manual transmission
hydraulic clutch conversion
stripped to the minimum
GT style front bumper
Let's just say that its light enough and has enough torque that it can start in 4th gear. yeah, I just found that out since my shifter is backwards in the LR plane. I have to reverse cable connection.
this week I will cut and buff the paint, layout the graphics, install the rockers.
I need to install a cooling system overflow tank. Right now I have no way to control the heat expansion.
Also, I have to roll the rear fenders. The 205/50 tires rub.
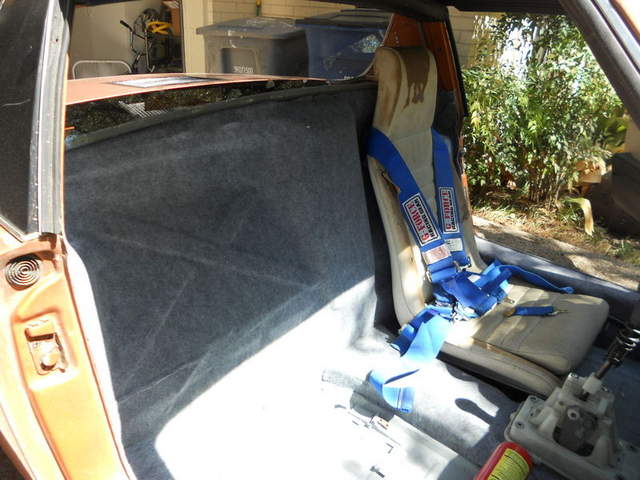
Also, I need to install a harness and seat. The seat is just sitting on the floor for now. It made my test drive quite fun.
I will post updates at the event. I will update with a full build after the event.
Posted by: rick 918-S Sep 25 2011, 06:43 PM
I'm excited for you. Good luck! Be sure to nut and bolt that thing before you try to shake it down for the first time. I would hate to see you get a DNF for a silly missed bolt or a hose or a wire rubbing through some place.
Posted by: jpnovak Sep 25 2011, 06:58 PM
Agreed. A nut and bolt effort is on the list. Everything from motor mounts to CV axles to simple things like light and seat mounting bolts.
I wish I had more time to sort the car.
Either way, I will have a blast and have loved building this car.
once I finish the event I have to determine if I keep it for a DE car or move on to something else. I can say that my wife would like to see one of the cars go...
Posted by: rick 918-S Sep 25 2011, 07:45 PM
If I was in Texas 
 I would be over to help you. I'll be watching and cheering you on!
Posted by: jpnovak Sep 26 2011, 07:35 AM
Ahh Texas where at the end of September it was 105 yesterday.
Hard to keep motivation up when working in the garage sweating all over the car.
Posted by: jpnovak Sep 27 2011, 07:32 AM
Despite another heat wave and hectic work schedule I managed to get the paint buffed. 15 minutes a panel spread over many hours can really accomplish a lot.
I am really starting to love the copper metallic color.
Also, I fixed the shifter by reversing the travel. Works much better now. I can even select all 6 gears. Yes that includes reverse.
Bad news, my home made rear differential cover plate leaks at the bottom. I guess I need to pull it and reseal.
Posted by: Brett W Sep 27 2011, 07:33 PM
What did you do about the axles? Did you have the splines re-cut to allow the use of the Suby inner joint? Looks like you could have a potential winner on your hands. If you keep the car for next year you can sort it out and make it better.
Posted by: jpnovak Sep 27 2011, 08:18 PM
The Subaru and 914 axles are the same diameter (+/- 0.5mm). I cut and welded the center of the axles and then welded a sleeve over the weld joint. The result is a hybrid subaru inner / 914 outer.
I suspect these should be strong enough for the event. Custom axles or the custom flanges might be a better option. However traction on the tires will be my weak point during the event.
jigged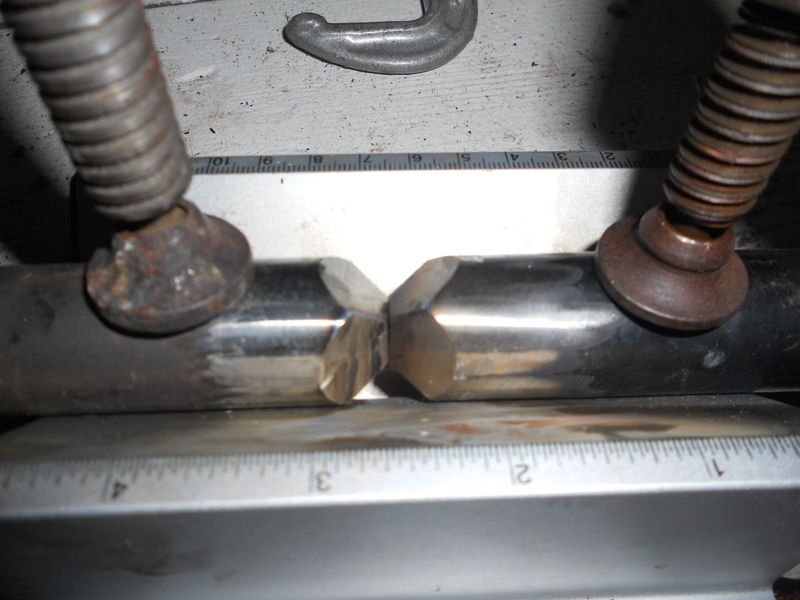
welded and finished 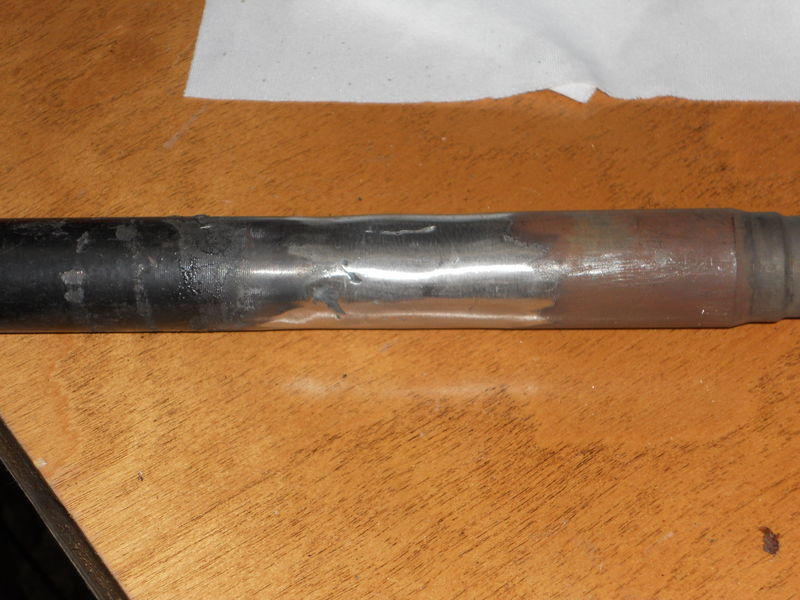
sleeved and welded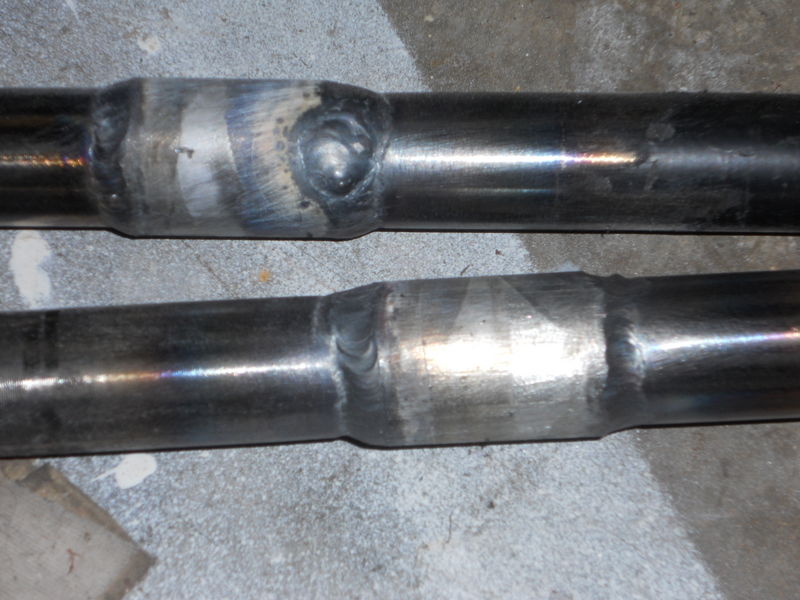
Posted by: Brett W Sep 28 2011, 06:41 AM
You might paint a white line the length of your axle shafts to make sure they don't twist. It would give you a pretty quick safety inspection through the weekend. Good luck.
Posted by: jpnovak Sep 28 2011, 07:00 AM
Great suggestion.
I was going to have them heat treated but could not find a vendor locally that could turn them around fast enough. I would love to have them rehardened.
if they survive the weekend I will harden them after the event.
Posted by: Eric_Shea Sep 28 2011, 08:23 AM
of the buffed out, decaled car!
Posted by: jpnovak Sep 28 2011, 11:30 AM
I have been working late for the day job and then later for the car job. I will see if I can get pictures before dark tonight.
I have still not completed the graphics layout. I put the stripes on in tape last night but did not like the way they looked. Not sure what to do next.
Posted by: jpnovak Sep 29 2011, 11:00 AM
Manged to get the tail lights installed and working last night. Also finished wiring up the tach. Did not have a chance to test it since there is still no muffler installed.
I am getting ready for a tune session on Saturday morning.
I think I have almost decided to forgo the graphics. I am sold on the simplicity of it all.
Posted by: jpnovak Sep 29 2011, 09:54 PM
All buffed up and somewhere to go... 
Yes, that is my garage door in the reflection. Its up and you are basically looking at the ceiling.
I would say that I brought the paint back into the land of the living. The black rectangle is the vent opening for the intercooler. Now some might say that it is placed in a position to take advantage of air flow separation coming off the rear roofline. Some might be correct.
Posted by: jpnovak Sep 29 2011, 09:56 PM
Tonight felt like there was nothing accomplished. However I did manage to paint the front trunk and rear decklid ducts and install the rockers.
I worked on the tach but I still do not get the signal output I need.
Posted by: jpnovak Oct 1 2011, 01:59 PM
Penny is out and about. Trying to sort the car around the neighborhood without irritating the neighbors too much. The zork off the turbo is a bit loud. Love that whhrrrsssshhh sound as the turbo spools.
I am in love with the shifter placement. right of the steering wheel where you would want it.
I managed to get a harness installed. Wish I had a better seat but there is no room left in the budget to replace that. 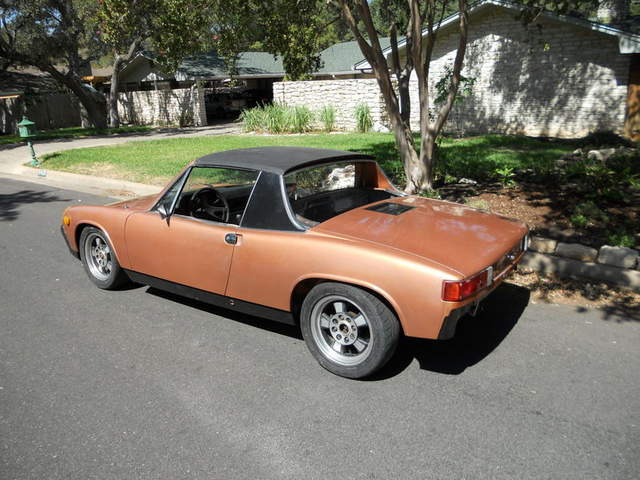

Posted by: bfrymire Oct 1 2011, 05:08 PM
Hum. Is it me, or does it seem to be riding a little high in the back?
-- brett
Posted by: rick 918-S Oct 1 2011, 05:23 PM
Looks good. Neaten up that wiring. No DNF's for wire fires or connections coming unplugged.
Posted by: jpnovak Oct 1 2011, 06:26 PM
I am getting ready to put the car on scales and setup the suspension. As far as I can tell, the rear is not adjustable unless I cut the spring or reweld the position of the spring perch. Please enlighten me if there is another way.
There is not enough room in the build budget to setup suspension properly. That will be the next step after the challenge is over.
Rick, the ECU has been in/out quite a bit as I try to build a circuit to make the tach work with the output signal. I have been probing pins trying to find the right signal on the oscilloscope. It still doe snot work.
the wiring will be cleaned up before the event. I have to retape a few sections of the harness after closing up the ECU.
I am also fighting isssues with the cam signal dropping out. This causes the ECU to loose its place and it drops out all signals. Can you say misfire? Its bad at 4K rpm and I have to get this fixed.
Posted by: shuie Oct 1 2011, 09:15 PM
Cool man. Thanks for sharing! Good to see you here
Posted by: jpnovak Oct 1 2011, 09:34 PM
Hey Sherman,
How are things in LA? I will passing through on Thursday morning towing to Gainesville. I will honk as I pass through Baton Rouge.
Posted by: jpnovak Oct 1 2011, 09:36 PM
I just pulled my car off the scales. Oh so close to 1900.
I was too tired to start the corner balance process. I will post full numbers some time tomorrow.
This car is going to scoot as long as I can tame the trigger signals to the ECU.
Posted by: bfrymire Oct 1 2011, 11:05 PM
I just pulled my car off the scales. Oh so close to 1900.
I was too tired to start the corner balance process. I will post full numbers some time tomorrow.
This car is going to scoot as long as I can tame the trigger signals to the ECU.
Somebody more experienced than me can comment:
1. I normally use either adjustable perches, or different springs to adjust ride height.
2. Without having adjustable rears, how are you going to be able to corner balance?
3. Your rear height will limit how low you can adjust the front, as you can't adjust the rear to match.
As far as item 1. How much budget to you have left? You could find a use set of springs for little money. I have seen shock/spring sets as low as $50. but, I don't think you have time for this. Sounds like the top item is to get it running well, and reliably.
Best of luck.
-- brett
Posted by: jpnovak Oct 2 2011, 05:48 PM
Brett, You are correct. However, there is some adjustability to help balance the car. Will it be perfect? No.
So...
1920#
50.1%/49.9% with me in the front seat. I don't think I will get closer than that.
Now, the right front is 1/2" higher than the LF since I can not adjust the rear to compensate ride height. At least I will have close to even front weights to help with braking.
I spent the afternoon trying to purge the cooling system. It was blowing lots of steam since there was an air bubble somewhere. Lots of cycles to let the engine run and then let it cool and suck water back in through the purge reservoir tank.
The ECU is still having issues. It cuts out right at 4K rpm just like hitting the rev limiter. It does, however. GO LIKE HELL. I can see why Britain needed more rubber. I can only imagine the car when it pulls to redline.
A friend of mine shot this video this afternoon. I can not get it to embed properly.
http://youtu.be/VkYU5aXgh5s
Posted by: rick 918-S Oct 2 2011, 06:10 PM
Damn! that ECU thing sux! When you get that sorted your going to have to watch the axles. Good luck man!
Posted by: jpnovak Oct 2 2011, 06:43 PM
I think I have found the solution to the ECU problem.
I guess I forgot to mention this car runs on Megasquirt. the stock ECU was dead. I assume its flash had been erased after living un-powered for several years.
The solution should be just 4 resistors away. I will solder them in tomorrow and check again.
I also found out that my homemade tire conditioner seems to be working well.
Posted by: jpnovak Oct 3 2011, 12:09 PM
ECU problems fixed for now. I came home at lunch for a quick test. revs freely to redline. I will wait and see what happens under load.
Tonight. I tune!
Posted by: bfrymire Oct 3 2011, 01:21 PM
ECU problems fixed for now. I came home at lunch for a quick test. revs freely to redline. I will wait and see what happens under load.
Tonight. I tune!
Uhm.. Feeling like sharing? Impendance mismatch? what fixed it. and what needed fixing.
(I have two more MS projects coming up, and one running now. Need all the info I can gather!)
-- brett
Posted by: Cupomeat Oct 3 2011, 01:40 PM
Penny is out and about. Trying to sort the car around the neighborhood without irritating the neighbors too much. The zork off the turbo is a bit loud. Love that whhrrrsssshhh sound as the turbo spools.
I am in love with the shifter placement. right of the steering wheel where you would want it.
I managed to get a harness installed. Wish I had a better seat but there is no room left in the budget to replace that.
Just a word of caution, most groups will not allow the use of the harness with a seat like the high back Porsche seats. There was some situations where the shoulder straps separated over the shoulders during accidents, exacerbated by the shape of the seat (and nothing holding the two straps together).
I don't know about this particular challenge, but usually safety equipment is not within the budgetary rules, and I'd look for a cheap kirkey replacement seat for your own safety.
This is a great thread, make my mind reel with interesting possibilities!

Posted by: jpnovak Oct 3 2011, 04:08 PM
Brett, the key is a 12K resistor in series with the + terminal of the VR sensor and a 2.2K resistor in parallel between the + and - terminals of the VR sensor. This is needed on the cam and crank sensors. Effectively, this creates a small voltage divider that removes the noise spikes from the trigger signals. I have a nice clean signal according to the TunerStudio tooth logger. Previously I was getting a noise spike every 50th tooth count or so. The noise spike would cause a tooth count to drop out and the system would not fire. It was like my own built in random rev-limiter.
Eric, I agree. I would not normally install the harness like this. The harness is free from cost. The seat is not. The autocross and drag race rules consider this arrangement legal. I have clarification from the Challenge organizers.
I would not run a DE car like this. Its really not comfortable. Future plans for the car call for new seats.
Now I just need to get the tach to work...
Posted by: Dave_Darling Oct 3 2011, 04:53 PM
For (very) slightly more support, remove the lower seat cushion. Or, for a little more work and a little better appearance, remove the cover from the lower cushion and cut the foam down, then re-install the cover.
It doesn't do anything for your upper body, but it can help keep your hips from sliding around too much. Especially if you've got a big butt...
--DD
Posted by: jpnovak Oct 4 2011, 07:45 AM
Great suggestion. I had already started to take the seat bottom apart so that I could shave the foam down. I tried to remove it but it was just not going to be comfortable enough.
I have alternative plans for seats that will be comfortable, supportive, use a 5 pt and not so bad to look at.
Posted by: jpnovak Oct 5 2011, 07:54 AM
last night I was trying to get the car ready for the trip. It fought me all the way.
The car is running but needs to be tuned. At least it will take throttle now. And then it started... The outside nut fell off the transmission cable. I no longer had access to 1-2 shift plane. Of course, its a 12-24 nut that I did not have a spare. I was half way around the block with this happened. I limped home in third gear and put the car away.
After work I stopped and picked up parts and made repairs. I think taped up the wiring harness and closed up the ECU. then the car would not start. It was not firing. I took off the ECU cover and connected the laptop. Everything was working fine from an electronics point of view. After trouble shooting for an hour or so I took a break and ate dinner. Came back out and found the car was out of gas. A trip to the store brought home 2 gallons and the car fired up. Now the car would not idle at all. I adjusted the idle and then all of a sudden the idle jumped to 2200 rpm. HMM Does not idle when cold. Idles high when hot. I think the Idle control valve is wired backwards. No time to fix let's put it on the trailer. Its after 10 and I have a loud car idling in the street.
Trailer was already hooked up and ready to go. I lined up the ramps and started up the trailer. halfway up the left ramp gives way and the car veers right. I ran over the right fender (yes the one that is very broken) and almost put the car off the trailer sideways. I manageed to stop it and drive it off backwards. What saved me was that the left rear dropped down and the right front was in the air. The car was crooked but still on the trailer. it was like one of those movie scenes where the car is teetering on the edge of a cliff. All I could think of was the car high-sided on the trailer with a big hole in the floor and me having no way to get it off.
Once the car was off I found the problem. A weld broke on the hing point of the ramp. The cross bar broke free on one side. I propped it up with a stack of 2x10s and easily drove the car up onto the trailer. At that point I hooked up a front and rear strap and backed the trailer into the driveway. It was parked and I was done for the moment.
I then spent an hour packing up tools and getting as many spares as I could think of.
Then I fired up the TIG and welded the ramp. The cross bar on the hinge had a cold weld. One side popped off completely and the other side was about 70% cracked. Let's just say I fixed it.
So... The car is sitting on the trailer, strapped down ready to go. the ramps slid easily between the wheelbase under the car. I just bought some more straps this morning to lash down the trailer ramps and have a spare set in case there is a problem on the road. These will just go into the tow bag.
All that is left is to load up the car and check the tire pressure on the trailer. We are planning to leave about 1pm this afternoon. I am hoping I can get through Houston by 3 in hopes that the traffic will be less. If we are late leaving I will leave about 330 from Austin.
And so... The trip begins.
Posted by: mojorisen914 Oct 5 2011, 11:41 AM
May the force be with you.
Posted by: jpnovak Oct 5 2011, 09:25 PM
Managed to get almost 8 hours on the road before it was time to stop for the night. My 5YO son was getting quite silly in the backseat. He is a great traveler but after a full day at school he reached the limit.
Tow is going very well. I am about 100 miles past where I had planned to be.
Posted by: jpnovak Oct 6 2011, 07:46 PM
Made it Gainesville. Almost 1100 mile tow. A few highlights of the trip. There is really nothing to show or describe except interstate and monotony.
The Sun will rise
The Sun will set
Am I out of TX yet?
Thankfully, we cleared the state line right at Sunset. I kept driving and eventually needed gas. Gas stop somewhere late in Louisiana. 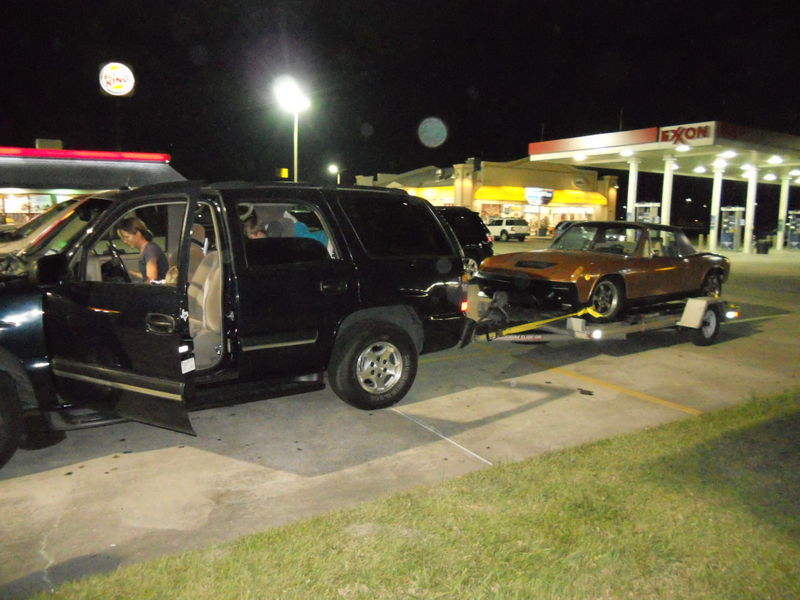
One of the interesting things about the Gulf Coast. There is a tunnel under the main channel of the Port of Mobile. Pretty cool to think that ships are probably going right overhead. 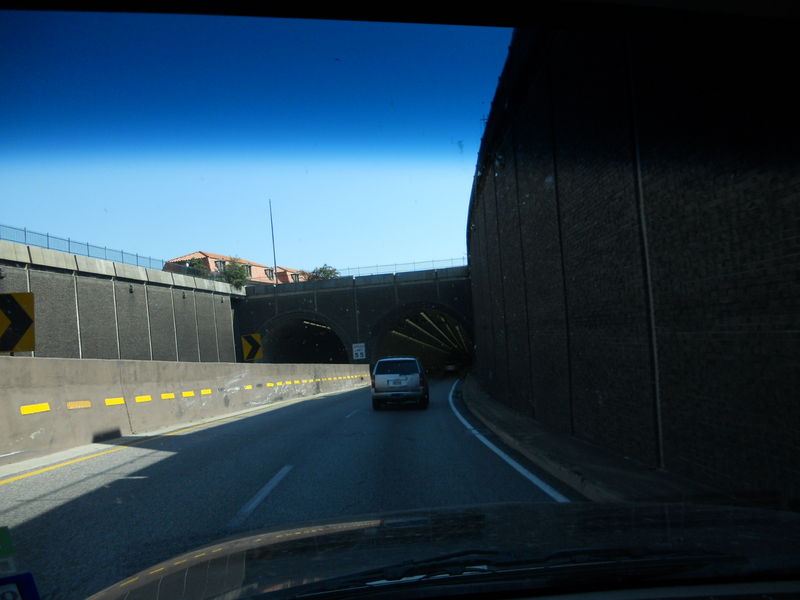
Mobile has a growing shipbuilding industry. Anchoring the effort is the near-shore Stealth Military boat built by Austel. Its cool and there was one parked at the dock the last time I was here.
Eventually I made it to Registration. I handed in my build packet and then started the process of setting up the car. 
In the parking lot the car generated a lot of interest. There is a lot of creative builds here. I will put up more documentation of the cars tomorrow. I think I already found my favorite. Lots of great people as well. 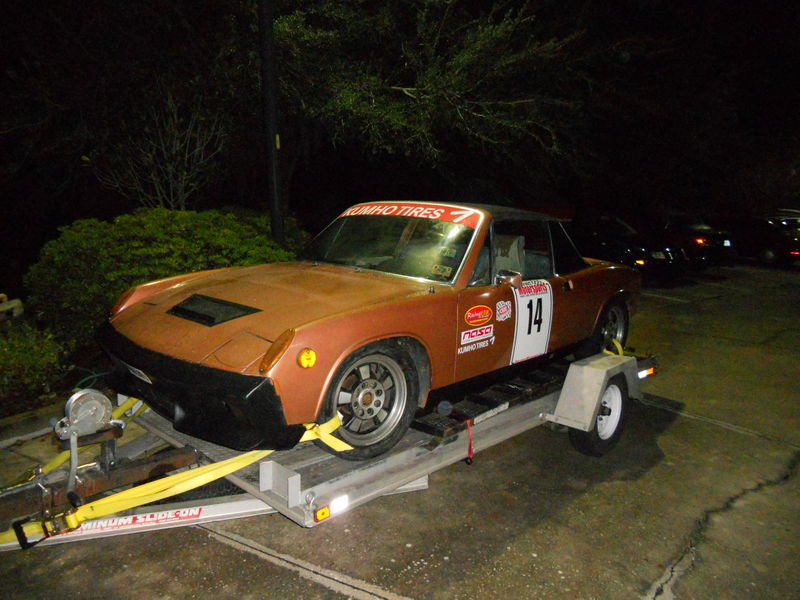
The car is ready for its track debut. I was given #14 - Fitting for the car.
Tomorrow is tech inspection and the AX. Should be fun.
Posted by: rick 918-S Oct 6 2011, 09:25 PM
Do us proud man! Lots of photos! Is that your wife with you? Hand her the camera.
Posted by: jpnovak Oct 7 2011, 03:34 PM
Disappointment. What can I say but... Disappointment.
The morning started off great. Car started right up. I was able to solve my idle problems by reversing two wires and generally the car was running well.
I went through the Concours section early and there was the rest of the day to put down a good AX time. However, before I took a run I had to plug the laptop into the car and actually drive it some. I had an unknown EFI map and the last thing I wanted to do was blow the motor by running lean on boost. Bad things happen when lean on boost..
So I plugged in the computer and went for a drive down the backroad that leads to the entrance to the raceway. I was just driving back and forth easily working my way up through the revs making sure everything was going well. Once I was satisfied that the AFRs were safe I turned on the camera and fillmed a few passes.
https://www.youtube.com/watch?v=7o2Q7XKKoCg
The car was running great. Pulling hard and its definitely quick. I was starting to think of how fast an AX run I could get and then the shifter cable broke. I can fix that. However, upon rev down, the motor knocked right before It reached idle. It was not a good knocking sound but it was quick and then gone.
I shut the car off since i had to manually put the car in gear. It fired right away and I started driving back into the paddock area. As I was coming through the last set of gates the car knocked again and then shut off. the starter would not turn the motor. I decided to let it cool down before doing anything else. Besides, I had to fix the shifter before making a run.
I located a team with a welder and a generator and quickly had the car shifting. the motor would still not turn over. Not good.
Once it was cool enough I pulled the plugs. No sign of water. This means its not a blown headgasket. The oil looks clean but I have not pulled the filter. The motor is still locked.
It is so locked that I broke a 22mm socket trying to free it.
Done.
Kaput.
Finsihed.
Not to DNF was the only goal I set for the event. I did not even meet that one. And so... tonight I will have a good time and tomorrow I will start the long drive home.
Many thanks to all the teams that offer help. many thanks to Brad(?) from DIY Autotune that lent me his sun canopy so I could lay under the car and try to revive her. Many thanks to the GRM staffers who put on a great event.
I will be back. And I have a full year to sort Penny. She will return and she will pissed next year. Watch out! I really learned how things work at the Challenge.
Posted by: Eric_Shea Oct 7 2011, 04:28 PM
Fixed your link. Sorry 
Posted by: Cairo94507 Oct 7 2011, 04:59 PM
Sorry to hear that.
Posted by: dlee6204 Oct 7 2011, 05:42 PM
Wow this sucks... Sorry.
Posted by: rick 918-S Oct 7 2011, 06:11 PM
Wow That blows! Can you fix the engine and run it again next year? Will you have too much money in it then? How does that work? Maybe you can score a used engine cheap. Too bad, the video was nice. You were really gettting it dialed in.
Posted by: trojanhorsepower Oct 7 2011, 06:25 PM
Bummer.
You will show'em next year.
Posted by: bfrymire Oct 7 2011, 06:34 PM
Wow. sorry to hear...
Did you pull the pan? Seems like you should be able to see something amiss. Did something go wrong with tranny?
Hope a miracle happens!
-- brett
Posted by: strawman Oct 7 2011, 06:42 PM
Arrrgh, that sux!
I have an EJ20 shortblock that you can have for shipping from 95618. I paid $50 for the disassembled longblock so that I could grab the heads and various other stuff, so you can use that for your cost calcs if you need to. It turns over easily by hand, but I don't know the condition of the bottom end...
Posted by: jpnovak Oct 9 2011, 07:46 PM
Thanks for the condolences. I had 1100 miles to reflect on the event. I will certainly be back next year. Right now I am looking to source a new crank and rods for a rebuild. Over the next week or so I will pull the oil pan and cut open the filter to see what the problem is. The long trip home has freed the engine enough to turn with the starter but there is a horrible clunking sound associated with it. Either way, its terminal but at least I will be able to split the case.
At least the rebuild parts are CHEAP!
Posted by: kg6dxn Oct 9 2011, 08:08 PM
You should call Strawman!
Posted by: RonW Oct 11 2011, 11:49 PM
jamie,
just followed your link to this thread after our emails. dude i was so cheering for you then to find out of the motor issues. spun bearing and from cracked oil pump pickup? those stupid picks ups I've read are notorious. gonna swap mine for piece of mind before i button everything up. can't wait to see it after the rebuild!
ron
Posted by: jpnovak Oct 13 2011, 12:07 PM
Update...
I started investigating the engine failure last night. Oil drained clean but the filter was full of copper shavings. Definitely a spun bearing.
I pulled the oil pan and it was mostly clean. A few shavings in the bottom but nothing excessive. It must have all pumped through the filter.
The oil pickup has a slight crack in the upper mounting flange. This is at the brazed intersection. it does not look large enough to have caused a complete oil pressure drop. The crack is certainly not as large as some of the other reported failures on the EJ25 series motors.
Either way, I will probably put an aftermarket pick-up tube in place for peace of mind.
I have several feelers out for replacement parts. I hope to have this motor built back up by the end of the year. Spring track season starts early in TX.
Posted by: SLITS Oct 13 2011, 05:21 PM
Make a list of the parts you will need and post it here. Maybe we can help.
Posted by: strawman Oct 15 2011, 07:58 PM
Jamie, I finally got time to strip the Subaru EJ20 turbo shortblock and weigh it. I removed the oil pan & pick-up, oil pump, AC & alternator mounts, pulleys, sensors, tensioner & mount, and oil windage tray. As you can see, it weighs 95 pounds according to my old bathroom scale. If we add ~4 pounds for packing materials, it looks like it will cost ~$102 via Greyhound Sacramento to Austin. However, their maximum weight is 100 pounds, so there might be good reason for you to check other shipping methods.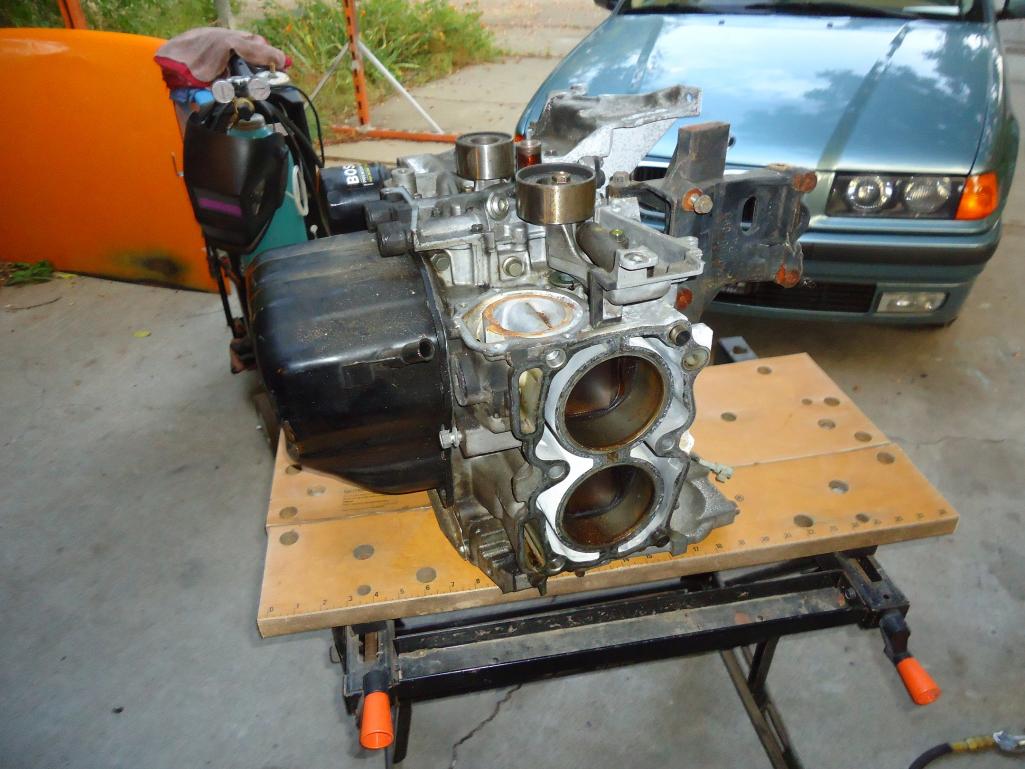
I have never run this engine, so I don't know if there are any problems in the bottom end. But I cannot feel any movement in the rod bearings. The oil pan is clean without any metals debris, too, so there are no obvious problems. The cylinder walls look good, with no gouges at all.
Like I said, it is yours for the cost of shipping. Let me know if you're still interested.
Posted by: jpnovak Jul 11 2012, 08:25 AM
I am opening this thread up again.
I have a new motor ready to go. Just need to install. I am still targeting the $2012 challenge on Sept 27-29.
Posted by: smj Jul 11 2012, 06:57 PM
Woo hoo! Heartbreaking to read about what happened last year, but as the great philosopher Bullwinkle said, "This time for sure!"
Posted by: jpnovak Jan 8 2013, 10:45 PM
So the usual parts of life have gotten in the way. It is hard to believe a year has gone by and Penny has been sitting in a field at my friends property outside town. I decided I had enough. Last night I hooked up the trailer and retrieved Penny. She is now comfortably back in the garage.
Since the new engine is still sitting on a dolly in the back of the garage I am starting the swap. Hopefully Penny will be back on the road in the next two weeks.
The good news is that the replacement engine was significantly cheaper than the previous one. I guess this means I have budget to actually do something with tires and suspension. Plus, I have all Spring to track the car and get her sorted.
Tonight I got the rear trunk lid off the car and found myself disconnecting all the wires and fuel lines. While I was at it, I disconnected the shift linkage, axles and pulled the muffler. All that is left to drop the motor are the two radiator hoses and the mounting bolts. Hopefully, this will go smoothly.
Once the dead engine is out of the car I will swap the engine wiring harness. Then its just a matter of bolting it back in and plugging it up. The battery is still at 12.9V after a year in storage. Love those Odyssey batteries.
Posted by: rnellums Jan 9 2013, 12:45 PM
Did you ever find what failed?
Posted by: FourBlades Jan 9 2013, 08:47 PM
Good luck with the car! 
Grassroots magazine really got me interested in car restoration.
I love their budget approach to motor sports.
John
Posted by: jersey914 Jan 9 2013, 09:34 PM
Yeah, what ever happened to cause the engine failure?

Posted by: jpnovak Jan 10 2013, 04:35 PM
The engine failure was two fold.
1. The oil pan had been pushed in just slightly in shipping. This closed the gap to the oil pickup. It was not until I started doing high rpm pulls that this became a problem.
2. The oil pickup tube had a slight crack at the braze line. Apparently, this is a common problem.
After lots of reading you find that the rod bearings are crappy from the factory and any slight changes in oil pressure (even the wrong oil, including Mobil 1 synthetic) can cause a rod bearing to spin. It appears I may have spun several but I have not torn down the engine to find out. I will, in time.
The old motor is now out of the car and sitting on the floor. I will swap the engine wiring harness over the weekend and then bolt the new one in place.
Once the engine is wired and running I will be installing one of these reinforced oil pickups. If the budget allows I will also mount a reinforced oil pan.
http://www.killerbmotorsport.com/index_files/UltimateOiPickup.htm
I cut the rear trunk and mounted the engine higher than most for more ground clearance. This helps but the sump is still vulnerable. I want every bit of protection. I am considering to make a skid plate that connects the center tunnel/fire wall to the engine mount. It will help should I ever "need" it. It would only take one OTE or road debris to make me have another really bad day.
Posted by: jpnovak Jan 14 2013, 07:43 AM
This weekend I made a bit of progress. Both intakes are off each engine. The new engine has been pressure washed and is clean enough to install. Next I identified the components from Intake #1 (Dead engine) that need to go on Engine #2 (good engine). There are quite a few differences that will make switching the entire system over.
1. the original ej20g is a single turbo with wasted spark coils.
2. the new engine (ej20tt) is a twin turbo with coil on plug (COP).
The intake manifold for the wasted spark system is very different than the COP. IT has coil mounting bosses. I am running a MS2 and do not have room for two additional ports to run a full sequential COP. Plus I did not want to have to rewire the car. That was a nightmare in its own way. So the easiest solution is to take the turbo feed pipe from engine #2 and mount it on the wasted spark intake from #1 and keep the existing wiring from engine #1. I will have more time later this week to get this system back into the car.
Posted by: jpnovak Jan 19 2013, 05:55 PM
Lots of progress today.
intake is on and sealed.
turbos and air intake are connected.
Most of the cooling lines on top of the motor are connected.
Wiring is all set to plug back in.
Then I was able to move the flywheel, clutch and PP to the new motor.
Tomorrow I should be ready to attach the transmission and bolt it in the car. Then I am just a few water lines, fuel lines and vacuum lines away from starting it up again.
It will feel really good to get this car running again.
Posted by: jpnovak Jan 20 2013, 08:33 PM
Well, the drivetrain is back in the car. clutch alignment sucks on this car. Oh well, a few sockets and a layer of tape and it finally slid together quite smoothly.
I must say, the stock flywheel and clutch package is amazingly heavy. Next time its out I will put something lighter in the car.
What else, I installed a reinforced oil pickup. Even the new engine's oil pan was pushed in a bit. I had to clearance it with a deadblow hammer and wood drift. Let's just hope my oiling issues are a thing of the past.
Next step is to plug in the wires and connect a few fuel lines to see if it will fire up. That will happen in the next few days as soon as I get a jug of oil and a new filter.
I am SO ready to have this car back on the road.
Posted by: jersey914 Jan 20 2013, 08:46 PM
I can't imagine you'd could have the oil issues twice in a row

Posted by: jpnovak Jan 21 2013, 12:59 PM
Let's hope not. My wife will probably want the car to go away if I have to go through this again.
Posted by: DBCooper Jan 22 2013, 07:57 AM
Sorry I'm late with this, but I just saw this thead. Nice work, by the way. You mentioned the KillerBee pan and a reinforced pickup, did you get their windage tray? My son lost two engines in an autocross bug, N/A EJ22 with a shortened pan, and that was the solution. You should be able to make one pretty cheaply, it's mostly flat sheet stock and really only limits how much oil can leave the sump area in hard cornering. I can take photos and dimensions if that would help.
If you wife gets any more annoyed sign her up here and we'll tell her what great work you're doing and what a cool guy you are, get her to cut you some slack. SURE we would! Really!
.
Posted by: jpnovak Jan 22 2013, 10:16 AM
I only used the oil pickup. I did not buy the pan nor the windage tray.
In my opinion the early ej20 has a much better oil pan setup in comparison to the later ones.
For example, the newer oil pans have no baffles. Only the STi has a triangulated corner and top baffle to prevent starvation. IN contrast, the early oil pan (circa mid-90s_ has a two layer baffle system. Let's just say, the new oil pickup tube would not clear. The lower rectangular pickup (very well built) was too large to fit inside the circular opening in the lower baffle. I spent 2 hours modifying the oil pan to make it clear. I had to cut the baffles and bend them out of the way to clear. Looks ugly inside but it does clear. Then I had to thoroughly clean the whole thing before putting it all back in. This also gave me a chance to clean out the bottom sludge. Not too bad but noticeable.
I am glad to hear that this solved the problem on the EJ22. I am not planning to shorten the oil pan.
I will just not run super low suspension setup to increase clearance. I will also be building a skid plate that connects the tunnel/firewall to the engine cradle. I would rather skip across an obsticle than rip out the bottom of the motor. I guess some shear bolts would also be an option on the oil pan.
the motor currently hangs down about even with the coolant lines under the car. At least those are flexible with 1/4" wall thickness. They can survive quite a bit of abrasion before having any leaks.
The new stiffer suspension setup will also help ward off compression based contact with the oil pan.
I admit my wife is very supportive of my car habit. I have been looking for an other 911 project and she said. go for it. It will either be an SC/Carrera based rally/rallyX car or a longhood with a small bore turbo flat six. Only the available market will make that decision.
Posted by: jpnovak Jan 22 2013, 10:37 PM
Ready, Steady, GO!
So, Last night I discovered a dead fuel pump. I picked up a new one this morning on the way to work. My Local CarQuest will usually have what I want on the shelf. In this case, it was a nice, large replacement fuel pump. Worth the money.
Tonight I went out to troubleshoot. I connected the laptop and spun the motor. I thought this was a good time to verify signals since there was no fuel in the system. All sensors seem to be working just fine. HMM no tach signal. Bummer. I get out the O-scope and start testing. (see John, these are so useful) Crank position sensor is sending a nice strong signal. Cool. Cam sensor. Not so good. No signal at all. I check continuity between the plug and the ECU. Yep, All good. Must be a bad sensor. So, I swap the cam sensor between the old motor and the new one. Now I have a good clean signal.
Next, I swapped in the new fuel pump. Nothing like the smell of rancid gas. I drained about a half gallon into a container and it is indeed filled with a watery mess. Ethanol in fuel does cause problems and is probably the reason my fuel pump was dead. At least I replaced all the fuel lines when I cleaned the tank a few years ago. Now the pump Whirrs away and is relatively quiet compared to the previous one. While I was testing the pumps I also looked for fuel leaks. Aside from a few bubbles working their way through the fuel rail mounted regulator all was good.
I went back and turned the key. Tach signal was good and then the engine started to sputter. It was too late to fire it up but I know I will be able to start it easily once everything is connected.
Tomorrow I will start to connect up the vacuum hoses that run between the manifold, ECU, turbos, wastegates and BOVs. Its a mess on the top of the motor right now. There are also some breather tubes to connect and some water lines to plug. None of this is difficult, just time consuming.
I am hoping to take Penny around the block this weekend.
WooHoo!
Posted by: jersey914 Jan 23 2013, 09:31 PM
Can't wait to see Penny's 2012 version of buzz around the block!
Posted by: jpnovak Jan 26 2013, 08:06 AM
Penny is alive. Started her up this morning after a few tanks of fresh gas. A little smoke, EFI is rich but nothing unexpected (MAP sensor disconnected).
I have 2 vacuum lines to finalize and then the cooling loop to connect. Maybe this afternoon I will get her out of the garage on her own power.
YES, a big milestone acheived.
Posted by: Justin Fischer Jan 26 2013, 08:09 PM
Congrats Jamie!!! Your projects are always interesting...
Posted by: jpnovak Jan 27 2013, 07:50 PM
Well, She is not driving around the block yet but she does run.
Next step would be to fix the broken shift cable so that I can actually drive her.
I also found a reasonable deal on an early 911 suspension setup. Looks like a 5 bolt conversion might happen such that I can install some vented brakes up front to stand up to some repeated track laps.
http://www.youtube.com/watch?v=r2CpG1z3X9o&feature=share&list=UUUqB_FPg89KPnz2BIRICGig
https://www.youtube.com/watch?v=r2CpG1z3X9o...89KPnz2BIRICGig
Posted by: FourBlades Jan 27 2013, 10:46 PM
Nice work!
Want to see Penny in the magazine this fall.
John
Posted by: jersey914 Jan 28 2013, 06:53 AM
It's aliveeeeeee!

Posted by: jpnovak Feb 3 2013, 03:48 PM
Despite the progress last week getting the car started I still had some issues. When I started up Penny I noticed something strange. The engine idled about 2500 rpm. This was way too high. At first I thought the idle control valve was not working. When I unplugged it the idle dropped about 200 rpm. Yep, it was working. Logical conclusion... Air leak.
I was gone all week traveling for work. I could not stop thinking about it so I came home at lunch Friday and cranked up the compressor. I used the manifold pressure inlet line and put about 30 psi on it. HMM that tell-tale hissing means there is more than just leaking from the throttle body. I start feeling around. All the vacuum lines were connected properly. It was not the purge valve that part of the crank breather. I finally got my hand down under the manifold and found it - a huge leak.
The head and intake manifold were not mating well. The Suby motor uses a pressed metal gasket and I did slightly bend it when pulling off the intake. It really sucks when the gasket sticks to the manifold on one end and the head on the other. Of course, there is no room to get your hand in there to separate so you just pull. My mistake. At least I had another set from the second motor.
The other night I pulled the intake. Of course, this means removing the intercooler, the DS turbo and a bunch of connections. I admit the single turbo setup is considerably less complicated. I only loosened up enough to lift up the intake and slide out the old gasket. Yep, it was crinkled like a potato chip. I got the new gasket, slathered a very thin layer of CurilT as extra insurance and got it back into place. Next, I tightened up the intake bolts and pressurized to about 40psi. No more leak! It holds pressure nicely so it should be ready for boost.
Shifter: I found a crack in the cable housing support. This keeps the housing of the push-pull cables on the shifter from sliding back and forth. I started to epoxy the crack and then decided it was not worth the chance of breaking again. So I made a new aluminum support. I might have to break down and order some custom cables for replacement. I also changed the cable routing for a smoother arc. big improvement. This should smooth out the shifting and reduce the effort. Actually, its not bad now. It feels like a 911 shifter the first time you shift with new bushings. Tight but direct.
I think I may have figured out the cooling system. I was previously purging all the air out but it would boil over at the first sign of heat. After much deliberation including complete removal of the thermostat I found that had the overflow canister connected to the wrong port on the purge canister. I just switched two hoses and everything seems to be working fine.
The overflow tank has three ports. One is the return line from the heater circuit and water cooling jackets, the second I had connected to the overflow tank and the third was not-connected. When pressure would build in the system it would just blow coolant out into the overflow tank. I just capped this second hose off after checking the factory manual. I found that this connection is an air-=bubble return on the automatic radiator bleed system. I do not need it since I have a remote bleeder at the front of the car. I capped this off and moved my overflow tank connection to the third port. The system pressurizes and seems to be bleeding correctly. Radiator is plenty hot. I now have to hook up the laptop and verify my temperatures.
I think I might be on the downhill slope to keeping Penny cool.
Until next time.
Oh Yeah, I did take Penny for a drive around the block. I scared some neighbors in the process.  . Nothing like a twin turbo open pipe/zork setup. I will start to fabricate some new mufflers this week to quiet it down.
I will get the wideband connected this week sometime and then start tuning it. The previous tune runs a little lean and has poor throttle transition. I am not taking it into boost until I can verify the AFR. Easy to fix.
I also need to get the tach working again. I am having a signal problem.
Posted by: jpnovak Feb 10 2013, 10:07 PM
Finally making progress.
1. High Idle. I previously fixed a high idle. But the idle was still too high. All the adjustment had been dialed out of the throttle body. The plate was as close as I could get it without scraping the sidewall. My last suspect was a sticking idle air control valve (IAC).
Tonight I went out and pulled it off the car. I thought it had the typical dirt problem and just needed to be cleaned. Then I discovered that the vane is connected to the solenoid with a magnetic pin. The vane is adjustable and had come out of adjustment. So, I cleaned it, adjusted on the bench and put some power to it. It opened as it should. Back in the car, turned the key and then unplugged the valve. Worked perfectly. Idle is now adjusted to about 700 rpm.
2. Mixture. The mixture always seemed a little lean. I could not verify previously because the narrow band O2 sensor just was not accurate. I connected an Innovate LC1 and have it working properly. What a big difference. Yes, the car was a bit lean for me. Now I can properly tune the car.
3. Steering wheel. The stock wheel was in great condition. Too bad my knees and the bottom of the wheel are just too intimate. So, I swapped it for an old Momo wheel I had on the shelf. Much better clearance. Next step is to pull the hub and modify it for the back collar and horn ring. 4 holes to drill and tap and I am all set. I am probably going to put a quick release on it as well. Once I put a decent seat in the car it will simplify egress.
4. Door handle. The DS exterior door handle quit working. Today I pulled apart the door to investigate. I found that stupid plastic part that pushed on the release catch to be laying in the bottom of the door. I guess Its time to fix that. I also lubricated the door latch assembly and window frame. They are both happy and moving freely now.
Next step is to put some type of muffler on the car. I am going to run twin can mufflers off each turbo and then bring them together GT3 style behind the transmission. Should look pretty cool when finished.
Posted by: jpnovak Feb 17 2013, 08:10 PM
Yesterday I managed a little time in the garage to do some cutting and welding. Usually this is too loud late at night after work. So I had a large bin of misc. mandrel bends from last year. Dug them out and found a few that fit my needs. The result after an hour or so was twin exhaust off the twin turbo. Later tonight I can pull each side off and finish weld the connections. I eventually plan to connect the rear with a gt3 style pipe around the rear valence. That will wait.
Today I got the exhaust welded up. I also swapped out the old MOMO wheel that was on the shelf. Its very worn and split but fits so much better. I had fun drilling the back of the hub to accept the filler cap and horn ring. I did not realize that the installation was so much different than a 911. Now if I could just get a horn button that fits everything would be great. The one I have is too large OD.
Late this afternoon I took the car out for a little run. I was never more than 2 blocks from the house considering I did not have plates and the numbers on the side kinda call attention to the car. Tuning the car is much different than the 911. I have to rethink the AFRs where the car is happy. It likes to run much leaner than a 911. Must be those modern 4 valve heads with a central spark plug. I have not even started tuning timing yet until I have the AFR in check.
I have to say the blow off valve makes cool noises when it dumps. It even kicks in when the car is not under boost. This means I am quickly pressurizing the IC but not actually the intake. I never went over 14% TPS according to the datalog.
I GOTTA GET PLATES AND TIRES. I so want to have fun and start driving it.
Posted by: RonW Feb 17 2013, 11:07 PM
jamie,
loved reading thru your thread. great work!!!
not sure if this would be any help but this is from my current tune. i dont know how to convert g/rev that the stock ecu uses to kPa that ms uses but perhaps as a reference its useful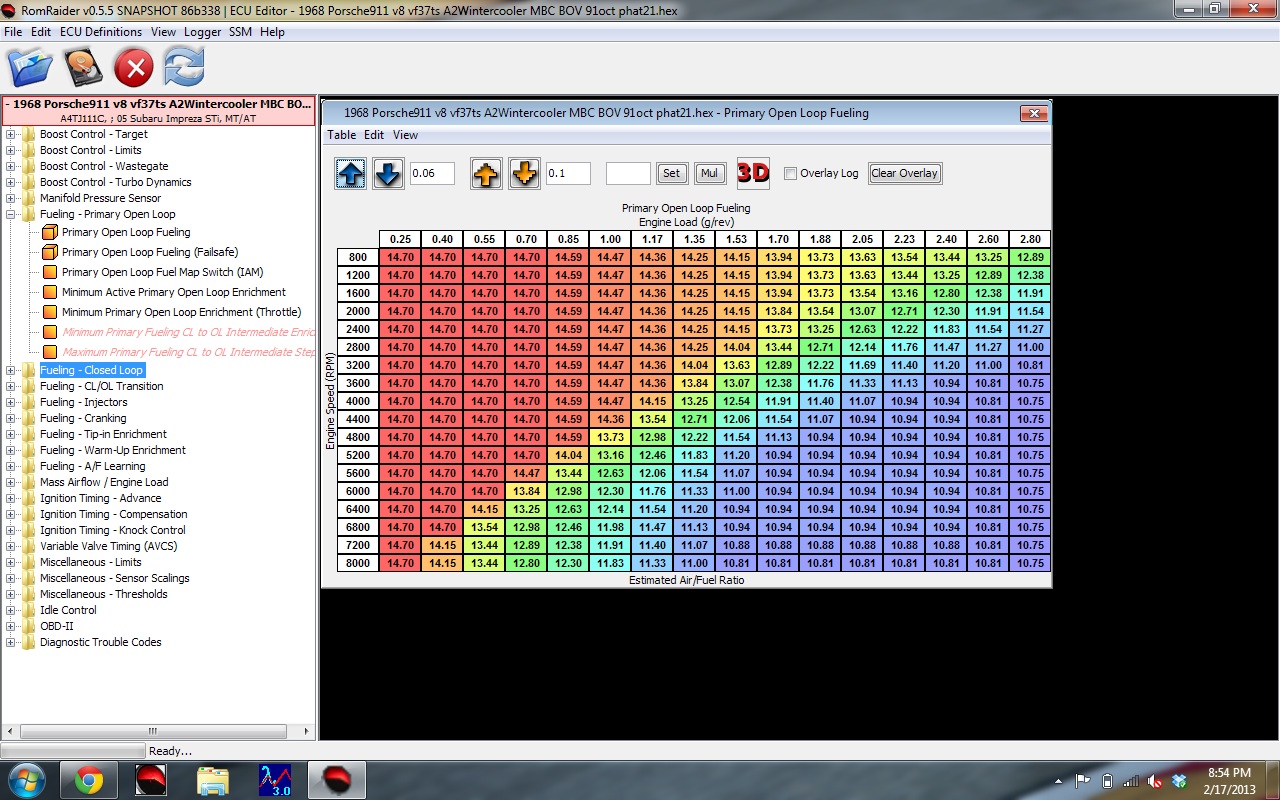
Posted by: jpnovak Feb 18 2013, 09:06 AM
Ron, How much boost are you running at WOT? This will allow me to convert the g/rev. This is a mass airflow conversion based on density and stroke volume for load.
Posted by: RonW Feb 18 2013, 11:04 AM
WOT 18#
Displacement 2.0L
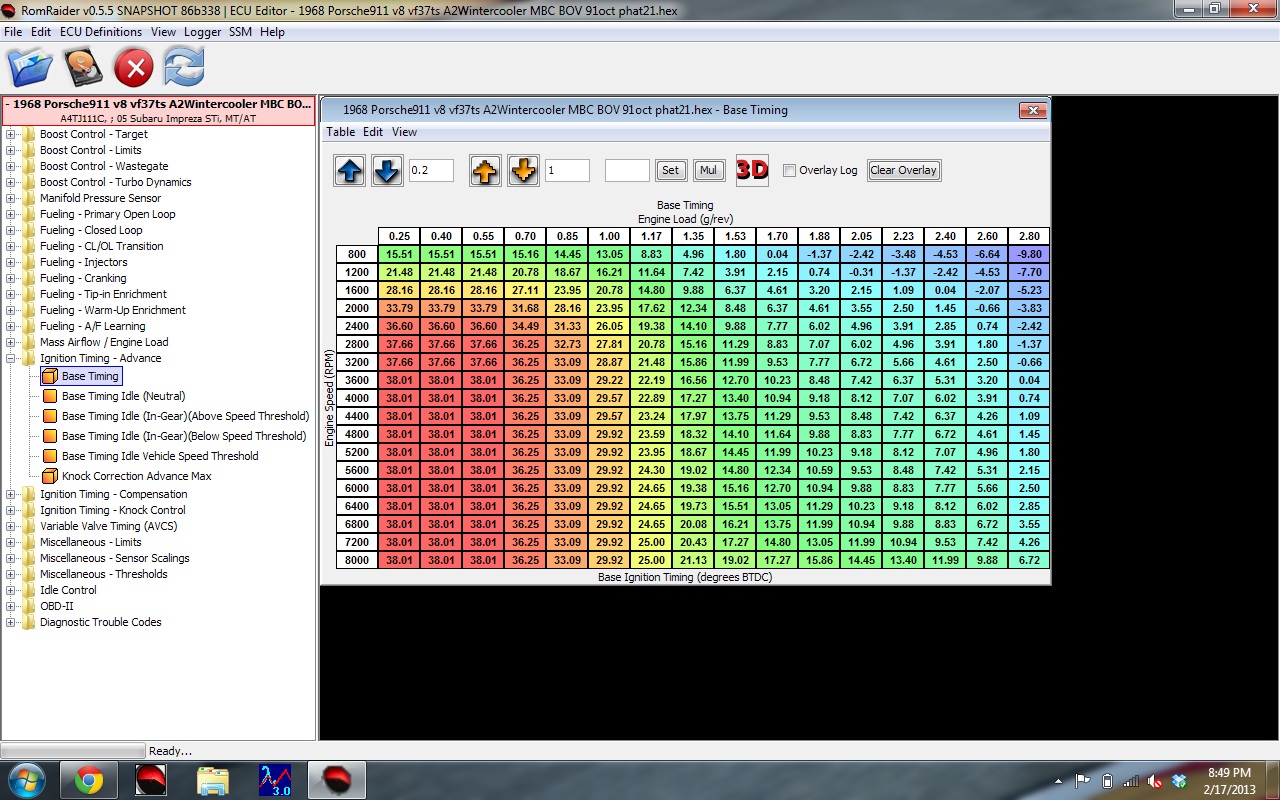
note: I am running AVCS so that will alter base timing. let me boot up the laptop and ill screen shot that as well.
this will be interesting to see the conversion.
Posted by: jpnovak Feb 18 2013, 11:23 AM
Cool. What is your boost control profile?
Also, Are you taking it to 8K? I have only been to about 5K with mine so far.
Posted by: RonW Feb 18 2013, 11:28 AM
I am running a manual boost controller. both tuners i interviewed (one of whom did my tune) discouraged the ebc or even the hybrid i initially had set up. they said they'd do it but stated the tune with the mbc would be better so i pulled the ebc and just ran a straight mbc
here is the avcs table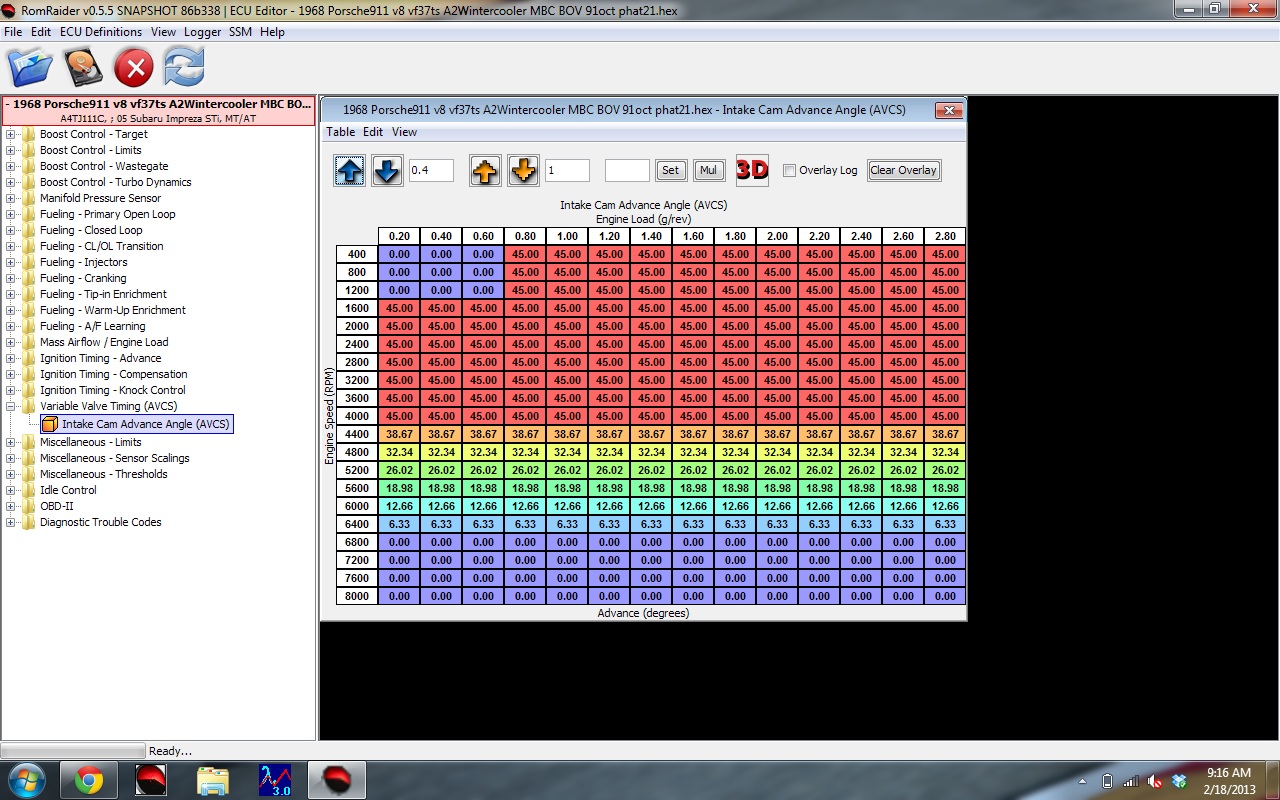
Posted by: RonW Feb 18 2013, 11:29 AM
oh and yes, taken to 8K
btw, ive got an extra MBC if you want it, a donation to the 2013 Build. its the one on the Left. the one of the right is the ebc i was going to run. 
Posted by: jpnovak Feb 18 2013, 11:32 AM
OK. g/rev = (pulse width / (2707.09 / injector flow rate))
Are you running stock injectors? These should be 540cc/hr. If so, I can easily calculate a pw table for MS.
The timing table really helps too.
Posted by: jpnovak Feb 18 2013, 11:33 AM
Great suggestion on the boost controller. I currently integrated the MS to the stock boost controller but I think it is dumping before I get boost. Safety factor while I get the car running well.
Posted by: RonW Feb 18 2013, 11:46 AM
they are the stock ones yes, pink's and i believe that is correct flow rate.
pm me your address and i'll send off the mbc tomorrow.
edit: in the interim, just hook up the nipple on the compressor housing directly to the iwg (bypassing any controller). then you will have around 8# boost, the least you can have. this is the force the from iwg spring holding the wg shut.
Posted by: Chi Town Feb 18 2013, 02:00 PM
Amazing and inspiring build!
I have not yet purchased my first 914, trying to get a feel for them first. Your thread is great! Thank you for detailing so much!
Posted by: jpnovak Feb 18 2013, 03:34 PM
@Chi Town - Thanks for the compliments
Ron, Do you have any pulsewidth numbers? Your fuel table is the target AFR for the open loop running. this is a strange way of presenting load as it should be a target table for a closed-loop system.
Posted by: RonW Feb 18 2013, 06:11 PM
@Chi Town - Thanks for the compliments
Ron, Do you have any pulsewidth numbers? Your fuel table is the target AFR for the open loop running. this is a strange way of presenting load as it should be a target table for a closed-loop system.
no, no pw numbers. i thought it was odd too. cant really wrap my brain around how the ecu responds to inputs and the tuning methodology. its not like the MS that uses the fuel/VE table for a fixed amount of fuel delivered under open loop situations. in the case of closed loop, compares measured ARF to the target AFR table and increases / decreases fuel from the VE table via pwm or something to that effect. this would be for closed loop operation or when tuning with VEAL or even manual by look at logs via mlv. this is a comparison of load (kpa) vs engine speed (rpm)
suby really relies on MAF and engine speed. MAF is basically a hot wire and is at a specific temperature, the more air passes over it, the cooler it will become. the ecu then adds more voltage to the MAF wire to heat it to that temp up and thus is able to determine how much air is flowing into the system based on that additional voltage. with that and the engine speed it knows where it is on the table. it compares the AFR to the target and give it more/less fuel. but what i dont get is how much fuel does it know to start with ??? closed or open. i dont get it
Posted by: jpnovak Feb 18 2013, 10:39 PM
Ron, I think I cracked the code.
The 2.8 value should correspond to your 18psi. If you scale the rest of the values by a (260kPa/18psi) the lowest value corresponds to 23 kPa. My car idles about 31 kPa so this is just about right to idle in the lowest corner of the map.
The rest of the values are just a linear distribution of the load table. In my case, I just scale by MAP reading. Simple. Effective.
Now if I could just figure out a way so that I did not have to type all those numbers in by hand. Ouch!
I can use the timing table and the target AFR table. Your cam setup will be slightly different and this will effect fuel values. No problem. I will just tune to the target AFR. Easy. I admit I was unsure how lean/rich to make these engines under boost. I found some info that said 11:1 under WOT boost was a great target. I see you are mostly a 10.8:1 so this is slightly more rich.
I am also surprised how much timing is pulled out at 18psi. Must be ready for a big bang to delay timing and pressure onset that late. Such great information.
Tomorrow I can start the number input game.
Posted by: RonW Feb 18 2013, 11:08 PM
Jamie,
thats awesome. glad you were able to use it. now to enter 18x16 tables by hand. watch out for carpal tunnel syndrome
oh, i was reading for FMIC 11:1 to 11.5:1 while TMIC 10.5:1 to 11:1 as a guide for reliable power but for more aggressive tune, up to 12:1 yikes!
i want video since you dont post pics fucker
Posted by: jpnovak Feb 24 2013, 02:36 PM
I guess Ron thinks I don't have any pictures.
First, how many Victoracers can you fit in the trunk of your daily driver? In my case, One, Two, Thrr-eee. It takes 3 VictoRacers to fill up the daily driver trunk. 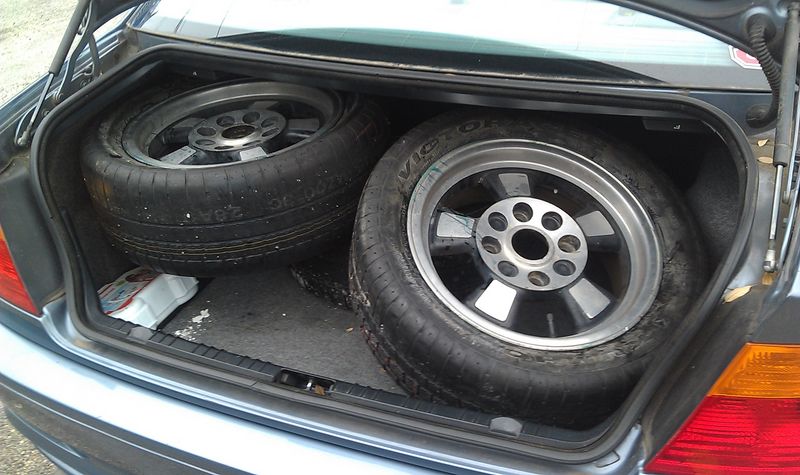
Armed with new rubber I went on to the next step. Today I started to tune the motor. Mostly low rpm. Still have not achieved boost. I need someone to drive while I tune. Auto tune (VEAL) works but I prefer to tune by hand.
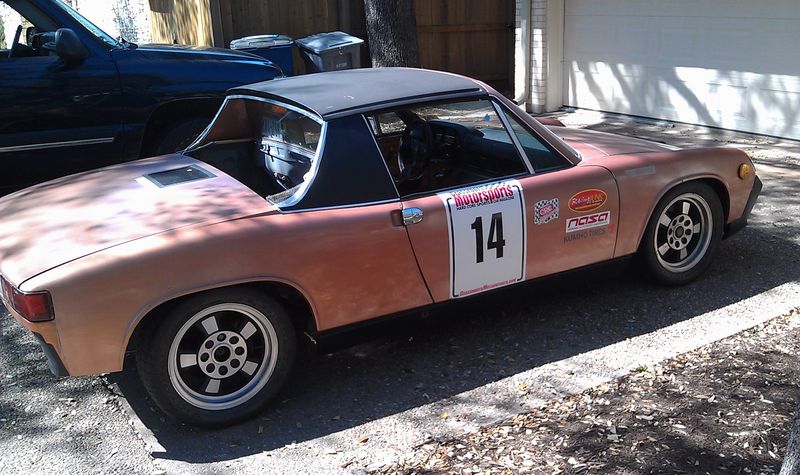
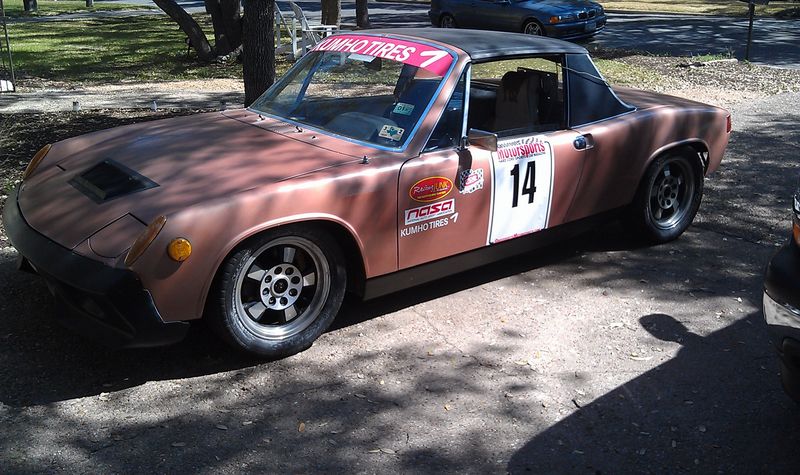
Anyway, here are some pictures in the driveway. 

Posted by: jpnovak Feb 24 2013, 02:37 PM
The car runs well around the neighborhood. Still need legal tags to venture farther away. These are in the works. At least insurance is current.
Posted by: jpnovak Mar 18 2013, 09:33 AM
I am finally starting to tune the EFI system. What fun this is. Drive around until you reach a point where the car runs like crap, look at the AFR and realize its too lean, start adding fuel and feel the car gain torque. Keep adding fuel until you have a stable AFR and feel the car really want more throttle and is happy. Rinse, Repeat.
Then go back at look at the fuel map and realize that you are dumping crazy amounts of fuel when the car comes into boost. Some would say, nothing good can come from this much fuel requirement. Some might say that the car is making considerably more horsepower in twin turbo trim that the base map from the single turbo trim. Otherwise there is no explanation for requiring that much more fuel.
And I only have the car limited to about 8psi right now. Wait till I get to 18!
Yes, it is my current mid-engine rocket ship.
Posted by: DBCooper Mar 18 2013, 02:41 PM
All I have to say about that is 
Car gets to be a LOT of fun when that boost comes in, doesn't it? You totally stop trying to drive subtle. Lee. Aim and shoot, hold on, repeat. It's serious fun, and mine isn't even as strong as yours.
.
Posted by: jpnovak Mar 19 2013, 07:25 AM
Yes, I will use VEAL. However, I start with datalogs and roughing in the map by hand. This allows me to have VEAL make minor adjustments where it works best. I have found that if the map is way off VEAL is difficult to control. If you give it more authority to make changes it will start to change where you don't want it to.
The best method is to have someone else drive while I tune. Much faster process. But, I don't have a passenger seat and that makes it difficult right now. But if that is the worst of my problems from here on out I will be fine.
Posted by: RonW Apr 7 2013, 12:10 AM
bump for an update
Posted by: jpnovak Apr 8 2013, 08:18 AM
Hey Ron,
Let's see...
I managed to get a new driver's seat installed. I picked up a GT3 fixed back replica seat a few months ago for $99 on ebay. Carbon fiber goodness but the stock seat is still lighter. This one offers significantly more support.
Otherwise, I am still tuning the car but I do not have a lot of time to devote to it. I really need large blocks of time (1.5 hours) of driving but the schedule has not allowed.
When tuning I ran out of VE table space (max 255) and had to rescale the table by increasing the req_fuel value and scaling the VE table down the same percentage. I should now have enough room to dump more fuel under boost. Of course, this has slightly messed up my midrange. Its just not as smooth as it could be.
I continue to work on it.
Posted by: jpnovak May 17 2013, 09:56 AM
So, Its been a few weeks since I updated the thread.
1. two weeks ago I had a CV joint come apart while tuning. The inner subaru came apart when the retaining clip came off. No damage but I had to wait for some parts. In the end, the axle on the DS was 3/8" too short and that was the root cause. I had to fabricate a new axle and get it installed. That was completed last night and the car is driving again.
2. tuning. The car is running well at most of the NA sites. I am now ready to start creeping into boost. I am taking my time since I don't want to blow this up while driving.
3. I completely revamped the braking system to stock. I refinished the rotors and installed some Ferodo DS2500 pads. These are a long time favorite dual purpose street/track pad that are cheap compared to others. What a difference. The car stops appropriately now.
4. Suspension... During the tuning process I have blown out both front shocks. Now you know what happens when you let your car sit untouched for 9 years. The seals will go and fluid will spill. Let's just say that the car will bottom out on every small bump now. Yeah, they are that bad. Digging through my stash to see if there are some old inserts laying around.
5. Track time... I had signed up for an open track day tomorrow (May 18). The car is not ready since its not tuned and the front shocks are blown. So I will take the bimmer DD instead and have some fun. Next time I am taking Penny.
6. Finally got my lost title replaced. Should have it registered next week and can finally start a real tuning process.
I promise to post video once the car is running properly.
Posted by: jpnovak Jul 6 2013, 08:25 PM
Let's see where are we with this project. I finally connected with the PO and got the title signed over. It took longer than expected to get the replacement for the lost title.
Penny is now legal for driving. To celebrate I took her out on a nice drive this morning to meet some friends for breakfast. Its funny driving a fully stickered up car around town. Lots of waves and thumbs up. Also lots of drivers that ignore everything around them. Yes, its the usual.
Anyway... I finally managed to get the cooling system working. I stay right around 195 even in the triple digit TX heat. I have fought corrosion in the motor, air bubbles, and a few other problems. What finally worked? 20% antifreeze, a bottle of water wetter and the rest distilled water. Burp well. Bleed well and then allow the system to work. The biggest improvement was the etching flush I made with oxalic acid to get rid of the old scale and rust. The owner of this engine must have let water sit in the system. Lots of yucky crud came out during the flush. Glad that's over.
The engine is tuned nicely. Currently running 12psi boost. The car is really quick as it is. I will still work through tuning to 18psi as I get time.
Now my problem is fuel delivery. The new Bosch fuel pump I installed a few months ago just took a dump. I was wondering why the car kept going lean above 3K. Turns out it just can not deliver enough fuel. Tomorrow morning I will get a new one and have that fixed. Only takes a few minutes to swap them out. I think it takes longer to remove the access panel and unbolt the pump compared to swapping lines on it.
After the new pump is installed I will get some video up and take some new pictures. I am just glad to be able to drive outside my neighborhood.
Posted by: RonW Jul 6 2013, 08:41 PM
congrats jamie, looking forward to seeing / hearing Penny making a few runs
Posted by: jpnovak Jul 14 2013, 10:56 AM
I managed to grab a few videos today. The car is running well now. I am currently at 13psi. Time to start turning up the boost. Though I am not sure how much more these small turbos can crank out.
http://contour.com/stories/file0033--498
http://contour.com/stories/porsche-914-subaru-ej20tt-swap
Posted by: RonW Oct 11 2013, 09:36 PM
jamie,
hows the car tuning coming along? you gonna make the 2013 challenge next month? hoping so!
Posted by: jpnovak Oct 18 2013, 03:37 PM
Hey Ron,
No, I am not going to FL for the event. Current work status (and thus financial concerns) have me in a cash conservation mode.
Penny is running and driving great. Registered, legal and lots of fun. In fact, She has been my DD for a few weeks now. Although, I am not quite ready to give up the usual DD.
So, I don't know what will happen to her. I will probably hit a few track events this spring and then she may have to be sold so that I can move on to my next project. I am almost ready for something new.
The one thing I do not like is the TT setup. The turbos spool late and I do not get full boost until after 3500 rpm. The car pulls well to redline (currently 7K) though I am maxing out my injectors under full boost. They exceed their duty cycle and dump fuel by basically staying open. Its not a problem of going lean, Quite the opposite. The car quickly goes rich due to lack of fuel metering control.
Another problem I have had is IC temps. Of course, the car has been in TX and up until last week we have still been in the 90s. I have not driven in the recent cold front and rain to see if this is all under control. I am concerned that the engine bay is siphoning cold air from below, heating it across the engine/exhaust and then pushing hot air across the IC at the top. Remember, the downward airflow in a stock 914 is due to the engine cooling fan - something I am missing.
I may have to reconfigure the IC to get really low charge temps.
So, If anyone is reading and interested please let me know.
Posted by: RonW Oct 19 2013, 09:17 AM
Jamie,
sorry to hear about the work status! that really bites. i'll keep my fingers crossed for a speedy resolution to that.
i agree with you on both issues and unfortunately, i think it will take bigger injectors (what size are they currently?) and switching to a water air IC system and remotely mounting the IC radiator (or ice box reservoir it that is sufficient volume.)
hope to see more of the car in action vs selling it for next project but if the next project is another suby conversion, bring it on 
Posted by: jpnovak Oct 22 2013, 08:20 AM
Ron, Thanks for the suggestion on larger injectors. I thought I would try another route based on parts availability in the garage. I am finally making progress on Penny.
One of the issues I have had with Penny is that the engine would cut out at high rpm under boost.
I have datalogged and looked and looked to find the problem. The AFR holds steady at 11.1 (good target for boost) until about 4900 rpm. Then all of a sudden it starts to go rich. Despite lowering the fuel value in that area of the map it still goes rich. I finally realized that the injectors were maxing out on the duty cycle. Effectively, the electrical signal is trying to switch on/off faster than the injectors are physically capable of handling. This means they basically stay open and then dump fuel. Too much fuel drops AFR below 10 which causes a rich misfire.
So last night it was time to fix the problem. I did not have larger injectors. But I can make more fuel flow through each cycle by raising fuel pressure. I took a stock Subaru fuel pressure regulator (FPR) and cut the end off. This meant I could pull the regulator portion out. I welded a cap onto the end. I should have taken a picture.
Having bypassed the stock regulator I installed the FPR from the ST. Its adjustable. I raised the pressure from stock 32 to 44. then adjusted the fuel scaling factors and the engine was running well. Basically, I had to lean it out because I was flowing more fuel. on the way to work it would pull to 6K without any issues. It still goes rich but that is a result of tuning, not duty cycle limits. At 6200 and 16psi I was just below 90% duty cycle. The stock injectors did not start having problems until about 95% duty cycle in my previous datalogs. Cool! Now I just need to fine tune the EFI again.
Honestly, she runs even better. I suspect higher fuel pressure is giving slightly better atomization of fuel.
WooHoo!. Oh, and cold weather is good for boost.
Another note. If the stock 420CC injectors are maxing out this should occur at a calculated 270 FWHP. HMM. If I have exceeded that limit I wonder where I am now. How about a little math.
From my calculations increasing the fuel pressure changes should add 6.8% fuel flow. Converting this to HP puts me just over 300. Of course, I am also loosing volumetric efficiency (BSFC). So somewhere close to this is fine with me. The car feels really quick above 4K rpm now.
I will report back after some more tuning.
Posted by: jpnovak Oct 24 2013, 03:33 PM
Penny just keeps getting better. As I finalize the engine tune she is much easier to drive and more responsive. The tach swings very quickly from 4-7K. Yeah!
I did find out that she does not like sitting in traffic. Temperatures begin to climb without airflow.
Doesn't matter, she is still my daily driver for a while until I sort everything out.
Posted by: RonW Oct 24 2013, 05:09 PM
great to hear you were able to incr fp and get a little more out of the injectors! im surprised the stock fp was only 32 psi, i though for sure it would have been in the 40's. i dumped my stock fpr as well and run an aeromotive that was already in my engine bay from the prior ms/t4. i don't recall any change in my tune though going from the stock to the aeromotive which is set at 43psi.
i'll have to look back thru your thread to see how your venting, i think it was to the side in to the wheel wells but maybe you should go thru the hood.
Posted by: jpnovak Oct 24 2013, 08:52 PM
Ron,
I am venting through the hood. I just don't have a fan. Without it the car does not have any airflow. Maybe I need one. The radiator is relatively small for a car without a fan. When moving the car stays nice and cool.
Yes, the factory spec for fuel pressure is relatively low. It is a rising rate regulator. Its just that the initial rates are not good enough considering I am running both turbos wide open into an open exhaust.
Posted by: veekry9 Oct 27 2013, 05:46 PM
All I have to say about that is
Car gets to be a LOT of fun when that boost comes in, doesn't it? You totally stop trying to drive subtle. Lee. Aim and shoot, hold on, repeat. It's serious fun, and mine isn't even as strong as yours.
.
Made Me Laugh
OldSchool courtesy of Playboy Mag.
Posted by: jpnovak Oct 31 2013, 08:22 AM
There has got to be a story or caption to that picture...
I am finally changing the title. I am now calling it a former GRM Challenge car. Its time to put a little money into this car to really enjoy it. I have been working on suspension and now need some new injectors. This will probably put me over budget. This is not a problem for this year as I am not able to go to the event. Maybe next year. Until then there are quite a few track days to complete.
Current Development Update:
Over the past two weeks I have been studying and configuring the vacuum lines on Penny. Originally, I left most of the factory connections in place. Maybe that was not the best idea.
It all started with the swap of the BOV and wastegate connections. They were connected with the BOV above the throttle and wastegates below. This was opposite of the way it should be. This is mostly my fault when I swapped the wiring harness and disconnected everything. After that, the car ran much better.
I had added a manual boost controller and yet, the car still would not pull more than 10psi. I found out that this is the factory spring setting on the wastegates. After some digging I found that the DS turbo had a vacuum bypass that connected the pressure side to the WG. HMM. This meant that my boost controller was bypassed. No wonder it would not hold boost.
AFter swapping and plugging a few vacuumports on the turbo I can now easily get 16psi. This is a whole different level of high rpm fun. Oh Yeah! Now I can finalize the tune and set an appropriate boost level.
the downside is that my injectors are way too small. I will be replacing those in the next week or so. Time to go spend a little money.
Posted by: rhodyguy Oct 31 2013, 11:13 AM
will you have to upsize on the fuel pump too?
Posted by: jpnovak Oct 31 2013, 08:46 PM
Its not a stock fuel pump. I am running a Bosch Motorsports fuel pump with dual filters. I have no problems with fuel flow, either in pressure or volume. Just delivery to the intake tract.
Posted by: jpnovak Nov 4 2013, 11:43 AM
I took my longest drive yet in Penny. I put almost 150 miles on the car this weekend prior to our local Cars and Coffee event. She was running very well and I am just starting to get used to the car and her capabilities.
4th gear pulls to triple digits were effortless.
I still have some tuning issues to sort through. The acceleration has a hesitation right as boost builds. I can see AFR that is a bit rich on the transition and this is easily fixed. I am also leaning out the AFR under full boost. I was very rich (too rich) for safety.
Now the fine tuning begins.
Posted by: dlo914 Mar 25 2014, 01:25 PM
Hey you're on Jalopnik!
http://jalopnik.com/for-5-000-a-penny-for-your-thoughts-1550361655?utm_campaign=socialflow_jalopnik_facebook&utm_source=jalopnik_facebook&utm_medium=socialflow
Powered by Invision Power Board (http://www.invisionboard.com)
© Invision Power Services (http://www.invisionpower.com)