Printable Version of Topic
Click here to view this topic in its original format
914World.com _ Member Vendors _ Inner Long Reinforcement Kits
Posted by: Engman May 22 2004, 02:52 PM
Well after several months, $ and patience they are done. Brad has a set - hopefully he will post some better pics of the layout. Please see http://engmanparts.com for details
Attached image(s)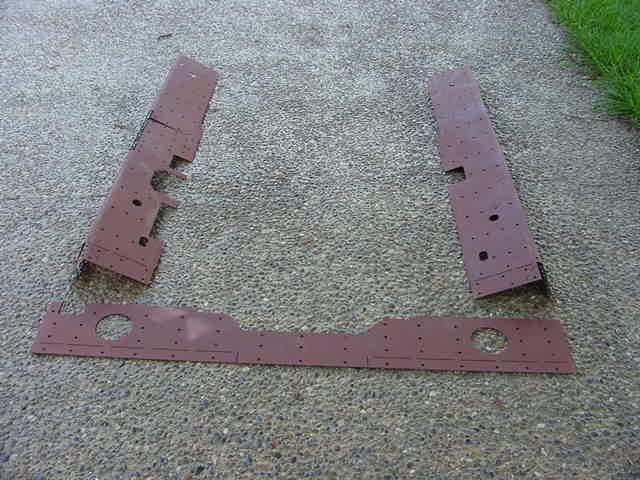
Posted by: Engman May 22 2004, 02:53 PM
Another....
Attached image(s)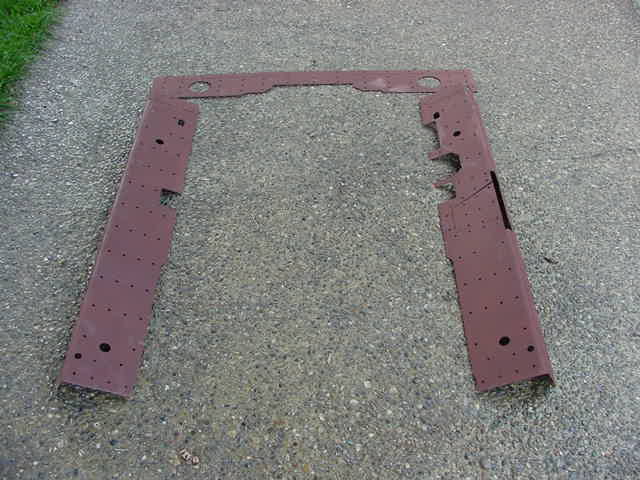
Posted by: Engman May 22 2004, 02:54 PM
More
Attached image(s)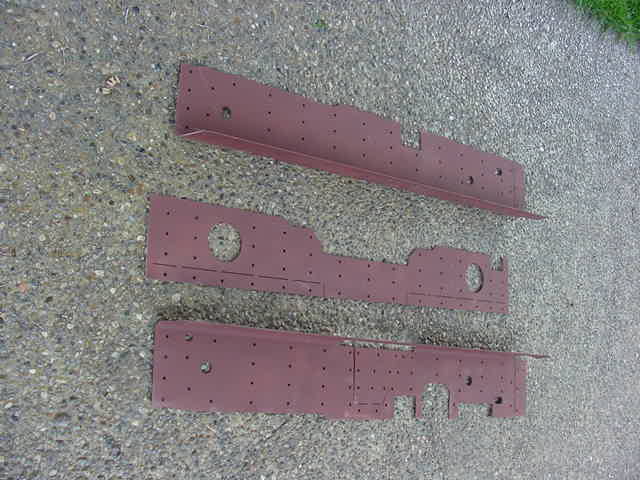
Posted by: Engman May 22 2004, 02:55 PM
asdf
Attached image(s)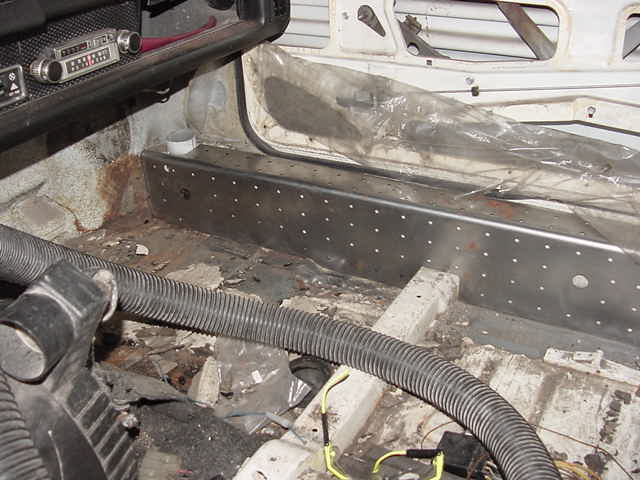
Posted by: Engman May 22 2004, 02:57 PM
zxcv
Attached image(s)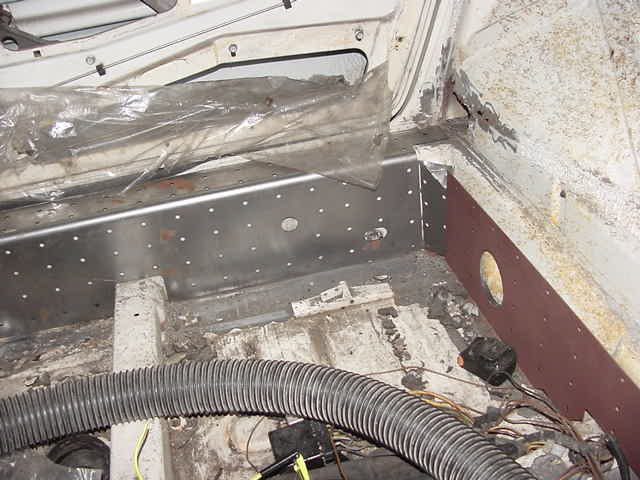
Posted by: Engman May 22 2004, 02:58 PM
Packaged!
Attached image(s)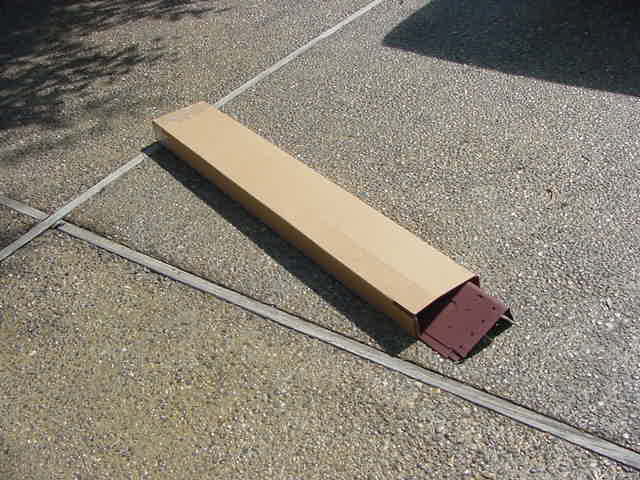
Posted by: neo914-6 May 22 2004, 11:16 PM
Mark,
Is this the "U" bracing Brad recommended in one of the cage threads? Was this reinforcement tested before and after installation? I recall Brad saying the boxing of rear arms is not necessary yet many do it...
Felix
Posted by: seanery May 23 2004, 07:19 AM
Dude!
those look sweet!!!
Posted by: Engman May 23 2004, 12:38 PM
These are 16g BTW. Today I performed some measurements on stiffness - Car is supported on 4 jackstands at the ends of the rear of each long. Long kit (old one witout the top pieces is installed on the drivers side only) Remove the drivers side jackstand and place wife on passenger rear corner (I will not say what she weights but this is done to keep the car in the rear on the jackstands). Me sits on the drivers side corner above the wheel ( I wieght too much - about 220) measure the amount of movement. Repeat for passenger side.
Results
Passenger side deflection - 1/4"
Drivers side deflection - 1/8"
Now this is not real scientific- my son read the deflection - even accounting for possible errors this is at least a 1/16" improvement. The passenger long above the battery has been repaired - cut out and welded new metal in so I do not think that that was an impact. And the rear connection piece had not been installed. Hope this helps.
M
Posted by: Pnambic May 24 2004, 03:18 PM
I may be wrong here, but I think I remember Brad talking about this rather emphatically when he was in Indy last fall. What Brad was saying is that the current chassis stiffening kits available are welded onto the outside and bottom of the longs, but that the inside of the long is where the real structural intergrity needed to be augmented. The longs, from the factory, are "C" shaped with the outside piece welded on, but that outside piece only handles a fraction of the torsional and/or structural rigidity.
I think what he was getting at is that it would take less material more strategically placed to get better results.
I *THINK* this is exactly what Mark addresses with his setup.
Am I making any sense here? 

Posted by: Rob Ways May 24 2004, 10:24 PM
This looks cool..... but does it work? Has it been tested for any amount of time? If the longs don't give... what will?? Just curious.
Posted by: seanery May 25 2004, 07:48 AM
Hopefully nothing.
I love the feel of a stiff ride. My 04 Durango is awesomely stiff for such a big vehicle.
Posted by: JmuRiz May 25 2004, 11:13 AM
So do you have to tack all those holes? Just checking to see if that's how they attach. Kindda like the GT kits for the rear wheel well. I like how all of this design will be covered by interior bits, all stock looking.
Perhaps post a link on the main site to see if this is in fact the kit that Brad was talking about. Looks cool, when I get into my bodywork etc I'll probably go for something like this!
Posted by: soloracer May 27 2004, 08:46 AM
If you are installing a roll cage would these be necessary? I'm thinking that a properly designed cage would take care of the flex.
Posted by: Engman May 27 2004, 01:28 PM
Yes this was developed based upon Brads input - He has one of these now. I am sure that a roll cage helps but this goes to the source of the flex. Static testing that I have done show a nice improvement. If you want ask Brad in the main forum - I am sure he will comment.
M
Posted by: Brad Roberts Jun 18 2004, 08:38 PM
Mark nailed this kit EXACTLY like I envisioned. I first did a crude stiffening like this in one of the first 9146 conversion cars I built back in 1995. It totally changed the dynamics of the car with the 6 in it. When you get on the gas in a 2.7 and up 9146 you can feel the chassis twist up like a loaded spring. With my crude kit in place the car didnt have that feeling. It also helped slow down the top squeek and made the windows fit better...LOL
I'll have install pics and a write up for the main BBS late Monday night. The kit Mark shipped to me is ready for install on Monday.
As far as not needing a cage... the cage is for safety. Strength is a by product of what gets built for safety. I honestly believe that this will be stronger than a production type cage where you are limited to a certain number of pickup points. This covers a lot of real estate along the frame rails.
Great job Mark. Cant wait to start selling them.
B
Posted by: trekkor Jun 19 2004, 12:20 AM

Posted by: Lawrence Jun 19 2004, 11:13 PM
Mark,
Does your kit interfere with the reinstallation of the speaker grills?
-Rusty 
Posted by: Engman Jun 20 2004, 11:15 AM
Nope - hole is in it for the screw on the long.
M
Posted by: trekkor Jun 20 2004, 09:25 PM
Do you recommend installing these plates with the car on the ground or on jack stands to take the stess off the longs?
Does it matter?
Posted by: Engman Jun 22 2004, 09:38 AM
You definately want the pressure off the longs - use the jackstands. (yes there is still stress in the longs on the jackstands- its just much reduced due to the distances of support)
M
Posted by: seanery Jun 22 2004, 10:00 AM
quick question about carpet fit.
Does a stock carpet set fit after these are installed?
Posted by: Engman Jun 22 2004, 10:14 AM
Yes - these vitually mold to the longs.
M
Posted by: goobu Jun 27 2004, 07:40 PM
How much do they weigh?
Posted by: McMark Jun 28 2004, 12:17 AM
When trekkor installed his he mentioned they were 18 pounds, but I don't know for sure how he came up with the figure.
Posted by: trekkor Jun 28 2004, 08:21 AM
I stepped on the bathroom scale, took note of my largeness, then reached for the kit and wallaw!
The difference is 18#.
Posted by: RAR Jun 28 2004, 07:23 PM
Do these require the removal of any interior sheet metal (spot weld cutting) before installation? Thanks.
Posted by: Engman Jun 28 2004, 08:30 PM
No removal of any metal inside is required. You do have to remove the seam sealer and sound deading material and clean up any residual glue on the longs where these attach in order to achieve good welds.
M
Posted by: Gint Jun 30 2004, 08:08 AM
Mark,
I need to prder one of your kits and have it shipped to MarkD. I'll send PM and email.
Posted by: corpselaurel Jul 12 2004, 06:51 AM
Mark I sent you an email and PM.
Posted by: Engman Jul 12 2004, 02:12 PM
PM sent - I currently have some in stock.
M
Posted by: trekkor Jul 19 2004, 12:56 AM
see the complete install photo documentary:http://www.914world.com/bbs2/index.php?act=ST&f=2&t=14508&st=
Trekkor
Posted by: retro74 Aug 12 2004, 06:24 PM
Looks good. Working on my 71 and these might be a nice thing to add. A couple of points to note about your install:
1. I stripped the tar on my two 914's (one will get trashed due to rust) and by far the easiest and fastest tar scraping was with a heat gun to soften the tar AND the use of a 1" wood chisel. The charp edge of the chisel is nicer that a putty knife. Heat 10" area for about a minute or less.
2. The seam sealer strips out nicely with high heat. A torch works great. Again, the 1: chisel is a cool tool for this.
3. Welding - I have yet to start my welding skill again, but I've been reading and reading. Metal should be shiny when you weld. Your users should use a pencil to trace-out the holes and then use a wire bruch to clean the area before welding. Also, any gap is too much. Tight fits are the way to go. Use sheet metal screws to pull it all in if you need to. Back them out when you get to that area and then just fill the hole. Cool MIG Tip - Use a pair of wire cutters and cut off the wire end after you stop every time. The end is oxidized, so this gives you a clean start.
4. I noticed that you did not weld along the floor pan. Makes sense to me since these floors are so thin anyway. But you should use POR15 or RustBullet to preserve the metal. I have been using POR15's rust converter first and it simply works -- leaves behind a cold zinc coating and the rust is neutralized.
5. Jacking it up. I worked on one of my Longs and used a 4x4 under the side that I was working on running just under the edge of the long. Nice, straight and spreads the load.
Nice looking product and useful welding pictures.
Good Luck
Joe C.
Posted by: jgiroux67 Aug 12 2004, 07:32 PM
Do you make them only in 16 gauge? Would 18 be too week?
Posted by: jgiroux67 Aug 12 2004, 07:37 PM
Also, do you need to strip the paint on the longs before putting the kit on?
Posted by: Engman Aug 12 2004, 07:44 PM
16G is the way to go. 18G could be used but the flex modulus is a lot worse - (ME term meaning more flex). 16G is also easier toweld in my opinon. You ideally should wire wheel and have 'clean' metal to weld to, but if you clean off any old glue you can weld these and the welder will burn thru the paint. Depends upon how gud a welder you are.
Mark
Posted by: trekkor Aug 13 2004, 08:48 PM
Thanks,
I haven't tried a torch or heat. But, believe me, the air chisel is BOLD.
Use short bursts and a 15-25 degree angle and it just breaks away...tonight!
No stink, no smoke, no accidental fires

Try this first, please.
KT
Posted by: Engman Sep 28 2004, 08:07 PM
I just got another batch of these run for those that have asked about them.
M
Posted by: ewdysar Jan 4 2005, 06:14 PM
Received my inner long kit, good looking product. The package got here quick, even right before xmas. Can't wait to schedule the interior removal and the install of this kit.
Great job Engman. 
Eric
PS. I'm trying to print the install thread by Trekkor to guide my friend with a welder. I think I'm going to cut and paste into a document to make a more usable format. I'll let people know how that works out
Posted by: MecGen Feb 13 2005, 10:51 AM
Hi
I just sent a PM regarding that inner kit... maybe more
Thanx
Joe
Posted by: trekkor Feb 13 2005, 10:50 PM
This kit is a great way to upgrade the overall feel of the car. It really works well and is very easy to install. Just takes about six hours. 
KT
Posted by: Lawrence Feb 14 2005, 08:26 AM
Does that 6 hours include all the prep work, tar removal and top coating?
-Rusty 
Posted by: Lawrence Feb 14 2005, 08:29 AM
| QUOTE (Engman @ Feb 9 2005, 12:52 PM) |
| I have one inner long kit that has some paint blemishes - metal is fine - just the paint is a little odd in a couple of spots - $230 plus shipping takes it - first one to respond gets it. I also have instructions now included - I would post it - but it is about 7M on my computer and I am on dail up. M |
Mark,
Email it to me. I'll host it on my site.
-Rusty
Posted by: spunone Feb 14 2005, 04:14 PM
Heh Mark Paypal has been sent thanks again I add ins just in case.Paul
Posted by: trekkor Feb 14 2005, 07:40 PM
| QUOTE |
| Does that 6 hours include all the prep work, tar removal and top coating? |
Yes and no

I took all the carpet, passenger seat and back pad out at home before I went to the friend's shop.
Time is: perimeter tar removal ( air chisel is that fast ), fitment, welding, grinding, priming, cleanup and driver seat back in.
KT
Posted by: tat2dphreak May 11 2005, 09:45 AM
would these be recommended on a street car, one that has had outer long repair?
or is this really just for handling rigidity? i.e would an auto-x car benefit more from this than a street car?
Posted by: Engman May 11 2005, 01:55 PM
I do not as of now autocross - maybe in the future. I wanted something stiffer in my car. So I made one. I did not have a cross brace in my first one (the 73)and am currently putting one in my stalled project 74LE car.
The stiffness difference is noticeable.
But I am biased - read what thers have said and form your own opinions on what YOU want in your 914.
M
Posted by: JmuRiz May 11 2005, 02:11 PM
What cross-brace are you talking about, the piece that goes on the back firewall?
Posted by: Engman May 11 2005, 02:25 PM
Yep - years ago I made one of these but witout the cross piece (one that goes across the back) - the longs on the 73 had been bondoed on the inside by the former po so that HAD to be fixed.
M
Posted by: tat2dphreak May 11 2005, 02:50 PM
hmm, I think I'll drive it first and see if it feels "flexy" on corners... I'm only repairing 2 small places...
Posted by: Travis Neff Jun 11 2005, 06:25 PM
The kit is great, I concur with Trekkor on the install time. A full day to remove the interior, peel out enough tar and seam sealer, fit and weld.
Wayne, from the look of the lower section of your inner longs, this kit will help out a ton!
Posted by: grantsfo Jun 14 2005, 11:25 AM
So its not clear to me. I'm in the process of building a leightweight AX and occasional track car. I will have a cage installed soon. Are there any benefits to using this if I have a well designed cage installed? For me will the 18 lbs of stiffness pay off on a 4 cyclinder car or is this kit primarily aimed at higher hp cars without cages? I guess if I'm going to add weight , adding it low on the car is good.
Posted by: Andyrew Jun 14 2005, 11:51 AM
Grant, your car, running hoosiers will greatly benefit from the extra stiffening. The more stick that a car has, the more flex it recieves...
I'd say reinforcements, and a cage will be fine for you... You can always cut out 18# of sheet metal somewhere else!
I will be installing these in my car sometime this year.
Posted by: ewdysar Jun 14 2005, 03:30 PM
If your cage will be tied into the suspension points, the inner long kit will be redundant. IMHO, it would be dead weight. It's primary reinforcement is the flex in the longs themselves (eliminated by a passenger compartment cage) and the connection at rear firewall (eliminated by tying into the rear console). So if your cage will be cockpit only, there may be some benefit to the inner long kit.
Of course, this is just in my head... I don't know ****.
Eric
Posted by: Engman Oct 9 2005, 09:19 PM
Sale - Inner long kits - $240.00 – limited number of sets available.
My painter screwed up. He was supposed to only ecoat one set and instead he did my entire last batch. Normally this is a $20.00 add to the cost, but since I called him on it I got the extra sets painted for free. Now I am passing the savings onto you. $240.00 plus shipping. First come first serve.
Or - pay full price and get free prioity mail shipping in the continental US.
Mark
Posted by: itsa914 Oct 10 2005, 08:37 AM
Mark I will take a set. Sending you a PM also.
Man my winter project list just keeps growing. 

Posted by: seanery Oct 10 2005, 09:04 AM
Mark,
I want a set.
Can I paypal?
Posted by: Engman Oct 10 2005, 01:20 PM
PM's sent!
M
Posted by: seanery Oct 15 2005, 06:14 PM
got mine today!
Thanks MARK!
Posted by: WRX914 Oct 27 2005, 11:35 AM
I have bought two items from Mark, and both items are what the doctor ordered! Mark is a honest man, he delivers exactly what he advertises... Great products Mark!
You da Man!
Keith


Posted by: Greenbuggy Nov 2 2005, 01:31 AM
| QUOTE (Engman @ Jun 22 2004, 07:38 AM) |
| You definately want the pressure off the longs - use the jackstands. (yes there is still stress in the longs on the jackstands- its just much reduced due to the distances of support) M |
Forgive a guy if these sound like dumb questions - I'll be posting pics/details up soon, but in short - I've got a guy who is paying me to restore his green '72 914 and he also has a parts car. As with all 914's it seems (but especially in the midwest) his car has rust and some sag, and of course that needs to be fixed.
Your products all look good, and I'll probably be making an order for your long reinforcement kit, pedal board and hell hole kit, god knows the car will need all of them. I'm determined to do this car right, and have previously resto'ed a '59 VW Type I chassied buggy that sat outside for 15 years, so I'm intimately familiar with what rust can do on a monocoque chassis and how to fix it.
That said - I have a few technical questions.
#1, I have jacks and jackstands and a smooth concrete floor to work on. Where would you suggest putting jackstands for the long repair, to keep the body straight while doing this repair? I'm guessing at the fronts and backs of the longs, but would like confirmation.
#2, the car needs floor pans repaired as well as the longs repaired. Obviously the longs will get repaired before the reinforcement plate goes on, but would it be easiest to replace the floors before or after the long reinforcement kit goes on?
#3, have any of you who have done this kit use some sort of brace where the targa top would go to keep the body straight up top while welding everything in place?
#4, lastly, I'm concerned about keeping rust away long-term for the owner of the car. I was thinking, after long repair, wire brush to bare metal, coat long in weld-thru primer, lay on reinforcement, weld in place, clean welds, POR-15 over the entire reinforced long assy, seam seal at edges, and final coat with some sort of epoxy based paint. Does this sound good to keep rust away long-term? Keep in mind that the entire underbody is also getting POR-15'ed, and that this is a midwestern car and will likely see rain and quite possibly even a little salt in the coming years.
Posted by: Greenbuggy Nov 2 2005, 04:43 PM
One more I forgot - would you recommend doing this kit with the engine in or out of the car? The engine is coming out anyway for the hell hole repair and to get cleaned up.
Posted by: type11969 Nov 3 2005, 04:05 PM
This is what I have done, but I have a serious hell hole and lower pass long repair (the lower left corner of the left long is rotted through along with the std hell hole rot, I think the PO let the pass. floorboard fill with water, rot away, and then they replaced the rotted floor with a new one without fixing the long). I have a brace with a turnbuckle going from the upper pass. seat belt mount to the upper pass door mount, and another brace with a turnbuckle going from the lower driver door mount to (essentially) the upper pass seat belt mount. Without both my targa bar was not aligned with my windshield.
PS- Mark, I received my set a few weeks ago, great product! It will be a while before it gets installed though . . .
Attached image(s)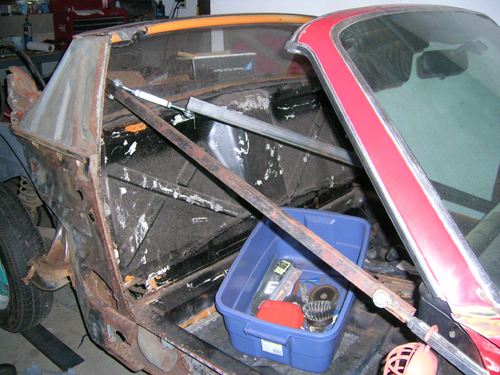
Posted by: Engman Nov 3 2005, 05:18 PM
| QUOTE |
| PS- Mark, I received my set a few weeks ago, great product! It will be a while before it gets installed though . . . |
Thanks - Made enough paper and metal check pieces to make sur that they fit!
| QUOTE |
| #1, I have jacks and jackstands and a smooth concrete floor to work on. Where would you suggest putting jackstands for the long repair, to keep the body straight while doing this repair? I'm guessing at the fronts and backs of the longs, but would like confirmation. #2, the car needs floor pans repaired as well as the longs repaired. Obviously the longs will get repaired before the reinforcement plate goes on, but would it be easiest to replace the floors before or after the long reinforcement kit goes on? #3, have any of you who have done this kit use some sort of brace where the targa top would go to keep the body straight up top while welding everything in place? #4, lastly, I'm concerned about keeping rust away long-term for the owner of the car. I was thinking, after long repair, wire brush to bare metal, coat long in weld-thru primer, lay on reinforcement, weld in place, clean welds, POR-15 over the entire reinforced long assy, seam seal at edges, and final coat with some sort of epoxy based paint. Does this sound good to keep rust away long-term? Keep in mind that the entire underbody is also getting POR-15'ed, and that this is a midwestern car and will likely see rain and quite possibly even a little salt in the coming years. |
1. Front and back of the long - use a jack in the center as well to adjust the door gap, Check it after you tack the long on that side in a few places and do so throughout the welding process.
2. Either way will work. Depenfding on the state of the floor - if it is really bad do the long first so the pan will set right.
3. See Type 11969's post.
4. Yep. Good method.
| QUOTE |
| One more I forgot - would you recommend doing this kit with the engine in or out of the car? The engine is coming out anyway for the hell hole repair and to get cleaned up. |
It*can* be done either way but my preferance on yours would be with engine out.
HTH
Thanks
Mark
Posted by: iamchappy Jun 16 2006, 07:50 AM
Mark are these still available.
Chap
Posted by: Engman Jun 16 2006, 08:34 AM
Yes - I have a couple in stock.
M
Posted by: iamchappy Jun 16 2006, 08:23 PM
Email sent
Posted by: iamchappy Jun 22 2006, 09:40 PM
Pay Pal sent ,
thanks Mark.
Chap
Posted by: trekkor Jun 22 2006, 11:27 PM
Yep, good kit.
KT
Posted by: iamchappy Jun 26 2006, 05:18 PM
Got mine today, are they coated with weld through primer?
Thanks, Mark
Chap
Posted by: iamchappy Jun 26 2006, 05:25 PM
I plan on welding these on, but I was wondering about panel adhesives. They have become so good, the factory and body shops use it all the time.
Posted by: Engman Jun 26 2006, 06:45 PM
Yes - weld thru -
No one has done the panel adhesive - yet. I do not recommend it unless you feel you can get both surfaces extemely clean and have done this before.
Thanks
M
Posted by: dlee6204 Jul 7 2006, 05:26 PM
Email Sent
Posted by: Brando Aug 6 2006, 09:16 PM
Mark,
Are you still producing these, or only selling a specific amount?
~B
Posted by: Engman Aug 6 2006, 09:37 PM
I just got a new batch in - so yes I have them.
M
Posted by: neo914-6 Aug 7 2006, 01:27 AM
Mark,
My sponsor Marty (Maltese Falcon) listed them on the detail sheet of my car's SEMA description. He picked few things from my psuedo "dealer" sticker, LOL.
Posted by: Engman Aug 10 2006, 05:40 PM
How coool is that!
But now you have to get there....
Thanks for the plug!
Mark
Posted by: ferlutt Sep 3 2006, 02:25 AM
Do you still have this kits for sale?? if so how much and my zip is 92173... how much for shipping?
Thanks!
Posted by: Engman Sep 3 2006, 02:37 PM
PM sent...
I have a few in stock. I also have all of my 'other' stuff in stock as well.
Thanks
M
Posted by: ferlutt Sep 29 2006, 01:16 AM

Do you still have this kits for sale?? if so how much and my zip is 92173... how much for shipping?
Thanks!
HEy i deleted by mistake the email u sent me, could u tell me one more time how much is it??
Im ready to buy them.
Thx
Posted by: craig downs Oct 28 2006, 05:05 PM
Just recieved my kit today. The pieces look great and the shipping was very quick.
Can't wait to install them. Thanks Mark
Posted by: ptravnic May 26 2007, 11:45 AM
I hope more of these kits are avail soon...
Posted by: fat73 Jun 13 2007, 10:07 AM
Any more of these kits available?
Ed aka W9R1
Posted by: Engman Jun 13 2007, 04:47 PM
In stock
Mark
Posted by: AvalonFal Jun 16 2007, 10:32 AM
I'd be interested in a set also. I will PM you.
Paul
Posted by: Engman Jun 28 2007, 10:03 AM
I have several of these available. PM or email me if you are interested.
M
Posted by: Blood red 914-6gt Sep 19 2007, 04:19 PM
So I brought these in with me to the guy who is going to fix my rust issues and weld this kit in my car. He is amazing at what he does. He looked at these kits and was amazed. He was telling me all about how they woud really help a car become more rigid and such. So I would definately suggest adding these to your car.
Posted by: rufio0205 Oct 8 2007, 07:28 AM
just going to ask this and not care about looking dumb, i need these piece because mine are a bit rusted. are there any other cheaper ones that i could get or is this all that exists?
Powered by Invision Power Board (http://www.invisionboard.com)
© Invision Power Services (http://www.invisionpower.com)