Printable Version of Topic
Click here to view this topic in its original format
914World.com _ The Paddock _ creating new susp for the monster
Posted by: byndbad914 Mar 31 2010, 02:19 PM
Car currently has RSR front struts with custom lower arm setup (sorta like a 935 front end) and the rear is a 5-link setup that is much like any old school 60s-80s open wheel car, GT-40, etc all attached to my tube chassis setup.
Decided I wanted to lower the car more and fix a couple issues with the rear 5-link geom so I started laying out some parts, then decided F it, time for a whole new update  I can't leave anything alone.
So I measured various available pickup points on the current chassis and whipped up this stuff in Pro/Engineer. The lower A is already a bit different than I have assembled in here, but close enough for convo - and JP was asking to see what I have going - I am sure so he can raz me about whether or not I actually win at DEs 
I used Pro to lay out the geometry so I could measure camber gain, get zero toe positions for the toe link (which will be adjustable in case I want to put some bumpsteer into the rear), RC height and motion, etc.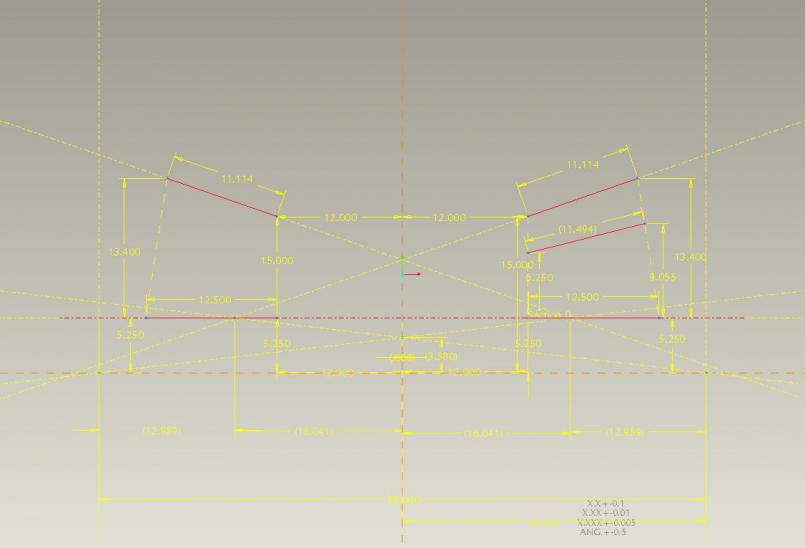
Is this perfectly optimal on all points? Hell no, but much better than what I have and works with existing structure - I am not about to really hack into this car. I can get tabs waterjet cut and welded into place, but not bending/notching tubes in my near future. Besides, it leaves me a little bit of excuse for why I am slow on the track cuz it certainly isn't my driving abilities hahaha 
So here is the rear design - it will be built using the stock trailing arm cut down to not much more than a bearing carrier. yeah, yeah, use this other thing, make that, blah blah - the stock rear bearing assy has worked for a few years now so it is fine. I intend to replace that big bearing every few years regardless of upright used anyways.
I did the same layout stuff for the front and even am going to be able to use the exact same billet lower A front and rear so that is nice. I can have them waterjetted for about $170 each including the 1.5" plate material, so not bad at all.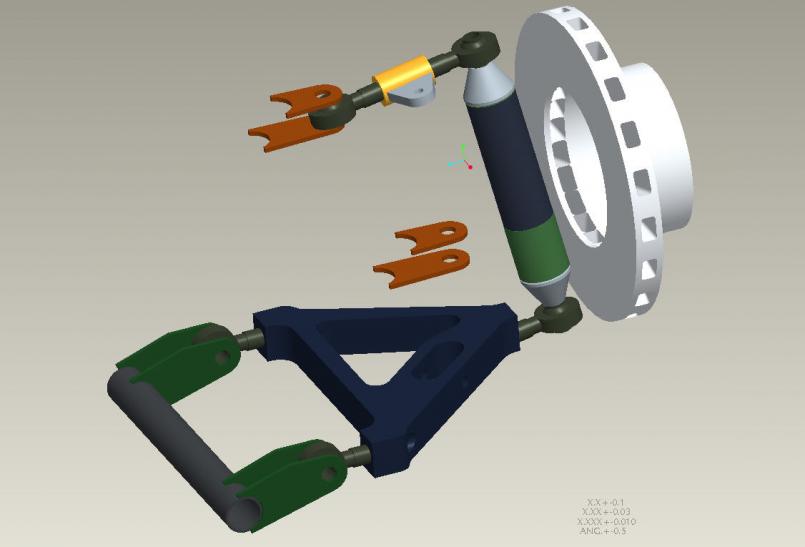
I bought a couple front strut housings from Carquip last week and had my machinist buddy endmill out that monster weld so gonna work on getting them apart down to the stock knuckle, then I have 2" diam chromoly I just got yesterday that I will have him machine down to make the front "upright". Note the two surface colors in the above image - the blue is turned down to fit in the knuckle (50mm) and the green is the stock 2" diam of the tubing - that ridge will be used to exactly place the tube relative to the knuckle so I get both spindles left to right in the exact same spot.
The upper forward link will be made on the fly so I didn't bother modeling it. I need to get this stuff in the car with the right pickup points placed, then place some dual adjustable coil over assys which might be tough on the front, then build the forward link around the shock assy. At some point you stop fisting the design and just build it 
Being a structural analyst I also have access to finite element code so I fully analyzed the lower A designs (I have 5 of 'em now hahaha) to make sure they are structurally sufficient. If I get off track in a big way I will likely bend them, but that you can't design for without having a 10lb A arm. These are just over 5 lbs per the modeling software.
Posted by: URY914 Mar 31 2010, 02:24 PM
I see. What about the angle of the dangle? 
Posted by: byndbad914 Mar 31 2010, 02:25 PM
that is something I hold constant - low and to the left  and just design around it
Posted by: SirAndy Mar 31 2010, 02:43 PM
Purdy! 
Posted by: J P Stein Mar 31 2010, 05:24 PM
It looks like you have set up to get some decent scrub radius with a wide wheel from that design. Going with a cantilevered shock/spring?
Looks like a DE winner to me. 
Posted by: ArtechnikA Mar 31 2010, 05:31 PM
Tell me about the RSR struts, especially if they're about to be surplus...
(2,8 RSR clone/homage in progress...)
Posted by: byndbad914 Mar 31 2010, 06:11 PM
Looks like a DE winner to me.
I am gonna RULE at DE events JP
Tell me about the RSR struts, especially if they're about to be surplus...
(2,8 RSR clone/homage in progress...)
Here is a couple links to see what they are - Patrick uses them on pretty much all of the customer stuff in their photo album so I will use his site as an example, and Pelican where I bought 'em when I lived about 5 blocks from their shop http://www.patrickmotorsports.com/part/1070/
http://www.pelicanparts.com/cgi-bin/ksearch/PEL_search.cgi?command=show_part_page&please_wait=N&make=POR&model=911M§ion=SUSshk&page=1&bookmark=5&part_number=VE3-61017-M12
I have had them for five years but they have limited track time (one year of that was while I built the tube chassis for example) on them so they are for all intents and purposes like new. Interested?
oh yeah - thanks Andy
Posted by: ArtechnikA Mar 31 2010, 07:40 PM
Here is a couple links to see what they are - Patrick uses them on pretty much all of the customer stuff in their photo album so I will use his site as an example, and Pelican where I bought 'em when I lived about 5 blocks from their shop http://www.patrickmotorsports.com/part/1070/
http://www.pelicanparts.com/cgi-bin/ksearch/PEL_search.cgi?command=show_part_page&please_wait=N&make=POR&model=911M§ion=SUSshk&page=1&bookmark=5&part_number=VE3-61017-M12
I have had them for five years but they have limited track time (one year of that was while I built the tube chassis for example) on them so they are for all intents and purposes like new. Interested?
Let's say I'm not interested at Patrick pricing ;-) ...
If you're dealing I'm interested.
Neither picture/source looks like the steering arm has been modified to compensate for the spindle - Do you use a bump-steer extended tie rod end, or is there a bend I'm not seeing?
Pelican lists two valving options - 220/100 and 161/160 - do you know which you've got? I have a set of RSR-spec inserts I had been planning on using but I'd have to go look at my notes to verify the valving numbers - they're not on the box anywhere I could see, although the part numbers are...
It almost looks like those are coilover struts - yes? I hadn't thought the 2,8's used coilovers but a quick check of Grüber's ,,Carrera RS'' book shows that they did, in a 'supplemental' role... Do you have the 'supplemental' coilovers? I'm sure the factory titanium springs are right out of my price range tho ...
I'm in no panic hurry to make this deal so take your time and think on what it'd take for you to part with them. PM or email me if you want.
Posted by: andys Apr 1 2010, 01:24 PM
Tim,
Nice work. Any issues with roll steer on that rear design? I'm sure you already checked it out, but thought I'd ask. Keep the good stuff coming!
Andys
Posted by: byndbad914 Apr 1 2010, 10:50 PM
The angle and length I have set up in the design for the rear toe links is set at nominal zero roll steer. They will be adjustable up/down at the upright in case I want to tune in some roll steer depending on how the car is acting on the track. Everything is adjustable with this other than RC - that I can only mess with ride height but can't move the inner tie points. I have too much other stuff in the way on the rear to make that adjustable.
Art... it is late here just checking emails - I will work on a response for you tomorrow or Sat. There is a fair amount of history to cover to explain to you the difference between the two sets available but if I take time to explain it you will understand what you want. Short answer is I have the better 220/100 set.
Posted by: byndbad914 Apr 2 2010, 01:31 PM
so the whole coil over thing with the RSRs started because they couldn't get a stiff enough torsion rate so they added helper springs in parallel with the torsion bars to get a higher spring rate (the spring rates add when in parallel).
So the original RSRs had lower rate springs than you would run in a strictly coil-over setup, which is what everyone does now. Because of this, the rebound rating on the stock RSR is too low and also the compression was somewhat high (the 161/160 values) which is more of a question of dynamic roll, etc.
Anyway, Bilstein came up with the set that I have, and pretty much everyone uses now, which has the spindle lowered (for lower ride height without having to F up the lower A arm geom on the front) and has the better valving for working with higher rate springs. The better rebound value helps to control the higher rate spring while the lower compression lets the higher rate spring do its job.
That is as I understand it
I was plenty happy with the RSR struts but I really want to get my car low to the ground, so I either put them thru the hood or go dual A. Also, I am going to go to double adj shock valving and in case you aren't aware, those puppies are MONEY so I would rather just build a dual A and use "universal" shocks I can buy for much much less off the shelf.
If you are looking to have a good setup with fully adjustable ride height front and rear (you can buy rear adj height coilovers easily thru Bilstein, etc) and can corner balance the car, the RSRs are a great way to go for the money.
Art... I will PM you about my parting price and so forth.
Posted by: ArtechnikA Apr 2 2010, 01:48 PM

So the original RSRs had lower rate springs than you would run in a strictly coil-over setup, which is what everyone does now.
no rear adjustable coilovers for 911 AFAIK ;-)
but it's OK - I am not building a true competition car - I am building a 'period-correct' 2,8 RSR without going crazy overboard trying to convince myself or anyone else that it is authentic. I don't mind a slight uprate here or there (i.e. front coilover rate) but I'm not building a car like we'd build it now, I'm building a car like I remember them. And I'll be glad to enjoy it like that, period-correct warts and all.
Posted by: byndbad914 Apr 2 2010, 03:41 PM
no rear adjustable coilovers for 911 AFAIK ;-)
I know you can get slip on threaded sleeves that fit over stock 91 rear shocks so you can easily upgrade to that in the rear... in fact, if you are doing simple upgrades here and there that is something you should definitely do IMO, and then in conjunction with the front RSRs you have a fully tuneable suspension for ride height and corner balancing, etc for the track.
Posted by: ArtechnikA Apr 2 2010, 04:15 PM
no rear adjustable coilovers for 911 AFAIK ;-)
I know you can get slip on threaded sleeves that fit over stock 91 rear shocks so you can easily upgrade to that in the rear... in fact, if you are doing simple upgrades here and there that is something you should definitely do IMO, and then in conjunction with the front RSRs you have a fully tuneable suspension for ride height and corner balancing, etc for the track.
If it doesn't look like something they had in 1973 it's probably not going on.
But 911's have had adjustable spring plates for a long time (not quite 1973...) but it is a very subtle modification to the spring plate. Coilovers in back would be a big (visual) change but I'm OK with the spring plate mod. So I'm covered for height and corner balance.
Posted by: jmill Apr 2 2010, 06:19 PM
Rebel has the RSR strut much cheaper than Patrick.
Attached image(s)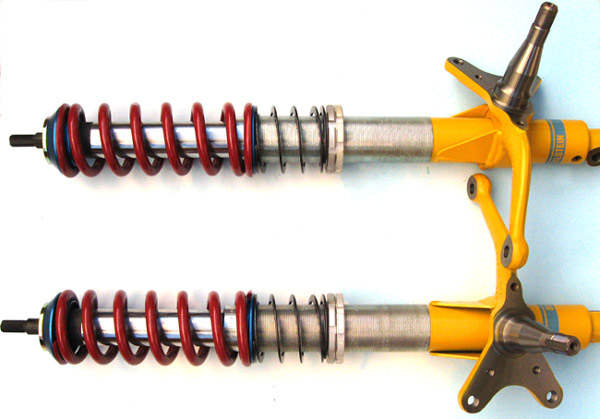
Posted by: ArtechnikA Apr 2 2010, 06:24 PM
Rebel has the RSR strut much cheaper than Patrick.
Everybody has stuff cheaper than Patrick ;-)
You go there for the one-stop-shopping, or because you know they'll have what you need when some of the low-margin guys are outta stock when you really, really need something.
There's some stuff I see on their site I want, but I'll sure look for it elsewhere first...
Posted by: stewteral Apr 2 2010, 09:50 PM
Tim,
Nice work. Any issues with roll steer on that rear design? I'm sure you already checked it out, but thought I'd ask. Keep the good stuff coming!
Andys
Hey Tim,
I'm with Andy: great design job. I know you've been working on it for quite a while.
The question I have is WHEN do you expect to get the new design in the car for the next track day? Has spring come to Colorado yet?
Terry
Posted by: byndbad914 Apr 3 2010, 12:48 AM
Spring in CO is a bit of a farce really - now is about the time we really start getting winter  It was damn near 80 just three days ago, had a bit of snow last night, will warm back up, then who knows.
Last year in April I started a basement remodel since I thought it would be a good time to haul lumber in and out - we got 14" of snow the very next Saturday and I had a trailer full of wood. Two weeks later another big snow, so you really don't put any faith in the weather here, or least I don't, 'til sometime in May 
All that said, I have the quote at the waterjet company being updated and hopefully have an answer on Monday - they called today and were a bit backed up so I told 'em Mon is fine. I am having every tab, bracket etc custom cut so I get everything exactly right - notice that every tab has a flat section on it that is parallel to ground so when I get the car up on stands I will set it perfectly level by shimming - then when I place the tabs I can just get them exactly level and the placement should be more accurate than a tape measure tho' I will of course double check the measurements before final welding. If I tell 'em to cut I should have everything pretty quickly - it will take them more time to source the material than to actually cut it as it goes so quickly once programmed.
The machinist that I am working with does it as side work at his job on the weekends and, unfortunately now that I am finally ready to go, his job has overtime work for the last two and next two weekends, so he has to do that. I am hoping to have most of the stuff to get started by the end of this month, if all goes well maybe be on the track in May when I can somewhat trust the weather.
Posted by: Brett W Apr 6 2010, 08:59 AM
Have you looked at the 928 front uprights. They are cheap, already have good parts on them and easy to work with. I am going to use a pair to design my front suspension around. They save me a bunch of fab work. They use 5x130 hubs, 3.5in caliper spacing or even the late style Brembo mounts. Wheel bearings and other parts are easy to find and heavy duty enough for a 3400lb car. Beats redesigning the wheel.
Rest looks good.
Posted by: byndbad914 Apr 6 2010, 01:30 PM
looked at 'em - what I couldn't get good clarification on was whether I could use my 930 Brembo setup and floating rotors with them but it seemed like "no". So since I already have so much stuff based on bolting to the RSR struts that I have, it was easier for me to make an upright from the spindles. If I were starting from scratch on brakes and so forth, yeah, they would be really easy to work with and agree that you should try and make that work instead.
That said, I forgot to snap pix but I have two spindles off the strut tubes as of yesterday - just had to drill out the spot weld and press the tubes out (it took 7,000 lbs on the hyd press gauge to press the strut tube out!!) so I now have two nice spindles and the .188" wall 2" diam chromoly tube showed up last week, so my machinist is turning that down to ~ 50mm OD (takes .030" off the diam) and we are going to use a light press fit to ensure structural integrity and I will be welding them as well.
Tom at Carquip in Boulder here has been super nice to work with (where I bought the used 911 struts) and even ran the spindles over his hone to true up the strut tube diameter, so they are looking really good.
The stock strut tube wall thickness was around 0.140" and the new upright wall is 0.158", so structurally pretty similar and should be essentially impossible to bend - if I bend it I have MUCH bigger issues 
Posted by: ArtechnikA Apr 6 2010, 01:41 PM
...the .188" wall 2" diam chromoly tube showed up last week...
Ooooh!
I went looking through McMaster last week looking for tube that size and they had nada.
Can you get me a pointer to your source?
Or would you like to sell 30" if you've got it to spare?
I need a tubular drift that size to press parts onto a Titan axle.
So Chromoly is _really_ overkill - I'd be happy with just about any ol' alloy that can take the specified ~7000 lbs in compression...
Lemme know...
Thanks !
Posted by: byndbad914 Apr 6 2010, 02:41 PM
McMaster-Carr was my only source I could find for 0.188"wall so odd you can't find it.
That said, two options are this:
1. Go to McM website http://www.mcmaster.com and search this PN 89955K6 and that is the only way you can get it, in the 72" length!!! So you see where I am going with this...
2. I can sell you half of mine I had to buy the 72" length - since that is all they carry and they won't cut cuz I asked
I have need for less than half of it (I am making two uprights + 1 spare setup in case I screw up one side like spin a bearing on the spindle, etc, I can just get a spindle and have a backup tube to press in and weld). Each of my uprights is about 8" long so I need 24" + cut so about 30" myself, meaning I have somewhere in the neighborhood of 40" left over so we can work it out. Can ship it with the struts so that should help there too If you need it sooner than the struts, we can work it. I will simply pro-rate the length to the price so 30"/72" * $104 = $43.33 + shipping.
PM me if you want to work specifics. The 30"pc should weigh about 10 lbs and I have the round tube shipping crate still so I can cut it down to 30" and ship it to you separate if you need it ASAP. I have your zip so I can figure shipping out if you are interested.
Posted by: Brett W Apr 6 2010, 03:27 PM
Slow your roll there guys. McMaster is steep for tubing especially in small lots. All you will ever need is available from these guys:
www.speedymetals.com
Here is the tubing you needed:
http://www.speedymetals.com/ps-3526-204-2-od-x-188-wall-dom-steel-tube.aspx
So you paid 104$ for the tubing? Ouch.
BTW I will be back out in Denver in May. I'll holler at you. Call me next time you need materials.
Posted by: byndbad914 Apr 6 2010, 03:58 PM
Slow your roll there guys. McMaster is steep for tubing especially in small lots. All you will ever need is available from these guys:
www.speedymetals.com
Here is the tubing you needed:
http://www.speedymetals.com/ps-3526-204-2-od-x-188-wall-dom-steel-tube.aspx
So you paid 104$ for the tubing? Ouch.
BTW I will be back out in Denver in May. I'll holler at you. Call me next time you need materials.
yeah, that is DOM and I couldn't find 4130 - it seems that neither they nor onlinemetals.com had it in 4130 at 0.188" wall, so I was sorta stuck. Places had 0.120" wall but I wanted to start thick walled since I was cutting the OD down to a metric size, leaving ~0.150" wall after that.
Yeah, you get out here in May gimme a call for sure! You may show up for a beer and find that you will have plenty of welding to do with the other free hand hahaha.
Posted by: ArtechnikA Apr 6 2010, 04:07 PM
www.speedymetals.com
Here is the tubing you needed:
http://www.speedymetals.com/ps-3526-204-2-od-x-188-wall-dom-steel-tube.aspx
So you paid 104$ for the tubing? Ouch.
that tubing will work for me, because my need is not structural; that's 1020.
36" of 1020 is $22. I haven't priced shipping. I'm inclined to help Tim defray his cost but I need to measure my application dimensions carefully. 0.188" wall is actually a bit smaller ID than I searched for, which is why I didn't find it at McMaster (which is just over the river in NJ and shipping is quick & cheap). This might actually be too tight for my application and I am disinclined to increase the ID of 4130 with only the tools I have...
Tim needs 4130 for his application; I don't see any of the more technical alloys on that site. A search for 4130 just turns up flat strip.
Posted by: Brett W Apr 7 2010, 07:50 AM
http://secure.chassisshop.com/partlist/5918/1/
Those are the go to guys for chromoly. They usually have pretty much everything at decent prices. I don't think he needs Chromoly in that wall thickness, but it is his choice. The car is already sweet.
Tim, drag home TIG machine and I will be happy to fly in and do some welding. Just don't get 4130 Filler rod. If you are building it out of 4130 you need ER70S2 or ER80S2 filler rod. Unless you plan on heat treating the whole thing.
Posted by: camaroz1985 Apr 7 2010, 08:55 AM
Yet another source.
http://www.wicksaircraft.com/catalog/product_cat.php/subid=10232/index.html
Used them during my FSAE days.
Posted by: andys Apr 7 2010, 10:33 AM
Guys,
Aircraft Spruce has .188" wall 2" diameter 4130.
http://www.aircraftspruce.com/catalog/mepages/4130tubing_un1.php
Tim, you're not going to like machining the OD of chromoly tubing, especially with a light cut (but it's doable). I never researched the reason, but you'll find hard and soft spots along it's length. At least that's been my experience when machining it.
Andys
Posted by: byndbad914 Apr 7 2010, 02:51 PM
Tim, you're not going to like machining the OD of chromoly tubing...
I have a machinist doing the work so I like it just fine
He said he can do it, so I am assuming not a big deal, and he is pretty cheap when he quotes me work.I have a nice Ford Focus with a burned up trans I have been holding in case I need to put together a commuter car - instead I am just trading him the car for a bunch of work so whatever it takes him, it takes him
I have a beater $800 Volvo now for running parts and commuting so the Focus was taking valuable garage space.I forgot about Aircraft Spruce - when I lived in SoCal I would just drive out to Corona and get stuff from their store all the time (like my wing upright tubing) and recall getting ChroMo from there now, but forgot somehow
Posted by: byndbad914 Apr 7 2010, 02:56 PM
BTW, you guys all suck for telling me this AFTER I ordered it
Posted by: Brett W Apr 7 2010, 03:40 PM
Shoulda called first. HEHE
Posted by: byndbad914 Apr 7 2010, 09:37 PM
If you are building it out of 4130 you need ER70S2 or ER80S2 filler rod. Unless you plan on heat treating the whole thing.
oh yeah, forgot, I planned to use the ER70 filler
My friend Ken has a TIG that I have used over here at the house so I have a nice 50A 220 line in the garage and a TIG at hand. It isn't a Miller or Lincoln but it is good enough to blow holes thru .120-.188 wall stuff
Posted by: Brett W Apr 8 2010, 08:44 AM
He your the one driving this thing at a high rate of speed and lateral acceleration. Nothing to worry about right?
Posted by: byndbad914 Apr 18 2010, 06:41 PM
some updates finally - been pushed back a bit as my machinist buddy was workin' OT the past two weeks, so finally back at it this weekend. He got the front upright stuff pressed together (light press just to ensure everything is perfectly centered to each other) so I can mock stuff up. I don't final weld anything until everything is in place and measured twice. I was just looking and think I can open up the wheelbase another inch without even noticing it, maybe 2" to get a little more stability (tho' pushing the rear back an inch will create more axle angle and what I am trying to get away from so I doubt I will do that).
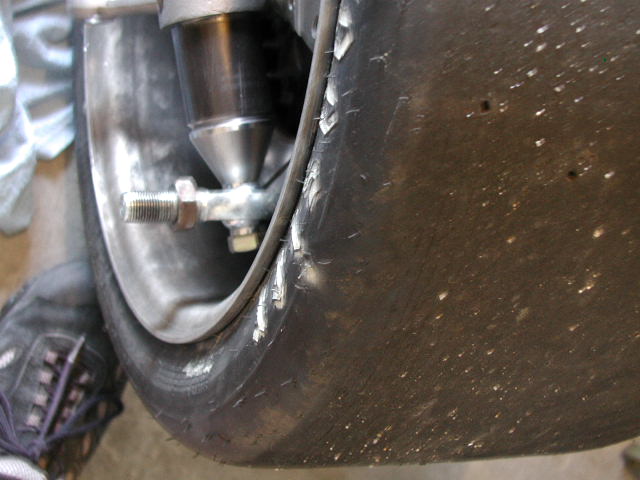
The front upright with a hub on it and pushed into the wheel. If I chose to I could get new wheel halves and push the hub in even deeper, but frankly, I have to draw the line and say there is some form over function, and I like the look of wheels with a bit of "dish".
This will still be about 3" of scrub, but much better than the 5" I had before! Again, could go with a 1" dish on the wheel v. the 3" dish I have to get down to 1", but those wheels on new cars just look awful.
not perfect and would be nicer to have a taller, up against the wheels upright but the car is what it is and I had to work with the tubing where it is, so it has to be about 2" shorter than I would like just to get all the geom correct and fit in the confines at the front. Close 'nuf for my monkeying around.
A shot of the right side just messing with the caliper (I have to admit I forgot to just test fit the calipers onto the struts originally, after all that work thought it might be good to verify they actually bolt up  )
)
Posted by: byndbad914 Apr 18 2010, 06:48 PM
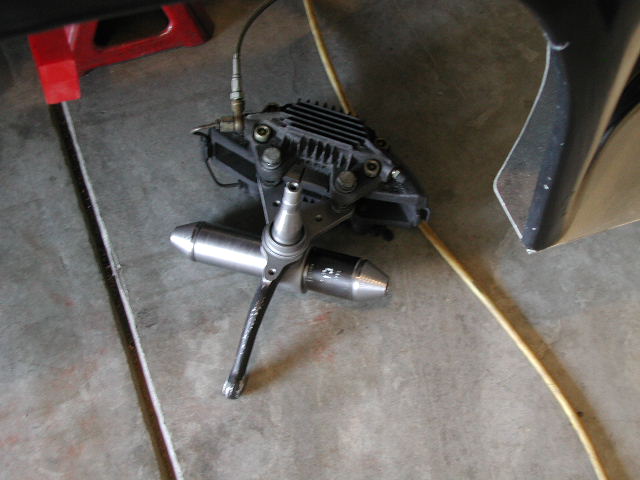
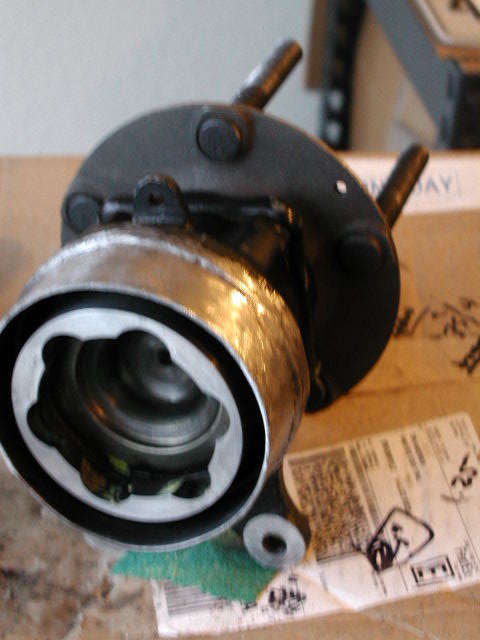
just getting started on the rear stuff too, that will be next weekend with the machinist getting him started on cutting all the rect tubing and so forth to build the uprights from. Here is what is left of the rear arm at this point.
Here it is with the "stub" axle - the late model axles have the stub and CV all integrated at the wheel so you can't get them apart and rebuild/regrease them, so instead I had Jason cut it down to a known diam and he is machining chromoly pcs to weld to these as adapters - they are threaded to bolt up stock 930 CVs to so I can have rebuildable CVs inside and out. Also I am pushing the hubs way out so I needed longer axles - this make the stock Carerra axles work instead.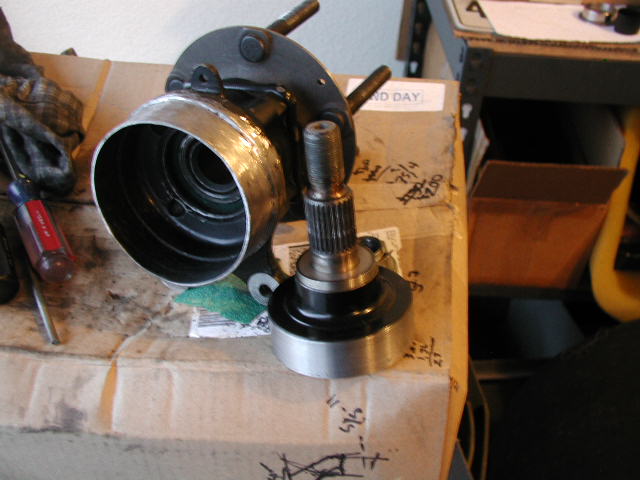
And what I used to use as the "upright" is laying on the floor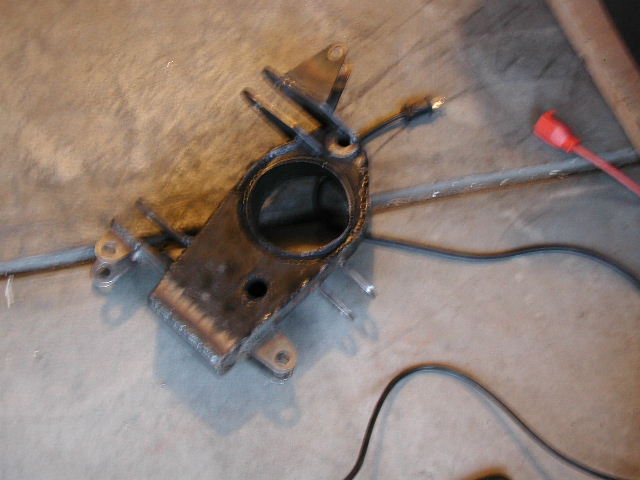
The water jet place said they should be ready by Friday to have all of my chassis tabs and the A-arms cut out, so hopefully I can get them next Fri, have Jason thread the A-arms for the rod ends and start mocking up next week sometime. Fingers crossed of course.
Posted by: andys Apr 19 2010, 10:02 AM
Hey, some progress.......Looking good!
What are your plans for keeping that bolt locked in place on the front heims?
I had to buy a 10ft. section of 4 3/4" OD X .125 wall EW tubing when I made my trailing arms, so if you need a foot or two for the rear uprights let me know. Making the rears use stock length axles is a good idea; I did mine that way.
Andys
Posted by: J P Stein Apr 19 2010, 10:58 AM
Were it me, I'd go after that 1 inch scrub......looks is not important....tho if it is to you, lengthen the A Arms and go to a wheel with more backspace. You will get much lighter steering. Your wheels are 3 piece, right? You've gone this far, why settle for half assed steering geometry?
Posted by: byndbad914 Apr 19 2010, 11:16 AM
I go back and forth on the wheels. I am going to see what the tire temps on the front are like and if they are too hot or significantly hotter than the rears then I will make that the next project (everything is easy to upgrade) on the front. However, on some tracks in circle track racing we would run as much as 3" of scrub to get heat into the tires. Scrub makes steering effort a bit tougher, sure, but it can serve a purpose.
Much moreso than roundy-round stuff, I have a super narrow selection of tires (all available slicks are GT2 category, there is maybe 6 overall slightly different sizes to choose from between GY and Hoosier), so given I am somewhat limited on width selection so I will be driven to finding the correct scrub to get the heat balanced front to rear. Believe it or not I was rather balanced on the 5" scrub, likely as the fronts are only 1" narrower than the rears with a 58% rear weight car, so that is also why I am going to try 3".
On a different note, I have been thinking of getting custom setup double adjustable shocks... BIG money, holy crap, but I also know that shocks setup is a huge factor in lap times and I have put no effort there on this car. Also don't have a budget like SouthWest Tour guys did ($70K min per year) so to have $3500 more in this car in just shocks is getting stupid. Already looking at $1600 for off the shelfs...
So you guys have any recommendations? I am aware of Guy Ankeny but he may be too AX oriented, dunno, but there would certainly be a dynamics difference between AX and road racing. If I lived in SoCal still I would slam dunk it since I am sure he could roll out to Willow Springs or Buttonwillow and help me get a best setup, but in CO, not gonna happen.
Posted by: andys Apr 19 2010, 12:02 PM
If you want to do it on the cheap as a start, you could do some AFCO small body valved to your choice for $100ea, or some revalvable ones for a bit more. I'm thinking shocks will be somewhat down the list when you start the shake-down process and this would get you started. You could buy a few sets and still not be out much money, but then that's just my aw-shucks approach. Of course if you want to spend the bux up front, that's your call.
Andys
Andys
Posted by: Joe Ricard Apr 20 2010, 03:15 PM
2nd the AFCO recommendation. Damn good shock for the price.
Not sure about the small body vs. large body.
I had large body aluminum 7" stroke double adjustables out back and the car gripped pretty good. Also had a set of PRO Shocks that were equally as good.
Both were user rebuildable / re-valveable.
Posted by: byndbad914 Apr 20 2010, 09:00 PM
thanks for the recommendations on shocks - will look into it. I am looking at the Penskes right now as they are available in 2.25" diam which matches all of my current spring sizes. Most other stuff tends to focus on 2.5" included my Foxes on the rear right now - I removed the spring collars and machined 'em down to 2.25" but that is a PITA if you can just buy the right sized stuff.
Picked up all the water jet stuff tonight. They forgot to make 4 tabs that I requested so we will see what happens tomorrow if they will fix that issue or not, but I took everything else in the meantime.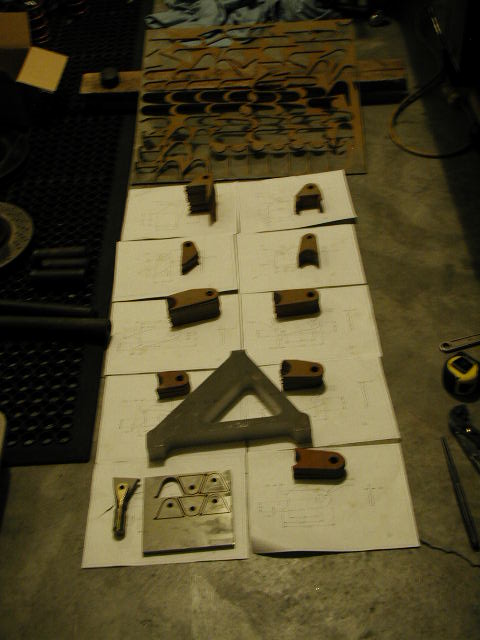
Stuff turns out really nice. I had the bolt holes all undersized .005" so I can clean them up with a more exact diam drill to tight fit the bolts - water jet has a 0.010" taper thru 3/16" plate so I didn't want them to wallow out over time. PITA but the holes will be really tight at least with the extra effort. I had the holes cut to get perfect center on them, then just do a slight slight ream.
Posted by: camaroz1985 Apr 21 2010, 09:32 AM
That a-arm looks heavy. Are you machining some of that material away?
Posted by: andys Apr 21 2010, 09:56 AM
Tim,
How are the A-arms constructed? Will they be boxed and welded or? I never quite gave that a thought when looking at those nice 3D models.
Andys
Posted by: byndbad914 Apr 21 2010, 11:26 AM
A-arms are billet, water jet cut from plate. No more light-weighting, with the power the car puts down the analysis shows these good with minimal deflection. They weigh just under 5lbs each so while they look heavy, they really aren't in the grand scheme of things.
The chunk of upright I cut off from before was 12lbs so I am ahead of the game at this point and have a nice, beefy arm.
I could machine them down into more of a T shape (like a Corvette lower for example) and get ~2lbs off of them, but the cost of doing that work exceeds my desire to save a little less than 2lbs...
Posted by: Smitty911 Apr 23 2010, 05:14 PM
I don't know if this helps, but I just found it.
http://suspensioncalculator.com/about.html
Just found this little nugget of information as well.
http://www.speed-wiz.com/
You may already be aware of these issues, but I thought it might help.
Smitty
Posted by: byndbad914 Apr 23 2010, 09:31 PM
being an engineer I have access to a fair amount of software - if you look at my initial post you will see how the suspension was laid out for the rear as an example. And it was free since I can use my work stuff
Posted by: Smitty911 Apr 24 2010, 08:04 AM
I knew you had Pro-E, but I'm not familiar with it.
I have Alibre, so I'll be playing with it.
Lot's of little parts need to be drawn, it would be nice if all the Fasteners, Hiems and stuff were already drawn, I know McMaster has some, but it take hours to get them found and downloaded/converted.
Posted by: byndbad914 May 8 2010, 10:53 PM
been a couple weeks with no updates... got the rear lower As all tacked into place and tacked the front left corner in, then in my usual fashion, decided to change my mind and called the water jet company to have some new lower A brackets made for the front that are longer. Gonna go ahead and remove more of the scrub and just cough up the extra cash and PITA of new wheel halves... getting them to not leak has been a bit of a challenge so any good ideas for sealant, etc feel free to let me know
Called Kodiak wheels a couple times now to work on getting new front wheel halves and those jackasses are the worst customer service ever other than Kanna Motorsports, still haven't heard back from them tho' I am assured someone will call me back They sucked ass on their customer service when I ordered them (they were good 'til they got me sucked into ever extending lead times and 6-8 weeks became 17 then made me deal with the FedEx claim when they damaged an outer) and this is really what I sadly expected. They must be busy Fing up Fikse since they took them over. Anyway, maybe one of these days I can get some new wheel halves on the way - I am assuming it will take 17 weeks to get 'em as that is what screwed up my initial order so I sorta wanna get that ball rolling.
Been talking to Penske and am pretty much set on getting a full set of their DA 8300s, just needed to predict what my spring rates will be with this setup (calculated suspension frequencies base on new motion ratios) so will be ordering hopefully this week. These seem to be the sh!t and unlike Kodiak the guy I have been talking to at Penske has been pretty cool and decent to work with. Of all the upgrades I could make, I know the shocks are gonna be a great one.
http://www.penskeshocks.com/Sports_Car-Formula_Car-8300_Series.php
hoping tomorrow to have my machinist buddy call me with more stuff done to get the rear uprights together and get the rear done, but we'll see how far he got today. Spent today stripping turbo axles down, putting inner CVs on both ends with Swepco 101 grease. Will be nice having both ends rebuild-able now with my custom stub axles setup.
So while I have been slow on updates, been busy working on it.
edit - and watching Toto on TV... holy crap that is an awesome group of musicians. Being a teen in the 80s I tended to like a couple of their songs, but gooood lawd I have played guitar for 22 years and can say their guitarist is awesome and having started learning drums this year, drummer is phenomenal too. Funny as my electronic drum set I bought used has a user programmed set that is the Toto drummer
Posted by: Randal May 9 2010, 09:05 AM
been a couple weeks with no updates... got the rear lower As all tacked into place and tacked the front left corner in, then in my usual fashion, decided to change my mind and called the water jet company to have some new lower A brackets made for the front that are longer. Gonna go ahead and remove more of the scrub and just cough up the extra cash and PITA of new wheel halves... getting them to not leak has been a bit of a challenge so any good ideas for sealant, etc feel free to let me know
Called Kodiak wheels a couple times now to work on getting new front wheel halves and those jackasses are the worst customer service ever other than Kanna Motorsports, still haven't heard back from them tho' I am assured someone will call me back
They sucked ass on their customer service when I ordered them (they were good 'til they got me sucked into ever extending lead times and 6-8 weeks became 17 then made me deal with the FedEx claim when they damaged an outer) and this is really what I sadly expected. They must be busy Fing up Fikse since they took them over. Anyway, maybe one of these days I can get some new wheel halves on the way - I am assuming it will take 17 weeks to get 'em as that is what screwed up my initial order so I sorta wanna get that ball rolling.Been talking to Penske and am pretty much set on getting a full set of their DA 8300s, just needed to predict what my spring rates will be with this setup (calculated suspension frequencies base on new motion ratios) so will be ordering hopefully this week. These seem to be the sh!t and unlike Kodiak the guy I have been talking to at Penske has been pretty cool and decent to work with. Of all the upgrades I could make, I know the shocks are gonna be a great one.
http://www.penskeshocks.com/Sports_Car-Formula_Car-8300_Series.php
hoping tomorrow to have my machinist buddy call me with more stuff done to get the rear uprights together and get the rear done, but we'll see how far he got today. Spent today stripping turbo axles down, putting inner CVs on both ends with Swepco 101 grease. Will be nice having both ends rebuild-able now with my custom stub axles setup.
So while I have been slow on updates, been busy working on it.
edit - and watching Toto on TV... holy crap that is an awesome group of musicians. Being a teen in the 80s I tended to like a couple of their songs, but gooood lawd I have played guitar for 22 years and can say their guitarist is awesome and having started learning drums this year, drummer is phenomenal too. Funny as my electronic drum set I bought used has a user programmed set that is the Toto drummer
Sounds like you're making great progress, but we need to see pictures! That car is just cool.
Oh, what is the price range on the Penske racing shocks?
Posted by: Randal May 9 2010, 10:33 AM
Also being an egineer, as well as an engine builder, wanted to get your opinion on this new motor.
http://www.jegs.com/i/GM-Performance/809/19244805/10002/-1?parentProductId=1277009
I don't think you could build a fully functional, high powered, fuel injection motor for anything close to the price quoted.
The dyno work, if you started from scratch, would be at least two days and you'd need someone who really understood fuel maps, so that alone would be thousands of dollars.
This motor also looks light.
Thanks.
Posted by: byndbad914 May 9 2010, 02:08 PM
Yeah, I should try to get out there with the camera. Shocks are $825 each with the remote reservoir.
As for that engine, I am a big fan of the LS design - to be honest it is really a small block Ford that has been upgraded. GM guys hate when I say that, but the dimensions of that engine are nearly identical to a mix of the 302/351W/351C Fords, nice center thrust on the mains, heads are similar in layout, and the head gasket is almost identical to a 302/351W with exact same bolt pattern. The early SBC like mine is a bit of a POS as far as design, and when I built mine the LS stuff had just come out so I was wary of it... if I knew then what I know now I would use the LS engine. Actually I would have a stroked 351W Ford had I foreseen going to tube chassis like I did... but that's just me.
Only funky thing with them is they seem to push oil thru the PVC system... my neighbor has a new Camaro and he went on a big round about journey down to AZ and back with windy roads, etc. He got back and has 3000 miles on it and it is down a quart on oil! A whole quart in 3K miles on a brand new engine. He said GM claimed they fixed the issue with the LS3 but sounds like they didn't.
Key is to just run a catch can inline with the PVC so you don't actually suck the oil into the intake and keep up on topping off the oil. If you programmed around the PVC you could just disconnect it altogether and run a catch-can breather.
And you're right, for the money you get a lot with those engines.
Posted by: Randal May 9 2010, 03:52 PM
Yeah, I should try to get out there with the camera. Shocks are $825 each with the remote reservoir.
As for that engine, I am a big fan of the LS design - to be honest it is really a small block Ford that has been upgraded. GM guys hate when I say that, but the dimensions of that engine are nearly identical to a mix of the 302/351W/351C Fords, nice center thrust on the mains, heads are similar in layout, and the head gasket is almost identical to a 302/351W with exact same bolt pattern. The early SBC like mine is a bit of a POS as far as design, and when I built mine the LS stuff had just come out so I was wary of it... if I knew then what I know now I would use the LS engine. Actually I would have a stroked 351W Ford had I foreseen going to tube chassis like I did... but that's just me.
Only funky thing with them is they seem to push oil thru the PVC system... my neighbor has a new Camaro and he went on a big round about journey down to AZ and back with windy roads, etc. He got back and has 3000 miles on it and it is down a quart on oil! A whole quart in 3K miles on a brand new engine. He said GM claimed they fixed the issue with the LS3 but sounds like they didn't.
Key is to just run a catch can inline with the PVC so you don't actually suck the oil into the intake and keep up on topping off the oil. If you programmed around the PVC you could just disconnect it altogether and run a catch-can breather.
And you're right, for the money you get a lot with those engines.
How do you think the Penske shocks will compare to the Fox shocks? Jerry Woods is pushing the Fox shocks out here so am taking a serious look.
Did you see that Horsepower TV episode where they put one of those motors on the dyno and it did 495hp with a different set of headers?
That motor can't weigh much more than a 6.
Posted by: andys May 9 2010, 04:21 PM
Probably don't need to go the E-Rod motor since he doesn't need CARB compliance, but nevertheless it's a great motor. Nice when you can start with 430HP dead stock! Being active on the LS1 forums, it's truely amazing how much power an LSx motor can make with some very simple mod's.
In my own case I'm running an LS1 motor which makes ~340HP, but it's a street car so I'll probably refraing from any mod's that have much effect on its manners. I could easily upgrade to an LS2, LS6, or an LS3 later on down the road, but I better focus on finishing the body and paint before thinking about that!
LSx an upgraded small block Ford?.......Never heard that one before :-) Keep the photos and updates comming!
Andys
Posted by: byndbad914 May 9 2010, 05:22 PM
How do you think the Penske shocks will compare to the Fox shocks? Jerry Woods is pushing the Fox shocks out here so am taking a serious look.
Did you see that Horsepower TV episode where they put one of those motors on the dyno and it did 495hp with a different set of headers?
That motor can't weigh much more than a 6.
The Fox Shox are rebuild-able/revalve-able so they are likely fine - the Penskes are supposed to be a seriously nice shock with a lot of repeat-ability. Lots-o-hyphens in that sentence. I have Fox Shox on the rear currently but they are single adjustable with nitrogen - problem is to adjust at the track to mess with it requires carrying a nitrogen bottle and the proper regulator setup to do that, a PITA.
These DAs have nitrogen as well, but instead of tuning with nitrogen (you can as well) they also have a knob to adjust them within a somewhat limited range, but adjustable nonetheless on the fly and easily. So if the car is neutral in the middle and plowing coming out I can futz with the rebound and compression settings front and rear to remove that pretty quickly. I had that issue for example before and no good way to tune it out - all the power just picks the front end up and drives it off the track. Getting shocks tuned right can cure that sort of stuff.
Does Fox make a double adjustable (DA) setup now? Or are they still just singles with nitrogen adjustment?
Back to the LS stuff - I didn't see that show but can attest as Andys mentions the LSx engines can make serious power. LS7s are out there with hyd roller cams making around 700HP. At 1.6HP/cube with a hyd setup that is pretty solid - 'course the LS7 spins over 7K rpm with the ti intake valves so that helps.
And I can say, the first time I went to drop a cyl head onto an LS engine and grabbed the gasket, I honestly thought they gave me the wrong ones and put 302 Fords in the gasket set by accident or someone at the shop was playing a trick on me and swapped 'em. Nope. They are very similar with only slight changes in water passage holes; the similarities to the SBF v. SBC are uncanny.
Got some quick pics after tacking in some more brackets on the rear so will upload 'em later.
Posted by: byndbad914 May 9 2010, 06:09 PM
couple shots of the rear, everything is laid out with levels and tape measures since it was all modeled in ProE, not guessing as to the location of the tabs or doing stuff by eye, so I can place them without having the uprights yet (parts are still in work today).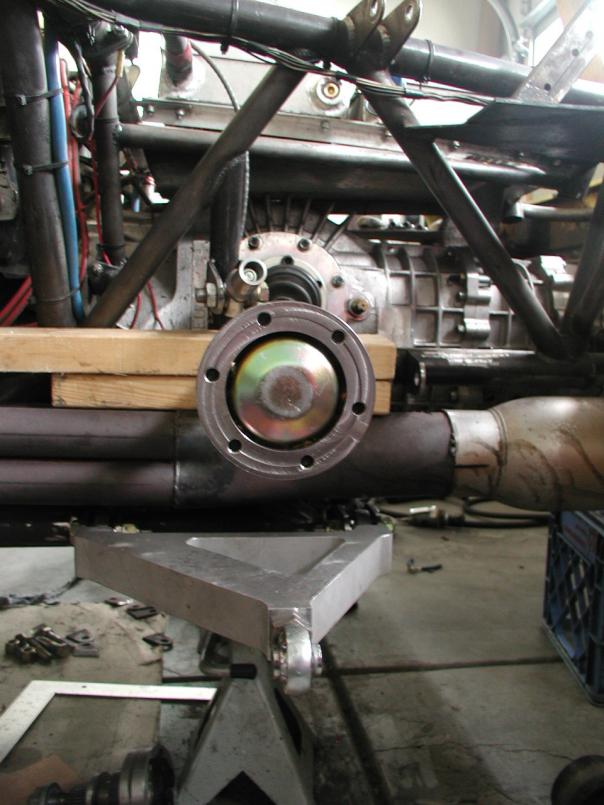
Posted by: stewteral May 10 2010, 11:22 AM
A-arms are billet, water jet cut from plate. No more light-weighting, with the power the car puts down the analysis shows these good with minimal deflection. They weigh just under 5lbs each so while they look heavy, they really aren't in the grand scheme of things.
The chunk of upright I cut off from before was 12lbs so I am ahead of the game at this point and have a nice, beefy arm.
I could machine them down into more of a T shape (like a Corvette lower for example) and get ~2lbs off of them, but the cost of doing that work exceeds my desire to save a little less than 2lbs...
Hey Tim,
I'm enjoying your progress on the suspension project, keep the postings coming w/ photos!
I have a question on your billet A-arms: what alloy did you use? Will you Polish, Paint or Plate them?
best,
Terry
Posted by: byndbad914 May 10 2010, 02:31 PM
I have a question on your billet A-arms: what alloy did you use? Will you Polish, Paint or Plate them?
They are 6061-T651 plate. I used that to get the high strength in the threaded joints to hold the rod ends in - 1D depth into 6061 is right at equivalent to the steel bolt strength, and I will be engaging more than 1D of thread into the arms with the heims at all times, so the weak point is the heims.
I plan to just rattle can them like the rest of the car, nothing special once all of the machining is done. I need to get the shocks, hang 'em and see where they can mount thru the arms and then machine the mounting pockets.
Posted by: sww914 May 10 2010, 10:54 PM
Rebel has the RSR strut much cheaper than Patrick.
I just want to say something nice about my friend Clint who owns Rebel Racing. Good guy, any way you look at it. Smart too. Oh yeah, nice products. I had one customer's car that kept breaking bump steer parts, like 2 a year. I put on Clint's bump steer kit 3-4 years ago and never another problem.
Posted by: byndbad914 May 10 2010, 10:58 PM
deet deet deet deet deet deet deet duhdeet deet deet deet
a low rye duh don't drive too fast drives real fast now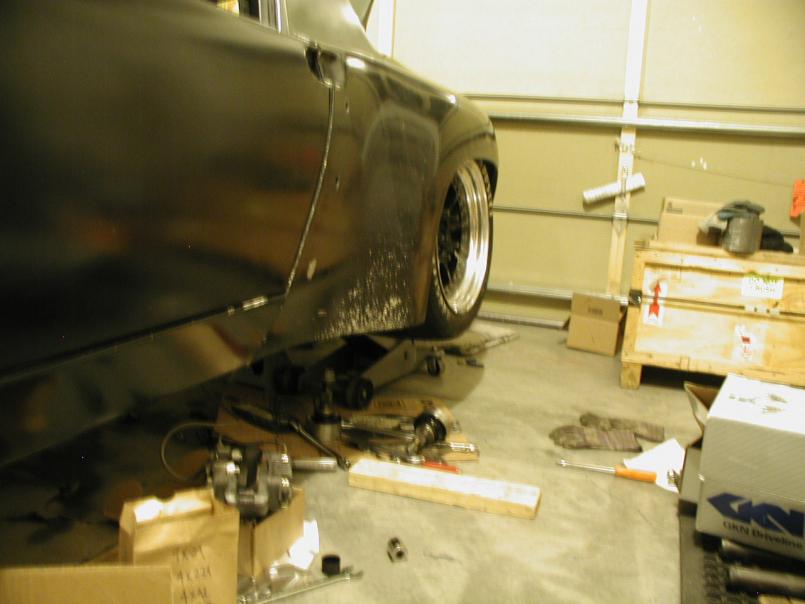
Mocked up the rear after my machinist friend dropped off the upright pieces so I could tack one up and get rolling again. Keep a couple things in mind with these photos, the rear wheel is around 5deg neg camber cuz I grabbed an old chunk of tube arm and barely threaded the ends in for the upper mockup, so they aren't even close to right yet and I will be making correct length arms. And also placement was funky with no caster link on the upper so it is just resting for the photo but close to correct - enough to BS at least.
Still haven't had a call from Kodiak and I called today only to get a voicemail, so we'll see if I ever get wheel halves on order for the front.
Posted by: byndbad914 May 10 2010, 10:59 PM
upright pieces all cut from box beam - I will use plate to cut little rectangles out to fully box these all in before use of course.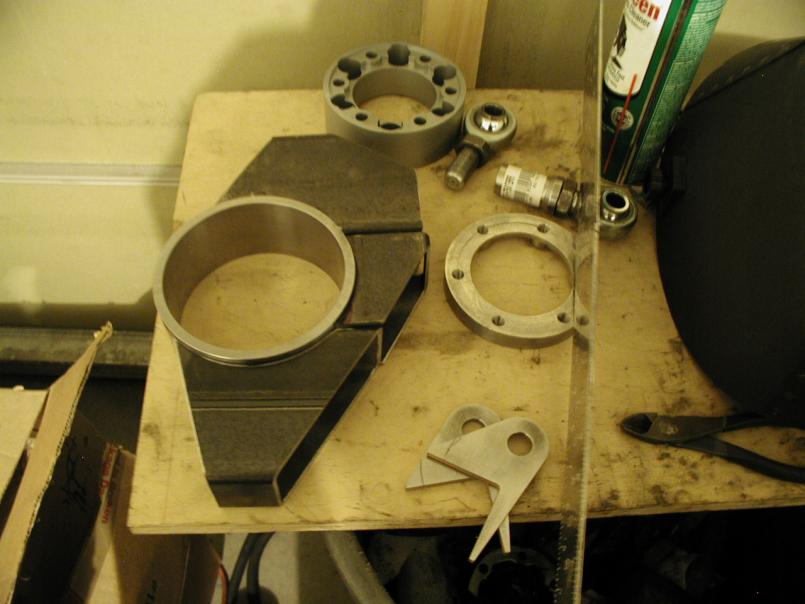
Posted by: byndbad914 May 10 2010, 11:01 PM
mo'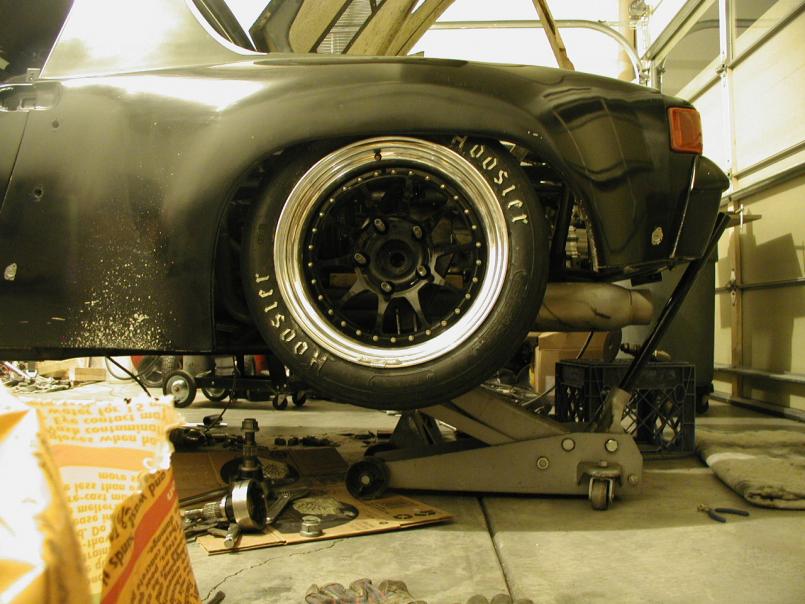
Posted by: byndbad914 May 10 2010, 11:01 PM
mo'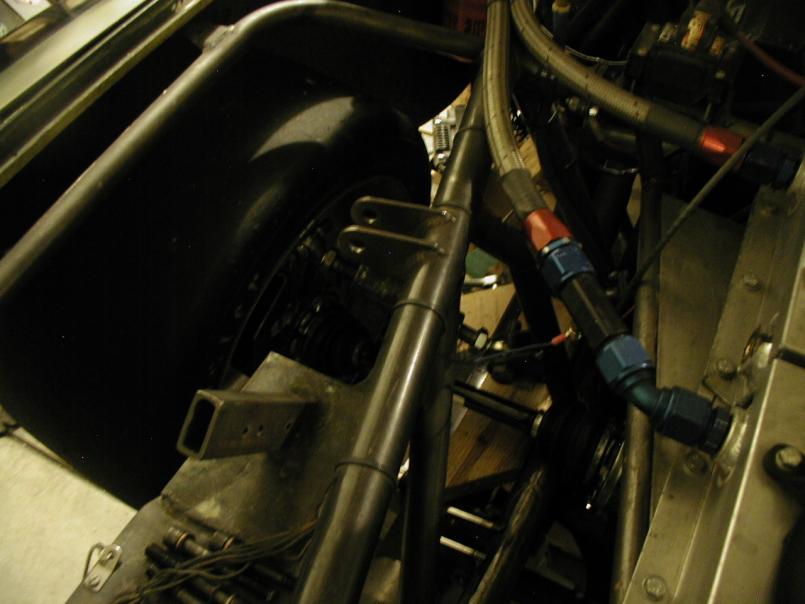
Posted by: byndbad914 May 10 2010, 11:02 PM
mo'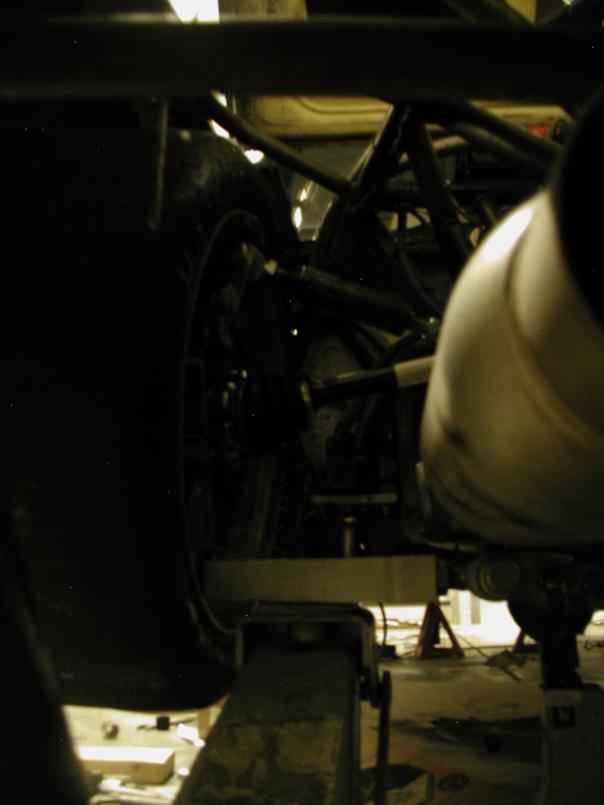
Posted by: byndbad914 May 10 2010, 11:13 PM
my friend back years ago - Chuck McKinney - lived in Pasadena when I first talked to Sheridan about my kit in the mid 90s (Roger was in Agoura Hills and in process of building his awesome car at the time) and essentially this is the ride height I wanted when I built the chassis but somehow that didn't quite happen, so now I am happy to be getting the car down where I want it.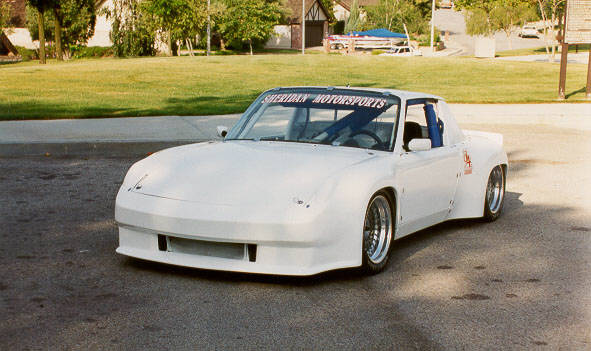
My car runs the same size wheel and tire sizing as his did here. I have never been a "level" car guy, I like rake, so I am just a bit higher in the rear than he was and will be a bit lower in the front for around 1" of rake. Because I can place the front spindles anywhere I want on that upright, I am going to tack everything in, lower the car down on jacks to get ride height front and rear and then set the spindle height by eye for what I like and roll with that (a lot of the reason why the front spindles look the way they do and have wheel clearance top and bottom whereas the rear wheels damn near scrape the heims to get best packaging/leverage).
and here is the ride height I am shooting for so I am pretty much spot on where I wanted to be.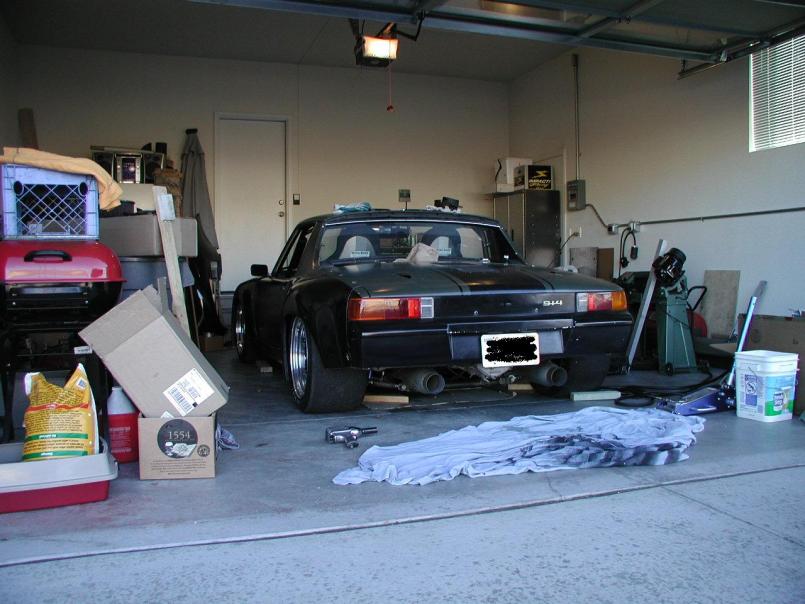
Posted by: effutuo101 May 11 2010, 12:21 PM
Love this!
Posted by: byndbad914 May 11 2010, 02:00 PM
Love this!
Thanks!
Just got off the phone with Aaron at Penske and have the shocks on order - I have to admit I am a PITA customer getting these cuz I have tons of questions given the $$ being spent, but he is super patient and we worked out a kick-ass setup me thinks. I have to run really short springs to get the rates I will need with this car, while the installed heights are tall given the current chassis config, but he got it all worked out with extended mounting eyes, extended spring seats, etc etc to where I have sufficient travel but can run as short as a 6" spring and have adjust-ability. Pretty stoked. And he is giving me a 10% discount and including bump stops on them as well, so he is being really cool.
I am going to base my initial setup on 2.2Hz frequencies front and rear (no bar) - I think a lot of road race guys shoot for higher but not me. Also he said most guys go down in spring rates once they have these shocks, so I will be starting there as that is what I basically had before and it was soft IMO so the new shocks with better compression design/tuning I will likely be fine. The motion ratios on this car with the dual As now means I have to run significantly more spring rate than say a strut with nearly 1:1 ratio - like 3-4 times as much spring rate. I am looking at 1500 lb/in rear rates and 1200 lb/in front rates to get the right wheel rates.
Posted by: brilliantrot May 11 2010, 03:30 PM
Those rates sound about right. Not to long ago I was helping clean out an old race teams Datona Prototype spares and they ran around the same rates on those cars. A lot of the parts I guess were sold to a guy building a Pantera with a 750Hp Ford motor with Motec, x-track 6-speed out of a DP car, and full DP suspension, brakes and wheels. Kida reminded me of your 914. Well other than the transmission was $45k for a used one .
Posted by: Brett W May 13 2010, 10:40 AM
Damn its a shame I couldn't get by there this past week/weekend while I was out in the area. Looks like you are making great progress.
Posted by: byndbad914 May 13 2010, 01:07 PM
I talked to Xtrac a few years back at the PRI show in Florida when I saw them on display - talked for about 25 mins before I bothered to ask for literature with pricing  Pretty much ended that convo.
Brett - yeah, I didn't hear from you but figured you got derailed with other things, it's all good, catch you next time.
Posted by: Brett W May 14 2010, 08:41 AM
Damn Toyota 4wd clutch job. I will hit you up when I come back later this year. I expect a ride.
Posted by: byndbad914 May 15 2010, 01:20 AM
hopefully it is back together by then
Got the right rear fully tacked in and mocked up both sides today and got the right front in with the longer brackets I had made to reduce scrub - the left front will come out and the longer brackets put in - measuring right to left with all tacked in everything was under 1/16" on the wheelbase so pretty amazing how just being anal can work out with a tape measure. The measure from the trans flanges to the uprights are also almost identical for axles lengths. When I redo the left front I will get the cross and wheelbases set exact - I didn't work too hard at it since the left side is coming out anyway. With adjustable upper As I can get it perfect but am shooting for perfect at the lower As with both sides all the same dimensions.
I set the car up to be pretty tune-able such as I will be running 3/4" wheel spacers in the back to shove the tire up to the fender, but also if the car doesn't want to turn, tho' it might look funny, I can run narrower and narrower spacers to reduce rear track width and just have the tires tucked like a tubbed drag car. I don't want to run spacers on the front for tuning as that will increase scrub again.
Now for the bummer - talked to Kodiak today (finally, been a process to say the least) and they have the outers I want but not the inners. Since everyone likes big heavy wheels, the 16" diam isn't so popular so they weren't even going to give me a lead time, just wait until they get an order for a couple more 16s... shit, that could be a year, so I offered to throw an extra $200 at the total to pay for setup time and that would help, so they might get to them in 3-4 wks. He said to call in 2 wks and didn't take a credit card # so who knows how this is gonna roll but at least this guy seems like he is trying to work with me.
So the car is going to be together and waiting for wheels. I really wanted to hit the track first week of June but that ain't happening now. I will pull the nose off and run my current wheels just to test drive it around the block and hope I don't get a ticket for driving a car with no signals or fenders on the front 
Posted by: andys May 15 2010, 05:31 PM
Tim,
You forgettin your roots? Hell you could get a whole set of Diamond wheels for the price of just one of those "I can't get em" wheels. Diamond makes 16's in a Porsche pattern with any off set, any width. That would get you on the track by June for sure!
Great progress!!!!
Andys
Posted by: byndbad914 May 15 2010, 11:28 PM
yeah, I just don't like how they look. I planned down the road to get a set of them as backups so I could have a second set of wheels, but really prefer the looks of the Kodiaks. We'll see what happens in two weeks, I may be buying the backups.
I just spent 2 hrs driving myself apeshit crazy measuring the crosses and having numbers that didn't match or make sense. Round and round I went. Then I thought I should actually double check all of the rod ends to make sure I have them all at he same lengths like I thought I did Apparently I brain farted on one of the fronts and threw myself into a complete whirlwind of BS by adjusting the rod ends 5/8" different So the back is all square, wheelbases match, cross Fd up. I hate when I have a long day because the obvious didn't hit me for 2 hrs 
Funny part is I have 8 spots now on the garage floor from plumb bobbing more points than I had to begin with She'll be square for sure now...
Posted by: byndbad914 May 16 2010, 10:22 PM
more fun in the saga today - found that the rear was not quite right doing all the squaring stuff, I was off 3/16" on the left placement with is exactly the thickness of the brackets, so sho' nuf I checked and I measured to the inside of the brackets on the right like I was supposed to, but then brain farted and measured to the backside on the left - at least I caught the obvious before spending 2 hours futzing with the crosses again
Easy fix since everything is tacked in 'til it all works out.
So relocated the left rear back 3/16", made a couple arms for the uppers now, got the lower As at exactly the wheelbase I want, etc etc and will get started on the front uppers this week. Lower As all around are all square now within 1/16" which is certainly within my accuracy with plumb bobs and tape measures and probably better than the car was new haha and picked up a little longer wheelbase which I wanted as well.
Don' need no sticking frame jig
Posted by: Brett W May 17 2010, 02:24 PM
We just went through issues with Diamond wheels. They aren't always round and true. The set we had has pretty significant runout. Call CCW and get the wheels you need. Tell Kodiak to take a flying leap.
Posted by: byndbad914 May 17 2010, 05:54 PM
pisser is I started out to get CCW wheels and found the Kodiaks - CCW said the wheels would be 18lbs each in my size and Kodiak said around 15 lbs each, so I went with them. 17 weeks later (4 times the quoted lead time) they showed up... 18 lbs each. Had they not lied about the weight, I would have gone with CCW to begin with.
Not going to get a new set of wheels tho', too much money. Already have $2400 in this set, so cheaper to deal with the BS on two wheels than get a whole new set. Assuming I have to wait 5 weeks, while is sucks, is worth not spending another $1700 additional on a whole new wheel set.
Posted by: Brett W May 18 2010, 10:32 AM
I agree. Possibly sell them to someone who can use them?
Posted by: andys May 18 2010, 10:35 AM
Guess I'm always looking at things from a racing perspective; you can either show up on the grid with some Diamonds, or stay home waiting. I know, we ain't racin :-) Gotta get that out of my head!
Andys
Posted by: byndbad914 May 18 2010, 02:33 PM
CCW has an offset that I would prefer too... argh. The real selling point was the looks of these wheels, I really like the centers and they tend to be pretty unique in the 3pc wheel world. CCWs look like every other BBS copy... I dunno. I really try to keep some level of form in the function equation on this car, and I really think these wheels look great on the car.
But the CCWs are damn tempting... to the point of getting a set, then telling Kodiak when they get around to it, make me new halves whenever and have the backup set. If anything could put a more DOT legal tire on 'em for the street I currently just blast around the neighborhood main roads with the slicks when I test drive, but if a cop were a tool he could tow the car as it wouldn't be considered "road worthy" on the slicks, even if I were only a block from home.
Meanwhile, more of this coming  I now have the lower As so fricken square you can't even measure the difference in cross or wheelbase on a tape, so less than 1/32", so the heims are locked down and I started building the upper As in the rear last night.
Rear wheel spacers are down to .350" thick with the bias plys, will be thicker with radials if I go back to them as the top comes way in, around 3/4" like I mentioned before. Nice thing about the thin spacers is I can use the hub centric feature on the hub itself, not the spacer, so less tolerance stackups which is what I am really after.
So now I don't feel so bad letting the cat out of the bag - this car was NOT square before by any stretch of the imagination or tape measure. I spent two days after I picked it up, one weekend before I moved to CO, with my circle track friend Scott trying to set this car up. He has built track cars on the floor of his garage in Moreno Valley and decades of racing means he knows his shit. We fought this car, gave up and got it as close as possible after a 15hr Sat and 12hr Sunday. The two of us can square a car within a couple of hours typically. Right off the bat we realized that somehow the whole rear end is shifted over 5/8" (!) and why I had all the new custom brackets waterjet so I can get everything where it belongs - the right side brackets in the rear are 5/8" longer at the lowers, same length at the uppers as the left.
Before I had different length tubing right to left, all sorts of shit just trying to get by, so now you guys all know why I decided to just hack in so deep and really redo everything.
So for guys like Brett - imagine what my RCs and ICs were like before! Certainly not symmetric and would have wandered like a mofo. And if I lowered the car 1" it would start bump steering in the rear to the tune of 1/8" in the next inch... PER SIDE.
Embarrassing to admit since this is stuff I caught and would have had fixed, but unfortunately I was moving out of state by the time it was in finishing stages, so I had to accept what I got.
Car bodywork is within 1/16" on all corners now with lower arms at exact same adjustment - damn fricken tight for a garage job I had to square the rear body work a little (it was out a bit as I fudged it to make the previous stuff seem ok) and now am plumb bobbed exactly the same fender to hub on the front and 1/16" out on the rear so a little more squaring, but everything is where it should be.
Finally. Need :smiley with poor bastard wiping sweat from his brow:
Feeling pretty good as it should be a much nicer car to drive now. It was a handful before when it wasn't squared up - makes a car freakin' DARTY, 'specially at speeds around 150-160mph when things aren't square. I need to knock on wood to remove the coming jinx, but I am really looking forward to seeing how this thing drives with the new stuff.
Posted by: andys May 18 2010, 03:21 PM
Bet it felt good to find those dicrepancies; not good that they were there at the start, but good that you can now make it right 
How good is the chassis in the horizontal plane?
Andys
Posted by: byndbad914 May 18 2010, 04:49 PM
Bet it felt good to find those dicrepancies; not good that they were there at the start, but good that you can now make it right
How good is the chassis in the horizontal plane?
Andys
yeah, feels good to have it right. In the horiz plane the whole car is level (mess with the jack stands a bit to get it totally level before I even started) and you can string around them and it is level on the bubble level, so I would guess within 1/16" all around.
Hard as hell to get that but part of what I did when I had the chassis tabs made was put a level feature on them (look back at my pic of the cutout plate and you will see lots of flat edges), so when I installed them I used a level to get that feature perfectly level to the leveled chassis, so everything tacks in perfectly. I might be off 1/2 deg here and there as those small, round chassis levels can be hard to read when you have your head shoved up in the fenderwell, but 1/2 deg over a 2" bracket won't be noticeable. I was going to use my laser finder but the issue is my garage floor isn't level enough to get the level to be level (hows that for play on words), so I leveled the arms, leveled some string at the four corners with a bubble level and measured with the tape up to the arms - can't measure any difference on the tape so good 'nuf for me.
I am super, super anal (probably why I moved from cars to engineering so smoothly) and that is why it took me four days to get the lowers all where I wanted them and relocated brackets to fix even 1/8"... way too anal really
I can guarantee this car wasn't this good from the factory Rubber bushings alone would deflect out of my tolerance zone.
Posted by: byndbad914 May 24 2010, 05:38 PM
been pretty busy on the car actually - got the rear tubes and mounts all finalized and boxed the uprights so the rear is all tacked together and looks great. Ride height is right where I expected it and the toe links all fit in the wheel. I have 1/2" adjustability up and down from center to dial rear bumpsteer in to exactly what I want (none, toe-in, or toe-out is all possible).
Posted by: byndbad914 May 24 2010, 05:39 PM
Posted by: byndbad914 May 24 2010, 05:40 PM

Posted by: byndbad914 May 24 2010, 05:46 PM
having the front upright tubes redone (my bad, slight mistake on my part and once I saw what I did, it was one of these moments  ) so I should get new ones back near the end of the week. It has been 13yrs or so since I have built a car from this level and the rust is showing
Shocks should be here Wed, talked to Penske today and he is set to ship them tomorrow and will next day them no extra charge to keep me moving. Gotta tell you, thus far I am very impressed with Aaron at Penske. Actual real, good customer service is hard to come by for some reason and he has been great.
So I should have shocks Wed, can set into the car and determine where I can cut the mount pocket on the lower As, etc and get those over to the machinist as well. I need them to know exactly what width I can make spacers, etc and the pocket to get full travel in the monoball mount.
here is final rear ride height and wheel placement. I have 1/4" spacers in there - I had decided to go with none until I found out that the wheels wouldn't bottom out on the Carrera flanges The wheels have big chamfers on the back but the hub-centric Carrera hub has a large diameter step, then the hub centric stuff, so the wheel sat on that step, not the mount flange. It is 0.230" tall, so I am running 1/4" spacers both sides to get a correct wheel mount.
Posted by: Brett W May 27 2010, 02:48 PM
Dude, what does your rear bump toe curve look like. Looks very scary.
Posted by: byndbad914 May 27 2010, 06:58 PM
Did everything in the computer to make sure that angles all work to have ability to get only a few thou bumpsteer thru first two inches of motion - much after that and the CVs will start bottoming out anyway and so will other items. I haven't measured it yet in the car but I have it adjustable to make sure it can be tuned to near zero or a few thousandths thru my range of motion. Preliminary quick check with a laser finder and tape measure looks fine, but not measuring down in the thous, just less than 1/16".
I can tune in either toe in on compression or toe out as well but am going to start with zero to slight toe in. The model predicted like 0.012" toe change at 1.5" compression IIRC, don't have it open as I write this.
Posted by: andys May 28 2010, 09:34 AM
After all the fabrication is done, the real work starts :-) Getting everything aligned, etc. You got a bump steer plate?
Then once you arrive at the track, make sure you brought along all the goodies necessary to to check and adjust accordingly since you'll be starting from zero. I know you don't like doing adjustments at the track, but I think in this case you'll need to invest a good deal of time with a solid methodical approach; it's a lot of work....I personally kind of enjoy that end of it as long as progress is made, otherwise it can be real frustrating. Once you iron out the basics, I'd be curious to see how the camber gain works out; a tire pyrometer is your friend.
Great work; keep the photos comming, and good luck!
BTW, I'll be meeting Terry @ SOW on Saturday for more testing and development.
Andys
Posted by: byndbad914 May 28 2010, 08:19 PM
doing adjustments to the five link setup before was really tough - it would often take me 2 hrs to get the rear setup at home. Now I have a much better designed setup and can change it pretty quickly. I will definitely be doing more tuning at the track now, especially with the Penskes being so adjustable just turning knobs I can easily mimic in spring rate, etc.
Agree about tire temps being key - my friend the circle track guy can damn near tune a car by only using tire temps and nothing else and I have gleaned a lot of what he does. 'course driving it will tell you a lot but you can come in, say nothing, he'll take temps and start in telling you what the car is doing without you saying anything.
Brett - checked the computer and then the actual car to confirm a couple things. I know you know, but many here might like the info. The lower arms are parallel to ground - if the toe link is in plane then it needs to be parallel as well. The upper link is 17-17.5 deg, so if the toe link is mounted at the same point inside, it needs to go out at 17-17.5 degrees. In my case the link is in between them and not at 50% but closer to the upper mount than lower mount, so the angle is around 12.5 deg degrees that it needs to be. The left one bumps in with the washer stack centering the link 1/16" at 2" compression. The right bumps in just over 1/16" at 2" (not so perfect at tacking and welding in place as the computer). I can move the link up and down to vary this, and when I find what I like will custom machine spacers to get exactly what I want to remove the washer stacks... mostly cuz they are an absolute PITA to get wedge in with the rod end
Talked to John at CCW yesterday, by the time I removed my head from my arse I realized it was too late to call and order wheels today. I just needed my notes on backspacing to know what to get now. I am going to try to sell the Kodiaks tho' I like the looks better, John can get the aggressive backspace I want for the fronts and Kodiak will take too long. He can have me a set in 2 wks and has some nice light inner barrels in stock to keep weight down around 18lbs each again. I just wish his LM20 was offered in the 130mm bolt pattern and I was going to attempt to convince him to make me a set and modify the center slightly to make it work I don't want to pay for that so I need to convince him every Porsche guy would want the slightly nicer style hahaha.
Posted by: byndbad914 May 29 2010, 07:24 PM
relocated the front brackets a bit to lower the front (see aforementioned moment I had before, this is part of the fix). I should now be about 1/2" lower in the front than the rear which is what I want. The tires right now are slightly smaller diam in the front than rear so I may have around 3/4" or so of rake which will look nice.
Always good to get done re-tacking everything into place and get the level out and find out where it all ended up. I couldn't have done this good if I tried any harder This is with both A arms level, then my long level across both of them - they are perfectly level to each other.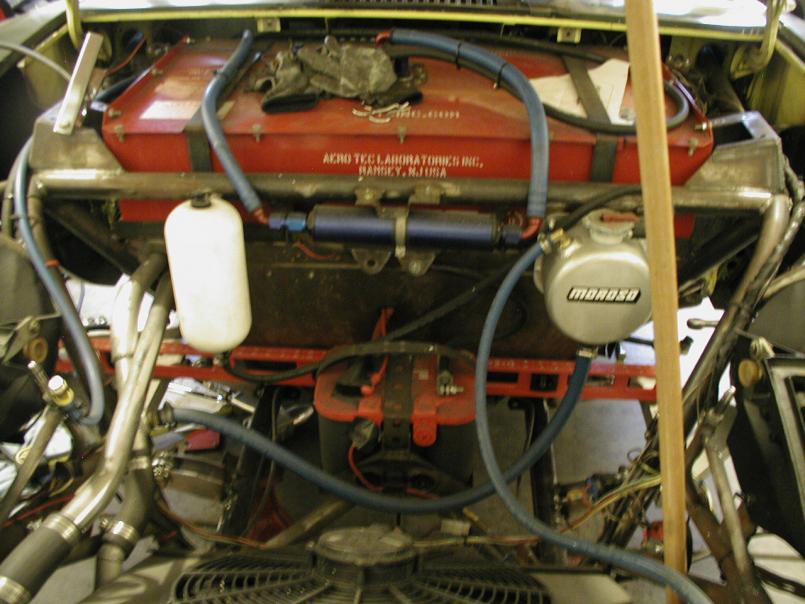
Posted by: byndbad914 May 29 2010, 07:24 PM
Posted by: byndbad914 May 29 2010, 07:25 PM
Penske shocks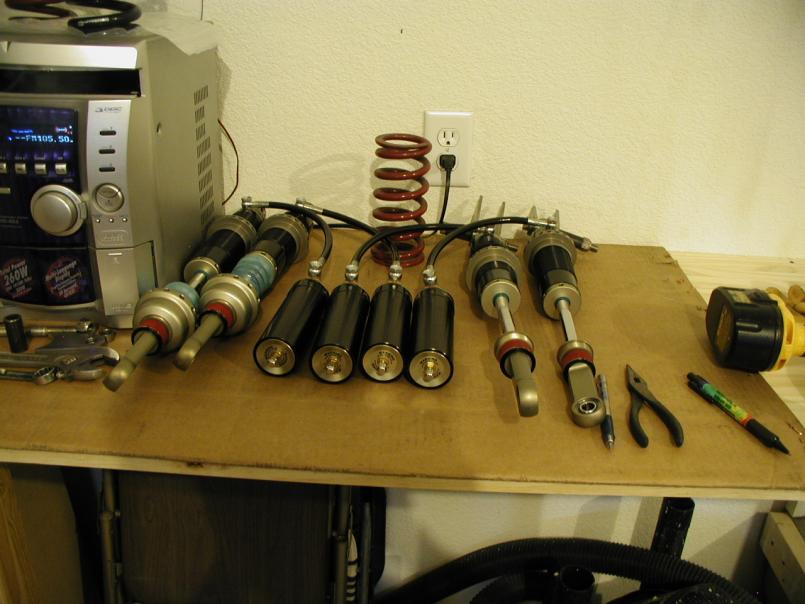
Posted by: byndbad914 May 29 2010, 07:27 PM
Brett - this might help to see the arms in relation to each other for bumpsteer tuning.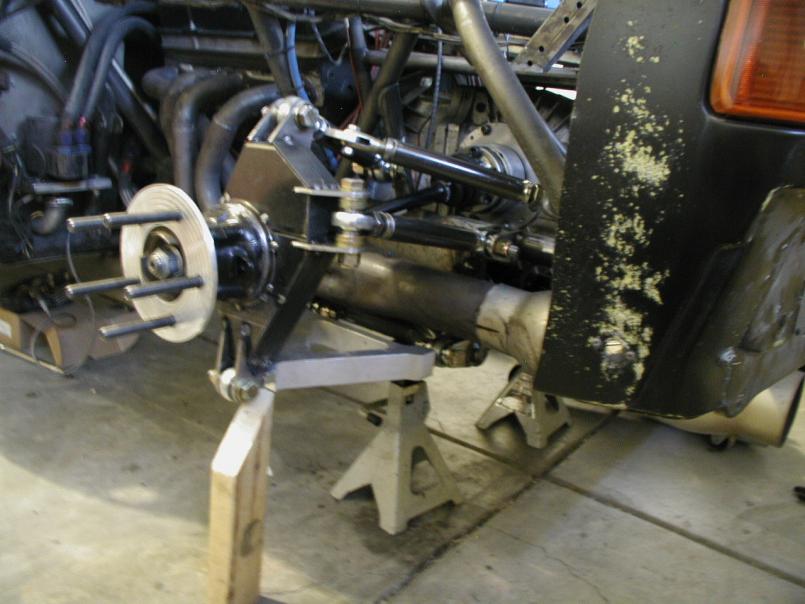
Posted by: byndbad914 May 29 2010, 07:31 PM
a look-see at the front uprights, no upper A arms yet. Will wait to get the wheel situation figured out first, then set the lower A to work with whichever backspacing I can get, then make the upper As correct to that geom. I had begun to weld in the upper mounts but then realized I better get everything else first, then know whats I gots 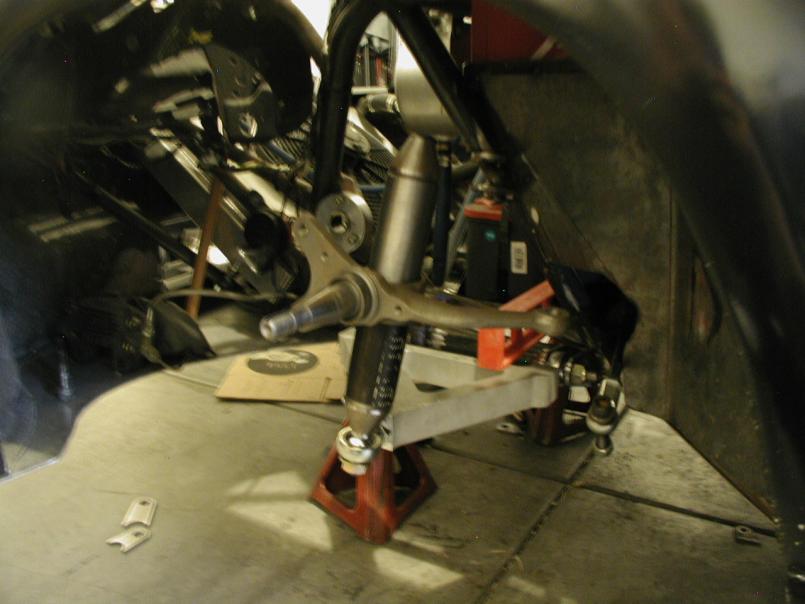
Posted by: puff adder May 31 2010, 05:50 PM
Amazing! Just awesome. As an artist and creator I am very impressed.
Those Penske shocks look sweet too!
Posted by: stewteral May 31 2010, 11:02 PM
Brett - this might help to see the arms in relation to each other for bumpsteer tuning.
Hey Tim,
Your suspension work is beautiful! The rear looks very CAN-AM-ish!
I'm interested in your design approach to the toe change as controled by
the "steering link." Will toe-in increase on jounce?
Keep those great pics coming: I can hardly wait to see the completed front suspension.
Best of luck,
Terry
Posted by: Brett W Jun 1 2010, 12:40 PM
That looks better. Must have been perspective. You may look widen the tabs for the toe link, just to have plenty of adjustment for bump steer. Looking good though.
Posted by: byndbad914 Jun 1 2010, 01:22 PM
thanks to all for the kind remarks!
Brett- yeah, figured having a more level sorta iso shot would make everything clearer and it was the perspective of the shot, after your remark I could see it wasn't the best angle of a photo.
I'm interested in your design approach to the toe change as controlled by
the "steering link." Will toe-in increase on jounce?
Going beyond ride height (droop) only toes-in... however, I can tune compression, which I am most concerned with anyway, to have virtually zero toe (.005" toe change in 2" compression), or tune for either bump toe-in or toe-out by moving the outer attachment point up/down. compression is of course loaded, and if the tire is mostly unloaded (drooping say 1") then the normal force and friction it is providing isn't as important as the loaded wheel's.
Posted by: Brett W Jun 2 2010, 08:45 AM
A little toe in under braking isn't a bad thing. It will make the car "feel " little better. Not a bunch of toe change but a small amount will help driver feel and improve confidence.
Posted by: Randal Jun 2 2010, 09:04 AM
thanks to all for the kind remarks!
Brett- yeah, figured having a more level sorta iso shot would make everything clearer and it was the perspective of the shot, after your remark I could see it wasn't the best angle of a photo.
I'm interested in your design approach to the toe change as controlled by
the "steering link." Will toe-in increase on jounce?
Going beyond ride height (droop) only toes-in... however, I can tune compression, which I am most concerned with anyway, to have virtually zero toe (.005" toe change in 2" compression), or tune for either bump toe-in or toe-out by moving the outer attachment point up/down. compression is of course loaded, and if the tire is mostly unloaded (drooping say 1") then the normal force and friction it is providing isn't as important as the loaded wheel's.
Fantastic work - man, what a project.
Can't wait to hear how the car does on the track.
Ever going to run that puppy at one of the California tracks? Would love to see you tearing around Infineon, Laguna Seca or Thunderhill. That would definitely be a track day I wouldn't miss.
Posted by: byndbad914 Jun 2 2010, 10:01 AM
yeah, will be interesting to see what the improvement is on the track... knowing my luck maybe a second
I would have to do some serious sorting on the car before branching out to far away tracks, but would love to run Thill with it - that track looks like fun. Willow Springs in SoCal is 1000 miles and it is around 1100-1200 miles to Thill so pretty significant commitment to roll out to one of them, but I like the bigger tracks in CA and would also like to run on Miller in Utah - that one is close enough that may be a reality if the sorting goes well, maybe as early as next year.
Posted by: byndbad914 Jun 2 2010, 05:28 PM
Oh yeah, forgot to mention, I did in fact call and order the CCW wheels yesterday, and just talked to John on the phone again here so they are getting rolling on them. As mentioned before he has some deep, 9" barrels that are an "old stock" lighter version that I can use - to make it work out I have 10.5" fronts coming and 11.5" rears v. my current 10/11 setup.
The front wheels are gonna look a bit funny IMO given the thin 1.5" outer barrels, but it is a sacrifice I need to make to get it to work out for the best.
Here is a shot of a car on his site with a 1" barrel, so I have a liiiiittttllle bit more lip than this at least... gonna use the black centers again of course, not polished like this shot.
http://www.ccwheel.com/files/zoomed-image.php?view=gallery&make=CHEVROLET&model=CORVETTE&chassis=C5&wheel=Classic&id=09.jpg
Posted by: byndbad914 Jun 5 2010, 01:17 AM
So I am sure many of you will like this one, certainly Brett and even Randal... traded the tow vehicle in tonight for a new Vette Grand Sport I have never thought I would ever use this acronym but OMFG is it awesome! Has the LS3 in it, dry sump, 6spd.
I have been wanting a C6 for quite awhile and I have really been eyeballing the Grand Sport since I am hoping they are going to be pretty limited production in the long run, but they had them in 63, then in 96, now hopefully limited for the C6 body but it is going to be a standard option now, so as long as run #s stay down they will be worth something someday.
I went in just testing the water, turns out they had a buyer for my truck already lined up looking for one, gave me a smokin' trade in, took a chunk off the tag, etc - I got a fully loaded (every option but one lame one) setup for the price of a pretty stripped down GS so I couldn't resist that one.
I went to a rental center earlier today and figured out I can just rent a moving truck for around $100 with mileage to run out to the local track, I can unbolt all of their hitch stuff and am going to weld up my own adapter to just bolt my hitch up Then I just bolt it on and off in about 5 minutes each time. At least that is the plan. They don't care if you tow with it, tho' they might not like the hitch stuff, but whatever, what they don't know won't hurt 'em
Posted by: stewteral Jun 5 2010, 11:23 AM
So I am sure many of you will like this one, certainly Brett and even Randal... traded the tow vehicle in tonight for a new Vette Grand Sport
I have never thought I would ever use this acronym but OMFG is it awesome! Has the LS3 in it, dry sump, 6spd.I have been wanting a C6 for quite awhile and I have really been eyeballing the Grand Sport since I am hoping they are going to be pretty limited production in the long run, but they had them in 63, then in 96, now hopefully limited for the C6 body but it is going to be a standard option now, so as long as run #s stay down they will be worth something someday.
I went in just testing the water, turns out they had a buyer for my truck already lined up looking for one, gave me a smokin' trade in, took a chunk off the tag, etc - I got a fully loaded (every option but one lame one) setup for the price of a pretty stripped down GS so I couldn't resist that one.
I went to a rental center earlier today and figured out I can just rent a moving truck for around $100 with mileage to run out to the local track, I can unbolt all of their hitch stuff and am going to weld up my own adapter to just bolt my hitch up
Then I just bolt it on and off in about 5 minutes each time. At least that is the plan. They don't care if you tow with it, tho' they might not like the hitch stuff, but whatever, what they don't know won't hurt 'em TIM,
Congrats on the new C6 Gran Sport, it's a great car. Share a couple pics, won't you?
The front engine/rear trans-diff is a fantastic layout giving the car great balance.
I've played with some stock C6s on Streets of Willow Springs and while I can pass them (much bigger tires + better power-to-wt), it is easy to see how well they handle and how easy they are to drive. A comfortable car is a fast car!
I just hope you won't give up on the 914 and go ALL CHEVY, ALL the TIME!
Terry
Posted by: byndbad914 Jun 6 2010, 06:45 PM
Cleared over 100 miles already in just a couple of days on the new car, bought it with 8. I will be using the 914 for racing for sure, this was one of those deals where I rarely would drive the truck due to mileage and diesel cost, as well as, I didn't want to rack the miles on it since it was so nice, so it didn't do me much good other than towing. So if I am going to be driving my $800 Volvo all the time, might as well as step up and get something I have been longing for since they restyled to the C6.
I have a few friends with the C5 Z06s and it is nuts how well they run with just an upgrade to Kumhos, but I just don't like their shape. The C6 is the sexiest Vette to me other than 2nd gens.
Car is on hold this weekend because my machinist buddy is off camping so no machining. I need him to make some bracket spacers for the shocks since my other ones from the Foxes didn't quite match, and he had to modify a couple shock brackets since I am putting them in with a bit different (but better) config than I originally planned. Next weekend hopefully. Then the wheels should show up the following week and I can get to finishing the front suspension.
I will get some pix of the car one of these days - was out at Bandimere Drag Strip today with my buddy's Volvo and off to dinner here. It is dark gray with dark gray wheels, they have to schedule to get the silver stripes on the fenders, and had two tone leather wrapped light/dark gray interior.
looks like the top car on this site but with silver instead of red in the trim package.
http://www.corvettemuseum.com/specs/2010/index.shtml
Posted by: Brett W Jun 7 2010, 10:48 AM
Now you can get all the suspension measurements you need from your daily driver. Great. Yes the C6 is the sexiest Vette built. Great looking cars. Drivetrain is awesome. Interior still feels chintzy. Cam, headers, tune and exhaust and your car will gain 100+hp.
Posted by: byndbad914 Jun 7 2010, 11:39 AM
http://www.harrop.com.au/root_folder/superchargers/htv2300_ve_g8gt.html
a couple years away but likely the path I will take. I had a 2004 Ford Lightning pickup and thought I liked superchargers before I had that truck... after having it I am thoroughly convinced a twin screw roots SC is the only way to go. Absolutely instant boost, flat boost curve and always at max boost. And maintains all drive-ability and I have to admit, this Vette really rides nicely. Not a Caddy by any means but if you rode in my F250 it was harsher than this car and won't pull a G in a turn.
I have seen 0.9Gs so far as I continue to get used to it, on my way to work today.
Posted by: Randal Jun 7 2010, 01:14 PM
If you're only going to make only one trip to California, then come and run Laguna or Infineon. If I had to choose just one, it would probably be ......ahh, can't make up my mind, both are just great.
At Laguna, driving your Beast from 4 through 5 and up the hill through 6 and to 7 (corkscrew) will be about as much fun as you can have while alive.
Likewise just getting around Infineon is a thrill.
BTW you can get great deals on diesel pickups out here now. The great thing about diesels is that they run down the road at 70 turning over 2K, the engines last forever.
And if the towing gets way expensive, just bring the new Vette.
Posted by: ArtechnikA Jun 7 2010, 01:28 PM
At Laguna, driving your Beast from 4 through 5 and up the hill through 6 and to 7 (corkscrew) will be about as much fun as you can have while alive.
...If you can find a sanctioning body that will let you run a non-Porsche engine (iffy with PCA) and if you can muffle it down under 92 dBA...
Posted by: byndbad914 Jun 7 2010, 06:20 PM
If you're only going to make only one trip to California, then come and run Laguna or Infineon. If I had to choose just one, it would probably be ......ahh, can't make up my mind, both are just great.
At Laguna, driving your Beast from 4 through 5 and up the hill through 6 and to 7 (corkscrew) will be about as much fun as you can have while alive.
Likewise just getting around Infineon is a thrill.
BTW you can get great deals on diesel pickups out here now. The great thing about diesels is that they run down the road at 70 turning over 2K, the engines last forever.
And if the towing gets way expensive, just bring the new Vette.
when I lived out there in SoCal I always wanted to run LSeca, would go there for the historics to watch, etc but never found a way to actually get the car on the track. As A..A says, it seemed like I needed to find a club that would let me run with them and I couldn't at the time, nor would I meet that dB rating.
Infineon would be awesome but the walls freak me out
And a friend met the tire barrier there one time.As for diesel trucks going for cheap money, I agree with you, and when the dealership came way up on my trade in value I just couldn't walk away! I got more for my truck than I expected, tho' wouldn't argue with it as I took crazy good care of it like all of my cars, so I always have clean/straight vehicles. I won't be surprised if they get their money out of it, but I doubt much more than that unless they find a fish to fry.
Older trucks are so cheap that when Uhaul and the like becomes a total PITA I will be setting aside some $$ and in a couple of years pick up a good, used F250 from back in the 90s, throw cheap liability insurance on it and use it to tow. For now, renting a Uhaul should be about the same for a few track days as insurance and maintenance would be for a year on a pickup, so we'll see if it works out or not. Until I deal with jumping thru those hoops I won't know whether I like my latest idea or not
Posted by: andys Jun 7 2010, 08:29 PM
Yeah, Laguna is huge fun! Sears Point (still can't get used to saying "Infineon") lacks run off areas, so any off track "event" will likely end with a damaged racecar if you don't also get hurt in the process.
Andys
Posted by: byndbad914 Jun 14 2010, 06:56 PM
funny, as soon as I shot pix last Monday the site went offline I'm bad luck! Anyway, some shots of the Grand Sport.
I drove it to work last Monday and apparently birds are haters - I parked, came out just around lunch to go to a meeting in another building and there was crap on the rear fender, no trees in sight, etc. Then I go back after the meeting and at the other building one dive bombed the gas cap right about the same spot! No trees, etc in sight! Haters hahaha.
Posted by: byndbad914 Jun 14 2010, 07:03 PM
Posted by: byndbad914 Jun 14 2010, 07:05 PM
got lucky as this one had the full 4LT leather wrapped interior including the dash, etc so the blend of the two tones in the interior is much nicer than the black with rather light silver inserts. The dark grey with light grey looks better IMO.
complete with great closeup of the dive bombing...
Posted by: Brett W Jun 15 2010, 03:00 PM
Time for a tune, cam and exhaust. Get with it. I can't believe you haven't already done that.
Posted by: byndbad914 Jun 15 2010, 09:32 PM
The plan is to keep it stock for the warranty period, then add a supercharger and tune for E85. We'll see if I last the five years of the warranty or if I do it sooner!
I really like the drive-ability of the LS3 and generally am okay with the 430HP it has currently. I may convert to E85 before the warranty period is up, but it voids the warranty...
Posted by: camaroz1985 Jun 16 2010, 07:30 AM
Friend of mine has an LS3 Vette. With a cam change and E85 tune it put out over 500 rwhp. Definitely a capable package.
Posted by: byndbad914 Jun 17 2010, 05:05 PM
Hit Bandimere last night for Wed Night Test and Tune... It ran 103mph at a mile high altitude and 88-90deg weather. Times varied from 14.25 to around 14.45 with horrible 60ft times - the car will spin the tires, the worst run felt like a bit of wheel hop in the rear actually, and traction control didn't seem to make a difference as I tried it with and without. Also, of course, it is a stick so I lose time to that not slamming gears.
Should be 13.70s at that mph, but it was nice to see a car that would run that mph at this altitude. That said, the need for more HP is already raring its ugly head There was a supercharged Lingenfelter Camaro out there running in the upper 12s (he was on pump gas which is beyond me with all the E85 around CO) and a whole bunch of stockers that were slower than the Vette with the LS3, so I am seeing a pretty easy move to 12s...
On topic again, finally, machinist is on the way with some parts too so I can get progress rolling again! Here in a few minutes. Got an email from UPS too that the wheels should be in my hands on Monday, so after I get the last of this stuff mocked up, I can get the wheels handled next week and hopefully next weekend get close to finished with all mockup work and be ready to weld all the bracketry up.
'Course the best laid plans thing will kick in so it will longer instead of two weeks to finalize but at least it appears I can get rolling again!
Posted by: stewteral Jun 17 2010, 07:25 PM
http://www.harrop.com.au/root_folder/superchargers/htv2300_ve_g8gt.html
a couple years away but likely the path I will take. I had a 2004 Ford Lightning pickup and thought I liked superchargers before I had that truck... after having it I am thoroughly convinced a twin screw roots SC is the only way to go. Absolutely instant boost, flat boost curve and always at max boost. And maintains all drive-ability and I have to admit, this Vette really rides nicely. Not a Caddy by any means but if you rode in my F250 it was harsher than this car and won't pull a G in a turn.
I have seen 0.9Gs so far as I continue to get used to it, on my way to work today.
Tim,
I agree! The intake manifold/supercharger is a fantastic way to go!
BTW: about the comment about chintcy interior: who can look at the interior while going that fast?? I like flat black everything on the interior so the Driver is not distracted.....Ijust MHO.
Terry
Posted by: puff adder Jun 18 2010, 07:22 AM
Interior? Hmmm, the last few years, I've looked at interiors as how easily they come out, and how much weight it'll save without.
You should also consider Thunderhill Raceway. It's a seriously fun track that rewards big powered cars.
Posted by: byndbad914 Jun 18 2010, 03:44 PM
I won't be removing interior from the Vette. I agree that the stockers are chintzy feeling, but I have to admit the 4LT leather wrapped dash and door panels, etc actually makes it pretty nice inside. And the two tone gray v. all black or black and silver gives it a bit more of an appeal, makes it seem a bit more Euro/upscale.
It's really comfortable too. I had to commute to another facility that is 40 miles away on Wed and felt great. Normally I get fidgety in virtually any car seat within a half an hour. Great news is it got 29 mpg on the freeway! Seems to get about 19 around town when I drive it "normal", and 13-16 when I drive it like I consider "normal"
Posted by: byndbad914 Jun 21 2010, 09:50 PM
was taking some pix of my Kodiak wheels and grabbed a quick (blurry so too quick apparently) shot of the front wheels from CCW. I prefer the look of the Kodiak centers since the satin finish matched the paint really well v. the rough/flat centers here, but the backspace as you can see is really deep now with the widened front suspension.
To be honest, I thought the big backspace was going to look hideous, but John did a good job and they really don't look that bad to me in terms of front wheel lip. Certainly better than I expected so at least the car won't look ugly, as well as have much less scrub radius now (1.5" v. 5" before!!!). I will get better shots once tires are on, I can mock em up on the car and show how it will look when installed.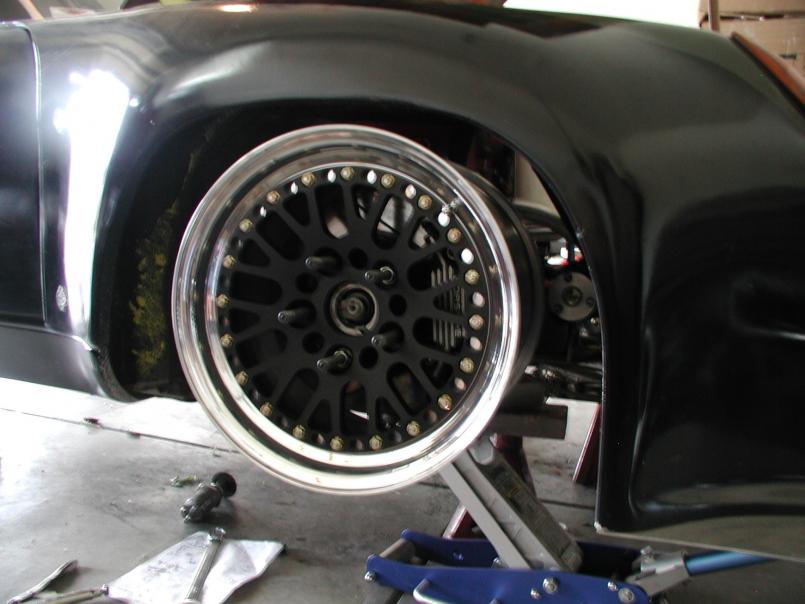
Posted by: stewteral Jun 21 2010, 10:16 PM
was taking some pix of my Kodiak wheels and grabbed a quick (blurry so too quick apparently) shot of the front wheels from CCW. I prefer the look of the Kodiak centers since the satin finish matched the paint really well v. the rough/flat centers here, but the backspace as you can see is really deep now with the widened front suspension.
To be honest, I thought the big backspace was going to look hideous, but John did a good job and they really don't look that bad to me in terms of front wheel lip. Certainly better than I expected so at least the car won't look ugly, as well as have much less scrub radius now (1.5" v. 5" before!!!). I will get better shots once tires are on, I can mock em up on the car and show how it will look when installed.
Hey Tim,
SEXY WHEELS! They look great and appear to spaced perfectly.
Best,
Terry
Posted by: Randal Jun 22 2010, 03:02 AM
funny, as soon as I shot pix last Monday the site went offline
I'm bad luck! Anyway, some shots of the Grand Sport.I drove it to work last Monday and apparently birds are haters - I parked, came out just around lunch to go to a meeting in another building and there was crap on the rear fender, no trees in sight, etc. Then I go back after the meeting and at the other building one dive bombed the gas cap right about the same spot! No trees, etc in sight! Haters hahaha.
Nice choice, a real beauty.
Posted by: byndbad914 Jun 22 2010, 09:17 PM
Thanks Randal, so far the color combo has been a hit with friends, etc!
Stew (and everyone else) - mocked the wheels on the rear as well, they fit great too but took the fender back off to just show how wide the wheels really are on this car Really puts it in perspective without the tires mounted...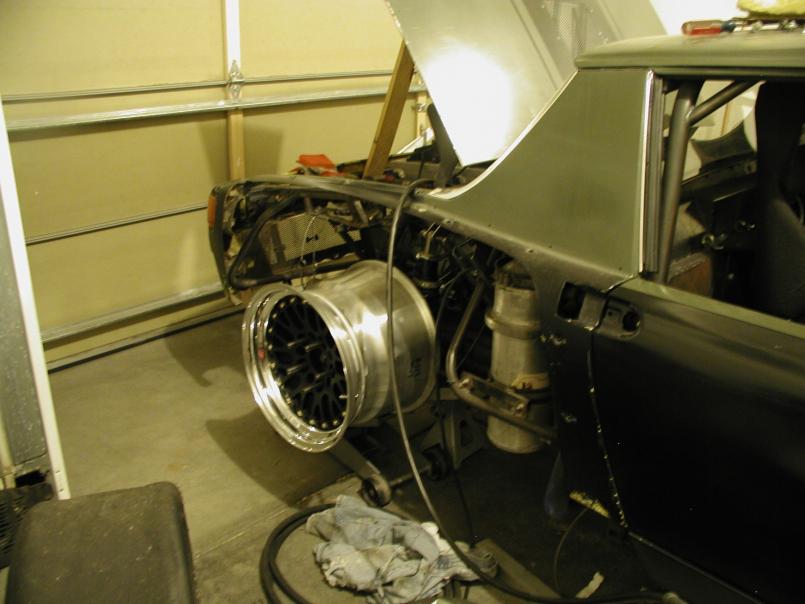
Posted by: byndbad914 Jun 22 2010, 09:19 PM
better shot of front, but I suspect my batteries are getting low since all are slightly blurred. Note the other front is in the background to get a feel for width again.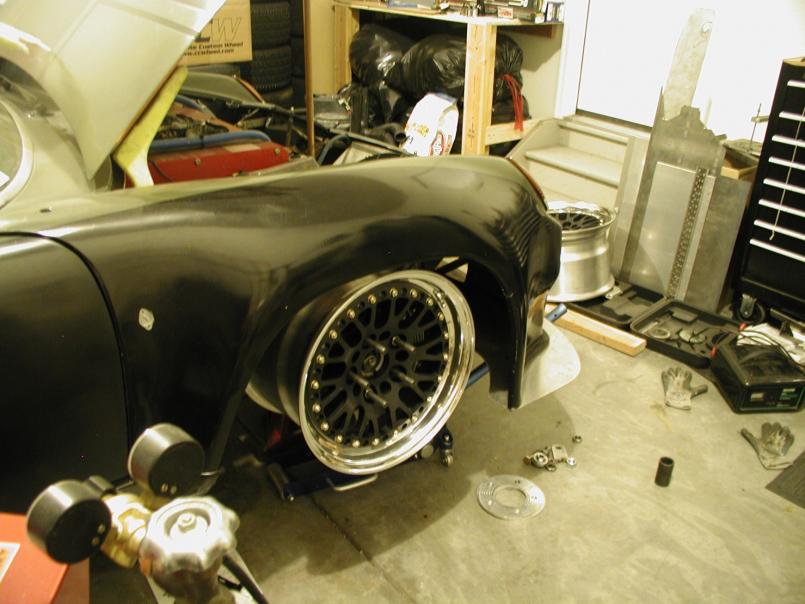
Posted by: byndbad914 Jun 22 2010, 09:21 PM
too much crap in the way - garage is tight with all this stuff going on!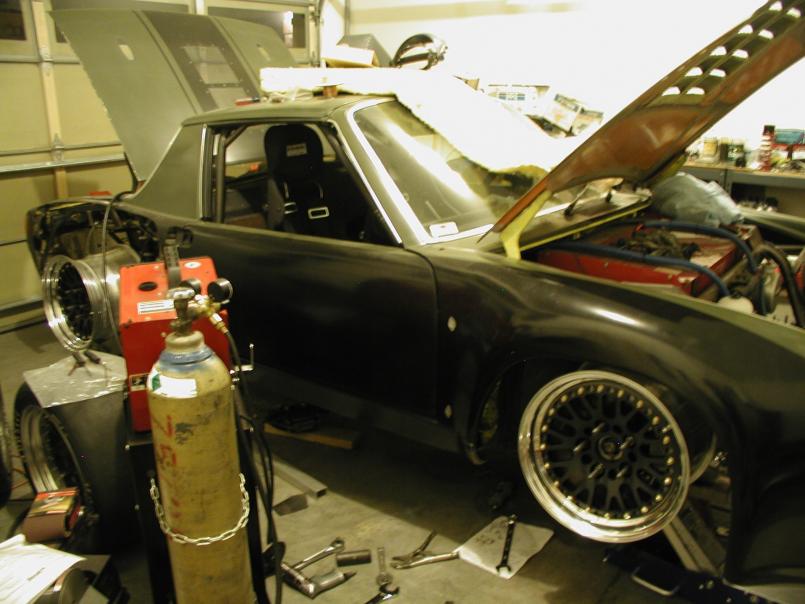
Posted by: J P Stein Jun 23 2010, 05:12 PM
To be honest, I thought the big backspace was going to look hideous, but John did a good job and they really don't look that bad to me in terms of front wheel lip. Certainly better than I expected so at least the car won't look ugly, as well as have much less scrub radius now (1.5" v. 5" before!!!). I will get better shots once tires are on, I can mock em up on the car and show how it will look when installed.
5 inches???? Good grief.
It'll feel like power steering now.
Posted by: byndbad914 Jun 24 2010, 09:55 AM
So I hope! Actually it was probably closer to 4" given the angle of strut KPI, etc, but yeah, it should turn real nice like
Posted by: byndbad914 Jul 14 2010, 09:45 PM
bit of a hiatus since my friend took a new job June 1st = good for him, bad for me because it is a more "legit" job where he can't use the tools on his own time, so I have to wait 'til he can sneak into his friend's shop on a Sat. So the A-arm shock mounts took 2 hrs to do the work but almost a month to get the Saturday shop time 
Anyway, front arms are pocketed for the shock to fit down into and the rears are single shear to clear the drive axles.
Shock bolt holes are reamed so they are really tight fit and the smooth shank at the shock to A interface makes for plenty of shear area. Takes me about 10 minutes and a lot of cussing to get the fronts slid down in with the spacers, everything is exactly 1" so zero tolerance fit which is good for load transfer but bad for assembly.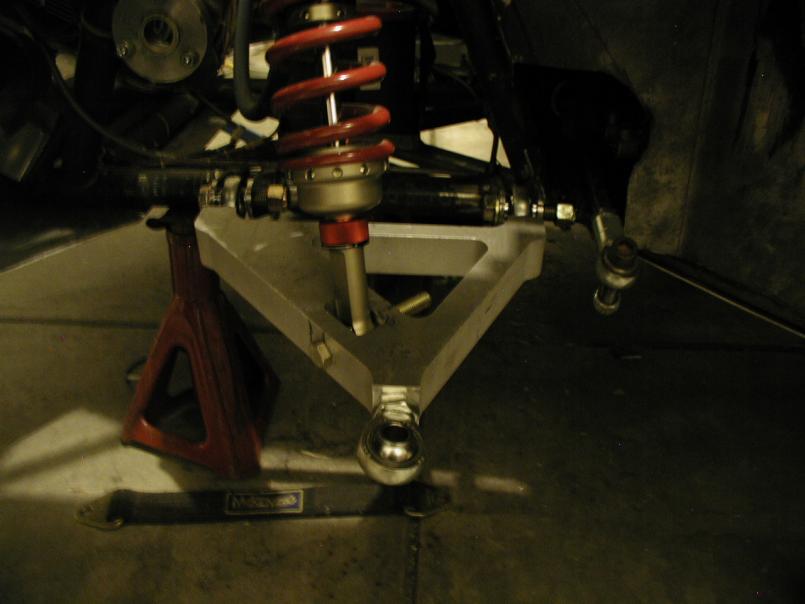
Posted by: byndbad914 Jul 14 2010, 09:47 PM
some are hard to see, but suffice it to say it is the proverbial 10lbs of shit in a 5lb bag... there is a reason why Porsche uses struts for packaging the front end.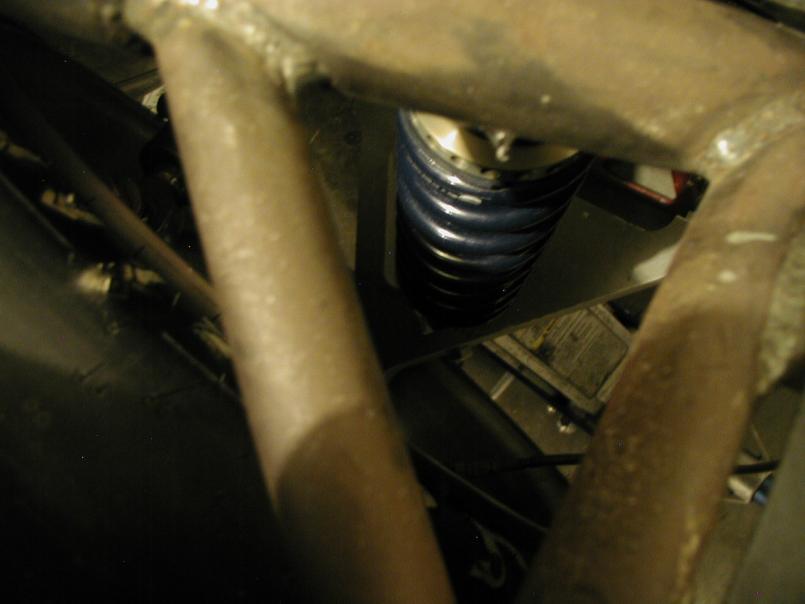
Posted by: byndbad914 Jul 14 2010, 09:50 PM
next item on the list is to measure the actual motion ratios now to see how bad it is... it will be like most old Chevy's I suppose with about a 2:1 length ratio which makes for a 4:1 swap in the spring rates. Will need big rates going forward, probably in the 1500lb/in range in the rear for instance v. 550lbs now (will go slightly softer in overall wheel rate with the new shocks per Penske's direction)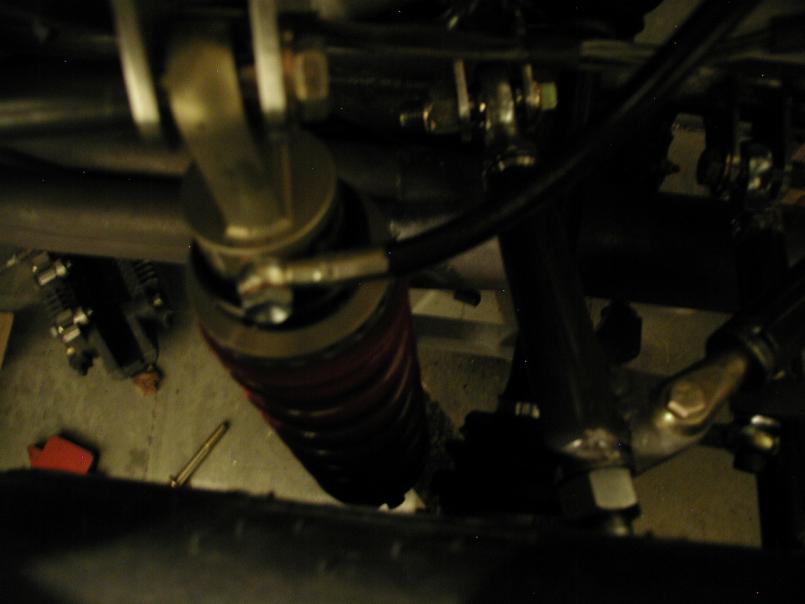
Posted by: byndbad914 Jul 14 2010, 09:51 PM
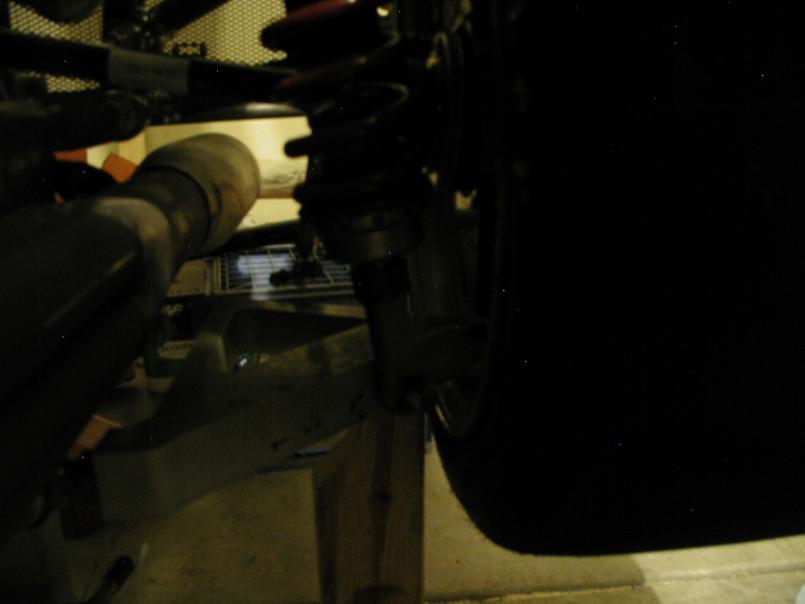
Posted by: Randal Jul 15 2010, 11:16 AM
Are those the new wheels Tim? Bet they look nice on the car!
Posted by: grantsfo Jul 15 2010, 12:12 PM
With good suspension I dont think we can call this a 914 anymore?
Posted by: byndbad914 Jul 15 2010, 05:26 PM
Randal - yep the new wheels. Same size as the Kodiaks basically and they look good, but have to admit, the smooth semi-gloss finish of the Kodiaks fit the paint scheme better. The CCWs are a rough and dull finish... looks good but a noticeable contrast to the semi-gloss black right by it on the fenders.
Grant - yeah, calling it a 914 is a bit of a farce for a couple of years now hahaha. Tube chassis race car with a chunk of 914 body... 'course the VIN on that chunk still registers the car as a 914
Posted by: byndbad914 Jul 15 2010, 05:45 PM
BTW, just to keep everyone up to speed on what I am essentially doing with the suspension I am mostly copying what the new Vettes use, except roll centers are driven a bit by what I could attach to on the existing tube chassis. Keep in mind the front geometry in terms of KPI and caster are almost exactly the same between an old 911/914 and the new Vettes.
So on the new Vettes the shocks are attached "centered" in the A on the front like I did with the pocket and then they use the outside of the front edge to mount the rears to clear the drive axles, so there is a bit of method to my madness if anyone is questioning the single shear rear concept. 1/2" bolt can take more force than the coil over would so I would have to bottom the car out to get anywhere near enough force in the spring to break that bolt.
Now, yes, Vettes use a single leaf spring spanning the car front and rear, but tons of racers are converting to coilovers and just replacing the shocks, so I have no worries about the rear suspension.
Figure I would answer the question before I got it My new Grand Sport is setup this way and I pulled over 1G the other day in an industrial parking lot - had the same thing happen as JP showed in another thread where the cars were leaving the ground in an AX - I hit a bump mid corner and put the whole rear end in the air for sure - car stepped out a few inches but then latched right onto the ground and I stayed in the throttle. Love this new Vette with the traction control turned off, so fricken fast for a street car. UNDRIVEABLE with the TC on actually, damn near a dangerous oversteer has happened a couple of time to me with it left on, so I just have to remember to shut it off when I fire it up. Talked to a local Vette racer and driving instructor and he agreed with TC they are a nightmare oddly enough and very neutral and fast with it off.
Posted by: ArtechnikA Jul 15 2010, 07:23 PM
...1/2" bolt can take more force than the coil over would so I would have to bottom the car out to get anywhere near enough force in the spring to break that bolt.
Just for completeness - as I'm sure you know - in the worst-case scenario you have not only the spring rate to deal with but the full-jounce damper rate too. The damper instantaneous resistance can be about 3X the spring rate if I recall what Carroll Smith observed so many years ago...
But I agree, without consulting any strength-of-materials references, 1/2" oughtta be enough...
Posted by: byndbad914 Jul 16 2010, 11:20 AM
A 1/2" bolt, at the shank (I don't have threads in shear here) is good for at least 13,000 lbs in single shear at ultimate failure. If one corner of my car experiences 13,000 lbs of reaction force in the spring, I am pretty much FUBAR'd Keep in mind static 1G weight on the corner is around 825 lbs on this car in the rear, so that means I need to see 15 Gs of reaction force at that corner to create that load.
Other than a Thelma and Louise move, I doubt I would see that
Additionally, the nice thing about steel bolts is they tend to yield for a long time (ductile) before you actually fail at Grade 8 and below, so I would see signs of yielding doing my typical inspection before a track day long before failure as well. Even so, to yield the bolt would require crushing the corner with weight.
Posted by: andys Jul 21 2010, 10:14 AM
Tim,
Great to see some progress, photo's, etc. Got any intention to "pretty-up" the lower A arms? Perhaps some outside corner radii or ball end milled reliefs? I know it won't gain you anything; just thought I'd ask.
Got an ETA for when you think you'll hit the track?
Terry signed up fo a track day to do some more chassis tuning; SOW in late August!! Sure to be brutally hot (and to think I used to race in those conditions!).
Andys
Posted by: byndbad914 Jul 21 2010, 12:48 PM
Nah, no intentions of doing anything else to the A-arms. I am hoping that I can hit the track some time in Sept at this point - my window of opportunity tightened up during July and Aug with work and a vacation 1st week of Aug, so I knew if I didn't hit it by June it would jump to Sept. Also, as you note, blistering Aug temps won't be much fun, so Sept should have better weather too.
My latest setback has been I had to go 1/2" wider on the wheels to get the lower weight inner barrels CCW had in stock... that 1/2" is inward of course and really tightened up where I can run the upper A arm around the shock/spring package, so I am now going to try to relocate the upper mounting of the shock and angle it over more to make that work... may have to send the shocks back for the next longer body. When I say everything is tight up front, it really is on this car so losing that 1/2" means I have to find it again somewhere else.
If work and weather holds (no rain) I am taking the Vette out this Friday AM to get a track fix That should hold me 'til Sept.
Posted by: byndbad914 Jul 23 2010, 04:08 PM
Hit the track this AM in the Grand Sport - once I figured out how to get ALL of the traction control shit turned off the car is an absolute blast to drive. I was chewing up other Vettes and quite a few cars with AC blasting Once I lowered the tire pressures down to 35psi hot the run flats stuck pretty well. The tires howled pretty much the whole time I was on the track of course
The Porsche is still a more fun car honestly, but man, the Vette isn't that far behind. One thing I can say is it is pretty easy to drive, which could easily equate to slower times, but it is an easy car to drive. I hit 125-130 in the front stretch out here and the Porsche is more like 145 typically so there is a definite difference in speed on the 914.
Saw a Formula 5000 out there with front upper A arms in a configuration I began considering for my car to get around the shocks, so that pretty much has convinced me to run the upper As backward to what I had planned. That means I need to cut the inner fenders out and add a couple bars to the car to get pickup points where I need them for the rearward upper link, etc. That won't happen this weekend and my vacation starts next weekend, etc, may be lucky to have this car done by Sept but will keep progress posted as I make it.
Posted by: stewteral Jul 23 2010, 08:46 PM
Hit the track this AM in the Grand Sport - once I figured out how to get ALL of the traction control shit turned off the car is an absolute blast to drive. I was chewing up other Vettes and quite a few cars with AC blasting
Once I lowered the tire pressures down to 35psi hot the run flats stuck pretty well. The tires howled pretty much the whole time I was on the track of course The Porsche is still a more fun car honestly, but man, the Vette isn't that far behind. One thing I can say is it is pretty easy to drive, which could easily equate to slower times, but it is an easy car to drive. I hit 125-130 in the front stretch out here and the Porsche is more like 145 typically so there is a definite difference in speed on the 914.
Saw a Formula 5000 out there with front upper A arms in a configuration I began considering for my car to get around the shocks, so that pretty much has convinced me to run the upper As backward to what I had planned. That means I need to cut the inner fenders out and add a couple bars to the car to get pickup points where I need them for the rearward upper link, etc. That won't happen this weekend and my vacation starts next weekend, etc, may be lucky to have this car done by Sept but will keep progress posted as I make it.
Tim,
I don't know, I'm beginning to worry about you: I think you are being SEDUCED by the "Vette Side." Does the jealousy show? I just wish I could run some laps in a Grand Sport!! It's has to be a great ride!
Good luck on getting your suspension design working. I'll be waiting for your next installment & be sure to send photos.
Best,
Terry
Posted by: byndbad914 Jul 24 2010, 11:30 AM
While there is no doubt I will track the Vette here and there, the Porsche remains the primary track car. I originally bought the Grand Sport to be a collector car but now realize it is an on-going model now, not a limited edition like 1996, and really why I am tracking it at all. If it had been a 1 yr model I would have tracked it at least once, but kept it nice and mint otherwise.
Still, the intent is to race the 914, I just needed a track fix. Been a year now.
Talking to Mike Pettiford, the owner/instructor of Go4It Racing, can be inspiring tho'! He recently had a T1 Grand Sport built and is a superstar driver. He holds the T1 record at the track I was at at 1:54. If I could run 1:54 in my 914 when this is all said and done, I would be really happy. THAT SAID, if I do run 1:54 in the 914 then I know it is fast as hell Mike could seriously get in my car and run easily 5 seconds faster than I ever could... dude won three championships in one season and has over 20 National champtionships, so he can drive, so I would expect to at best break a 2 min lap in the very Vette he ran 1:54.
There is no doubt the 914 is faster than my GS so a much better car. It was already faster with the old suspension.
Posted by: Randal Aug 1 2010, 12:26 PM
Saw a Formula 5000 out there with front upper A arms in a configuration I began considering for my car to get around the shocks, so that pretty much has convinced me to run the upper As backward to what I had planned.
F5000's are such great cars, but expensive! Sure would be fun to have one of those to do track days and hill climbs. What kind of time was it's turning?
Next thing we know Tim you're going to be buying sticky tires for your new toy and leaving the 914 in the garage. Hate to see you going to the dark side!
\Any video of the vette run?
Posted by: byndbad914 Aug 4 2010, 12:11 AM
No vid of the Vette since I don't have any sort of camera mount in it. I won't be tracking that car much at all, no problem with the dark side, that is my good weather "keeper" car.
I dunno the times the F5000 was running but they are fast in general - that driver was an older dude that tends to just F around and not really push that car. With a good driver they are damn fast tho'. Pettiford was out cornering him in a Pontiac Solstice so that should be an indicator how far off real pace that old guy is, the formula only got away in the straights based on shear power to weight.
Posted by: Randal Aug 4 2010, 09:28 AM
No vid of the Vette since I don't have any sort of camera mount in it. I won't be tracking that car much at all, no problem with the dark side, that is my good weather "keeper" car.
I dunno the times the F5000 was running but they are fast in general - that driver was an older dude that tends to just F around and not really push that car. With a good driver they are damn fast tho'. Pettiford was out cornering him in a Pontiac Solstice so that should be an indicator how far off real pace that old guy is, the formula only got away in the straights based on shear power to weight.
Having watched a bunch of F1 and F5000 historic races it's simply amazing how great they handle. At Infineon they are still accelerating and shifting around two, where everyone else is shutting down.
One of these days you've got to come out here and run a few of our tracks Tim. We need to see your machine in action.
Posted by: Randal Aug 12 2010, 05:28 PM
I think you would have enjoyed seeing this car at the Pre-Historics at Laguna Seca last weekend Tim. You actually have the suspension knowledge to appreciate how this puppy works!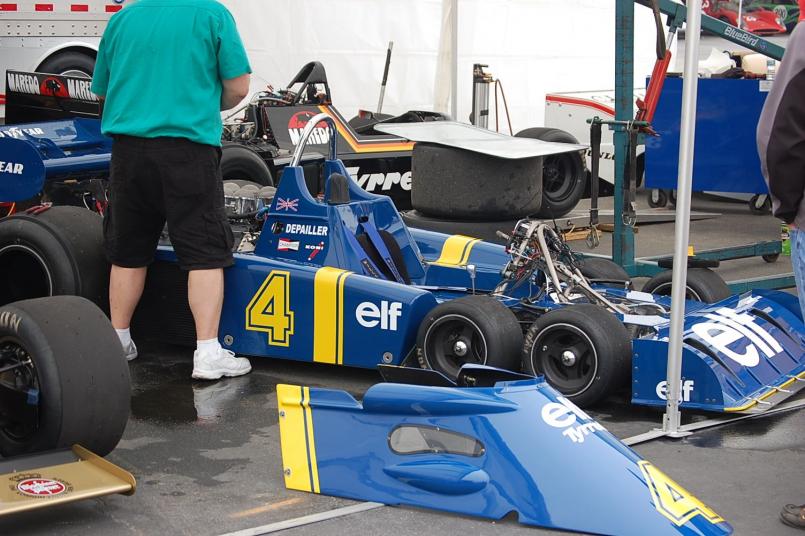
Posted by: Randal Aug 12 2010, 05:31 PM
The guy driving the car was a pretty big fellow. He walked away from the entire field when the race started, I mean he kicked their asses.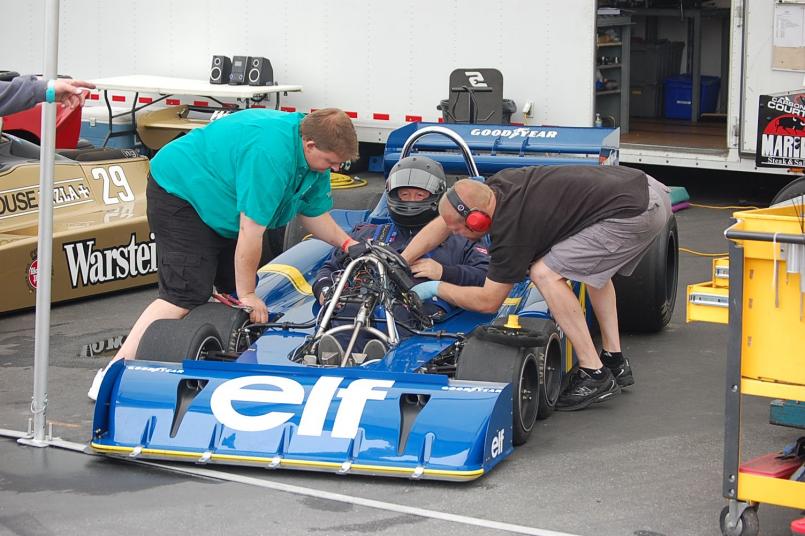
Posted by: byndbad914 Aug 16 2010, 03:43 PM
Yeah, that six wheeler is a trippy car for sure. Interesting idea for reducing drag (which IIRC didn't actually do that since the back tires were still same size) that turned into a great idea for braking and contact patch, but clearly F1 wasn't having it and modified the rules to not allow them... have to wonder what a modern F1 would look like if that combo were allowed...
Finally all of my vacations, relatives in town, etc plans are finally thru, so hopefully can get back on the car again. Need to order some chromoly tubing and get that on the way to add in some mounting bars at the front.
Posted by: stewteral Aug 16 2010, 10:14 PM
Yeah, that six wheeler is a trippy car for sure. Interesting idea for reducing drag (which IIRC didn't actually do that since the back tires were still same size) that turned into a great idea for braking and contact patch, but clearly F1 wasn't having it and modified the rules to not allow them... have to wonder what a modern F1 would look like if that combo were allowed...
Finally all of my vacations, relatives in town, etc plans are finally thru, so hopefully can get back on the car again. Need to order some chromoly tubing and get that on the way to add in some mounting bars at the front.
Hey byndbad914,
If you remember the 6-wheel Experiment: my "cousin" Sir Jackie Stewart found that the car had too much understeer! In spite of 4 front wheels, the tire compounds available were too hard and it was never worked out before the F1 rules outlawed the design. So, another interesting idea was KILLED.
Best,
Terry
Posted by: Randal Aug 28 2010, 10:45 PM
Yeah, that six wheeler is a trippy car for sure. Interesting idea for reducing drag (which IIRC didn't actually do that since the back tires were still same size) that turned into a great idea for braking and contact patch, but clearly F1 wasn't having it and modified the rules to not allow them... have to wonder what a modern F1 would look like if that combo were allowed...
Finally all of my vacations, relatives in town, etc plans are finally thru, so hopefully can get back on the car again. Need to order some chromoly tubing and get that on the way to add in some mounting bars at the front.
Hey byndbad914,
If you remember the 6-wheel Experiment: my "cousin" Sir Jackie Stewart found that the car had too much understeer! In spite of 4 front wheels, the tire compounds available were too hard and it was never worked out before the F1 rules outlawed the design. So, another interesting idea was KILLED.
Best,
Terry
But today he could have sneaked in a set of A15 compounds and who would know the difference.
Actually not many as this guy drove away from the field.
Posted by: byndbad914 Aug 30 2010, 10:08 AM
yeah, have to wonder if there was any net gain with that technology if it were still allowed to be messed with - one of those "who knows" sorta deals that probably would result in no net benefit but we will never know.
Back on the home front, I can assure everyone that notching tubing by hand suuuuuuuuucks but I got a couple new tubes added into the car on Saturday so I have rearward upper A arm mount locations to build the front uppers to. Have to go super slow with it to ensure nice tight seams for welding and still managed to get some not so perfect ends, but weldable nonetheless.
Next weekend we are supposed to have cooler temps, and it is a 4 day weekend for me (I have every other Friday off and Labor Day Monday) so hopefully I can really get some focus into the car without sweating to death... when I have to grind and weld, shorts and a T-shirt tends to hurt, but jeans and long sleeves in 90 deg weather is just like hand notching tubing - suuuuuuuucks
Posted by: stewteral Aug 30 2010, 09:49 PM
yeah, have to wonder if there was any net gain with that technology if it were still allowed to be messed with - one of those "who knows" sorta deals that probably would result in no net benefit but we will never know.
Back on the home front, I can assure everyone that notching tubing by hand suuuuuuuuucks
but I got a couple new tubes added into the car on Saturday so I have rearward upper A arm mount locations to build the front uppers to. Have to go super slow with it to ensure nice tight seams for welding and still managed to get some not so perfect ends, but weldable nonetheless.Next weekend we are supposed to have cooler temps, and it is a 4 day weekend for me (I have every other Friday off and Labor Day Monday) so hopefully I can really get some focus into the car without sweating to death... when I have to grind and weld, shorts and a T-shirt tends to hurt, but jeans and long sleeves in 90 deg weather is just like hand notching tubing - suuuuuuuucks
Hey Tim,
Glad to hear you parked the Z06 and started slaving on your 914 again! Please send photos! I'd love to see your CAD design turned into real parts.
BTW: The Tyrrell 6-wheel car had another big issue: with the narrow front track,
it tended to roll too much while cornering.
Terry
Posted by: J P Stein Aug 31 2010, 05:12 AM
Back on the home front, I can assure everyone that notching tubing by hand suuuuuuuuucks
but I got a couple new tubes added into the car on but jeans and long sleeves in 90 deg weather is just like hand notching tubing - suuuuuuuucks A propper diameter hole saw, drill press and a good drill press vise makes it less painful.....A mill makes it better. Too late, eh?
Posted by: Joe Ricard Aug 31 2010, 07:25 AM
Bought a Habor frieght tube notcher back when I was doing the cage in the race car. 1/2" heavy duty beast of a drill made it not so bad.
Posted by: Brett W Aug 31 2010, 10:56 AM
The HF notcher is the biggest POS. Way too much flex. I broke one and used another for awhile. The I actually like my new one more than even a mill. It is stout.
This one is money. http://www.vansantent.com/tube_coping_machines/Notchmaster.htm
Posted by: J P Stein Aug 31 2010, 08:42 PM
The HF notcher is the biggest POS. Way too much flex. I broke one and used another for awhile. The I actually like my new one more than even a mill. It is stout.
This one is money. http://www.vansantent.com/tube_coping_machines/Notchmaster.htm
That does look like the cat's ass......just the same, I'm glad I'm done with cage building.
Posted by: byndbad914 Aug 31 2010, 09:01 PM
I hear you guys about the tubing notchers and have used similar items in the past... but I only had to do two straight tubes so while notching by hand sucks, it wasn't worth it to me to spend a few hundred dollars for two tubes to buy my own I was just whining really
But will definitely keep that info Brett in case I find myself needing to add any significant tubing in the future. I literally added two 21" lengths (no bends) to tie in between two main supports to have something to weld upper A brackets to. When I get further next weekend I will take some pix and it will become obvious.
Posted by: Brett W Sep 1 2010, 09:34 AM
Check out the tubing coping software available on the net. A buddy of mine used it a couple of weeks ago when I took my notcher back. He said he loved it. That is probably the ticket for the few tubes you have to do.
BTW I am coming out in Sept for my honeymoon. Would like to stop by, but I doubt the new wife would be cool with me spending several hours at your place and not paying attention to her.
Posted by: andys Sep 1 2010, 11:14 AM
If it's for your suspension arm, then I would highly recommend you use a tubing notcher to get as close a fit up as possible as opposed to using a grinder. I use my mill to notch tubing since I don't have a notcher, but the one that Brett posted looks pretty nice as it has a lot of adjustability built in.
Andys
Posted by: byndbad914 Sep 1 2010, 11:47 PM
Check out the tubing coping software available on the net. A buddy of mine used it a couple of weeks ago when I took my notcher back. He said he loved it. That is probably the ticket for the few tubes you have to do.
BTW I am coming out in Sept for my honeymoon. Would like to stop by, but I doubt the new wife would be cool with me spending several hours at your place and not paying attention to her.
Kristi looks forward to every chance she gets to listen to me and friends talk shop!Congrats on the upcoming wedding nonetheless! How long are you going to be out here and when?
Andy - using a hand held die grinder I am able to get the fits pretty tight actually - I am super anal so I hate any gap really but that is why it takes so long when I did it last weekend - I take a little at a time, check fit, measure location/level, mark, grind, again until it fits exactly how I want it. The hard part is of course getting both sides absolutely symmetric in terms of location, etc but the two tubes are tacked in and looking great to build from. Final welding will go without a hitch.
Posted by: Brett W Sep 2 2010, 07:56 AM
That soft ware will make your job super easy.
I am getting married on 9-14 at 9:14. Flying to Denver round 8PM. Stealing Brian's truck and finding a nice hotel. Not interested in seeing you on my wedding night. Then we are driving down to Durango and around to several other places and flying out on Sunday night. Might could catch up with you on Sunday, but make no promises.
Posted by: byndbad914 Sep 6 2010, 11:09 PM
I assume I should take some comfort that you don't need to see me before you can feel prepared for your wedding night
So didn't get as far as I had hoped due to lack of parts, and Labor Day weekend meant no chance of finding stuff (hard to do in CO as is, I tend to order from CA places anyway), but I can actually see some light at the end of the tunnel. I have the front susp mount tabs tacked in and verified for upper arm angles, etc.
I cut some old rear susp tubing way down and tacked it back together to get a feel for overall fit on the front upper As - I need a couple more threaded bungs to weld in to make the rear tubes (apparently miscounted what I needed originally and need two more), and after seeing how short the upper is really going to be if I try to use two rod ends, I am thinking I will order the drop in spherical bearings and weldable cups to make the upper As make more sense (only need one side of adjustment for camber anyways).
So I need to order some parts from Kartek this week and get them on their way, hopefully tomorrow work gets out of the way so I can order and maybe have by Friday.
Nonetheless, I think this thing can be fully mocked up and maybe start or have finished all of the welding on it by month's end. It won't have sway bars as I will have to fab something at this point, but if it were on the ground by Oct 1 I would be happy. I have work travel first week of Oct, SEMA in Nov, so forth so I have this narrow window to get things finished.
Had to cut out a simple reinforcement tube for the headlight assy (like it actually needed that kind of reinforcement anyway) to get tire clearance. This puppy is going to be LOW. At full rub
Posted by: byndbad914 Sep 6 2010, 11:12 PM
you can see where the tube was that is now removed. look back thru other pix and you will see it.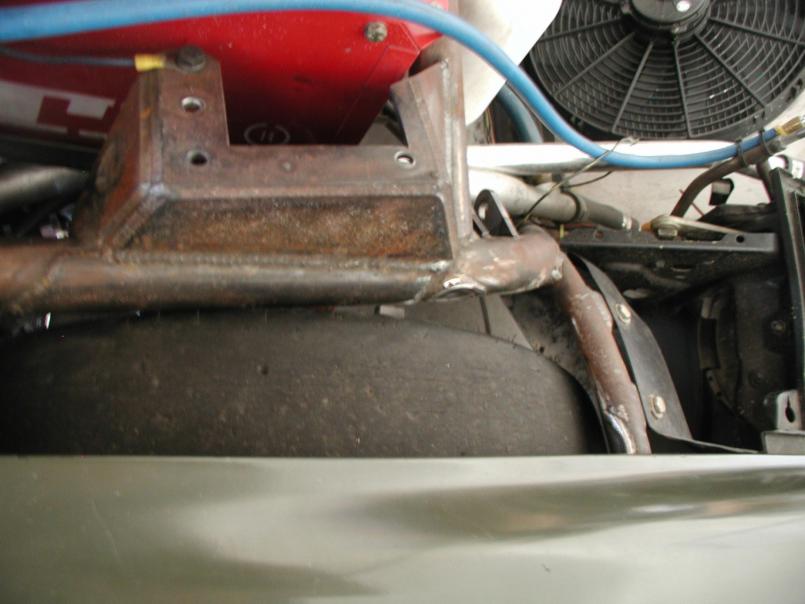
Posted by: byndbad914 Sep 6 2010, 11:14 PM
sitting on some blocks the tire is about 1/4" up from ride height, so this is approx height. I have the front spindles adjustable so once everything is tacked and verified I can weld up the susp, etc, set the car down on the ground in the rear, then set the front with jacks where I want the ride height to be, set the lower As and tack the spindles exactly where I want them. Again, leaving some room for error between reality and a computer design.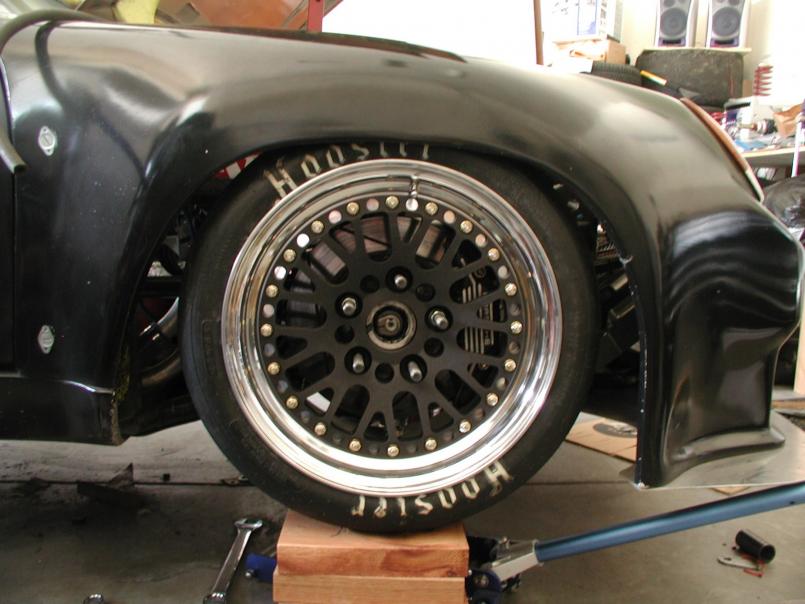
Posted by: byndbad914 Sep 6 2010, 11:17 PM
showing one side with one of the new tubes I added in for mounting points for the upper As.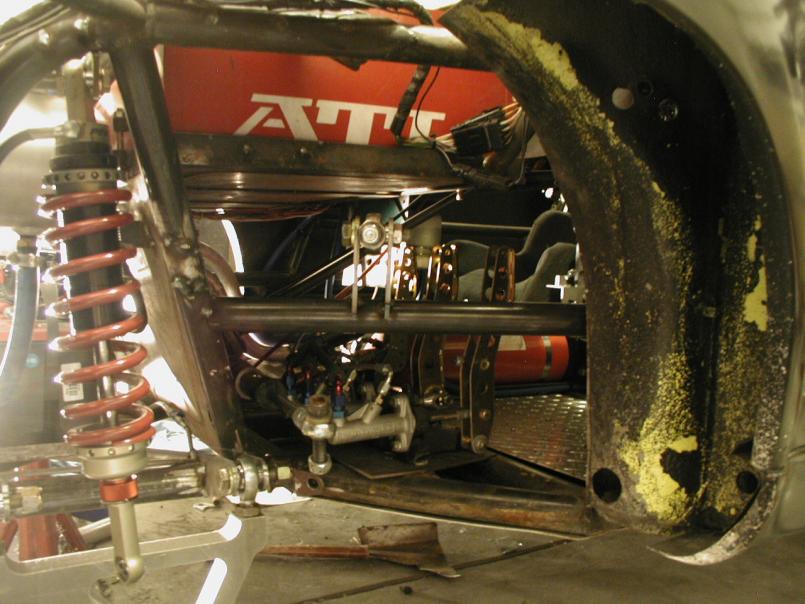
Posted by: byndbad914 Sep 6 2010, 11:19 PM
you can see how tight the upper A is to package if I try to use two rod ends v. a spherical cup and rod end.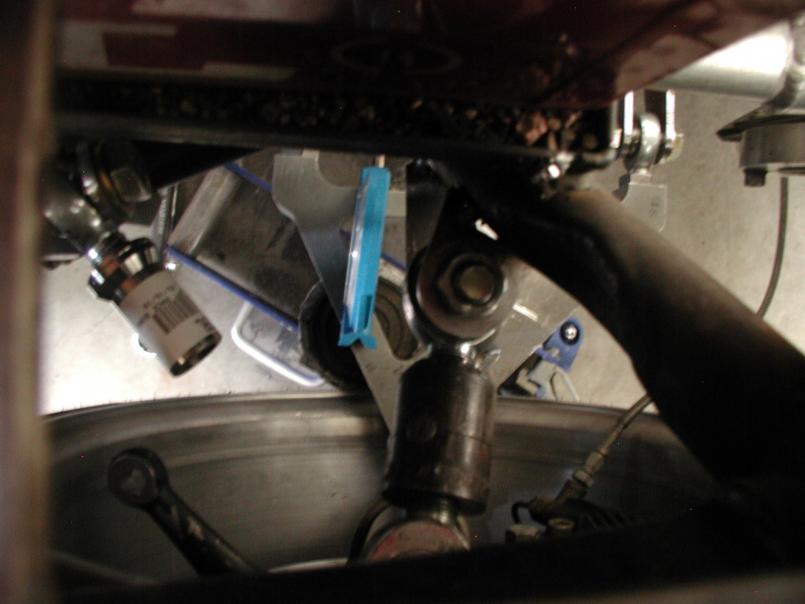
Posted by: andys Sep 8 2010, 09:48 AM
That upper arm looks really short. How short is it, as the photo may be deceiving? Is that the result of having to adjust for the different wheel offset than you originally designed for? Camber curve look ok? Knowing you, you undoubtedly ran the numbers.
Andys
Posted by: byndbad914 Sep 8 2010, 11:33 AM
pivot to pivot is around 5.5", so yeah, it is pretty short. That said, I have run the numbers and I get around 1.3 degree camber gain in 1" compression, so that is fine, and at the upper arm angle required for that I get a RC height I like as well (forget the exact number of top of head, but it was where I wanted it relative to the rear RC height). At 2" of compression it gains another 1.5 deg, so that is getting pretty aggressive, but I won't get anywhere near that kind of compression with the setup the way it is - bump stops will come in before that.
Frankly I like being able to stand the tires up a bit more at static settings to get maximum contact patch for more initial brake stability up front and rear traction, so I expect to be happy with the camber gain curves I have plotted out.
Again, it is all theory for now, we'll see how it is in practice The car is a collection of compromises as all cars are, so I focused on what mattered most to me and dealt with the remaining items Fortunately suspension motion tends to be pretty small on track and camber gain can be fine tuned with static settings/tire temps.
edit - actually if you look, it is hard to see in the above pic but in other pics you can see the lower A arm tabs extend out from the frame pretty far - I kept the lower A somewhat short that way to balance out the short upper. If you look at an Ultima kit car for instance, the upper As aren't much longer when you actually see them in person BUT the lower A is much longer, so they would have similar camber gain, maybe even more (haven't mapped one out, but "by eye" looks similarly ratio'd to what I have.
Posted by: byndbad914 Sep 8 2010, 11:57 AM
check out this website - he has a bunch of dynamic tags on pix so I can't embed the images I want to show, so just go he'are
http://www.markkoch.net/canamMain.asp
click on his suspension tab on the left, scroll down the page near the bottom to see what the ultima stuff looks like for reference. Now imagine being a dorky arse engineer actually putting a ruler on the screen and measuring the arms upper and lower to get a ratio between them  yeah, that's me!
From one of the pix I got a measurement of roughly 2.5" upper to 4" lower on the screen at the base image size, my upper arms were going to be around 5.3" to 5.5", so I set the lower A at 5.4" * 4 / 2.5 ~ 8.64", so I made the lower pivot length 8.5" to 8.75" (depends on overall static camber settings as I adjust the bulk of that with the lower). With bias plys I will be around 8.5" and with radials closer to 8.75".
Again, all of that stuff floats in reality so that is why I say it is all approximate (~).
Posted by: andys Sep 10 2010, 09:38 AM
I think I've seen that site before. Anyway, good to model after or reference a proven design, and the Ultima is a good one.
Andys
Posted by: byndbad914 Sep 13 2010, 09:24 PM
got a fair amount accomplished this weekend as my needed parts showed up Friday. I have the front all tacked into place and was able to set the car down and inspect ride height. I have some blocks setup for 3.25" front frame height and 3.75" rear frame height.
As mentioned I left the front end able to have the spindle height moved in case my tolerance stackups were off, and I need to make some adjustments to the front spindle height to get the A arms exactly where I want them, but overall this ride height will be where it should end up. There is 3" at the front splitter.
Pay no attention to the camber, etc here as everything has been moving a bit as I mess with adjust-ability, etc, and all that will be correct when I am done. No sway bars yet, will have to probably build them from scratch to match what I have in the car.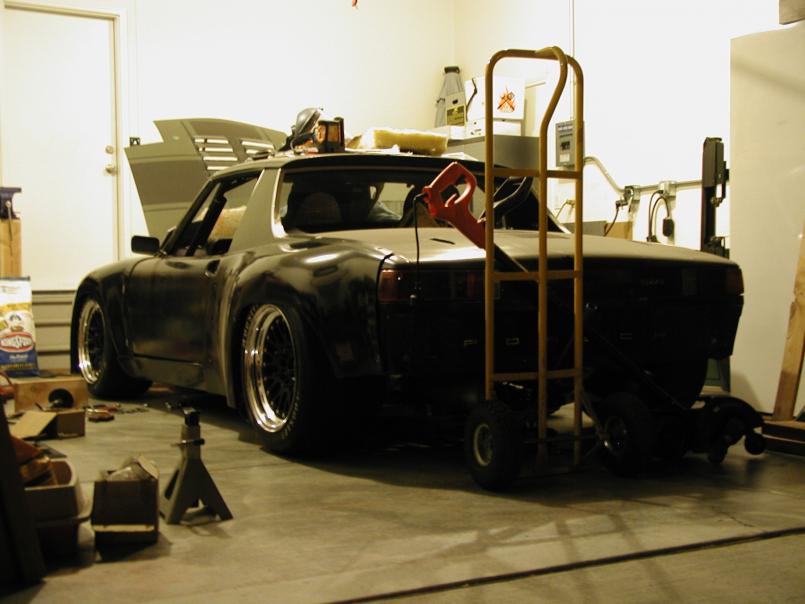
Posted by: byndbad914 Sep 13 2010, 09:27 PM
funny, looking at the pic I just posted, that hand truck is taller than the car
close up of the rear, little blurry, but you can see the lower A is exactly where I wanted it to be with 3.75" rear height. I don't think I would want this car much lower in the end... I was restricted to 3.75" at the lowest by existing geometry of the frame and where I could fit mount points - I think that it turned out a good restriction. Much lower and I could never recover if I went off track 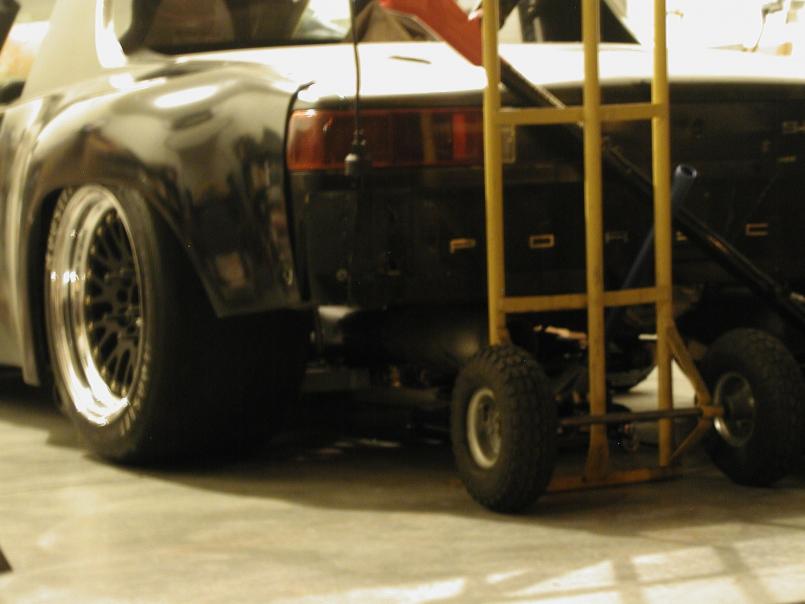
Posted by: byndbad914 Sep 13 2010, 09:29 PM
and a shot of the front upper A. Note I will have to post machine the high-angle spacers I have with the upper heim joint - they are too tall. I can machine them down a bit, still have full articulation, and get the upper A down almost parallel to the lower. Then I can simply shim that interface to adjust roll center 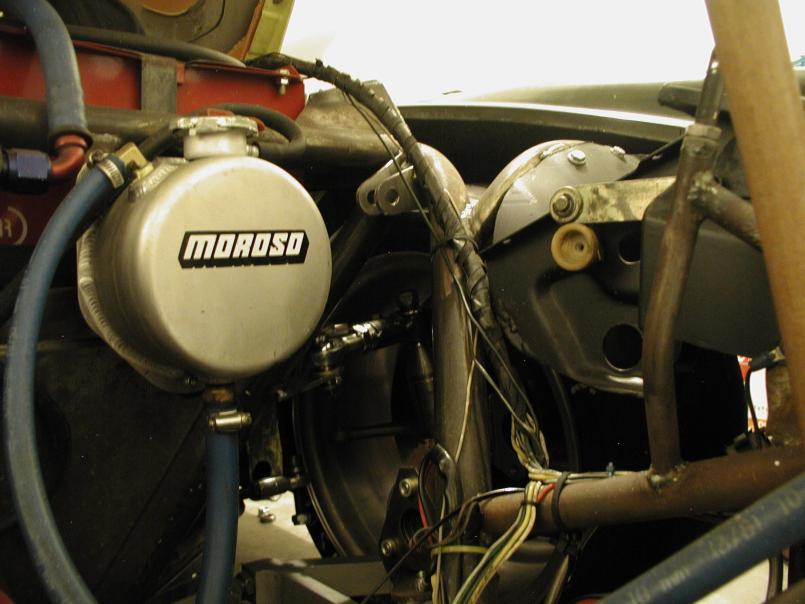
Posted by: byndbad914 Sep 27 2010, 04:28 PM
got all of the chassis tabs and new tubes welded in this weekend, hopefully going to get the uprights all TIG'd up next weekend. Have a new front swaybar on order amongst other items so will hopefully be able to mock all of that up next weekend as well.
If I can get the uprights all TIG'd together I can at least make a blast or two around the neighborhood with the car next weekend... we'll see, depends on a couple items coming in UPS by Friday. Relying on others for welding can be tough, but I wouldn't go 150 mph on my welds
Squared the car up as well so I should be able to weld up the uprights, put it all back together and only have slight tweaking to be ready to roll.
Posted by: byndbad914 Oct 20 2010, 08:23 PM
thought I would throw out a quick update - been awhile and been working all the little stuff that it takes to wrap things up.
Rear is fully welded along with the uprights fully TIG'd, etc and the car is officially sitting on the ground in the rear, on the springs, ready to roll. My custom stub axle adapters are all welded up, so now I have removable/rebuildable 930 CVs inside and outside on the Carrera axles.  Not being able to rebuild the outers has been a thorn in my side since I bought that setup but the axles fit perfectly and it is nice to have an off-the-shelf item.
Various UPS orders and delays would move me around a bit and sometimes really blow a weekend, but I got the sway bars and custom bent links (they are steel and unfortunately rather heavy - 13lbs per end!) and finally my other rod end showed up to put the front tie rods together and get the front end squared. It is nice as I used the computer to determine nominal toe link angles for near zero bump and doing this both front and rear meant that I measured the link angle with a gauge when I installed them, and sho' nuf, when I checked bump all four corners were spot on.
I had to order some more tubing to mount the rear sway bar, notched the existing chassis to fit it in, welded it in with reinforcement, all that good noise so now I have a rear sway bar finally! Much needed after I added the LSD sequential trans.
The front sway bar mounting was already set up for the 1" diam Tarret bar, so I had to remachine and grind out some of those pieces to work with the new 1.25" diam Speedway front bar and all that is done and the front bar is also now installed.
Was cutting downlinks tonight from tubing so I hope to get them drilled and threaded tomorrow or Fri, then Sat my buddy is set to come over (barring he doesn't get called into work, he has had insane OT lately = bad for me ) and finish weld the front upper A arm stuff.
I am actually thinking I may be able to fire the car up and hammer around the block by Sunday :knock on wood/hope I didn't jinx that smiley: I sure hope so, weather has been perfect for a track day and will not be so in a few weeks.
Will be gone to SEMA first week of Nov as well, so I want to keep rollin' on this and be done!
Posted by: stewteral Oct 21 2010, 10:05 PM
thought I would throw out a quick update - been awhile and been working all the little stuff that it takes to wrap things up.
Rear is fully welded along with the uprights fully TIG'd, etc and the car is officially sitting on the ground in the rear, on the springs, ready to roll. My custom stub axle adapters are all welded up, so now I have removable/rebuildable 930 CVs inside and outside on the Carrera axles.
Not being able to rebuild the outers has been a thorn in my side since I bought that setup but the axles fit perfectly and it is nice to have an off-the-shelf item.Various UPS orders and delays would move me around a bit and sometimes really blow a weekend, but I got the sway bars and custom bent links (they are steel and unfortunately rather heavy - 13lbs per end!) and finally my other rod end showed up to put the front tie rods together and get the front end squared. It is nice as I used the computer to determine nominal toe link angles for near zero bump and doing this both front and rear meant that I measured the link angle with a gauge when I installed them, and sho' nuf, when I checked bump all four corners were spot on.
I had to order some more tubing to mount the rear sway bar, notched the existing chassis to fit it in, welded it in with reinforcement, all that good noise so now I have a rear sway bar finally! Much needed after I added the LSD sequential trans.
The front sway bar mounting was already set up for the 1" diam Tarret bar, so I had to remachine and grind out some of those pieces to work with the new 1.25" diam Speedway front bar and all that is done and the front bar is also now installed.
Was cutting downlinks tonight from tubing so I hope to get them drilled and threaded tomorrow or Fri, then Sat my buddy is set to come over (barring he doesn't get called into work, he has had insane OT lately = bad for me
) and finish weld the front upper A arm stuff.I am actually thinking I may be able to fire the car up and hammer around the block by Sunday :knock on wood/hope I didn't jinx that smiley: I sure hope so, weather has been perfect for a track day and will not be so in a few weeks.
Will be gone to SEMA first week of Nov as well, so I want to keep rollin' on this and be done!
Hey Tim,
Thanks for the project update! It's great to hear of your progress. I am jones'n for some more photos to see your accomplishments.
So, if you are able to take your 914 out for a "spin around the block", will you need to use SNOW TIRES?
Best,
Terry
Posted by: byndbad914 Oct 22 2010, 12:25 PM
gonna try to get some pix after it is all wrapped up. So far if I can be done by Sunday no snow tires but sadly they are predicting snow showers already next week
Got my buddy lined up to rent me his diesel truck to tow the car tho' if I can get a track day in this month. Economy caught up with his position at work last Fri so I figure would rather give him $120 than U-haul.
You only get about 3 really great months here in CO, roughly May or June, and then Sept and Oct where the weather is perfect 70s to 80s and nice evenings. Otherwise it is either hotter than 85 or colder than 65. Nothing like a 55 deg track day in Dec if the track is clear
Posted by: Randal Oct 23 2010, 07:47 AM
gonna try to get some pix after it is all wrapped up. So far if I can be done by Sunday no snow tires but sadly they are predicting snow showers already next week
Got my buddy lined up to rent me his diesel truck to tow the car tho' if I can get a track day in this month. Economy caught up with his position at work last Fri so I figure would rather give him $120 than U-haul.
You only get about 3 really great months here in CO, roughly May or June, and then Sept and Oct where the weather is perfect 70s to 80s and nice evenings. Otherwise it is either hotter than 85 or colder than 65. Nothing like a 55 deg track day in Dec if the track is clear
Forget the track pictures, we want video with sound and all. Want to hear that puppy pulling out of corners at blinding speeds!
Posted by: andys Oct 23 2010, 11:40 AM
Tim,
Thanks for the report! I'm looking forward to your first track day when the rubber meets the road (track). That's when the real work begins! Keep us posted.
Andys
Posted by: byndbad914 Oct 24 2010, 09:51 PM
man, it has been a LONG day. Getting a car perfectly square and hitting all of the alignment numbers is a fricken nightmare, but I always get it pretty much exact the first time because once I start adjusting at the track, that can go all over the place and I want to know that I am as close to square as can be.
Being a bit off, say 1/4" in cross I don't think I could ever notice or feel to be honest, so if I start at zero I have some wiggle room.
No pics as I just got wore out but I did blast around the block for grins earlier today just to actually drive the car. I forget how nuts this thing is to drive in a neighborhood  as even first gear is a bit fast. Car is so low - like 3-1/8" at the rear and 2-3/4" at the front... if I go with the Goodyears instead of Ho's the front tire is a bit larger in diam (matches the rear) so the car would be somewhat level with that setup.
It has been over a year since firing, but primed the motor with the dry sump and poured some gas down the carb vents to fill the bowls and it fired right up. Weather is predicted for sunny and in the 60s next Sunday (tho' a week forecast in CO is a bit of a farce) with an open track day and winter rates, so hopefully I can rent my friend's truck
Need to finish squaring it up (yeah, still going) over the next couple of nights and hopefully Friday I can take it out of the neighborhood and run it up a bit.
Posted by: Brett W Oct 25 2010, 03:38 PM
Good deal man, glad to hear it is working out.
Posted by: stewteral Oct 25 2010, 09:41 PM
man, it has been a LONG day. Getting a car perfectly square and hitting all of the alignment numbers is a fricken nightmare, but I always get it pretty much exact the first time because once I start adjusting at the track, that can go all over the place and I want to know that I am as close to square as can be.
Being a bit off, say 1/4" in cross I don't think I could ever notice or feel to be honest, so if I start at zero I have some wiggle room.
No pics as I just got wore out but I did blast around the block for grins earlier today just to actually drive the car. I forget how nuts this thing is to drive in a neighborhood
as even first gear is a bit fast. Car is so low - like 3-1/8" at the rear and 2-3/4" at the front... if I go with the Goodyears instead of Ho's the front tire is a bit larger in diam (matches the rear) so the car would be somewhat level with that setup.It has been over a year since firing, but primed the motor with the dry sump and poured some gas down the carb vents to fill the bowls and it fired right up. Weather is predicted for sunny and in the 60s next Sunday (tho' a week forecast in CO is a bit of a farce) with an open track day and winter rates, so hopefully I can rent my friend's truck
Need to finish squaring it up (yeah, still going) over the next couple of nights and hopefully Friday I can take it out of the neighborhood and run it up a bit.
Hey Tim,
HOORAH! Isn't it great, after all the work, to have it come to life and be DRIVEABLE! Good Job! Looking for those pics!!
Best,
Terry
Posted by: byndbad914 Oct 26 2010, 09:33 PM
OK, it is freakin' FREEZING out here I have been running the garage heater the past two nights keeping a rollin' but can say the car is fully squared and setup for the trial run! Wheelbase and crosses are so spot on I can't measure the difference, so they are within a 1/16", all four bias ply tires are set at -0.4 deg camber (close enough to -0.5 to start with static and see if the camber curves work out from there), front caster is just over 6 deg, rear toe is 1/16" in with slight toe in on bump, the front is 1/8" toe out with slight toe out on bump. Just need to bolt the front underside panel and splitter on to be ready to roll.
Here are some final pix on the ground. I took seven pix of the rear sitting outside and only one wasn't shaky from me shivering in the cold air Keep in mind this was a ride height I was shooting for originally
Posted by: byndbad914 Oct 26 2010, 09:35 PM
think I hit it almost exact!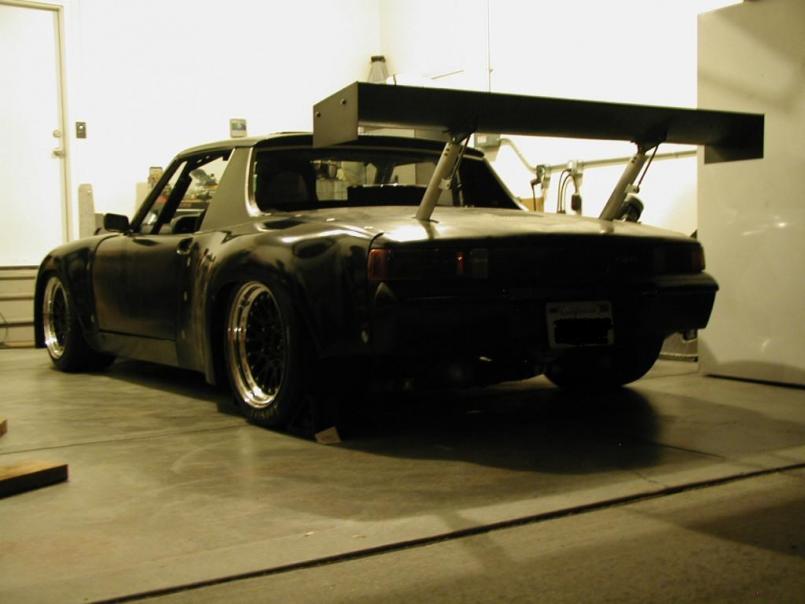
Posted by: byndbad914 Oct 26 2010, 09:36 PM
front shot - kinda tight in the garage to get it all in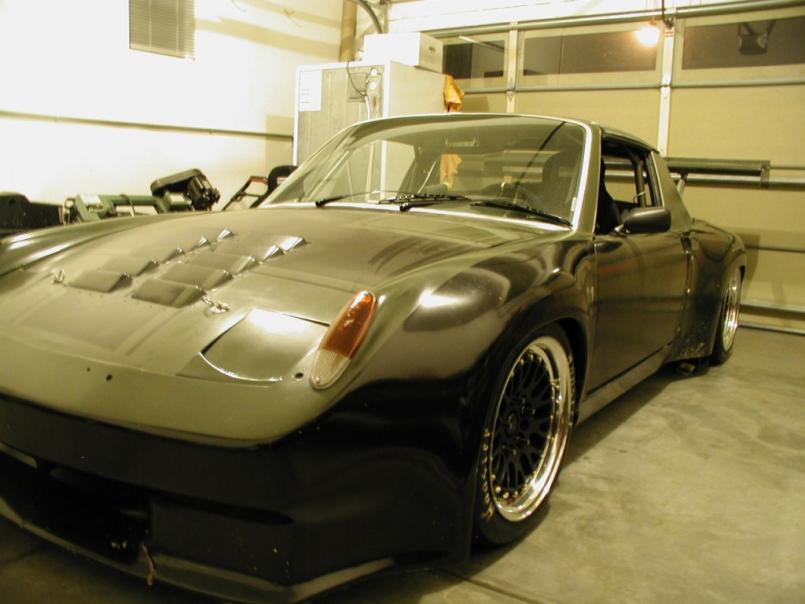
Posted by: byndbad914 Oct 26 2010, 09:38 PM
nuther - note to self, a T-shirt and sweats aren't gonna cut it when it is this cold - out of 5 shots this was the least shaky one!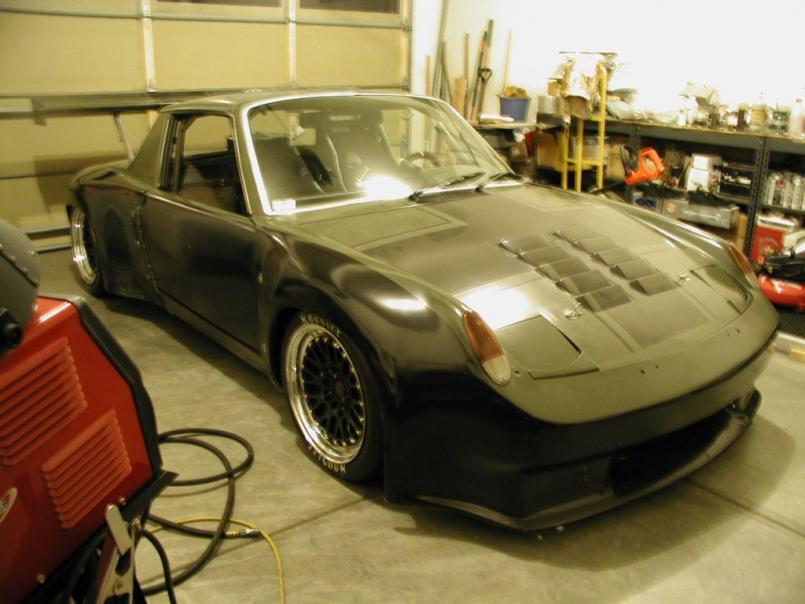
Posted by: byndbad914 Oct 26 2010, 09:42 PM
coolest part is all of that backspace on the wheels and NO spacers with the wide bodywork. Will be interesting to see how much easier this thing is to turn with the scrub reduced so much.
Crap! Just realized, I have no front fenderwells (had to cut them out to fit the upper A mount tubes) so I gotta figure that out. Might just Gorilla duct tape the crap out of the inside - it is amazing what that stuff can do! Total redneck move but now that I think about it, that may have to work in a pinch. this may be my last track day (and only track day) of the year so fenderwells out of duct tape is a completely viable solution at this juncture! Maybe I can hit pick a part on Friday...
Posted by: Krieger Oct 27 2010, 01:47 PM
That is one AWSOME looking machine!!!! Drive it like you stole it!
Posted by: byndbad914 Oct 27 2010, 02:07 PM
thanks! I definitely want to beat hell out of it! After a few warm up laps of course. My hope is that the initial setup is close enough to get some good laps in - the fear is I am off somehow on setup and it either under or oversteers like mad, etc. I only have the set of springs that are on the car (the old spring rates are way too low) so I don't have a bevy of springs to mess with unfortunately, just sway bar adjustments and shocks. This first day will truly be a "see where I am starting from" sorta test and tune.
Just talked my buddy, the truck is secured for this weekend, so now it is just a matter if the track has enough sign ups to actually open for the day. Gonna work on my duct tape fenderwells later today.
A smiley story of how the fenderwells were dealt with
 the old ones out in some new support tubes
  duct tape
 ![popcorn[1].gif](style_emoticons/default/popcorn[1].gif)
Posted by: byndbad914 Oct 29 2010, 09:19 PM
cardboard and duct tape fenderwells are in, got the car all corner balanced today, and finally took it out onto the main streets. I can already see this car is WAY easier to steer with the major reduction in scrub.
Also stepped up and bought Hawk DTC-70 brake pads for the car - I have been using the "performance" version of pads for 930 calipers and they have been rather sucky - lemme say the DTC-70s, stone cold, are orders of magnitude better brake pads. Literally locked all four tires up (have never done that BTW with the big slicks) after having to completely readjust my brake bias. Car will slam me into the windshield so I am really feeling stoked to get this onto the track on Sunday! And I totally forget just how fast this thing accelerates  Now it may stop just as quickly!
Holy crap, there is something called Lingerie Football League on MTV2 right now... this is a whole new level of entertainment! Chicks in tiny shorts, bikini tops, shoulder pads and helmets playing indoor football and tackle the crap out of each other... I have never been one to sit and watch a football game but I am thinking I could get into this  Was just watching Underworld with Kate Beckinsale
  She may be a vampire, because there is really no way someone can be that stunning and be human. The football girls are a bit like Maaco paint jobs - great at 10 ft hahahaha.
Anyway, back on topic, signed up and paid my money for the track day, friend got back into town tonight and will be rollin' out with me on Sunday so I have a camera mount now and will try to get some vid of the car on the track. Gonna have him help me double check toe front and rear tomorrow, get loaded up and be ret' ta roll.
Posted by: stewteral Oct 29 2010, 11:23 PM
cardboard and duct tape fenderwells are in, got the car all corner balanced today, and finally took it out onto the main streets. I can already see this car is WAY easier to steer with the major reduction in scrub.
Also stepped up and bought Hawk DTC-70 brake pads for the car - I have been using the "performance" version of pads for 930 calipers and they have been rather sucky - lemme say the DTC-70s, stone cold, are orders of magnitude better brake pads. Literally locked all four tires up (have never done that BTW with the big slicks) after having to completely readjust my brake bias. Car will slam me into the windshield so I am really feeling stoked to get this onto the track on Sunday! And I totally forget just how fast this thing accelerates
Now it may stop just as quickly! Holy crap, there is something called Lingerie Football League on MTV2 right now... this is a whole new level of entertainment! Chicks in tiny shorts, bikini tops, shoulder pads and helmets playing indoor football and tackle the crap out of each other... I have never been one to sit and watch a football game but I am thinking I could get into this
Was just watching Underworld with Kate Beckinsale She may be a vampire, because there is really no way someone can be that stunning and be human. The football girls are a bit like Maaco paint jobs - great at 10 ft hahahaha.Anyway, back on topic, signed up and paid my money for the track day, friend got back into town tonight and will be rollin' out with me on Sunday so I have a camera mount now
and will try to get some vid of the car on the track. Gonna have him help me double check toe front and rear tomorrow, get loaded up and be ret' ta roll.Hey Tim,
Great news! Way to go: it's on the road and you can drive it! You scared me for a minute as I thought the photo was YOUR lady and I was thinking, hell, he'll NEVER find his way to the garage!!
Forget the Chicks, any chance of pics of the finished suspension?
Best,
Terry
Posted by: Randal Nov 1 2010, 09:54 AM
"Holy crap, there is something called Lingerie Football League on MTV2 right now... this is a whole new level of entertainment! Chicks in tiny shorts, bikini tops, shoulder pads and helmets playing indoor football and tackle the crap out of each other... I have never been one to sit and watch a football game but I am thinking I could get into this Was just watching Underworld with Kate Beckinsale"
I saw the same channel when surfing and just had to look.
When you said the ladies were hitting and tackling hard, that would be an understatement. They were tough.
And the outfits!
Hey where is that video from the track day and your first impressions driving the car????
Posted by: J P Stein Nov 1 2010, 10:13 AM
Now that you've cured the scrub, put some erasers on them wheels & go autocrossing. The "trend" these days with SCCA is open courses with HP getting the nod. You'd fit like a glove in E Mod.
Posted by: andys Nov 1 2010, 10:45 AM
Hey where is that video from the track day and your first impressions driving the car????
Ditto......How'd it go?
Andys
Posted by: byndbad914 Nov 1 2010, 10:28 PM
man, editing video to get it down to a reasonable timeframe for YouTube is a PITA!
So I have "part 1" edited and loaded up.
http://www.youtube.com/user/byndbad914?feature=mhum#p/a/u/0/z8S9v2LkacM
The car ran great - have a couple minor issues to flesh out but all in all the best track day I have had in easily 5 years, not kidding. I ended up having to remove the rear sway bar links and use their smaller diam spacers for the shocks as the bolt head was rubbing on the rear wheels at max compression so my wheels have some scraping but nothing major. Will need to machine up a couple more small spacers to reattach the drop links.
The car has a severe low speed understeer so the rear is just too soft (and why it was moving so much and rubbing the bolts I suspect). So I need higher rate rear springs and get the bar back in.
I had such bad understeer in the tight turn coming up out of the first downhill (you can see in the vid how slow I take it tho' not as bad as the Miata ) that even tho' I was going slow and had lower gear mechanical advantage, if I would smash the gas to bring the rear around it would just lift the front and drive off track, so no steering with the right foot unfortunately. You can often see the front plow out coming into the esses as well. I would go into T1 rather slow too to be safe and keep it on the track.
With no traffic and a more neutral setup I would hope to shave a few more seconds off. Best time was 2:02.11 in the afternoon session (in part 2 to come tomorrow night). I am sure I could get the car sub 2:00 after some tuning... which is a pretty fast time for the track but not the fastest by any means. If I were more like 1:55 I would be happier of course... maybe with more track time, no traffic and some tuning!
Oh yeah, those brake pads are night and day compared to semi-metallics I had before!
Posted by: andys Nov 2 2010, 11:16 AM
Congratulations!! Nothing broke, and minimum problems makes it a successful outing given the massive changes to the car. I'll refrain from being PITA about tire temps, adjustments, etc. Glad you enjoyed the day, and I look forward to video #2.
Andys
Posted by: stewteral Nov 2 2010, 11:55 AM
man, editing video to get it down to a reasonable timeframe for YouTube is a PITA!
So I have "part 1" edited and loaded up.
http://www.youtube.com/user/byndbad914?feature=mhum#p/a/u/0/z8S9v2LkacM
The car ran great - have a couple minor issues to flesh out but all in all the best track day I have had in easily 5 years, not kidding. I ended up having to remove the rear sway bar links and use their smaller diam spacers for the shocks as the bolt head was rubbing on the rear wheels at max compression
so my wheels have some scraping but nothing major. Will need to machine up a couple more small spacers to reattach the drop links.The car has a severe low speed understeer so the rear is just too soft (and why it was moving so much and rubbing the bolts I suspect). So I need higher rate rear springs and get the bar back in.
I had such bad understeer in the tight turn coming up out of the first downhill (you can see in the vid how slow I take it tho' not as bad as the Miata
) that even tho' I was going slow and had lower gear mechanical advantage, if I would smash the gas to bring the rear around it would just lift the front and drive off track, so no steering with the right foot unfortunately. You can often see the front plow out coming into the esses as well. I would go into T1 rather slow too to be safe and keep it on the track.With no traffic and a more neutral setup I would hope to shave a few more seconds off. Best time was 2:02.11 in the afternoon session (in part 2 to come tomorrow night). I am sure I could get the car sub 2:00 after some tuning... which is a pretty fast time for the track but not the fastest by any means. If I were more like 1:55 I would be happier of course... maybe with more track time, no traffic and some tuning!
Oh yeah, those brake pads are night and day compared to semi-metallics I had before!
Tim,
Thanks for all the video, I am eager for the rest.
FANTASTIC!!!! You car just looked Fantastic! I've never seen a 914 sit so flat in corners, especially a 914 V8!! I hope you are very proud after all the time and work you put into your suspension: it certainly works!
Now I'm feeling sick to my stomach: I thought my car was getting pretty good, but nothing like yours. AW SHUCKS!!!
Hey, I'm thinking you're ready for the Rolex Series!
Best,
Terry
Posted by: byndbad914 Nov 2 2010, 12:45 PM
yeah, pretty happy overall with the outcome on the car.
No tire temps - can't believe of all the things to forget on the workbench, I had some welding gloves thrown over it and just didn't see it! But tire wear looked good so that is promising.
I was going to swap the front bar to the rear since it is a stiffer bar, but then as I noted, I had to remove the rear bar down links anyway... I made sure to have the exact same length/diam bar front and rear so I can play that game (different wall thickness for stiffer rate) but again, will start with stiffer rear springs first for the next outing. At the rate I have been moving, likely next year as winter should be coming on here, tho' we have been unseasonably warm (me likey!!).
Funny anecdote, when I downloaded my camera there was a quick vid I shot almost exactly one year ago on 10/30/09 - it was the day after we had 16" of snow and I noted it hit 50 deg that day and melted most of it!! So having a solid 60s temp with minimal winds at HPR on Halloween was really a dream of a day. Not the most perfect track weather but certainly the closest I have been in awhile.
Back to work... will edit the other 1/2 of the vid tonight, then tomorrow pack, off to SEMA Th and Fri!
Posted by: byndbad914 Nov 2 2010, 02:48 PM
second half is up
http://www.youtube.com/watch?v=eEkrIEixEuQ
get to see the car compared to a couple of Z06 Vettes, 1 C5 and a C6. The black C6 has similar HP and a bit more torque so we have similar speeds in the straights, I have a slight advantage given my lower weight (around 600-700 lbs lighter).
I need to go to the slightly taller rear tire I think as I am hitting redline @ 110 mph in the short straight and just letting off but could run it out a bit more with a bigger tire. Get rid of the understeer and I could go thru T1 a lot faster as well.
Posted by: J P Stein Nov 2 2010, 09:31 PM
Do you have a clutch type LSD?
Posted by: byndbad914 Nov 2 2010, 11:35 PM
Do you have a clutch type LSD?
yep. Ever since I went to LSD from open diff I had understeer, so I added the rear bar. Unfortunately just not enough bar, then had to disconnect it altogether.
Posted by: J P Stein Nov 3 2010, 07:07 AM
As I see it, track cars want a slight bit of understeer.....a tail happy track car could scare the weewee out of a guy.....unless you're a drit track specalist.
Clutch type LSD keep the rear tires spinning at the same rate up to the clutch-unlock rate.....equal means straight ahead....I know, I'm telling you stuff you already know. I avoided this with a TB diff, but "they" say TB diffs don't work well
in high HP applications. 
I don't know enuff to offer much good advice and certainally not a cure. I suspect that you will have to tune to get the car to a workable understeer on sweepers and live with what's left on the tighter stuff.....unless you are a Steve Kinser wannabe. Then again Mark Donahue put a locked diff in all his cars.....even where it wasn't strictly legal.
There is a clutch pack there is clutch packing
Posted by: andys Nov 3 2010, 11:41 AM
yep. Ever since I went to LSD from open diff I had understeer, so I added the rear bar. Unfortunately just not enough bar, then had to disconnect it altogether.
Tim,
Terry and I went through the same thing; good balance with the open diff to understeer with the LSD. Adding a rear bar got us a lot better. I think he can now go with a slightly softer rear spring rate, but we'll test first before changing.
Are you gonna get another shot at a track day before the winter hits CO?
I wasn't there, but I'll give it my best guess. I think I might go with your assessement of stiffer rear springs depending on how the rear of the car behaved. I'd be inclined to go slightly stiffer (and adjust shocks accordingly) if you need more control over the chassis in the rear. Otherwise, I might opt for a stiffer rear sway bar complimented with softening up the front just a little bit; perhaps a softer sway bar setting, and/or less dampening depending on the spring/shock. JP's right in that you don't want it tail happy, so you need to sneak up on it a bit at a time; but as I said, it's all a best guess. You know me, test and adjust and test and........
Too bad you're in CO; today's high in SoCal (Valencia) is forecast for 90 degrees, so winter is nowhere in sight.......yet.
Andys
Posted by: byndbad914 Nov 3 2010, 03:07 PM
Clutch type LSD keep the rear tires spinning at the same rate up to the clutch-unlock rate.....equal means straight ahead....I know, I'm telling you stuff you already know. I avoided this with a TB diff, but "they" say TB diffs don't work well in high HP applications.
I just want to get it so I can get it loose with my right foot, but I certainly prefer high speed understeer and it is why I left the wing on (I was going to leave it off at one point but last minute put it on again).
The Mendy only had a clutch type diff available - I asked about a TB diff but they didn't have that option on the S4 trans.
doubt it - but who knows... there are days that it will be 70 deg in Jan for instance, it just has to miraculously coincide with an open track day.
given how much motion I had at the rear and the fact I reduced the frequency value I calculated to based on the Penske tech recommendations, I am going to increase the rear spring rate based on what the car was doing. I obviously won't throw the existing springs away
so if I find it affects my ability to plant the throttle out of a turn I will swap back and swap sway bars and put the stiffer one in the rear. Car was pretty flat watching the vids so I think my sway bars are about correct for what I want to do.I definitely sneak up and specifically set the rear bar soft and the front bar stiff just to hopefully guarantee a start with understeer - oversteer on these cars tends to mean spin - it has to be very slight - so I too try to start under and tune to neutral with on-throttle oversteer which is quite manageable. Just gotta get there
And the more I think about it, those guys standing by Ken timed me at 2:02 and you can see me having to pass traffic that lap... I don't think I ever had a clean lap once I was running my timer (different topic altogether but it double clicks so I have to add two times together and I have to worry about consistency of the second click across the track in the back straight)... it is totally possible the car is faster than that already! I hope so, it feels fast as hell, and they got the black Z at 2:08 and I was gaining on him pretty quickly each lap, probably quicker than 6 seconds difference (tho' who can say how clean his laps were, but that is cooking for a Z06 so he had a good lap there). And the caution was out nearly the whole session with that white Porsche cup car.

The car, on paper, should be good for 1:55s I would think and I suspect I can get there with tuning. Here are some results from groups that I follow for a good comparo since you guys have no way of knowing if 2:02 is fast, slow, or sorta
Rocky Mountain Vintage Group - I look at the big bore group as that is all the vintage Trans Am cars and typically where the Porsches run as well. Porsches prepped by 3R can be pretty darn fast and I have yet to see one clear the 2:00 mark, but they get real close-like. Oh yeah, be careful, you have to watch what track config they run, the full track is 2.55 miles and they sometimes to the shorter 2.0 mile version
http://www.mylaps.com/results/showevents.jsp?org=140
- Oct 3rd enduro, fastest lap of all cars = 2:02.872 I don't know what car model that is as I don't know that driver combo.
- Oct 2nd was qualifying on the short course, no comparo.
- May 16th Ken Petrie clicked off a best of the weekend of 2:00.891 in his big block 2nd gen Vette. That dude is seriously fast and a champion driver and holds most of the RMVR track records, has Formula 5000s, etc. I should be able to beat that Vette. Note there was a faster car at 1:53.305 - that was a Lola or similar if I understand correctly that was thrown in that group. If I could run with him I would be stoked! He ran a 1:57 in qual and got faster, so did Ken, so me thinks Sunday was best weather/conditions
SCCA stuff - again, watch the course length... July 3rd was 2.0 miles, the 4th was 2.55 miles
http://www.coloradoscca.org/results/20100704HighPlainsRaceway.pdf
- Note that a GT3 Cup guy ran a 1:55.911
- Pettiford ran a 2:00 in his Solstice T2 car.
- Mike also ran a 1:57.968 in his C6 Grand Sport in the Sept 4th national event and I was there that day... he failed to qualify, started dead last, worked thru the whole group, then went on to lap the whole group in the session! Awesome driver and took 3 nat'l championships AGAIN that weekend (twice he has done it and the only guy to win 3 classes in 3 cars, let alone twice, in SCCA - amazing driver
I need to be running at the 1:55s to make all this effort worthwhile

Posted by: byndbad914 Nov 21 2010, 12:31 AM
weather has been in the 50s with no snow, and I was able to pick up 8 sets of Hyperco springs from a fellow Porsche racer late Wed night, so I bumped up to 1500 lb/in rears on Thursday, replaced a torn CV boot and rescaled the car, loaded up yesterday afternoon and hit the track today. Drove in heavy fog and cold until I was 5 miles from the track and literally the wall of fog disappeared and the sun came out as I pulled in The gods wanted to see some Porsches running today. I would say that by noon it was sunny and somewhere around 55-60 degrees (supposed to be 58 today and it felt like it).
Still have bad understeer, tire temps showed the fronts 25F colder than the rears and I need a bit more camber all around, but the car was running great and I ran a few 1/2 hour sessions, with my last tank of fuel around 2pm. The Cup car that broke the last time was back out there also - owner was a pretty cool guy. I was running right with him, another guy claiming he was faster than he was (told me he was running 55s... not true but nice guy nonetheless), and Mike Pettiford was running his Vette right at his SCCA T1 record just in front of me with high 1:57s to low 58s.
My best time 1:58.18 with consistent mid 58s to low 59s. In the top four cars today for sure, and it is amazing what shows up to HPR on open track days. At least 5 Porsche track cars, another two GT3 RSs, a Gallardo, Vettes, etc.
Good news is I picked up a full four seconds just going up 100 lb/in wheel rate in the rear I had been running 59s but figured out how to powerslide the car in the slow turns to overcome the understeer and picked up the other second.
My friend came out that is also a vintage racer which makes life so much easier - he was able to get tire temps for me the correct way in the hot lane, and pressures, etc. so I have a good game plan going forward. I was going to swap the sway bars today but was just enjoying the car too much and burned thru 30 gallons of fuel in 3 hours.
I had my GoPro HD cam setup but haven't viewed the footage yet... sadly it was off when I came in from the last, fastest session so I think I filled the card and am hoping I at least got some good footage following the cars I mentioned above before that happened.
Next iteration is to swap the sway bars, go to -1.0 deg front and -0.8 deg rear and I suspect I can tune the car in from there.
Posted by: J P Stein Nov 21 2010, 08:20 AM
I love it when a plan comes together.
Posted by: byndbad914 Nov 22 2010, 01:56 AM
...well let's hope my future plans have similar returns! Picking up four seconds with a spring rate change and getting more used to the track is promising.
After taking forever to process, then have it take almost forever to upload to YouTube only to fail at the end, then reload again, I finally have the fourth session up online. Eesh. It does have a 480p max, I am not going to bother with trying a 1080p again.
http://www.youtube.com/watch?v=SliMdISeDmI
Not the most exciting thing you will ever watch So bummed I didn't get my next and last session on vid (my 8GB card is clearly not enough so I need to bring a spare) as it would be much more exciting as the two Porsches at the beginning of this vid, the SCCA T1 Nat'l Champ and I were out there really working thru the traffic and having a good time. All four of us were the fastest fendered cars on the track and running within 1 second of each other.
Posted by: stewteral Nov 22 2010, 07:11 PM
yep. Ever since I went to LSD from open diff I had understeer, so I added the rear bar. Unfortunately just not enough bar, then had to disconnect it altogether.
Tim,
Terry and I went through the same thing; good balance with the open diff to understeer with the LSD. Adding a rear bar got us a lot better. I think he can now go with a slightly softer rear spring rate, but we'll test first before changing.
Are you gonna get another shot at a track day before the winter hits CO?
I wasn't there, but I'll give it my best guess. I think I might go with your assessement of stiffer rear springs depending on how the rear of the car behaved. I'd be inclined to go slightly stiffer (and adjust shocks accordingly) if you need more control over the chassis in the rear. Otherwise, I might opt for a stiffer rear sway bar complimented with softening up the front just a little bit; perhaps a softer sway bar setting, and/or less dampening depending on the spring/shock. JP's right in that you don't want it tail happy, so you need to sneak up on it a bit at a time; but as I said, it's all a best guess. You know me, test and adjust and test and........
Too bad you're in CO; today's high in SoCal (Valencia) is forecast for 90 degrees, so winter is nowhere in sight.......yet.
Andys
Hey Tim,
When I read your post, I have the same thought as Andy. We had developed the chassis by stiffening the rear and got it GREAT, but then I had hopeless inside wheel spin coming off corners.
I installed the Quaife Diff and went right back to UNDERSTEER! Andy pushed for a rear bar and after making one, WHOA, I had a car that would point AND put the power down. It was a "big swing" change and the first outing was way too oversteery. While I could drive it, I had to be "up on the wheel" to stay ahead of the loose condition. There was NO place to relax at the wheel and a few scary moments.
Now I 'm set for my next event with slightly SOFTER rear springs and my Big Bar. I believe the car is now in the right range to make final adjustments to achieve PEFECT HANDLING! (or at least, That's the story I'll tell)
Best of luck, your car looked SO good on-track. Dontcha' LOVE blowing off 'Vettes?
Terry
Posted by: byndbad914 Nov 23 2010, 12:18 AM
well, don't know about blowin' off all the Vettes, Pettiford's T1 Vette is still faster and a heavier car, so I need to beat him to be able to feel I can blow by all the Vettes What would be fun is to run with the Cup cars, that would be really fun as those cars are truly fast cars. Specifically if I can do it with a car at about half the price tag.
Talked with my good friend that has raced for a long time and talked about my tire temps, camber, etc etc and it is always good to have a resource like that to bounce ideas off of, so I have a game plan for sure. 4 day weekend coming up so may mess with the car this weekend to be ready to roll out if the weather continues to work out well. He also mentioned a word I had forgotten about a bit but as soon as he said it, I was reminded I was concerned about it since the tube chassis was built and the rack was moved - Ackerman. It would make total sense that the car has turn in and mid corner issues on the tight turns like I am seeing if the Ack is outta whack (whoa, that was a Johnny Cochoran moment there!) and I believe it to be so and have threatened to relocate the rack.
So I am going to mess with the other items that are just adjustments, no fabbing, and see how the car reacts. If ultimately it wants to persist, then I know I need to relocate the rack.
Posted by: Brett W Nov 23 2010, 10:37 AM
What is your ackerman? You can use ackerman to generate more slip angle in the front tires if necessary. Need to see where you are, 100% is way to much, you might try for almost none and see how the car does. Also, do you have any roll steer in the front? What kind of caster curves are you running? Caster will transfer weight diagonally across the chassis. You could be unloading the front tires in a turn.
Posted by: andys Nov 23 2010, 11:04 AM
Tim,
Thanks for the video; that was fun to watch. It looks like you were having fun in the cockpit as well. You should be proud of your results after so much work.
The understeer was very evident, as you pointed out. There's just no way to get a fast lap when the car doesn't want to turn. I'd wager you'll pick up a couple of seconds just by getting rid of that understeer. Judging by the video my guess would be you need more than some subtle adjustments to get where you need to be. I wish I was there, but then I would've been wanting you to change xyz and being a real PITA :-)
On the Ackermann issue, I just sort of assumed you worked all that out in your design; if not, then by all means do plot it out and adjust accordingly assuming you want to start at normal Ackermann.
Andys
Posted by: ghuff Nov 23 2010, 02:30 PM
This 914 > * .
Wayne's world not worthy moment.
Posted by: byndbad914 Nov 23 2010, 11:53 PM
thanks ghuff
I haven't measured the actual Ackerman values but can say I know there is too much as I have turned the tires on a smooth garage floor, pushed the car and have heard the inside tire squeal, which means too much. Not an exact science but when I started questioning Ack before I did that as a test. So when I get into these tight turns and have the wheel really cranked around the inside tire is leading way out and then just scrubbing v. steering so the outside tire has to carry everything.
I did not move the rack with the new suspension design and figured I would start with what I have and see how I want to make new mounting after running a couple days. I need to relocate the rack up as it is (I am running spacers to get the bump steer down to essentially zero which answers that question) so I am going to work on making new mounting bracketry so I can relocate the rack fore and aft to tune to whatever Ack works for the track. Just need to add a slip joint into the steering arm so I can move it back and forth at will.
In the meantime (and this is likely where you are going Brett) I am going to go to toe-in settings on the front instead of toe out - that would have the effect of bringing the inside wheel in and the outside wheel in as well, essentially countering the Ack affect for now. I can also add toe in on bump to get the outside wheel to turn in dynamically. Having no bump steer as well as toe out static settings is exacerbating the Ack issue.
Posted by: Brett W Nov 24 2010, 09:32 AM
You don't want toe in on turn in. That will make the car hard to drive. You want toe out. Toe out will keep the car from turning more than you ask it as it rolls into a turn. Roll steer out is more predictable and easier to drive. Obviously you don't want a lot of it, but just enough.
Posted by: byndbad914 Nov 24 2010, 11:25 AM
I would agree w/ toe out if the Ackerman is not an issue - having too much Ack the inside tire is turning in too much compared to the outside tire so by running toe in v. out I am bringing the inside tire back in, as well as, turning the outside tire more into the turn, attempting to cancel the over-affect of too much Ack. Keep in mind these changes are all small, not like I run 1/2" of toe out It is just something I am thinking of trying in the interim... if I have a gain then I know I have an Ack issue for sure.
Posted by: J P Stein Nov 27 2010, 09:28 PM
Hay Tim, this is not strictly on topic but I have a question.
Are the louvers in your hood the sole venting for your radiator?
Venting out the hood looks like the cat's ass and since the shitbox is going water cooled next season, we're trying to finger it out. Brit has sourced the louvers. Anythng to watch out for? The radiator itself is 14 X 18 and my eyeball says your vents are big enough to do the trick......what size is your pannel? I dunno shit about water, cept it's good to drink but in excess, it will kill ya.
Posted by: byndbad914 Nov 28 2010, 05:06 PM
the louvers would be the main source of venting, but I haven't sealed the back side of the radiator shroud to them so air can get out elsewhere but they are the primary source. I had a lot of heat in the cabin before and it has helped a ton to have the louvers. The nice thing is that as air travels over them it helps to suck the air out. Every other way for the air to get out should look like a higher pressure area to the hot air.
Mine are the "wide" Genesis louvers.
http://www.hrpworld.com/index.cfm?form_prod_id=3876&action=product
I have threatened to make a simple box to seal up to the louvers to reduce in cabin temps a bit more but just haven't done that yet. Lazy
For any sort of Suby conversion they should be more than adequate. The openings are 0.75" x 8.5" approximately and there are five per piece.
Posted by: byndbad914 Dec 28 2010, 10:45 PM
little update - swapped the sway bars (thicker wall one in the rear now), added some camber to the front and went to toe-in since the last track day. Messed with tire pressures a lot today looking to get some heat and some grip (it was 49 deg peak today around 1pm) and the max tire temps I got were only around 135 deg at the core on the best lap.
Good news is I managed to pull one clean lap and get the best time yet of 1:57.9. There was a fair amount of traffic today since anybody with a V8 or roll bar somehow assumes they are good for the "fast" group but there were some fast guys, couple GT3 RSRs including the one from previous vids (that broke the first time) and I was rolling faster than him today, and a Cayman racer that was running pretty strong.
The rear was really skatey in some turns even tho' I still have have to power slide thru the tight ones to get the car to rotate but overall it was feeling pretty good. Not going to do any major changes going forward until I get good temp days, real temp in the tires, etc.
Posted by: Randal Dec 29 2010, 10:52 AM
...well let's hope my future plans have similar returns! Picking up four seconds with a spring rate change and getting more used to the track is promising.
After taking forever to process, then have it take almost forever to upload to YouTube only to fail at the end, then reload again, I finally have the fourth session up online. Eesh. It does have a 480p max, I am not going to bother with trying a 1080p again.
http://www.youtube.com/watch?v=SliMdISeDmI
Not the most exciting thing you will ever watch
So bummed I didn't get my next and last session on vid (my 8GB card is clearly not enough so I need to bring a spare) as it would be much more exciting as the two Porsches at the beginning of this vid, the SCCA T1 Nat'l Champ and I were out there really working thru the traffic and having a good time. All four of us were the fastest fendered cars on the track and running within 1 second of each other.I hadn't seen the in-car video until now, but could tell you were having fun. Made me smile just watching.
Posted by: andys Dec 30 2010, 12:29 PM
little update - swapped the sway bars (thicker wall one in the rear now), added some camber to the front and went to toe-in since the last track day. Messed with tire pressures a lot today looking to get some heat and some grip (it was 49 deg peak today around 1pm) and the max tire temps I got were only around 135 deg at the core on the best lap.
Good news is I managed to pull one clean lap and get the best time yet of 1:57.9. There was a fair amount of traffic today since anybody with a V8 or roll bar somehow assumes they are good for the "fast" group but there were some fast guys, couple GT3 RSRs including the one from previous vids (that broke the first time) and I was rolling faster than him today, and a Cayman racer that was running pretty strong.
The rear was really skatey in some turns even tho' I still have have to power slide thru the tight ones to get the car to rotate but overall it was feeling pretty good. Not going to do any major changes going forward until I get good temp days, real temp in the tires, etc.
If I remember correctly, your time was competitive with that fast Vette from the previous time out, so that's good news for such a cold day. It's difficult to make an assessement of what the car's doing in low grip conditions (where you'd otherwise want to soften everything up). As you say, you'd probably be best served to wait for that next warm(er) track day. Why you decide to go with toe in?
Andys
Posted by: byndbad914 Dec 30 2010, 07:45 PM
I went toe in to reduce the Ackerman in the turns. Even with toe in I had positive Ackerman on the front, to the tune of around 1/2 degree at my tightest turn on the track.
Posted by: J P Stein Jan 1 2011, 10:53 PM
Tim:
A bit off the wall but need to know.
How tall are your hood louvers? SCCA solo rules allow 1 inch of height above the front hood for louvers. Since your louvered pannels are 150ish bucks a pop it would be good to know if we can make em' work.
The SEB just released a rule "clarification" for XP that threw a wrench in the werks.
As per usual practice it is pretty mindless. The old saw that says "You no play the game, you no makey the rules" doesn't apply here.
Posted by: byndbad914 Jan 2 2011, 09:29 PM
I think the key will be to mount the louvers from the underside, through the hood. This is how I mounted mine, and if you take a tape measure and measure from the hood surface and look across they louvers they are under 1" by a smidgen. It is a rough average of about 7/8", of course it varies as eye level/angle and molding tolerances mean it can move around a bit, but they appear to stay juuuust under 1" pretty much consistently if you mount them like that.
I think you should be okay unless you get a total JackA doing the measuring, which there is no rule that can work fairly with a JA enforcing it. I would be surprised if you had an issue if you are allowed a full 1". Worse case put a washer or two between the louvers and the hood on the underside and push the louvers down. Technically they will be below 1" from the top surface and you get the largest louver possible.
Posted by: J P Stein Jan 2 2011, 09:43 PM
Thanks.
The Sheridan hood is around 3/8" thick out in the middle ....foam core/CF *I think*.
We won't really know till we start cutting. We wanted to make a duct to direct the hot air out away from the gas tank....but that's illegal . Looks like an air deflector is next best. If you have a Lotus Elite it is legal because they came from the factory with ducting from the radiator exiting the hood......hay, don't ask me, I just play the game.
Posted by: Britain Smith Jan 3 2011, 01:39 AM
Thanks for the info, I will get a pair of these on order.
BTW, I think you told me before but can you remind me...are yours the narrow or wide version?
http://www.genesisparts.com/index.cfm?tpc=Genesis_Carbon_Fiber_Hood_Louvers&form_prod_id=1_8&action=product
-Britain
Posted by: byndbad914 Jan 3 2011, 07:15 PM
Mine are the "wide" Genesis louvers.
http://www.hrpworld.com/index.cfm?form_prod_id=3876&action=product
The openings are 0.75" x 8.5" approximately and there are five per piece.
Posted by: byndbad914 Jan 15 2011, 07:08 PM
some good, overall shots of the suspension while I am going thru the bearings. There were some requests for good, final shots and here they are. I have the front bearings fully replaced and hubs back on, the rears I got apart today but need to get bearings - should have them early next week. I will try to remember to get some rear shots with the uprights reinstalled.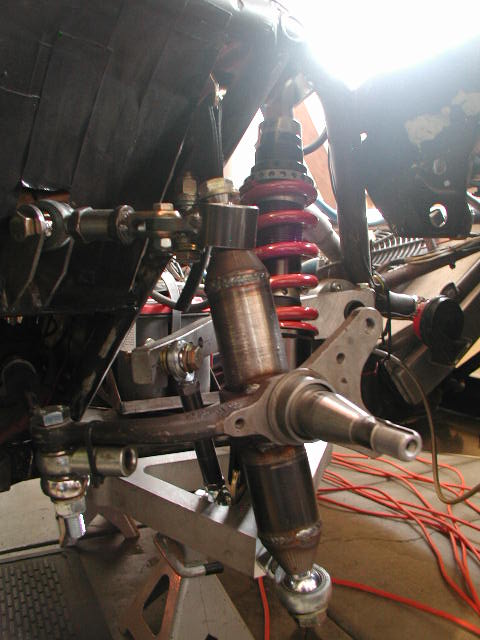
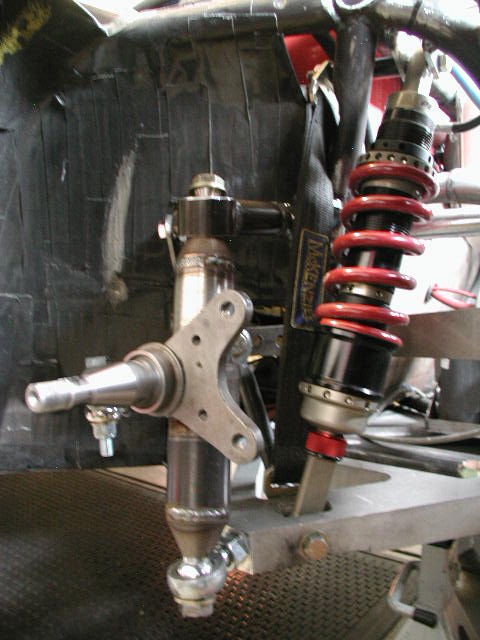
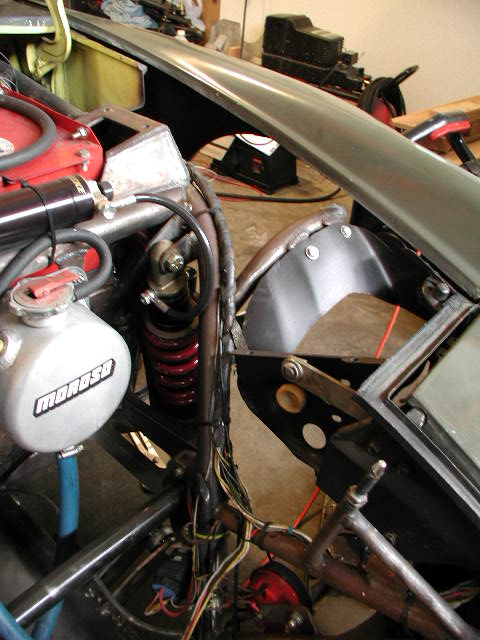
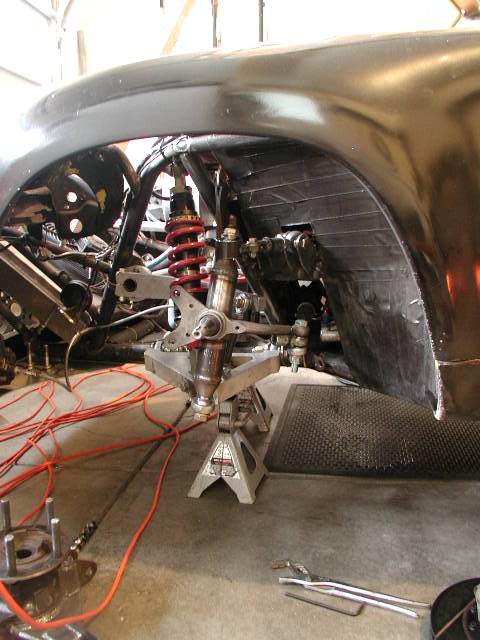

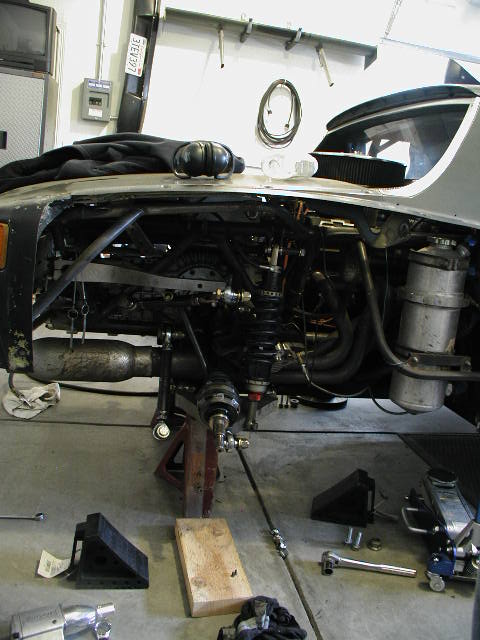
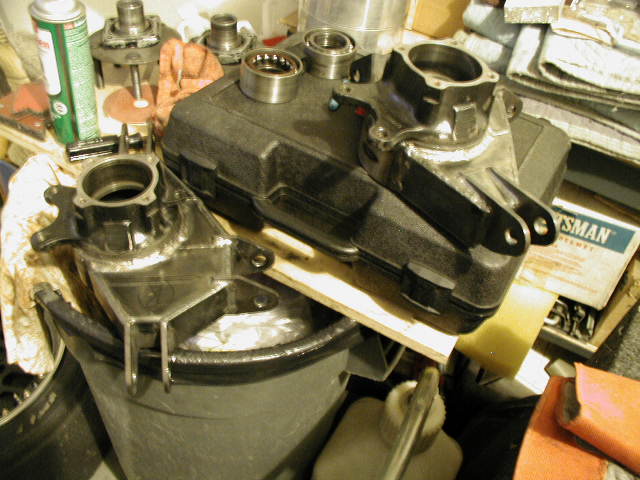
this shows the bearing spacers made by Patrick to use Carrera hubs with 914 bearings.
Posted by: Krieger Jan 16 2011, 11:05 AM
 awesome work!
Posted by: jd74914 Jan 16 2011, 11:19 AM
OH NO....ROD ENDS IN BENDING!!
Just poking fun Tim. It looks great! Thanks for the pictures.
Posted by: byndbad914 Jan 16 2011, 11:48 AM
yeah, plenty of people like to freak out about rod ends in shear I have to admit, I did the math over and over again convincing myself it was going to be okay... and that is starting out knowing how difficult to impossible it is to bend 3/4" diam steel.
For integrity tho' and just a point of discussion if someone decides to use ends in shear like this, note the "jam" nut is really a full size, tall nut - this taller nut helps to both stabilize the rod end and also serves to reduce the length of the 3/4" section of thread which then increases the moment capacity.
Powered by Invision Power Board (http://www.invisionboard.com)
© Invision Power Services (http://www.invisionpower.com)