Printable Version of Topic
Click here to view this topic in its original format
914World.com _ The Paddock _ Engine Installation
Posted by: Randal Feb 14 2011, 06:41 PM
I am going to be putting my engine in by myself, so trying to get everything lined up so it will be a smooth process.
My throttle bodies and fuel rails are wider than the stock sheet metal, so will be removing one of them so I won't have to use crazy angles (again) to get the engine back up in there. My engine is about as high as one with Webers.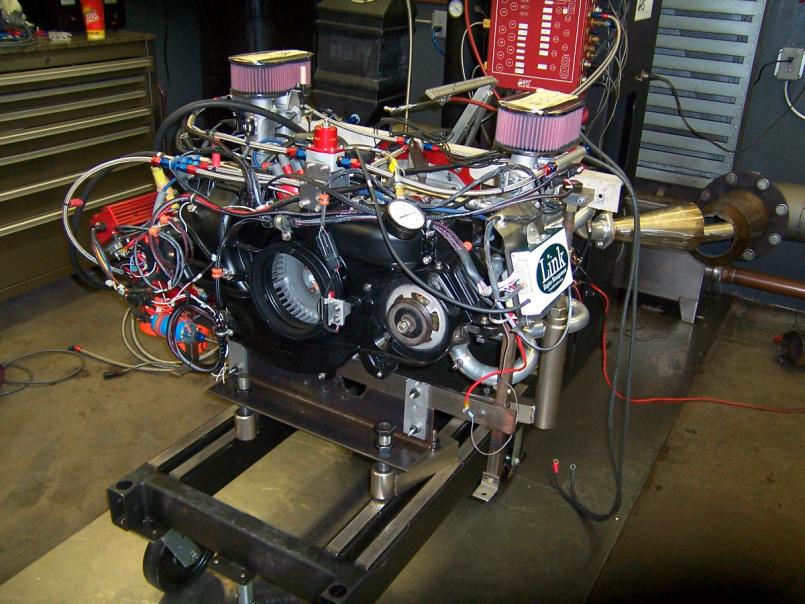
I've built two large wide ramps and extra blocks so that I can have the rear wheel about 14" off the ground.
Don't have my car here so can't test it out, but figured all you jack stand / car ramp guys will know if that is high enough for my engine to fit under the bumper.
If not, some more 2 x 6's are going to get cut up for blocks.
Posted by: J P Stein Feb 14 2011, 06:56 PM
For my weber carbed 2.7L I needed 32 inches from the ground to the rear bulkhead. The lifting gear under the motor was about 8 inches tall.
I permanently removed all the sheet metal from the motor and the engine shelf (both sides) without causing any heat problems......the engine room did get dirtier, tho.
After pushing the motor /trans in rough place and jacking the thing to full extension, I'd block the cradle in place then add a 10 inch box on the jack and take it the rest of the way up. I got good at doing it solo but extra help is good JIC.
Attached thumbnail(s)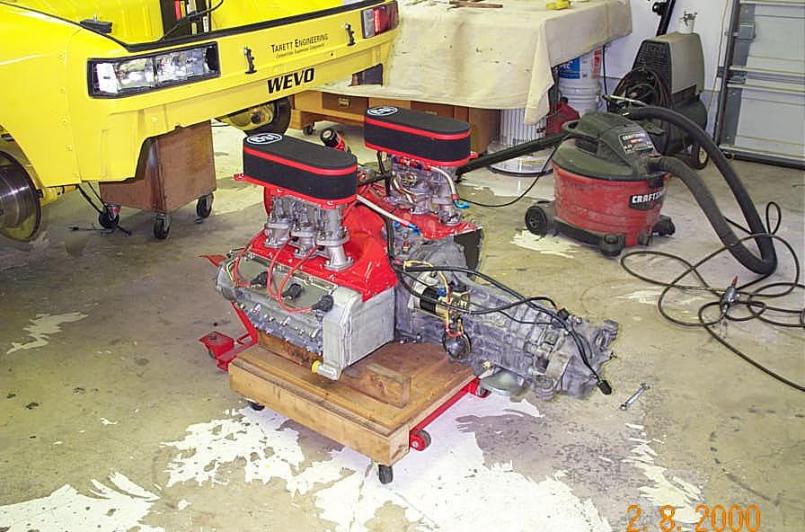
Posted by: Borderline Feb 14 2011, 11:20 PM
I don't like having the car that high in the air, so I remove the carbs and air cleaners and leave the intake manifolds with some tape over them to keep any crud out. then after the engine is in, I re-assemble the carbs. Also, I leave the headers off until after the engine is installed. Personal preference, I guess.
Posted by: Racer Chris Feb 15 2011, 09:51 AM
One of our lift plates gets the engine down to about 4" from the floor, on a jack that will raise it 14" or more 
With the TBs out of the way you have a chance with the car at the level you mentioned Randal. You may have to get creative lowering the car a little bit to meet the engine before any of the bolts will go in.
Posted by: Randal Feb 15 2011, 02:14 PM

One of our lift plates gets the engine down to about 4" from the floor, on a jack that will raise it 14" or more
With the TBs out of the way you have a chance with the car at the level you mentioned Randal. You may have to get creative lowering the car a little bit to meet the engine before any of the bolts will go in.
Thanks Chris.
As you suggested the TB's will be out of the way.
I'd cut the sheet metal, but Paul (built my engine) would be unhappy given all the effort he took to maintain engine cooling.
After carefully looking at one of the HF transmission jacks I decided to buy one for this job. It has the ability to alter angle fairly dramatically basically North, South East or West.
It is made pretty well and I think it will do what is needed. We'll see how it works when I have the motor, along with the transmission, on it. BTW I made a block to protect the special oil sump and that fits precisely into the top of the jack plate. I'll strap the engine to that plate with tie down straps.
So I should be able to get the engine to the right height to allow the bolts to go in.
Just waiting until this rain goes away and then the motor is going in. We need that T-Shirt weather that was here last week!
Posted by: Racer Chris Feb 15 2011, 07:52 PM
BTW I made a block to protect the special oil sump and that fits precisely into the top of the jack plate. I'll strap the engine to that plate with tie down straps.
The balance point of a 4 cyl. engine/transmission ass'y is very close to the rear of the engine.
Posted by: draganc Feb 15 2011, 10:16 PM
Great looking engine and very interesting setup!!
Do you mind sharing some information about the “crank” sensor (I believe you have mounted it next to the fan) and the fuel rail set-up?
Thanks,
Dragan
PS: Are those Tangerine headers?
Posted by: Randal Feb 16 2011, 05:02 AM
Great looking engine and very interesting setup!!
Do you mind sharing some information about the “crank” sensor (I believe you have mounted it next to the fan) and the fuel rail set-up?
Thanks,
Dragan
PS: Are those Tangerine headers?
Tangerine headers, yes. Chris Foley made them and they work well.
When first testing the engine couldn't get the bounce out of the Mallory distributor, even with several changes, blueprinting, etc., so the engine builder set up a crank sensor that has very little bounce. The Mallory is the backup.
I'll take some closer pictures of the fuel rail set up, along with the fuel regulator and filters.
Posted by: draganc Feb 16 2011, 07:34 AM
Great looking engine and very interesting setup!!
Do you mind sharing some information about the “crank” sensor (I believe you have mounted it next to the fan) and the fuel rail set-up?
Thanks,
Dragan
PS: Are those Tangerine headers?
Tangerine headers, yes. Chris Foley made them and they work well.
When first testing the engine couldn't get the bounce out of the Mallory distributor, even with several changes, blueprinting, etc., so the engine builder set up a crank sensor that has very little bounce. The Mallory is the backup.
I'll take some closer pictures of the fuel rail set up, along with the fuel regulator and filters.
Thanks for the info!
Yes, Chris makes great stuff. I have a set from him as well. They look great and I hope they will work even better. I'm still working on my crank sensor setup and did not run them yet, hence the engine is not installed yet :-(.
I'm using McMark's crank disk between the flange and cooling fan. How did you mount the the disk and sensor?
Dragan
Posted by: McMark Feb 19 2011, 02:13 PM
Dragan, looks like a Hall Effect sensor (mine is VR) and magnets mounted in the fan. Lots of FI systems use the Hall sensor because they require less 'effort' of the ECU. I'm sure either one works well.
At the risk of hijacking Randal's thread, here is the hall sensor mount I'm using on Rob Sime (ConeDodger) 's engine. Magnets are drilled and epoxied into the back of the A/C pulley.
Attached image(s)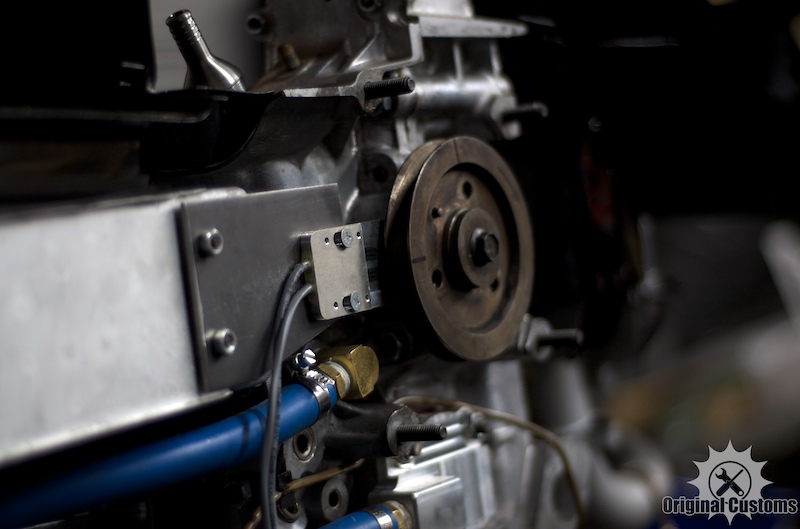
Posted by: draganc Feb 19 2011, 10:23 PM
Randal sorry for the highjack and thank you Mark for your input and pic.
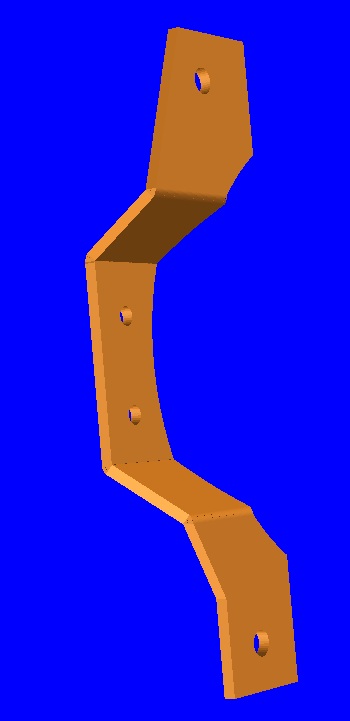
See attached the bracket that I’m working on for a VR sensor set-up. This would bold between the engine and the fan housing. The fan housing mounting points will need to be milled down for the thickness of the bracket.
Dragan
PS: My rear valence is about 25” of the ground and a used a HF lift table to rest and remove the engine. It's been like this for more then a year 
Posted by: J P Stein Feb 20 2011, 09:06 AM
I spent 10-12 winters under my 914. I hate jackstands....don't trust em', never will....so I made some alternatives at the get go and never regretted it.
An added plus is their usefullness for other stuff.......worked for Mr.2 also.
Plenty of room to move around under there.
Attached thumbnail(s)
Posted by: grantsfo Feb 23 2011, 03:34 PM
Man you guys are fancy. I remember my 914 first engine install 28 years ago was on old floor jack with a piece of plywood on top with car resting on cement blocks.
Of course with Boxster got a little more creative.
Attached image(s)
Posted by: Randal Feb 23 2011, 07:01 PM
I spent 10-12 winters under my 914. I hate jackstands....don't trust em', never will....so I made some alternatives at the get go and never regretted it.
An added plus is their usefullness for other stuff.......worked for Mr.2 also.
Plenty of room to move around under there.
Are those 3/4 plywood boxes JP? How high?
That will be my next project down at my buddies stair company.
Posted by: J P Stein Feb 23 2011, 08:57 PM
Without going out to my cold garage, I recall they are made out of a basic 16 inch max cut.......rip a 4 X 8 plywood sheet into 3 ea.16 inch wide strips....less the kerf.
This makes 18, 16 inch (approx) squares. Inside each box is a X cross brace top to bottom & 2X2s in the corners.
Screw & glue the whole works together, some HF swivel casters and ya have 3 boxes.....less the X brace which requires more wood. IIRC, it took 2 sheets of 3/4 plywood. They stand about 22-23 inches tall with the casters......IIRC. It's snowing
intermittently & I'm staying in the warm house.
The 16 inch squares go at the top & bottom and the rest get trimmed to fit as required. When your done you'll have a BS degree in plywood management. 
They are stout.
Attached image(s)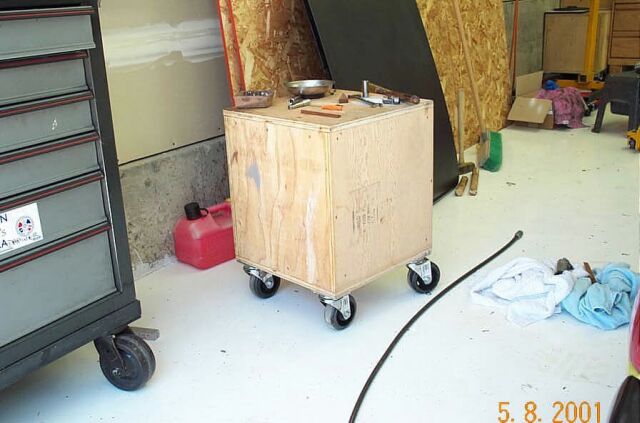
Posted by: Randal Feb 24 2011, 10:08 AM
Without going out to my cold garage, I recall they are made out of a basic 16 inch max cut.......rip a 4 X 8 plywood sheet into 3 ea.16 inch wide strips....less the kerf.
This makes 18, 16 inch (approx) squares. Inside each box is a X cross brace top to bottom & 2X2s in the corners.
Screw & glue the whole works together, some HF swivel casters and ya have 3 boxes.....less the X brace which requires more wood. IIRC, it took 2 sheets of 3/4 plywood. They stand about 22-23 inches tall with the casters......IIRC. It's snowing
intermittently & I'm staying in the warm house.
The 16 inch squares go at the top & bottom and the rest get trimmed to fit as required. When your done you'll have a BS degree in plywood management.
They are stout.
I'll bet they are stout. When it gets warm enough to make the garage trip please show a picture of how you did the X brace. Thanks.
Posted by: J P Stein Feb 24 2011, 10:44 AM
I'll bet they are stout. When it gets warm enough to make the garage trip please show a picture of how you did the X brace. Thanks.
The braces are permanently enclosed in the boxes so discription will have to do.
Once you have the 4 sides on the bottom of your box, measure the inside width.....prolly around 14-1/2 inches. Rip 2 of your 16 inch squares to that width.
Find the center of that width & layout a 3/4 ( actually 11/16 cause 3/4 ply ain't) inch slot X 8 inches deep & centered on that CL. Cut it out on 2 pieces and shove them together.....slot to slot (tight fits are gud)....now you have an X brace.
A couple 2 X 2s where they join for screwing/glueing purposes makes em' solid and locked within the box.
One needs a good table saw with an accurate fence.....a cabniet shop is the perfect place to find one. I built mine.......the build discription would run to pages if I could remember how I did it.
 WAG bout 6-700 lbs.....but it's on casters.
 We ended up with 3-4 inches of snow last night so I'm taking vacation today.....to shovel my steep driveway clear.....bummer.
Attached thumbnail(s)
Posted by: Randal Feb 25 2011, 10:12 PM
I'll bet they are stout. When it gets warm enough to make the garage trip please show a picture of how you did the X brace. Thanks.
The braces are permanently enclosed in the boxes so discription will have to do.
Once you have the 4 sides on the bottom of your box, measure the inside width.....prolly around 14-1/2 inches. Rip 2 of your 16 inch squares to that width.
Find the center of that width & layout a 3/4 ( actually 11/16 cause 3/4 ply ain't) inch slot X 8 inches deep & centered on that CL. Cut it out on 2 pieces and shove them together.....slot to slot (tight fits are gud)....now you have an X brace.
A couple 2 X 2s where they join for screwing/glueing purposes makes em' solid and locked within the box.
One needs a good table saw with an accurate fence.....a cabniet shop is the perfect place to find one. I built mine.......the build discription would run to pages if I could remember how I did it.
WAG bout 6-700 lbs.....but it's on casters. We ended up with 3-4 inches of snow last night so I'm taking vacation today.....to shovel my steep driveway clear.....bummer.
That is a real work of art JP.
I really miss having my table saw with the professional fence. Great tool.
Posted by: Randal Feb 25 2011, 10:15 PM
The next phase of the installation begins tomorrow.
Have to sort out the electrics and finish tying together the oiling system.
Pretty exciting.
Of course if this storm decides to hit tomorrow morning all will be put on hold as I have less room, in my garage, than anyone else on the planet.
Posted by: J P Stein Feb 26 2011, 09:18 AM
My outside thermometer says 16F this morning........
Posted by: Randal Feb 26 2011, 05:08 PM
My outside thermometer says 16F this morning........
Richard came over this morning and we went outside, it was about 38 degrees, and worked on the car. With the breeze it was cold for us wimpy California boys.
We figured out the wiring and traced a few unknown wires back to the ECU, so will be able to tell what they're for shortly.
Also got the oil system completely hooked up, same with the throttle assembly and most of the clutch stuff.
We also bolted in the TWM throttle bodes along with all the brackets and special little bits that Paul built to hold the air meter, etc.
Got the hood hold downs all tidied up, but still need to buy another Morosa set as they shorted me a critical piece.
Now for a bunch of brackets to hold the tachometer and the three gauges in place that I'll be running.
Off to Bontempi's House on Monday morning for the remaining clutch stuff.
Progress is good.
Posted by: DrifterJay Feb 26 2011, 06:34 PM
I always found it extremely easy to just remove the rear wheels and use a large jack on each side of the car to raise it up. I would then have my engine on a heavy duty and flat furniture dolly (rectangle with for casters). With carbs removed I would just lower the car over the drivetrain. No pain...super easy. Would bolt the engine bar to the chassis, then use a pump jack to get the transmission situated and bolted in. Pull out dolly and jack and I am done, 30 minutes top.
Posted by: Randal Feb 27 2011, 09:53 PM
I always found it extremely easy to just remove the rear wheels and use a large jack on each side of the car to raise it up. I would then have my engine on a heavy duty and flat furniture dolly (rectangle with for casters). With carbs removed I would just lower the car over the drivetrain. No pain...super easy. Would bolt the engine bar to the chassis, then use a pump jack to get the transmission situated and bolted in. Pull out dolly and jack and I am done, 30 minutes top.
No question removing the TB's or carburetors make a big difference in the installation.
Taking the engine out of The Beast could be done easily in less than an hour. Same with reinstalling. Of course The Beast had no sheet metal!

Posted by: McMark Feb 28 2011, 03:20 PM
What linkage are you using with your TWMs?
Posted by: Randal Feb 28 2011, 10:20 PM
What linkage are you using with your TWMs?
I think it was CB performance, but will have to check my records and let you know.
Posted by: McMark Mar 1 2011, 01:00 AM
I only ask because I've had poor experiences with the cross-bar linkages and have started using the http://www.vwparts.net/CSP129941400.html and have liked it much better. Easier to sync and more precise.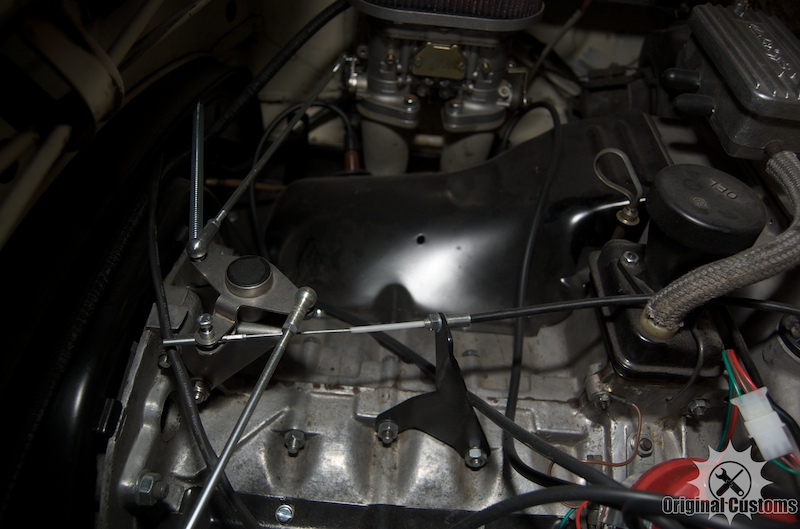
Posted by: orchid914 Mar 1 2011, 01:35 PM
Randal,
I put the front and back of the 914 on Jackstands with the nose of the car an inch from a wall. I then use a floor jack on each side of the rear with a block of wood to raise the car high enough to get the motor under the car. My 4 cyl. has a 911 cooling fan with FAT shroud so I have to raise it quite a lot. The best thing is that I use Chris Foley's jack lift plate that balances the engine and tranny so it is no problem to manuever it. If you need help let me know. (you should have put this thread on AXPADDOCK.COM)
John

Posted by: Randal Mar 2 2011, 11:05 AM
I only ask because I've had poor experiences with the cross-bar linkages and have started using the http://www.vwparts.net/CSP129941400.html and have liked it much better. Easier to sync and more precise.
That looks like a nice setup Mark. What do they cost?
Posted by: Randal Mar 2 2011, 11:07 AM
Randal,
I put the front and back of the 914 on Jackstands with the nose of the car an inch from a wall. I then use a floor jack on each side of the rear with a block of wood to raise the car high enough to get the motor under the car. My 4 cyl. has a 911 cooling fan with FAT shroud so I have to raise it quite a lot. The best thing is that I use Chris Foley's jack lift plate that balances the engine and tranny so it is no problem to manuever it. If you need help let me know. (you should have put this thread on AXPADDOCK.COM)
John
I am going to buy one of Chris's balance plates. It would make everything so much easier.
Posted by: Randal Mar 2 2011, 11:14 AM
My outside thermometer says 16F this morning........
Richard came over this morning and we went outside, it was about 38 degrees, and worked on the car. With the breeze it was cold for us wimpy California boys.
We figured out the wiring and traced a few unknown wires back to the ECU, so will be able to tell what they're for shortly.
Also got the oil system completely hooked up, same with the throttle assembly and most of the clutch stuff.
We also bolted in the TWM throttle bodes along with all the brackets and special little bits that Paul built to hold the air meter, etc.
Got the hood hold downs all tidied up, but still need to buy another Morosa set as they shorted me a critical piece.
Now for a bunch of brackets to hold the tachometer and the three gauges in place that I'll be running.
Off to Bontempi's House on Monday morning for the remaining clutch stuff.
Progress is good.
Update: Well thanks to Scott I now have all the (latest) electrical figured out and ready to install. It is really amazing how your forget what you did two years ago.

Found a nice way to mount my electronics box in the front off the roll bar and will be mounting my 3 gage cluster below (and attached) to that.
I don't think I'm going to show any pictures. The competition on this site, for clean work, has gotten pretty intense, especially for us hackers.
Posted by: Randal Mar 2 2011, 04:18 PM
OK, I'll show one as the installation of the electronic box and the guage cluster came out OK. No holes were drilled in the bottom of the electronic box. 
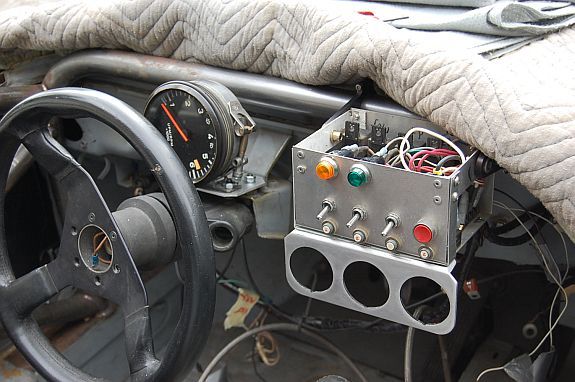
Posted by: Randal Mar 20 2011, 11:03 AM
I have a Tilton starter in "222" which is the high torque variety.
Learned an expensive lesson when, after checking all the wiring, I went to start the engine. Nothing. Finally figured out that the starter had gone bad.
I typically power wash my engine and transmission after every few events. If you don't cover the starter you can count on it getting water in it and it'll be a candidate for a rebuild.
Live and learn. I thought all starters were sealed given that they are exposed to water any time you drive in the rain. But guess the seals aren't designed for use with a pressure washer.
I blame Mark as it was him that cut all the metal out of the trunk... Yea, that will be my story!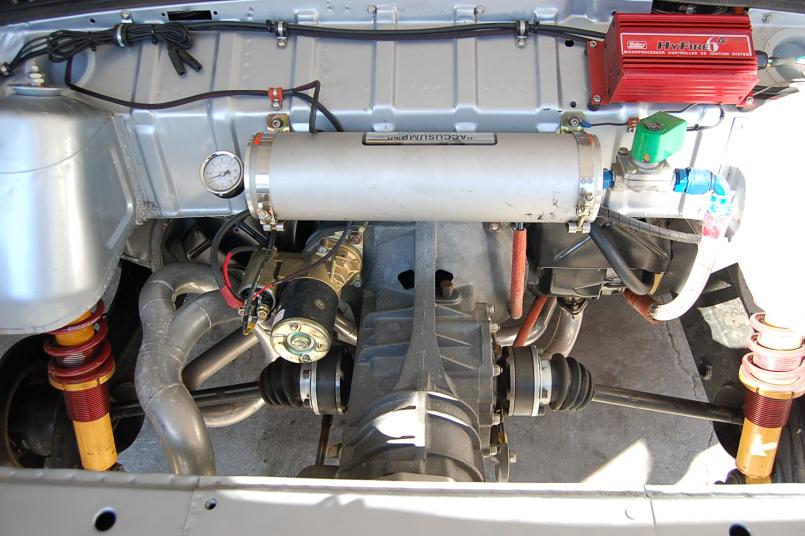
Posted by: McMark Mar 21 2011, 05:54 PM
 Maybe we need to make you a fiberglass pan to put in there.
Or your starter needs a shower cap. 
Posted by: Randal Mar 23 2011, 12:17 PM
Maybe we need to make you a fiberglass pan to put in there. Or your starter needs a shower cap.
Yup all of the above.
Tig welding all the seams that attach the transmission bar to the car will be a good event.
Posted by: Randal Mar 26 2011, 10:44 AM
Maybe we need to make you a fiberglass pan to put in there. Or your starter needs a shower cap.
Yup all of the above.
Tig welding all the seams that attach the transmission bar to the car will be a good event.
Actually today Mark we all need a shower cap.
The rain doesn't want to let up, but I'm out in the garage anyway getting all the recently acquired parts back on.
Cold and wet. Looking forward until tomorrow, supposed to be better or at least some breaks from constant rain.

Posted by: Randal Mar 30 2011, 10:37 PM
I'm ready to fire her up now.
Looking forward to hearing the engine running again.
Posted by: McMark Mar 30 2011, 10:43 PM
Video...
Posted by: Randal Apr 1 2011, 10:36 PM
I'm going to borrow Bill's pre-oiler next week. After that is done it will be time to fire her up.
Posted by: Randal Apr 15 2011, 10:46 AM
I'm going to borrow Bill's pre-oiler next week. After that is done it will be time to fire her up.
I've had a bunch of issues getting the car to run properly. Mostly making sure all the electrical connections are seated (Link controller), injectors seated in the fuel rail and in the manifold, various wiring issues and just basic troubleshooting what might be wrong.
So I've cleaned out the fuel tank, fuel filters, taken the manifold off to be sure all the injectors are in correctly and sometimes it works and sometimes it doesn't.
I think all of the issues come about because the car has been in various garages in the last two years and like it or not things get abused.
My fault, but I'll sort through it.
Oh, right now she is running great, but it still feels to me like it's loading up a bit.
(Note: This ended up being a balance issue between the throttle bodies. Just like carburetors, they need to be balanced so that the begin pulling at the same time. Very delicate throttle adjustment was needed).
Richard is coming down today and we are going to download the current fuel map into my spare Link controller so that we have a backup. We will also try the spare controller to see if that gets rid of the loading up.
I also think Link has some diagnostics that we might check.
Posted by: jjackson Apr 16 2011, 08:11 PM
How is it going? Are you ready to run it?JJackson 
Posted by: Randal Apr 16 2011, 10:35 PM
How is it going? Are you ready to run it?JJackson
It's running and running good now. The final issue was balance between the TB's which my engine builder fixed. Very suttle adjustment.
What happened was I took the TB's off to make the engine installation easier, but then lost the finite adjustment on the linkage. Hard to believe but just taking it apart and putting it back together was enough to change the balance.
Next week Paul is bringing down the syncro device so we can get it even closer.
Nice to hear it rev.
I couldn't believe how much fuel we used up (at $15.00 a gallon) just doing the tuning. She is a thirsty lady.
Posted by: jjackson Apr 19 2011, 07:24 PM
Congrats on getting her up and running.Hp really likes fuel-We got a local dirt tracker that sells us 110 renegade for $6.25 a gallon this year.He went up from $6.00 last year and actually apologized for the increase when we went and picked up first batch this year-Great guy.
The faster the car has gotten-the more critical every little detail becomes.JJackson 
How is it going? Are you ready to run it?JJackson
It's running and running good now. The final issue was balance between the TB's which my engine builder fixed. Very suttle adjustment.
What happened was I took the TB's off to make the engine installation easier, but then lost the finite adjustment on the linkage. Hard to believe but just taking it apart and putting it back together was enough to change the balance.
Next week Paul is bringing down the syncro device so we can get it even closer.
Nice to hear it rev.
I couldn't believe how much fuel we used up (at $15.00 a gallon) just doing the tuning. She is a thirsty lady.
Posted by: Randal Apr 20 2011, 08:55 AM
$6.25 is a great deal. 
Out here in Greenie California VP Racing CT 12 is $15.00 a gallon and you have to sign a release form to get it. Might as well be buying gas in France.
It's pretty interesting how every detail of a car has to be right to go fast. You end up learning a bunch about things you never thought you'd have to understand, but that is the nature of doing it yourself.
Posted by: Randal May 11 2011, 09:37 AM
Taking the car to the dyno on Thursday to confirm the fuel map beyond 6100.
Don't have a clue where the motor will roll over, so just have to run it and see.
On pins and needles!
Posted by: grantsfo May 12 2011, 03:29 PM
Taking the car to the dyno on Thursday to confirm the fuel map beyond 6100.
Don't have a clue where the motor will roll over, so just have to run it and see.
On pins and needles!
How did it go? Is it running better now? Dyno graphs? Thats my favorite running T4 motor.
Posted by: Randal May 12 2011, 10:03 PM
Ended up with 174 hp at the rear wheels and the same amount of torque at 6100.
Spent a bunch of time getting the A/R ratio closer to 12 everywhere.
The motor spins easily to 7K now. That will be nice in spots where you need a few more rpm to make it to the corner.
Posted by: grantsfo May 12 2011, 10:26 PM
Ended up with 174 hp at the rear wheels and the same amount of torque at 6100.
Spent a bunch of time getting the A/R ratio closer to 12 everywhere.
The motor spins easily to 7K now. That will be nice in spots where you need a few more rpm to make it to the corner.
Not bad for 40 year old engine technology! What dyno type and is that corrected number? Did you have much variation between runs? I haven't seen honest assessment on big bore type 4 ever. Would be cool to see the real scoop with dyno type and correction factor.
Makes you realize how far engine technology has come when street motors of similar displacement make 20 to 30 more WHP. But I think t4 still makes more torque from 2500 to 4500 than anything new.
Posted by: J P Stein May 13 2011, 07:11 AM
[Not bad for 40 year old engine technology! What dyno type and is that corrected number? Did you have much variation between runs? I haven't seen honest assessment on big bore type 4 ever. Would be cool to see the real scoop with dyno type and correction factor.
from
I can agree with that. I've never seen an independently verified 200hp (at the crank) T-4 dyno chart. Pretty damn good.

Posted by: PeeGreen 914 May 13 2011, 09:37 AM
Can't wait to see this car run This is the car you are bringing to the WCR right?
Posted by: Randal May 13 2011, 09:54 PM
Can't wait to see this car run
This is the car you are bringing to the WCR right?Right, 222 is the car I am bringing to Medford.
Get ready for Britain to set the standard when he runs. When he ran the SB there last year it was a one of the nicest driven runs I've ever seen. And now he has 140 more RWHP than 222, but maybe he'll set up a tight course?
I am really looking forward to just learning the course and seeing if I can give JP, my co-driver a go.
Posted by: HAM Inc May 14 2011, 09:21 AM
Randall I'm so glad to hear that it is performing well now. And 174 @ the wheels at 6100RPM's! WOW! Sounds like you guys did a great job of tuning that baby!
Making that kind of hp at that low a RPM means that thing is loaded with torque! That was the idea all along; gobs of mid-range torque.
Looking forward to hearing what it's like to drive! 
Posted by: jjackson May 14 2011, 12:35 PM
Randall I'm so glad to hear that it is performing well now. And 174 @ the wheels at 6100RPM's! WOW!
Making that kind of hp at that low a RPM means that thing is loaded with torque!
Congrats-those are fantastic #s out of type iv.Let us know how the next event goes-I know you'll get out shakin!Good luck! JJackson
Posted by: Randal May 14 2011, 10:21 PM
Randall I'm so glad to hear that it is performing well now. And 174 @ the wheels at 6100RPM's! WOW!
Making that kind of hp at that low a RPM means that thing is loaded with torque!
Congrats-those are fantastic #s out of type iv.Let us know how the next event goes-I know you'll get out shakin!Good luck! JJackson
Well we get a short (3 lap) trial tomorrow morning at "Duel at DeAnza.
Just looking forward to seeing how the car works with all the changes.
Next weekend is an American AutoX Series event at the Marina. They run wide open courses, for muscle cars, so will be a great practice session for the hill climb.
Got to make sure I know what this car does at higher speed, i.e., top of 3rd gear and maybe 4th.
Powered by Invision Power Board (http://www.invisionboard.com)
© Invision Power Services (http://www.invisionpower.com)