Printable Version of Topic
Click here to view this topic in its original format
914World.com _ The Paddock _ Sheridan Rear Spoiler
Posted by: tomeric914 Feb 5 2014, 07:20 PM
Direct link to the "How-To" part: http://www.914world.com/bbs2/index.php?s=&showtopic=229928&view=findpost&p=2022462
I received my Sheridan Rear Spoiler today and WOW is it ever nice! It is a simple piece but by far the nicest piece of fiberglass I have ever purchased.
To do it justice, what is the best way to mount it to the deck? Sure, I could run stainless TEK screws through it but what have others done? If you have pictures, please post!
thanks
Posted by: Woody Feb 5 2014, 09:03 PM
Pics please. ![popcorn[1].gif](style_emoticons/default/popcorn[1].gif)
Posted by: Randal Feb 5 2014, 10:20 PM

I received my Sheridan Rear Spoiler today and WOW is it ever nice! It is a simple piece but by far the nicest piece of fiberglass I have ever purchased.
To do it justice, what is the best way to mount it to the deck? Sure, I could run stainless TEK screws through it but what have others done? If you have pictures, please post!
thanks
Doesn't it have bolt protruding from the bottom? If not I'd use riv nuts. I can post a picture of mine if you like.
Posted by: campbellcj Feb 6 2014, 12:24 AM
Coincidentally I am about to install one too. I was planning to use either large aluminum or stainless rivets, or possibly those screws that tighten from both ends (forgot what they're called.)
I decided to get a 2nd lid so I will have one with the spoiler and one without. Partially for cosmetics - I think the car looks cleaner without - and partially because I would probably have to remove it for vintage racing. It never hurts to have spare fiberglass regardless.
Posted by: campbellcj Feb 6 2014, 12:24 AM
Randal there are no holes or hardware in the one I have. Just fiberglass.
Posted by: carr914 Feb 6 2014, 04:45 AM
I used Stainless Nuts & Bolts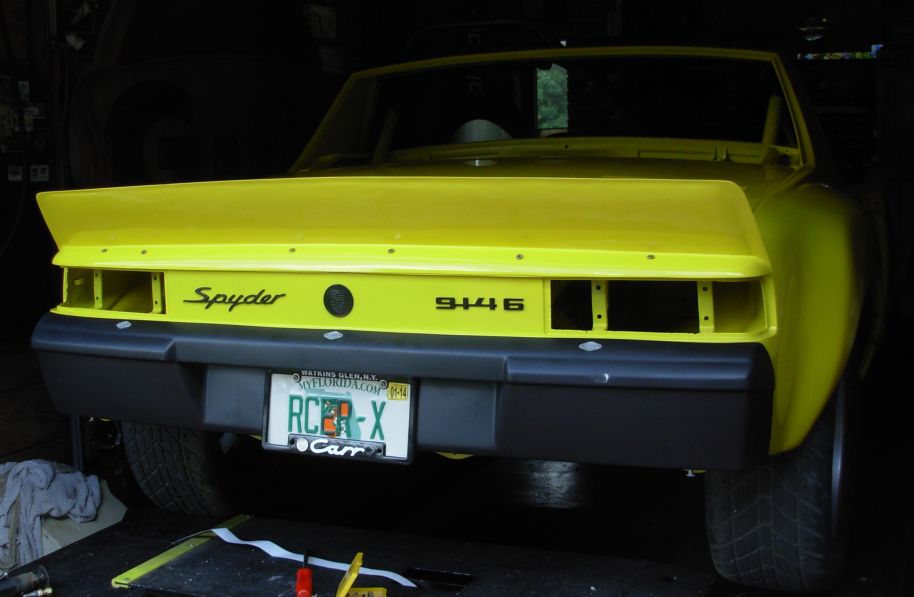
Posted by: tomeric914 Feb 6 2014, 08:13 AM
Doesn't it have bolt protruding from the bottom? If not I'd use riv nuts. I can post a picture of mine if you like.
Yes, please post a pic of yours. There are no bolts protruding. O-ring, closed end rivnuts may be the best way to go to prevent any leaks into the trunk area. I'd want to back up each riv nut with a fender washer if possible.
...or possibly those screws that tighten from both ends (forgot what they're called.)
Those are typically called binding rivets. Years ago they were used to bind pages of a book together.
I used Stainless Nuts & Bolts
I saw that. The screw pattern looks somewhat random. Was there a reason for that?
Posted by: tomeric914 Feb 6 2014, 08:17 AM
BTW, Roger made mine in black gelcoat at my request. It's so nice that I may just clear coat it.
Posted by: bulitt Feb 6 2014, 12:18 PM
How come the bolts are not equi-distant?
Posted by: Randal Feb 6 2014, 02:24 PM
[quote name='tomeric914' date='Feb 6 2014, 06:13 AM' post='1994236']
[quote name='Randal' post='1994087' date='Feb 5 2014, 11:20 PM']
Doesn't it have bolt protruding from the bottom? If not I'd use riv nuts. I can post a picture of mine if you like.
[/quote]
Yes, please post a pic of yours. There are no bolts protruding. O-ring, closed end rivnuts may be the best way to go to prevent any leaks into the trunk area. I'd want to back up each riv nut with a fender washer if possible.
Couldn't find the picture I wanted to show you, but again Riv nuts work great. My mechanic made a small iron bar, with a hole in one end to use tightening up Riv nuts with a socket. Works good, especially with the larger riv nuts you will want to use.
Please post a picture of the spoiler and also where it will be going so we can see both parts.
Posted by: tomeric914 Feb 6 2014, 03:06 PM
Please post a picture of the spoiler and also where it will be going so we can see both parts.
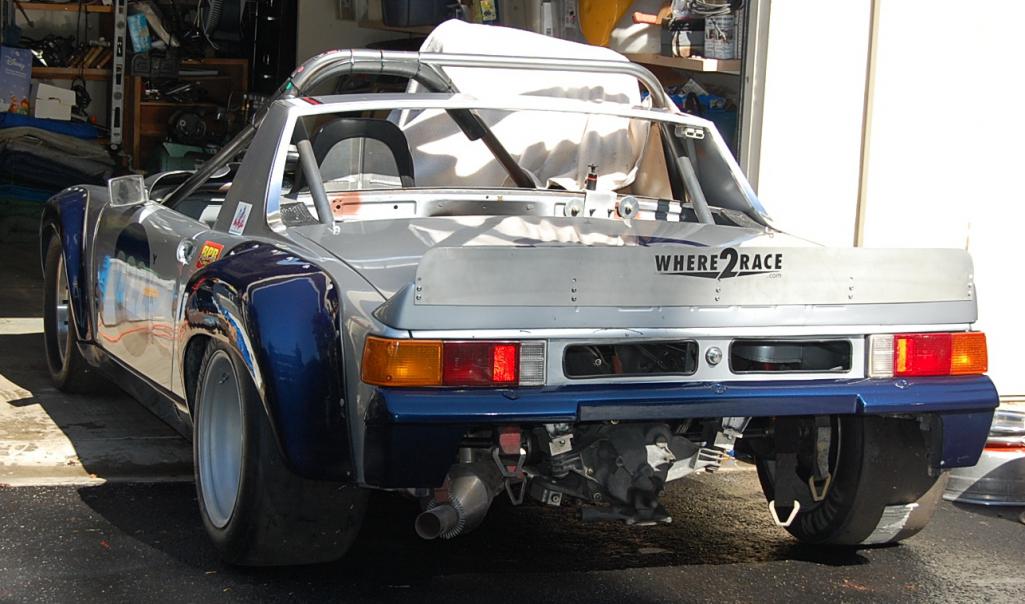
The spoiler looks like TC's except it isn't yellow.
Posted by: carr914 Feb 6 2014, 07:10 PM
How come the bolts are not equi-distant?
I have no Idea

Posted by: tomeric914 Feb 6 2014, 07:48 PM
Some more to think about: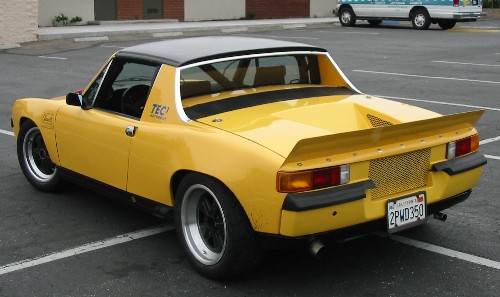
Posted by: Randal Feb 14 2014, 10:05 AM
I used Stainless Nuts & Bolts
How high is that spoiler?
SCCA allows 10" - have to make another one as mine is 8" following PCA rules.
The riv nuts hold the extension well, at least as fast as I've been going on a hill climb, i.e., 100mph.
Posted by: tomeric914 Apr 8 2014, 06:55 PM
Ok, finally mounted mine using rivnuts with a sealed shoulder, stainless 1/4-20 x 5/8" bolts and stainless bonded sealing washers.
Step 1 - make sure the trunk is properly aligned with equal gaps on both sides
Step 2 - clamp in place and align spoiler evenly side to side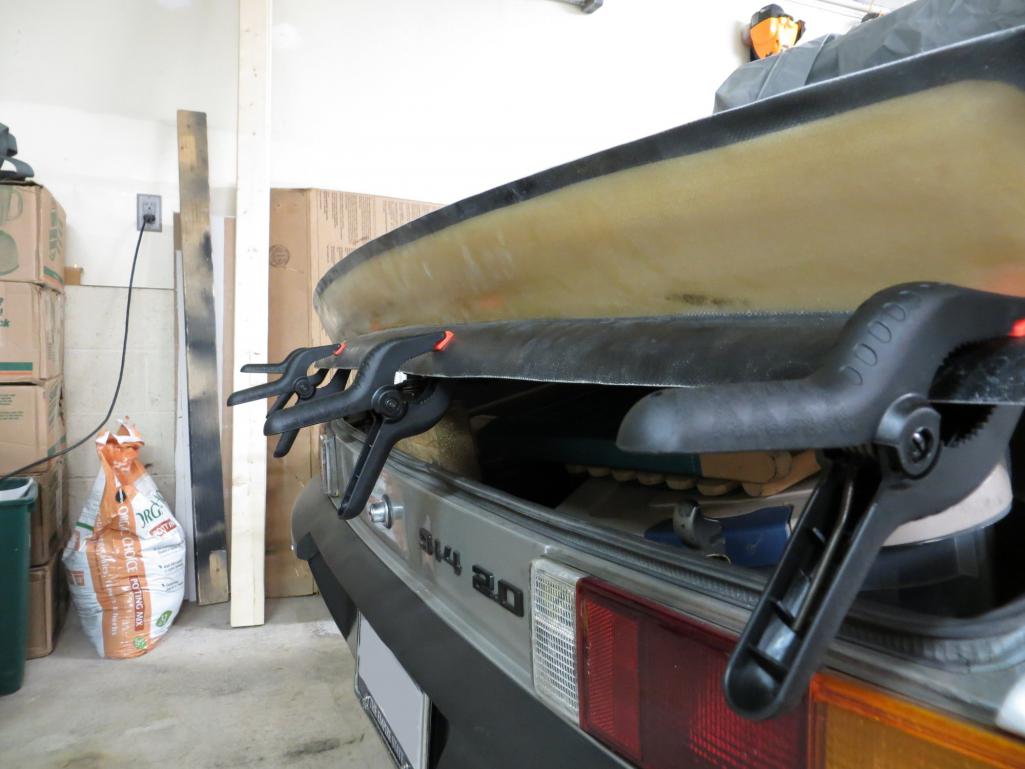
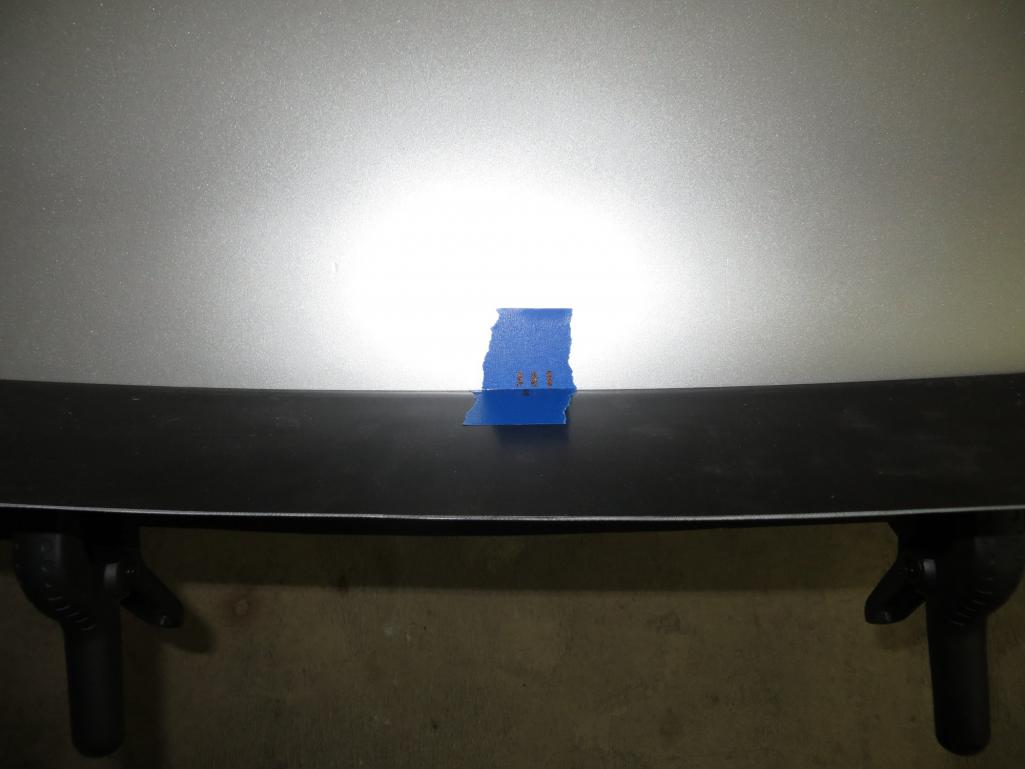
Step 3 - mark spoiler for drilling. I drilled 1/2" from the upright portion of the spoiler in the center and at 1 foot increments to both sides. Drill through the spoiler into the trunk for perfect alignment.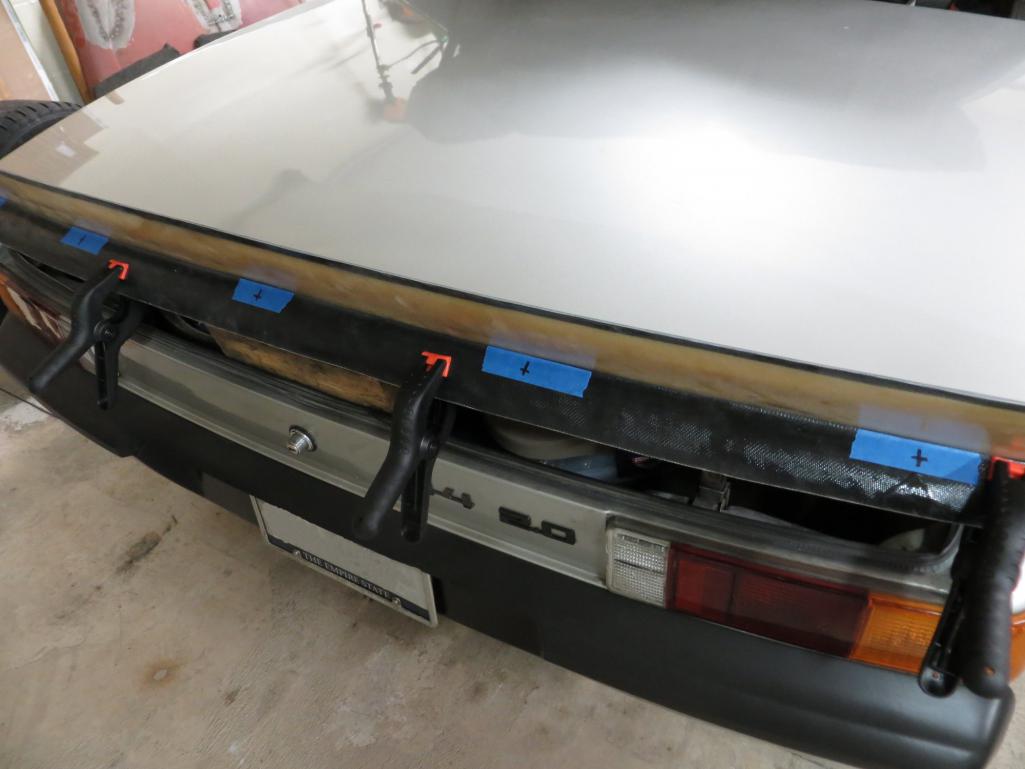
Step 4 - install rivnuts. It will help to drill all the way through with a 1/4" drill to allow the rivnut tool to fully extend for the holes right next to center. The outer holes will need to be drilled straight through full size and will slightly contact the rubber seal strip of the trunk.
Step 5 - mount spoiler and enjoy!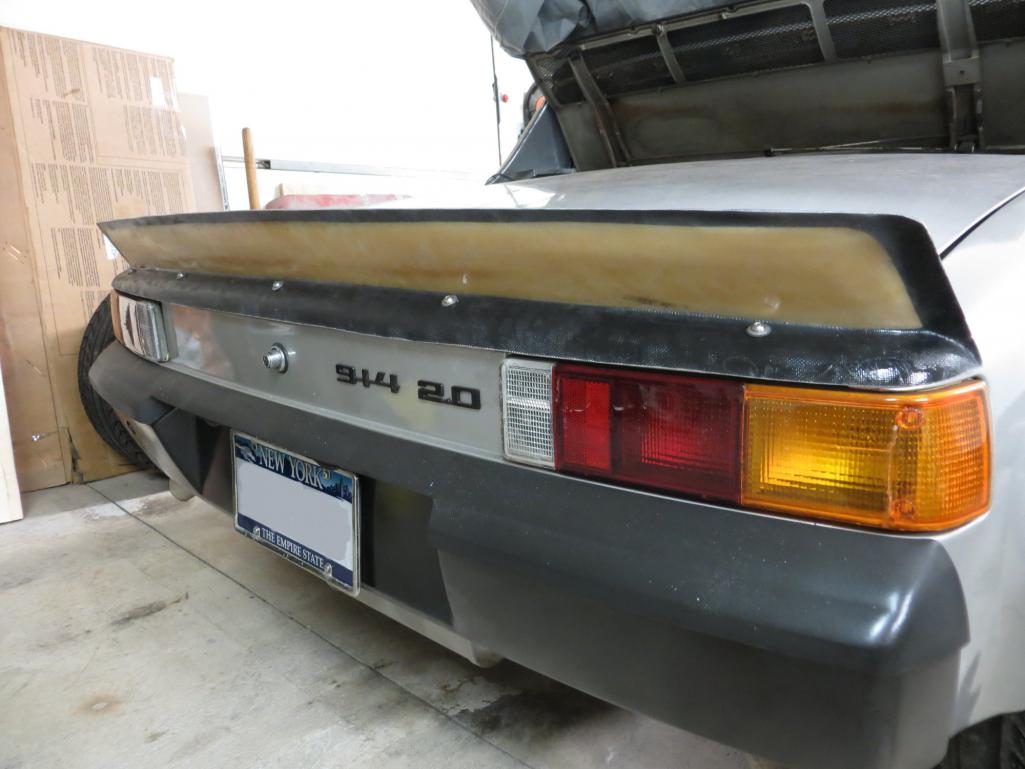
Posted by: Randal Apr 8 2014, 10:35 PM
Ok, finally mounted mine using rivnuts with a sealed shoulder, stainless 1/4-20 x 5/8" bolts and stainless bonded sealing washers.
Step 1 - make sure the trunk is properly aligned with equal gaps on both sides
Step 2 - clamp in place and align spoiler evenly side to side
Step 3 - mark spoiler for drilling. I drilled 1/2" from the upright portion of the spoiler in the center and at 1 foot increments to both sides. Drill through the spoiler into the trunk for perfect alignment.
Step 4 - install rivnuts. It will help to drill all the way through with a 1/4" drill to allow the rivnut tool to fully extend for the holes right next to center. The outer holes will need to be drilled straight through full size and will slightly contact the rubber seal strip of the trunk.
Step 5 - mount spoiler and enjoy!
Nice!
Posted by: reds Oct 13 2016, 10:25 AM
I am looking to purchase a Sheridan rear spoiler very soon. For those of you who purchased the 6” version, is visibility out the back a problem?
Posted by: campbellcj Oct 13 2016, 11:49 AM
I honestly never even noticed any change in visibility...but it's not like visibility is that great to begin with especially with full rollcage/race seat/helmet/hans...
Posted by: campbellcj Oct 14 2016, 12:16 PM
https://flic.kr/p/vhjwE5https://flic.kr/p/vhjwE5 by https://www.flickr.com/photos/cjcam/, on Flickr
https://flic.kr/p/KYV5C4https://flic.kr/p/KYV5C4 by https://www.flickr.com/photos/cjcam/, on Flickr
Posted by: tomeric914 Oct 15 2016, 11:35 AM
Who looks out the back window? 
It does not obscure my view at all.
I am looking to purchase a Sheridan rear spoiler very soon. For those of you who purchased the 6” version, is visibility out the back a problem?
Powered by Invision Power Board (http://www.invisionboard.com)
© Invision Power Services (http://www.invisionpower.com)