|
|
|
Porsche, and the Porsche crest are registered trademarks of Dr. Ing. h.c. F. Porsche AG.
This site is not affiliated with Porsche in any way. Its only purpose is to provide an online forum for car enthusiasts. All other trademarks are property of their respective owners. |
|
|

  |

| stewteral |
 Jun 22 2011, 12:50 PM Jun 22 2011, 12:50 PM
Post
#1
|
|
Old Member  Group: Members Posts: 384 Joined: 4-December 07 From: Camarillo, CA Member No.: 8,424 Region Association: Southern California |
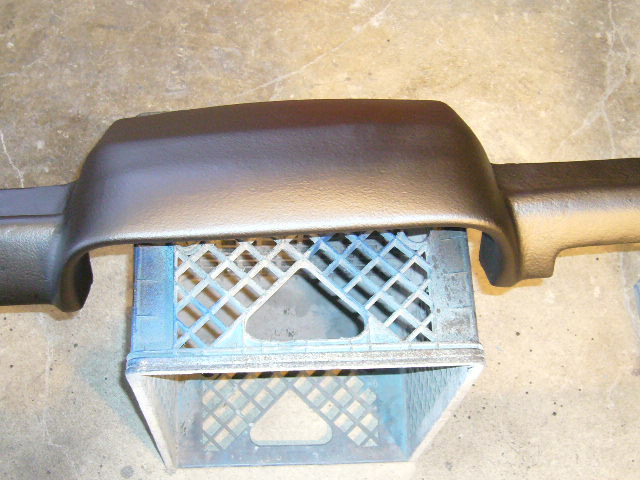 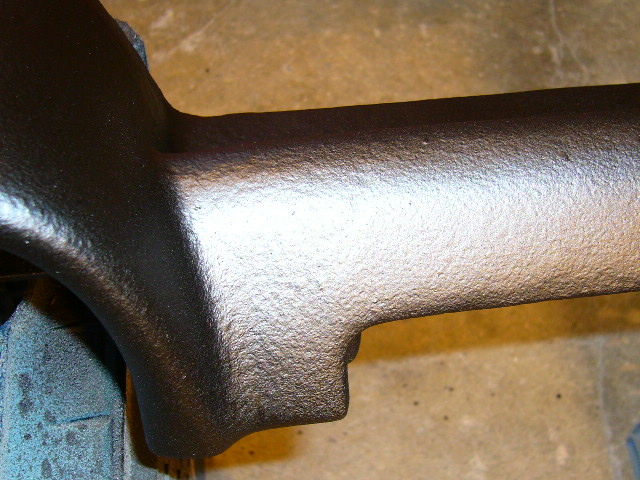 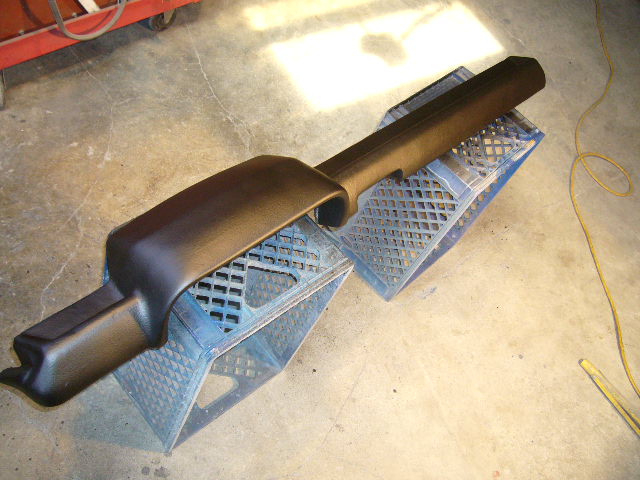 [attachmentid=264 [attachmentid=264324] ALL 914ers: I've come up with a great way to repair the cracks in the dash cover yourself with minimal tools and a little work: 1) Remove the dash cover from the car by loosening the nylon nuts holding it in place. This will leave the dash in place. 2) Buy 2 things: -FLEXIBLE body filler made for repairing plastic bumpers (~~$20) This is like Bondo, but formulated to remain flexible after setting. -Eastwood # 12742Z Flexible Sealer and Sound Deadener from Jegs as they are $5 cheaper than Eastwood. http://www.jegs.com/i/Eastwood/352/12742Z/10002/-1 3) Remove foam back from the edges of cracks to create a good pocket to hold the putty. I used a Dremel tool, but it could also be done with an X-Acto knife. (Harbor Freight has a "Dremel" tool for ~~ $9) 4) Mix the putty and fill the cracks leave enough sticking above the level of the dash cover to allow sanding flush. 5) Sand carefully with 50 or 60 grit until almost flush, then finish with 100 grit. 6) With the surface of the dash cover now smooth when sliding your hand up & down its length, spray the Eastwood sealer in long smooth passes over the part as a 12" - 18" distance. I found 18" very good for laying an even coat. I found that the spary nozzle is NOT a paint type and afte a pass of spraying, excess sealer will build up on the nozzle and cause large drops on the sprayed finish. The solution was to wipe the nozzle clean after each pass. 7) After the plastic coat has dryed, it can be sanded to 50-60 grit sanding block to smooth out the layer. 8) The Eastwood can is good for 3 good coats, so you must plan on make your 3rd coat your last. Attached are photos of the results: a smooth, nicely textured flexible plastic surface. Enjoy, Terry Attached image(s) 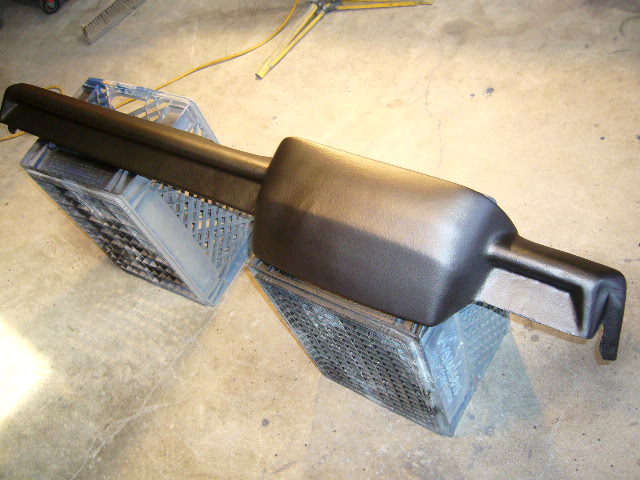
|
   |

 
|
| Andyrew |
Jun 22 2011, 01:31 PM
Post
#2
|
|
Spooling.... Please wait Group: Members Posts: 13,376 Joined: 20-January 03 From: Riverbank, Ca Member No.: 172 Region Association: Northern California |
Side note, HF's dremmel tool isnt worth $9.. Buy a real dremmel for $40 as its well worth the money in comparison.
Terry, this is a great writeup! do you have any in progress pics? Im curious how long this coating will last in the sun before it starts looking dried out. Thanks for the writeup! |
|
|
|
| 76-914 |
Jun 22 2011, 02:57 PM
Post
#3
|
|
Repeat Offender & Resident Subaru Antagonist Group: Members Posts: 13,495 Joined: 23-January 09 From: Temecula, CA Member No.: 9,964 Region Association: Southern California |
Good job, Terry. Looks great. I hope it stands up and that you have discovered something that can benefit the majority of our members. Will you give us a 3,6 & 12 month updates? I hope, I hope! Btw, ignore the negative comments if they start to fly. I love thinking outside of the parallelogram. (IMG:style_emoticons/default/piratenanner.gif)
|
|
|
|
| Zundfolge |
Jun 22 2011, 03:17 PM
Post
#4
|
|
Senior Member Group: Members Posts: 847 Joined: 12-August 07 From: Colorado Springs Member No.: 7,994 Region Association: Rocky Mountains |
That's all kinds of awesome!
ya know, if one had access to a good sewing machine and some leather I bet one could stop at step 5 and then sew a leather cover that you could stick down with spray adhesive and it would last even longer. |
|
|
|
| campbellcj |
Jun 22 2011, 10:05 PM
Post
#5
|
|
I can't Re Member Group: Members Posts: 4,544 Joined: 26-December 02 From: Agoura, CA Member No.: 21 Region Association: Southern California |
Terry, that's a great DIY solution. My dash is in fairly bad shape but for a race car a new dash or pro re-cover seems silly. Thanks for posting this!
|
|
|
|
| Prospectfarms |
Jun 22 2011, 10:28 PM
Post
#6
|
|
Member Group: Members Posts: 495 Joined: 7-March 11 From: Louisville, KY Member No.: 12,801 Region Association: Upper MidWest |
Thank you very much for sharing your good idea and photos. Every time I look at the cracks in my otherwise fine dash cover I think about some way to fill them. Apparently so did you.
Per exposure to sunlight: lots of folks put elastomeric undercoat on the outsides of things -- even cars -- so I'm thinking it contains a uv inhibitor. That would be pretty easy to figure out. |
|
|
|
| stewteral |
Jun 22 2011, 11:42 PM
Post
#7
|
|
Old Member Group: Members Posts: 384 Joined: 4-December 07 From: Camarillo, CA Member No.: 8,424 Region Association: Southern California |
QUOTE(76-914 @ Jun 22 2011, 01:57 PM)  Good job, Terry. Looks great. I hope it stands up and that you have discovered something that can benefit the majority of our members. Will you give us a 3,6 & 12 month updates? I hope, I hope! Btw, ignore the negative comments if they start to fly. I love thinking outside of the parallelogram. (IMG:style_emoticons/default/piratenanner.gif) Please don't hold your breath on updates as the bare chassis is still up on the rotisserie. It is likely to be a year before I'll be finished and driving it. Terry |
|
|
|
| stewteral |
Jun 22 2011, 11:45 PM
Post
#8
|
|
Old Member Group: Members Posts: 384 Joined: 4-December 07 From: Camarillo, CA Member No.: 8,424 Region Association: Southern California |
QUOTE(Zundfolge @ Jun 22 2011, 02:17 PM) That's all kinds of awesome! ya know, if one had access to a good sewing machine and some leather I bet one could stop at step 5 and then sew a leather cover that you could stick down with spray adhesive and it would last even longer. Originally, I was looking at gluing vinyl over the sanded putty, but since I'm NOT an upholstery guy, was concerned about the compound curves and getting it to fit right. The plastic spray was the perfect solution. Terry |
|
|
|
| stewteral |
Jun 22 2011, 11:48 PM
Post
#9
|
|
Old Member Group: Members Posts: 384 Joined: 4-December 07 From: Camarillo, CA Member No.: 8,424 Region Association: Southern California |
QUOTE(campbellcj @ Jun 22 2011, 09:05 PM) Terry, that's a great DIY solution. My dash is in fairly bad shape but for a race car a new dash or pro re-cover seems silly. Thanks for posting this! I agree! On my 914V8 track car, I shamelessly slapped a dash rug on top and forgot about the ugly dash underneath! Terry |
|
|
|
| Valy |
Jun 23 2011, 03:35 PM
Post
#10
|
|
Senior Member Group: Members Posts: 1,671 Joined: 6-April 10 From: Sunnyvale, CA Member No.: 11,573 Region Association: Northern California |
nice work!
i did something similar last year (you can search it here or on the club) i recomend to spray vinyl paint over to get glare it had in its glory time. |
|
|
|
|
1 User(s) are reading this topic (1 Guests and 0 Anonymous Users)
0 Members:

|
Lo-Fi Version | Time is now: 9th May 2024 - 06:53 PM |
Invision Power Board
v9.1.4 © 2024 IPS, Inc.