|
|
|
Porsche, and the Porsche crest are registered trademarks of Dr. Ing. h.c. F. Porsche AG.
This site is not affiliated with Porsche in any way. Its only purpose is to provide an online forum for car enthusiasts. All other trademarks are property of their respective owners. |
|
|

  |

| Chris Julian |
 Oct 29 2004, 11:03 PM Oct 29 2004, 11:03 PM
Post
#21
|
|
Member  Group: Members Posts: 159 Joined: 19-March 04 From: SF Bay area Member No.: 1,821 |
Thanks Scott
|
   |

 
|
| Jeroen |
Oct 31 2004, 02:12 PM
Post
#22
|
|
914 Guru Group: Members Posts: 7,887 Joined: 24-December 02 From: The Netherlands Member No.: 3 Region Association: Europe |
|
|
|
|
| Chris Julian |
Nov 11 2004, 12:51 AM
Post
#23
|
|
Member Group: Members Posts: 159 Joined: 19-March 04 From: SF Bay area Member No.: 1,821 |
Well a couple of weeks and 600$ and it’s done.
Here’s the before and after photos. If anyone’s interested I will attach a list of components. BTW, no major cuts in the firewall. The new compact Tilton masters and Gurling remote reservoir cylinders fit tightly but do fit. I think the pedal cluster is maybe 2” closer to the seat but still feels fine for me (5’, 11” tall). Chris Attached thumbnail(s) 
|
|
|
|
| Chris Julian |
Nov 11 2004, 12:56 AM
Post
#24
|
|
Member Group: Members Posts: 159 Joined: 19-March 04 From: SF Bay area Member No.: 1,821 |
Not sure why the pics are so large there set to 800 x 400
Attached image(s) 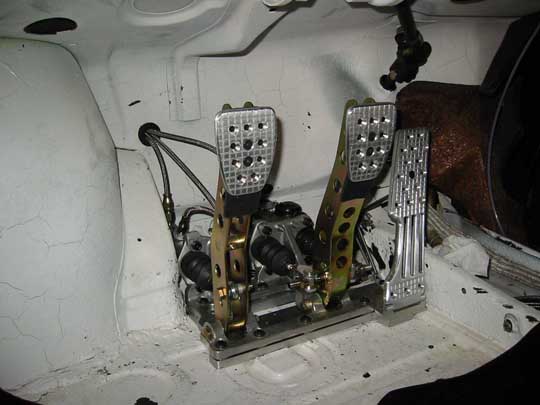
|
|
|
|
| Chris Julian |
Nov 11 2004, 12:57 AM
Post
#25
|
|
Member Group: Members Posts: 159 Joined: 19-March 04 From: SF Bay area Member No.: 1,821 |
fgfg
Attached image(s) 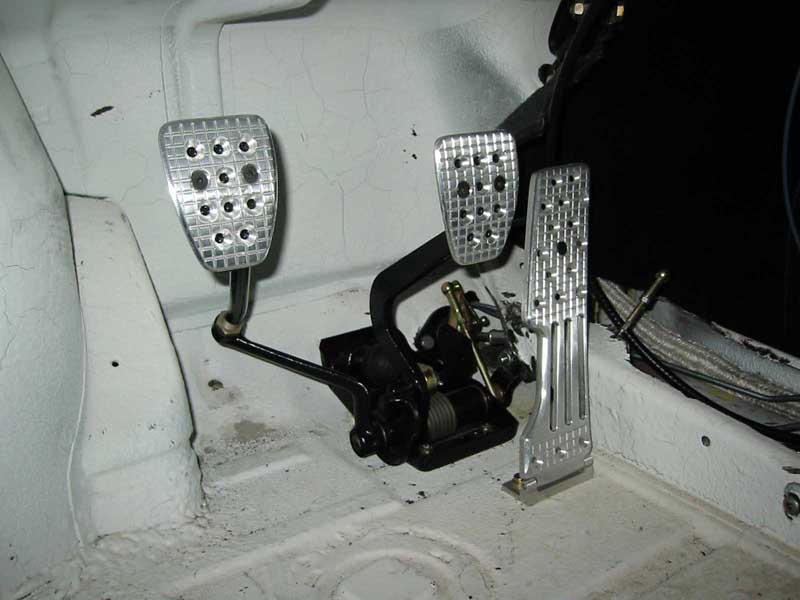
|
|
|
|
| Chris Julian |
Nov 11 2004, 12:58 AM
Post
#26
|
|
Member Group: Members Posts: 159 Joined: 19-March 04 From: SF Bay area Member No.: 1,821 |
ghgfgh
Attached image(s) 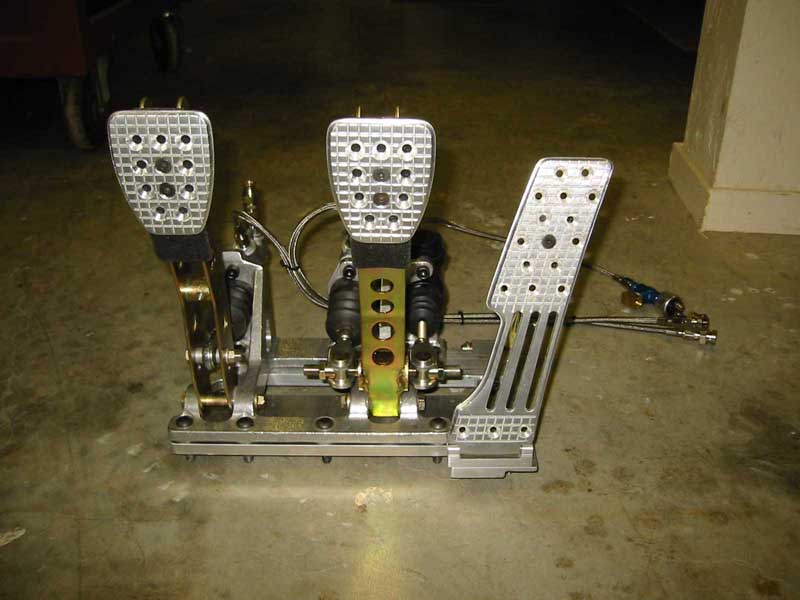
|
|
|
|
| Chris Julian |
Nov 11 2004, 12:59 AM
Post
#27
|
|
Member Group: Members Posts: 159 Joined: 19-March 04 From: SF Bay area Member No.: 1,821 |
gggfg
Attached image(s) 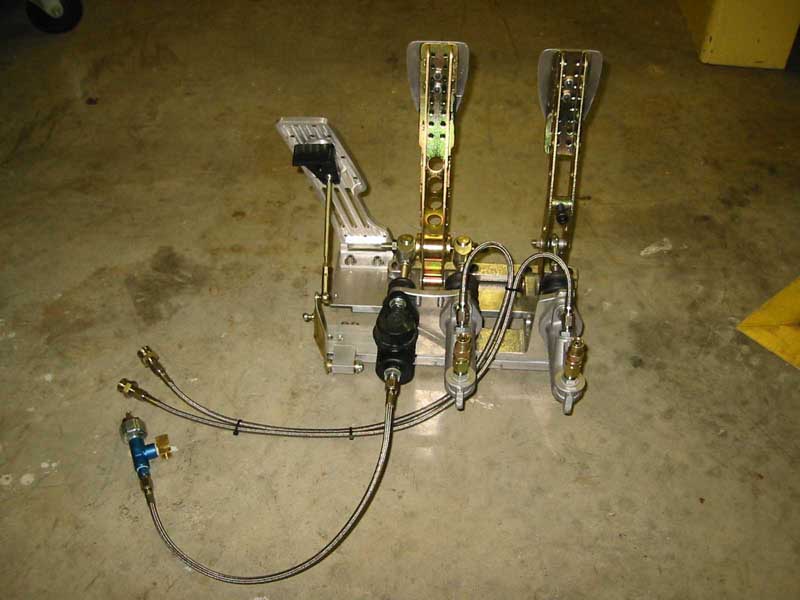
|
|
|
|
| sj914 |
Nov 11 2004, 01:57 PM
Post
#28
|
|
Senior Member Group: Members Posts: 805 Joined: 20-August 03 From: San Jose, CA Member No.: 1,053 |
Is that bottom plate that the hydraulic pedal assembly and throttle pedal mount to custom.
|
|
|
|
| RON S. |
Nov 11 2004, 02:34 PM
Post
#29
|
|
9140430841, FINALLY RUNNING Group: Members Posts: 1,211 Joined: 22-May 03 From: WALTERBORO,S.C. Member No.: 724 Region Association: South East States |
That unit is sure pretty,but I went for a more simplistic route.
I bought a 964 pedal assembly at Hershey this past year for $50 .00 bucks and it grafted perfectly to the side of the 914 unit. Works good with the Wilwood slave cyl. Attached image(s) 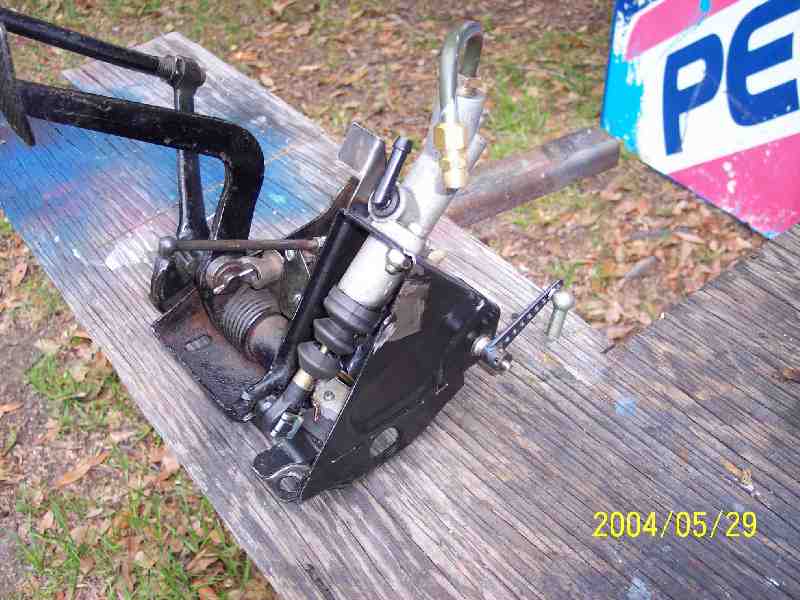
|
|
|
|
| RON S. |
Nov 11 2004, 02:35 PM
Post
#30
|
|
9140430841, FINALLY RUNNING Group: Members Posts: 1,211 Joined: 22-May 03 From: WALTERBORO,S.C. Member No.: 724 Region Association: South East States |
Installed pic
Ron Attached image(s) 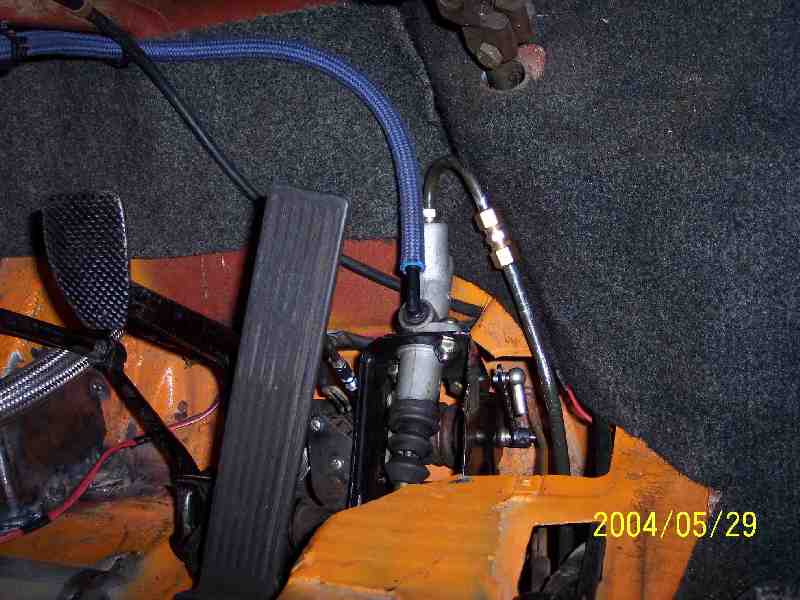
|
|
|
|
| Mueller |
Nov 11 2004, 02:56 PM
Post
#31
|
|
914 Freak! Group: Members Posts: 17,146 Joined: 4-January 03 From: Antioch, CA Member No.: 87 Region Association: None |
damn Chris...that looks killer (IMG:style_emoticons/default/smile.gif)
Ron, have you had any problems bleeding air out of the system?? |
|
|
|
| Chris Julian |
Nov 11 2004, 03:10 PM
Post
#32
|
|
Member Group: Members Posts: 159 Joined: 19-March 04 From: SF Bay area Member No.: 1,821 |
Hey Ron, I wish I could have gone that route, I mean the 50$. I actually tried many things prior to going to this extreme. Since I am running the high torque ~450 ft lbs chevy install, the clutch required a little more input force then the stock pedal could handle. I found that the pedal assy was flexing and the master cylinder which I mounted to the firewall was also in need of additional rigidity. So rather then cut and weld, I decided to drop in a dedicated unit. To each his own........
And yes sj914 that is a custom lower plate assembly. I wanted a complete drop in assembly- throttle and all. I deally I would have welded in plates but this car has already gone through all of that and paint. So it's brackets and rivots at this point. Chris |
|
|
|
| RON S. |
Nov 12 2004, 05:57 AM
Post
#33
|
|
9140430841, FINALLY RUNNING Group: Members Posts: 1,211 Joined: 22-May 03 From: WALTERBORO,S.C. Member No.: 724 Region Association: South East States |
QUOTE(Mueller @ Nov 11 2004, 12:56 PM) Ron, have you had any problems bleeding air out of the system?? No problems bleeding air outa the unit. I made the wife do the pedal pumpin while I laid on my back underneath workin the bleed screw on the Wilwood slave cyl. I haven't touched the car in about 3 month's cause I've been workin on other things,but the other day I sat in it and hit the clutch pedal.Still workin fine,no leaks,and no air in the system. Ron |
|
|
|
| rick 918-S |
Nov 12 2004, 08:32 AM
Post
#34
|
|
Hey nice rack! -Celette Group: Members Posts: 20,451 Joined: 30-December 02 From: Now in Superior WI Member No.: 43 Region Association: Northstar Region |
How did you reinforce the floor where the peddle assembly is attached? From what I see it appears this assembly would still tend to flex if it is only mounted to the sheet metal floor pan. Is there a brace under the cylinders we can't see? I like the double brake master setup.
(edit) never mind went back to the photos and looked again. |
 |
|
| soloracer |
Nov 12 2004, 11:22 AM
Post
#35
|
|
Senior Member Group: Members Posts: 793 Joined: 7-April 03 From: Calgary Member No.: 538 |
So does this mean you are using dual brake master cylinders which allow you to set the bias front/rear? Is this a kit or did you put this together yourself? Care to share the parts list/supplier?
|
|
|
|
| Chris Julian |
Nov 12 2004, 02:53 PM
Post
#36
|
|
Member Group: Members Posts: 159 Joined: 19-March 04 From: SF Bay area Member No.: 1,821 |
Guys,
yes this is a custom setup, not a kit. I took the Tilton dual peddle assy and an aftermarket 914 aluminum pedal set and melded them together with a large baseplate. The large plate allowed me to: 1, attach the throttle pedal and OEM linkage pivot assembly 2, spread the load over a broader area - Rick you are right I did add a support brace directly behind the two brake masters. The brace is tied directly to the welded body seam behind the pedals and boxes the entire assembly.-- very stiff 3, raise the assembly ~1/2", allowing me to locate the pedals ~1" further back. 4, install and remove the entire assembly. If anyone is considering this keep in mind cost was about 600-700$ (purchased parts), and I spent at least 20 hours fabricating all the brackets and installing the assembly. Although most of the work was done on the bench there is fair amount of under-the-dash time required to test fit, ect.. One other thing to note, I used flexible braided lines off all the master cylinders. This simplified the install but added to the cost. I am also not sure what this will do to peddle feel. Typically hard lines are run straight to the back of the masters but that would have really complicated the install. Chris Take a close look at this photo and you should see the rear brace Attached thumbnail(s) 
|
|
|
|
|
1 User(s) are reading this topic (1 Guests and 0 Anonymous Users)
0 Members:

|
Lo-Fi Version | Time is now: 10th May 2024 - 11:10 PM |
Invision Power Board
v9.1.4 © 2024 IPS, Inc.