|
|
|
Porsche, and the Porsche crest are registered trademarks of Dr. Ing. h.c. F. Porsche AG.
This site is not affiliated with Porsche in any way. Its only purpose is to provide an online forum for car enthusiasts. All other trademarks are property of their respective owners. |
|
|

  |

| Trekkor |
 Dec 30 2004, 12:00 AM Dec 30 2004, 12:00 AM
Post
#1
|
|
I do things...  Group: Members Posts: 7,809 Joined: 2-December 03 From: Napa, Ca Member No.: 1,413 Region Association: Northern California |
I'm repairing the battery tray and related hot spot. (IMG:http://www.914world.com/bbs2/html/emoticons/unsure.gif)
I need your tech advice on the procedure. I want to first make paper templates and then fit the sheet metal. Maybe hang it with rivets or screws before the big weld off. Stock look is not important to me. Just needs to drain and support the new battery tray and pedestal. I will sand off the remaining surface rust before applying rust converting primer. I'm scratching the naval jelly approach. Also, please post pics of your repaired areas. Here's my project. Thanks, as usual! (IMG:http://www.914world.com/bbs2/html/emoticons/clap.gif) KT Attached image(s) 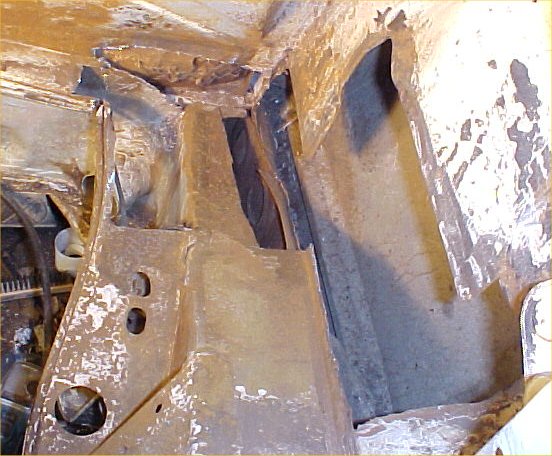
|
   |

 
|
| J P Stein |
Dec 30 2004, 12:25 AM
Post
#2
|
|
Irrelevant old fart Group: Members Posts: 8,797 Joined: 30-December 02 From: Vancouver, WA Member No.: 45 Region Association: None |
I see the specter of Dirk Wright hovering over your project.....hopefully he won't be back here for a while. (IMG:http://www.914world.com/bbs2/html/emoticons/laugh.gif)
Fit the pieces.... hold them in place with magnets & weld the suckers up. Found a lovely paint removing/ metal finishing tool today. It fits on my favorite tools....die grinders. I show you a pic, but my camera batteries are daid. (IMG:http://www.914world.com/bbs2/html/emoticons/sad.gif) |
|
|
|
| Trekkor |
Dec 30 2004, 12:28 AM
Post
#3
|
||
|
I do things... Group: Members Posts: 7,809 Joined: 2-December 03 From: Napa, Ca Member No.: 1,413 Region Association: Northern California |
(IMG:http://www.914world.com/bbs2/html/emoticons/confused24.gif) KT |
||
|
|
|
||
| John |
Dec 30 2004, 12:36 AM
Post
#4
|
|
member? what's a member? Group: Members Posts: 3,393 Joined: 30-January 04 From: Evansville, IN (SIRPCA) Member No.: 1,615 Region Association: None |
Man, that's a big hole.
You have your work cut out for you (pardon the pun). I would make up some templates as you suggest and then start filling in the holes. I would not use rivits, but clamps/magnets/etc. to hold the parts in place while you weld them in. I would probably start with the longitudinal repair and work "up" from there. I would suggest to leave a large drain area and not necessarily duplicate what the factory did in that area (BTDT). As for the battery tray and support, I would buy the parts and weld in the support and then screw the tray to the support so you can clean under it annually. |
|
|
|
| airsix |
Dec 30 2004, 12:46 AM
Post
#5
|
|
I have bees in my epiglotis Group: Members Posts: 2,196 Joined: 7-February 03 From: Kennewick Man (E. WA State) Member No.: 266 |
In the picture below I've marked off the pieces I'd cut and numbered them in the order I'd weld them in. The first piece would be the firewall patch. I'd clean out all the seam sealer goop and weld this in from inside the passenger compartment. Then touch it up if needed from the engine side. Next would be the vertical portion of the longitudinal because if you save it for later you won't be able to get to it. Also, it provides something to weld too when you get to the horizontal top patch. Since the tongitudinal top is curved you'll need to do some 'beat to fit' as they say. Rough out your patches with plenty of overlap. I put a question mark on the longitudinal top patch because I'm undecided whether I'd make it short, or longer (into the area with the question mark). It depends on how weakened that area looks to you. Since I've shown a top patch with so much overlap I'd probably drill holes above the overlap areas for some rosette welds to tie it together really strongly. This is just my suggestion and I do not have an advanced degree in rustoration science.
-Ben M. Attached image(s) 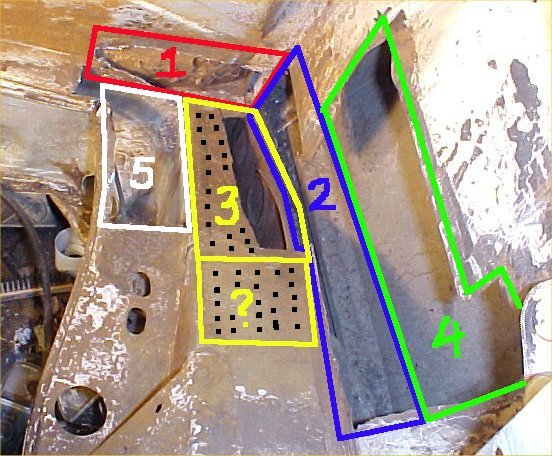
|
|
|
|
| GWN7 |
Dec 30 2004, 01:48 AM
Post
#6
|
|
King of Road Trips Group: Members Posts: 6,280 Joined: 31-December 02 From: Winnipeg, MB, Canada Member No.: 56 Region Association: Northstar Region |
You can also trim the holes to make square patches fit. Cut the patches to fit snuggly and butt weld them in...grind the welds down and you won't hardly see the patch. You can even add bondo over the welds so it look like it's factory fresh.... (IMG:http://www.914world.com/bbs2/html/emoticons/wink.gif)
(IMG:http://www.914world.com/bbs2/html/emoticons/beerchug.gif) |
|
|
|
| J P Stein |
Dec 30 2004, 01:52 AM
Post
#7
|
|
Irrelevant old fart Group: Members Posts: 8,797 Joined: 30-December 02 From: Vancouver, WA Member No.: 45 Region Association: None |
Drik Wright........this is 914 lore so listen up..........
Dirk Wright's Disease (DWD....otherwise knowed as the "While I'm Here Syndrome"....WISH....artistic license (IMG:http://www.914world.com/bbs2/html/emoticons/biggrin.gif) ) effects those foolish folks doing projects on 914s. He found "surprises" while working on his 30 year car and found an ever expanding list of things to "take care of" while buying parts and continually disassembling his project. He drove him self over the edge, solt all his stuff at pennies on the dollar and checked into a monastary in Tibet...I heard. Personally, I think he was so anal that he crawled up his own asshole and disappeared.....but I have no proof (IMG:http://www.914world.com/bbs2/html/emoticons/cool_shades.gif) Speaking of anal.... Hi, Ben. Seen Dirk lately? (IMG:http://www.914world.com/bbs2/html/emoticons/laugh.gif) |
|
|
|
| DJsRepS |
Dec 30 2004, 06:44 AM
Post
#8
|
|
Member Group: Members Posts: 431 Joined: 4-November 04 From: Sarasota Florida Member No.: 3,060 |
This is a great Form good post AirSix I just did all that but mine was not as bad. Should the surrounding metal be treated with the osphos treatment before welding ? Good or bad? I was concerned about inhaleing the welding fumes from the treated metal.
|
|
|
|
| Bleyseng |
Dec 30 2004, 07:16 AM
Post
#9
|
|
Aircooled Baby! Group: Members Posts: 13,034 Joined: 27-December 02 From: Seattle, Washington (for now) Member No.: 24 Region Association: Pacific Northwest |
Set up your pieces like Ben said but buy the engine shelf as its pretty hard to make the curves fit right. Clean everything first to bare metal then use a weld thru primer. Spray the rust stuff down into the long and into the wheelhouse. To get a stock look lay the pieces over the hole, tack them in, and then cut along the new piece to get a perfect seam to butt weld. or just slap the new metal on over the hole and stitch weld it in slowly.
DWD, we all get it sometime! Guess I and getting my fair share this winter with the engine repair. (IMG:http://www.914world.com/bbs2/html/emoticons/dry.gif) Geoff |
|
|
|
| Gint |
Dec 30 2004, 07:17 AM
Post
#10
|
|
Mike Ginter Group: Admin Posts: 16,071 Joined: 26-December 02 From: Denver CO. Member No.: 20 Region Association: Rocky Mountains |
Ben's plan makes sense to me. Id prolly also drill out te spot welds for the engine shelf and just pop the $$$ for a replacement from Restoration Design. Taking it off will also give you (DW's LOL) more room to work while you're in there.
|
 |
|
| McMark |
Dec 30 2004, 11:56 AM
Post
#11
|
|
914 Freak! Group: Retired Admin Posts: 20,179 Joined: 13-March 03 From: Grand Rapids, MI Member No.: 419 Region Association: None |
I like Ben's plan. I think Trekkor should use rivits. I don't think he should buy the R.D. engine shelf piece. I think "beat-to-fit" will work fine for him.*
*This message was custom tailored from Trekkor and does not in any way represent the way I would do things. But I know Trekkor and this is his way. |
|
|
|
| greg.treadway |
Dec 30 2004, 12:10 PM
Post
#12
|
|
914 Nut Group: Members Posts: 282 Joined: 16-December 04 From: Marietta, GA Member No.: 3,295 |
Looks to me like you need an engine shelf, inner wheel house, upper longitudinal and then a small piece to cover that back firewall.
(IMG:http://www.autoatlanta.net/itemgraphics/23581-1.jpg) (IMG:http://www.autoatlanta.net/itemgraphics/23044-1.jpg) (IMG:http://www.autoatlanta.net/itemgraphics/24025-1.jpg) I hope this helps. |
|
|
|
| Aaron Cox |
Dec 30 2004, 12:15 PM
Post
#13
|
|
Professional Lawn Dart Group: Retired Admin Posts: 24,541 Joined: 1-February 03 From: OC Member No.: 219 Region Association: Southern California |
wow.... that looks like the way to go greg,
how much do those 4 pieces add up to through you?? |
|
|
|
| greg.treadway |
Dec 30 2004, 12:31 PM
Post
#14
|
|
914 Nut Group: Members Posts: 282 Joined: 16-December 04 From: Marietta, GA Member No.: 3,295 |
The pieces are not cheap. The engine shelf retails for $175, the wheel house retails for $250 and the longitudinal piece retails for $275 and they are all in stock. For club members I will personally give a 5% discount. I hope this helps.
As always feel free to contact me via any of the instant messenger programs. |
|
|
|
| airsix |
Dec 30 2004, 12:50 PM
Post
#15
|
|
I have bees in my epiglotis Group: Members Posts: 2,196 Joined: 7-February 03 From: Kennewick Man (E. WA State) Member No.: 266 |
Let me elaborate a little on my 'beat to fit' comment. What I would do specifically is get some card stock (like standard paper manila folders) and cut templates out that fit the way you want them too. You'll be able to bend them to fit the curves and trim them up until you like the fit. Test each piece to see where you need to attach it first so that as you press it into place everything lines up correctly. You'll apply your sheet metal patches the same way. Then flatten the cardboard pieces back out and use them as paterns to cut your sheet metal pieces. Now when you start to work with your flat sheet metal patches you can hammer form them as you weld them in - alternately welding and hammering as you go. You should be able to form the pieces nicely into possition this way.
If this was a concourse show car I'd get AA or Restoration Design's repair pieces, or make accurate patches and butt-weld them. But to clean up a driver on a budget, or if building a autocross/track car I'd use the overlapped/seam-welded patch method. I would trust it to be stronger than butt-welded perfect-fit patches (at least if it was me doing the welding). I'd do the metal prep just like Geoff said. I'd also apply some POR-15 'Metal Ready' (like Ospho) before I sprayed the weld-through primer, but that's probably not necessary if you've done a good job of grinding all the scale away. -Ben M. |
|
|
|
| Trekkor |
Dec 30 2004, 02:52 PM
Post
#16
|
||||||
|
I do things... Group: Members Posts: 7,809 Joined: 2-December 03 From: Napa, Ca Member No.: 1,413 Region Association: Northern California |
Thanks for the report.
I'll be back at it in a little while. (IMG:http://www.914world.com/bbs2/html/emoticons/welder.gif)
I put them in the car last night. (IMG:http://www.914world.com/bbs2/html/emoticons/wink.gif)
Of course... (IMG:http://www.914world.com/bbs2/html/emoticons/smash.gif)
Function before fashion. All the way. who's gonna stick their head in my engine compartment, besides me? (IMG:http://www.914world.com/bbs2/html/emoticons/ohmy.gif) Greg, thanks for your pics! I would like to see some more top view shots of completed work. KT |
||||||
|
|
|
||||||
| Trekkor |
Dec 30 2004, 07:26 PM
Post
#17
|
|
I do things... Group: Members Posts: 7,809 Joined: 2-December 03 From: Napa, Ca Member No.: 1,413 Region Association: Northern California |
Good things are happening (IMG:http://www.914world.com/bbs2/html/emoticons/biggrin.gif)
Used the grinder and wire wheel to remove most of the surface rust. Attached image(s) 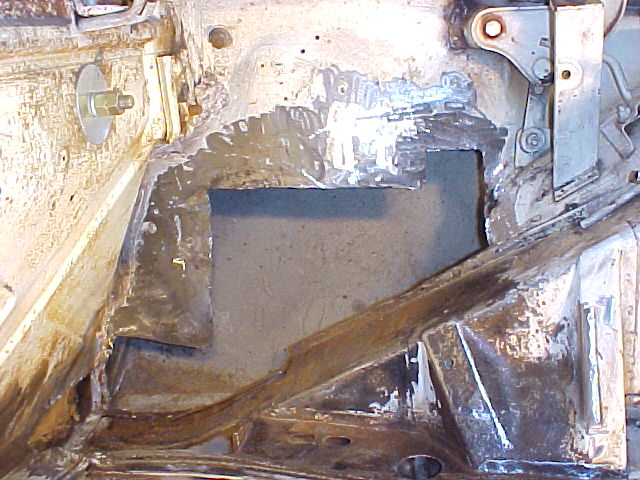
|
|
|
|
| Trekkor |
Dec 30 2004, 07:28 PM
Post
#18
|
|
I do things... Group: Members Posts: 7,809 Joined: 2-December 03 From: Napa, Ca Member No.: 1,413 Region Association: Northern California |
Painted with rust converting primer. (IMG:http://www.914world.com/bbs2/html/emoticons/rolleyes.gif)
Attached image(s) 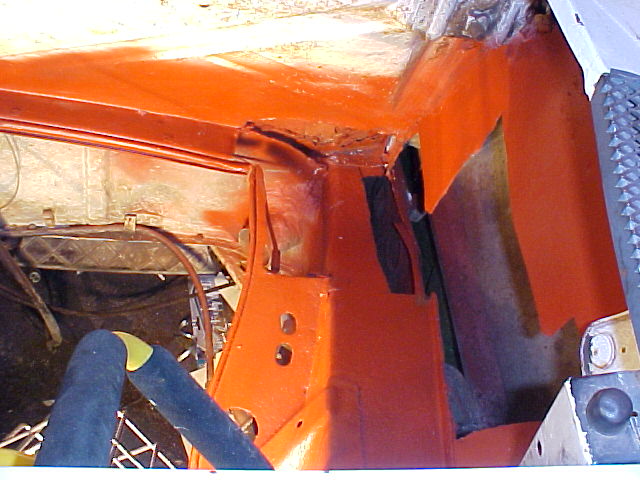
|
|
|
|
| Trekkor |
Dec 30 2004, 07:33 PM
Post
#19
|
|
I do things... Group: Members Posts: 7,809 Joined: 2-December 03 From: Napa, Ca Member No.: 1,413 Region Association: Northern California |
Here's the pieces ready to weld in.
Firewall patch, engine shelf in 22g and the long patch is in 16g. After this post I'll go weld 'em in. (IMG:http://www.914world.com/bbs2/html/emoticons/welder.gif) Attached image(s) 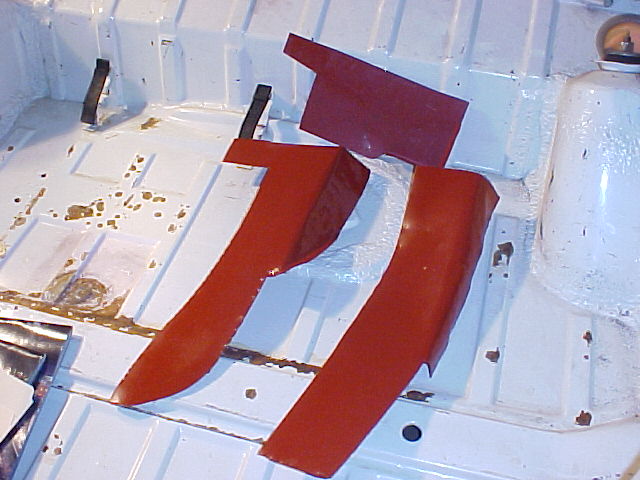
|
|
|
|
| Trekkor |
Dec 30 2004, 07:36 PM
Post
#20
|
|
I do things... Group: Members Posts: 7,809 Joined: 2-December 03 From: Napa, Ca Member No.: 1,413 Region Association: Northern California |
One more (IMG:http://www.914world.com/bbs2/html/emoticons/dry.gif)
I made a matching engine shelf for the other side. Covers the hole and blower pedestal butchery. I'm goin' back...now! Attached image(s) 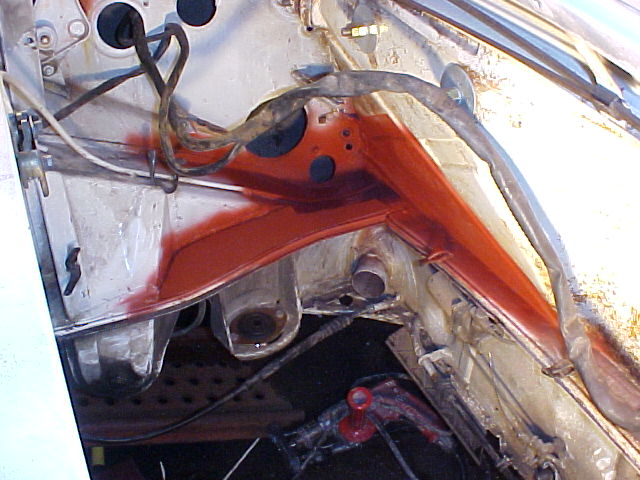
|
|
|
|
|
1 User(s) are reading this topic (1 Guests and 0 Anonymous Users)
0 Members:

|
Lo-Fi Version | Time is now: 11th May 2024 - 03:15 PM |
Invision Power Board
v9.1.4 © 2024 IPS, Inc.