|
|
|
Porsche, and the Porsche crest are registered trademarks of Dr. Ing. h.c. F. Porsche AG.
This site is not affiliated with Porsche in any way. Its only purpose is to provide an online forum for car enthusiasts. All other trademarks are property of their respective owners. |
|
|

  |

| horizontally-opposed |
 May 19 2019, 08:44 PM May 19 2019, 08:44 PM
Post
#1
|
|
Advanced Member  Group: Members Posts: 3,431 Joined: 12-May 04 From: San Francisco Member No.: 2,058 Region Association: None |
So my 914's backpad sits just below the rubber seal on the engine lid side of the rear glass—creating an ugly eye into the space under said seal as well as the butyl tape. In the past, I've hidden that gap with electrical tape "artfully" placed, but it ain't pretty.
Looks like I am not the first to do so… http://www.914world.com/bbs2/index.php?sho...&hl=backpad Wondering if there is a better way. Has anyone moved the backed up a bit to sit high enough to match up with the engine lid seal on the other side of the back window? Thanks!! |
   |

 
|
| Rand |
May 19 2019, 09:06 PM
Post
#2
|
|
Cross Member Group: Members Posts: 7,409 Joined: 8-February 05 From: OR Member No.: 3,573 Region Association: None |
The first???? LOL How old are you?
Be sure it's actually in its proper place. There are tabs to align it. Sounds like not all of the tabs have been aligned / hooked in right. Rust changes our geometry, but a backpad? Nope. It has to be a simple error in placement. Trivia question: When removing, do you slide it down or up? The answer could explain a lot. |
|
|
|
| Rand |
May 19 2019, 09:13 PM
Post
#3
|
|
Cross Member Group: Members Posts: 7,409 Joined: 8-February 05 From: OR Member No.: 3,573 Region Association: None |
Please do not use electrical tape on these anymore unless your car is seriously roached.
|
|
|
|
| Rand |
May 19 2019, 09:16 PM
Post
#4
|
|
Cross Member Group: Members Posts: 7,409 Joined: 8-February 05 From: OR Member No.: 3,573 Region Association: None |
There are rubber spacers to hold your window as you apply new butyl. Align the window in the frame first. I can't speak to the other misalignments.
|
|
|
|
| porschetub |
May 19 2019, 10:10 PM
Post
#5
|
|
Advanced Member Group: Members Posts: 4,698 Joined: 25-July 15 From: New Zealand Member No.: 18,995 Region Association: None |
QUOTE(horizontally-opposed @ May 20 2019, 02:44 PM)  So my 914's backpad sits just below the rubber seal on the engine lid side of the rear glass—creating an ugly eye into the space under said seal as well as the butyl tape. In the past, I've hidden that gap with electrical tape "artfully" placed, but it ain't pretty. Looks like I am not the first to do so… http://www.914world.com/bbs2/index.php?sho...&hl=backpad Wondering if there is a better way. Has anyone moved the backed up a bit to sit high enough to match up with the engine lid seal on the other side of the back window? Thanks!! Hard to sort really you will need to peel back the covering and move the metal (clip in) brackets @ the top,mines kinda like that but depends on the crappy cardboard liner is to how much it won't fit,I fiberglassed mine from the back and added soundproofing pretty much sorted fit wise. Classic answer from Rand between him and the logo we always have silly replies to entertain (IMG:style_emoticons/default/lol-2.gif) (IMG:style_emoticons/default/lol-2.gif) . |
|
|
|
| horizontally-opposed |
May 19 2019, 10:16 PM
Post
#6
|
|
Advanced Member Group: Members Posts: 3,431 Joined: 12-May 04 From: San Francisco Member No.: 2,058 Region Association: None |
^ Thanks. Moving the metal clips...I like that idea.
Rand is on fire. (IMG:style_emoticons/default/whip[1].gif) Now just waiting on Larmo. |
|
|
|
| don-6 |
May 19 2019, 10:21 PM
Post
#7
|
|
Stock vs Modified? Group: Members Posts: 172 Joined: 7-April 14 From: Conroe, TX Member No.: 17,219 Region Association: Southwest Region |
I have used electrical tape on two different cars to give a nice clean line behind the back pad. I don't like to see an uneven line of butyl tape in the window.
|
|
|
|
| porschetub |
May 19 2019, 11:30 PM
Post
#8
|
|
Advanced Member Group: Members Posts: 4,698 Joined: 25-July 15 From: New Zealand Member No.: 18,995 Region Association: None |
QUOTE(horizontally-opposed @ May 20 2019, 04:16 PM) ^ Thanks. Moving the metal clips...I like that idea. Rand is on fire. (IMG:style_emoticons/default/whip[1].gif) Now just waiting on Larmo. (IMG:style_emoticons/default/lol-2.gif) (IMG:style_emoticons/default/lol-2.gif) ,yes but Lawrence has gone all shy lately,lastest replys have been very tame (IMG:style_emoticons/default/stirthepot.gif) (IMG:style_emoticons/default/stirthepot.gif) . |
|
|
|
| Rand |
May 19 2019, 11:50 PM
Post
#9
|
|
Cross Member Group: Members Posts: 7,409 Joined: 8-February 05 From: OR Member No.: 3,573 Region Association: None |
Damned jalapenos. I need at least a couple a day.
|
|
|
|
| rick 918-S |
May 20 2019, 04:25 AM
Post
#10
|
|
Hey nice rack! -Celette Group: Members Posts: 20,452 Joined: 30-December 02 From: Now in Superior WI Member No.: 43 Region Association: Northstar Region |
|
|
|
|
| windforfun |
May 20 2019, 10:46 AM
Post
#11
|
|
Senior Member Group: Members Posts: 1,780 Joined: 17-December 07 From: Blackhawk, CA Member No.: 8,476 Region Association: None |
Some pics would be nice. I wouldn't move the clips. IIRC, the pad loads from below. You must also align the two bottom holes where it's attached with coarse thread sheet metal screws.
|
|
|
|
| horizontally-opposed |
May 20 2019, 09:15 PM
Post
#12
|
|
Advanced Member Group: Members Posts: 3,431 Joined: 12-May 04 From: San Francisco Member No.: 2,058 Region Association: None |
QUOTE(don-6 @ May 19 2019, 09:21 PM) I have used electrical tape on two different cars to give a nice clean line behind the back pad. I don't like to see an uneven line of butyl tape in the window. Yep, been there and done that—and also hate seeing the butyl tape as well as the "gap" under the engine lid seal plus a bit of body color. Looks cheap... Interesting that the CW thread referenced in the first post shows that electrical tape is the preferred method of the factory, as seen in the manual—I decided to do just that (without the manual) years ago, but notice that electrical tape changes with heat, etc. Wondering if there's a better way, one that raises the backpad and the bar a bit. QUOTE(porschetub @ May 19 2019, 10:30 PM) (IMG:style_emoticons/default/lol-2.gif) (IMG:style_emoticons/default/lol-2.gif) ,yes but Lawrence has gone all shy lately,lastest replys have been very tame (IMG:style_emoticons/default/stirthepot.gif) (IMG:style_emoticons/default/stirthepot.gif) . Yes, I remember worrying that Lawrence might have "peaked" with "I even brushed my teeth." (IMG:style_emoticons/default/lol-2.gif) (IMG:style_emoticons/default/sheeplove.gif) (IMG:style_emoticons/default/unsure.gif) QUOTE(rick 918-S @ May 20 2019, 03:25 AM) Yep. Comin' right up... (IMG:style_emoticons/default/type.gif) QUOTE(windforfun @ May 20 2019, 09:46 AM) Some pics would be nice. I wouldn't move the clips. IIRC, the pad loads from below. You must also align the two bottom holes where it's attached with coarse thread sheet metal screws. Agree on not moving the clips. I think. As for the bottom of my back pad? Well it is, uh, let's call it "unstable." (The boards down there have seen better days. Not terrible, but not factory fresh. I don't think it's bad enough to prompt me to rebuild the whole thing, and I don't have problems with the back pad moving around when I am driving or otherwise...I'd just like to get it to sit a bit higher.) My recollection is the pad is pushed up from the bottom as well, and all of that works okay. What I am surprised by is that the factory seems to be okay with using electrical tape across the bottom of the glass, rather than having the back pad engineered/designed to come up to match the height of the engine lid seal on the other side of the glass...hence my request for other 914world members to weigh in with what their back pads look like. Pics would be great! As for my pics... Attached thumbnail(s) 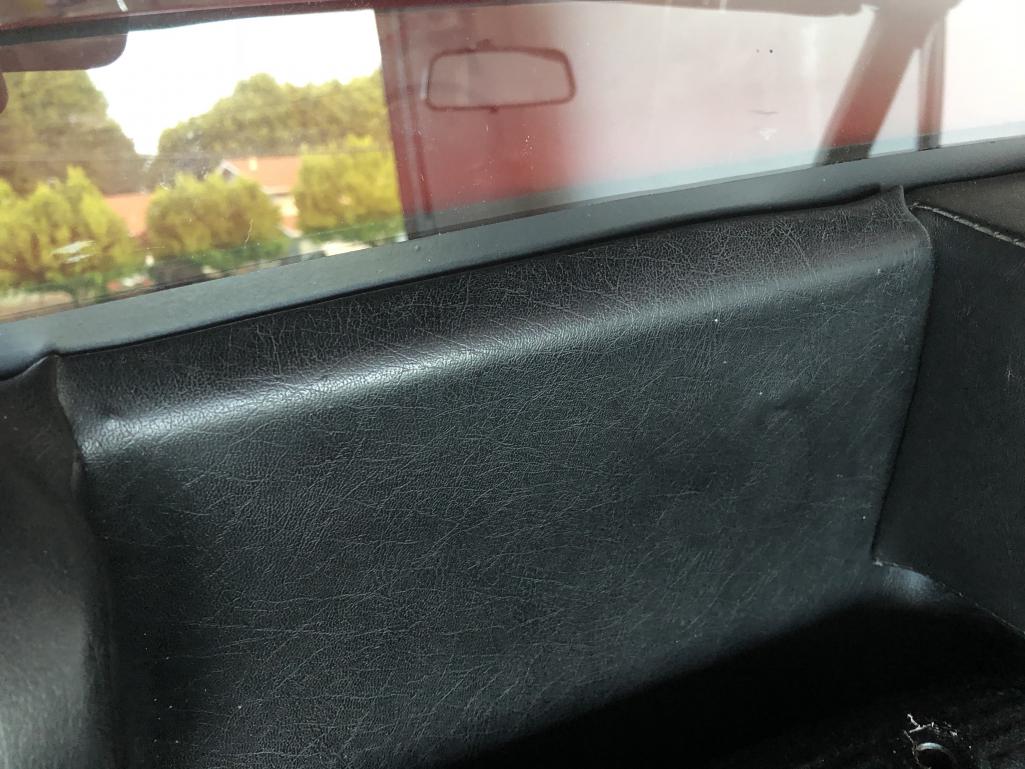
|
|
|
|
| horizontally-opposed |
May 20 2019, 09:18 PM
Post
#13
|
|
Advanced Member Group: Members Posts: 3,431 Joined: 12-May 04 From: San Francisco Member No.: 2,058 Region Association: None |
...
Attached thumbnail(s) 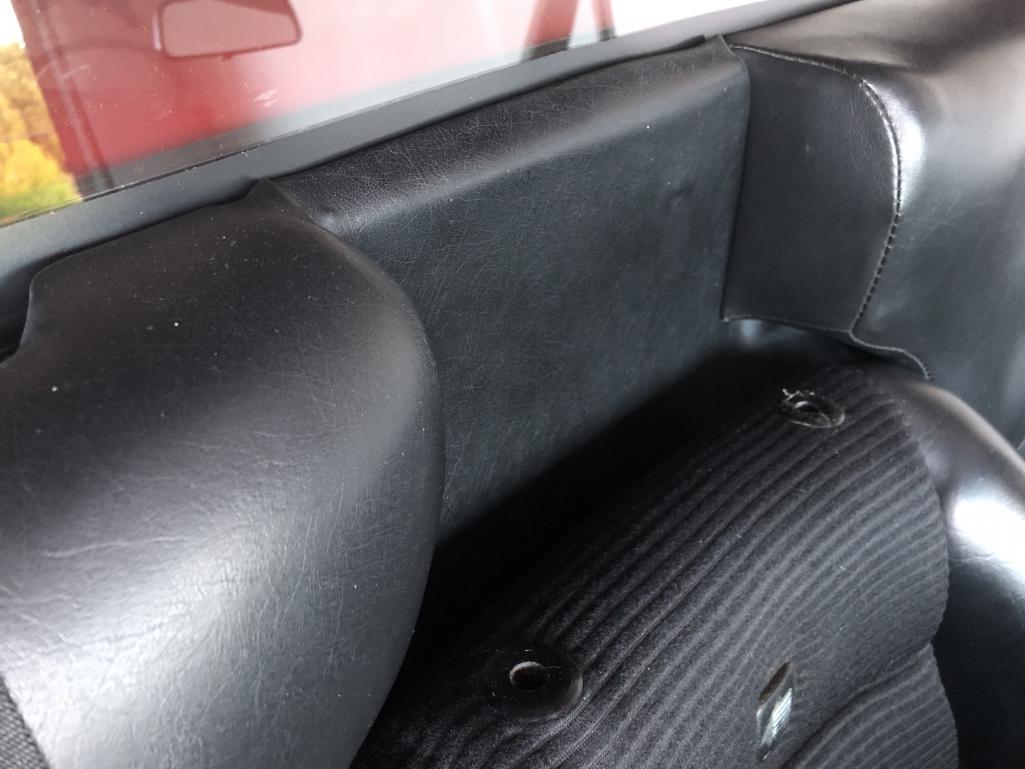
|
|
|
|
| horizontally-opposed |
May 20 2019, 09:20 PM
Post
#14
|
|
Advanced Member Group: Members Posts: 3,431 Joined: 12-May 04 From: San Francisco Member No.: 2,058 Region Association: None |
...
Attached thumbnail(s) 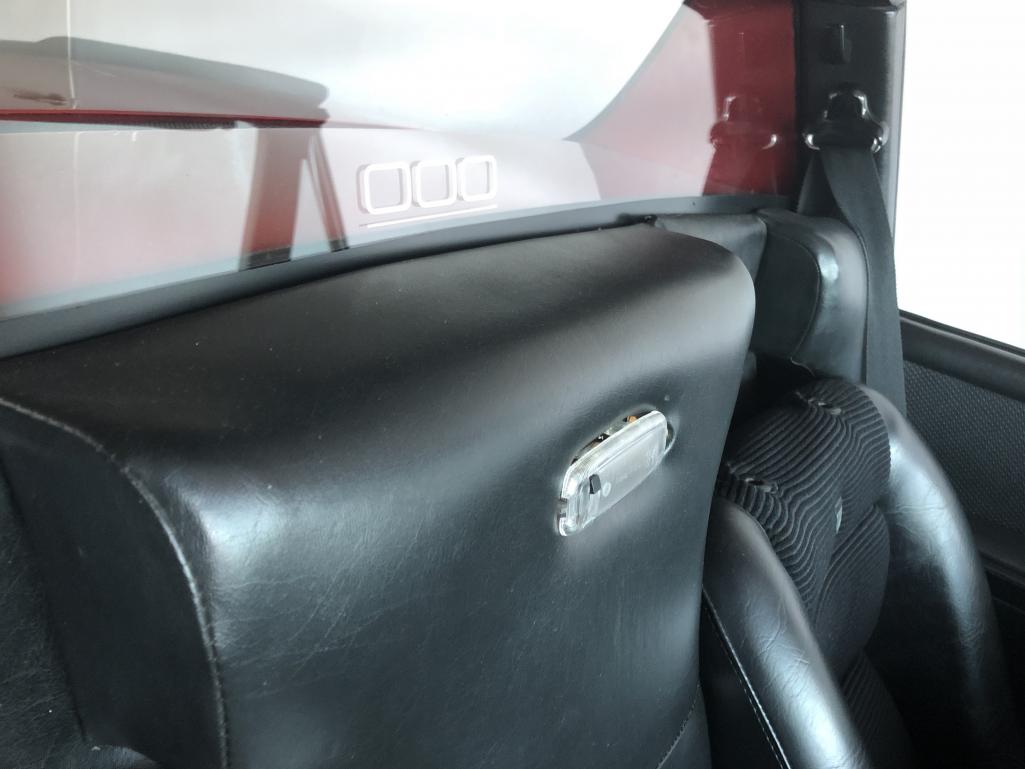
|
|
|
|
| Larmo63 |
May 20 2019, 09:23 PM
Post
#15
|
|
Advanced Member Group: Members Posts: 4,264 Joined: 3-March 14 From: San Clemente, Ca Member No.: 17,068 Region Association: Southern California |
I'm an outlaw and I don't run a back pad.
But to your issue, if you raise the pad, the four lower screws won't index. I'm doing Perlon behind my seats, and sorry to disappoint, (IMG:style_emoticons/default/smilie_pokal.gif) I don't even have a smartass comment to offer.... |
|
|
|
| horizontally-opposed |
May 20 2019, 11:02 PM
Post
#16
|
|
Advanced Member Group: Members Posts: 3,431 Joined: 12-May 04 From: San Francisco Member No.: 2,058 Region Association: None |
QUOTE(Larmo63 @ May 20 2019, 08:23 PM) I'm an outlaw and I don't run a back pad. (IMG:style_emoticons/default/beerchug.gif) QUOTE(Larmo63 @ May 20 2019, 08:23 PM) But to your issue, if you raise the pad, the four lower screws won't index. Pretty sure those got indexed into a trash can or one of those dishes with all of the "leftover" hardware a long, long time ago. Will dig in and look soon... QUOTE(Larmo63 @ May 20 2019, 08:23 PM) I'm doing Perlon behind my seats… I may end up following you down that road. Do you move your dome light, or just ditch it? Been wondering about running a small LED or two in the vinyl pad over the rear window, pointing forward, if I go this way. Would also be great to cut an access hole in the firewall. We'll see… QUOTE(Larmo63 @ May 20 2019, 08:23 PM) …and sorry to disappoint, (IMG:style_emoticons/default/smilie_pokal.gif) I don't even have a smartass comment to offer.... (IMG:style_emoticons/default/slap.gif) |
|
|
|
| Larmo63 |
May 21 2019, 07:36 AM
Post
#17
|
|
Advanced Member Group: Members Posts: 4,264 Joined: 3-March 14 From: San Clemente, Ca Member No.: 17,068 Region Association: Southern California |
No back pad light with the Perlon. I've been thinking of other ways to have light in the cab.
Perhaps a 911 rocker type light under the dash? |
|
|
|
| Literati914 |
May 21 2019, 08:33 AM
Post
#18
|
|
Senior Member Group: Members Posts: 1,461 Joined: 16-November 06 From: Dallas, TX Member No.: 7,222 Region Association: Southwest Region |
maybe the bottom of the glass could be painted... but that'd be more practical during a restoration.
Also, I've thought of adding a couple a areas with heavy duty industrial velcro behind the pad, particularly low and in the corner because that area tends to lift in all the 914s I've had. But I could see it also helping to keep the pad lifted - particularly since it's installed by pushing UP into the clips. |
|
|
|
| windforfun |
May 21 2019, 08:47 AM
Post
#19
|
|
Senior Member Group: Members Posts: 1,780 Joined: 17-December 07 From: Blackhawk, CA Member No.: 8,476 Region Association: None |
Here's an old pic that's not super clear. Anyway, I used three pieces of tape - 6" long pieces on either side for a nice flush fit & then one long continuous piece centered in the middle.
Attached thumbnail(s) 
|
|
|
|
| horizontally-opposed |
May 21 2019, 09:59 AM
Post
#20
|
|
Advanced Member Group: Members Posts: 3,431 Joined: 12-May 04 From: San Francisco Member No.: 2,058 Region Association: None |
QUOTE(Literati914 @ May 21 2019, 07:33 AM) maybe the bottom of the glass could be painted... but that'd be more practical during a restoration. Also, I've thought of adding a couple a areas with heavy duty industrial velcro behind the pad, particularly low and in the corner because that area tends to lift in all the 914s I've had. But I could see it also helping to keep the pad lifted - particularly since it's installed by pushing UP into the clips. Thought about painting it, too, and came to the same conclusion. May also be scratch-prone in a way that the tape isn't? I'm beginning to wonder about the method of the clips, as they are likely the limiting factor. Need to think about how the sides of the back pad will interface with the targa bar sides if it is lifted, as well as what all of it will look like the seats in (in my case Scheels, and with the driver's side seat frame lowered. Perlon is sounding better by the keystroke, but I do like the design of the original backpad—kind of seems like part of the 914's overall design, as well as the period in general, to me. Then again...914-6 GT. QUOTE(windforfun @ May 21 2019, 07:47 AM) Here's an old pic that's not super clear. Anyway, I used three pieces of tape - 6" long pieces on either side for a nice flush fit & then one long continuous piece centered in the middle. Thanks for the pic! Looks about the same as mine. Wish I had taken some time at Luft to look at this detail across a number of 914s. |
|
|
|
|
1 User(s) are reading this topic (1 Guests and 0 Anonymous Users)
0 Members:

|
Lo-Fi Version | Time is now: 13th May 2024 - 03:29 AM |
Invision Power Board
v9.1.4 © 2024 IPS, Inc.