|
|
|
Porsche, and the Porsche crest are registered trademarks of Dr. Ing. h.c. F. Porsche AG.
This site is not affiliated with Porsche in any way. Its only purpose is to provide an online forum for car enthusiasts. All other trademarks are property of their respective owners. |
|
|

  |

| ctc911ctc |
 Apr 7 2020, 02:56 PM Apr 7 2020, 02:56 PM
Post
#1
|
|
Senior Member  Group: Members Posts: 892 Joined: 9-June 18 From: boston Member No.: 22,206 Region Association: North East States |
All,
'74 914, 2L, original engine - about 20K miles I started a new thread because the ones I could find did not address this issue. Perhaps it is me???? Last month I purchased new gaskets (thanks Mark @914R) and annealed them as per instructions. Used super glue to stick them in place. Mounted the heat exchanger/manifold and locked them in with around 20lbs of torque. Copper goo on the nuts, etc. When I started the car it was the sound of my youth - smooth, strong,,,,,,ahh After a few days the sound changed, using a rubber tube held to my ear I found exhaust leaks in the junction to the muffler (used new gaskets, alum sandwiched ones). Here are the leaks Copper Gasket Leaks 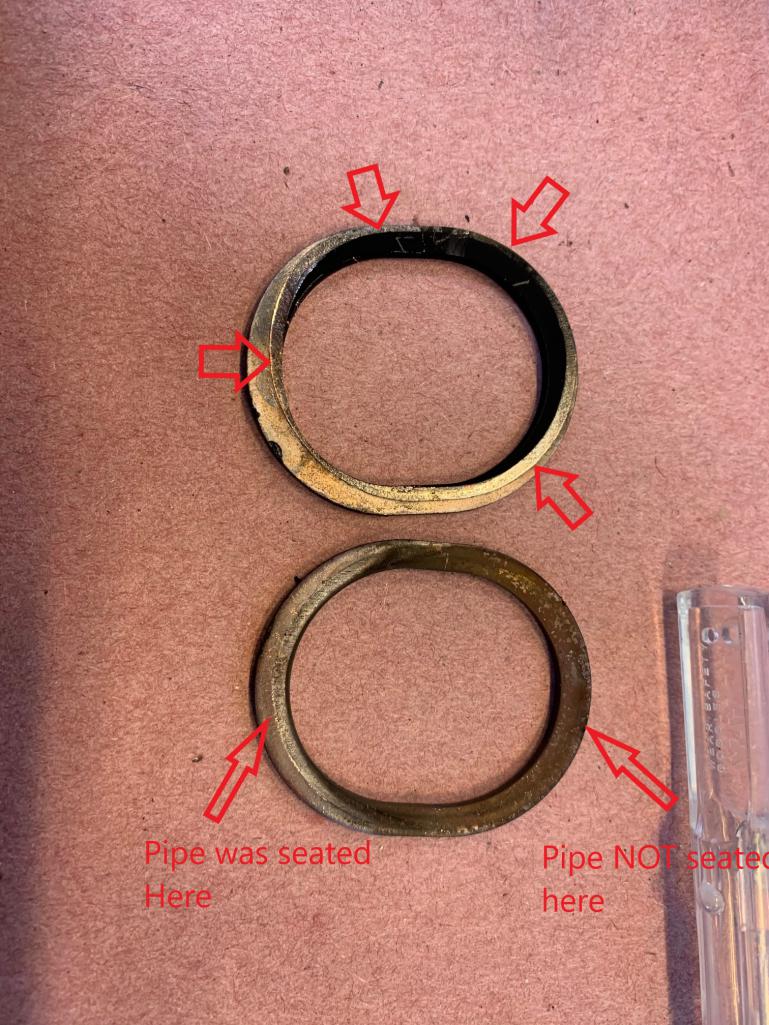 Seems as if the nuts were not tight enough. I made certain that the edge of the pipes were square and both on the same plane. Questions as to the copper gaskets: 1. Seems that one was not seated concentrically with the pipe, that exhaust was leaking from day one - is there a method to square this or center it? 2. the other gasket it seems did not get seated at all, so it seems as if it was concentric just not tight enough????? Now the aluminum Gaskets 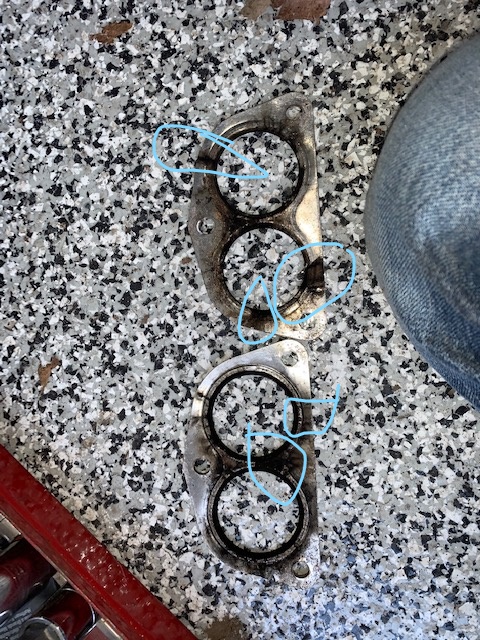 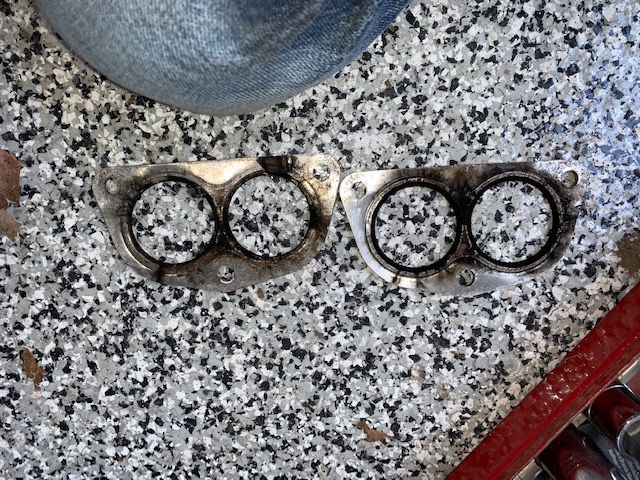 I really tightened the bolts, I have ordered new gaskets and am brushing smooth the flanges which were both kind of cruddy, any advice as to installing these? THANK YOU TEENERS! |
   |

 
|
| Rand |
Apr 7 2020, 03:14 PM
Post
#2
|
|
Cross Member Group: Members Posts: 7,409 Joined: 8-February 05 From: OR Member No.: 3,573 Region Association: None |
Exhaust leaks are a plague. Of course you have filed the mating surfaces? Annealing is a subject of debate on the copper rings. (They
do that themselves) |
|
|
|
| TonyA |
Apr 7 2020, 03:47 PM
Post
#3
|
|
Nachmal Group: Members Posts: 468 Joined: 17-November 16 From: Hilltown PA Member No.: 20,596 Region Association: North East States |
I remember seeing a Youtube from a guy in Florida that filed down the HE tubes to square them up.
|
|
|
|
| ctc911ctc |
Apr 7 2020, 03:48 PM
Post
#4
|
|
Senior Member Group: Members Posts: 892 Joined: 9-June 18 From: boston Member No.: 22,206 Region Association: North East States |
Certainly, someone has come up with a sure-fire 100% good-guy guaranteed method for tightening and securing this assembly? Anyone? Anyone?
|
|
|
|
| BeatNavy |
Apr 7 2020, 04:11 PM
Post
#5
|
|
Certified Professional Scapegoat Group: Members Posts: 2,924 Joined: 26-February 14 From: Easton, MD Member No.: 17,042 Region Association: MidAtlantic Region |
QUOTE(ctc911ctc @ Apr 7 2020, 05:48 PM)  Certainly, someone has come up with a sure-fire 100% good-guy guaranteed method for tightening and securing this assembly? Anyone? Anyone? No, but there are some things that help. Filing the HE's so they are the same height can help. IMO, most important to seal at the head, then get the muffler to tight to the HE's. Torque the HE's slowly to exhaust studs and leave the muffler somewhat loose at first. Try to verify that you can see gasket on each side of the HE as you tighten to head. Once you think you have it, lightly torque the muffler to the HE. Then check the seal by using a shop vac set to blow, instead of suck, and put it on the exhaust outlet. Feel around the bottom of the head to see which, if any, of the mating surfaces may not be seated, and adjust everything as needed. Remember not to overtighten! Drive around a couple of times, then check the torque on everything again. Others will have other, probably better, ideas. |
|
|
|
| IronHillRestorations |
Apr 7 2020, 04:42 PM
Post
#6
|
|
I. I. R. C. Group: Members Posts: 6,717 Joined: 18-March 03 From: West TN Member No.: 439 Region Association: None |
What do the sealing surfaces look like on the heat exchangers and muffler?The gaskets show where it's leaking, but maybe not why. Pics of the sealing surfaces might be helpful.
In the first pic shows that the exhaust flange wasn't centered on the copper gasket. You should see copper around each exhaust flange before you tighten to spec. Checking the sealing surfaces with a file can reveal discrepancies that can cause a leak. Are these stock heat exchangers or SSI's? Factory heat exchangers have a much better sealing surface than SSI's, which are only thin tubing. It's also common for the flanges on SSI's to not be level with each other, put a good straight edge across the surfaces to check them. I bolt it all together finger tight before tightening to spec which is much less than you think, 11 ft lb IIRC I think it does help to anneal the copper gaskets. I had trouble with a leak on one car and it helped. Just get them hot enough and quenching isn't really required, except to put them in faster. |
|
|
|
| ctc911ctc |
Apr 7 2020, 05:29 PM
Post
#7
|
|
Senior Member Group: Members Posts: 892 Joined: 9-June 18 From: boston Member No.: 22,206 Region Association: North East States |
Yes, there is a very good engine build video where this is done - mine are square and the two are on the same plane.
QUOTE(TonyA @ Apr 7 2020, 03:47 PM) I remember seeing a Youtube from a guy in Florida that filed down the HE tubes to square them up. |
|
|
|
| ctc911ctc |
Apr 7 2020, 05:33 PM
Post
#8
|
|
Senior Member Group: Members Posts: 892 Joined: 9-June 18 From: boston Member No.: 22,206 Region Association: North East States |
Great advice, I will try this tomorrow
The exchangers are SSI, and I would think a larger mating surface would help, that the pipe edges are the mating service seems a bit weird. THANK YOU B-Navy! \ QUOTE(BeatNavy @ Apr 7 2020, 04:11 PM) QUOTE(ctc911ctc @ Apr 7 2020, 05:48 PM) Certainly, someone has come up with a sure-fire 100% good-guy guaranteed method for tightening and securing this assembly? Anyone? Anyone? No, but there are some things that help. Filing the HE's so they are the same height can help. IMO, most important to seal at the head, then get the muffler to tight to the HE's. Torque the HE's slowly to exhaust studs and leave the muffler somewhat loose at first. Try to verify that you can see gasket on each side of the HE as you tighten to head. Once you think you have it, lightly torque the muffler to the HE. Then check the seal by using a shop vac set to blow, instead of suck, and put it on the exhaust outlet. Feel around the bottom of the head to see which, if any, of the mating surfaces may not be seated, and adjust everything as needed. Remember not to overtighten! Drive around a couple of times, then check the torque on everything again. Others will have other, probably better, ideas. |
|
|
|
| ctc911ctc |
Apr 7 2020, 05:36 PM
Post
#9
|
|
Senior Member Group: Members Posts: 892 Joined: 9-June 18 From: boston Member No.: 22,206 Region Association: North East States |
Wow, as to the surfaces at the muffler, wavey-gravy! Will have to think about how to seal that interface, the SSI steel seems a bit soft......hhhhmmmm,
The tube surfaces are very straight and even. The two surfaces are even straight in relation to each other. Will follow this great advice tomorrow along with B-Navy and the vacuum idea! THANK YOU IHR QUOTE(IronHillRestorations @ Apr 7 2020, 04:42 PM) What do the sealing surfaces look like on the heat exchangers and muffler?The gaskets show where it's leaking, but maybe not why. Pics of the sealing surfaces might be helpful. In the first pic shows that the exhaust flange wasn't centered on the copper gasket. You should see copper around each exhaust flange before you tighten to spec. Checking the sealing surfaces with a file can reveal discrepancies that can cause a leak. Are these stock heat exchangers or SSI's? Factory heat exchangers have a much better sealing surface than SSI's, which are only thin tubing. It's also common for the flanges on SSI's to not be level with each other, put a good straight edge across the surfaces to check them. I bolt it all together finger tight before tightening to spec which is much less than you think, 11 ft lb IIRC I think it does help to anneal the copper gaskets. I had trouble with a leak on one car and it helped. Just get them hot enough and quenching isn't really required, except to put them in faster. |
|
|
|
| ctc911ctc |
Apr 7 2020, 06:02 PM
Post
#10
|
|
Senior Member Group: Members Posts: 892 Joined: 9-June 18 From: boston Member No.: 22,206 Region Association: North East States |
Prior to blowing me out of the water, might a layer of this on both the copper ring AND the pipe interface assist with the bonding at the interface?
 |
|
|
|
| Bleyseng |
Apr 7 2020, 06:30 PM
Post
#11
|
|
Aircooled Baby! Group: Members Posts: 13,034 Joined: 27-December 02 From: Seattle, Washington (for now) Member No.: 24 Region Association: Pacific Northwest |
No, file the HE's flat with a big flat file. I put them in without the muffler and wiggle them in or tap with a plastic BFH . Once they are truely seated then I tighten the nuts slowly wiggling the HE's as I tighten. Before torquing I then put the muffler (Bursch or Triad exhaust) and tighten those to the HE's. Then I tighten the HE nuts down, of course I have put a dap of anti seize on the studs.
I haven't had any leaks on the 914 or the Westy this way. |
|
|
|
| IronHillRestorations |
Apr 7 2020, 07:41 PM
Post
#12
|
|
I. I. R. C. Group: Members Posts: 6,717 Joined: 18-March 03 From: West TN Member No.: 439 Region Association: None |
QUOTE(ctc911ctc @ Apr 7 2020, 04:02 PM) Prior to blowing me out of the water, might a layer of this on both the copper ring AND the pipe interface assist with the bonding at the interface? That's a negative, that will give you leaks for sure. |
|
|
|
| r_towle |
Apr 7 2020, 07:50 PM
Post
#13
|
|
Custom Member Group: Members Posts: 24,574 Joined: 9-January 03 From: Taxachusetts Member No.: 124 Region Association: North East States |
Hang the HE on the muffler hanger, tighten HE, wiggle and tighten again.
I have used double gaskets between the HE and the muffler before. (IMG:style_emoticons/default/smile.gif) |
|
|
|
| MartyYeoman |
Apr 7 2020, 08:35 PM
Post
#14
|
|
Senior Member Group: Members Posts: 1,518 Joined: 19-June 03 From: San Ramon, CA Member No.: 839 Region Association: Northern California |
You might want to check that the bolt mounting loops aren't bottoming out before the mounting faces (pipe end and copper gasket) seat properly. I had to file mine to create some necessary clearance. Just say'n.
|
|
|
|
| ctc911ctc |
Apr 8 2020, 10:21 AM
Post
#15
|
|
Senior Member Group: Members Posts: 892 Joined: 9-June 18 From: boston Member No.: 22,206 Region Association: North East States |
Had not considered this - I will look for this while installing
Thank You! QUOTE(MartyYeoman @ Apr 7 2020, 08:35 PM) You might want to check that the bolt mounting loops aren't bottoming out before the mounting faces (pipe end and copper gasket) seat properly. I had to file mine to create some necessary clearance. Just say'n. |
|
|
|
| IronHillRestorations |
Apr 8 2020, 10:40 AM
Post
#16
|
|
I. I. R. C. Group: Members Posts: 6,717 Joined: 18-March 03 From: West TN Member No.: 439 Region Association: None |
QUOTE(MartyYeoman @ Apr 7 2020, 06:35 PM) You might want to check that the bolt mounting loops aren't bottoming out before the mounting faces (pipe end and copper gasket) seat properly. I had to file mine to create some necessary clearance. Just say'n. This jogged my memory of another car I had in with non OE exhaust studs that were a bit too long to torque the exhaust nuts on two cylinders. It had some washers stacked to compensate. It was a low budget situation, and I wasn't going to pull the exhaust studs and open a can of worms |
|
|
|
| ctc911ctc |
Apr 8 2020, 07:30 PM
Post
#17
|
|
Senior Member Group: Members Posts: 892 Joined: 9-June 18 From: boston Member No.: 22,206 Region Association: North East States |
*****UPDATE******
It dawned on me that the reason you file the HE pipes that interface to the copper gaskets is NOT to level them as much as to square the pipe to the face of the gaskets.........so German. Soo, I put a good face on the pipe and used these nuts from BelMetric. They went on super smooth and when I cranked they were very smooth no squeaks, etc. 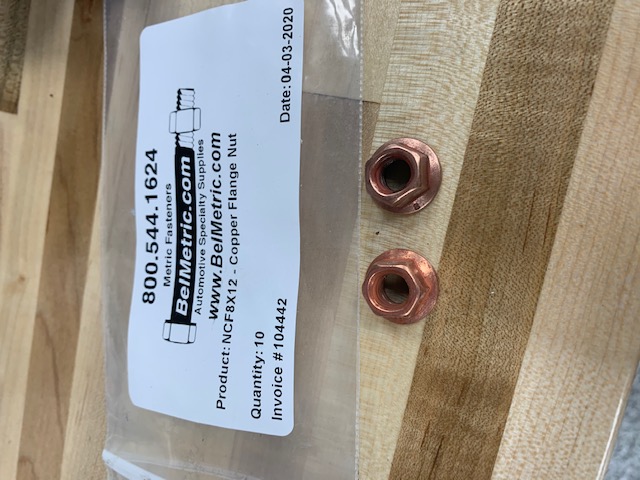 As you can see this is what they look like installed and I was able to examine and see copper on all sides of the pipe PRIOR to synching them 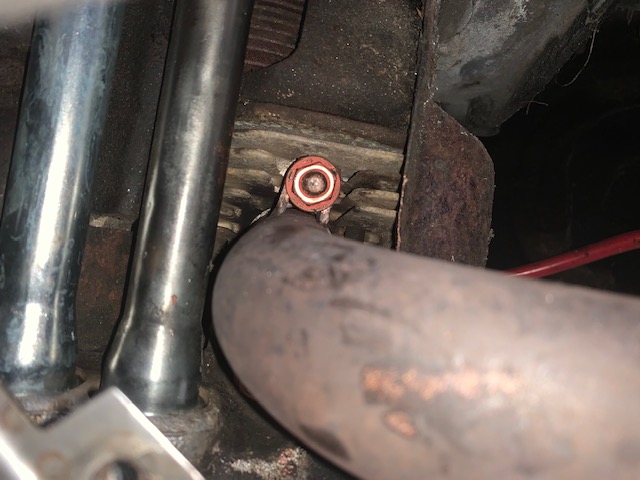 Starting it tomorrow, will advise. |
|
|
|
| 914_teener |
Apr 8 2020, 10:36 PM
Post
#18
|
|
914 Guru Group: Members Posts: 5,197 Joined: 31-August 08 From: So. Cal Member No.: 9,489 Region Association: Southern California |
QUOTE(IronHillRestorations @ Apr 7 2020, 06:41 PM) QUOTE(ctc911ctc @ Apr 7 2020, 04:02 PM) Prior to blowing me out of the water, might a layer of this on both the copper ring AND the pipe interface assist with the bonding at the interface? That's a negative, that will give you leaks for sure. Yes...it will.....I.ve used it several times.Did a whole long thread on it and have had two glasses of wine so....search my name and look dor it. |
|
|
|
| 914_teener |
Apr 8 2020, 10:38 PM
Post
#19
|
|
914 Guru Group: Members Posts: 5,197 Joined: 31-August 08 From: So. Cal Member No.: 9,489 Region Association: Southern California |
QUOTE(BeatNavy @ Apr 7 2020, 03:11 PM) QUOTE(ctc911ctc @ Apr 7 2020, 05:48 PM) Certainly, someone has come up with a sure-fire 100% good-guy guaranteed method for tightening and securing this assembly? Anyone? Anyone? No, but there are some things that help. Filing the HE's so they are the same height can help. IMO, most important to seal at the head, then get the muffler to tight to the HE's. Torque the HE's slowly to exhaust studs and leave the muffler somewhat loose at first. Try to verify that you can see gasket on each side of the HE as you tighten to head. Once you think you have it, lightly torque the muffler to the HE. Then check the seal by using a shop vac set to blow, instead of suck, and put it on the exhaust outlet. Feel around the bottom of the head to see which, if any, of the mating surfaces may not be seated, and adjust everything as needed. Remember not to overtighten! Drive around a couple of times, then check the torque on everything again. Others will have other, probably better, ideas. No...no better ideas. How the heck are you Rob....waiting for this thong to blow over? |
|
|
|
| porschetub |
Apr 8 2020, 10:45 PM
Post
#20
|
|
Advanced Member Group: Members Posts: 4,698 Joined: 25-July 15 From: New Zealand Member No.: 18,995 Region Association: None |
Last build I had leaks,filed the flats of the flanges and they were really off,refitted that side with 10ft/lbs and leaks gone,other side was fine.
I never overtighten the nuts for the reason that this can pull out the studs from the heads,strip or snap them off. I have never annealed the copper sealing rings ,in this case there is poor alignment of the pipes into the heads and overtightening has caused the sealing rings to deform. The other issue is damage to the machined face of the exhaust port,I have seen some pretty rough ones,very hard to fix. |
|
|
|
|
1 User(s) are reading this topic (1 Guests and 0 Anonymous Users)
0 Members:

|
Lo-Fi Version | Time is now: 14th May 2024 - 09:24 PM |
Invision Power Board
v9.1.4 © 2024 IPS, Inc.