|
|
|
Porsche, and the Porsche crest are registered trademarks of Dr. Ing. h.c. F. Porsche AG.
This site is not affiliated with Porsche in any way. Its only purpose is to provide an online forum for car enthusiasts. All other trademarks are property of their respective owners. |
|
|

  |

| pt_700 |
 Sep 26 2020, 03:18 PM Sep 26 2020, 03:18 PM
Post
#1
|
|
Senior Member  Group: Members Posts: 1,108 Joined: 4-March 10 From: san jose, ca Member No.: 11,430 Region Association: Northern California |
given the caliber of 914 stewardship here, i kind of already know...
i'm in the midst of installing a "new to me" 1.7. not intended to be the "end all, be all" powertrain, this is more of a "tide me over" until i do my long intended small block conversion. as expected, i'm doing a lot of "while i'm in there..." work. after taking a wire wheel to my battery tray and hell hole, there's more of "less" in the former, while the later is still solid. battery tray support is also still solid. tray itself feels solid, i've been using it as a step to get in and out of the engine bay to do things like body to motor mount bar brackest, upgrade firewall shifter bushing, fuel lines (while i'm in there stuff) etc... is replacing the battery tray an "i can't believe you haven't done this already?!", or can i put it off a few more years (until the engine upgrade) with rust treatment? the car will almost never see rain, will be driven very occasionally and lives in a garage. anybody have a battery go "walkabout" while driving due to such a tray? if i'm convinced i should replaced the battery tray now, what's a ballpark figure for that welding job? i have a few friends that weld but, it's a bit more of a favor than i'm comfortable asking, unless my favor balance was well into the black... these particular friends have already helped me way more than i've been able to help them, my conscience dictates monetary payment. 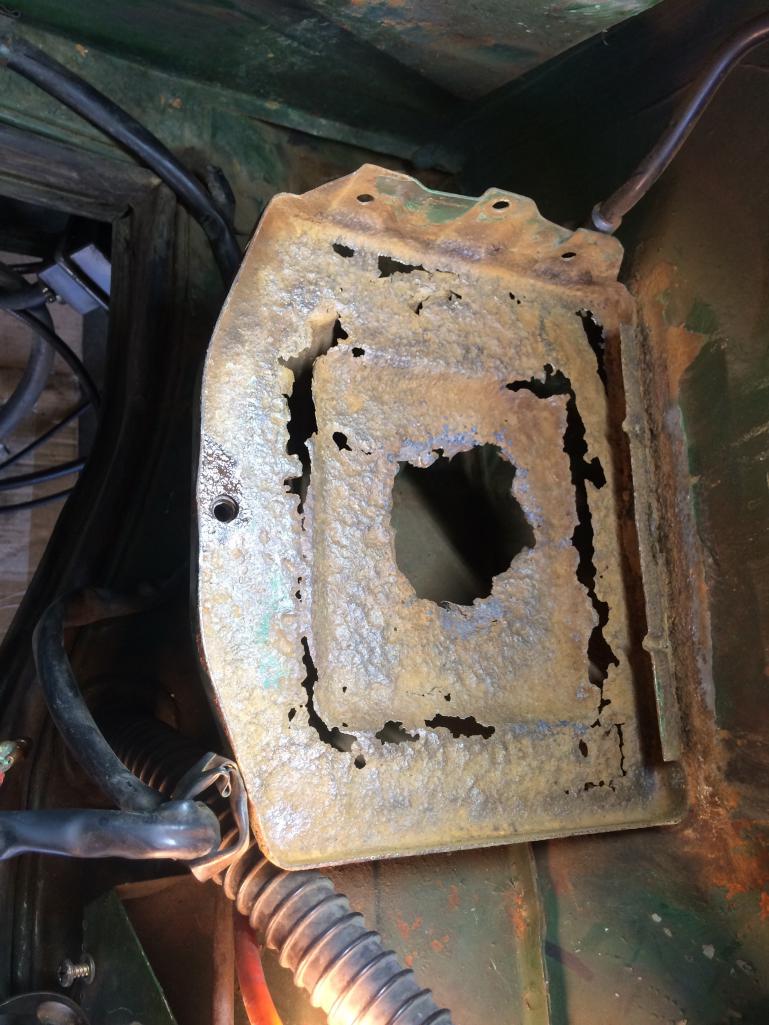 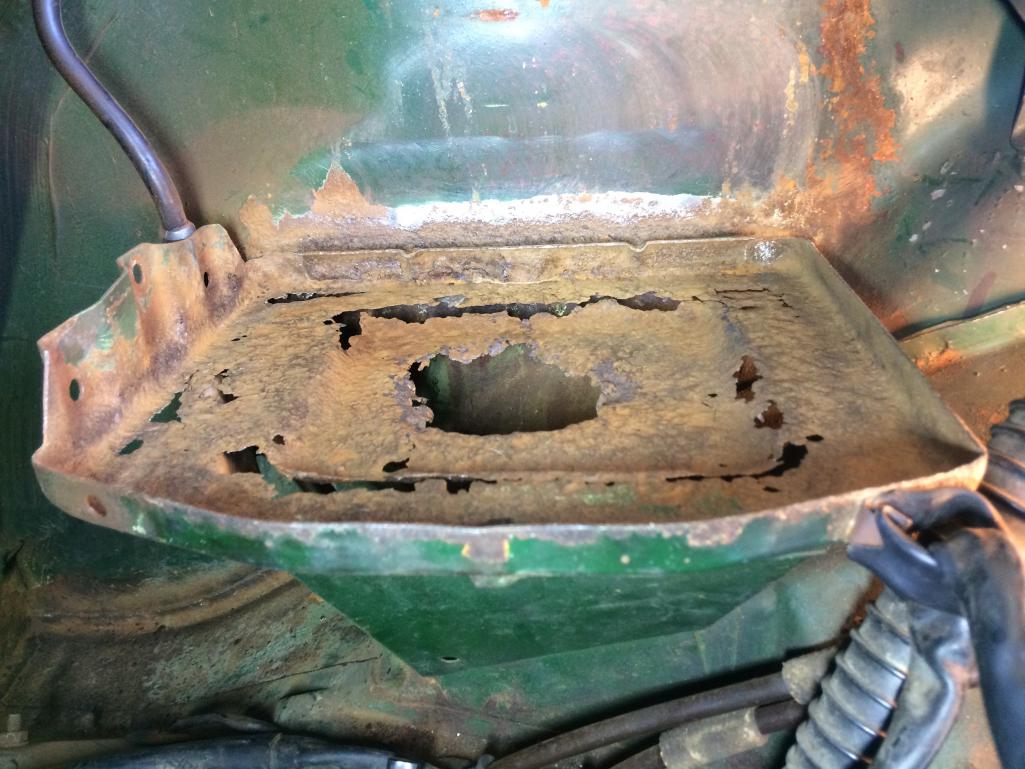 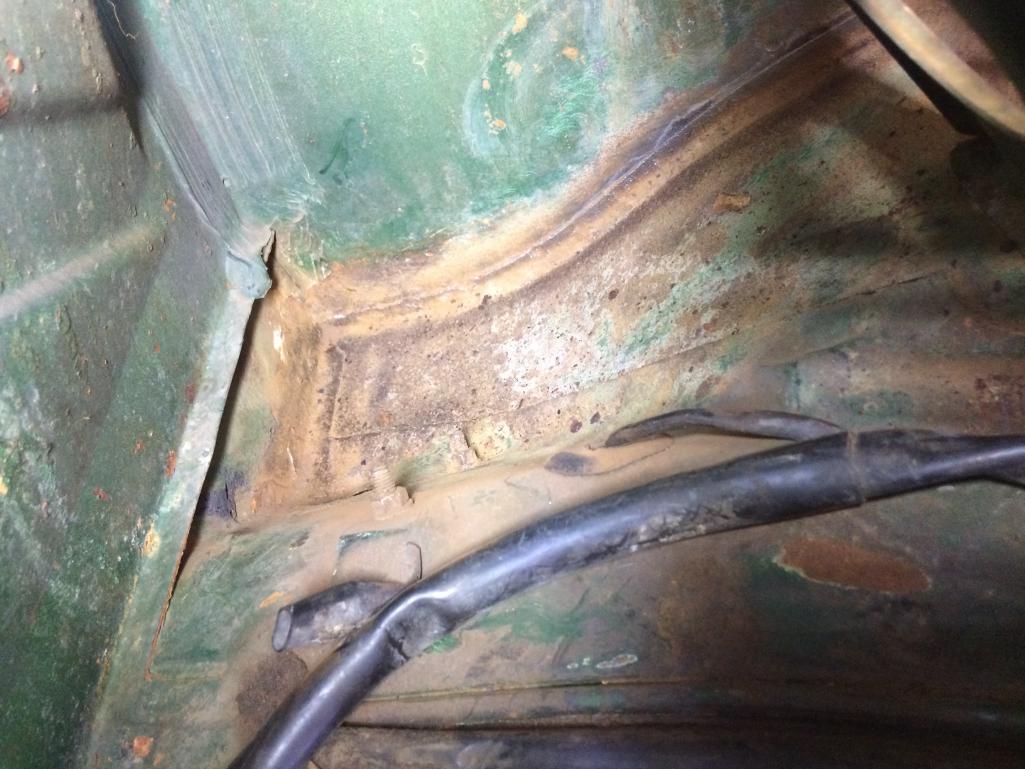 |
   |

 
|
| 914Sixer |
Sep 26 2020, 05:56 PM
Post
#2
|
|
914 Guru Group: Members Posts: 9,190 Joined: 17-January 05 From: San Angelo Texas Member No.: 3,457 Region Association: Southwest Region |
Really nice, simple battery tray replacement. (IMG:style_emoticons/default/beerchug.gif)
|
|
|
|
| BillC |
Sep 26 2020, 07:22 PM
Post
#3
|
|
Senior Member Group: Members Posts: 675 Joined: 24-April 15 From: Silver Spring, MD Member No.: 18,667 Region Association: MidAtlantic Region |
I would replace the battery tray, especially while the engine is out.
If you remove rest of the old tray and pre-fit the new one -- including drilling holes for plug welds -- your friend should be able to weld in the new tray in less than half an hour. |
|
|
|
| Coondog |
Sep 26 2020, 07:27 PM
Post
#4
|
|
Advanced Member Group: Members Posts: 2,089 Joined: 24-September 15 From: Apple Valley Calif Member No.: 19,195 Region Association: Southern California |
Consider yourself lucky....... (IMG:style_emoticons/default/first.gif)
|
|
|
|
| bkrantz |
Sep 26 2020, 08:32 PM
Post
#5
|
|
914 Guru Group: Members Posts: 8,436 Joined: 3-August 19 From: SW Colorado Member No.: 23,343 Region Association: Rocky Mountains |
One other option: surgically remove the old tray, leaving the inner fender wall and the support intact. Then install a new tray bolted to the fender wall and support. Others have done this before so that the tray is removable.
|
|
|
|
| cary |
Sep 26 2020, 10:28 PM
Post
#6
|
|
Advanced Member Group: Members Posts: 3,900 Joined: 26-January 04 From: Sherwood Oregon Member No.: 1,608 Region Association: Pacific Northwest |
Be careful removing / detaching tray from the wall. You have some degradation, but it looks like its still solid enough to weld too. But be careful.
|
|
|
|
| Superhawk996 |
Sep 27 2020, 08:42 AM
Post
#7
|
|
914 Guru Group: Members Posts: 7,219 Joined: 25-August 18 From: Woods of N. Idaho Member No.: 22,428 Region Association: Galt's Gulch |
Not sure if it is just shadowing but I think I see two small black pinholes on the firewall (left side in the hell hole pocket).
 Check carefully. When pinholes start here, they allow water to enter the cabin. That in turn leads to floorpan rust inside the cabin. If there are pinholes, I wouln't get into deep metal work at this point. Clean, neutralize with Ospho or similar, cover with seam sealer, paint to match. |
|
|
|
| pt_700 |
Sep 27 2020, 11:25 AM
Post
#8
|
|
Senior Member Group: Members Posts: 1,108 Joined: 4-March 10 From: san jose, ca Member No.: 11,430 Region Association: Northern California |
thankfully superhawk, those are just shadows, it's all still solid.
thanks all for convincing me to do right by my 914. i'll order a tray and have reached out to an old friend who has a welding business to see if he is (or knows somebody) who could use a little job. QUOTE(Superhawk996 @ Sep 27 2020, 07:42 AM)  Not sure if it is just shadowing but I think I see two small black pinholes on the firewall (left side in the hell hole pocket). Check carefully. When pinholes start here, they allow water to enter the cabin. That in turn leads to floorpan rust inside the cabin. If there are pinholes, I wouln't get into deep metal work at this point. Clean, neutralize with Ospho or similar, cover with seam sealer, paint to match. |
|
|
|
| Tdskip |
Sep 27 2020, 11:28 AM
Post
#9
|
|
Advanced Member Group: Members Posts: 3,737 Joined: 1-December 17 From: soCal Member No.: 21,666 Region Association: None |
Are you sure those are shadows? Think @superhawk996 found an issue.
|
|
|
|
| rjames |
Sep 27 2020, 11:39 AM
Post
#10
|
|
I'm made of metal Group: Members Posts: 4,313 Joined: 24-July 05 From: Shoreline, WA Member No.: 4,467 Region Association: Pacific Northwest |
Like others have said, just remove the battery tray. It doesn't look like you'll need to remove the support, just the tray. But...
(IMG:style_emoticons/default/agree.gif) with Superhawk. Those aren't shadows. Have you looked at the entire firewall behind the passenger seat and the longs on this car yet? |
 |
|
| ndfrigi |
Sep 27 2020, 01:04 PM
Post
#11
|
|
Advanced Member Group: Members Posts: 2,967 Joined: 21-August 11 From: Orange County Member No.: 13,474 Region Association: Southern California |
QUOTE(pt_700 @ Sep 27 2020, 10:25 AM) thankfully superhawk, those are just shadows, it's all still solid. thanks all for convincing me to do right by my 914. i'll order a tray and have reached out to an old friend who has a welding business to see if he is (or knows somebody) who could use a little job. QUOTE(Superhawk996 @ Sep 27 2020, 07:42 AM) Not sure if it is just shadowing but I think I see two small black pinholes on the firewall (left side in the hell hole pocket). Check carefully. When pinholes start here, they allow water to enter the cabin. That in turn leads to floorpan rust inside the cabin. If there are pinholes, I wouln't get into deep metal work at this point. Clean, neutralize with Ospho or similar, cover with seam sealer, paint to match. For battery tray, I think Jeffery ( @914_7T3 ) has one for sale. |
|
|
|
| VaccaRabite |
Sep 27 2020, 06:35 PM
Post
#12
|
|
En Garde! Group: Admin Posts: 13,757 Joined: 15-December 03 From: Dallastown, PA Member No.: 1,435 Region Association: MidAtlantic Region |
Just get the part from Restoration Design.
The parts are EXCELLENT. I have one of them in my own car. Zach |
|
|
|
| pt_700 |
Sep 27 2020, 10:37 PM
Post
#13
|
|
Senior Member Group: Members Posts: 1,108 Joined: 4-March 10 From: san jose, ca Member No.: 11,430 Region Association: Northern California |
tray's been ordered from restoration designs.
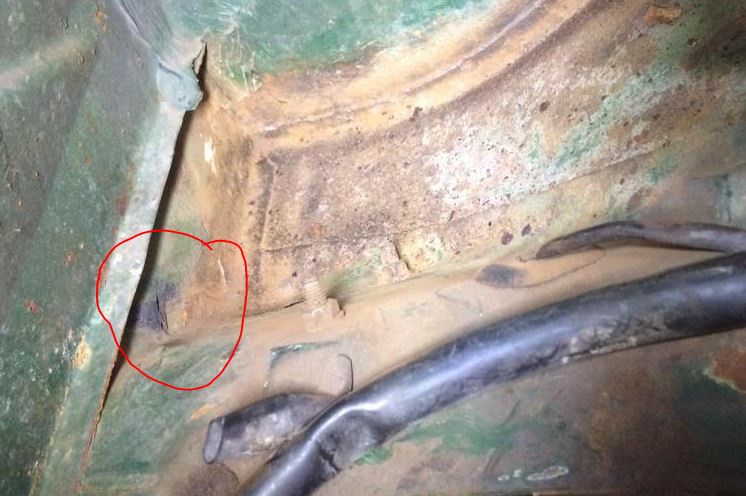
i appreciate the concern about the possible pin holes. here's a better pic (sorry for the orientation). seems i missed a bit of seam sealer when having at it with my wire wheel... after i cleaned up, i realized my right angle cordless drill might have allowed me a bit more access... at some point, i'll get to the interior and have a closer look at the firewall and floorpans. please understand, i'm a blue collar schmuck and have a limited budget and even more limited time to enjoy my 914 (not to mention several other old machines in the stable, all needing my attention...). i'm often in awe of the caliber of work many of you are able to put into you cars. my car's destined to be a "driver" while in my stewardship. i endeavor to leave someone else a good foundation when i can no longer enjoy her! (IMG:style_emoticons/default/beerchug.gif) 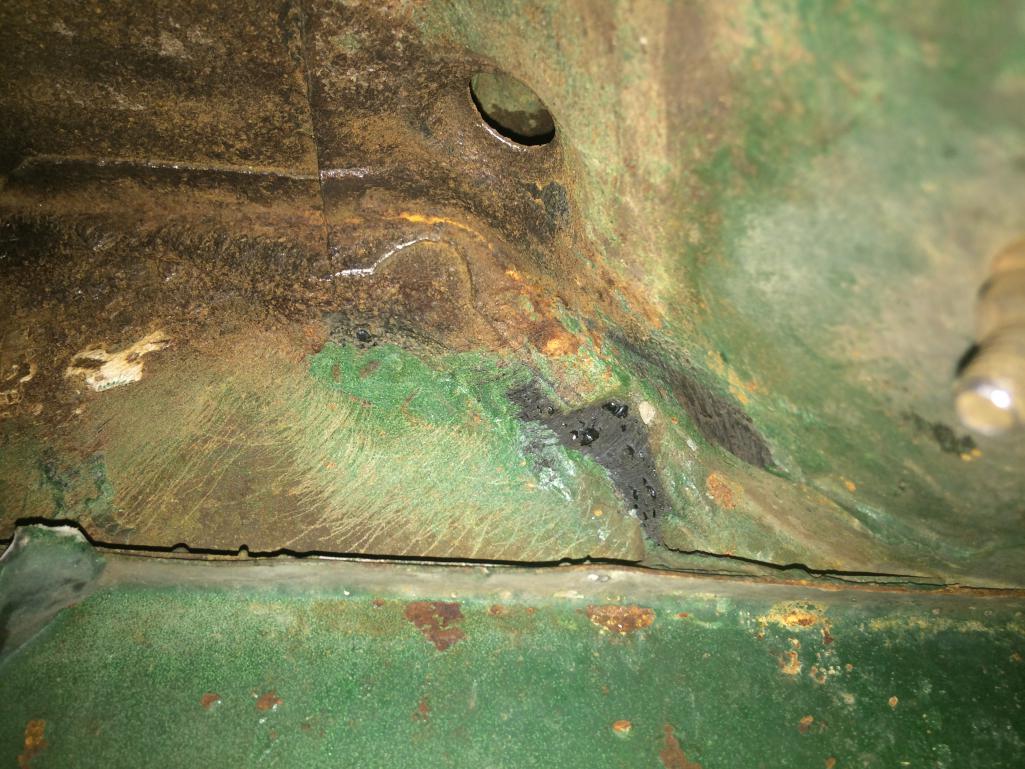 |
|
|
|
| ctc911ctc |
Sep 29 2020, 03:25 PM
Post
#14
|
|
Senior Member Group: Members Posts: 1,163 Joined: 9-June 18 From: boston Member No.: 22,206 Region Association: North East States |
You have no idea how lucky you are!
|
|
|
|
| Frankvw |
Sep 30 2020, 12:51 AM
Post
#15
|
|
working on my first 914 ! Group: Members Posts: 653 Joined: 13-April 16 From: Holland, the Netherlands Member No.: 19,896 Region Association: Europe |
in case you are going for the 'top-tray-only' replacement, I hope you shoot some pics to show us. Good you have people around you that that can help with the welding !
Good luck with the work . |
|
|
|
| Tdskip |
Sep 30 2020, 07:03 AM
Post
#16
|
|
Advanced Member Group: Members Posts: 3,737 Joined: 1-December 17 From: soCal Member No.: 21,666 Region Association: None |
QUOTE(pt_700 @ Sep 27 2020, 11:37 PM) tray's been ordered from restoration designs. i appreciate the concern about the possible pin holes. here's a better pic (sorry for the orientation). seems i missed a bit of seam sealer when having at it with my wire wheel... after i cleaned up, i realized my right angle cordless drill might have allowed me a bit more access... at some point, i'll get to the interior and have a closer look at the firewall and floorpans. please understand, i'm a blue collar schmuck and have a limited budget and even more limited time to enjoy my 914 (not to mention several other old machines in the stable, all needing my attention...). i'm often in awe of the caliber of work many of you are able to put into you cars. my car's destined to be a "driver" while in my stewardship. i endeavor to leave someone else a good foundation when i can no longer enjoy her! (IMG:style_emoticons/default/beerchug.gif) No need to apologize for being a real human, and it is your car to do with as best you can / as you see fit. Wire brushing everything and repeated soaking with phosphoric acid won’t cost more than $20 and will help preserve that area. |
|
|
|
| malcolm2 |
Sep 30 2020, 07:13 AM
Post
#17
|
|
Advanced Member Group: Members Posts: 2,747 Joined: 31-May 11 From: Nashville Member No.: 13,139 Region Association: South East States |
My 2 cents on the rust.... Some people like the stuff, so people hate it. I have precisely followed the directions for POR15 with their Cleaner, their Metal Ready and the Paint. No issues. That stuff turns to a super hard coating. I used it on this exact same spot. Patched a VW gas tank with it and some fiberglass mat.
Looking at your pictures, I think POR was made for this exact problem. Good Luck. |
|
|
|
| Superhawk996 |
Sep 30 2020, 08:34 AM
Post
#18
|
|
914 Guru Group: Members Posts: 7,219 Joined: 25-August 18 From: Woods of N. Idaho Member No.: 22,428 Region Association: Galt's Gulch |
I'd love for that hell hole to have been my starting point.
Great job confirming the shadows. You've got a great starting point that won't be too hard to fix up. |
|
|
|
| rjames |
Sep 30 2020, 10:15 AM
Post
#19
|
|
I'm made of metal Group: Members Posts: 4,313 Joined: 24-July 05 From: Shoreline, WA Member No.: 4,467 Region Association: Pacific Northwest |
QUOTE(malcolm2 @ Sep 30 2020, 06:13 AM) My 2 cents on the rust.... Some people like the stuff, so people hate it. I have precisely followed the directions for POR15 with their Cleaner, their Metal Ready and the Paint. No issues. That stuff turns to a super hard coating. I used it on this exact same spot. Patched a VW gas tank with it and some fiberglass mat. Looking at your pictures, I think POR was made for this exact problem. Good Luck. If used properly it works very well. Too many people just apply POR15 without any prep and then complain that the product doesn't work. |
|
|
|
| mlindner |
Sep 30 2020, 10:18 AM
Post
#20
|
|
Senior Member Group: Members Posts: 1,688 Joined: 11-November 11 From: Merrimac, WI Member No.: 13,770 Region Association: Upper MidWest |
Last replace with a gel battery/ non-acid.
|
|
|
|
|
1 User(s) are reading this topic (1 Guests and 0 Anonymous Users)
0 Members:

|
Lo-Fi Version | Time is now: 11th July 2025 - 10:58 AM |
Invision Power Board
v9.1.4 © 2025 IPS, Inc.