|
|
|
Porsche, and the Porsche crest are registered trademarks of Dr. Ing. h.c. F. Porsche AG.
This site is not affiliated with Porsche in any way. Its only purpose is to provide an online forum for car enthusiasts. All other trademarks are property of their respective owners. |
|
|

  |

| strawman |
 Apr 18 2008, 12:19 AM Apr 18 2008, 12:19 AM
Post
#1
|
|
Senior Member  Group: Members Posts: 891 Joined: 25-January 08 From: Los Osos, CA Member No.: 8,624 Region Association: Central California |
Hi All --
This is my second post, but I've been lurking on this fine website for a while now. I've wanted a 914 since I was in high school, but always seemed to stumble upon other projects... until recently. My neighbor gave me this 1973 Porsche 914 about a month ago. He told me he blew a head gasket and parked it in his parents' driveway in 1992. When his parents finally told him to move it or they were calling a local junkyard, he offered it to me since he knows I'm a gearhead. In for a penny, in for a pound... I hauled it home, knowing that it has some rust issues in the battery area and rear trunk. But it appears to have never been in a wreck and it is complete. It turns out that an exhaust stud pulled, so he coulda fixed it for a couple hundred and probably kept another 914 from languishing but I guess all things happen for a reason (namely, so I would undertake this project!). I sold the engine to a local Craigslister for use in his Meyers Manx dune buggy, and bought a wrecked but running 1993 Subaru Legacy turbo wagon. This is the closed-deck 2.2 liter engine, and 250 hp is easy with boost control and an open exhaust. I've already done a Subaru into a VW Vanagon and my daily driver is a 1992 Suby Legacy, so this won't be too much of a stretch for me. I plan to use the Suby 5-speed transmission (out of a 1998 Suby Forester) with the Aussie-sourced RWD elimination coupler and custom-mated 914/Suby axles. I've got a suburban home with a crowded two-car garage (my 125 shifter kart and my daughter's FJA kart will likely get lonely!), a MIG welder, and a wide assortment of air/power/hand tools -- so the adventure begins! This project will likely take a year to finish, so please be patient. I've attached some pics of the car as found in the driveway, some rust areas and the rear trunk repairs I've started. I'll chronicle the build as I go, so feel free to chime in! Geoff Attached image(s) 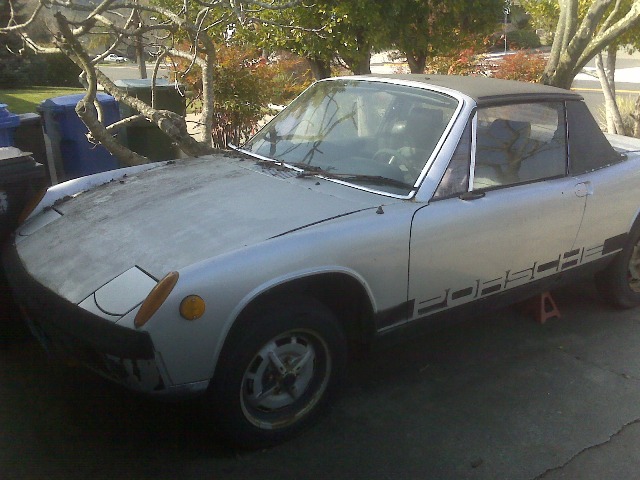 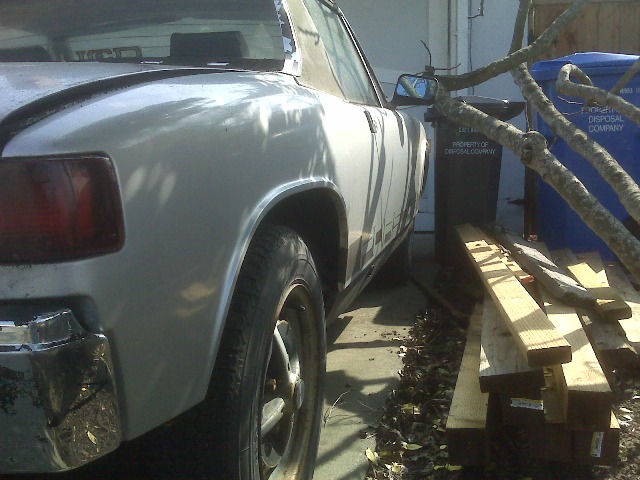 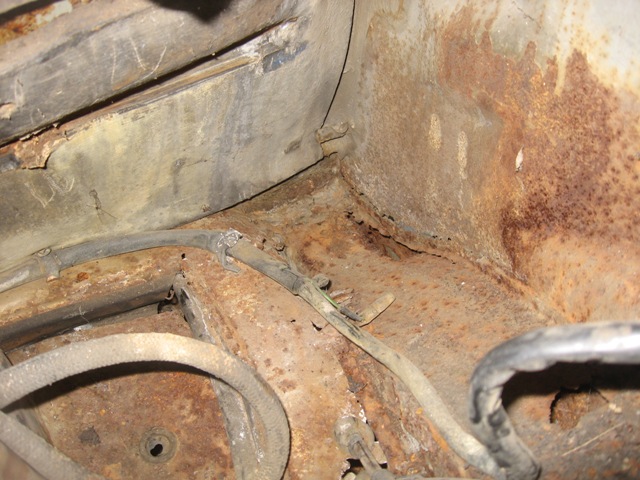
|
   |

 
|
| strawman |
Apr 18 2008, 12:25 AM
Post
#2
|
|
Senior Member Group: Members Posts: 891 Joined: 25-January 08 From: Los Osos, CA Member No.: 8,624 Region Association: Central California |
More pics of the rust in/around the battery tray and passenger side long...
Notice the dirt packed around the jacking point. Yuck! Attached image(s) 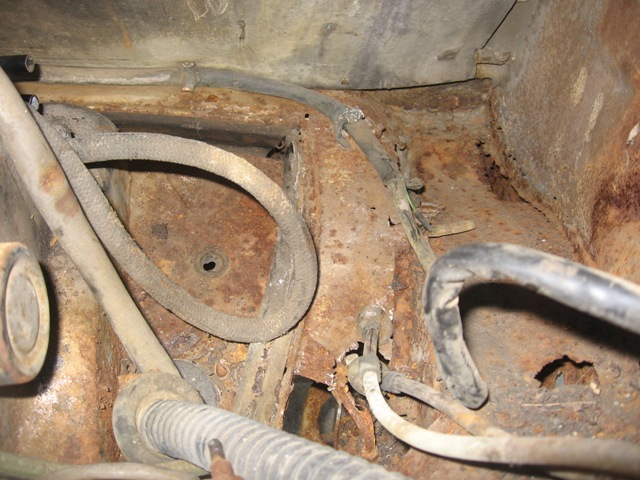 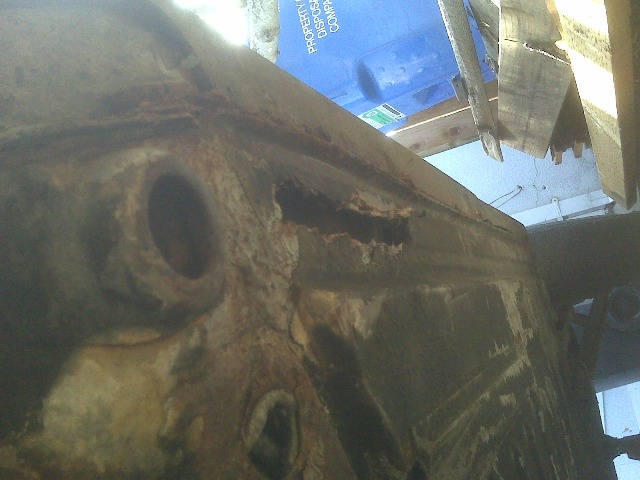 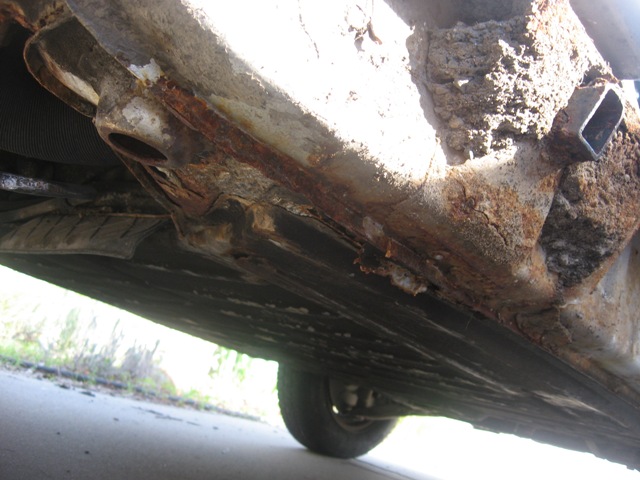
|
|
|
|
| strawman |
Apr 18 2008, 12:30 AM
Post
#3
|
|
Senior Member Group: Members Posts: 891 Joined: 25-January 08 From: Los Osos, CA Member No.: 8,624 Region Association: Central California |
Here are some pics of the front and rear trunks...
Note the standing water. More yuck! Actually, when I opened the passenger side headlight bucket, I found that foul-smell that kept wafting up from the front of the car. I found a swamp caused by a plugged drain hole (sorry no pic). NAAAAASSSSTY! Attached image(s) 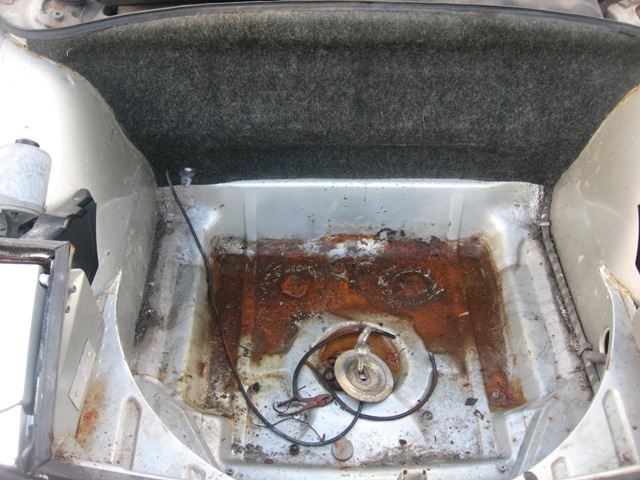 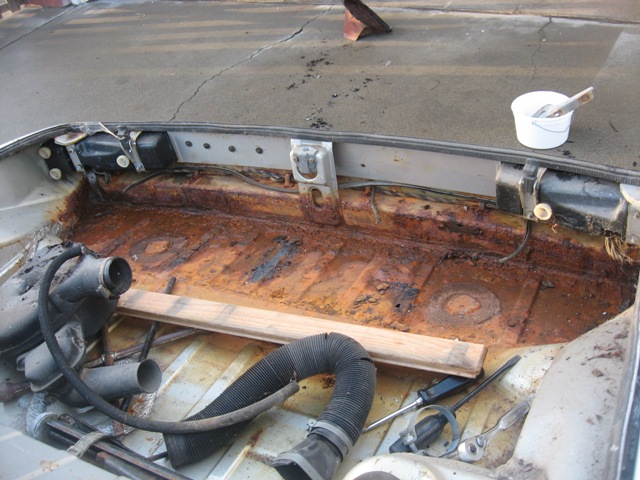
|
|
|
|
| strawman |
Apr 18 2008, 12:33 AM
Post
#4
|
|
Senior Member Group: Members Posts: 891 Joined: 25-January 08 From: Los Osos, CA Member No.: 8,624 Region Association: Central California |
Here are some pics of windshield/cowl area that'll need some attention.
The floors look strong (more pics to follow, once I scrape out the tar), and there is some rust bubbling under the sail vinyl and the rear trunk lid... Attached image(s)  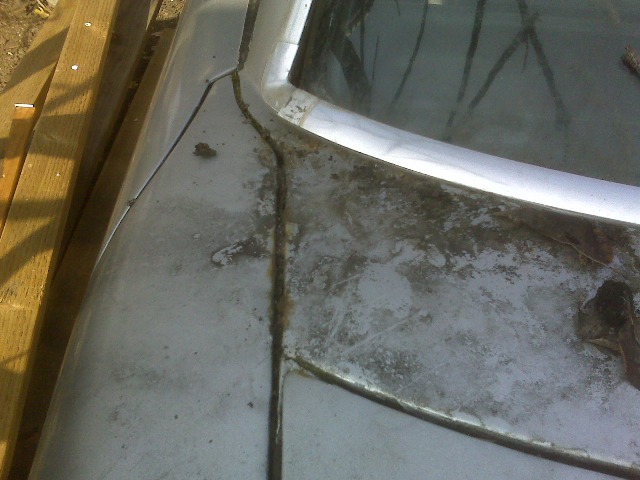
|
|
|
|
| strawman |
Apr 18 2008, 12:41 AM
Post
#5
|
|
Senior Member Group: Members Posts: 891 Joined: 25-January 08 From: Los Osos, CA Member No.: 8,624 Region Association: Central California |
Okay, here are some pics of the rear trunk area. I started out using a 3/8" tri-point drill, but ended up using Harbor Freight spot-weld bits. The first HF bit lasted about 30 spot welds, the second bit lasted two spot welds and the third about 20 so far. For $3.95 apiece, tho, it was a bargain. I had to grind out a few spot welds in the rear corners because the space was too tight for the drill & bit and I had to cut out the trunk pan in one large piece and two smaller corner pieces.
I've already purchased an Auto Atlanta rear trunk replacement panel, as well as a rear suspension console. I'm not so happy with the fit of AA trunk panel; it fits pretty poorly around the left/right "humps." Looks like I'll need to section in pieces of sheetmetal to make it fit (notice the 1/2" gap at the forward edge of the humps in the later pics). It also sits higher against the rear panel than stock, so I'll have to rosette weld in the 1/8" holes I drilled through the rear panel. Attached image(s) 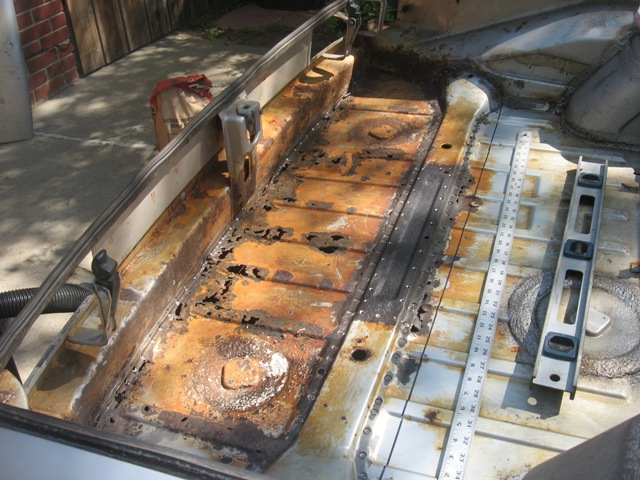 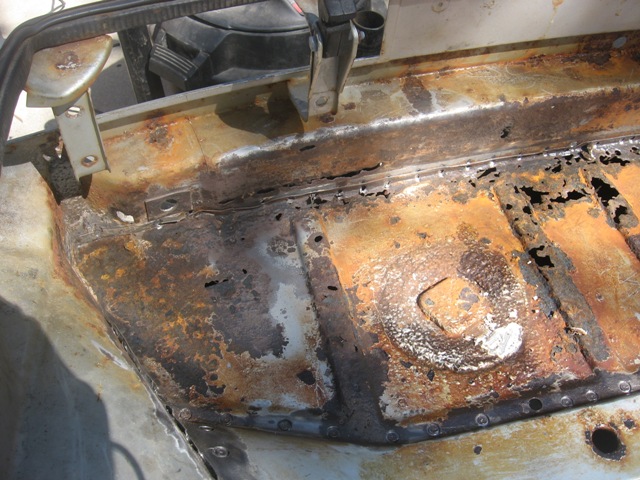
|
|
|
|
| strawman |
Apr 18 2008, 12:45 AM
Post
#6
|
|
Senior Member Group: Members Posts: 891 Joined: 25-January 08 From: Los Osos, CA Member No.: 8,624 Region Association: Central California |
More trunk pics...
Attached image(s) 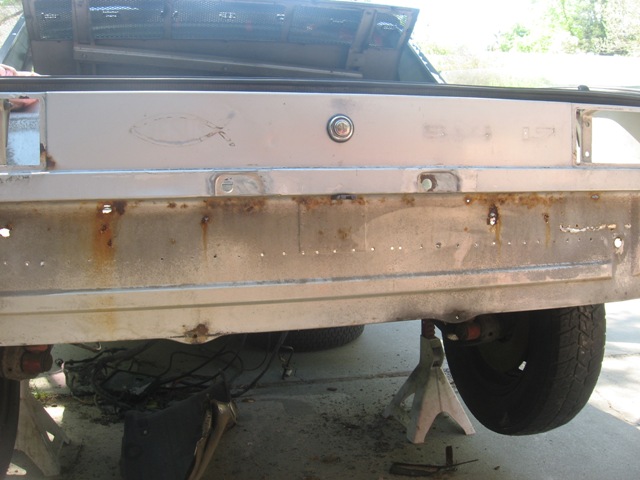 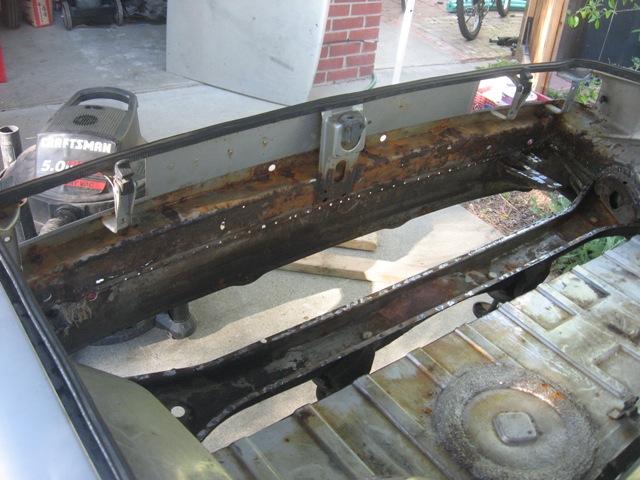 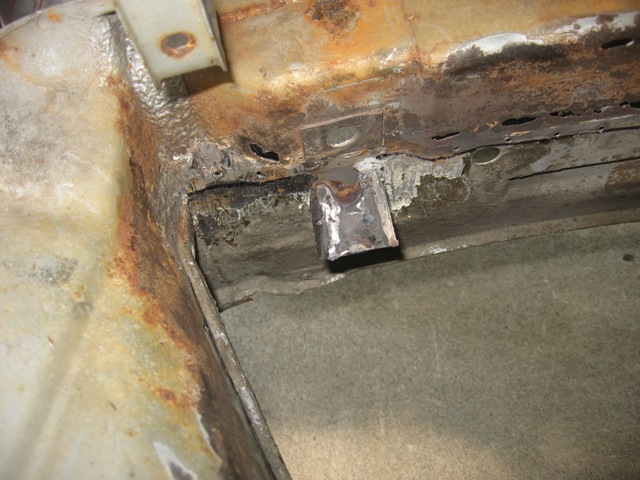
|
|
|
|
| strawman |
Apr 18 2008, 12:46 AM
Post
#7
|
|
Senior Member Group: Members Posts: 891 Joined: 25-January 08 From: Los Osos, CA Member No.: 8,624 Region Association: Central California |
More...
Attached image(s) 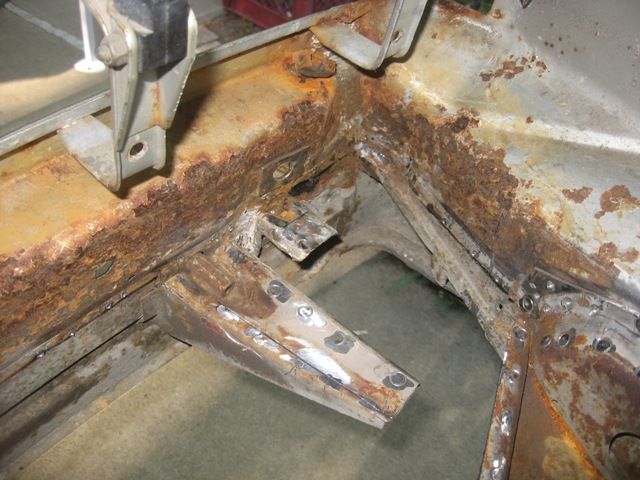  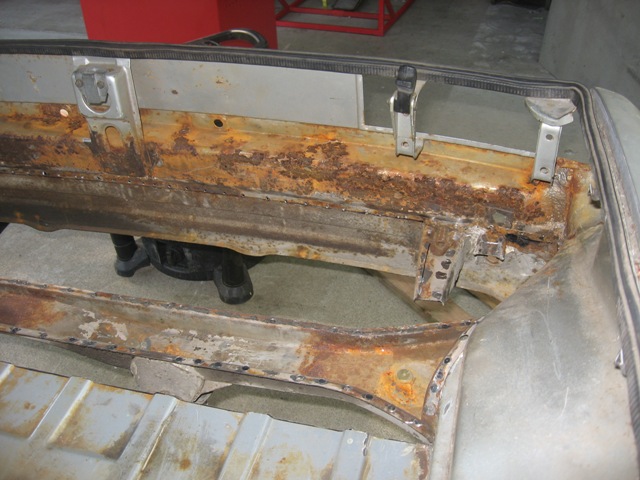
|
|
|
|
| strawman |
Apr 18 2008, 12:49 AM
Post
#8
|
|
Senior Member Group: Members Posts: 891 Joined: 25-January 08 From: Los Osos, CA Member No.: 8,624 Region Association: Central California |
And some more, with the AA trunk pan mocked up...
Attached image(s) 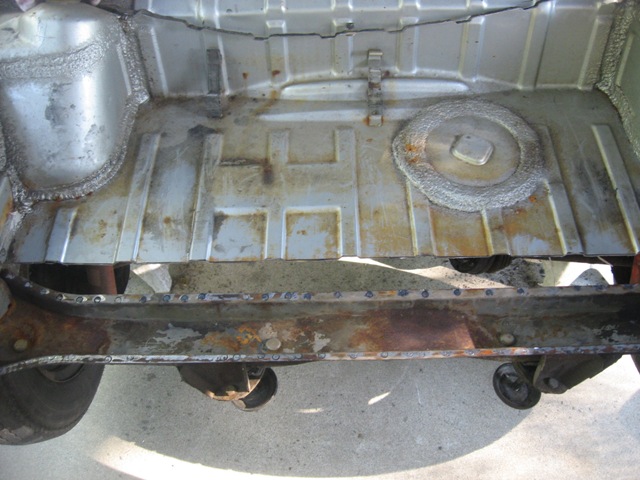 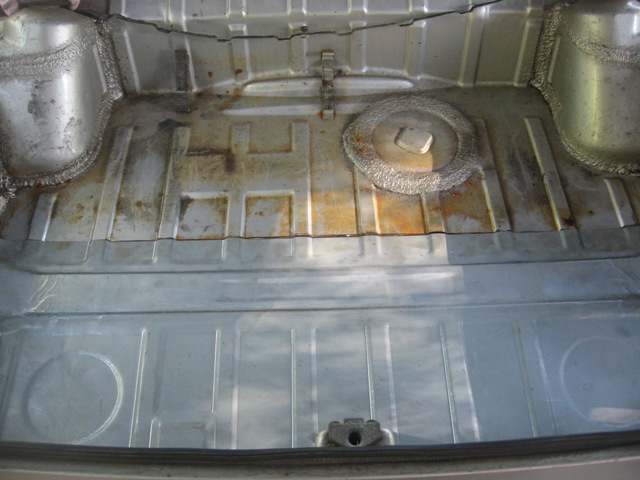 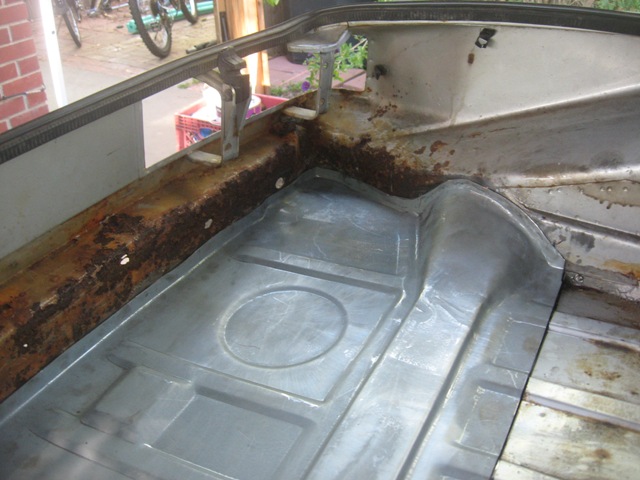
|
|
|
|
| strawman |
Apr 18 2008, 12:50 AM
Post
#9
|
|
Senior Member Group: Members Posts: 891 Joined: 25-January 08 From: Los Osos, CA Member No.: 8,624 Region Association: Central California |
Finally, here are some pics of the gaps near the forward portion of the humps...
Attached image(s) 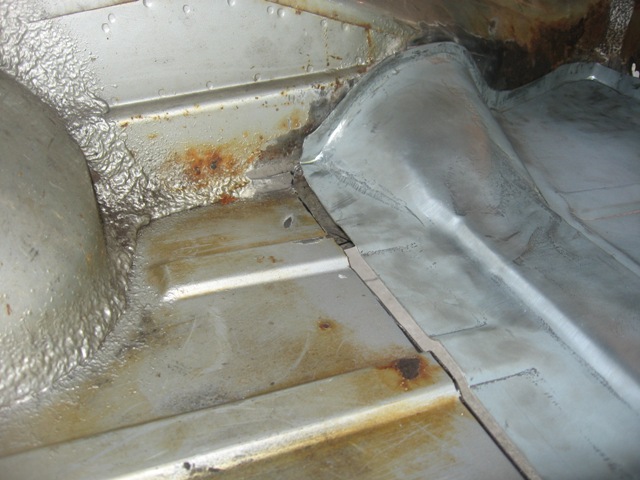 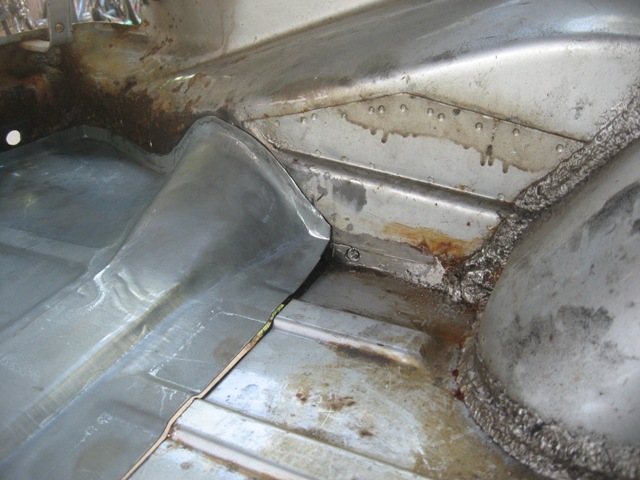
|
|
|
|
| strawman |
Apr 18 2008, 12:56 AM
Post
#10
|
|
Senior Member Group: Members Posts: 891 Joined: 25-January 08 From: Los Osos, CA Member No.: 8,624 Region Association: Central California |
I've ordered some POR-15 supplies and some Wurth Weld-Thru primer, but in the meantime I'll need to do some rust repair on the rear panel and try to massage the AA trunk pan into place. Once the rear trunk is shored up, I'll remove the suspension and get it up on a rotisserie to begin the frame repairs.
Anyone in the NorCal area have a rotisserie they want to give/sell/loan to me? I found some plans on this site that I'll build if that avenue doesn't work... Finally a pic of me that my wife finds especially amusing. I always wanted to be an engine! Stay tuned. Attached image(s) 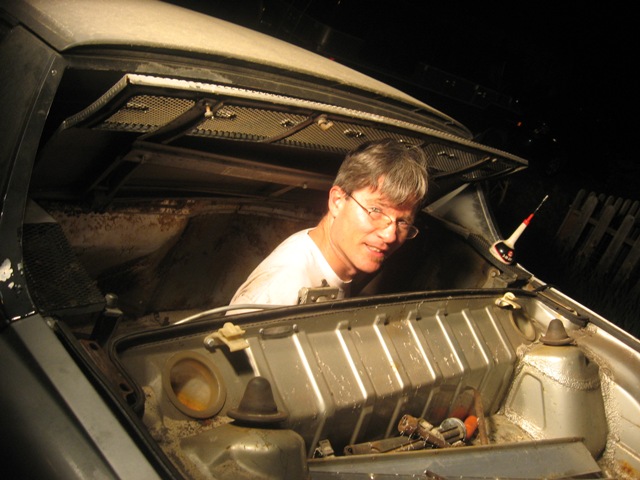
|
|
|
|
| charliew |
Apr 18 2008, 10:16 AM
Post
#11
|
|
Advanced Member Group: Members Posts: 2,363 Joined: 31-July 07 From: Crawford, TX. Member No.: 7,958 |
Hi Strawman, Good work sofar, I hope you don't get discouraged on the rust challenges. I'm also accumulating all the subie stuff.
Mind explaining the 99 forester tranny choice? I have a 96tt tranny I have done the Bremar conv too and just got a helical lsd to put in it. I'm pretty sure I can make the spline adapter on the bremar conv. out of the old parts by welding them up. The plate is just that but their's is prettier. I kinda hate to tear up the center diff though. I was hoping the tt tranny would be stronger since it was one of the first higher hp versions. (260/280) I also have a 02 5k miles wrx tranny but it's a early version and supposedly has weaker gears that they updated in late 02. My 914 is pretty rust free. You might consider while you are fighting the longs putting the cooling tubes in them and it might also add strength to the tub. You might even consider some 3x3 thinwall tubing to replace the long and save the money on the replacement parts. I haven't got a good answer on the front of the long for the radiator tubes into the front trunk. I'll be watching, good luck. I've used lots of por 15 products. I wish you could sandblast all the places that you find rusty and use PPG DP epoxy primer. Paint sticks to the epoxy primer much better than the por 15. I have a jeep truck that I have used a lot of por 15 on and am going to need to redo some of it. It's about 5 yrs old now. None of the rubber undercoating has stayed on over the por 14. Charliew |
|
|
|
| Zaney |
Apr 18 2008, 11:00 AM
Post
#12
|
|
Deuchland en der Haus Group: Members Posts: 461 Joined: 1-March 04 From: Engine 11 Redmond, WA Member No.: 1,738 Region Association: Pacific Northwest |
Awesome start! I am going to dive into my Suby-rustoration after this summers WCC 08 meet here in the PNW. Hopefully by then some of the other fellow Scooby projects will have some products that I can purchase to complete the bolt in conversion.
Keep the pics coming! (IMG:style_emoticons/default/aktion035.gif) |
|
|
|
| strawman |
Apr 18 2008, 11:17 AM
Post
#13
|
|
Senior Member Group: Members Posts: 891 Joined: 25-January 08 From: Los Osos, CA Member No.: 8,624 Region Association: Central California |
QUOTE(charliew @ Apr 18 2008, 09:16 AM)  Mind explaining the 99 forester tranny choice? It is what came in my donor car. The PO replaced the stock wagon auto with a 5-speed transaxle & rear diff (4.11 gears, IIRC) out of a '98 Forester, which also uses a hydraulic clutch actuation system like the Legacy Turbo sedans. I'm considering picking up a FWD Suby trans, since it is cable-actuated and I would not have to buy the Bremar kit. But I can't find any info on NASIOC on the strength of that unit. Do you know? QUOTE(charliew @ Apr 18 2008, 09:16 AM) I've used lots of por 15 products. I wish you could sandblast all the places that you find rusty and use PPG DP epoxy primer. I've never personally used POR-15, but my old 4WD buddies swore by the stuff. But they generally used it on their frames to ward of the Utah salt. I have a HF pressurized sandblaster; I'll have to do some research on epoxy primers vs. POR-15 -- thanks for the tip. QUOTE(charliew @ Apr 18 2008, 09:16 AM) You might consider while you are fighting the longs putting the cooling tubes in them and it might also add strength to the tub. You might even consider some 3x3 thinwall tubing to replace the long and save the money on the replacement parts. I haven't got a good answer on the front of the long for the radiator tubes into the front trunk. I'll have to do some research on this, too. This is strictly a fun car, since I know I can't compete well against the big bucks SCCA SM2 autocross guys. So the 3x3 idea might have some merit. But how do you tie well into the rear longs with this setup? |
|
|
|
| strawman |
Jul 9 2008, 12:04 PM
Post
#14
|
|
Senior Member Group: Members Posts: 891 Joined: 25-January 08 From: Los Osos, CA Member No.: 8,624 Region Association: Central California |
Been a while since I last posted, but I've been making some progress. I built a rotisserie, purchased the Bremar 2wd conversion kit for the AWD Subaru transmission, removed doors/suspensions/trunks, and got further into the rear trunk/panel rust repairs.
The original rear panel was too far gone, so I picked up a rear clip (thanks Echocanyons!) to replace the rear portion of the trunk floor and the rear panel. The rear panel is "pinched" between two panels at the factory, so I was forced to cut (vertically) a portion of the rear quarter panel "wrap-arounds" to get the old panel out and to install the replacement one. Pictures below provide a better idea... 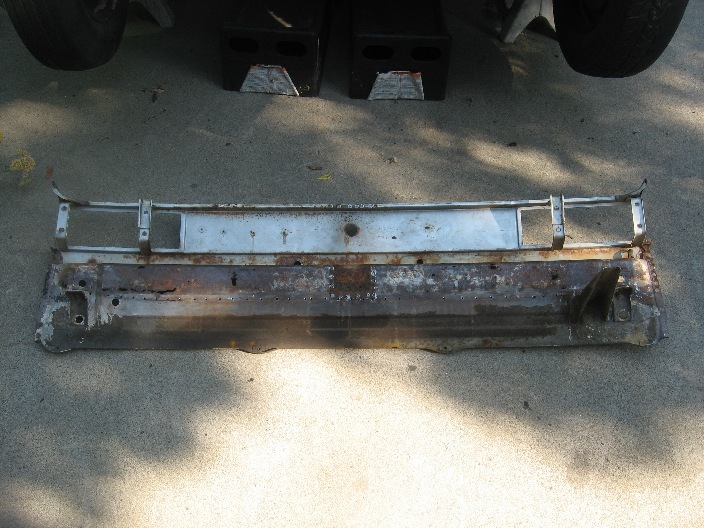 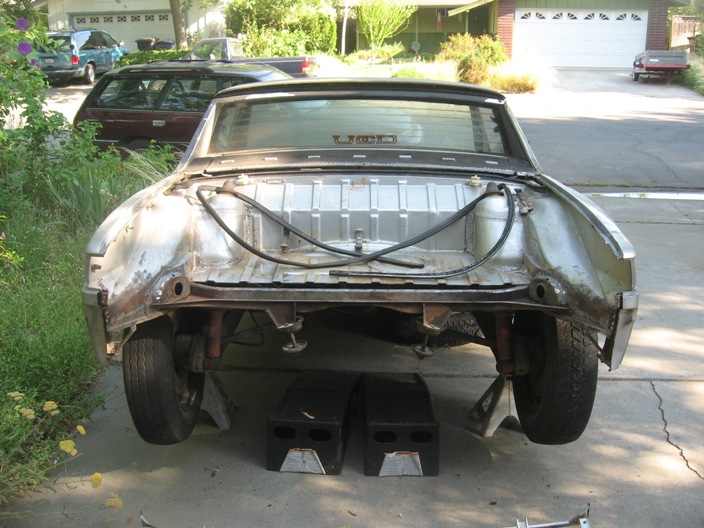 |
|
|
|
| strawman |
Jul 9 2008, 12:16 PM
Post
#15
|
|
Senior Member Group: Members Posts: 891 Joined: 25-January 08 From: Los Osos, CA Member No.: 8,624 Region Association: Central California |
Here is a pic of the rear trunk/panel, ready for installation.
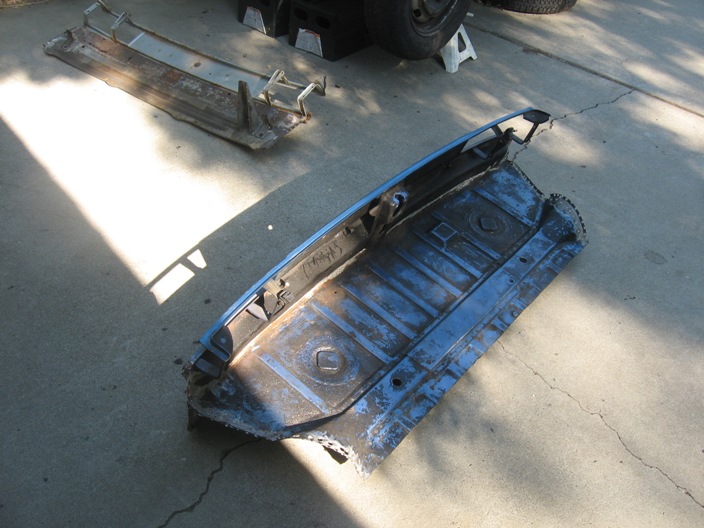 Voila, now it is tacked into place. I used Wurth Weld-Thru zinc primer on all joints (after using Marine Clean and Metal Prep to knock out the surface rust), but that made it very difficult to spark the welds. For subsequent welds, I think I'll clean off the Weld-Thru in those areas that will actually be welded. 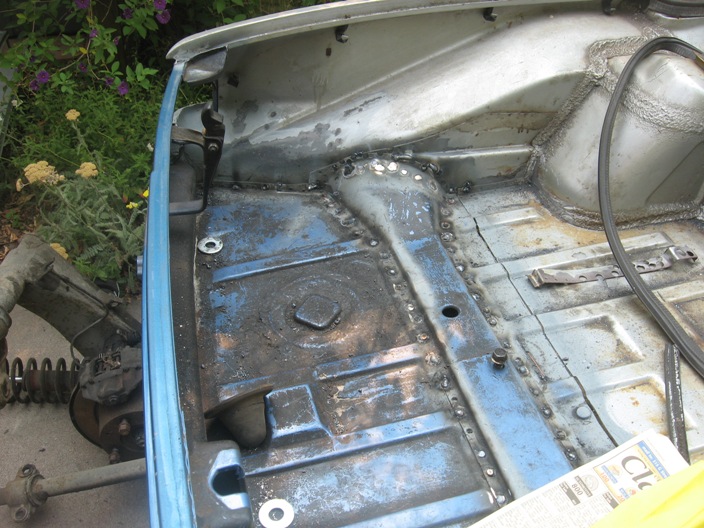 On the right of the lower picture, you can see one of the two the vertical pieces that I had to cut out of the quarter panel wrap-around in order to install the rear panel. It is "swiss-cheesed" from cutting the spot welds, but the compound bends suggest that I should repair it rather than trying to bend up a replacement piece. Most of it will be hidden behind the rear bumper anyway... |
|
|
|
| strawman |
Jul 9 2008, 12:19 PM
Post
#16
|
|
Senior Member Group: Members Posts: 891 Joined: 25-January 08 From: Los Osos, CA Member No.: 8,624 Region Association: Central California |
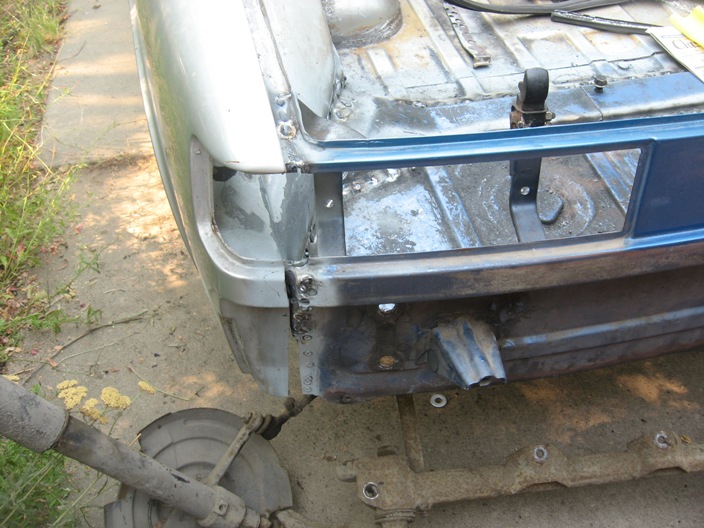
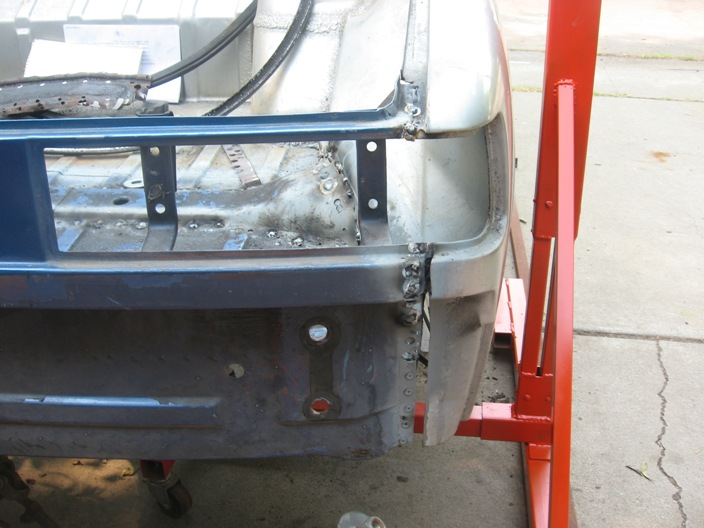
Here are two closeup pics of the rear corners, that depict the vertical strips that were cut out.
  |
|
|
|
| strawman |
Jul 9 2008, 12:45 PM
Post
#17
|
|
Senior Member Group: Members Posts: 891 Joined: 25-January 08 From: Los Osos, CA Member No.: 8,624 Region Association: Central California |
Now for a pic of the rotisserie parts. I bought a couple of engine stands off Craigslist (one was purchased from a guy that lives only four doors down from my house!) -- I got one for $25 and the other for $30. I also bought another $100 of 2" x 2" x 1/8" square tubing, and got some scrap 1.5" for free that I'll use to connect the two stands (see the rusty piece on the ground?). I had some scrap steel sitting in my garage that I used to extend the height of the two stands, and used some leftover steel to triangulate the base/vertical portion. I hope to have a small beer/pizza party this weekend to lift the chassis onto the stands.
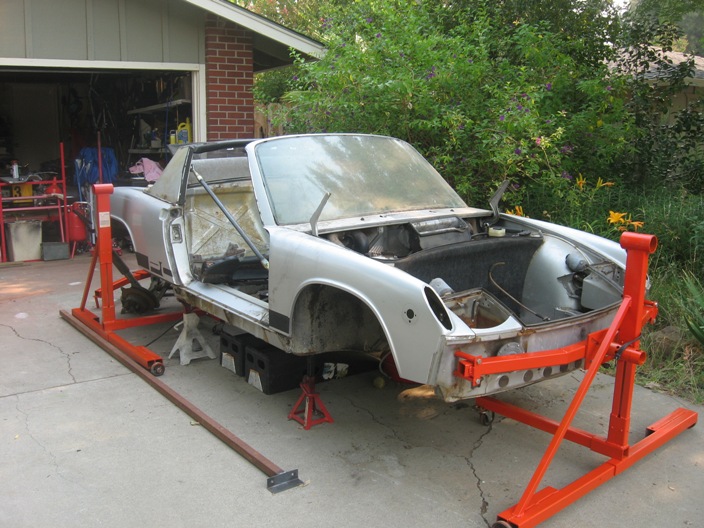 I'm planning on using the engine stand steel wheels to save cash on buying new casters. Anyone want to chime in to say this is a bad idea??? Yes, I'm an SF Giants fan, so I had to paint the rotisserie orange. I'll eventually paint the car orange, too. You can also see the turnbuckle system I'm using. I bought two 3-point tractor connectors (one for each side) for $20/each at Tractor Supply Company. I then cut 'em in half and welded in some Schedule 40 pipe to extend them the proper length. I'm following Jeff Hail's lead by welding in the lower support to the kick panel so that I can install the doors to check gaps as I weld in the hellhole repair panels. I used the lefty-tighty heim joint for the upper mount, and used a 3/4" bolt welded onto angle steel for the lower mount. Here's a closeup of the upper mount: 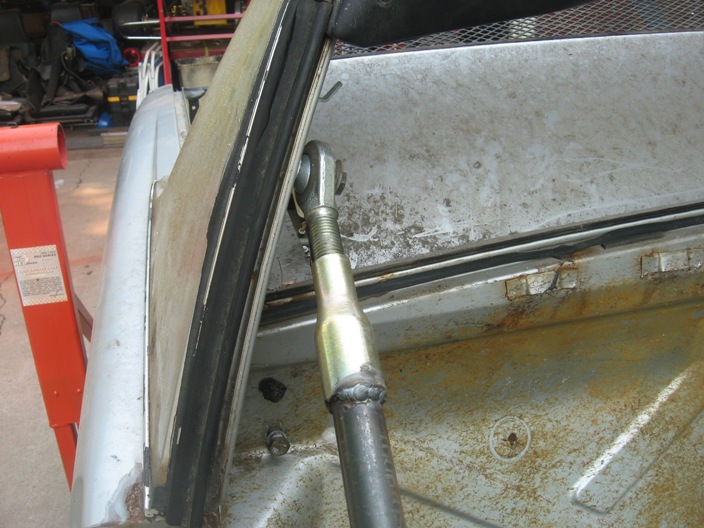 I've committed to the GT Flare / rocker group buy, so those will be welded in after the rust issues have been tackled. I also bought the Desert Hybrid chassis stiffening kit and trailing arm stiffening kit that'll be installed while the car is up in the air. Stay tuned! |
|
|
|
| tdgray |
Jul 9 2008, 03:37 PM
Post
#18
|
|
Thank God Nemo is not here to see this Group: Members Posts: 9,706 Joined: 5-August 03 From: Akron, OH Member No.: 984 Region Association: None |
Good work... keep it up... I've done worse and made it through... I'm sure you'll get there.
|
|
|
|
| strawman |
Jul 17 2008, 09:02 PM
Post
#19
|
|
Senior Member Group: Members Posts: 891 Joined: 25-January 08 From: Los Osos, CA Member No.: 8,624 Region Association: Central California |
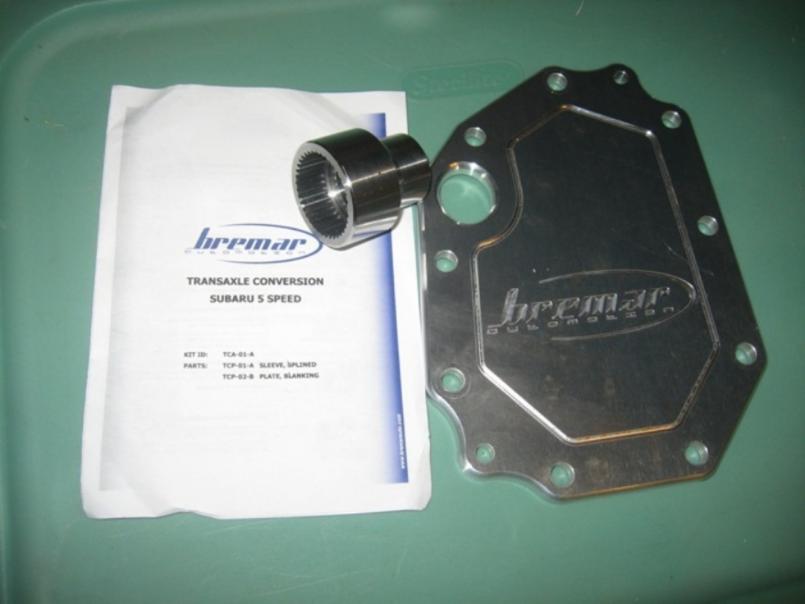
Look what showed up today at my doorstep... the Bremar kit to convert my Subaru AWD 5-speed transmission to FWD. This item cost about $385 and arrived in less than two weeks from when I placed the order. More pics to follow once I begin digging in!
 I didn't get a chance to get the car onto the vertical stands last weekend, bu tI hope to do so on Saturday. I'll post more pics soon... |
|
|
|
| rick 918-S |
Jul 17 2008, 10:22 PM
Post
#20
|
|
Hey nice rack! -Celette Group: Members Posts: 21,299 Joined: 30-December 02 From: Now in Superior WI Member No.: 43 Region Association: Northstar Region |
|
|
|
|
|
1 User(s) are reading this topic (1 Guests and 0 Anonymous Users)
0 Members:

|
Lo-Fi Version | Time is now: 8th July 2026 - 11:08 AM |
Invision Power Board
v9.1.4 © 2026 IPS, Inc.