|
|
|
Porsche, and the Porsche crest are registered trademarks of Dr. Ing. h.c. F. Porsche AG.
This site is not affiliated with Porsche in any way. Its only purpose is to provide an online forum for car enthusiasts. All other trademarks are property of their respective owners. |
|
|

  |

| jridder |
 Feb 5 2004, 07:33 PM Feb 5 2004, 07:33 PM
Post
#1
|
|
Member  Group: Members Posts: 136 Joined: 5-May 03 From: Sunnyvale, CA Member No.: 656 |
Here's some pictures of my installation of aluminum and braided fuel lines and a Holley Commander 950 TBI system on my V8.
First pic shows the 3/8" aluminum fuel lines in the area under the gas tank. Attached image(s) 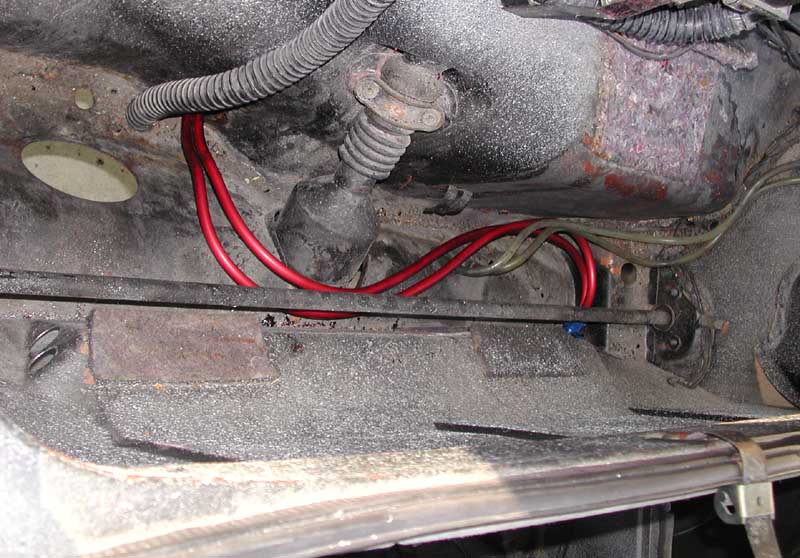
|
   |

 
|
| jridder |
Feb 5 2004, 07:44 PM
Post
#2
|
|
Member Group: Members Posts: 136 Joined: 5-May 03 From: Sunnyvale, CA Member No.: 656 |
A closeup of the fuel lines under the gas tank.
Attached image(s) 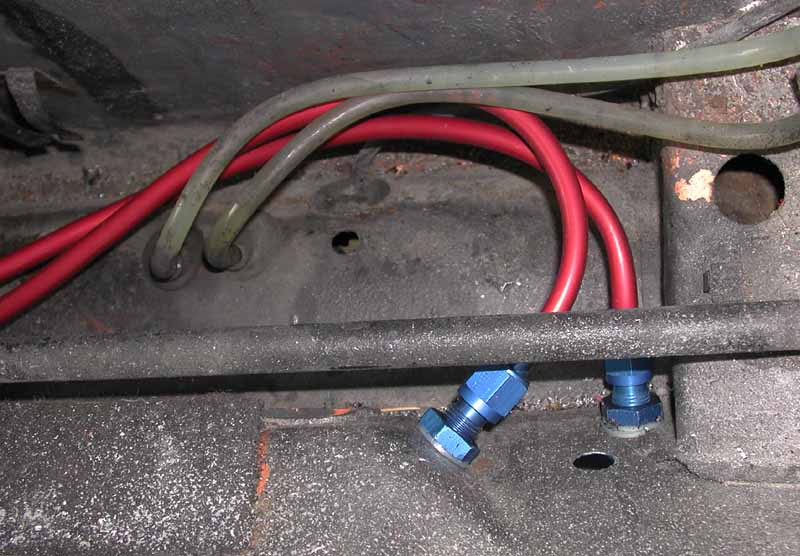
|
|
|
|
| jridder |
Feb 5 2004, 07:45 PM
Post
#3
|
|
Member Group: Members Posts: 136 Joined: 5-May 03 From: Sunnyvale, CA Member No.: 656 |
Here are the fuel lines in the engine compartment. The return is on the left and ends in a bulkhead fitting (AN -6) and the supply goes into a Canton fuel filter.
Attached image(s) 
|
|
|
|
| jridder |
Feb 5 2004, 07:46 PM
Post
#4
|
|
Member Group: Members Posts: 136 Joined: 5-May 03 From: Sunnyvale, CA Member No.: 656 |
Here are the fuel lines in the engine compartment from below.
Attached image(s) 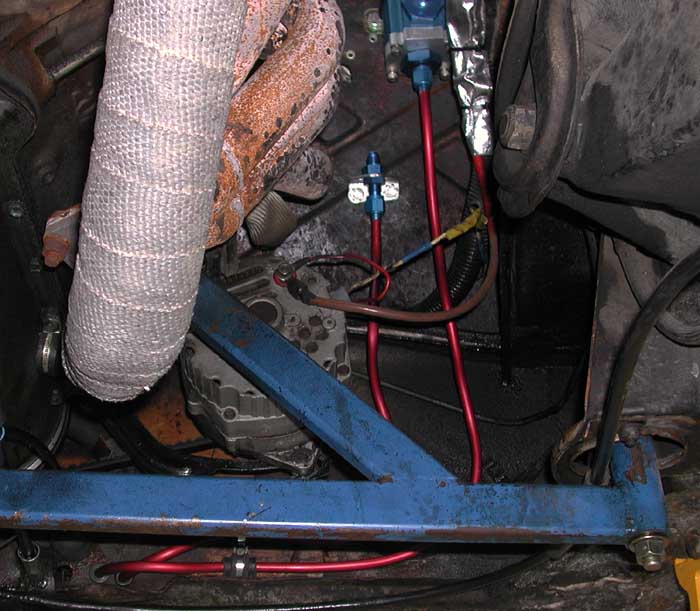
|
|
|
|
| jridder |
Feb 5 2004, 07:48 PM
Post
#5
|
|
Member Group: Members Posts: 136 Joined: 5-May 03 From: Sunnyvale, CA Member No.: 656 |
Here are the braided lines attached to the fuel tank before the tank was installed. I had the tank cleaned by J&J Radiator in San Jose. It cost $65 and when it came back it looked better, but still had some surface rust on the inside. The next lowest price was around $125. Luckily my tank was in pretty good condition to begin with cause their hot tanking didn't seem to do much.
Attached image(s) 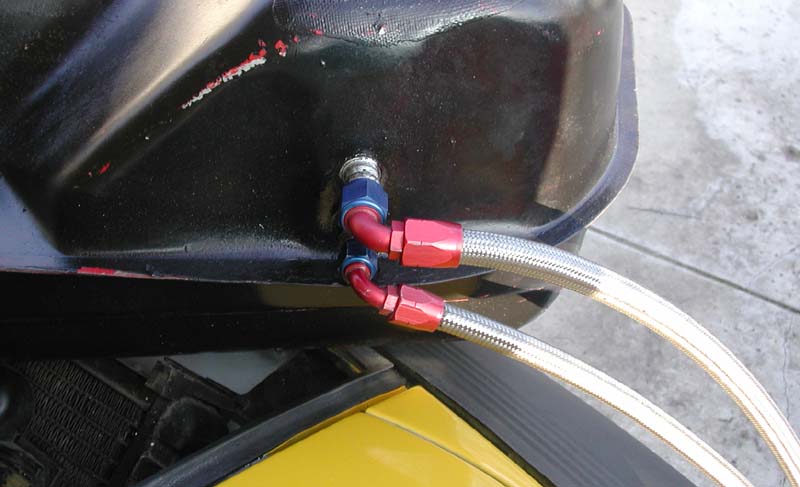
|
|
|
|
| jridder |
Feb 5 2004, 07:50 PM
Post
#6
|
|
Member Group: Members Posts: 136 Joined: 5-May 03 From: Sunnyvale, CA Member No.: 656 |
The gas tank lines from below after the tank was installed. Even though it looks like the fittings extend pretty far out on the tank, they are tucked up well above the access hole after installation.
Attached image(s) 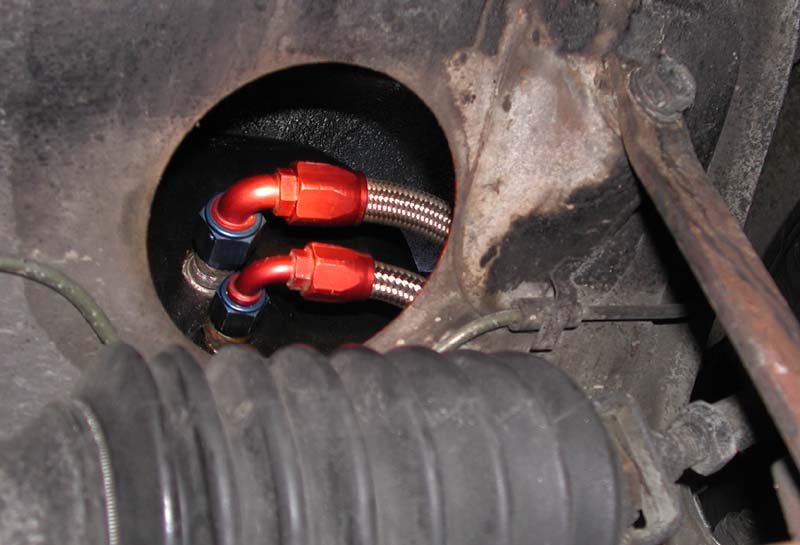
|
|
|
|
| jridder |
Feb 5 2004, 07:54 PM
Post
#7
|
|
Member Group: Members Posts: 136 Joined: 5-May 03 From: Sunnyvale, CA Member No.: 656 |
Here are the fuel lines in the trunk area. The return line is on top. The feed line to the fuel pump is a -8 hose and goes to a screen filter first. The Holley fump pump from the Commander 950 kit has no easy was of connected to AN fittings so I had to use hose barbs. The Holley pump is mounted with a rubber coated clamp but the whine from the pump is still very loud. It's gotten louder after 100 miles of driving. I'll check the screen filter when the fuel tank gets emptier.
Attached image(s) 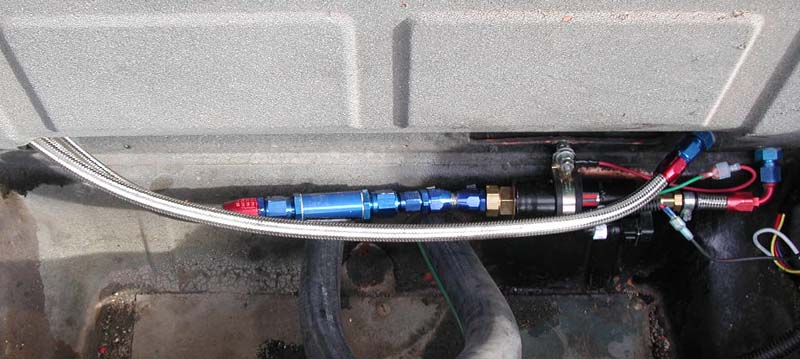
|
|
|
|
| Dave_Darling |
Feb 5 2004, 07:55 PM
Post
#8
|
|
914 Idiot Group: Members Posts: 14,986 Joined: 9-January 03 From: Silicon Valley / Kailua-Kona Member No.: 121 Region Association: Northern California |
What are the red hoses? Are they "hard" lines, or covered SS braided lines, or something else?
How are you securing the SS braided lines in place? Make sure to keep them away from anything important, as the braid makes a good file. --DD |
|
|
|
| jridder |
Feb 5 2004, 07:57 PM
Post
#9
|
|
Member Group: Members Posts: 136 Joined: 5-May 03 From: Sunnyvale, CA Member No.: 656 |
Here is the Commander 950 brain installed behind the passenger seat. It seems to have a pretty comprehensive list of features and controls both the fuel and the spark timing. They recently released a wideband O2 sensor for it. It would make tuning easier and allow me to run closed loop under WOT (not that I can run WOT right now since my clutch is slipping). However, it costs $650 which is almost what I paid for the whole system on Ebay. Seems like a reasonable price though, compared to other wideband sensors.
Attached image(s) 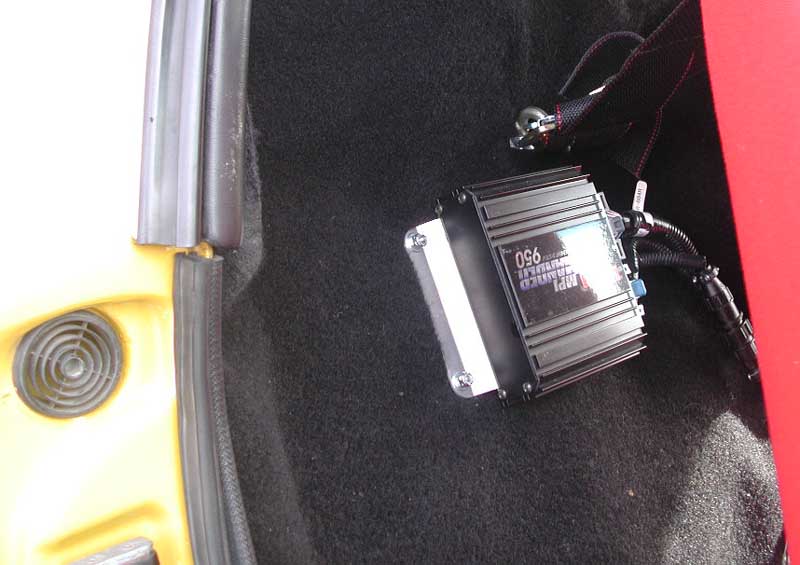
|
|
|
|
| jridder |
Feb 5 2004, 08:00 PM
Post
#10
|
|
Member Group: Members Posts: 136 Joined: 5-May 03 From: Sunnyvale, CA Member No.: 656 |
A shot of the right side of the engine compartment after installation. The MAP sensor is at the top of the picture. Most of the other sensors (TPS, idle air control, injectors, manifold air temp) are on the throttle body unit. In the lower right is the stock Holley filter. I'll use that until I run a few tanks of gas through the system. The Canton filter is empty right now.
Attached image(s) 
|
|
|
|
| jridder |
Feb 5 2004, 08:04 PM
Post
#11
|
|
Member Group: Members Posts: 136 Joined: 5-May 03 From: Sunnyvale, CA Member No.: 656 |
The left side of the engine compartment. Not much to see here. The water temp sensor is on the top right of the pic. The water going to the radiator used to exit on this side but I moved it to the other side to make the hose routing under the car work better.
You can also see the single torsion spring on the engine compartment lid. With the rain tray removed, a single spring is just about right for raising the lid. With two springs you have to hold the lid or it will slam violently into the targa bar trim. Attached image(s) 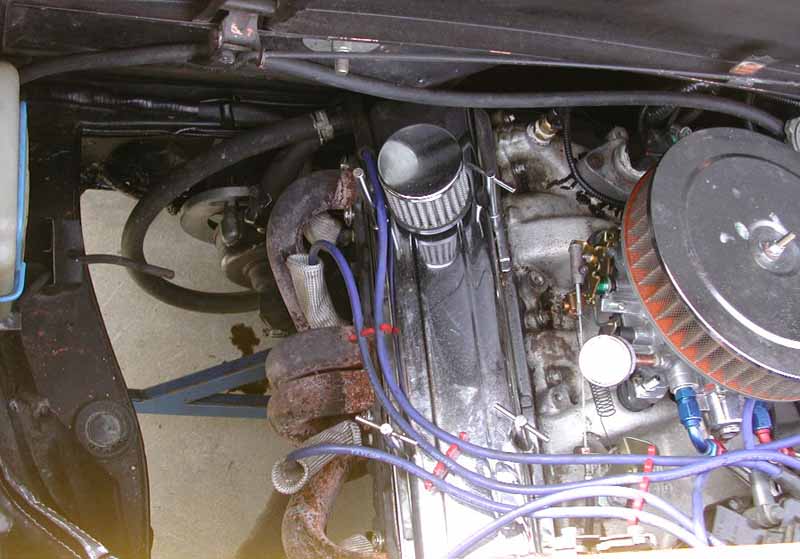
|
|
|
|
| jridder |
Feb 5 2004, 08:12 PM
Post
#12
|
|
Member Group: Members Posts: 136 Joined: 5-May 03 From: Sunnyvale, CA Member No.: 656 |
>What are the red hoses? Are they "hard" lines, or covered SS braided lines, or something else?
The red hoses are anodized aluminum hard lines from Russell. >How are you securing the SS braided lines in place? The SS lines in the trunk go through rubber grommets where they pass under the gas tank. I'll be putting a hose clamp on the return line in the trunk but it's got nothing to run against anyway. I'll tie th lines in the engine compartment together after I remove the stock Holley filter and start using the Canton. My setup is probably not ideal for air cooled cars because of the intrusion into the trunk. However, I lose the trunk anyways so the location makes it easy to work on. |
|
|
|
| Brad Roberts |
Feb 5 2004, 08:26 PM
Post
#13
|
|
914 Freak! Group: Members Posts: 19,148 Joined: 23-December 02 Member No.: 8 Region Association: None |
For your fuel pump... use the stock 914 rubber isolators (or the 3.2/3.6 isolators) for the fuel pump. They are small rubber stand offs with duel threaded ends. One end secures to the tub and the other end secures the clamp for the fuel pump. This will help keep the noise down. The studs are not connected in the isolator. They are mini versions of the stock 914 rubber front engine mounts on the later 73-76 cars. I think they run about 5$ apiece (or less).
B |
|
|
|
| campbellcj |
Feb 5 2004, 10:33 PM
Post
#14
|
|
I can't Re Member Group: Members Posts: 4,545 Joined: 26-December 02 From: Agoura, CA Member No.: 21 Region Association: Southern California |
Thanks for the pics & writeup. The aluminum tubing in the tunnel gives me some good ideas for my upcoming fuel system re-do. I was planning to use the AN-6 braided line in the engine compartment and front trunk/cell area but the tunnel was a big question mark.
Is the tubing relatively easy to run thru the tunnel? Does it need to be clamped down with adel clamps or something, or does it pretty much stay put on its own? |
|
|
|
| jridder |
Feb 5 2004, 11:20 PM
Post
#15
|
|
Member Group: Members Posts: 136 Joined: 5-May 03 From: Sunnyvale, CA Member No.: 656 |
>Is the tubing relatively easy to run thru the tunnel?
It was very easy to run through the tunnel. I put some 3/8" rubber grommets in the holes and slid the lines in from the rear. I left it coiled up and uncoiled it as I slid it through the tunnel. The hard part was bending it to the right shape under the gas tank and then in the engine compartment. It is very easy to collapse the tubing when bending it. I didn't use a tubing bender but that would have helped a little. >Does it need to be clamped down with adel clamps or something, or does it pretty much stay put on its own? I haven't clamped it in the tunnel. I was going to cut some pieces of 3/8" rubber tubing lenghtwise and slide it over the tubes to keep them from rattling. However, they some pretty firm in the tunnel and haven't made any noise. Of course the noise level in my car is not quite at Mercedes level so I may just not be hearing it. |
|
|
|
| tesserra |
Feb 5 2004, 11:23 PM
Post
#16
|
|
Member Group: Members Posts: 210 Joined: 26-March 03 From: Lafayette CA Member No.: 479 |
Beautiful work!
Want to do mine now that you are good at it? I am getting ready to replace my bad SBC and change to FI at the same time. I was going to use the Holley 670 projection system. Any advantage to doing it when the motor is out? Doesnt look like it. Thanks for the idea on the single torsion bar too. Can the return line go in the top of the tank? George |
|
|
|
| seanery |
Feb 6 2004, 07:51 AM
Post
#17
|
|
waiting to rebuild whitey! Group: Retired Admin Posts: 15,852 Joined: 7-January 03 From: Indy Member No.: 100 Region Association: None |
Does that aluminum bend and conform like plumber's "Soft Copper"?
|
|
|
|
| andys |
Feb 6 2004, 04:12 PM
Post
#18
|
|
Advanced Member Group: Members Posts: 2,165 Joined: 21-May 03 From: Valencia, CA Member No.: 721 Region Association: None |
jridder,
Did you weld the male AN fitting to the existing fuel tank outlet after cleaning? Those aluminum lines are commonly used in aircraft, and are quite soft and easy to bend/form. Yeah, I would make sure they are isolated from the body/frame. Andy |
|
|
|
| BIGKAT_83 |
Feb 6 2004, 04:33 PM
Post
#19
|
|
Senior Member Group: Members Posts: 1,798 Joined: 25-January 03 From: Way down south Bogart,GA Member No.: 194 Region Association: South East States |
Jridder
The fuel lines and the filter look real good. Looking at your distributor it looks like it could be a tooth or 2 off on your timing. Bob (IMG:style_emoticons/default/cool.gif) |
|
|
|
| scotty |
Feb 6 2004, 06:39 PM
Post
#20
|
|
The Fun Never Stops Group: Members Posts: 773 Joined: 20-May 03 From: Portland. Oregon (SW) Member No.: 718 Region Association: None |
niiiiiice! (IMG:style_emoticons/default/smile.gif) I'm in the middle of doing the same. The front was easy, but you inspire me for the engine compartmment (IMG:style_emoticons/default/pray.gif)
QUOTE I haven't clamped it in the tunnel. I was going to cut some pieces of 3/8" rubber tubing lenghtwise and slide it over the tubes to keep them from rattling. However, they some pretty firm in the tunnel and haven't made any noise. Of course the noise level in my car is not quite at Mercedes level so I may just not be hearing it. I did that (and used the stock clamps)...worked out nicely!Very nice work on the tank end of things. I used the stock stuff, which fit a -5 barb well, then went with a -5 to -6 adapter. Next winter I'll try it your way (IMG:style_emoticons/default/wink.gif) |
|
|
|
|
1 User(s) are reading this topic (1 Guests and 0 Anonymous Users)
0 Members:

|
Lo-Fi Version | Time is now: 17th May 2024 - 05:50 PM |
Invision Power Board
v9.1.4 © 2024 IPS, Inc.