|
|
|
|
|
|
Here's a picture of the 1911 installed and running. It took some time to get the carbs sync'd. I had to do a little fabrication on the linkage and plenty of trips to the hardware store. Still need a crankcase breather. Attached thumbnail(s) 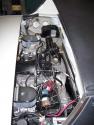
After months of working in fits and starts I finally got the car driving. Had immediate issues with the FI that were beyond my troubleshooting skills. I suspected the throttle switch, but after having spent much $ on FI components, I scrapped the whole works for a pair of Webers. The FI is boxed up and will be the next owner's headache. I found a set of Italian-made 40's and had A.C.E. rebuild them. The costs of the carbs, rebuild, and extra components exceeded what I already spent on the FI. But I knew they would work once connected. They look great and when I fired off the car, sounded even better. So...a new fuel pump from CB, set the timing, and I was off. The motor ran great and felt very strong. Makes my '74 1.8 feel like a 36hp bug. Very excited. I'll post pics later.
More of the assembly and a final one of in the car. Attached thumbnail(s) 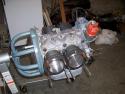 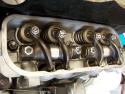 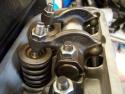 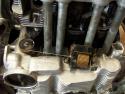 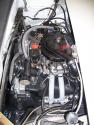
Well, the engine is in the car. However, as soon as I began to crank it over, two of the injectors decided to leak from the bodies. I figured I better face the music an get some 2.0 injectors. So there it sits awaiting a set procured here on this site. What a headache it is getting a set of injectors!  But, here are some pictures of the final assembly. Installing pistons and cylinders is straight forward. Setting the proper pushrod length is another matter. Thanks to Jake Raby for the excellent article on setting things up correctly. I had ordered his upgrade kit, as you can see in the pictures. I was able to get within 3-4% of correct valve lift and set the proper alignment with .020 spacers underneath each rocker assembly. That was the most interesting step of the rebuild. Very time intensive but again, very interesting. It's nice to be able to take the time and know you're setting things up for success. Attached thumbnail(s) 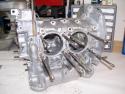 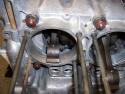 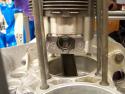
More pictures of the assembly Attached thumbnail(s) 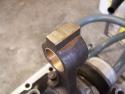 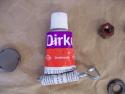 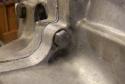 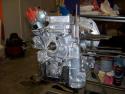
I've been away from the camera but have done some work lately. Here's a few pictures of the crankshaft and camshaft resting in the case. Another picture is of the heads and right side of case. I cleaned all of the assembly hardware with brake cleaner and my wire wheel. They looked great and assembled with ease. For assembly I use Dirko between the case halves. My 911 mechanic, John Walker, recommended it to me. I've used it on two 911 motors with no leaks and have used it here. It has a longer set up time than Locktite, which is why John uses it. He used to use Locktite but one 930 assembly took just a little too long and left a small hole to weep oil out of. 40 hours down the drain. Another picture shows the rod ends after weighing and balancing. Another the squeeze through between the halves. Next the pistons and cylinders  Attached thumbnail(s) 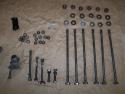 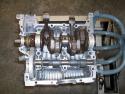 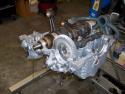 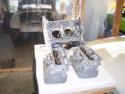
Since the crankshaft and rods were in good working order - I've decided to build a 1911 motor. My parts list includes: Rebuilt 1.8 heads with 1.7 rocker arms 96mm AA jugs 96mm KB pistons Raby basic valve train kit with 9550 cam Gasket kit plus front/rear oil seals All new bearings New alternator (since I'm there) New MPS. Found a good deal and couldn't pass it up Machining: Clean case Clean, polish, magnaflux crank Re-surface, re-bush and balance rods (at least weigh and see where they are) Re-surface flywheel I'm taking a few things in next week so I'll update once all the stuff gets in.
My assumption was correct. This motor had not been rebuilt, nor ever been apart. Well worn 90mm P&C's, rings were shot. The good news, and deciding factor for this motor was the crankshaft. The journals all measured in spec. No deep grooves or gouges. The case looks great; only oil stains on the bearing journals. So with that info I decided to re-use the crank and rods. Had they been out of spec, I was going to replace all internal with a 2.0 drivetrain. The camshaft is pretty worn, but I never intended to re-use it anyway. More to follow after I order all the parts, rebuild the 1.8 heads I have, and return from the machine shop. Attached thumbnail(s) 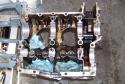 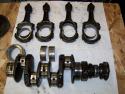 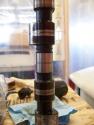
Here's a couple more pictures of the teardown. Also, I discovered the source of the oil leak - a missing thermostat and pulley. But more importantly, the pulley bolt was not re-installed, hence the shower of oil once everything was warmed up. The upside is, of course, a rebuilt engine, but also I found a NOS thermostat in one of the boxes of parts that came with the car. Attached thumbnail(s) 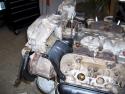 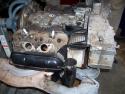
A 1.7 from a 1970. Stock D-Jet. The original owner said he had it rebuilt. Since the motor starting raining oil about 10 miles from where I bought it, I figured he was lying. Unable to pinpoint the massive leak, and unable to know for sure what the condition of the engine internals were, I decided to rebuild. My assumptions were everything was stock on the inside. The car had 72,000 miles on it. Which, aside from all the other crap the PO told me, I'm certain is correct based on the overall condition of the car. Attached thumbnail(s) 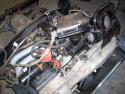 |


 Apr 27 2009, 10:56 PM