|
|
|
Porsche, and the Porsche crest are registered trademarks of Dr. Ing. h.c. F. Porsche AG.
This site is not affiliated with Porsche in any way. Its only purpose is to provide an online forum for car enthusiasts. All other trademarks are property of their respective owners. |
|
|

  |

| Van |
 Feb 21 2008, 02:28 PM Feb 21 2008, 02:28 PM
Post
#1
|
|
Member  Group: Members Posts: 199 Joined: 15-January 08 From: Hyde Park, NY Member No.: 8,571 |
I am enbarking on an engine rebuild - doing a RAT 2270.
I've been taking detailed pictures and posting them here. So far I've take it all apart. Now I'm doing lots of cleaning and ordering parts (and waiting for them to show up). Enjoy! teaser: Attached image(s) 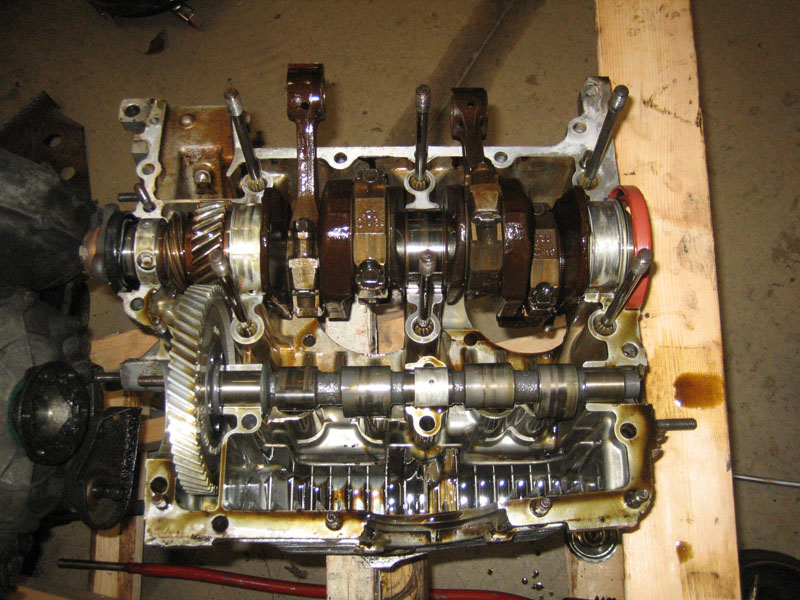
|
   |

 
|
| johannes |
Feb 21 2008, 03:44 PM
Post
#2
|
|
Club Porsche 914 France President Group: Members Posts: 3,084 Joined: 13-January 06 From: France Member No.: 5,409 Region Association: France |
|
|
|
|
| purple |
Feb 21 2008, 03:52 PM
Post
#3
|
|
Pigeon feeders attract me Group: Members Posts: 938 Joined: 24-July 07 From: Houston, TX Member No.: 7,942 Region Association: None |
Very nice! I wouldnt have done it any differently!
I feel like I'm watching the Raby video in picture detail form. This is awesome! Thanks! |
|
|
|
| Sleepin |
Feb 21 2008, 03:55 PM
Post
#4
|
|
Advanced Member Group: Members Posts: 3,647 Joined: 20-November 07 From: Grand Junction, Co. Member No.: 8,357 Region Association: Rocky Mountains |
Very cool!
|
|
|
|
| Van |
Feb 21 2008, 09:58 PM
Post
#5
|
|
Member Group: Members Posts: 199 Joined: 15-January 08 From: Hyde Park, NY Member No.: 8,571 |
Thanks for the positive comments, guys!
|
|
|
|
| yarin |
Feb 22 2008, 09:11 AM
Post
#6
|
|
'14-X'in FOOL Group: Members Posts: 988 Joined: 13-May 03 From: Guttenberg, NJ Member No.: 693 Region Association: North East States |
QUOTE(Van @ Feb 21 2008, 10:58 PM)  Thanks for the positive comments, guys! It's a bit of a drive for me (70 miles), but I'd like to come by and see your build sometime soon. I'd like to build a motor sometime, possibly next summer and could use a hands on view. |
|
|
|
| greybeard50 |
Feb 22 2008, 09:37 AM
Post
#7
|
|
Newbie Group: Members Posts: 46 Joined: 24-September 06 Member No.: 6,909 |
Excellent pictures!
Be sure to do the oil galley plug R&R as per the Raby site. Start with a clean motor! |
|
|
|
| race914 |
Feb 22 2008, 09:53 AM
Post
#8
|
|
73 914-4 Group: Members Posts: 1,006 Joined: 31-October 05 From: Nipomo, California (Central Coast) Member No.: 5,027 Region Association: Central California |
Fantastic picture gallery of your effort (IMG:style_emoticons/default/smilie_pokal.gif)
Anxious to follow your project! |
|
|
|
| Jake Raby |
Feb 22 2008, 10:29 AM
Post
#9
|
|
Engine Surgeon Group: Members Posts: 9,394 Joined: 31-August 03 From: Lost Member No.: 1,095 Region Association: South East States |
Van looks great!!
Just make sure not to reuse those copper head nuts at rebuild time :-) Thanks for your parts orders!!! |
|
|
|
| Van |
Feb 23 2008, 10:06 PM
Post
#10
|
|
Member Group: Members Posts: 199 Joined: 15-January 08 From: Hyde Park, NY Member No.: 8,571 |
I got to do a little work this weekend on my project. I've done the oil galley plug update (I'm tryin' to do this right, Greybeard!) and started cleaning the case halves.
Now I just need to spend some time scrubbing the other case half (it's pretty boring work - standing in the laundry room with half an engine in the utility sink...) Anyhow, here's the link! Oh, Jake, will you give me some advanced notice before the heads ship? I'd like to add new valve keepers and those head nuts you recommend replacing to the order (and maybe cylinder shims, too). |
|
|
|
| orange914 |
Feb 23 2008, 10:33 PM
Post
#11
|
|
http://5starmediaworks.com/index.html Group: Members Posts: 3,371 Joined: 26-March 05 From: Ceres, California Member No.: 3,818 Region Association: Northern California |
|
|
|
|
| AgPete139 |
Feb 24 2008, 04:53 AM
Post
#12
|
|
AgPete139 Group: Members Posts: 90 Joined: 12-February 08 From: Houston, TX Member No.: 8,701 Region Association: South East States |
QUOTE(yarin @ Feb 22 2008, 09:11 AM) QUOTE(Van @ Feb 21 2008, 10:58 PM) Thanks for the positive comments, guys! It's a bit of a drive for me (70 miles), but I'd like to come by and see your build sometime soon. I'd like to build a motor sometime, possibly next summer and could use a hands on view. 70 miles per drive just makes it to the next city in Texas! But seriously, that's about an hour drive, not bad at all. I like the photos and the organization form the pain page. Looks good, and keep up the neat work! Pete |
|
|
|
| pete914 |
Feb 24 2008, 09:16 AM
Post
#13
|
|
Member Group: Members Posts: 178 Joined: 21-August 07 From: east coast Member No.: 8,025 |
Sweet!! Very informative
|
|
|
|
| Jake Raby |
Feb 24 2008, 09:10 PM
Post
#14
|
|
Engine Surgeon Group: Members Posts: 9,394 Joined: 31-August 03 From: Lost Member No.: 1,095 Region Association: South East States |
QUOTE(Van @ Feb 23 2008, 09:06 PM) I got to do a little work this weekend on my project. I've done the oil galley plug update (I'm tryin' to do this right, Greybeard!) and started cleaning the case halves. Now I just need to spend some time scrubbing the other case half (it's pretty boring work - standing in the laundry room with half an engine in the utility sink...) Anyhow, here's the link! Oh, Jake, will you give me some advanced notice before the heads ship? I'd like to add new valve keepers and those head nuts you recommend replacing to the order (and maybe cylinder shims, too). New valve keepers (ground) are included with our heads, as well as all new hardware... |
|
|
|
| Van |
Feb 24 2008, 09:29 PM
Post
#15
|
|
Member Group: Members Posts: 199 Joined: 15-January 08 From: Hyde Park, NY Member No.: 8,571 |
QUOTE(Jake Raby @ Feb 24 2008, 07:10 PM) QUOTE(Van @ Feb 23 2008, 09:06 PM) Oh, Jake, will you give me some advanced notice before the heads ship? I'd like to add new valve keepers and those head nuts you recommend replacing to the order (and maybe cylinder shims, too). New valve keepers (ground) are included with our heads, as well as all new hardware... Then do you need the valve springs and retainers (from the cam kit) back for the heads? Or do I put that together myself? Thanks again! -Van |
|
|
|
| auerbach |
Feb 24 2008, 09:44 PM
Post
#16
|
|
Lee David Auerbach, Esq Group: Members Posts: 235 Joined: 26-July 07 From: Westchester, New York Member No.: 7,947 Region Association: MidAtlantic Region |
Van, the thread is extremely interesting. Any idea how many hours you have into the rebuild?
|
|
|
|
| Van |
Feb 25 2008, 02:00 PM
Post
#17
|
|
Member Group: Members Posts: 199 Joined: 15-January 08 From: Hyde Park, NY Member No.: 8,571 |
QUOTE(auerbach @ Feb 24 2008, 07:44 PM) Van, the thread is extremely interesting. Any idea how many hours you have into the rebuild? Boy, that's really hard to calculate... First, most of my time chunks are very little blocks - like 15 to 30 minutes. Then, to make matters worse, I'm usually "monitoring" my little kids while they play in the garage. (e.g. I get the long block onto the engine stand, then have to push the 1 year old around on a tricycle - then give the 3 year old a ride on the hand truck, then remove the valve covers...) Every once in a while Mamma will take the kids somewhere on the weekend and I'll have a few hours to myself to work. (IMG:style_emoticons/default/welder.gif) But, for the sake of argument, let's say I've been working on it for the last 6 weeks at 2 or 3 hours a week. That makes it 12 to 18 hours so far - which sounds about right. If I had full time to devote to this, it would be half the time. Here's my littlest helper: Attached image(s) 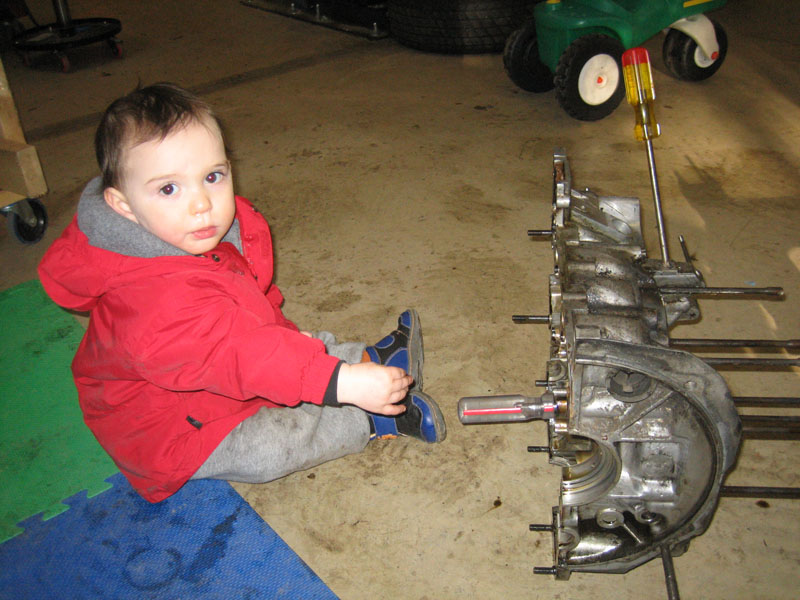
|
|
|
|
| auerbach |
Feb 25 2008, 11:01 PM
Post
#18
|
|
Lee David Auerbach, Esq Group: Members Posts: 235 Joined: 26-July 07 From: Westchester, New York Member No.: 7,947 Region Association: MidAtlantic Region |
Are those Pilottis he's wearing?
|
|
|
|
| Van |
Feb 26 2008, 07:33 AM
Post
#19
|
|
Member Group: Members Posts: 199 Joined: 15-January 08 From: Hyde Park, NY Member No.: 8,571 |
QUOTE(auerbach @ Feb 25 2008, 09:01 PM) Are those Pilottis he's wearing? We're not that trendy. (IMG:style_emoticons/default/smile.gif) They're Robeez - toddler shoes. |
|
|
|
| Van |
Mar 24 2008, 08:12 AM
Post
#20
|
|
Member Group: Members Posts: 199 Joined: 15-January 08 From: Hyde Park, NY Member No.: 8,571 |
New updates!
I've made a sensor bracket for an Electromotive ignition system, made my new TDC mark on the fan and sent all of the rotating stuff to be ballanced. Updates here: www.ephotomotion.com/914engine |
|
|
|
|
1 User(s) are reading this topic (1 Guests and 0 Anonymous Users)
0 Members:

|
Lo-Fi Version | Time is now: 1st June 2024 - 05:53 AM |
Invision Power Board
v9.1.4 © 2024 IPS, Inc.