|
|
|
Porsche, and the Porsche crest are registered trademarks of Dr. Ing. h.c. F. Porsche AG.
This site is not affiliated with Porsche in any way. Its only purpose is to provide an online forum for car enthusiasts. All other trademarks are property of their respective owners. |
|
|

  |

| 904svo |
 Sep 21 2015, 06:24 PM Sep 21 2015, 06:24 PM
Post
#26
|
|
904SVO  Group: Members Posts: 1,129 Joined: 17-November 05 From: Woodstock,Georgia Member No.: 5,146 |
Try this. On fuse#1 there is 2 white/blue wires (one goes to High beam light the other to the fog light relay) cut these two wires apart find out which one goes to
the High beam light ( apply battery) reconnect this to fuse#1 with a new spare wire. Connect this wire to terminal #85 on a new relay. The Blue/white wire left over attach to a new relay terminal #30 . Connect terminals #86 and #87a together and run to ground. This fix will supply ground to the fog light relay on when the low beams headlight are on and remove it when the high beams are turn on. |
   |

 
|
| dangerranger01 |
Sep 21 2015, 07:21 PM
Post
#27
|
|
Member Group: Members Posts: 145 Joined: 12-August 05 From: Boring, Oregon U.S.A. Member No.: 4,578 Region Association: None |
QUOTE(Chris H. @ Sep 21 2015, 08:21 AM)  Aw man really? Have we confirmed the JWest flasher is the problem? Was getting close to ordering these... Curious about this too. I was about to order the jwest kit as well. |
|
|
|
| orthobiz |
Sep 21 2015, 07:46 PM
Post
#28
|
|
Senior Member Group: Members Posts: 1,772 Joined: 8-January 07 From: Cadillac, Michigan Member No.: 7,438 Region Association: Upper MidWest |
QUOTE(904svo @ Sep 21 2015, 08:24 PM) Try this. On fuse#1 there is 2 white/blue wires (one goes to High beam light the other to the fog light relay) cut these two wires apart find out which one goes to the High beam light ( apply battery) reconnect this to fuse#1 with a new spare wire. Connect this wire to terminal #85 on a new relay. The Blue/white wire left over attach to a new relay terminal #30 . Connect terminals #86 and #87a together and run to ground. This fix will supply ground to the fog light relay on when the low beams headlight are on and remove it when the high beams are turn on. Sounds doable! I think what I really want to do is have the fog lights work whenever I pull out the fog light switch. I will never run them with the brights, I just don't want to worry about the fog lights being triggered by anything other than me pulling out the dash switch! Paul |
|
|
|
| 904svo |
Sep 21 2015, 09:02 PM
Post
#29
|
|
904SVO Group: Members Posts: 1,129 Joined: 17-November 05 From: Woodstock,Georgia Member No.: 5,146 |
QUOTE(orthobiz @ Sep 21 2015, 05:46 PM) QUOTE(904svo @ Sep 21 2015, 08:24 PM) Try this. On fuse#1 there is 2 white/blue wires (one goes to High beam light the other to the fog light relay) cut these two wires apart find out which one goes to the High beam light ( apply battery) reconnect this to fuse#1 with a new spare wire. Connect this wire to terminal #85 on a new relay. The Blue/white wire left over attach to a new relay terminal #30 . Connect terminals #86 and #87a together and run to ground. This fix will supply ground to the fog light relay on when the low beams headlight are on and remove it when the high beams are turn on. Sounds doable! I think what I really want to do is have the fog lights work whenever I pull out the fog light switch. I will never run them with the brights, I just don't want to worry about the fog lights being triggered by anything other than me pulling out the dash switch! Paul If you want that option, take the Blue/white wire and put it to ground instead of wiring it to #30 , forget about the rest of the wiring and relay. |
|
|
|
| Dave_Darling |
Sep 21 2015, 09:03 PM
Post
#30
|
|
914 Idiot Group: Members Posts: 15,355 Joined: 9-January 03 From: Silicon Valley / Kailua-Kona Member No.: 121 Region Association: Northern California |
QUOTE(904svo @ Sep 21 2015, 05:24 PM) Connect this wire to terminal #85 on a new relay. The Blue/white wire left over attach to a new relay terminal #30 . You don't need to do that. If you want the fogs on only with the low beams, just move the "left over" white/blue wire to one of the low beam fuses. You can use a "piggyback connector" do do that relatively painlessly. --DD |
|
|
|
| Chris Pincetich |
Sep 22 2015, 08:56 AM
Post
#31
|
|
B-) Group: Members Posts: 2,082 Joined: 3-October 05 From: Point Reyes Station, CA Member No.: 4,907 Region Association: Northern California |
QUOTE(Chris H. @ Sep 21 2015, 08:21 AM) Have we confirmed the JWest flasher is the problem? Was getting close to ordering these... NO I am NOT saying that. That module has been awesome for 5+ years. AND when I took it off, I realized I had it hooked up wrong in the first place, which may have been causing part of my problem...so, more work to do! (IMG:style_emoticons/default/smash.gif) I felt removing it was a good idea since it was time to strip down to basic wiring and work back up to the functionality I had and want. I hope to re-install the JWest module, and may buy a new one. (IMG:style_emoticons/default/beerchug.gif) For some reason, I had it hooked up to 12V power on the ground wire (IMG:style_emoticons/default/headbang.gif) It mostly worked! I just never had high beams (IMG:style_emoticons/default/huh.gif) All this wiring work started because I was installing the GE LED headlights. Got them off Amazon with double coupons (IMG:style_emoticons/default/beerchug.gif) QUOTE(904svo @ Sep 21 2015, 05:24 PM) Try this. On fuse#1 there is 2 white/blue wires (one goes to High beam light the other to the fog light relay) cut these two wires apart find out which one goes to the High beam light ( apply battery) reconnect this to fuse#1 with a new spare wire. Connect this wire to terminal #85 on a new relay. The Blue/white wire left over attach to a new relay terminal #30 . Connect terminals #86 and #87a together and run to ground. This fix will supply ground to the fog light relay on when the low beams headlight are on and remove it when the high beams are turn on. Ok! Thanks for posting the potential fixes (IMG:style_emoticons/default/beerchug.gif) |
|
|
|
| whitetwinturbo |
Sep 23 2015, 03:01 PM
Post
#32
|
|
Honey, does this wing make my ass look fat? Group: Members Posts: 1,391 Joined: 22-October 11 From: Newport Beach/Kalefornya/USA Member No.: 13,704 Region Association: Southern California |
..........how did you get "double" coupons (IMG:style_emoticons/default/blink.gif)
|
|
|
|
| mepstein |
Sep 23 2015, 03:32 PM
Post
#33
|
|
914-6 GT in waiting Group: Members Posts: 20,836 Joined: 19-September 09 From: Landenberg, PA/Wilmington, DE Member No.: 10,825 Region Association: MidAtlantic Region |
QUOTE(whitetwinturbo @ Sep 23 2015, 05:01 PM) Order one at a time |
 |
|
| Chris H. |
Sep 23 2015, 04:36 PM
Post
#34
|
|
Senior Member Group: Members Posts: 4,093 Joined: 2-January 03 From: Chicago 'burbs Member No.: 73 Region Association: Upper MidWest |
QUOTE NO I am NOT saying that. That module has been awesome for 5+ years. AND when I took it off, I realized I had it hooked up wrong in the first place, which may have been causing part of my problem...so, more work to do! (IMG:style_emoticons/default/smash.gif) I felt removing it was a good idea since it was time to strip down to basic wiring and work back up to the functionality I had and want. I hope to re-install the JWest module, and may buy a new one. (IMG:style_emoticons/default/beerchug.gif) For some reason, I had it hooked up to 12V power on the ground wire (IMG:style_emoticons/default/headbang.gif) It mostly worked! I just never had high beams (IMG:style_emoticons/default/huh.gif) All this wiring work started because I was installing the GE LED headlights. Got them off Amazon with double coupons (IMG:style_emoticons/default/beerchug.gif) Ah! Got it. Makes sense. I wish I had a dime for everything I've wired incorrectly! I might still have the JWest installation instructions if it would help you. Just PM me. |
|
|
|
| orthobiz |
Sep 24 2015, 06:18 PM
Post
#35
|
|
Senior Member Group: Members Posts: 1,772 Joined: 8-January 07 From: Cadillac, Michigan Member No.: 7,438 Region Association: Upper MidWest |
QUOTE(mepstein @ Sep 23 2015, 05:32 PM) QUOTE(whitetwinturbo @ Sep 23 2015, 05:01 PM) Order one at a time I made two separate orders with Amazon on the same day in the same sitting with two credit cards, just to be sneaky. Before they sent them I received an e-mail that because they were going to the same address they'd make only one shipment in one box. Got the benefit of two coupons. They don't seem to care! I think they may be watching me type this now............LOL Paul |
|
|
|
| orthobiz |
Sep 24 2015, 06:19 PM
Post
#36
|
|
Senior Member Group: Members Posts: 1,772 Joined: 8-January 07 From: Cadillac, Michigan Member No.: 7,438 Region Association: Upper MidWest |
Also I am happy with an "on my honor" system. I'd like the fog lights to go on and off completely separately from any other relay or failsafe mechanism. I solemnly pledge that I will never use them with my high beams.
I know there's a way to do that... Paul |
|
|
|
| Dave_Darling |
Sep 24 2015, 06:33 PM
Post
#37
|
|
914 Idiot Group: Members Posts: 15,355 Joined: 9-January 03 From: Silicon Valley / Kailua-Kona Member No.: 121 Region Association: Northern California |
Just move that one wire to the relay off of the high-beam circuit, and hook it up to a constant +12V circuit. I did that, and have killed at least one battery that way. (Oops!) Maybe hook it up to a switched power circuit instead...
--DD |
|
|
|
| FlacaProductions |
Mar 28 2019, 02:22 PM
Post
#38
|
|
Advanced Member Group: Members Posts: 2,256 Joined: 24-November 17 From: LA Member No.: 21,628 Region Association: Southern California |
researching the truck light LEDs - did this ever get resolved?
|
|
|
|
| Chi-town |
Mar 28 2019, 04:19 PM
Post
#39
|
|
Senior Member Group: Members Posts: 851 Joined: 31-August 18 From: Disneyland Member No.: 22,446 Region Association: Southern California |
@bdstone914 looks like this is similar to the issue we were discussing
|
|
|
|
| Mikey914 |
Mar 29 2019, 09:11 AM
Post
#40
|
|
The rubber man Group: Members Posts: 12,782 Joined: 27-December 04 From: Hillsboro, OR Member No.: 3,348 Region Association: None |
QUOTE(Chi-town @ Mar 28 2019, 03:19 PM) I think it was the No high beams you were discussing. The relay requires more load to trigger to high, the additional wire in resistors fix that. Who would think not drawing current on the headlights could be a problem. |
|
|
|
| bdstone914 |
Mar 29 2019, 04:34 PM
Post
#41
|
|
bdstone914 Group: Members Posts: 5,342 Joined: 8-November 03 From: Riverside CA Member No.: 1,319 |
QUOTE(Mikey914 @ Mar 29 2019, 08:11 AM) QUOTE(Chi-town) I think it was the No high beams you were discussing. The relay requires more load to trigger to high, the additional wire in resistors fix that. Who would think not drawing current on the headlights could be a problem. @Chi-town @mikey914 Dylan, Yes exact same problem we discussed. Low beam on, turn on fogs and high beams come on. Common in LED conversions. Many U tube videos showing how to install the resistor of circuits like turn signal. Affect many vehicles. Mark, Who would have thought low resistance was a problem ? About everyone on this thread including me. |
|
|
|
| Spoke |
Mar 29 2019, 07:18 PM
Post
#42
|
|
Jerry Group: Members Posts: 7,411 Joined: 29-October 04 From: Allentown, PA Member No.: 3,031 Region Association: None |
Seems when changing to LEDs one should expect issues and then be pleasantly surprised if no issues arise.
For LED turnsignals likely the OEM flasher relay will need replaced. It's an absolute must with the 911 as its OEM flasher will hyperflash even if one turnsignal front or rear is replaced with LEDs. For 911's with cruise control, if all brake lights are changed to LEDs, the CC will not engage. Turns out the CC ECU dumps about 7ma into the brake lights. With incandescent bulbs, this is not a problem. With LED brake lights, the light will glow dimly as LEDs will light up even with a tenth of a milliamp. The 911 CC ECU monitors the voltage on the brake lights. I couldn't put enough ballast resistance on the boards to allow the CC to function properly. What solved this was the pigtail below with two 12 ohm 50W resistors in parallel. One 6 ohm 50W resistor could have been used but it would get too hot if one engaged the brakes for a long period of time. This pigtail is inserted in series with the brake light switch on the brake master cylinder. Attached thumbnail(s) 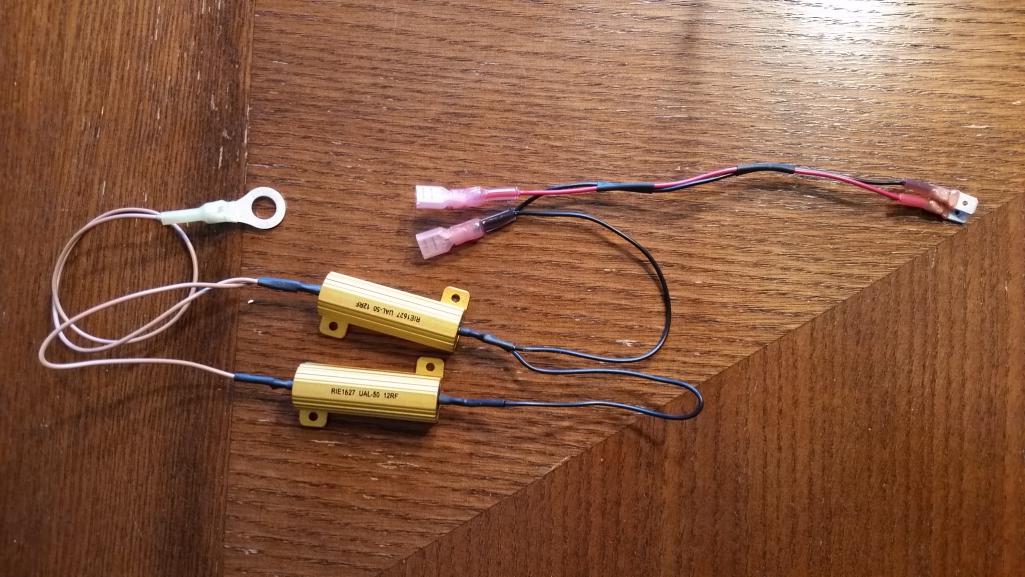 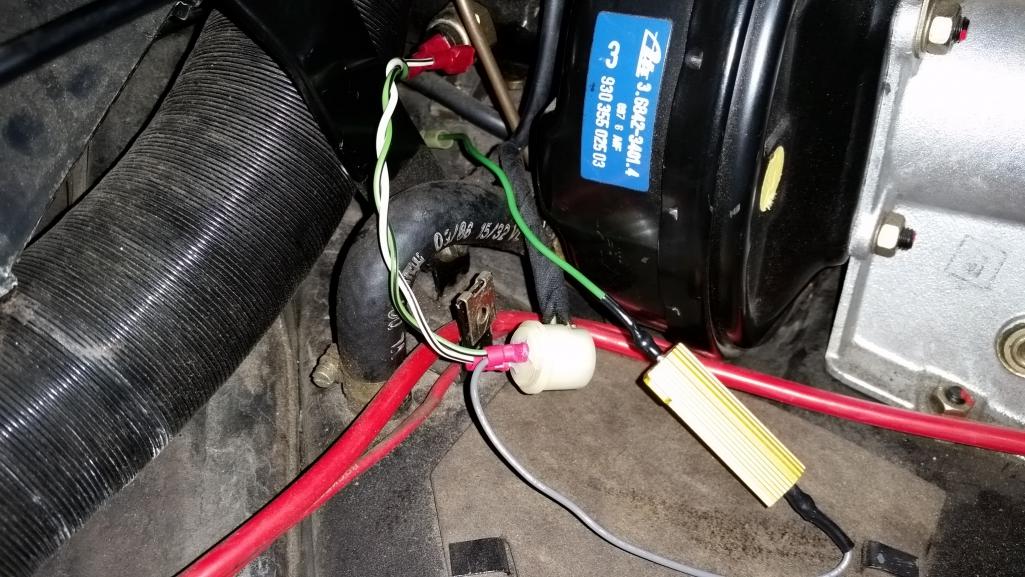
|
|
|
|
| Matty900 |
Mar 29 2019, 11:19 PM
Post
#43
|
|
Senior Member Group: Members Posts: 1,315 Joined: 21-February 15 From: Oregon Member No.: 18,454 Region Association: Pacific Northwest |
The issue is the led is not pulling enough load. When you add a resistor it solves the problem. We have them and I tested them to confirm that it solves the problem. I have not had the chance to finalize the install instructions and Bruce has been trying to help me on this. The only questions I have are where is the best place to mount it. One thought is to mount it to the headlight housing on the opposite side of the bar as far away from the metals pop up cover. The reason being, it's a resistor and will get warm. I don't want it next to the paint. The pros of putting it hear is that it is out of sight. The con's if you drive in the rain this can become a wet area so your connections need to be properly weather proofed (good barrel connectors and heat shrink.)
The 2nd photo is only showing you what wires you need to tie in to, not where to do so. However, you can put the wires in here and plug the light in to test and make sure this resolves your issue. Spoke, Chi-town, Mike B where would you suggest mounting this? Attached thumbnail(s) 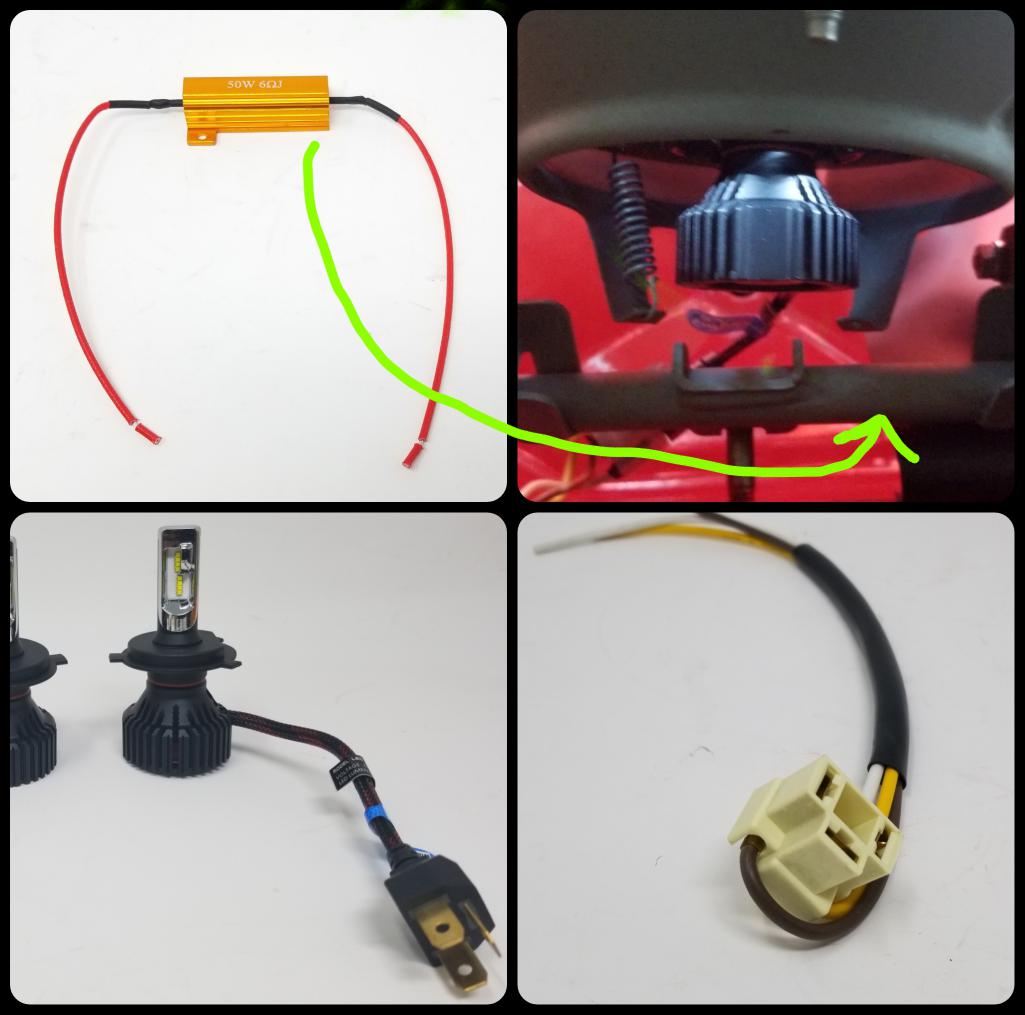 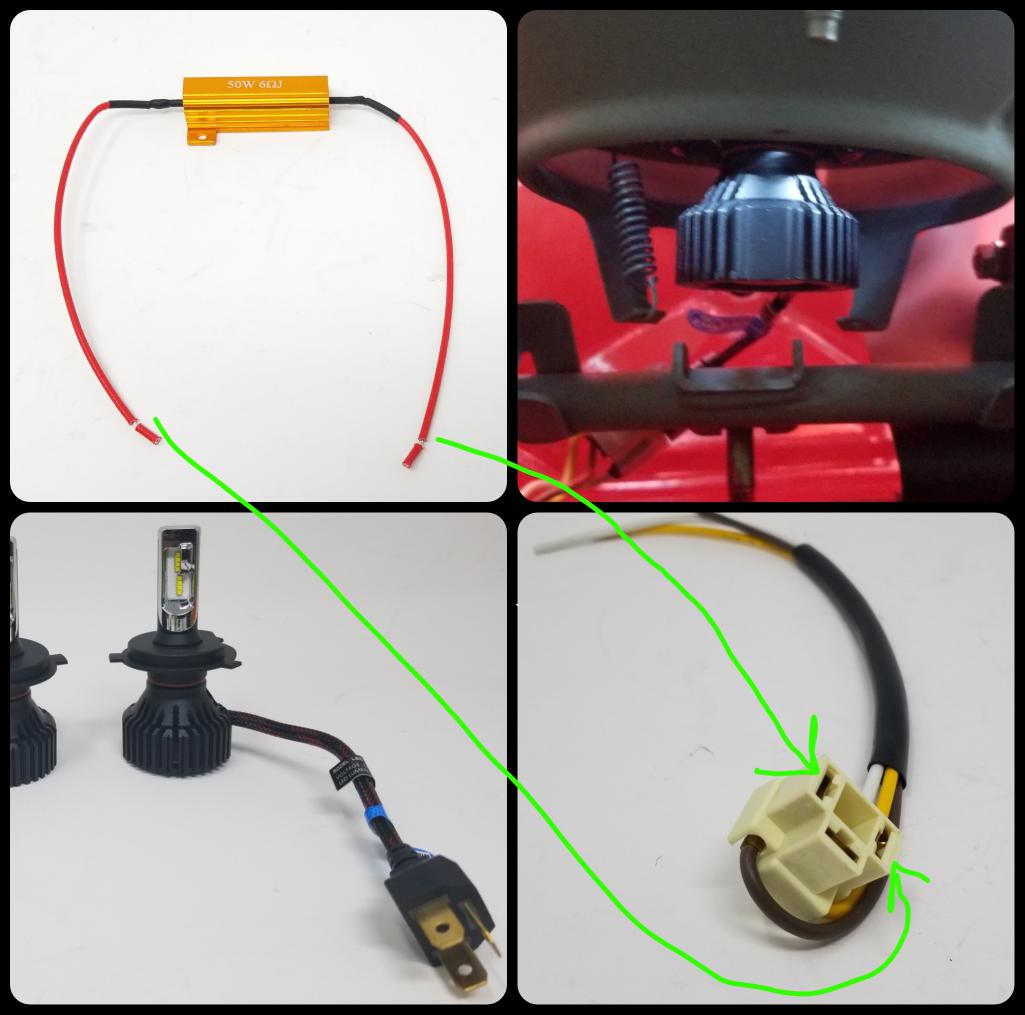
|
|
|
|
| Spoke |
Mar 30 2019, 07:46 AM
Post
#44
|
|
Jerry Group: Members Posts: 7,411 Joined: 29-October 04 From: Allentown, PA Member No.: 3,031 Region Association: None |
QUOTE(Matty900 @ Mar 30 2019, 01:19 AM) ...it's a resistor and will get warm. Spoke, Chi-town, Mike B where would you suggest mounting this? Does this go across the high beam or low beam LED? I assume the resistor will have full battery voltage (14V) on it when energized. From the picture it looks like its a 6 ohm, 50W resistor. With a 6 ohm resistor with 14V across it, it will be burning 32W (V*V/R). According to Vishay's TMC0506R000FE02 6 ohm, 50W resistor specs, free air mounting of the resistor allows only 40% of the power dissipation or 20W. To burn 32W reliably the resistor should be mounted on a metal surface like an inner fender likely using the tabs to mount it with screws. A metal brace or bracket might work as well as long as there is solid contact between the brace and the bottom of the resistor. All paint should be scraped off of the brace/bracket/fender for good thermal conduction. This derating in power dissipation in free air is why I ended up with two 12 ohm 50W resistors for the brake light ballast. I started with one 6 ohm 50W resistor but realized this would exceed the manufacturer's recommended free air power dissipation. The resistors for the brake ballast can be tie wrapped onto a brace near the brake MC. Can you use a higher ohm resistor like 12 ohm? If so, then the power dissipation would be 16W and would be consistent with the manufacturer's guidelines for free air mounting. I think you only need to be able to trick the high/low beam switch and provide a low enough resistance to energize the fog light relay. Interestingly these resistors are recommended as ballast resistors for turnsignals when LEDs are used. In this case, they can be used in free air since the turnsignal is on only 1/2 the time thus the overall power dissipation is 32/2 which is less than 20W (40%). |
|
|
|
| FlacaProductions |
Mar 30 2019, 09:10 AM
Post
#45
|
|
Advanced Member Group: Members Posts: 2,256 Joined: 24-November 17 From: LA Member No.: 21,628 Region Association: Southern California |
Sounds like this is the truth.....
QUOTE Seems when changing to LEDs one should expect issues and then be pleasantly surprised if no issues arise. |
|
|
|
|
1 User(s) are reading this topic (1 Guests and 0 Anonymous Users)
0 Members:

|
Lo-Fi Version | Time is now: 26th July 2026 - 07:44 PM |
Invision Power Board
v9.1.4 © 2026 IPS, Inc.