|
|

|
Porsche, and the Porsche crest are registered trademarks of Dr. Ing. h.c. F. Porsche AG.
This site is not affiliated with Porsche in any way. Its only purpose is to provide an online forum for car enthusiasts. All other trademarks are property of their respective owners. |
|
|
| McMark |
 Nov 28 2010, 12:20 PM Nov 28 2010, 12:20 PM
Post
#1
|
|
914 Freak!                Group: Retired Admin Posts: 20,179 Joined: 13-March 03 From: Grand Rapids, MI Member No.: 419 Region Association: None |
I'm got a tubing bender to make a replica GT half cage for a customer car. This is the style of bolt in cage used on some of the GT cars pictured on Armando's AWESOME GT site, as well as the style used in the PMB GT.
Material is mandrel bent 1.75" DOM 0.95", notched and will be completely welded. Plates are laser cut steel, ensuring they look great and fit perfectly. You will be required to weld the provided receiver plates onto your longs. These cages will keep the seats from moving all the way back because of the center brace bars. I have some ideas that will adapt the cage to work better with stock seats. PM me for details. Also, these cages will obviously not work with a stock backpad, nor the door handle/pocket. Each cage will be $xxx in bare steel, with powdercoating available. Shipping is possible, we're probably looking at crate and freight shipping, which should be around $175 (give or take $25). Cages are built to order. --Optional Item 1-- Leave off the two bars going to the center hump. This would let you keep the backpad and knock $xxx off the price. --Optional Item 2-- Leave off the forward/door bars. These add a lot of rigidity, but make getting in and out of the car harder. Leave these off and knock $xx off the price. Custom alterations are also available at full shop rate of $125/hr for actual time spent beyond the building of the standard cage. These cages are now special order. Contact me for details. 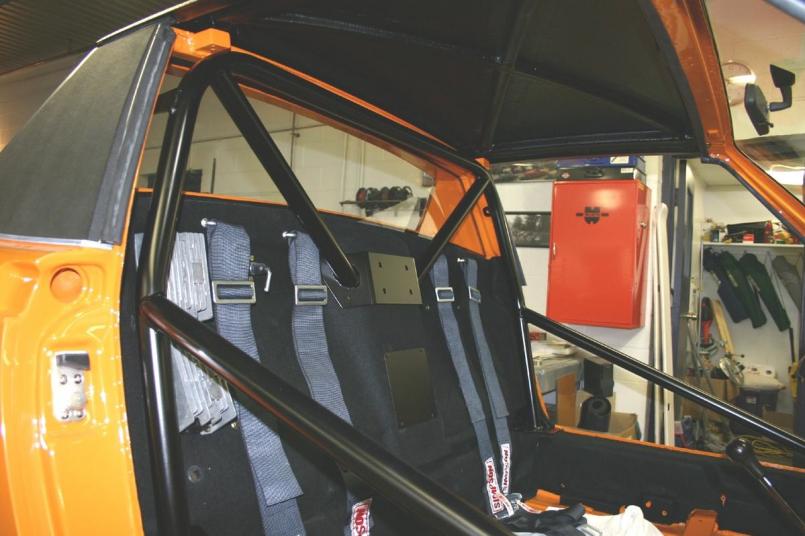 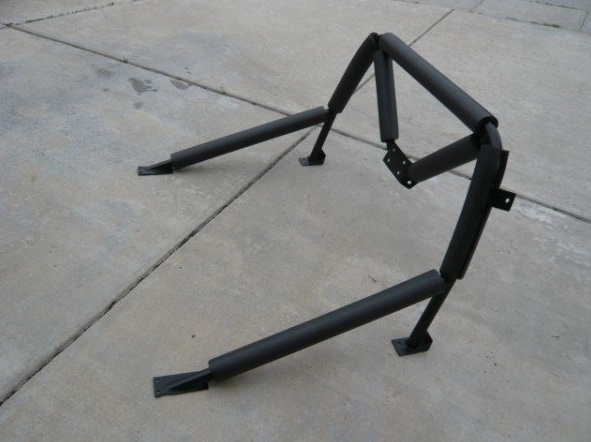 Installation Info: 1. Use a jack on both sides of the car, in the middle of car (between the wheels) with slight pressure simply to counteract the weight of the car. If you think about the way the weight is distributed, it's split between four wheels roughly equally. You're using the jack to try and distribute the weight six ways evenly. If you lift too much in the middle, you're changing the bias. This is not an exact science or setting. You just have to use your best judgement. 2. Test and measure the door gaps and opening closing effort before and during the welding process. Also measure between the targa bar and the windshield hoop, using the attached picture. Anything within 2-3mm is considered correct. But keep checking that measurement as you weld to make sure things aren't moving. 3. Do not run a bead longer than 1" ever on any joint. Long continuous welds are how cars get warped. 4. If you're using the bolt-in setup, weld the base plates in while they are bolted to the cage. Welding the base plates with the cage fully assembled ensures that everything lines up. 5. Get the cage to sit correctly, fully assembled, before fully welding a single piece. You cannot adjust things as you go. Get them all lined up, sitting flat, etc before you start permanently attaching things. 6. Tack weld the forward bars to the main hoop first, but fully weld the rear bottom plates first. Then weld the forward bottom plates and the forward bars to the main hoop at the same time. A little weld on each bottom plate, a little weld on the forward bar joint, then a little time to let things cool off. Then repeat. 7. Leave time for welds to cool completely between steps. This can seem long and tedious and it's REALLY hard to slow down and take your time. Ideally you'll have 30m of welding time spread out over 1.5-2h. More cooling time reduces the risk of warping the car and you can't let it cool too much. The times I just mentioned allow the welds to cool at the rate of 2-3m cooling for each minute of welding time. 8. Read #5 again. Good installs require good prep. The quality and success of your install ALL happens before you pick up the welder. Good luck. (IMG:style_emoticons/default/welder.gif) Attached image(s) 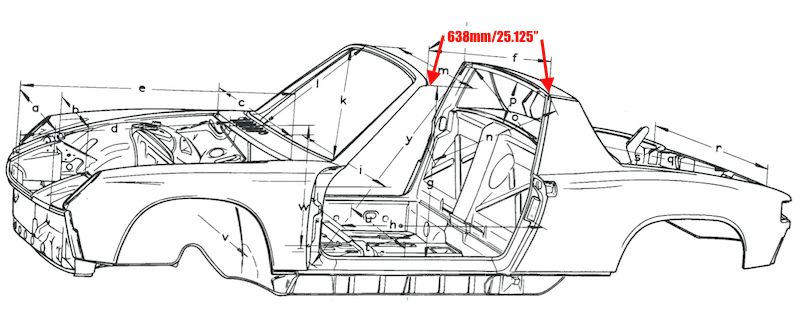
|
  |
Replies(20 - 39)
| SirAndy |
 Nov 28 2010, 08:22 PM Nov 28 2010, 08:22 PM
Post
#21
|
|
Resident German                          Group: Admin Posts: 41,651 Joined: 21-January 03 From: Oakland, Kalifornia Member No.: 179 Region Association: Northern California |
How much of a pain in the ass is it to get in and out with the side bar of the cage? I am 6ft, 220#. It's actually EASIER than without. You can use the sidebar to push yourself up when getting out of the car ... (IMG:style_emoticons/default/shades.gif) Andy |
| McMark |
 Nov 28 2010, 08:23 PM Nov 28 2010, 08:23 PM
Post
#22
|
|
914 Freak!                Group: Retired Admin Posts: 20,179 Joined: 13-March 03 From: Grand Rapids, MI Member No.: 419 Region Association: None |
Could/would you make one with the angled side-bars that are removable...so you can take them out for street driving? Would it still be stiff? Also would it be beneficial to add a Perry or Engman long stiff kit along with this? Man I need a new job so I can afford this! I'll do some figuring and get back to you. Nathan, We might be able to do something with these. (IMG:http://www.914world.com/bbs2/uploads_offsite/www.cachassisworks.com-419-1290997403.1.jpg) It'll add some cost though and sacrifice some rigidity, and probably aren't smart for actual track safety. |
| ConeDodger |
 Nov 28 2010, 08:24 PM Nov 28 2010, 08:24 PM
Post
#23
|
|
Apex killer!                Group: Members Posts: 23,596 Joined: 31-December 04 From: Tahoe Area Member No.: 3,380 Region Association: Northern California 
|
Mark,
Get a hold of Elliot Cannon. His door bar in the yellow car is an outstanding modification that can make these much easier to get in and out of with a street car. |
| jmill |
 Nov 28 2010, 08:57 PM Nov 28 2010, 08:57 PM
Post
#24
|
|
Green Hornet     Group: Members Posts: 2,449 Joined: 9-May 08 From: Racine, Wisconsin Member No.: 9,038 Region Association: Upper MidWest |
Looks bada$$. (IMG:style_emoticons/default/wub.gif)
|
| rick 918-S |
 Nov 28 2010, 09:50 PM Nov 28 2010, 09:50 PM
Post
#25
|
|
Hey nice rack! -Celette                Group: Members Posts: 20,464 Joined: 30-December 02 From: Now in Superior WI Member No.: 43 Region Association: Northstar Region 

|
Nice idea Mark. The GT bar is a nice looking design.
|
| ottox914 |
 Nov 28 2010, 10:30 PM Nov 28 2010, 10:30 PM
Post
#26
|
|
The glory that once was.    Group: Members Posts: 1,302 Joined: 15-December 03 From: Mahtomedi, MN Member No.: 1,438 Region Association: Upper MidWest  |
McMark: waddya think of this? The 914T currently has the Brad Mayeur heavy duty outer long kit installed. It was not installed to repair ANY structural rust or rot to the longs, I added it to a solid car to keep it that way. IF I was to add your rollbar kit, would the car be stiff enough that I could remove the box sections that run between the center tunnel and the outer sill that the seats mount to? I've been thinking I'd like to put some after market seats in, and retain the seat slider/tilt system that is in the car now, but would need to mount it flat to the floor to fit a non-914 seat. In my car pics you can see the OMP seat I have in the car on the driver side. I made some flat adapters to fit the seat to the oem sliders, and when I'm in the car with my helmet on, I am above the windshield with the top of the helmet. I'd like to put in 2 matching seats, and mount them lower. I was thinking of a full autopower style cage, but had concerns on the street. Your cage could be one solution to consider.
What does anyone think? With Brads outer kit already installed, and if I were to add McMarks rollbar, would adding the engman kit add much more strength? I could easily have a weld-a-thon one weekend and do the engman and the roll bar... ...and, what would you need to do for a replacement back pad- go over the metal firewall directly, or leave the insulation panel glued on and go over that? Attached image(s) 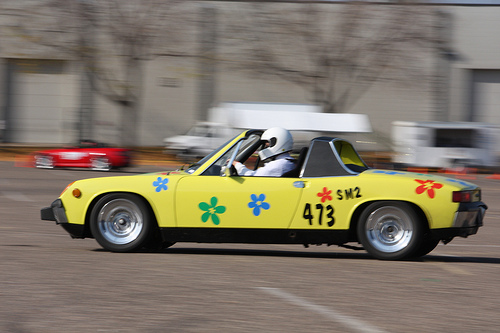 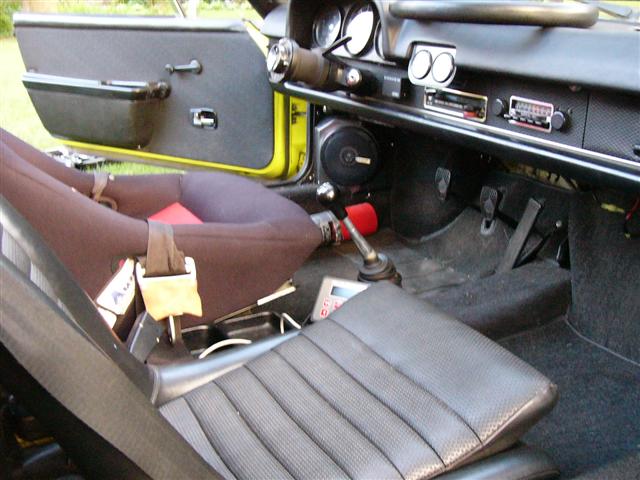 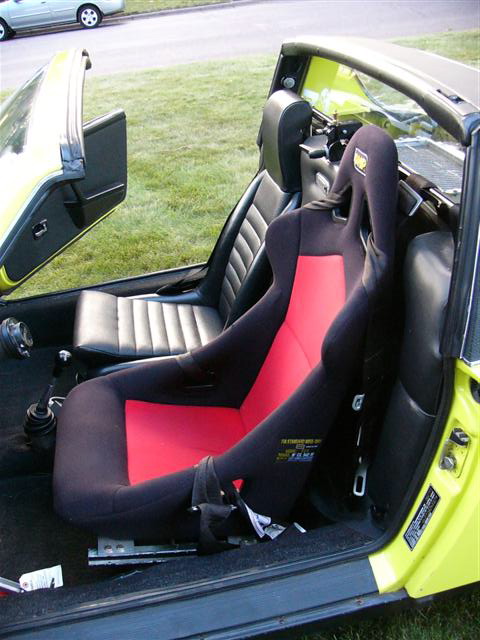
|
| zx-niner |
 Nov 28 2010, 10:33 PM Nov 28 2010, 10:33 PM
Post
#27
|
|
Member   Group: Members Posts: 294 Joined: 13-June 05 From: Las Vegas, NV Member No.: 4,269 Region Association: Central California |
Does it require use of a racing harness in place of stock seat belts?
|
| McMark |
 Nov 28 2010, 11:32 PM Nov 28 2010, 11:32 PM
Post
#28
|
|
914 Freak!                Group: Retired Admin Posts: 20,179 Joined: 13-March 03 From: Grand Rapids, MI Member No.: 419 Region Association: None |
No, you can use any belts you wish.
|
| McMark |
 Nov 28 2010, 11:44 PM Nov 28 2010, 11:44 PM
Post
#29
|
|
914 Freak!                Group: Retired Admin Posts: 20,179 Joined: 13-March 03 From: Grand Rapids, MI Member No.: 419 Region Association: None |
Dave,
I think the cross-bar under the seats is of little structural value. I think it's partly to provide a support for the seats, and partly to brace the floor pan. Check out post #50 of this thread where horizontally-opposed modified the beam for the same purpose as you. If I were doing the modification, I would go this route. That way the floor pan retains some support. Moving the beam forward would also accomplish the same. You cannot lower the seat and keep the tilt feature. The 'teeth' that lock the height adjustment are part of what makes the cross-beam so tall. To get height adjustment you would need to fabricate something custom. I would also think that you'll get the best results by getting rid of the seat hinges. I think this GT half-cage would marginalize the Engman kit. If you're looking for every last scrap of stiffening, then you could do both. Because you can't use the stock backpad, a bare firewall or a carpeted firewall would be the only solution. |
| Elliot Cannon |
 Nov 29 2010, 12:54 AM Nov 29 2010, 12:54 AM
Post
#30
|
|
914 Guru      Group: Retired Members Posts: 8,487 Joined: 29-December 06 From: Paso Robles Ca. (Central coast) Member No.: 7,407 Region Association: None 

|
I have no idea where the hardware for this came from but it works pretty good. I'll sell anyone the side bars for $20,000. What the hell, I'll even throw in the car. (IMG:style_emoticons/default/av-943.gif)
Attached thumbnail(s) 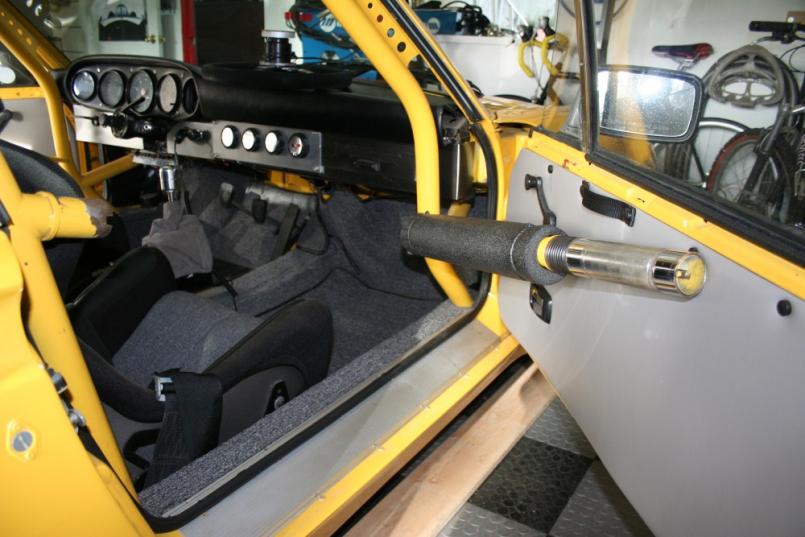 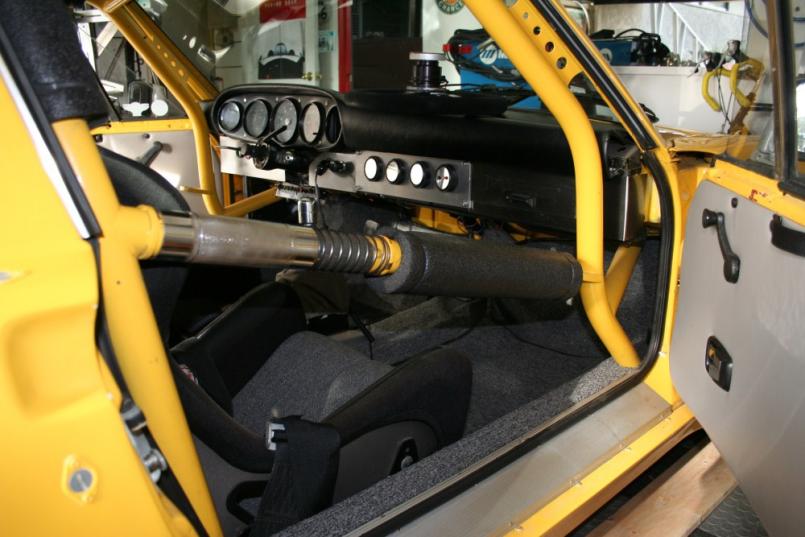
|
| Zimms |
 Nov 29 2010, 05:33 AM Nov 29 2010, 05:33 AM
Post
#31
|
|
Senior Member    Group: Members Posts: 1,413 Joined: 11-February 06 From: Michigan Member No.: 5,565 Region Association: Upper MidWest 
|
How much of a pain in the ass is it to get in and out with the side bar of the cage? I am 6ft, 220#. It's actually EASIER than without. You can use the sidebar to push yourself up when getting out of the car ... (IMG:style_emoticons/default/shades.gif) Andy Thanks! |
| race914 |
 Nov 29 2010, 09:48 AM Nov 29 2010, 09:48 AM
Post
#32
|
|
73 914-4    Group: Members Posts: 1,006 Joined: 31-October 05 From: Nipomo, California (Central Coast) Member No.: 5,027 Region Association: Central California |
Hi McMark,
Thanks so much for reproducing these. I'm on a never-ending quest to make our (the 914-6 is Tricia's) GT clone a really accurate clone! 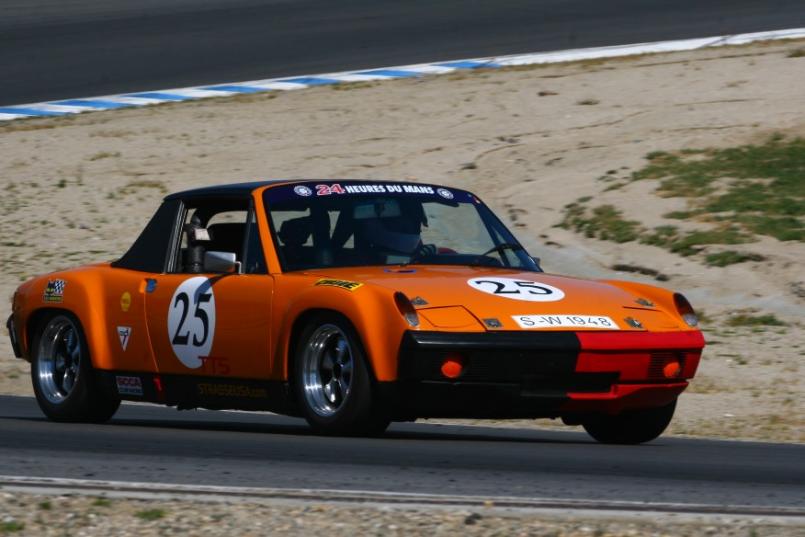 I'm investigating my 'secret' 914 funds now to see if I can order one without being kicked out of the house... (I've already ordered the GT headlight kit.. shhhhhhh : ) Just a quick question, which is somewhat OT from the originality. Didn't brant have a post about the safety factor of a side to side bar behind the seats? I thought he promoted the safety of a side to side bar with a T-Bone in the drivers door? I'm not proposing you add these, but just want to respond to the previous posts and offer the thought that they are functional and do add some safety. Thanks again for offering this exciting GT product! I'll be in touch Greg |
| McMark |
 Nov 29 2010, 12:31 PM Nov 29 2010, 12:31 PM
Post
#33
|
|
914 Freak!                Group: Retired Admin Posts: 20,179 Joined: 13-March 03 From: Grand Rapids, MI Member No.: 419 Region Association: None |
I think in this case, if all-inclusive safety is your #1 goal, this may not be the product for you. I'm making this available as a replica GT part for 'originality' purposes, as well as a stiffening benefit. There is obviously a safety benefit to any roll bar/cage, but this setup is less about safety than some of the others.
That being said, I would love to see a link to the post you're thinking of. I'm always eager to learn, and other bolt in/weld in cages may be in my future. (IMG:style_emoticons/default/wink.gif) |
| jt914-6 |
 Nov 29 2010, 12:50 PM Nov 29 2010, 12:50 PM
Post
#34
|
|
Driving & working on teeners 41 years    Group: Members Posts: 1,786 Joined: 3-May 08 From: Bryant, Arkansas Member No.: 9,003 Region Association: South East States |
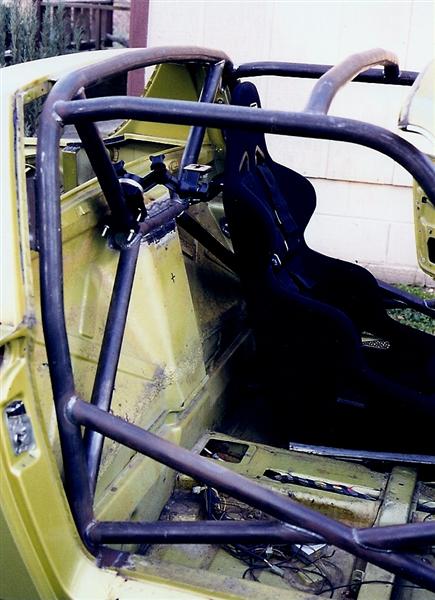
That looks a whole lot like a Safety Devices bolt in roll cage for a 914. I bought one years ago with the idea of having it welded in. Instead I used it for a pattern and made my own full cage from the pattern and sold the bolt in cage....I did not use the plate on the firewall...did something better..... (IMG:style_emoticons/default/biggrin.gif)
|
| McMark |
 Nov 29 2010, 12:53 PM Nov 29 2010, 12:53 PM
Post
#35
|
|
914 Freak!                Group: Retired Admin Posts: 20,179 Joined: 13-March 03 From: Grand Rapids, MI Member No.: 419 Region Association: None |
(IMG:style_emoticons/default/blink.gif) Looks pretty different to me...
(IMG:http://www.914world.com/bbs2/uploads_offsite/www.stableenergies.com-419-1291056813.1.jpg) |
| jt914-6 |
 Nov 29 2010, 01:04 PM Nov 29 2010, 01:04 PM
Post
#36
|
|
Driving & working on teeners 41 years    Group: Members Posts: 1,786 Joined: 3-May 08 From: Bryant, Arkansas Member No.: 9,003 Region Association: South East States |
The one I had was from the mid 90's. They may have changed the design since.... (IMG:style_emoticons/default/dry.gif)
|
| McMark |
 Nov 29 2010, 01:05 PM Nov 29 2010, 01:05 PM
Post
#37
|
|
914 Freak!                Group: Retired Admin Posts: 20,179 Joined: 13-March 03 From: Grand Rapids, MI Member No.: 419 Region Association: None |
|
| Brett W |
 Nov 29 2010, 01:08 PM Nov 29 2010, 01:08 PM
Post
#38
|
|
Advanced Member     Group: Members Posts: 2,856 Joined: 17-September 03 From: huntsville, al Member No.: 1,169 Region Association: None 
|
SCCA requires a full diagonal to run from the top corner to a bottom corner in order to be legal for Time Trial, you might see if you can convince them that these are just as strong and get them allowed. Otherwise they aren't SCCA legal unless you do a diagonal on the rearward down bars, which will totally ruin your goal of having a replica bar.
|
| Eric_Shea |
 Nov 29 2010, 02:41 PM Nov 29 2010, 02:41 PM
Post
#39
|
|
PMB Performance                Group: Admin Posts: 19,275 Joined: 3-September 03 From: Salt Lake City, UT Member No.: 1,110 Region Association: Rocky Mountains  |
I don't recommend any further stiffening kits with these. Added weight that won't be necessary.
|
| jt914-6 |
 Nov 29 2010, 02:48 PM Nov 29 2010, 02:48 PM
Post
#40
|
|
Driving & working on teeners 41 years    Group: Members Posts: 1,786 Joined: 3-May 08 From: Bryant, Arkansas Member No.: 9,003 Region Association: South East States |
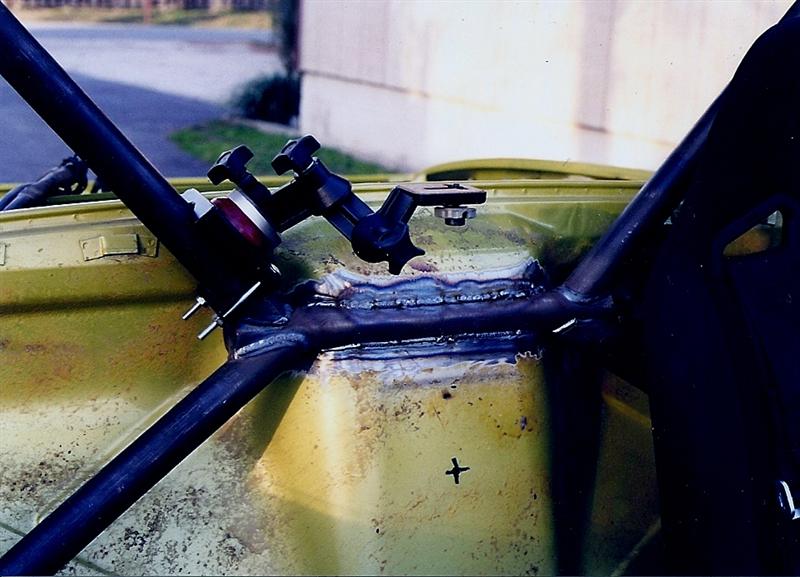
Here's the way mine was done. Instead of the flat piece that goes on the firewall we put in a piece through the firewall connecting all four of the rear brace bars. I would think that would pass for a top to bottom corner bar??? (IMG:style_emoticons/default/idea.gif)
  |
  |
1 User(s) are reading this topic (1 Guests and 0 Anonymous Users)
0 Members:

|
Lo-Fi Version | Time is now: 23rd May 2024 - 01:50 AM |
Invision Power Board
v9.1.4 © 2024 IPS, Inc.


