|
|
|
Porsche, and the Porsche crest are registered trademarks of Dr. Ing. h.c. F. Porsche AG.
This site is not affiliated with Porsche in any way. Its only purpose is to provide an online forum for car enthusiasts. All other trademarks are property of their respective owners. |
|
|

  |

| ptravnic |
 May 1 2011, 07:04 AM May 1 2011, 07:04 AM
Post
#1
|
|
Senior Member  Group: Members Posts: 1,231 Joined: 27-May 03 From: Chicago, IL Member No.: 747 Region Association: None |
Anyone had the "jumpy" fuel gauge problem before?
I have a 72 that I've had for ~20yrs. The tank was treated sometime in the mid-90's and I haven't had a problem w/fuel delivery or gauge reading...until now. The car sat w/only a few gallons of gas for the past 5yrs. It got its first full tank on the drive back from Brad Mayeur's last month (he did some work over the winter) While fuel delivery is not a problem but my dash gauge jumps around a bit and sometimes doesn't get a reading at all. I'd like to get this sorted before I get it in for paint - just in case the "fix" involves taking the tank out. I know tank removal can be done without scratching the paint but I'd rather not run the risk. Before I pony up to a new sending unit, could it just be dried out or an intermittent ground somewhere on/around the sending unit? -pt |
   |

 
|
| Mike Bellis |
May 1 2011, 08:25 AM
Post
#2
|
|
Resident Electrician Group: Members Posts: 8,345 Joined: 22-June 09 From: Midlothian TX Member No.: 10,496 Region Association: None |
If you're going to paint it, pull the tank first.
Sounds like a bad or dirty sending unit. There are 3 wires to the sender located on the top of the tank. The brown wire is ground. It is bonded next to the fuse panel. Make sure your grounds are tight. The green wire is the signal 10-70 ohms. The black is the low fuel light. McMark did a write up on cleaning the sender. Remove it, take off the little nut at the bottom. Gently persuade the sender apart. There is a float and a resistance wire inside. Be careful if the wire breaks, game over. Once apart, use some laquer thinner to clean the wire and terminals. Use an Ohm meter to make sure the resistance changes smoothly. re assemble and test with the guage. If it doesn't fix it, find a used one or fork over $140 for a new one. |
|
|
|
| ptravnic |
May 1 2011, 09:40 AM
Post
#3
|
|
Senior Member Group: Members Posts: 1,231 Joined: 27-May 03 From: Chicago, IL Member No.: 747 Region Association: None |
QUOTE(kg6dxn @ May 1 2011, 09:25 AM)  McMark did a write up on cleaning the sender. Remove it, take off the little nut at the bottom. Gently persuade the sender apart. There is a float and a resistance wire inside. Be careful if the wire breaks, game over. Once apart, use some laquer thinner to clean the wire and terminals. Use an Ohm meter to make sure the resistance changes smoothly. re assemble and test with the guage. If it doesn't fix it, find a used one or fork over $140 for a new one. I'm able to find your writeup: your post re gauges but couldn't find a write up from McMark on the topic. However, I did find this: Fuel Sending Unit Cleaning It is probably dirty and the float is sticking. Looks like this will get me pointed in the right direction. Many thanks. (IMG:style_emoticons/default/bye1.gif) -pt |
|
|
|
| ptravnic |
May 1 2011, 09:55 AM
Post
#4
|
|
Senior Member Group: Members Posts: 1,231 Joined: 27-May 03 From: Chicago, IL Member No.: 747 Region Association: None |
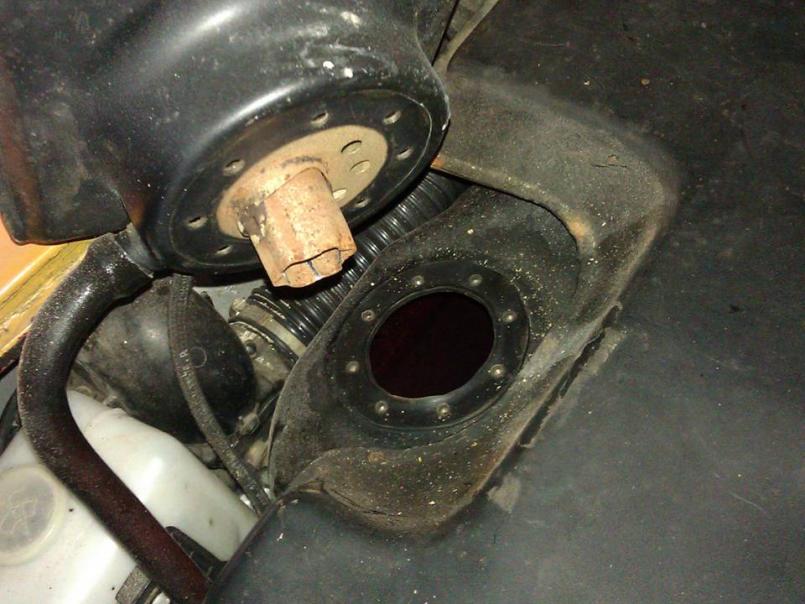
Uh, er, um - I think I'm missing something here... The long sending unit is supposed to be attached to this stump, right?
 |
|
|
|
| Strudelwagon |
May 1 2011, 09:59 AM
Post
#5
|
|
Member Group: Members Posts: 411 Joined: 11-October 08 From: interior, British Columbia Member No.: 9,633 Region Association: Canada |
QUOTE(ptravnic @ May 1 2011, 08:55 AM) Uh, er, um - I think I'm missing something here... The long sending unit is supposed to be attached to this stump, right? It's under the expansion tank on the other side of the seam weld on the tank. I just put mine back together....follow the wires S |
|
|
|
| StratPlayer |
May 1 2011, 10:00 AM
Post
#6
|
|
StratPlayer Group: Members Posts: 3,278 Joined: 27-December 02 From: SLC, Utah Member No.: 27 Region Association: Rocky Mountains |
It sure is missing
|
|
|
|
| ptravnic |
May 1 2011, 10:05 AM
Post
#7
|
|
Senior Member Group: Members Posts: 1,231 Joined: 27-May 03 From: Chicago, IL Member No.: 747 Region Association: None |
QUOTE(StratPlayer @ May 1 2011, 11:00 AM) It sure is missing I was afraid of that. The tank is about 3/4 full, too. I suppose I can siphon it out... Better to have found out now before paint! -pt |
|
|
|
| Mike Bellis |
May 1 2011, 11:42 AM
Post
#8
|
|
Resident Electrician Group: Members Posts: 8,345 Joined: 22-June 09 From: Midlothian TX Member No.: 10,496 Region Association: None |
The expansion tank sits on top of the fuel tank. It is full of vapor only. There is a screw next to the center strap and one behind the tank on the passenger side. Remove it and you will see the sender. You do not have to remove the piece you did. As long as it is off, leave it off and remove the expansion tank. The fuel sender is closer to the center of the tank, right on top.
|
|
|
|
| ptravnic |
May 1 2011, 12:03 PM
Post
#9
|
|
Senior Member Group: Members Posts: 1,231 Joined: 27-May 03 From: Chicago, IL Member No.: 747 Region Association: None |
QUOTE(kg6dxn @ May 1 2011, 12:42 PM) The expansion tank sits on top of the fuel tank. It is full of vapor only. There is a screw next to the center strap and one behind the tank on the passenger side. Remove it and you will see the sender. You do not have to remove the piece you did. As long as it is off, leave it off and remove the expansion tank. The fuel sender is closer to the center of the tank, right on top. Good catch. Will report back later today. |
|
|
|
| ptravnic |
May 1 2011, 08:35 PM
Post
#10
|
|
Senior Member Group: Members Posts: 1,231 Joined: 27-May 03 From: Chicago, IL Member No.: 747 Region Association: None |
Removed the sending unit, cleaned up the main shaft w/light steel wool and took extra caution not to damage the thin wires. One of the wires was outside of the two pick ups so I put it back in-between the two where it belongs.
Turned on the ignition and TaDa - the gauge now correctly reads 5/8 of a tank. Won't be able to drive test it for a bit since I have the dash ripped apart for other things but I do believe the sending unit just needed a little TLC. Thanks for the guidance! (IMG:style_emoticons/default/beerchug.gif) -pt |
|
|
|
|
1 User(s) are reading this topic (1 Guests and 0 Anonymous Users)
0 Members:

|
Lo-Fi Version | Time is now: 2nd June 2024 - 10:56 AM |
Invision Power Board
v9.1.4 © 2024 IPS, Inc.