|
|
|
Porsche, and the Porsche crest are registered trademarks of Dr. Ing. h.c. F. Porsche AG.
This site is not affiliated with Porsche in any way. Its only purpose is to provide an online forum for car enthusiasts. All other trademarks are property of their respective owners. |
|
|

  |

| TargaToy |
 Mar 3 2012, 08:13 AM Mar 3 2012, 08:13 AM
Post
#1
|
|
-NONSOLIS RADIOS SEDIOUIS FULMINA MITTO-  Group: Members Posts: 714 Joined: 26-March 10 From: DelMarVa Peninsula Member No.: 11,509 Region Association: MidAtlantic Region |
Rick's recent posts where he expertly repaired a previously filled dent in his green car's fender prompted me to post this question. I'm working on the same part of my car but didn't want to hijack his post.
Speaking of beating down the hight spots, this is what was under the filler: 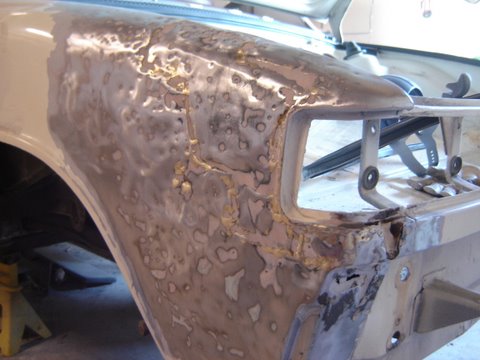 I cut out the whole bad section and reworked the same section I had in a salvaged fender. 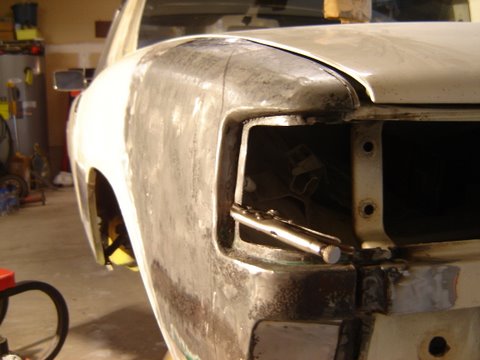 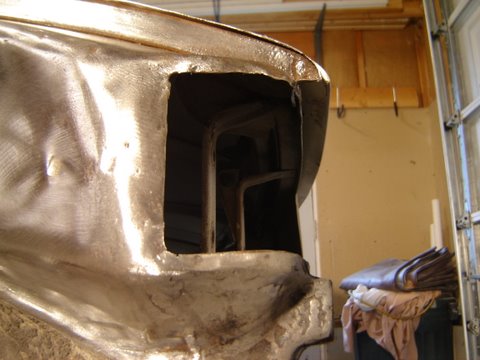 As you can see, I cut out the old section right along the top edge of the quarter panel. The cut line was only about 3/16" from the channel for the trunk weather-stripping. 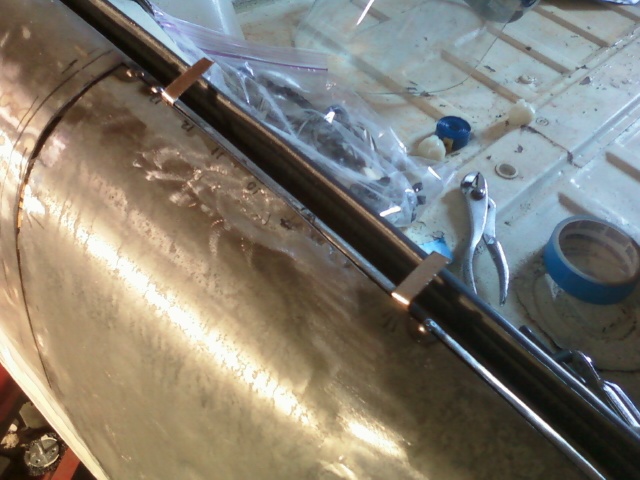  In retrospect, I may have made a booboo here. I thought I took my sweet time welding in this panel but now that everything's said and done (and cooled off), the shrinkage in the panel has pulled the trunk lid gap a bit. 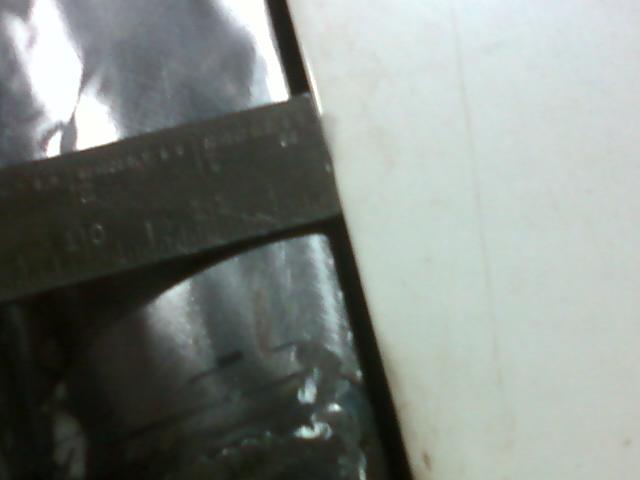 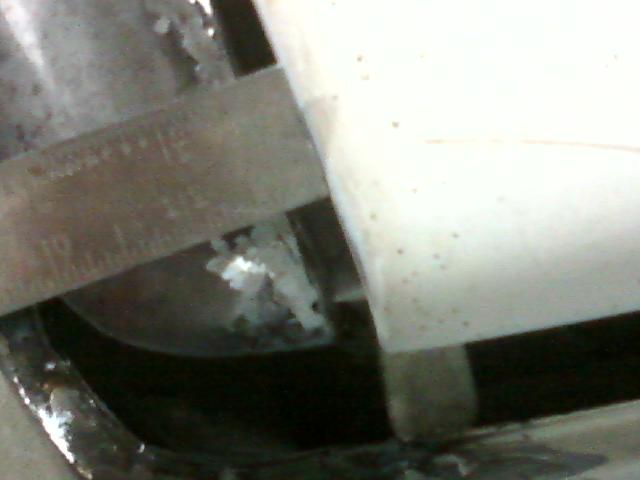 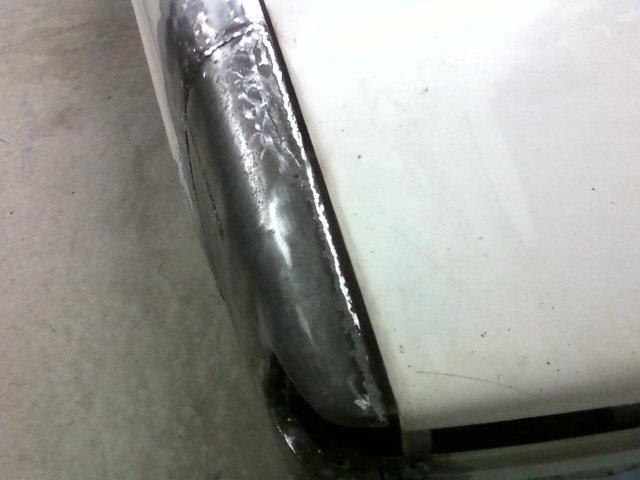 Rick, you once told me that if the gaps were within 3mm (3 dimes) not to stress as the bodies were hand built. However, I'm not thrilled with the trunk gap now and and my finish grinding is not even done yet which means there'll be more heat introduced. Can this be corrected? Also, my vertical weld where the two panels join also shrank a bit. Can I use some dolly work and bumping to bring the area out once I do my finish grinding and minimize the amount of filler that'll be needed? |
   |

 
|
| rick 918-S |
Mar 3 2012, 09:59 AM
Post
#2
|
|
Hey nice rack! -Celette Group: Members Posts: 21,263 Joined: 30-December 02 From: Now in Superior WI Member No.: 43 Region Association: Northstar Region |
No no.. The 3mm tolerance I was refering to is for acceptable chassis repair diamensions ( strut tower locations, suspension pickup points, diagonal measurements like windsheild post to targa bar etc.) Best to be right on the money for these, but if your within 3mm your fine.
Average door gaps should be around 5+mm. Front lids align from the cowl edge then check your side measurements. Rear trunk lids are never that accurate. There always seems to be some hang over at the corners and the gaps never seem to be perfect. But what you have there is way out of spec. Here's what I would do: Align the lid to the engine lid and passanger side quarter panel. The goal is to be able to open the lid without catching the engine lid. Depending on the rear trunk hinges and the angle they lift, your gap to the engine lid will very. Now heres where it gets dicey. I just measured the Alien. I had 5mm on the drivers side and 8mm on the passanger side. The lid closes good and just clears my engine lid so I'm good with that. (IMG:style_emoticons/default/confused24.gif) (IMG:style_emoticons/default/biggrin.gif) So, if your anywhere near 5-8mm and the lid latches and the corners aren't too far out of whack You should be fine. Now check the gap about mid way up the left side of the lid. This should be past the area you cut out. It sux but take your die grinder or panel saw or what ever you want to use and slice the panel back open along your weld line. Once it's opened up you can push the lip back over and line it up to the gap you measured half way up the lid. Use something wide like a flat spoon dolly of something that will allow you to move it gradually. Your going to have a sizeable gap. There are a couple ways to fill it. One of them is NOT to try to fill it with mig welding wire. If you can get the gap free of bumps from your last weld job that would be great. I mean under the quarter panel. This may require cutting part or all of the upper weld seam away. Don't worry about it. Just do it. Tape some tag board or poster board or cereal box over the gap you made. TIP OF THE DAY: If you have a print shop near you stop in and ask them to sell you some tag board. This is the stuff that they use as the heavy cardboard for desk top size calendars. It cuts nice and shapes good for pattern making. Ok, Back to the issue at hand. Once you have the above done take some weld through primer and spray lightly over the gap. This will make your pattern. Cut this out, mark a piece of sheetmetal cut it, shape it and fit it. Tight but nice! Now dig into your scrape metal pile and find a piece of old copper tubing. 3/4" works really good. Cut a section, hammer it flat. This will be used as a backer and will help hold the panelfrom pulling again. Shape it to fit the inside contour of the panel. You don't have to do the whole length at once. Infact shaping a backer that long may be a real pain in the ass. I usually try to back about 6" at a time. Then move the backer. If I were you I would fit the backer and either cleco it to the panel or use a couple sheetmetal screws to hold it. I wouldn't try to clamp it as the weight of the clamp may lift the panel and cause mis-alignment. Work slowly and tack the piece in place. Grind your tacks and check it as you go. Once your done welding you can grind everything and plug weld your cleco or sheetmetal screw holes. You not upside down. You just learned what not to do. Oh, BTW: you did the right thing replacing that nasty cracker jack surprise! |
|
|
|
| GeorgeRud |
Mar 3 2012, 10:04 AM
Post
#3
|
|
Advanced Member Group: Members Posts: 3,725 Joined: 27-July 05 From: Chicagoland Member No.: 4,482 Region Association: Upper MidWest |
Does anyone use lead anymore to do final fitting on gaps such as these? I thought that was the way door gaps were finalized in the old 356 days.
|
|
|
|
| rick 918-S |
Mar 3 2012, 10:13 AM
Post
#4
|
|
Hey nice rack! -Celette Group: Members Posts: 21,263 Joined: 30-December 02 From: Now in Superior WI Member No.: 43 Region Association: Northstar Region |
QUOTE(GeorgeRud @ Mar 3 2012, 10:04 AM)  Does anyone use lead anymore to do final fitting on gaps such as these? I thought that was the way door gaps were finalized in the old 356 days. Yep, 356's but the panel fits were not good to begin with. 914's have pretty good panel fit to begin with, with the exception of the rear lids. It's a large opening with no real defining cowl line to build off of. |
|
|
|
| rudedude |
Mar 3 2012, 10:41 AM
Post
#5
|
|
Senior Member Group: Members Posts: 560 Joined: 1-January 05 From: minneapolis, mn Member No.: 3,387 Region Association: Upper MidWest |
Rick,
Kind of off this topic but closely related, how does your lenco panelspotter work with your new attachment for spot welding structural panels? Since the 356 topic got introduced I am doing extensive panel replacement on one and it would be so much easier than plug welding. Thanks, Jule |
|
|
|
| rick 918-S |
Mar 3 2012, 11:42 AM
Post
#6
|
|
Hey nice rack! -Celette Group: Members Posts: 21,263 Joined: 30-December 02 From: Now in Superior WI Member No.: 43 Region Association: Northstar Region |
QUOTE(rudedude @ Mar 3 2012, 10:41 AM) Rick, Kind of off this topic but closely related, how does your lenco panelspotter work with your new attachment for spot welding structural panels? Since the 356 topic got introduced I am doing extensive panel replacement on one and it would be so much easier than plug welding. Thanks, Jule It works good but you have to carefully set the pinch tension or you will blow holes through the panel flanges. |
|
|
|
| TargaToy |
Mar 4 2012, 08:49 PM
Post
#7
|
|
-NONSOLIS RADIOS SEDIOUIS FULMINA MITTO- Group: Members Posts: 714 Joined: 26-March 10 From: DelMarVa Peninsula Member No.: 11,509 Region Association: MidAtlantic Region |
Hey, Rick. Thanks as always for the (free) expert advice. Wish we lived closer as I truly enjoy learning from the experienced.
For anybody interested in learning from my mistakes, here's a little follow up after cutting my weld line back out: 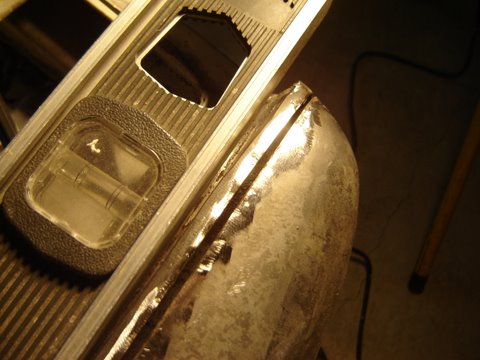 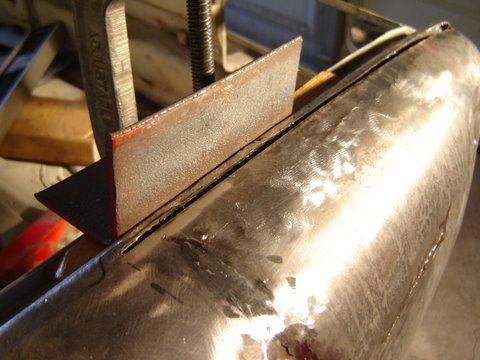 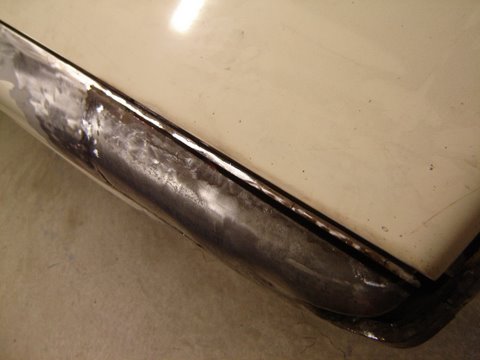 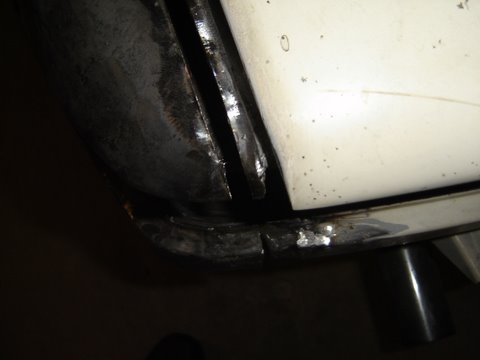 Now I'm considering reshaping the fender point to bring it out a bit. The trunk lid is parallel at the motor cover and the PS gap looks very good. Fender from motor cover to point on DS is 1/8" shorter than on the PS. You can see in the last couple shots how the fender and trunk lid don't match. Should I lengthen the point by 1/8"? 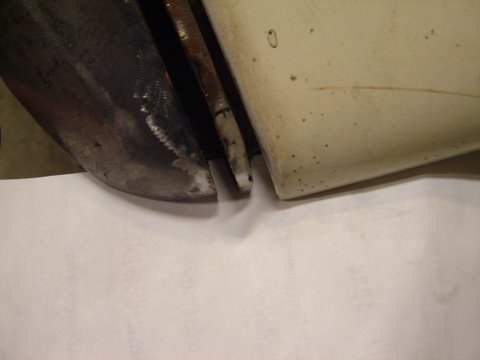 |
|
|
|
| rick 918-S |
Mar 4 2012, 09:04 PM
Post
#8
|
|
Hey nice rack! -Celette Group: Members Posts: 21,263 Joined: 30-December 02 From: Now in Superior WI Member No.: 43 Region Association: Northstar Region |
I think my rear lid is like that. Is the passenger side like that?
|
|
|
|
| rick 918-S |
Mar 4 2012, 09:07 PM
Post
#9
|
|
Hey nice rack! -Celette Group: Members Posts: 21,263 Joined: 30-December 02 From: Now in Superior WI Member No.: 43 Region Association: Northstar Region |
Make sure your tail light fits also.
|
|
|
|
| TargaToy |
Mar 4 2012, 09:16 PM
Post
#10
|
|
-NONSOLIS RADIOS SEDIOUIS FULMINA MITTO- Group: Members Posts: 714 Joined: 26-March 10 From: DelMarVa Peninsula Member No.: 11,509 Region Association: MidAtlantic Region |
QUOTE(rick 918-S @ Mar 4 2012, 10:04 PM) I think my rear lid is like that. Is the passenger side like that? The passenger side looks almost perfect but, then, I haven't removed the paint over there yet. I know for sure there's filler in the seam below the PS light and I also know the trunk lid has been filled along the entire rear edge. It's lumpy and irregular, although the lid itself measures the same length on both sides at the corners. QUOTE(rick 918-S @ Mar 4 2012, 10:04 PM) Make sure your tail light fits also. Light fitment on DS still looking good. |
|
|
|
| rick 918-S |
Mar 4 2012, 09:37 PM
Post
#11
|
|
Hey nice rack! -Celette Group: Members Posts: 21,263 Joined: 30-December 02 From: Now in Superior WI Member No.: 43 Region Association: Northstar Region |
QUOTE(TargaToy @ Mar 4 2012, 09:16 PM) QUOTE(rick 918-S @ Mar 4 2012, 10:04 PM) I think my rear lid is like that. Is the passenger side like that? The passenger side looks almost perfect but, then, I haven't removed the paint over there yet. I know for sure there's filler in the seam below the PS light and I also know the trunk lid has been filled along the entire rear edge. It's lumpy and irregular, although the lid itself measures the same length on both sides at the corners. QUOTE(rick 918-S @ Mar 4 2012, 10:04 PM) Make sure your tail light fits also. Light fitment on DS still looking good. Examine the inner panel on the driver side and be sure there isn't some damage that needs to be straightened that would give you back some length. Otherwise you may want to check the measurement of both quarter panels from the engine bay seal to the tail light. If they are the same then do what you need to to get where you want to be. |
|
|
|
| TargaToy |
Mar 6 2012, 08:50 PM
Post
#12
|
|
-NONSOLIS RADIOS SEDIOUIS FULMINA MITTO- Group: Members Posts: 714 Joined: 26-March 10 From: DelMarVa Peninsula Member No.: 11,509 Region Association: MidAtlantic Region |
QUOTE(rick 918-S @ Mar 4 2012, 10:37 PM) Examine the inner panel on the driver side and be sure there isn't some damage that needs to be straightened that would give you back some length. Otherwise you may want to check the measurement of both quarter panels from the engine bay seal to the tail light. If they are the same then do what you need to to get where you want to be. Now that you say that, the whole mess looks to me (if I had to guess) like a truck with a hitch backed into the quarter or punctured it. You can see in my first pics the nasty patch some shop brazed in. The inner panel had a soft dent that it appeared had been pounded back out from the trunk side. I'll bet you're right and that's where my 1/8" of original length went. I'm planning to screw a copper backer under the re-cut line when I go to weld in the new wedge section. Should I bend the vertical section I'm welding to a bit past vertical in the opposite direction to compensate for an more possible shrink/pull? |
|
|
|
| rick 918-S |
Mar 6 2012, 09:41 PM
Post
#13
|
|
Hey nice rack! -Celette Group: Members Posts: 21,263 Joined: 30-December 02 From: Now in Superior WI Member No.: 43 Region Association: Northstar Region |
QUOTE(TargaToy @ Mar 6 2012, 08:50 PM) QUOTE(rick 918-S @ Mar 4 2012, 10:37 PM) Examine the inner panel on the driver side and be sure there isn't some damage that needs to be straightened that would give you back some length. Otherwise you may want to check the measurement of both quarter panels from the engine bay seal to the tail light. If they are the same then do what you need to to get where you want to be. Now that you say that, the whole mess looks to me (if I had to guess) like a truck with a hitch backed into the quarter or punctured it. You can see in my first pics the nasty patch some shop brazed in. The inner panel had a soft dent that it appeared had been pounded back out from the trunk side. I'll bet you're right and that's where my 1/8" of original length went. I'm planning to screw a copper backer under the re-cut line when I go to weld in the new wedge section. Should I bend the vertical section I'm welding to a bit past vertical in the opposite direction to compensate for an more possible shrink/pull? No, I don't you'll need to do that now that your aware what can happen if you leave a gap and not notice what is happening when you weld in the est of tha panel. Good luck! Go slow, think it through and show us when your done. Oh, BTW: check your tail light fit again. I just have this sinking feeling you may actually have to pull the patch panel over to meet the trunk lip section not add a piece in the gap..... Just a thought. Take some measurements off the other side too. Just to be sure. If that's the case I have an idea for closing the gap. Let us know. |
|
|
|
| TargaToy |
Jun 9 2012, 06:58 AM
Post
#14
|
|
-NONSOLIS RADIOS SEDIOUIS FULMINA MITTO- Group: Members Posts: 714 Joined: 26-March 10 From: DelMarVa Peninsula Member No.: 11,509 Region Association: MidAtlantic Region |
Here's an update...and I'd like to add that if it seems like this is taking forever, it's because it is...but I've got 3 school-aged daughters, a wife, a home, a job...a dog...and a new project car for my 16 yr old so my time is really stretched.
But anyway, Rick, THANKS for the help on closing that trunk lid gap. I used your advice and am very happy with the results. The gap is now even from the front to the rear of the trunk lid. 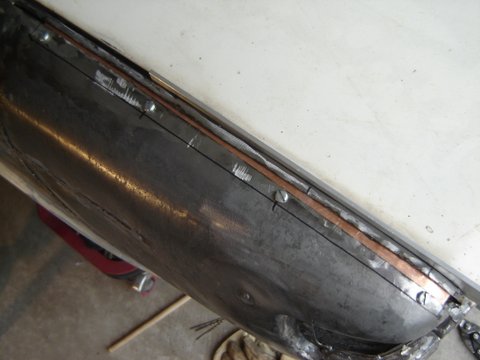 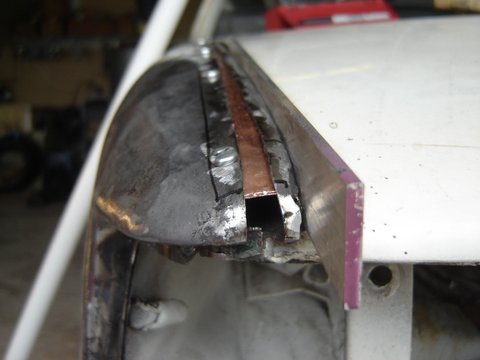 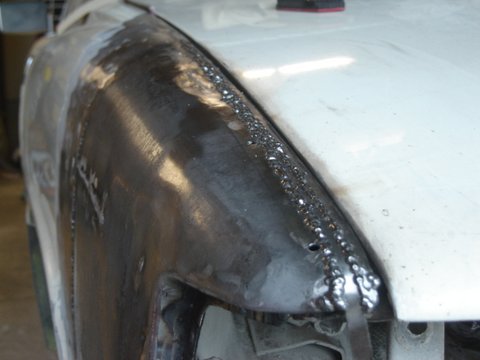 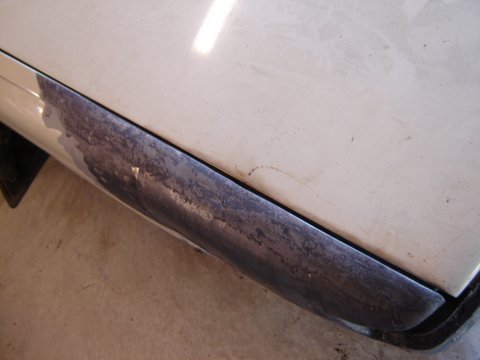 Next thing: Before I welded this quarter section in, I made sure the profiles of the existing fender and the patch matched. I even made a template and shaped the patch to match the car. That seam shrank too. Now, from the top, you can see the shrunken depression. It's very tight to try to hammer/dolly this out from the back side. Can it be done? I'm thinking of you and your disdain for "filler abuse" and want to do this right. Thanks. 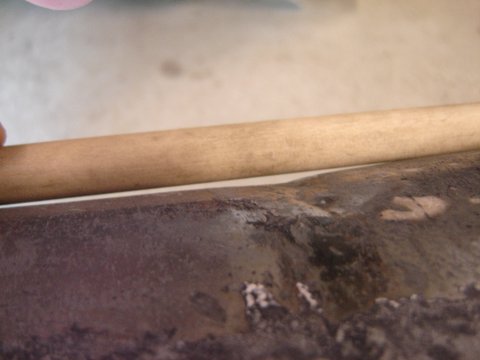 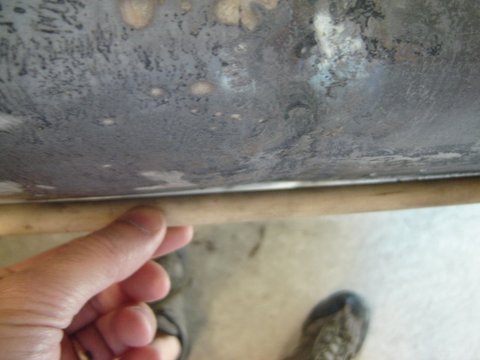 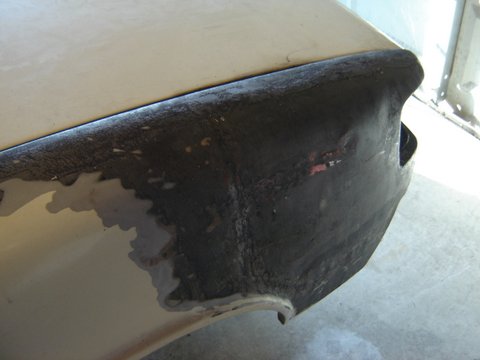 |
|
|
|
| FourBlades |
Jun 9 2012, 07:05 AM
Post
#15
|
|
From Wreck to Rockin Group: Members Posts: 2,056 Joined: 3-December 07 From: Brevard, FL Member No.: 8,414 Region Association: South East States |
Nice save! (IMG:style_emoticons/default/piratenanner.gif) Thanks for posting the whole process, I definitely learned from that. John |
|
|
|
| Mike Bellis |
Jun 9 2012, 08:01 AM
Post
#16
|
|
Resident Electrician Group: Members Posts: 8,348 Joined: 22-June 09 From: Midlothian TX Member No.: 10,496 Region Association: None |
Have you test fit the tail lamp yet?
|
|
|
|
| TargaToy |
Jun 9 2012, 10:31 AM
Post
#17
|
|
-NONSOLIS RADIOS SEDIOUIS FULMINA MITTO- Group: Members Posts: 714 Joined: 26-March 10 From: DelMarVa Peninsula Member No.: 11,509 Region Association: MidAtlantic Region |
QUOTE(kg6dxn @ Jun 9 2012, 10:01 AM) Have you test fit the tail lamp yet? Yes. I haven't showed it in pictures but the lamp fixture has been my "meter" through this whole process. It fits much better now than it did when I got the car. Also not shown was a bunch of work to rebuild the lamp's "socket" within that fender. Actually, now that I say that, there's a post on here someplace where I showed how I did that. (found it) It's post #126 on the "what did you do to your 914 today" thread. http://www.914world.com/bbs2/index.php?sho...nder&st=120 |
|
|
|
| rick 918-S |
Jun 11 2012, 08:47 PM
Post
#18
|
|
Hey nice rack! -Celette Group: Members Posts: 21,263 Joined: 30-December 02 From: Now in Superior WI Member No.: 43 Region Association: Northstar Region |
Review this thread again.
http://www.914world.com/bbs2/index.php?sho...=171994&hl= In tight area's it's way easier to knock a dent in than it is to try to knock it out. There is no hammer made that will move that metal up inside the tight arch of that panel. But it's not too bad to hold a block and bump the panel in. Find a block or chunk of steel you can use like a fist. Put on some light gloves and try to bump it up. My suggestion would be to start at the top of the panel and thump that crease out. Even if it ends up slightly out. Like I said, it will be easier to do the fine work as you bump it in and work the panel. If you can't hit it out use a stud gun on it if you have one. If you don't try to tack a piece of sheet metal tab in the crease. About 1/2-3/4" wide. Use a vise grip and pull as you tap tap tap on either side of the crease. Lots of light hits are better than a couple big ones. Here's a sketch as an example. 1 is how the dent is. 2 is what happens to the panel as you pull. The whole panel will flex out. You likely won't see it like the diagram. 3 is showing the location to tap. Sometimes things look worse before they get better. I think this will be the case here with your crease. Don't get discouraged. Working metal is a time consuming process. You make many mistakes before your confident about the process. EDIT: OK, for some reason I can't post my paint brush doodle but I'm sure you get the picture. |
|
|
|
| TargaToy |
Jun 11 2012, 09:11 PM
Post
#19
|
|
-NONSOLIS RADIOS SEDIOUIS FULMINA MITTO- Group: Members Posts: 714 Joined: 26-March 10 From: DelMarVa Peninsula Member No.: 11,509 Region Association: MidAtlantic Region |
Thanks, Rick.
So when I'm working the dolly up in the back side in a punching motion, am I tapping from the front too? Do I just need a block or something against the outside face while hammering or tapping from the back? I reread your original post and saw it took you 3 solid hours on that quarter you were working...so I see this can be a painstaking process where progress is very slow. |
|
|
|
| rick 918-S |
Jun 11 2012, 09:20 PM
Post
#20
|
|
Hey nice rack! -Celette Group: Members Posts: 21,263 Joined: 30-December 02 From: Now in Superior WI Member No.: 43 Region Association: Northstar Region |
QUOTE(TargaToy @ Jun 11 2012, 10:11 PM) Thanks, Rick. So when I'm working the dolly up in the back side in a punching motion, am I tapping from the front too? Do I just need a block or something against the outside face while hammering or tapping from the back? I reread your original post and saw it took you 3 solid hours on that quarter you were working...so I see this can be a painstaking process where progress is very slow. No block needed on the outside to rough it in. (when you are driving the deep dent out) Just bang it out. Then do the fine work as you hold a block from the back side and bump the panel back in from the outside. |
|
|
|
|
2 User(s) are reading this topic (2 Guests and 0 Anonymous Users)
0 Members:

|
Lo-Fi Version | Time is now: 8th May 2026 - 08:47 PM |
Invision Power Board
v9.1.4 © 2026 IPS, Inc.