|
|
|
Porsche, and the Porsche crest are registered trademarks of Dr. Ing. h.c. F. Porsche AG.
This site is not affiliated with Porsche in any way. Its only purpose is to provide an online forum for car enthusiasts. All other trademarks are property of their respective owners. |
|
|

  |

| watsonrx13 |
 May 21 2003, 06:52 PM May 21 2003, 06:52 PM
Post
#1
|
|
Advanced Member  Group: Members Posts: 2,735 Joined: 18-February 03 From: Plant City, FL Member No.: 312 Region Association: South East States |
I've begun my fuel delivery upgrade with the removal of the fuel tank. Everything went as planned until I needed to remove the tank from the car. The article, from PP, suggested that I lift the passenger side and cut the fuel lines at the bottom of the tank. I was unable to lift the tank high enough on the passenger side, but I was able to lift it on the drivers side (the rubber lines were about 4" long). The only way I was able to cut the lines was with a hacksaw blade. After removing the tank from the car, the next problem I ran into was removing the metal fuel lines from the bottom on the tank.
After removing the large nut, how do I remove the line (see attached pic)? Do I need to keep the larger line (3/8") or the smaller line (5/16") if I'm running dual webers? Attached image(s) 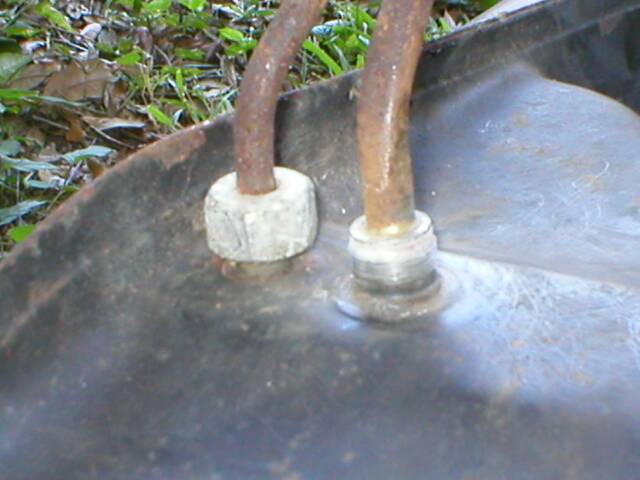
|
   |

 
|
| watsonrx13 |
May 21 2003, 06:55 PM
Post
#2
|
|
Advanced Member Group: Members Posts: 2,735 Joined: 18-February 03 From: Plant City, FL Member No.: 312 Region Association: South East States |
After I've cleaned the tank with water I'll use the POR fuel tank kit. The attached pic shows the products: marine clean, metal ready, and fuel tank sealer.
Attached image(s) 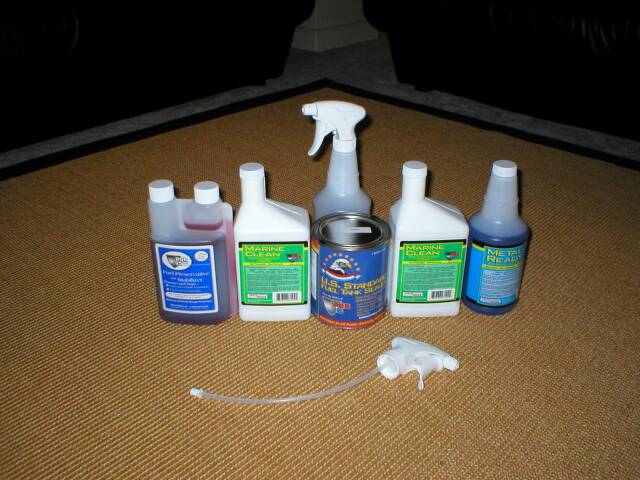
|
|
|
|
| Porsche Rescue |
May 21 2003, 06:57 PM
Post
#3
|
|
Saving and Enjoying Old Porsches Group: Members Posts: 2,978 Joined: 31-December 02 From: Bend, Oregon Member No.: 64 Region Association: None |
The larger line is the "out" line , smaller is the return. Looks like the large line is stuck in place by corrosion. You should be able to pull/twist it out. It will have a metal screen filter on it which is probably pretty clogged up. You need to clean or replace it. Or you can eliminate it as long as you install a filter before the pump.
|
|
|
|
| Brad Roberts |
May 21 2003, 06:57 PM
Post
#4
|
|
914 Freak! Group: Members Posts: 19,148 Joined: 23-December 02 Member No.: 8 Region Association: None |
So.. the PP site didnt say a damn thing about pulling the splash shield out from under the car and reaching up (you can see them from under the car) and cutting them from below ??LOL
Your playing with fire by removing those lines... If I recall correctly..the seals below them are NLA (No Longer Available) sooo unless they are leaking.. leave them alone and use some 3M scotch bright to clean them up. I would leave both lines in place and cap the return line back near the firewall. This will allow gas to stay in the plastic lines in case you hate carbs 3 years from now and decide to go back to injection (or convert the car to 6 cyl w/Motronic. B |
|
|
|
| watsonrx13 |
May 21 2003, 07:11 PM
Post
#5
|
|
Advanced Member Group: Members Posts: 2,735 Joined: 18-February 03 From: Plant City, FL Member No.: 312 Region Association: South East States |
Hey B, I cut the rubber lines between the fuel tank and the firewall. Yea, I read Haynes, where they suggested you reach into the access hole and disconnect the lines, yea right...
After cleaning the tank, my next hurdle is to replace the plastic lines in the center tunnel. Do you recommend replacing with aluminium or standard rubber fuel lines? This is what was in the tank: Attached image(s) 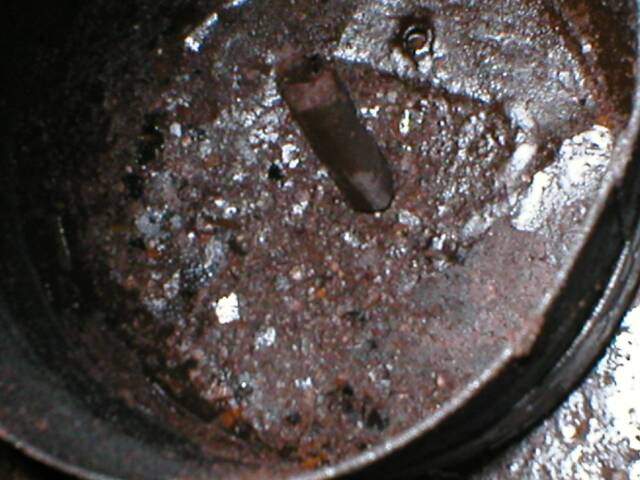
|
|
|
|
| Brad Roberts |
May 21 2003, 07:16 PM
Post
#6
|
|
914 Freak! Group: Members Posts: 19,148 Joined: 23-December 02 Member No.: 8 Region Association: None |
OUCH. Replace the tank. Every 914 parts place has 10-20 good ones (at least in this area).
Actually..its very easy to reach under and do the lines for the tank. You can see them clearly. How do you think the last person installed the hose clamps on the short lines you found ?? (from underneath) Tough call on the lines.. I have used both and (rubber and stainless). The rubber goes quickly.. the stainless takes several hours. Both have worked fine for me. B |
|
|
|
| Zeke |
May 21 2003, 07:57 PM
Post
#7
|
|
Never left, but not right.... Group: Members Posts: 392 Joined: 26-January 03 From: Long Beach CA Member No.: 197 Region Association: None |
When switching to carbs, I left the smalller return line and installed a short hose and a petcock to drain the tank if I want to. I ran Aeroquip push on hose from the bigger line a few inches to a truck brake line. That's 3/8ths steel. It wont rub thru from vibration. At least not as fast as aluminum. Easy to push thru the tunnel. Once in the engine bay, I went back to Areoquip to the filter, then the pump, next the regulator and then the tee.
|
|
|
|
| watsonrx13 |
May 21 2003, 08:03 PM
Post
#8
|
|
Advanced Member Group: Members Posts: 2,735 Joined: 18-February 03 From: Plant City, FL Member No.: 312 Region Association: South East States |
Thanks Milt, do you have any pics of your set up?
Does anyone have any pics of the line/filter after it's been removed? |
|
|
|
| Elliot_Cannon |
May 24 2003, 01:09 PM
Post
#9
|
|
Senior Member Group: Retired Members Posts: 1,922 Joined: 26-March 03 From: Orange County Ca Member No.: 480 Region Association: None |
I just got my fuel tank back from the shop. (Clean and reseal). I removed the two fittings from the bottom of the tank before I sent it to the shop. Now I can't remember... was there a rubber gasket in those fittings that I can't find now or is it a metal to metal seal?? I turned 57 this month and short term memory isn't what it used to be. (Getting old is a bitch but considering the asternative I guess it's not too bad.)
Cheers, Elliot |
|
|
|
| ChrisFoley |
May 24 2003, 02:13 PM
Post
#10
|
|
I am Tangerine Racing Group: Members Posts: 7,990 Joined: 29-January 03 From: Bolton, CT Member No.: 209 Region Association: None |
IIRC, the seal between the metal fitting and the tank is phenolic (thermoset resin impregnated fiber), not rubber or metal. A crush washer (aluminum or copper) of the right size would work fine.
|
|
|
|
| watsonrx13 |
May 24 2003, 03:33 PM
Post
#11
|
|
Advanced Member Group: Members Posts: 2,735 Joined: 18-February 03 From: Plant City, FL Member No.: 312 Region Association: South East States |
It's metal to metal (see pic). Don't forget the filter on the larger line. My bad, after checking the Haynes manual, yes there is a gasket. I just checked the PP BBS and Dave says they're NLA, therfore, I'll need to find a substitute that is impervious to fuel. I've completed the metal etching and I'm in the process of drying the tank before resealing. Stay tuned...
Attached image(s) 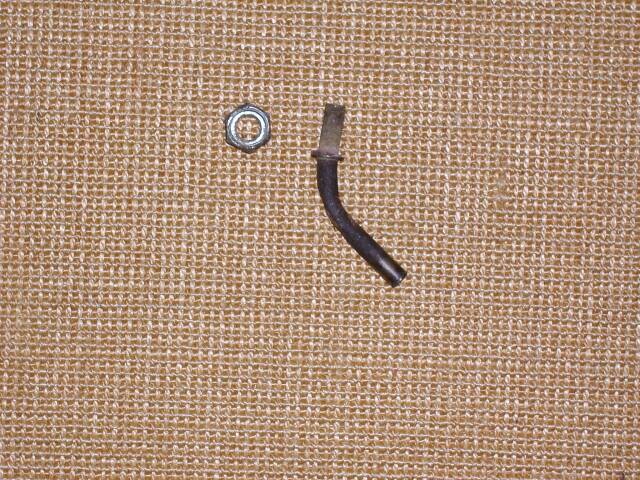
|
|
|
|
|
1 User(s) are reading this topic (1 Guests and 0 Anonymous Users)
0 Members:

|
Lo-Fi Version | Time is now: 11th July 2025 - 05:24 AM |
Invision Power Board
v9.1.4 © 2025 IPS, Inc.