|
|
|
Porsche, and the Porsche crest are registered trademarks of Dr. Ing. h.c. F. Porsche AG.
This site is not affiliated with Porsche in any way. Its only purpose is to provide an online forum for car enthusiasts. All other trademarks are property of their respective owners. |
|
|

  |

| JRust |
 May 8 2016, 03:50 PM May 8 2016, 03:50 PM
Post
#1
|
|
914 Guru  Group: Members Posts: 6,307 Joined: 10-January 03 From: Corvallis Oregon Member No.: 129 Region Association: Pacific Northwest |
Okay so I finally got around to installing my new 914 rubber reproduced dash. I have to admit I was ready to beat the $hit out of someone but the time I was done. Been quite a while since I removed a dash. The 9 13mm nuts are the worst to get out. I had to remove my radio which normally isn't a problem. The little sleeve it slides into just would not release. A few of the tabs I just couldn't get to. Pretty much destroyed that damn thing taking it out. Not all that big a deal as I want to just install an amp with a blue tooth connection. I never use a radio anymore anyway. The fit of the dash is just a little different than my original. The portion above my gauges where it meets the vinyl under the windshield. Where I notice that the most. I'll get another picture showing it. I took one picture with my new dash in place. At this point I am just glad I am done with the job. Getting those little nut's onto my new dash. Especially the 2 behind the gauges. Those are the worst of them all to feed on there & get tight. At least I won't have to worry about doing it again with my new dash in place right (IMG:style_emoticons/default/evilgrin.gif)
So the end result was just fine but it took me a good 2+ hours of fighting it (IMG:style_emoticons/default/headbang.gif) . Hell I could pull my drive train in a lot less time Attached thumbnail(s) 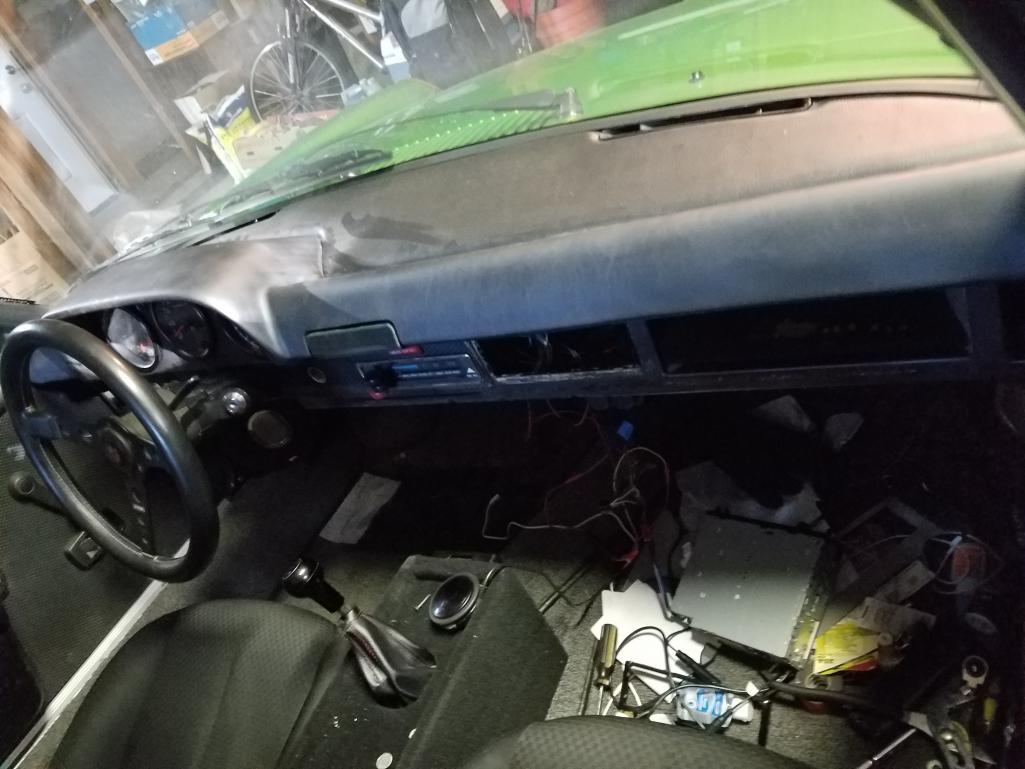
|
   |

 
|
| orthobiz |
May 8 2016, 05:21 PM
Post
#2
|
|
Senior Member Group: Members Posts: 1,754 Joined: 8-January 07 From: Cadillac, Michigan Member No.: 7,438 Region Association: Upper MidWest |
Congratulations!
Uhhh...I'm sure you know there's a Brad Mayeur video installation of Mikey's dash. Still there are those 914 jobs that are just killer, like removing all of the screws of the targa padded roof bar in front of the rear roof latches...Simple but NOT! Paul |
|
|
|
| DRPHIL914 |
May 9 2016, 06:58 AM
Post
#3
|
|
Dr. Phil Group: Members Posts: 5,769 Joined: 9-December 09 From: Bluffton, SC Member No.: 11,106 Region Association: South East States |
I can sympathize , I ran into the same issues when replacing my dash a couple months back! I ruined that same sleave around the radio, the tabs were stuck and had a heck of a time getting it out, now I am thinking a retro looking classic period correct look with the modern connections, Bluetooth etc. - ive now done this 2x. Once with a recovered dash and doing the front pad a few years back, -
Now if we could get mark to finish up those lower dash piece and the back targa bar pad!!!! Hey Mark, how long before we have a group buy on either of those? anyway looks good, you should be set now for 20+ years!! |
|
|
|
| eric9144 |
May 9 2016, 01:20 PM
Post
#4
|
|
Advanced Member Group: Members Posts: 2,734 Joined: 30-March 11 From: San Diego, CA Member No.: 12,876 Region Association: Southern California |
Congrats it looks awesome--so what would you say was total install time from start?
I have to put mine in, wondering how long my cussing fit will last so I can warn the wife and children to stay clear (IMG:style_emoticons/default/av-943.gif) (IMG:style_emoticons/default/lol-2.gif) |
|
|
|
| iankarr |
May 9 2016, 01:42 PM
Post
#5
|
|
The wrencher formerly known as Cuddy_K Group: Members Posts: 2,482 Joined: 22-May 15 From: Heber City, UT Member No.: 18,749 Region Association: Intermountain Region |
I had the entire dash out when I put mine in and it was MUCH easier than installing with the dash in. Of course getting the 4 cowl nuts off and pulling the climate control to remove the dash frame presented their own brand of misery, but given the choice, I think I prefer the dash-out method. And it allows you to clean / tidy up the dash pad.
One thing...whether you install with the dash in or out, lay a towel or other protection on the dash pad while you're trying to get the dash top bolts to line up with the holes. It's a very very tight fit that will require you to fiddle around a lot...and the bolts can scratch up the pad in the process. |
|
|
|
| SirAndy |
May 9 2016, 02:02 PM
Post
#6
|
|
Resident German Group: Admin Posts: 41,688 Joined: 21-January 03 From: Oakland, Kalifornia Member No.: 179 Region Association: Northern California |
QUOTE(JRust @ May 8 2016, 02:50 PM)  I was ready to beat the $hit out of someone Because you were doing it all wrong! (IMG:style_emoticons/default/rolleyes.gif) You're supposed to put your 914 up on jackstands, remove everything from the body, including the suspension, engine/transmission, windshield, dash-frame and other assorted bits and pieces. That way, you'll have plenty of time to work on all the pieces while they are out of the car and you don't have to worry about breaking anything while driving it. (IMG:style_emoticons/default/laugh.gif) |
|
|
|
| Mikey914 |
May 9 2016, 02:14 PM
Post
#7
|
|
The rubber man Group: Members Posts: 12,679 Joined: 27-December 04 From: Hillsboro, OR Member No.: 3,348 Region Association: None |
The good news is that you will not need to do this again in your lifetime. It is a full 4hours, and yes there will be some swearing, but the results will make you happy
The roll bars are in the works now and we will be posting a thread in the next week or so.. Mark |
|
|
|
| Creamsicle New Zealand |
May 9 2016, 02:25 PM
Post
#8
|
|
Member Group: Members Posts: 83 Joined: 5-February 15 From: New Zealand Member No.: 18,403 Region Association: Australia and New Zealand |
Nice job well done. Did you replace the vinyl between the dash pad and the windscreen while you had the dash pad out?
If so were did you get the vinyl piece from. I'm about to replace my dash pad and front vinyl piece and looking for as close to original pattern as possible. Steve |
|
|
|
| JRust |
May 9 2016, 02:49 PM
Post
#9
|
|
914 Guru Group: Members Posts: 6,307 Joined: 10-January 03 From: Corvallis Oregon Member No.: 129 Region Association: Pacific Northwest |
Total time was 2 1/2 hours for me. You need to pull the bottom dash first. Radio if it is there. Radio I wasted a fair amount of time on really. If yours comes out easy. you'll be way ahead. The 2 nuts behind the gauges that you have to feed through the 3/8" opening are what are a serious PITA. The rest are accessible with the stuff out of the way. It was my radio giving me fits & those 2 fuching nuts that pushed me over the edge. Didn't clean up all of shit in the cab even. Just left my tools as they lay & got out of the garage quick. There was no happiness that I got the job done. Just wanted to get out of there before I decided to break something (IMG:style_emoticons/default/dry.gif)
|
|
|
|
| JoeD |
May 9 2016, 02:55 PM
Post
#10
|
|
Member Group: Members Posts: 156 Joined: 19-July 15 From: Atlanta, GA Member No.: 18,973 Region Association: South East States |
Having done this myself a few months ago, I agree- the two nuts behind the gauges are the worst. Trying to get your fingers through there and get the nylon nuts started on the studs was sheer torture.
I did find that a set of stubby ratcheting wrenches from HF were incredibly helpful in the overall install. Worth the money if only for this job alone. End result was amazing- looks fantastic. I hope Mark is right though... I never want to do that job again! |
|
|
|
|
1 User(s) are reading this topic (1 Guests and 0 Anonymous Users)
0 Members:

|
Lo-Fi Version | Time is now: 17th June 2024 - 09:04 AM |
Invision Power Board
v9.1.4 © 2024 IPS, Inc.