|
|
|
Porsche, and the Porsche crest are registered trademarks of Dr. Ing. h.c. F. Porsche AG.
This site is not affiliated with Porsche in any way. Its only purpose is to provide an online forum for car enthusiasts. All other trademarks are property of their respective owners. |
|
|

  |

| 914four |
 Oct 17 2016, 07:36 PM Oct 17 2016, 07:36 PM
Post
#1
|
|
Senior Member  Group: Members Posts: 525 Joined: 4-March 07 From: Rainbow City, Alabama Member No.: 7,582 Region Association: South East States |
Running down a bucking issue and found my MPS to be leaking. After rebuilding the MPS and verifying a good seal, everything went back together okay. When I started the car, the engine surged up and down and would not idle.
The electrical connector socket on the MPS does not appear to be keyed and using the diagram below from Clay's D-Jet troubleshooting guide it seems I may have plugged in the MPS wire incorrectly. I ohmed the wires from the ECU connector to the MPS socket and made sure the wires are in the order shown in the diagram. The wires look to be looping back from terminal 7 to 15 and 8 to 10 so that the socket could be plugged in either way and work correctly. Could plugging in the MPS wires incorrectly have damaged the ECU? If not, what should I be looking for that would cause the surging and lack of idle? 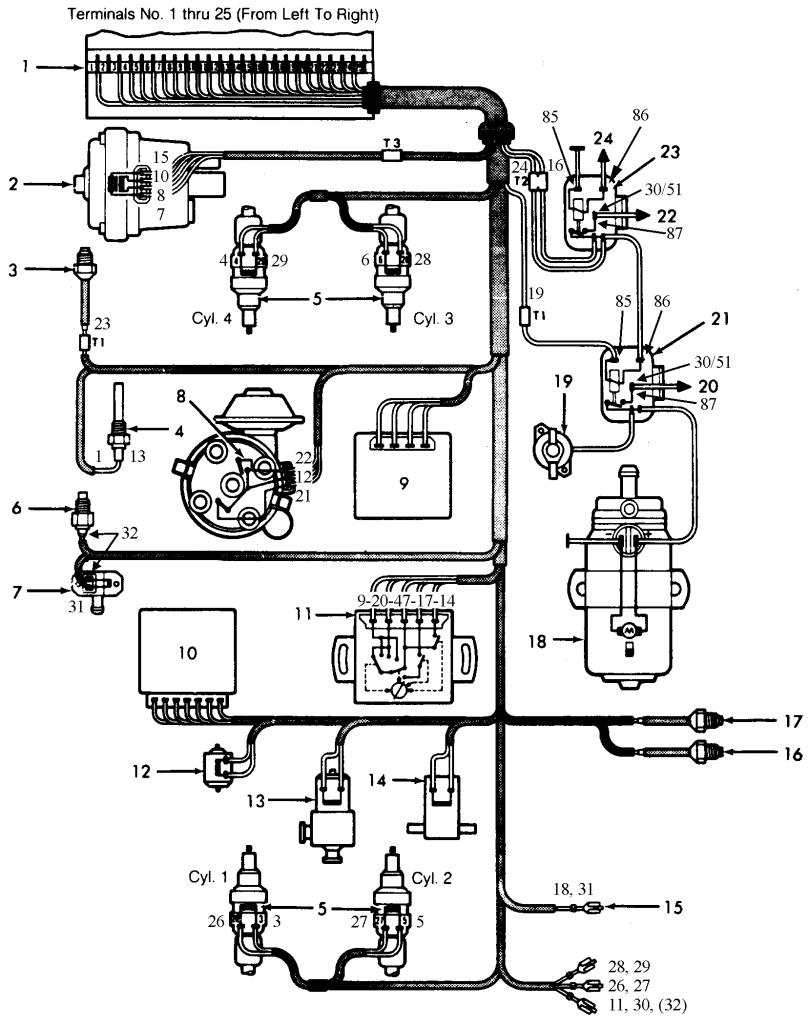 |
   |

 
|
| Rand |
Oct 17 2016, 07:39 PM
Post
#2
|
|
Cross Member Group: Members Posts: 7,413 Joined: 8-February 05 From: OR Member No.: 3,573 Region Association: None |
It's lean. Which means vacuum leak somewhere away from the MPS because MPS changes mixture based on vacuum. Usually fails rich, and I didn't think the connector affected that.
Hmm, looking forward to learning from this. |
|
|
|
| pbanders |
Oct 17 2016, 07:47 PM
Post
#3
|
|
Senior Member Group: Members Posts: 990 Joined: 11-June 03 From: Scottsdale, AZ Member No.: 805 Region Association: Southwest Region |
You can't plug the MPS in incorrectly, you didn't damage the ECU. Wildly varying idle makes me think first of a vacuum leak. Have you checked carefully to make sure you didn't inadvertently pull a vacuum line off when you were swapping the MPS? Suggest you check my page (see sig) and others to make sure you have the vacuum hoses right, and that all components in the D-Jet are correctly connected and functioning. Take a look at the idle mixture adjustment knob on the ECU, you may have set it to full lean when your MPS was malfunctioning/leaking (which makes it rich), and now you're full lean. There's an indicator on the knob, try setting it to the middle of the range as that's the "factory" setting, about 3% CO.
|
|
|
|
| 914four |
Oct 17 2016, 08:13 PM
Post
#4
|
|
Senior Member Group: Members Posts: 525 Joined: 4-March 07 From: Rainbow City, Alabama Member No.: 7,582 Region Association: South East States |
QUOTE(pbanders @ Oct 17 2016, 08:47 PM)  You can't plug the MPS in incorrectly, you didn't damage the ECU. Wildly varying idle makes me think first of a vacuum leak. Have you checked carefully to make sure you didn't inadvertently pull a vacuum line off when you were swapping the MPS? Suggest you check my page (see sig) and others to make sure you have the vacuum hoses right, and that all components in the D-Jet are correctly connected and functioning. Take a look at the idle mixture adjustment knob on the ECU, you may have set it to full lean when your MPS was malfunctioning/leaking (which makes it rich), and now you're full lean. There's an indicator on the knob, try setting it to the middle of the range as that's the "factory" setting, about 3% CO. Thanks for the assurance I didn't kill my ECU and direction. I'll use you webpage and go back through the vacuum hoses and connectors to see if I left something off. Kelvin |
|
|
|
| JeffBowlsby |
Oct 17 2016, 10:26 PM
Post
#5
|
|
914 Wiring Harnesses & Beekeeper Group: Members Posts: 9,212 Joined: 7-January 03 From: San Ramon CA Member No.: 104 Region Association: None |
The MPS may be calibrated too lean for your engine. It may be possible to compensate for that by bumping the fuel pressure slightly. Use a fuel pressure gauge and increase 1-3psi to see it idle and driveability improves.
|
|
|
|
| pbanders |
Oct 17 2016, 11:19 PM
Post
#6
|
|
Senior Member Group: Members Posts: 990 Joined: 11-June 03 From: Scottsdale, AZ Member No.: 805 Region Association: Southwest Region |
QUOTE(Jeff Bowlsby @ Oct 17 2016, 09:26 PM) The MPS may be calibrated too lean for your engine. It may be possible to compensate for that by bumping the fuel pressure slightly. Use a fuel pressure gauge and increase 1-3psi to see it idle and driveability improves. I agree with Jeff but suggest that you test this before making any changes. Either borrow or obtain a CO meter that can be used while driving on a flat road at part-load, and check your CO level. If you're seeing 2% CO or less you're too lean. I believe mine is set to 2.5%, Jeff can give you better numbers. Jeff brings up a good point which is that the order in which mixture settings are done on the 2.0L and 1.7L D-Jet engines is critical. The first setting should be the part-load setting (center screw on the MPS), followed by the full-load setting (full-load stop), then the transition setting (outer screw). Once all of these are set, then the idle mixture is set using the ECU knob. All of these settings need to be done with everything else fully checked-out (fully-charged battery, good alternator/regulator, fuel supply, fuel pressure, ignition timing & dwell, proper plug gap, valve clearance, no vacuum leaks, etc, etc), and with a fully warmed-up engine. 914's were originally build with stock Bosch MPS calibrations locked into the sealed unit. The only mixture adjustment that could have been done at the factory was the idle mixture, and I doubt that was done, as the ECU's have a mark for the factory setting, and I suspect that's where it was left at. Only thing I believe was actually done on any of the motors is setting the idle bleed screw. If you want to do optimal tuning of the MPS for your engine, by following the procedures on my page, you can match the MPS more precisely to your needs, but it requires access to emissions measurement systems and a good understanding of MPS adjustments. |
|
|
|
| DRPHIL914 |
Oct 18 2016, 06:33 AM
Post
#7
|
|
Dr. Phil Group: Members Posts: 5,895 Joined: 9-December 09 From: Kennesaw, GA Member No.: 11,106 Region Association: South East States |
I agree with all the above,
you are running lean- this happens after MPS rebuilds - I have done several and have had issues once they were resealed- did you replace the diaphragm too, or just the o-ring seals? if you replaced the copper diaphragm and did not remove the epoxy around the plug, you will need to do that in order to adjust the inner and outer screws and full load stop to get it with in spec. also I had 2 mps that were set to what was believed to be factory spec, and once on my car( using a wave-tec LCR meter per Anders site and others) yet both were too lean, so I had to adjust them and I did that by following Brad's instructions and having a A/F meter installed so that I know exactly where the mixture is - Jeff Bowlsby can check your MPS and set it to the factory specs if you send it to him. - remember, if you start to play with this when you turn the inner screw, you have to hold the outer one still, and it does not take much, say just a quarter turn can make a big difference. - adjust the idle screw on the mps and see ifthat helps, make sure you have no vac leaks anywere, - if you cant adjust idle with the ECU adjustment then your TPS is not set correctly. - Phil |
 |
|
| Bleyseng |
Oct 18 2016, 08:07 AM
Post
#8
|
|
Aircooled Baby! Group: Members Posts: 13,036 Joined: 27-December 02 From: Seattle, Washington (for now) Member No.: 24 Region Association: Pacific Northwest |
You are running too lean and need to use a AF meter to adjust the MPS... (IMG:style_emoticons/default/biggrin.gif)
|
|
|
|
| pbanders |
Oct 18 2016, 08:11 AM
Post
#9
|
|
Senior Member Group: Members Posts: 990 Joined: 11-June 03 From: Scottsdale, AZ Member No.: 805 Region Association: Southwest Region |
QUOTE(Philip W. @ Oct 18 2016, 05:33 AM) Jeff Bowlsby can check your MPS and set it to the factory specs if you send it to him. - remember, if you start to play with this when you turn the inner screw, you have to hold the outer one still, and it does not take much, say just a quarter turn can make a big difference. - adjust the idle screw on the mps and see ifthat helps, make sure you have no vac leaks anywere, - if you cant adjust idle with the ECU adjustment then your TPS is not set correctly. - Phil is right, setting an MPS to duplicate the factory spec requires careful adjustment. The inner main mixture screw is particularly sensitive. I came up with using an LCR meter to adjust the MPS because such meters are fairly available, but the more accurate method is to duplicate the D-Jet system on the benchtop and adjust the injection pulse width. I have a EFI Associates tester that lets me do just that, with 0.1 ms sensitivity. To vary an MPS by 0.1 ms requires less than 1/8 of a turn of the main mixture screw. The ECU idle knob is also quite sensitive. Each click corresponds to a change in CO of about 0.5%. Make any changes 1 click at a time, reset the idle bleed screw to the correct idle rpm, and give it a minute or two to settle before deciding to make any further changes. |
|
|
|
| 914four |
Oct 18 2016, 11:16 AM
Post
#10
|
|
Senior Member Group: Members Posts: 525 Joined: 4-March 07 From: Rainbow City, Alabama Member No.: 7,582 Region Association: South East States |
Thank you all for the responses. I was able to check my hoses to make sure they are all connected properly but still have the same surging issue. I would rather not spray all the hose connections with a flammable spray to check for leaks. The hoses are only a couple of years old and in very good condition. I'll look for another way to check for air leaks.
I replaced the copper diaphragm as well as the O-rings during the MPS rebuild. The Diaphragm did not seem to have any breaches but it came with the rebuild kit so I replaced it. My MPS had two large thin O-rings for the case halves on top each other and the kit came with one large thick O-ring as a replacement. I replaced the two large O-rings with the thicker replacement O-ring. I also replaced the small O-ring. I used the method in Chris' instructions for installing the diaphragm which had me measure the depth of the diaphragm nut setting and using that on the new diaphragm. It looks like my next steps are to verify no air leaks then send my MPS to someone who has the equipment to setup the MPS with a bench circuit for proper calibration. Jeff has been very busy lately and has a back log of wiring harnesses to build. He may not have time for MPS calibrations but I'll check. Thank you again for the help. Kelvin |
|
|
|
| ChrisFoley |
Oct 18 2016, 11:32 AM
Post
#11
|
|
I am Tangerine Racing Group: Members Posts: 8,019 Joined: 29-January 03 From: Bolton, CT Member No.: 209 Region Association: None |
Kelvin,
You have the adjustment tools. It may take no more than a small change to the center screw to bring the mixture into the proper range. The first step is to see if turning the mixture knob clockwise on the ecu improves the idle. If so, return it to the center position and back off the MPS center screw 1/8 turn at a time until the idle smooths out. You can do this with the engine running as long as you don't push in on the diaphragm with the tools. |
|
|
|
| 914four |
Oct 19 2016, 09:17 PM
Post
#12
|
|
Senior Member Group: Members Posts: 525 Joined: 4-March 07 From: Rainbow City, Alabama Member No.: 7,582 Region Association: South East States |
QUOTE(Racer Chris @ Oct 18 2016, 12:32 PM) Kelvin, You have the adjustment tools. It may take no more than a small change to the center screw to bring the mixture into the proper range. The first step is to see if turning the mixture knob clockwise on the ecu improves the idle. If so, return it to the center position and back off the MPS center screw 1/8 turn at a time until the idle smooths out. You can do this with the engine running as long as you don't push in on the diaphragm with the tools. Chris, Thank you for the direction on the MPS. I was able to turn the ECU knob four turns clockwise and it stopped there. I started the engine and the idle settled down so I turned the ECU knob back to the original position. I adjusted the MPS center screw 1/8 turn counterclockwise but the surging came back. Ran out of time this evening but I'll try to adjust the center screw another 1/8 turn in the next day or so. Just wanted to give a quick update because I think you have me headed in the right direction. Thanks again, Kelvin |
|
|
|
| pbanders |
Oct 20 2016, 09:28 AM
Post
#13
|
|
Senior Member Group: Members Posts: 990 Joined: 11-June 03 From: Scottsdale, AZ Member No.: 805 Region Association: Southwest Region |
QUOTE(914four @ Oct 19 2016, 08:17 PM) Thank you for the direction on the MPS. I was able to turn the ECU knob four turns clockwise and it stopped there. I started the engine and the idle settled down so I turned the ECU knob back to the original position. I adjusted the MPS center screw 1/8 turn counterclockwise but the surging came back. Ran out of time this evening but I'll try to adjust the center screw another 1/8 turn in the next day or so. Good to hear you're making progress with Chris's information. Once you get it somewhere close to where you want it, I recommend that you get the idle CO, part-load CO, and full-load CO tested. Doing adjustments "by ear" can produce good results, but it can also leave you far from optimal. If you've put this much work into it by this point, you deserve to get it right. Good luck. Good numbers for stock 2.0 CO are: Idle: 3.0 % (I've got mine at 2.5%, but some work better at 3.0%) Part-load: 2.5% Full-load: 4.0% |
|
|
|
| zambezi |
Oct 20 2016, 10:39 AM
Post
#14
|
|
Senior Member Group: Members Posts: 711 Joined: 14-April 08 From: Lafayette, LA Member No.: 8,920 Region Association: South East States |
What would you recommend for a good tester to test the CO. And where should the probe be placed? Is a tailpipe probe good enough or should a dedicated O2 bung be welded into the exhaust pipe (and where)? I will need to fine tune my fuel system as well and am trying to plan it all out now so it does not take me weeks to get good results.
|
|
|
|
| pbanders |
Oct 20 2016, 02:16 PM
Post
#15
|
|
Senior Member Group: Members Posts: 990 Joined: 11-June 03 From: Scottsdale, AZ Member No.: 805 Region Association: Southwest Region |
QUOTE(zambezi @ Oct 20 2016, 09:39 AM) What would you recommend for a good tester to test the CO. And where should the probe be placed? Is a tailpipe probe good enough or should a dedicated O2 bung be welded into the exhaust pipe (and where)? I will need to fine tune my fuel system as well and am trying to plan it all out now so it does not take me weeks to get good results. There are probably others here with more experience than me in fitting a wide-band AFM to your 914, with recommendations. Hopefully, someone will see this and comment, otherwise, you might want to start a new topic. The way I'm doing it with my car is that I have a Heathkit Emissions Tester that I bought and built probably 30 years ago. It still works great and has always correlated well when I've compared it to my emissions test results, and I can actually use it while driving, so I can determine my part and full-load mixtures. The Heathkit is NLA, you see them on Ebay from time to time. There are a number of similar standalone CO testers, look on Google and Amazon. Another way you can do this is to find a tuner shop with a dyno and shop-quality emissions gear. Most places charge something on the order of $100 to $200 to do a test run on your car. This approach offers you the possibility of tuning your MPS on-the-fly, and can duplicate all running conditions. |
|
|
|
| 914four |
Oct 20 2016, 08:36 PM
Post
#16
|
|
Senior Member Group: Members Posts: 525 Joined: 4-March 07 From: Rainbow City, Alabama Member No.: 7,582 Region Association: South East States |
Success!
I disassembled the MPS and added the new full load stop that came with the kit so I can adjust the MPS while running. Still tweaking with the setting but the car is now drivable. I plan on finding a CO meter to do further testing and adjustments. Thanks to all. Kelvin |
|
|
|
| 914four |
Nov 3 2016, 06:24 PM
Post
#17
|
|
Senior Member Group: Members Posts: 525 Joined: 4-March 07 From: Rainbow City, Alabama Member No.: 7,582 Region Association: South East States |
So far I my car has been running smother than ever and has been a lot of fun to drive. The surging issue was completely fixed with the adjustments I made.
I was able to find a CO meter that measures vehicle exhaust gases. It is a Gunson model G4125. After going through the manual and learning how to operate the gas analyzer I found the CO at idle to be about 10. I set the ECU adjustment to center and started adjusting the MPS down. I was able to get the CO level set to 3.0 at idle speed and simulated have load and full load adjustments close. During my test drive I found there is a small amount of bucking now. Should I go back to making small adjustments on the MPS to get this out or is there a better place to make this adjustment? Kelvin |
|
|
|
| 914_teener |
Nov 3 2016, 07:08 PM
Post
#18
|
|
914 Guru Group: Members Posts: 5,270 Joined: 31-August 08 From: So. Cal Member No.: 9,489 Region Association: Southern California |
Check your fuel pressure and TPS conditions first.
|
|
|
|
| pbanders |
Nov 3 2016, 11:19 PM
Post
#19
|
|
Senior Member Group: Members Posts: 990 Joined: 11-June 03 From: Scottsdale, AZ Member No.: 805 Region Association: Southwest Region |
QUOTE(914four @ Nov 3 2016, 05:24 PM) So far I my car has been running smother than ever and has been a lot of fun to drive. The surging issue was completely fixed with the adjustments I made. I was able to find a CO meter that measures vehicle exhaust gases. It is a Gunson model G4125. After going through the manual and learning how to operate the gas analyzer I found the CO at idle to be about 10. I set the ECU adjustment to center and started adjusting the MPS down. I was able to get the CO level set to 3.0 at idle speed and simulated have load and full load adjustments close. During my test drive I found there is a small amount of bucking now. Should I go back to making small adjustments on the MPS to get this out or is there a better place to make this adjustment? Kelvin CO was 10% when you started? Yeow... I like what you did to set the main mixture on the MPS, but you definitely want to do a part load test. First thing I'd check on the bucking is to make 100% sure that the CHT female connector is inserted properly in the male connector that's inside the plastic insulator coming off the wiring harness. It's very easy to have it look like it's correct, when it's actually jammed to the side between the plastic and the male spade connector inside the insulator. I had that happen to me and thought I had a bad TPS for about a year before I figured it out. Turns out I wasn't the only one. |
|
|
|
| lsintampa |
Nov 21 2016, 07:55 AM
Post
#20
|
|
Senior Member Group: Members Posts: 520 Joined: 28-January 13 From: Tampa, FL Member No.: 15,441 Region Association: South East States |
I chased a surge for over a year on my 2L (1975). Replaced all hoses, had MPS rebuilt, replaced TPS board, adjusted ECU knob, pretty much went through the entire gambit.
Finally took it to a shop who's owner started working at a Porsche dealership back in 1974 and he's only been working on Porsche's since. Mostly the vintage cars. He found at least two leaks in my plenum using a smoke test. It's a machine that uses oil to make smoke which is blown into the air box (engine off) after sealing off any potential places for the smoke to escape. Both leaks were pinholes in the plenum - and both on the bottom. Very hard to get to with spray. IDK, I tried spraying all about prior to the smoke test, never once did I pick up any sign of leaks. I will only add that I had been very skeptical of a "leak" for over a year. I was sure I didn't have a leak, only to find out that indeed there was a leak. So bottom line - is most likely you have a leak. I'd suggest a smoke test to rule out any leaks - or more likely - find out where your leak is. |
|
|
|
|
1 User(s) are reading this topic (1 Guests and 0 Anonymous Users)
0 Members:

|
Lo-Fi Version | Time is now: 18th March 2026 - 02:44 PM |
Invision Power Board
v9.1.4 © 2026 IPS, Inc.