|
|
|
Porsche, and the Porsche crest are registered trademarks of Dr. Ing. h.c. F. Porsche AG.
This site is not affiliated with Porsche in any way. Its only purpose is to provide an online forum for car enthusiasts. All other trademarks are property of their respective owners. |
|
|

  |

| mihai914 |
 May 16 2005, 07:14 AM May 16 2005, 07:14 AM
Post
#1
|
|
Senior Member  Group: Members Posts: 800 Joined: 2-March 05 From: Montreal, QC Member No.: 3,697 Region Association: None |
Hi to all,
After receiving my welding course from JoeSpark (thanks!!!). I'm going to start to tackle repairing the big holes in the car. First though I need to make some replacement panels but have never really done any metal working. If I want to make the exact same part as in this picture below, what would be the best way to proceed. Should I make the flanges fisrt and then try and bend the whole thing or vice-versa? It's probaly very simple to do but I'm sure there are steps to follow. Any help is appreciated. Mihai Attached image(s) 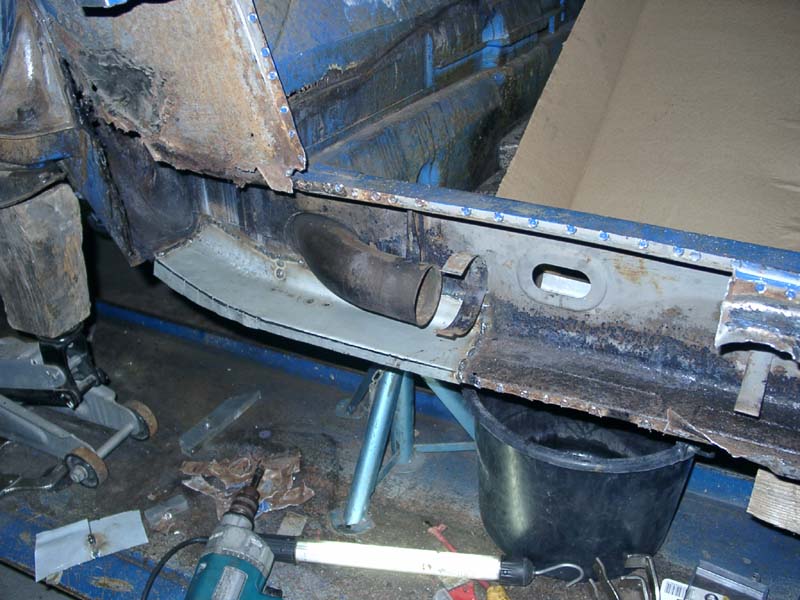
|
   |

 
|
| skline |
May 16 2005, 07:17 AM
Post
#2
|
|
Born to Drive Group: Members Posts: 7,910 Joined: 26-December 02 From: Costa Mesa, CA Member No.: 17 Region Association: Southern California |
Wow, that some pretty serious repair work you have going on. I do hope you have braced the car really well, welding in that much structure I would want to make sure the doors will still close when you weld in all the new metal.
|
|
|
|
| mihai914 |
May 16 2005, 07:35 AM
Post
#3
|
|
Senior Member Group: Members Posts: 800 Joined: 2-March 05 From: Montreal, QC Member No.: 3,697 Region Association: None |
That's not my car it's Michelko's on this board, I have a very similar job to do on mine anf for sure it's going to need serious bracing!
|
|
|
|
| ArtechnikA |
May 16 2005, 07:52 AM
Post
#4
|
|
rich herzog Group: Members Posts: 7,390 Joined: 4-April 03 From: Salted Roads, PA Member No.: 513 Region Association: None |
i would recommend Ron Fornier's book on metal fabrication.
excellent resource on the sequence of operations and how to achieve compound curves (slowly...) |
|
|
|
| mihai914 |
May 16 2005, 08:13 AM
Post
#5
|
||
|
Senior Member Group: Members Posts: 800 Joined: 2-March 05 From: Montreal, QC Member No.: 3,697 Region Association: None |
Thanks Rich, found it on Amazon Ron Fournier. |
||
|
|
|
||
| rick 918-S |
May 16 2005, 08:24 AM
Post
#6
|
|
Hey nice rack! -Celette Group: Members Posts: 21,011 Joined: 30-December 02 From: Now in Superior WI Member No.: 43 Region Association: Northstar Region |
Make the flange, then clamp the narrow flange in the vice with part you want to curve sticking out off the edge. Carefully lift on the piece stretching the short flange just a little. Move the piece further into the vice and repeat. This will give you a slow curve in the flange. I have a home made tool for the shrinking required for the other side. I'll try to get out and take pictures later. easier to show than to tell.
|
|
|
|
| freezing14 |
May 16 2005, 08:56 AM
Post
#7
|
|
freezing14 Group: Members Posts: 435 Joined: 21-June 04 From: brockville , Ontario, Canada Member No.: 2,233 |
hey fellow canadian ( or quebecois) when i did mine I manufactured the whole part on the bench and added it to the car , just PM me if you need help, i can go and give you a hand one of those week end
Yves |
|
|
|
| 1bad914 |
May 16 2005, 09:00 AM
Post
#8
|
|
Senior Member Group: Members Posts: 618 Joined: 6-May 04 From: Battle Creek, MI Member No.: 2,028 |
Safety man here! That jack and brick or block of wood used to jack the blue car is dangerous looking! I would never do that and I'm crazy...please be careful!
|
|
|
|
| Triaddave |
May 16 2005, 09:47 AM
Post
#9
|
|
Member Group: Members Posts: 244 Joined: 31-December 03 From: olympia,wa Member No.: 1,478 |
a good tip to hold the metal in place before welding is to use the self tapping framing screw. when done, remove the screw and weld the hole closed. this allows alittle fine tuning before the weld hits...
|
|
|
|
| michelko |
May 16 2005, 12:54 PM
Post
#10
|
||
|
Senior Member Group: Members Posts: 867 Joined: 30-November 03 From: Germany, Lambsheim Member No.: 1,404 Region Association: None |
That block of wood was only to support the trailing arm. The car stand on four jack stands with some big piece of wood between. But you are right: safety first (IMG:http://www.914world.com/bbs2/html/emoticons/wink.gif) (IMG:http://www.914world.com/bbs2/html/emoticons/smilie_flagge6.gif) |
||
|
|
|
||
| GWN7 |
May 16 2005, 01:03 PM
Post
#11
|
|
King of Road Trips Group: Members Posts: 6,280 Joined: 31-December 02 From: Winnipeg, MB, Canada Member No.: 56 Region Association: Northstar Region |
Looks like your on your way. As mentioned be carefull about your door gaps. At the top of the page is a tab "914 Info". In there you will find measurements for all your door gaps.
|
|
|
|
| mihai914 |
May 16 2005, 08:11 PM
Post
#12
|
|
Senior Member Group: Members Posts: 800 Joined: 2-March 05 From: Montreal, QC Member No.: 3,697 Region Association: None |
Thanks to all who replied. Yves, I'll PM you shortly.
As for the chassis measurements in the info section, do those apply to a bare chassis, or a normal car with the engine and tranny inside, because there's a whole lot of a difference there. Mihai |
|
|
|
| GWN7 |
May 16 2005, 10:15 PM
Post
#13
|
|
King of Road Trips Group: Members Posts: 6,280 Joined: 31-December 02 From: Winnipeg, MB, Canada Member No.: 56 Region Association: Northstar Region |
Hi,
the chassis was built originally without a engine or trans, so it dosen't reallly matter if it's in or out when your working on it. A solid car won't flex with the addition of the weight of the engine or trans. More important is making your sure the door gaps don't shrink (or grow) while your welding in the replacement parts. There was a thread about a roll cage being inserted in a car where the body shrank 1 inch while it was being done. The easiest way to make sure, is to measure your gaps and compare them to the specs in the info area. If your out now you will have a hard time getting the doors/roof to fit later. Make the car match the specs and cut and weld a bar in from the front door jam to the rear door jam. All you need is a 1 inch bar to hold it in spec. There was a member who made a slick adjusting bar that fits in this spot. If he reads this he might post some pics of the bar with the screw ends on it for you. |
|
|
|
| John |
May 16 2005, 11:20 PM
Post
#14
|
|
member? what's a member? Group: Members Posts: 3,393 Joined: 30-January 04 From: Evansville, IN (SIRPCA) Member No.: 1,615 Region Association: None |
If I was going to fabricate that replacement part as shown in the picture (never mind what else is in the pic), I would start out with a piece of sheet metal and break over the flange (about 3/4"?).
I would then make the other flange with the large radius bend. To make that radius, I would get a piece of pipe that approximates the radius and roll the steel around the pipe. The last step would be to now bend this Z shaped channel. This is the tough part. I would use a stretcher to "stretch" the first flange so that I could bend the part as shown. To allow the large radius flange to bend, I would cut it as he did to relieve the stress (you can see the slit he made and see the tack welds when he closed up that gap). It takes a lot of practice to be able to make parts from scratch as this person did. This was not his first metal working project. His parts looked very good and more importantly fit nearly perfectly. Take the time to work your parts so that they fit perfectly and you will like your results. If you rush the repair, it will look rushed. Just my $0.02 I wish you the best of luck. |
|
|
|
| MecGen |
May 17 2005, 04:07 AM
Post
#15
|
|
8 Easy Steps Group: Members Posts: 848 Joined: 8-January 05 From: Laval, Canada Member No.: 3,421 |
Hey
Almost missed the thred... I was thinking about strenghthening the box from the inside, with triangled bracing, I think I saw a pic of this ? (IMG:http://www.914world.com/bbs2/html/emoticons/confused24.gif) If we can get together one weekend, stick it on my frame machine, lock it down, weld away. Maybe we can hook up with freezing14, and set something up. Mihai and I spoke about keeping the car strait while doing the work, he's got it down. The good thing about doing this on a frame machine is the car can be adjusted before welding in new parts. In my shop I have a 914 that had major surgery, and is too much opened (opposite of rust sag) the person that replaced the rockers, then reinforced, he was expecting a "bounce" so it was put with an intentional oversized clearances. It never bounced...car weighs nothing (IMG:http://www.914world.com/bbs2/html/emoticons/sawzall-smiley.gif) I would like to see the differences of a hand made part and a pre-fab metal replacement panel (installed pic), little pricey for us Canucks.... Later Joe Attached image(s) 
|
|
|
|
| ChrisFoley |
May 17 2005, 04:40 AM
Post
#16
|
||
|
I am Tangerine Racing Group: Members Posts: 7,990 Joined: 29-January 03 From: Bolton, CT Member No.: 209 Region Association: None |
(IMG:http://www.914world.com/bbs2/html/emoticons/smile.gif) Attached image(s) 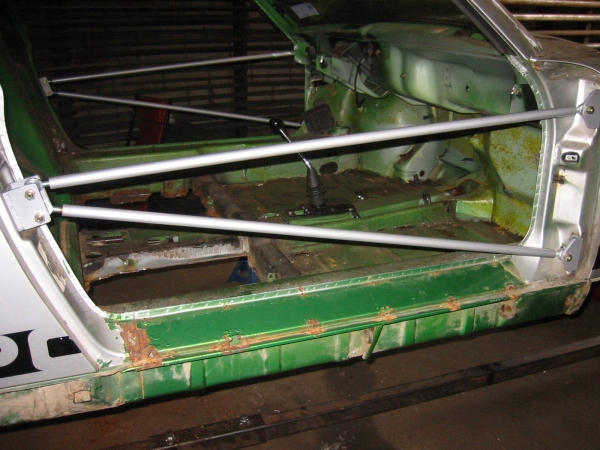
|
||
|
|
|
||
| GWN7 |
May 17 2005, 06:14 AM
Post
#17
|
|
King of Road Trips Group: Members Posts: 6,280 Joined: 31-December 02 From: Winnipeg, MB, Canada Member No.: 56 Region Association: Northstar Region |
That's the picture (IMG:http://www.914world.com/bbs2/html/emoticons/beerchug.gif)
If I remember it bolts in to the door & lock bolting plates and the ends adjust so you can fine tune the specs. |
|
|
|
| freezing14 |
May 17 2005, 06:40 AM
Post
#18
|
|
freezing14 Group: Members Posts: 435 Joined: 21-June 04 From: brockville , Ontario, Canada Member No.: 2,233 |
hey mihai914 and joespark,, if you need a hand anytime just let me know, I would be up for a welding or sawall (lol) party
freezing |
|
|
|
| joea9146 |
May 17 2005, 06:46 AM
Post
#19
|
|
Senior Member Group: Members Posts: 663 Joined: 10-February 03 From: Denver, NC Member No.: 283 Region Association: None |
I find it helpful to fabricate the parts out of cardboard first where possible.
Then transfer the cardboard template to the Metal.... Good Luck (IMG:http://www.914world.com/bbs2/html/emoticons/smile.gif) |
|
|
|
| freezing14 |
May 17 2005, 06:49 AM
Post
#20
|
|
freezing14 Group: Members Posts: 435 Joined: 21-June 04 From: brockville , Ontario, Canada Member No.: 2,233 |
I tried the cardboard works good then i tried thin aluminuim sheet and even if it is a bit harder to cut it keep its shape a whole lot better
|
|
|
|
|
1 User(s) are reading this topic (1 Guests and 0 Anonymous Users)
0 Members:

|
Lo-Fi Version | Time is now: 6th July 2025 - 11:38 AM |
Invision Power Board
v9.1.4 © 2025 IPS, Inc.