|
|
|
Porsche, and the Porsche crest are registered trademarks of Dr. Ing. h.c. F. Porsche AG.
This site is not affiliated with Porsche in any way. Its only purpose is to provide an online forum for car enthusiasts. All other trademarks are property of their respective owners. |
|
|

  |

| jmitro |
 Jan 6 2018, 08:33 AM Jan 6 2018, 08:33 AM
Post
#1
|
|
Senior Member  Group: Members Posts: 713 Joined: 23-July 15 From: Oklahoma Member No.: 18,986 Region Association: None |
Here is my process for raising spindles on standard 914 boge strut bodies. As documented elsewhere this modification allows you to lower the car but maintain correct camber curve and suspension travel. Raising by 19 mm allows use of 15”, 16”, or 17” wheels. I have converted to 5 lug using 911 front strut bodies, so my learning curve was to first modify these 914 struts. First photo is comparison of stock unmodified left side 914 strut body versus modified right side (my first one).
Attached thumbnail(s) 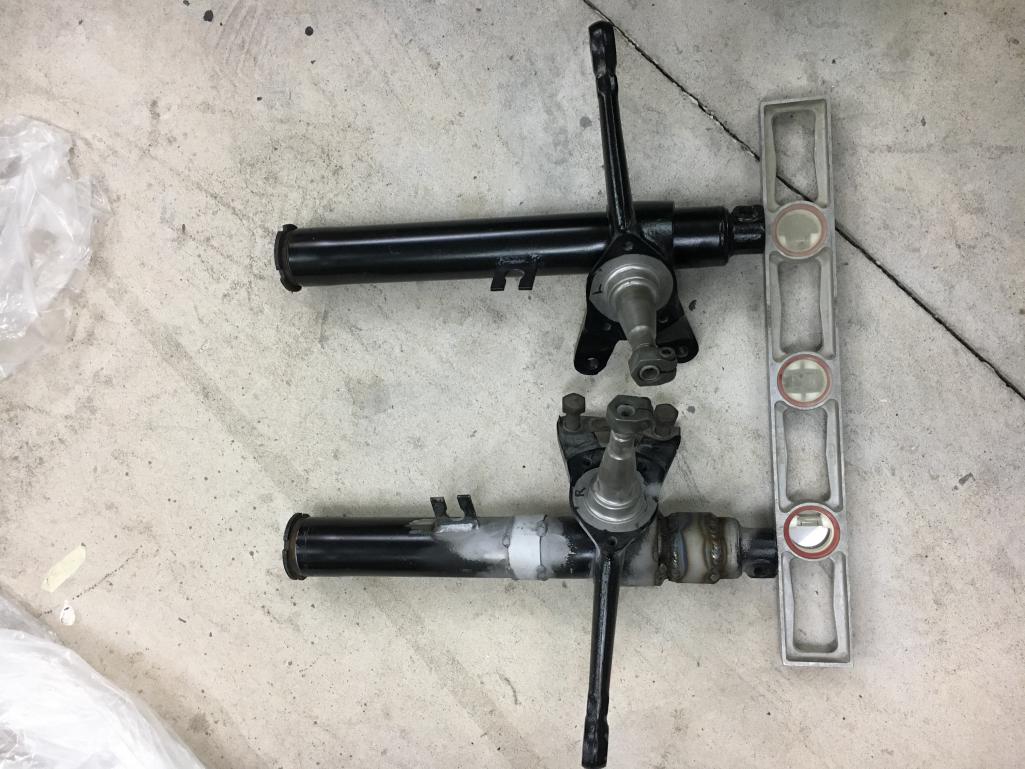
|
   |

 
|
| jmitro |
Jan 6 2018, 08:35 AM
Post
#2
|
|
Senior Member Group: Members Posts: 713 Joined: 23-July 15 From: Oklahoma Member No.: 18,986 Region Association: None |
Next is measure the length of strut body, Mark out 19 mm to be removed above the spindle, and remove the brake line mount. I later determined it was probably not necessary to remove the brake line mount since I could remove 19mm above it and retain the proper distance from spindle to brake line
Attached thumbnail(s) 
|
|
|
|
| jmitro |
Jan 6 2018, 08:37 AM
Post
#3
|
|
Senior Member Group: Members Posts: 713 Joined: 23-July 15 From: Oklahoma Member No.: 18,986 Region Association: None |
Next, remove 19 mm or 3/4 inch above the spindle.
The other tubes are sleeves to be explained below. Attached thumbnail(s) 
|
|
|
|
| jmitro |
Jan 6 2018, 08:39 AM
Post
#4
|
|
Senior Member Group: Members Posts: 713 Joined: 23-July 15 From: Oklahoma Member No.: 18,986 Region Association: None |
Next is weld the strut back together. In order to ensure precise alignment I used a EDITED 1.75" OD tube inserted the length of the body which is the exact dimension of the bilstein insert
Attached thumbnail(s) 
|
|
|
|
| mepstein |
Jan 6 2018, 08:39 AM
Post
#5
|
|
914-6 GT in waiting Group: Members Posts: 19,325 Joined: 19-September 09 From: Landenberg, PA/Wilmington, DE Member No.: 10,825 Region Association: MidAtlantic Region |
Some of the guys bend the tie rod arm down.
Attached image(s) 
|
|
|
|
| jmitro |
Jan 6 2018, 08:40 AM
Post
#6
|
|
Senior Member Group: Members Posts: 713 Joined: 23-July 15 From: Oklahoma Member No.: 18,986 Region Association: None |
Initial welding of the strut body
Attached thumbnail(s) 
|
|
|
|
| jmitro |
Jan 6 2018, 08:41 AM
Post
#7
|
|
Senior Member Group: Members Posts: 713 Joined: 23-July 15 From: Oklahoma Member No.: 18,986 Region Association: None |
Sleeve welded on to add strength to my butt welds. It's a thin walled 2.06" ID tube.
Also, brake mount welded back in place; as above I didn't really need to remove the tab in the first place Attached thumbnail(s) 
|
|
|
|
| jmitro |
Jan 6 2018, 08:43 AM
Post
#8
|
|
Senior Member Group: Members Posts: 713 Joined: 23-July 15 From: Oklahoma Member No.: 18,986 Region Association: None |
In my haste to complete the project, I forgot to photograph the second half of the modification which includes cutting off the ball joint end and welding an external sleeve to return the strut to original length. This is a 2.01" ID x 2.25" OD sleeve. Again a EDIT 1.75" OD tube was inserted to ensure precise alignment, and orientation of the ball joint pin hole was maintained
Attached thumbnail(s) 
|
|
|
|
| jmitro |
Jan 6 2018, 08:53 AM
Post
#9
|
|
Senior Member Group: Members Posts: 713 Joined: 23-July 15 From: Oklahoma Member No.: 18,986 Region Association: None |
Final completion of both strut bodies. As you can see the Bilstein insert works perfectly with no binding, and length is correct to ensure engagement of the threads.
This insert is actually for my 911 strut bodies but also fits the 914 Attached thumbnail(s) 
|
|
|
|
| jmitro |
Jan 6 2018, 08:54 AM
Post
#10
|
|
Senior Member Group: Members Posts: 713 Joined: 23-July 15 From: Oklahoma Member No.: 18,986 Region Association: None |
Close up of external sleeve on the lower edge. Again perfectly aligned and measured to original strut length, and orientation of the ball joint pin hole is maintained
Attached thumbnail(s) 
|
|
|
|
| Mark Henry |
Jan 6 2018, 09:05 AM
Post
#11
|
|
that's what I do! Group: Members Posts: 20,065 Joined: 27-December 02 From: Port Hope, Ontario Member No.: 26 Region Association: Canada |
Good job (IMG:style_emoticons/default/thumb3d.gif)
|
|
|
|
| infraredcalvin |
Jan 6 2018, 11:38 AM
Post
#12
|
|
Distracted Member Group: Members Posts: 1,529 Joined: 25-August 08 From: Ladera Ranch, CA Member No.: 9,463 Region Association: Southern California |
Nice work, I’ve been contemplating doing this as well. I have a couple of questions.
- the upper sleeve appears to be for strengthening of the welded joint while the lower is necessary to address the material lossed from cutting the strut. With the thickness of the strut tube itself, along with a good weld, do you really feel the upper sleeve is necessary? - in your pic, the sleeves appear to be in different locations along the upper portion of the tube. I’m assuming that the lower strut in the picture is your 2nd pass, where you didn’t have to remove the brake line retainer? Thanks for posting! |
 |
|
| TargaToy |
Jan 6 2018, 12:32 PM
Post
#13
|
|
-NONSOLIS RADIOS SEDIOUIS FULMINA MITTO- Group: Members Posts: 692 Joined: 26-March 10 From: DelMarVa Peninsula Member No.: 11,509 Region Association: MidAtlantic Region |
QUOTE(infraredcalvin @ Jan 6 2018, 12:38 PM)  - the upper sleeve appears to be for strengthening of the welded joint while the lower is necessary to address the material lossed from cutting the strut... I think when I've seen this done before, the section of strut body removed from the upper cut is grafted back in at the lower cut. This is how the overall length is maintained. I also seem to recall another member here posted the process and did not add the external reinforcing sleeves. |
|
|
|
| jmitro |
Jan 6 2018, 12:34 PM
Post
#14
|
|
Senior Member Group: Members Posts: 713 Joined: 23-July 15 From: Oklahoma Member No.: 18,986 Region Association: None |
QUOTE(infraredcalvin @ Jan 6 2018, 11:38 AM) Nice work, I’ve been contemplating doing this as well. I have a couple of questions. - the upper sleeve appears to be for strengthening of the welded joint while the lower is necessary to address the material lossed from cutting the strut. With the thickness of the strut tube itself, along with a good weld, do you really feel the upper sleeve is necessary? Correct; it's possible the sleeve is not necessary; however, in my case I wanted to be sure strength was maintained because, even with beveled edges, my butt welds did not penetrate the entire strut tube wall; they probably would have if I had separated the tubes a bit more. QUOTE(infraredcalvin @ Jan 6 2018, 11:38 AM) - in your pic, the sleeves appear to be in different locations along the upper portion of the tube. I’m assuming that the lower strut in the picture is your 2nd pass, where you didn’t have to remove the brake line retainer? Thanks for posting! actually, that is my first attempt; the brake line mount is farther from the spindle compared to my second attempt where it is retained at the original distance. My reasoning for this was to ensure no binding or interference of the brake lines with the inside of wheel/tire QUOTE(TargaToy @ Jan 6 2018, 12:32 PM) I think when I've seen this done before, the section of strut body removed from the upper cut is grafted back in at the lower cut. This is how the overall length is maintained. I also seem to recall another member here posted the process and did not add the external reinforcing sleeves. I thought about that also, but a couple of things prevent that from being feasible: 1. the width of tube removed is too short due to the 2mm cutting wheel removing 2mm on each end of the graft so instead of a 19mm graft you end up with a 15-16mm graft 2. the strut body narrows at the spindle so the OD (outside diameter) of the upper strut section is larger (2.09") than OD of the lower section (2.00") |
|
|
|
| maf914 |
Jan 8 2018, 09:43 AM
Post
#15
|
|
Not a Guru! Group: Members Posts: 3,049 Joined: 30-April 03 From: Central Florida Member No.: 632 Region Association: None |
QUOTE(mepstein @ Jan 6 2018, 06:39 AM) Some of the guys bend the tie rod arm down. The tie rod arms are quite substantial. How does one bend them? Heat and hammer like a blacksmith? The second photo is from Tangerine Racing, who offer strut shortening. Attached image(s)  
|
|
|
|
| rgalla9146 |
Jan 8 2018, 07:33 PM
Post
#16
|
|
Advanced Member Group: Members Posts: 4,570 Joined: 23-November 05 From: Paramus NJ Member No.: 5,176 Region Association: None |
Everything old is new again.
Hot Rodders heated and bent the steering arms on old Ford spindles. It was necessary when they installed 'dropped' axles to lower their cars. Best done with some sort of jig to ensure uniform shape on both struts. |
|
|
|
| Spoke |
Jan 8 2018, 07:58 PM
Post
#17
|
|
Jerry Group: Members Posts: 6,992 Joined: 29-October 04 From: Allentown, PA Member No.: 3,031 Region Association: None |
Nice work. Especially the welding.
|
|
|
|
| IronHillRestorations |
Jan 9 2018, 08:38 AM
Post
#18
|
|
I. I. R. C. Group: Members Posts: 6,732 Joined: 18-March 03 From: West TN Member No.: 439 Region Association: None |
I've never tried this.
I always thought you could just grind out the welds holding the spindle assembly and slide it up. |
|
|
|
| mepstein |
Jan 9 2018, 09:36 AM
Post
#19
|
|
914-6 GT in waiting Group: Members Posts: 19,325 Joined: 19-September 09 From: Landenberg, PA/Wilmington, DE Member No.: 10,825 Region Association: MidAtlantic Region |
QUOTE(Perry Kiehl @ Jan 9 2018, 09:38 AM) I've never tried this. I always thought you could just grind out the welds holding the spindle assembly and slide it up. You can on at least some of them. Takes some work and at least a 20 ton press but it’s an option. |
|
|
|
| ChrisFoley |
Jan 9 2018, 10:16 AM
Post
#20
|
|
I am Tangerine Racing Group: Members Posts: 7,937 Joined: 29-January 03 From: Bolton, CT Member No.: 209 Region Association: None |
That method doesn't work on 914 Boge struts. The tube increases in diameter right above the knuckle.
|
|
|
|
|
2 User(s) are reading this topic (2 Guests and 0 Anonymous Users)
0 Members:

|
Lo-Fi Version | Time is now: 16th June 2024 - 10:46 PM |
Invision Power Board
v9.1.4 © 2024 IPS, Inc.