|
|
|
Porsche, and the Porsche crest are registered trademarks of Dr. Ing. h.c. F. Porsche AG.
This site is not affiliated with Porsche in any way. Its only purpose is to provide an online forum for car enthusiasts. All other trademarks are property of their respective owners. |
|
|

  |

| defianty |
 May 17 2019, 11:38 AM May 17 2019, 11:38 AM
Post
#1
|
|
Senior Member  Group: Members Posts: 659 Joined: 9-August 06 From: Essex, UK Member No.: 6,621 Region Association: None |
I wasn't looking forward to installing this seal as I kept reading about soap, glycerine etc. I wondered if there was a different way.
As my original seal was in a good condition I reused it on the car. From start to finish I had the seal installed in 20 minutes including installing new anodised gutters and done with no lubrication. Firstly I installed the new gutters and then pushed on one corner of the seal, seating it on to the protruding part of the gutter that goes into the seal. I then pushed the downward part of the seal into the gutter so only the inward part of the rubber was correctly seated in the gutter. After taping up the gutter and paintwork to avoid any scratches I then took a cell phone opening tool and pushed the outer part of the seal in place. (IMG:http://www.914world.com/bbs2/uploads_offsite/i.postimg.cc-6621-1558114712.1.jpg) (IMG:http://www.914world.com/bbs2/uploads_offsite/i.postimg.cc-6621-1558114712.2.jpg) (IMG:http://www.914world.com/bbs2/uploads_offsite/i.postimg.cc-6621-1558114712.3.jpg) (IMG:http://www.914world.com/bbs2/uploads_offsite/i.postimg.cc-6621-1558114713.4.jpg) Here's the tool I used. I only used it as I had to it hand and it was less likely to do any damage if I slipped. https://www.ebay.com/itm/6-piece-Repair-Kit...675.c100623.m-1 Sorry I didn't take more photos of the process. The whole process was over so quickly. (IMG:style_emoticons/default/laugh.gif) I hope this helps someone out. |
   |

 
|
| mepstein |
May 17 2019, 12:03 PM
Post
#2
|
|
914-6 GT in waiting Group: Members Posts: 20,535 Joined: 19-September 09 From: Landenberg, PA/Wilmington, DE Member No.: 10,825 Region Association: MidAtlantic Region |
You had an edge using your old seal since it already was a perfect fit. I would do the same if any of mine were even usable. (IMG:style_emoticons/default/beerchug.gif)
|
|
|
|
| 914_7T3 |
May 17 2019, 12:13 PM
Post
#3
|
|
Please forgive me, I'm new to all of this! Group: Members Posts: 1,894 Joined: 3-April 17 From: Los Angeles, CA Member No.: 20,991 Region Association: Southern California |
Thanks for this as I still need to do mine.
|
|
|
|
| defianty |
May 17 2019, 12:25 PM
Post
#4
|
|
Senior Member Group: Members Posts: 659 Joined: 9-August 06 From: Essex, UK Member No.: 6,621 Region Association: None |
QUOTE(mepstein @ May 17 2019, 07:03 PM)  You had an edge using your old seal since it already was a perfect fit. I would do the same if any of mine were even usable. (IMG:style_emoticons/default/beerchug.gif) That thought crossed my mind. It would be interesting if someone tried this method on a new seal. |
|
|
|
| mepstein |
May 17 2019, 01:00 PM
Post
#5
|
|
914-6 GT in waiting Group: Members Posts: 20,535 Joined: 19-September 09 From: Landenberg, PA/Wilmington, DE Member No.: 10,825 Region Association: MidAtlantic Region |
QUOTE(defianty @ May 17 2019, 02:25 PM) QUOTE(mepstein @ May 17 2019, 07:03 PM) You had an edge using your old seal since it already was a perfect fit. I would do the same if any of mine were even usable. (IMG:style_emoticons/default/beerchug.gif) That thought crossed my mind. It would be interesting if someone tried this method on a new seal. I'm guessing the old seal makes a difference because when we reinstall a 911 windshield and seal, it's pretty much pops back in. The rubber has taken a set to the correct space. When we use a new seal, it's a process and usually involves, pushing, massaging, working the edge, cursing, etc. Also the old Porsche seals have a factory fit, the new ones are the correct general shape but not a great fit. |
|
|
|
| Specracer |
May 17 2019, 07:00 PM
Post
#6
|
|
Member Group: Members Posts: 100 Joined: 27-March 17 From: SE Mass Member No.: 20,970 Region Association: None |
I too did one this week (new 914 rubber piece). After all the comments on how brutal it was, didnt know what to expect. Was non issue. Use a little glycerine started at the top of the A pillar, got the back edge and then pushed in the outside edge. I used a wider tool, a dzus fastener tool, its short and a wide blade.
|
|
|
|
| defianty |
May 18 2019, 01:20 AM
Post
#7
|
|
Senior Member Group: Members Posts: 659 Joined: 9-August 06 From: Essex, UK Member No.: 6,621 Region Association: None |
QUOTE(Specracer @ May 18 2019, 02:00 AM) I too did one this week (new 914 rubber piece). After all the comments on how brutal it was, didnt know what to expect. Was non issue. Use a little glycerine started at the top of the A pillar, got the back edge and then pushed in the outside edge. I used a wider tool, a dzus fastener tool, its short and a wide blade. Brilliant, that's great to know this method works on new seals too. I can't imagine how difficult it would be to try and slide the seal all through the gutter. |
|
|
|
| Specracer |
May 18 2019, 03:34 AM
Post
#8
|
|
Member Group: Members Posts: 100 Joined: 27-March 17 From: SE Mass Member No.: 20,970 Region Association: None |
With out this forum, I would have tried to slide it (with massive frustration). The method I used, if I recall, is how 914rubber has posted, as the way they do it.
This was the tool I used, it being so short really gave good control, and the wide blade didnt want to dig into the rubber. Attached image(s) 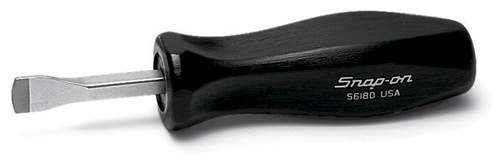
|
|
|
|
| mb911 |
May 18 2019, 04:59 AM
Post
#9
|
|
914 Guru Group: Members Posts: 7,723 Joined: 2-January 09 From: Burlington wi Member No.: 9,892 Region Association: Upper MidWest |
The last one I installed I did it that way as well.
|
|
|
|
|
2 User(s) are reading this topic (2 Guests and 0 Anonymous Users)
0 Members:

|
Lo-Fi Version | Time is now: 13th March 2026 - 05:30 PM |
Invision Power Board
v9.1.4 © 2026 IPS, Inc.