|
|
|
Porsche, and the Porsche crest are registered trademarks of Dr. Ing. h.c. F. Porsche AG.
This site is not affiliated with Porsche in any way. Its only purpose is to provide an online forum for car enthusiasts. All other trademarks are property of their respective owners. |
|
|

  |

| bkrantz |
 Apr 26 2020, 07:54 PM Apr 26 2020, 07:54 PM
Post
#1
|
|
914 Guru  Group: Members Posts: 7,801 Joined: 3-August 19 From: SW Colorado Member No.: 23,343 Region Association: Rocky Mountains |
As shown on my build thread, I am working on the rear of the body, including the trunk lid. This is a donor lid I got last year to replace the rusty original.
Now with the work I was doing to straighten the new lid edge, I found rust where I thought was clean--should have known better. Attached thumbnail(s) 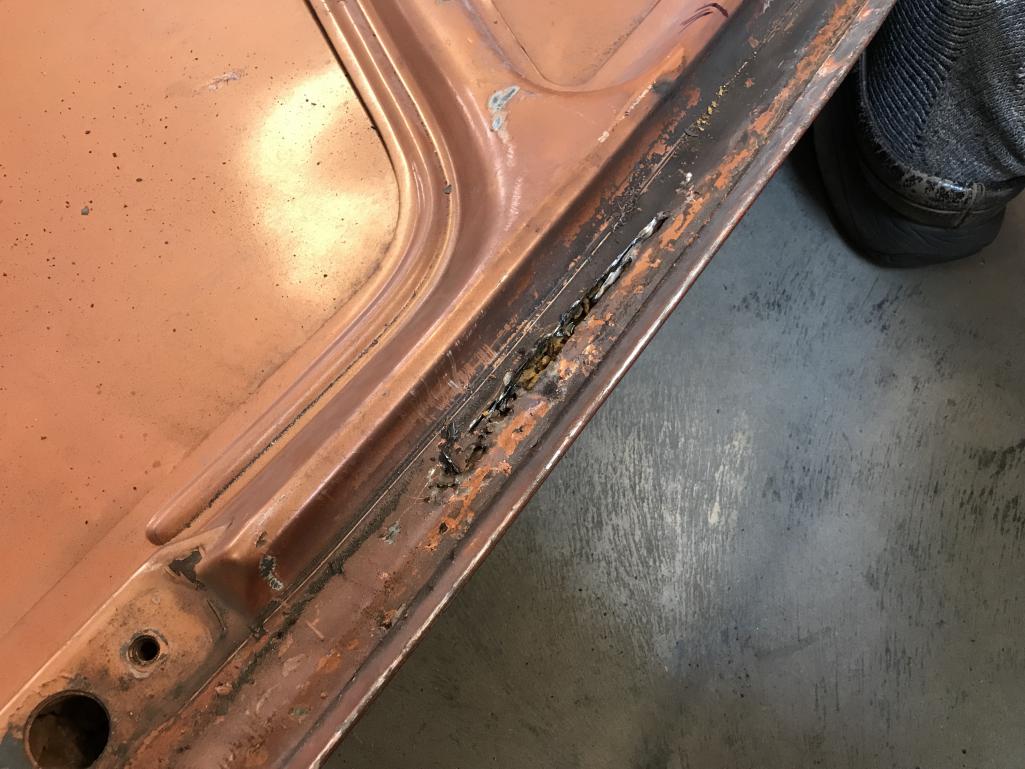
|
   |

 
|
| bkrantz |
Apr 26 2020, 07:57 PM
Post
#2
|
|
914 Guru Group: Members Posts: 7,801 Joined: 3-August 19 From: SW Colorado Member No.: 23,343 Region Association: Rocky Mountains |
Some quick surgical exploration makes it look like the rust-through of the inner brace is confined to a small area. But heavy surface rust is sure to be present all across the brace, and the inner side of the skin.
Any collective wisdom on what to do? Explore more and patch the local rust? Try to chip away the rest of the interior foam? Use a rust treatment? Or cut out the entire brace? Or don't bother and go looking for a better lid? Attached thumbnail(s) 
|
|
|
|
| djway |
Apr 26 2020, 08:21 PM
Post
#3
|
|
Senior Member Group: Members Posts: 787 Joined: 16-October 15 From: Riverside Member No.: 19,266 Region Association: Southern California |
I completely removed the skin on one hood I did. I blasted everything then repaired what was necessary the put the skin back on. Saved time in the long run.
|
|
|
|
| rjames |
Apr 26 2020, 11:00 PM
Post
#4
|
|
I'm made of metal Group: Members Posts: 3,954 Joined: 24-July 05 From: Shoreline, WA Member No.: 4,467 Region Association: Pacific Northwest |
Is the inner layer only attached around the perimeter?
|
|
|
|
| cn2800 |
Apr 27 2020, 07:23 AM
Post
#5
|
|
Member Group: Members Posts: 119 Joined: 11-August 14 From: Amarillo, Texas Member No.: 17,766 Region Association: None |
QUOTE(djway @ Apr 26 2020, 08:21 PM)  I completely removed the skin on one hood I did. I blasted everything then repaired what was necessary the put the skin back on. Saved time in the long run. How did you remove the skin from the frame? The frame appears to be captured by the rolled edge of the decklid skin. Did you cut around the edges, or did you actually un-crimp the edges? I’m wondering because I’ve got a lightly bent hood that could be fixed if the two parts were separated. |
|
|
|
| dr914@autoatlanta.com |
Apr 27 2020, 08:26 AM
Post
#6
|
|
914 Guru Group: Members Posts: 7,894 Joined: 3-January 07 From: atlanta georgia Member No.: 7,418 Region Association: None |
as long is the top is not perforated, you can fix is like in the picture, The insulation sound deadening packing and leaking rear tail lights and heat is what rusts the lids. THANKFULLY we bought Al's inventory of perfect used rust free california deck lids so we now have plenty of GOOD ones (along with the over 500 NOT GOOD ones!
|
|
|
|
| djway |
Apr 27 2020, 10:33 AM
Post
#7
|
|
Senior Member Group: Members Posts: 787 Joined: 16-October 15 From: Riverside Member No.: 19,266 Region Association: Southern California |
QUOTE(cn2800 @ Apr 27 2020, 06:23 AM) QUOTE(djway @ Apr 26 2020, 08:21 PM) I completely removed the skin on one hood I did. I blasted everything then repaired what was necessary the put the skin back on. Saved time in the long run. How did you remove the skin from the frame? The frame appears to be captured by the rolled edge of the decklid skin. Did you cut around the edges, or did you actually un-crimp the edges? I’m wondering because I’ve got a lightly bent hood that could be fixed if the two parts were separated. I opened up the edges. Google “replacing door skins” which is done all the time. |
|
|
|
| bbrock |
Apr 27 2020, 05:26 PM
Post
#8
|
|
914 Guru Group: Members Posts: 5,269 Joined: 17-February 17 From: Montana Member No.: 20,845 Region Association: Rocky Mountains |
My frunk lid had spots that looked a lot like that and I was able to patch them. I also made up a wand attached to a pressure bottle sprayer that I ran through the channels to treat the guts with ospho.
|
|
|
|
| bkrantz |
Apr 27 2020, 09:38 PM
Post
#9
|
|
914 Guru Group: Members Posts: 7,801 Joined: 3-August 19 From: SW Colorado Member No.: 23,343 Region Association: Rocky Mountains |
Thanks, everyone. More questions:
1. If I try to repair without undoing the edge crimp and taking off the skin, how worthy is this? How likely that rust in the crimp will win out? 2. If I go ahead as started, and cut out sections of the inner rib, I can get most of the foam out. Then what? What rust treatment? 3. Should I just spend the time and money to get a better lid? |
|
|
|
| bbrock |
Apr 27 2020, 10:31 PM
Post
#10
|
|
914 Guru Group: Members Posts: 5,269 Joined: 17-February 17 From: Montana Member No.: 20,845 Region Association: Rocky Mountains |
Can't speak to getting the foam out but I think phosphoric acid (e.g. Ospho) does a very good job treat the rust and can seep into crimps and crevices nicely. After rinsing the Ospho with water and drying it with a heat gun, I followed with Eastwood Internal Frame Coating add protection. After all that, I looked inside with a boroscope and liked what I saw. After I painted, I followed up treating all the cavities with 3M Cavity Wax Plus. I might have gone overboard but really like cavity wax and figured I'd provide as much protection as possible. Car hasn't been on the road yet though so can't say how long it will last.
|
|
|
|
| mepstein |
Apr 28 2020, 08:13 AM
Post
#11
|
|
914-6 GT in waiting Group: Members Posts: 19,313 Joined: 19-September 09 From: Landenberg, PA/Wilmington, DE Member No.: 10,825 Region Association: MidAtlantic Region |
Some guys like BBrock are awesome DIY'ers. I'm a WTB'er in the classifieds.
|
|
|
|
| bbrock |
Apr 28 2020, 08:42 AM
Post
#12
|
|
914 Guru Group: Members Posts: 5,269 Joined: 17-February 17 From: Montana Member No.: 20,845 Region Association: Rocky Mountains |
QUOTE(mepstein @ Apr 28 2020, 08:13 AM) Some guys like BBrock are awesome DIY'ers. I'm a WTB'er in the classifieds. Ha! For the record, I WTBd my rear trunk lid but it was farther gone than this one. All but about 50 square inches of my original trunk lid skin ended up back in the car as patches and fabricated parts though, so she's still with us. (IMG:style_emoticons/default/biggrin.gif) |
|
|
|
| StarBear |
Apr 28 2020, 08:49 AM
Post
#13
|
|
Senior Member Group: Members Posts: 1,910 Joined: 2-September 09 From: NJ Member No.: 10,753 Region Association: North East States |
QUOTE(mepstein @ Apr 28 2020, 10:13 AM) Some guys like BBrock are awesome DIY'ers. I'm a WTB'er in the classifieds. (IMG:style_emoticons/default/agree.gif) But greatly admire those with the area, tools and expertise to DIY. |
|
|
|
| aggiezig |
May 1 2020, 12:21 AM
Post
#14
|
|
Porsche Wannabe Group: Members Posts: 319 Joined: 13-January 16 From: Los Angeles, CA Member No.: 19,557 Region Association: Southern California |
I encountered this same crap on my trunk lid. I ended up dissecting, removing as much foam as possible, using phosphoric acid, and finally coating with master series before welding back up. The clean metal got a coat of epoxy primer and then seam sealer before paint. I'm pretty confident in the repair, it should hold up another 45 years.
Link to my thread with pics: http://www.914world.com/bbs2/index.php?s=&...t&p=2593726 |
|
|
|
|
1 User(s) are reading this topic (1 Guests and 0 Anonymous Users)
0 Members:

|
Lo-Fi Version | Time is now: 7th June 2024 - 05:16 PM |
Invision Power Board
v9.1.4 © 2024 IPS, Inc.