|
|
|
Porsche, and the Porsche crest are registered trademarks of Dr. Ing. h.c. F. Porsche AG.
This site is not affiliated with Porsche in any way. Its only purpose is to provide an online forum for car enthusiasts. All other trademarks are property of their respective owners. |
|
|

  |

| DennisV |
 Jun 20 2025, 07:06 PM Jun 20 2025, 07:06 PM
Post
#1
|
|
Senior Member  Group: Members Posts: 666 Joined: 8-August 20 From: Santa Rosa, CA Member No.: 24,575 Region Association: Northern California |
Is this the correct placement for the camber alignment shim on the rear trailing arm? it seems weird to me that it sticks off at the corner like that, but I can't find any other orientation that allow 3 bolt holes to line up.
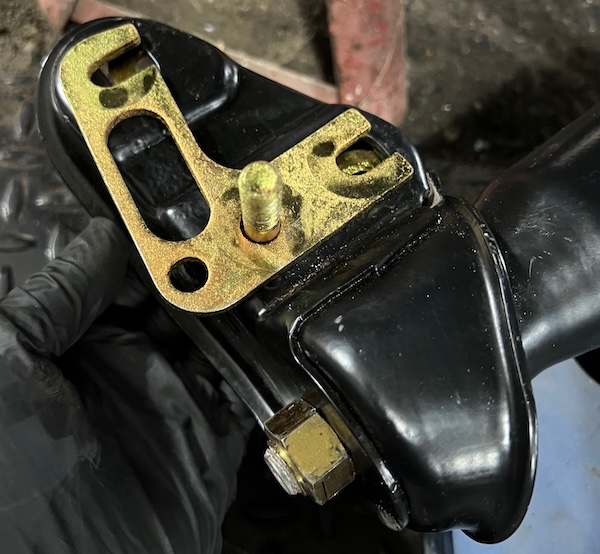 Does the washer go on the trailing arm side of the body tab, as opposed to the nut side? 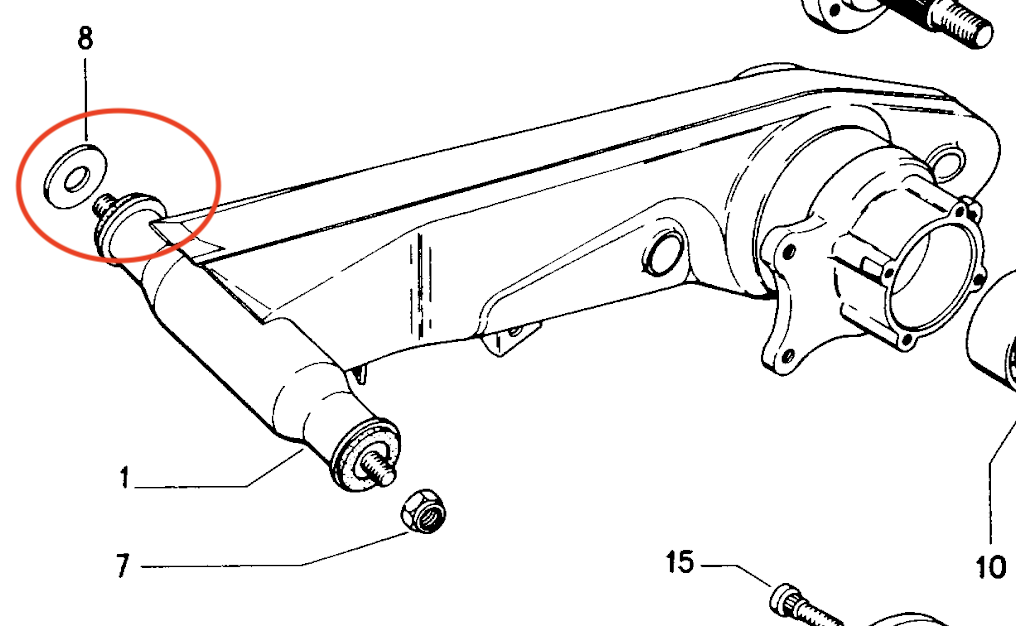 Thank you. |
   |

 
|
| bkrantz |
Jun 20 2025, 08:30 PM
Post
#2
|
|
914 Guru Group: Members Posts: 8,420 Joined: 3-August 19 From: SW Colorado Member No.: 23,343 Region Association: Rocky Mountains |
I can't get my head upside down to picture the shims, but in theory/practice they can be slid in or out from the side, with one bolt removed.
|
|
|
|
| Ishley |
Jun 20 2025, 08:32 PM
Post
#3
|
|
Member Group: Members Posts: 219 Joined: 4-October 21 From: Clarendon Hills Il Member No.: 25,957 Region Association: Upper MidWest |
Yes to both. The only thing I did different was to use locking nuts from
McMaster Carr. I found the inside nut would loosen as I drove the car… and this was recommended by others. I haven’t had the issue since I added these nuts. I get under the car from time to time and just check that everything is still tight. Something to consider after you drive a bit. You’ll also want to get a wheel alignment. https://www.mcmaster.com/product/93795A335 They are single use nuts… so I have a pack of 8 more if I ever need it. |
|
|
|
| DennisV |
Jun 21 2025, 04:58 AM
Post
#4
|
|
Senior Member Group: Members Posts: 666 Joined: 8-August 20 From: Santa Rosa, CA Member No.: 24,575 Region Association: Northern California |
QUOTE(Ishley @ Jun 20 2025, 07:32 PM)  Yes to both. The only thing I did different was to use locking nuts from Thank you for the confirmation and tip on the lock nuts. |
|
|
|
| Cfletch |
Jun 28 2025, 09:26 PM
Post
#5
|
|
Member Group: Members Posts: 139 Joined: 30-January 14 From: Santa Barbara Member No.: 16,941 Region Association: Southern California |
I will be doing this install in the next week on my car along with torquing the axle nut to 250 to clamp down the assembly to be ready for brakes. You are asking all the questions I had in my head about this. My car did not have the washer at all on the trailing are and I am wondering why.... yikes!
|
 |
|
| Montreal914 |
Jun 29 2025, 12:19 PM
Post
#6
|
|
Senior Member Group: Members Posts: 1,854 Joined: 8-August 10 From: Claremont, CA Member No.: 12,023 Region Association: Southern California |
Humm... Interesting (IMG:style_emoticons/default/idea.gif)
Am I understanding correctly what is being said here is that the washer should be placed between the rubber bushing flange (shaft end) and the suspension ear? I have never seen this washer in between the arm's rubber bushing and the suspension ear on my car. I always thought the pivot shaft serrations were supposed to grab on the surface of the suspension ear to prevent the shaft from rotating (although that is a lot to ask). Picture below shows the serration marks from the shaft to the suspension ear and rubbing of the rubber bushing against the metal, which seens to be what it would be designed for. @bdstone914 , @mepstein , please share your recollection of that assembled area, thanks! 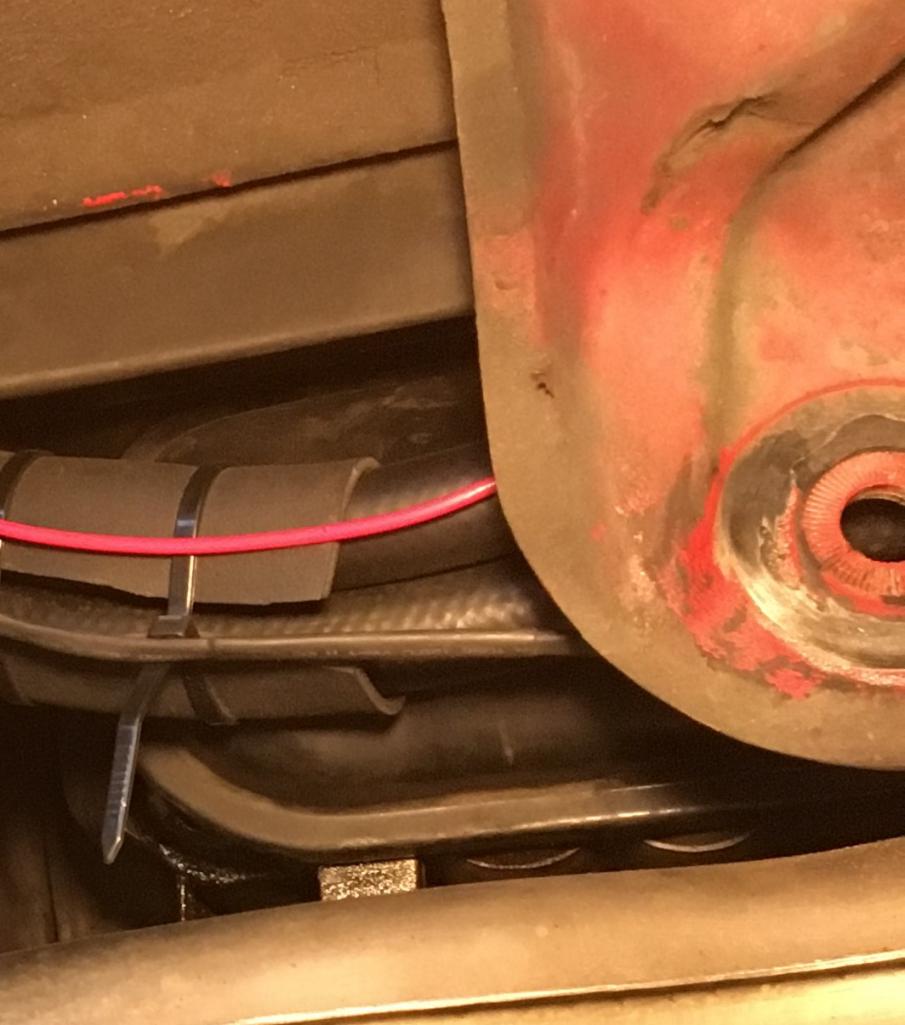 |
|
|
|
| Superhawk996 |
Jun 29 2025, 12:38 PM
Post
#7
|
|
914 Guru Group: Members Posts: 7,197 Joined: 25-August 18 From: Woods of N. Idaho Member No.: 22,428 Region Association: Galt's Gulch |
QUOTE(Montreal914 @ Jun 29 2025, 02:19 PM) I have never seen this washer in between the arm's rubber bushing and the suspension ear on my car. I always thought the pivot shaft serrations were supposed to grab on the surface of the suspension ear to prevent the shaft from rotating (although that is a lot to ask). You are correct |
|
|
|
| mepstein |
Jun 29 2025, 01:29 PM
Post
#8
|
|
914-6 GT in waiting Group: Members Posts: 19,953 Joined: 19-September 09 From: Landenberg, PA/Wilmington, DE Member No.: 10,825 Region Association: MidAtlantic Region |
QUOTE(Superhawk996 @ Jun 29 2025, 02:38 PM) QUOTE(Montreal914 @ Jun 29 2025, 02:19 PM) I have never seen this washer in between the arm's rubber bushing and the suspension ear on my car. I always thought the pivot shaft serrations were supposed to grab on the surface of the suspension ear to prevent the shaft from rotating (although that is a lot to ask). You are correct (IMG:style_emoticons/default/beerchug.gif) |
|
|
|
| Ishley |
Jun 29 2025, 02:14 PM
Post
#9
|
|
Member Group: Members Posts: 219 Joined: 4-October 21 From: Clarendon Hills Il Member No.: 25,957 Region Association: Upper MidWest |
Yea I guess I wasn’t clear. I didn’t pickup the second comment in between the images. I was saying yes to the orientation of the shim and yes it does stick out a little bit.
There are no washers between the bushings and their mounts. The nuts clamp the rubber bushings between the splines/bushings and the rubber twists as the swing arm moves. Sorry if that was not clear. . |
|
|
|
| bkrantz |
Jun 29 2025, 08:22 PM
Post
#10
|
|
914 Guru Group: Members Posts: 8,420 Joined: 3-August 19 From: SW Colorado Member No.: 23,343 Region Association: Rocky Mountains |
QUOTE(Montreal914 @ Jun 29 2025, 12:19 PM) Humm... Interesting (IMG:style_emoticons/default/idea.gif) Am I understanding correctly what is being said here is that the washer should be placed between the rubber bushing flange (shaft end) and the suspension ear? I have never seen this washer in between the arm's rubber bushing and the suspension ear on my car. I always thought the pivot shaft serrations were supposed to grab on the surface of the suspension ear to prevent the shaft from rotating (although that is a lot to ask). Picture below shows the serration marks from the shaft to the suspension ear and rubbing of the rubber bushing against the metal, which seens to be what it would be designed for. @bdstone914 , @mepstein , please share your recollection of that assembled area, thanks! Is that a patch of peeling paint on the mounting arm above the pivot hole? Or something worse? |
|
|
|
| DennisV |
Jun 30 2025, 06:56 AM
Post
#11
|
|
Senior Member Group: Members Posts: 666 Joined: 8-August 20 From: Santa Rosa, CA Member No.: 24,575 Region Association: Northern California |
QUOTE(Montreal914 @ Jun 29 2025, 11:19 AM) I have never seen this washer in between the arm's rubber bushing and the suspension ear on my car. I always thought the pivot shaft serrations were supposed to grab on the surface of the suspension ear to prevent the shaft from rotating (although that is a lot to ask). What I'm reading now is that the washer goes on the nut side? Good catch. 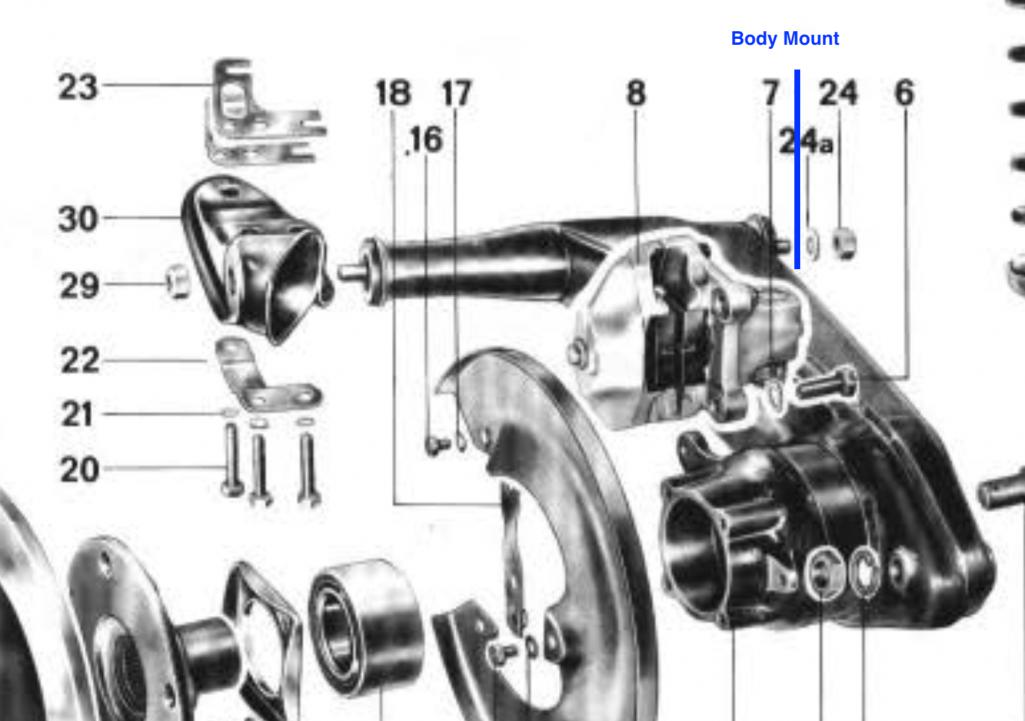 Wish the workshop manual was more clear. It's in a photo, but no description of its correct position. Argh! Disappointing to be learning this now. It was a struggle getting the control arms installed. Guess I will get more practice. (IMG:style_emoticons/default/headbang.gif) |
|
|
|
| Montreal914 |
Jun 30 2025, 08:40 AM
Post
#12
|
|
Senior Member Group: Members Posts: 1,854 Joined: 8-August 10 From: Claremont, CA Member No.: 12,023 Region Association: Southern California |
Sorry Dennis, it has been bugging me for a few days but I didn't have a chance to raise the question sooner...
Second time should be a breeze! (IMG:style_emoticons/default/sunglasses.gif) Good luck and continue sharing the progress! (IMG:style_emoticons/default/smile.gif) |
|
|
|
| Literati914 |
Jun 30 2025, 11:22 AM
Post
#13
|
|
Senior Member Group: Members Posts: 1,983 Joined: 16-November 06 From: Dallas, TX Member No.: 7,222 Region Association: Southwest Region |
QUOTE(Ishley @ Jun 20 2025, 09:32 PM) Yes to both. The only thing I did different was to use locking nuts from McMaster Carr. I found the inside nut would loosen as I drove the car… and this was recommended by others. I haven’t had the issue since I added these nuts. I get under the car from time to time and just check that everything is still tight. Something to consider after you drive a bit. You’ll also want to get a wheel alignment. https://www.mcmaster.com/product/93795A335 They are single use nuts… so I have a pack of 8 more if I ever need it. Love these kinds of tips, thanks!.. I'm gonna grab a pack of them now. Do you used them at item #24 ..AND the #29 spot? |
|
|
|
|
2 User(s) are reading this topic (1 Guests and 0 Anonymous Users)
1 Members: mxkinn01

|
Lo-Fi Version | Time is now: 1st July 2025 - 10:48 AM |
Invision Power Board
v9.1.4 © 2025 IPS, Inc.