|
|
|
Porsche, and the Porsche crest are registered trademarks of Dr. Ing. h.c. F. Porsche AG.
This site is not affiliated with Porsche in any way. Its only purpose is to provide an online forum for car enthusiasts. All other trademarks are property of their respective owners. |
|
|

  |

| gopack |
 Mar 25 2006, 05:47 PM Mar 25 2006, 05:47 PM
Post
#1
|
|
CHEESEHEAD in CA, MARK  Group: Members Posts: 744 Joined: 7-August 04 From: Folsom, CA Member No.: 2,472 Region Association: Northern California |
Ok, here goes. I decided to start a running thread to document the cars progress. I have started a blog, but this seems like a better way to memorialize the progress.
History: I purchased the car in Northern New Mexico in the 2001 or so. PO said the engine was a recent rebuild, and the tranny had been gone through (do they all say that?) The car was 20 footer, and had at least 3 layers of paint with 2 different yellows over the Bahia red factory finish, some body filler work was evident, but it looked to be a reasonably rust free car for under 2 grand. Drove it for a summer and the clutch went out, so I put it away until next summer. It sat for nearly a year in the garage, until I performed what to me was the most difficult automobile repair I had ever attempted, clutch job. Using the PP tech article I was able to get it in with a minimum of errors and excitement. Test drove it and put it away for winter again. Somewhere along the way I decided it was time to start the deconstruction (the reason I bought the car in the first place), so I slid the jack stands under it in the winter of 2003. Fast forward 3 years. In 2005 I moved twice, first to Idaho where i met some of the SLC guys and Ginter, and then to Wisconsin. I draged the car along behind the whole way. I accumulated parts along the way, including all needed for 5 lug conversion, Fuchs, upholstered the interior pieces, steel flares, 911 style dash, gauges, suspension upgrades, a parts car (did I need that?) Well I made and appointment to start the body work the first of March, so I worked all January and February to get every nut, bolt, wire, and grommet out of the car, and dragged it down to the body shop for soda blasting. |
   |

 
|
| gopack |
Mar 25 2006, 05:58 PM
Post
#2
|
|
CHEESEHEAD in CA, MARK Group: Members Posts: 744 Joined: 7-August 04 From: Folsom, CA Member No.: 2,472 Region Association: Northern California |
Here is how it looks today
(IMG:http://www.914world.com/bbs2/uploads/blog-1143330529.jpg) and how it looked when i brought it in 2 weeks ago (IMG:http://www.914world.com/bbs2/uploads/blog-1143331081.jpg) |
|
|
|
| gopack |
Mar 25 2006, 06:11 PM
Post
#3
|
|
CHEESEHEAD in CA, MARK Group: Members Posts: 744 Joined: 7-August 04 From: Folsom, CA Member No.: 2,472 Region Association: Northern California |
I know everyone has a facination with the hell hole area so here is mine first from below
(IMG:http://www.914world.com/bbs2/uploads/blog-1143328126.jpg) You have to love the home made battery try! that thing is SCARY! HTe body guy just grabbed it and yanked it out of there! (IMG:http://www.914world.com/bbs2/uploads/blog-1143328160.jpg) here is a veiw of the home made engine shelf that the "battery tray" is mounted on. (IMG:http://www.914world.com/bbs2/uploads/blog-1143328171.jpg) Here is all that crap stripped out (IMG:http://www.914world.com/bbs2/uploads/blog-1143328215.jpg) Top view of the RUST (IMG:http://www.914world.com/bbs2/uploads/blog-1143328243.jpg) another angle (IMG:http://www.914world.com/bbs2/uploads/blog-1143328257.jpg) All cleaned up (IMG:http://www.914world.com/bbs2/uploads/blog-1143328287.jpg) and another view of it afterwards. All in all not too bad I guess. he is going to pull out the engine mount on that side as well to clean up any remaining rust undr that peice too! (IMG:http://www.914world.com/bbs2/uploads/blog-1143328301.jpg) |
|
|
|
| gopack |
Mar 25 2006, 06:20 PM
Post
#4
|
|
CHEESEHEAD in CA, MARK Group: Members Posts: 744 Joined: 7-August 04 From: Folsom, CA Member No.: 2,472 Region Association: Northern California |
Then he reworked all of the weatherstrip channels under the front hood that were rusted out from the DAPO using silicone bathroon caulk to hold the rubber down, trapping all the warter there so it could have the maximum effect!
back edge all rusted out (IMG:http://www.914world.com/bbs2/uploads/blog-1143327646.jpg) replacement ready to weld in (IMG:http://www.914world.com/bbs2/uploads/blog-1143327660.jpg) head light buckets and their associated rust (IMG:http://www.914world.com/bbs2/uploads/blog-1143327896.jpg) (IMG:http://www.914world.com/bbs2/uploads/blog-1143328076.jpg) (IMG:http://www.914world.com/bbs2/uploads/blog-1143327910.jpg) Fixed! (IMG:http://www.914world.com/bbs2/uploads/blog-1143327972.jpg) (IMG:http://www.914world.com/bbs2/uploads/blog-1143328009.jpg) (IMG:http://www.914world.com/bbs2/uploads/blog-1143328023.jpg) |
|
|
|
| jim912928 |
Mar 25 2006, 06:28 PM
Post
#5
|
|
Senior Member Group: Members Posts: 1,487 Joined: 8-January 04 From: Granger, IN Member No.: 1,536 Region Association: Upper MidWest |
cool!....it's going to be a looker! So, what other items do you have planned for this project?
|
|
|
|
| gopack |
Mar 25 2006, 06:39 PM
Post
#6
|
|
CHEESEHEAD in CA, MARK Group: Members Posts: 744 Joined: 7-August 04 From: Folsom, CA Member No.: 2,472 Region Association: Northern California |
Mocking up the flares
(IMG:http://www.914world.com/bbs2/uploads/blog-1143330529.jpg) (IMG:http://www.914world.com/bbs2/uploads/blog-1143332504.jpg) They should fix up the hell hole this week, and start on the flares and stuff. Now it is up to me to go and buy the rest of the parts like floor rear half, seat hinges, jack posts and supports. ANd maybe NEW F/G bumpers. the old ones off the parts car really suck, and they may be cheaper to buy new than to make the old ones work! |
|
|
|
| gopack |
Mar 26 2006, 05:57 AM
Post
#7
|
||
|
CHEESEHEAD in CA, MARK Group: Members Posts: 744 Joined: 7-August 04 From: Folsom, CA Member No.: 2,472 Region Association: Northern California |
Here is a partial list of all the things i have ready to go in no particular order: • Reupholstered the entire interior, with core doors panels and back pad • New Getty 911 style dash also with matching vinyl • 911 front struts • weltmeister sway bars • turbo tie rods • new ball joints • 911 front calipers • Elephant Racing poly bronze front bushings • Elephant Racing top strut Weather-Sealed Front Monoball Cartridge • Weltmeister hollow torsion rods • Rear 5 lug conversion using 914 hubs and new bushings • Rear koni’s • 180 # rear springs • 916 style front and rear bumpers (used, need some work)* not using • fiberglass trunk with integral lip spoiler* not using • Fiberglass flared rocker covers* bought new • Windshield* • Reproduction steel flares • 16” x 6 and 16” x 7 Fuchs wheels think I may want or need wider wheels in the rear and the 7s will fit in front *from a 916 clone roller I bought recently still need: • Elephant Racing low friction control arm mounts • Carpet set • weather striping • Rebuild brakes • Side shift conversion? • all sorts of nickel and dime stuff Plans are to do all the body work and paint it black with the Fuchs refinished black with polished lips. I may use the 7s on the front, and get 8 or 9s for the rears. That stuff all needs to be sorted out. Issues still to be addressed / ironed out / decided: • Use the old “bondo-lishious” doors and repair them, or use the 1973 new style doors from parts car • Wheel choice • Gauge package/ re working • Exhaust (want Tangerine racing, but I am afraid the budget will not allow it! So I will go with the rusted out HEs and the Manta muffler it came with • May decide to powder coat / paint the suspension parts for some flash • May paint calipers • Convert to side shift tranny? Miscellaneous custom touches. I would love for this car to be one of a kind. Some Pie in the sky idea that will likely not be realized: • SIX! • Chopped roof (take 1.5 to 2 inches from the A and B pillars • 928 style head light buckets grafted on • black out all the “chrome trim” • box out the rear chrome trim and eliminate totally |
||
|
|
|
||
| TINCAN914 |
Mar 26 2006, 08:47 AM
Post
#8
|
|
Summer's Commin... Group: Members Posts: 2,440 Joined: 18-August 05 From: Colorado Springs, CO. Member No.: 4,611 Region Association: Rocky Mountains |
Amazing work on the channels.... Nice detail..
|
|
|
|
| drewvw |
Mar 26 2006, 08:52 AM
Post
#9
|
|
new england car guy Group: Members Posts: 1,632 Joined: 24-February 06 From: Boston, MA Member No.: 5,630 Region Association: North East States |
looking good, keep up the good work.... |
|
|
|
| BigDBass |
Mar 26 2006, 09:56 PM
Post
#10
|
|
Dumb Question Champion Group: Members Posts: 1,438 Joined: 11-January 06 From: Chicago (south 'burbs) Member No.: 5,405 Region Association: Upper MidWest |
I got to visit Mark's car (and the cheesehead that owns it) at the shop.
It's neat to see a a bare metal tub being worked on (IMG:http://www.914world.com/bbs2/html/emoticons/welder.gif). It screams with potential. Mark's dedication to doing it right was obvious. His plan sounds great and the shop is on the same page. The shop seems ready, willing, and able, and I'm glad to know it's only 25 miles from my house. Among a couple nice muscle cars, I was very happy to see a roller Ghia convertible with fresh burgundy/maroon paint. In the parking lot was a great looking sky(?) blue VW combi. Here in the midwest, seeing these old VWs is a real treat. (IMG:http://www.914world.com/bbs2/html/emoticons/clap56.gif) (IMG:http://www.914world.com/bbs2/html/emoticons/w00t.gif) |
|
|
|
| gopack |
Mar 28 2006, 08:38 PM
Post
#11
|
|
CHEESEHEAD in CA, MARK Group: Members Posts: 744 Joined: 7-August 04 From: Folsom, CA Member No.: 2,472 Region Association: Northern California |
well some more progress to report.
I ordered the following from restoration designs. figured I may as well do it right while I am in there (any one heard that before? maybe as they them selves uttered it?) rear half floor pan seat mounts and hinges battery tray and support jack receiver plate jack receiver tube Engine tray didn't really need some of it, like jack receiver stuff , but I figured it best to take them off and get rid of any surface rust under there and save trouble down the road. also worked on one of hte pie in the sky ideas..... I ordered a center mount brake light from a Honda Del Sol to see how and whether it fits into the targa bar. If it works I will post lots of pics! Attached thumbnail(s) 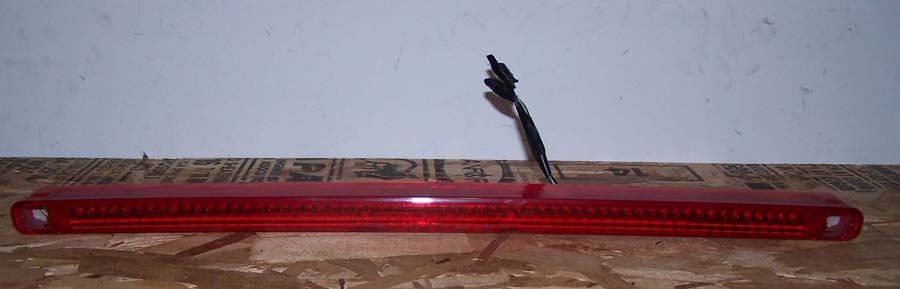
|
|
|
|
| Bleyseng |
Mar 29 2006, 07:09 PM
Post
#12
|
||
|
Aircooled Baby! Group: Members Posts: 13,037 Joined: 27-December 02 From: Seattle, Washington (for now) Member No.: 24 Region Association: Pacific Northwest |
Thats gay...Del Sol are for fat chicks. (IMG:http://www.914world.com/bbs2/html/emoticons/smash.gif) |
||
|
|
|
||
| jim912928 |
Mar 29 2006, 07:48 PM
Post
#13
|
|
Senior Member Group: Members Posts: 1,487 Joined: 8-January 04 From: Granger, IN Member No.: 1,536 Region Association: Upper MidWest |
I might have some stuff you can use. I have the front end off a 71 911 that I rebuilt almost everything on 1 1/2 years ago...new bearings, new vented rotors, new ball joints, koni's. I'm taking it off my 914 and putting on an 84 carrera front end.
Also have spaced rear 914 brakes with turned down vented rotors. Brakes were totally rebuilt. I also have 6X16 and 6X17 fuchs on the carrera i'm getting the motor/tranny off of. |
|
|
|
| new914fan |
Mar 29 2006, 08:29 PM
Post
#14
|
|
Newbie Group: Members Posts: 15 Joined: 24-March 06 From: desert, CA Member No.: 5,766 |
wow.... that's one heck of a restoration!
you think you're gonna get it back on the road for the beautiful summers in madison? since this is the official restoration thread.... do you mind disclosing the cost associated with each stage? how much did you pick up the car for, how much for the parts, and how much are you paying the body shop?? |
|
|
|
| new914fan |
Mar 30 2006, 02:46 PM
Post
#15
|
|
Newbie Group: Members Posts: 15 Joined: 24-March 06 From: desert, CA Member No.: 5,766 |
i hope i didn't kill this thread.....
|
|
|
|
| gopack |
Mar 30 2006, 03:55 PM
Post
#16
|
|
CHEESEHEAD in CA, MARK Group: Members Posts: 744 Joined: 7-August 04 From: Folsom, CA Member No.: 2,472 Region Association: Northern California |
Well.....
The car was the cheapest part I guess. I paid $1700 for it Flares were about 1 G interior was north of 1 G used Fuchs 750 parts car 450 suspension parts ~1500 to 2000 body shop. HMMM lets see, as much as i want to send them ..... the more I ask for , the more I will pay. The estimate is 10-15 K.... not cheap, but I can't do this stuff, and I want it done right! I HOPE to bust ass and get it on the road by end of september so I can at least drive it once this year! |
|
|
|
| gopack |
Apr 2 2006, 07:02 AM
Post
#17
|
|
CHEESEHEAD in CA, MARK Group: Members Posts: 744 Joined: 7-August 04 From: Folsom, CA Member No.: 2,472 Region Association: Northern California |
new progress from yesterdays visit to body shop.
So far the flares are welded on and cleaned up a bit on passenger side. FRONT (IMG:http://www.914world.com/bbs2/uploads/blog-1143928501.jpg) REAR (IMG:http://www.914world.com/bbs2/uploads/blog-1143928511.jpg) He is going to box the flare in the front bottom area to ease the transtion from the rocker panels and make it look good! and stich welded on the drivers side rear (IMG:http://www.914world.com/bbs2/uploads/blog-1143928531.jpg) and the cut out made on the front! (IMG:http://www.914world.com/bbs2/uploads/blog-1143928522.jpg) It is amazing to me how big a hole you need to get flares on! THe replacement sheet metal has also arrived, got a new rear floor pan half, seat hinges and mounts, seat reinforcememnts, battery tray and support and jack reciever and surround. Next week he is going ot insatll all of those peices, finish repairing the drivers door and start to box in the targa bar I picked up a high mounted stop light on Ebay for cheep, and when we have the targa bar mods going on we will atttemp to install it right in there as if it belongs there from the factory! Here it is siting on the parts car! the curve of the light fits the roof line curve exactly! (IMG:http://www.914world.com/bbs2/uploads/blog-1143981850.jpg) Showing curve on flat counter top (IMG:http://www.914world.com/bbs2/uploads/blog-1143981868.jpg) and the targa bar on my car with tape measure (IMG:http://www.914world.com/bbs2/uploads/blog-1143928545.jpg) and the measure of the light (IMG:http://www.914world.com/bbs2/uploads/blog-1143981880.jpg) I will have them take a lot of pics of this part of the work in case any one is interested. The only reason I am even considering this route, is that we are going to cut off the targa bar spot weld flange, and seam weld the whole thing all around to eliminate the targa bright trim. so I figured while we are at it, I can add a pocket for a high mounted light, and get the custom factor, and be safer at the same time! It will be a tight fit, and we may have to add a bump protruding down wards of 1/8 inch or so , but it will look good! The only issue will be mounting depth. I think it will be fine as the light is only 2 inches deep at the widest part. |
|
|
|
| Lou W |
Apr 2 2006, 08:40 AM
Post
#18
|
|
"Here Kitty Kitty" my ass...... Group: Members Posts: 4,109 Joined: 9-May 04 From: Roseburg, OR. Member No.: 2,039 Region Association: Spain |
Sure is looking good, keep the pictures coming. (IMG:http://www.914world.com/bbs2/html/emoticons/smilie_pokal.gif)
|
|
|
|
| Gint |
Apr 2 2006, 09:08 AM
Post
#19
|
|
Mike Ginter Group: Admin Posts: 16,108 Joined: 26-December 02 From: Denver CO. Member No.: 20 Region Association: Rocky Mountains |
Looking good Mark!
|
|
|
|
| BigDBass |
Apr 9 2006, 01:18 PM
Post
#20
|
|
Dumb Question Champion Group: Members Posts: 1,438 Joined: 11-January 06 From: Chicago (south 'burbs) Member No.: 5,405 Region Association: Upper MidWest |
Where's the 4/8 update? Did you take the day off? Are you slacking???
|
|
|
|
|
1 User(s) are reading this topic (1 Guests and 0 Anonymous Users)
0 Members:

|
Lo-Fi Version | Time is now: 9th June 2026 - 05:24 AM |
Invision Power Board
v9.1.4 © 2026 IPS, Inc.