|
|
|
Porsche, and the Porsche crest are registered trademarks of Dr. Ing. h.c. F. Porsche AG.
This site is not affiliated with Porsche in any way. Its only purpose is to provide an online forum for car enthusiasts. All other trademarks are property of their respective owners. |
|
|

  |

| Bogaat |
 Jul 11 2007, 11:09 AM Jul 11 2007, 11:09 AM
Post
#1
|
|
Member  Group: Members Posts: 195 Joined: 8-January 07 From: Charleston, SC Member No.: 7,436 |
I am preparing myself for my first paint job. I have the car mostly ready and most of the materials purchased. I bought a set of the Devilbiss guns from Eastwood (and it came with directions). I am looking for advice on which areas of the car to paint first, in what order, panels to take off, etc. I am planning on painting the trunks, engine compartment and door jams as well. I already have the doors off. It would be great to do all of the painting in one day. I would also be interested in painting techniques as far as top to bottom or left to right when working on a panel. I obviously have some practicing to do before I slap the paint on. Again, all input is appreciated. I am planning on doing a base/clear. Here are a few shots I pulled off one of my other threads. They don't show much of the body, but it is basically primered in spots and the original single stage in others. I did have the rear reflector holes sealed up and a new battery tray installed. Thanks guys!
(IMG:style_emoticons/default/beer3.gif) 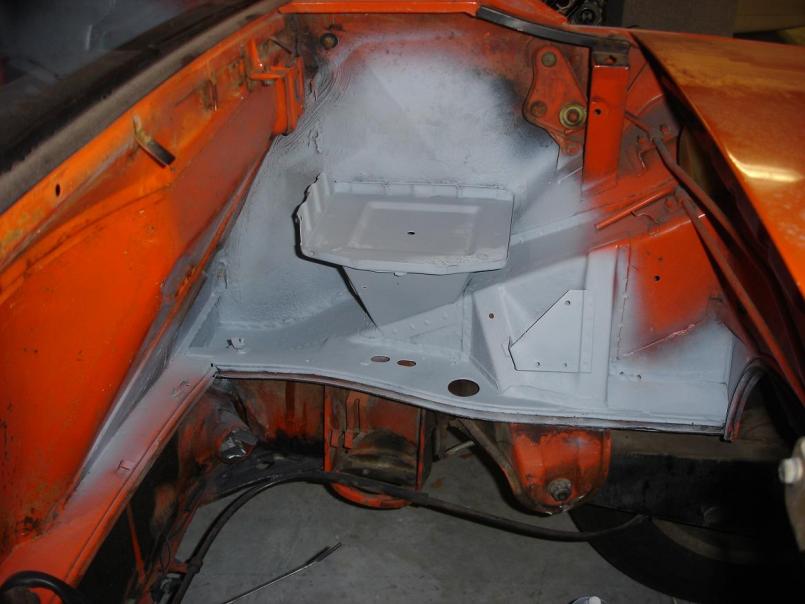 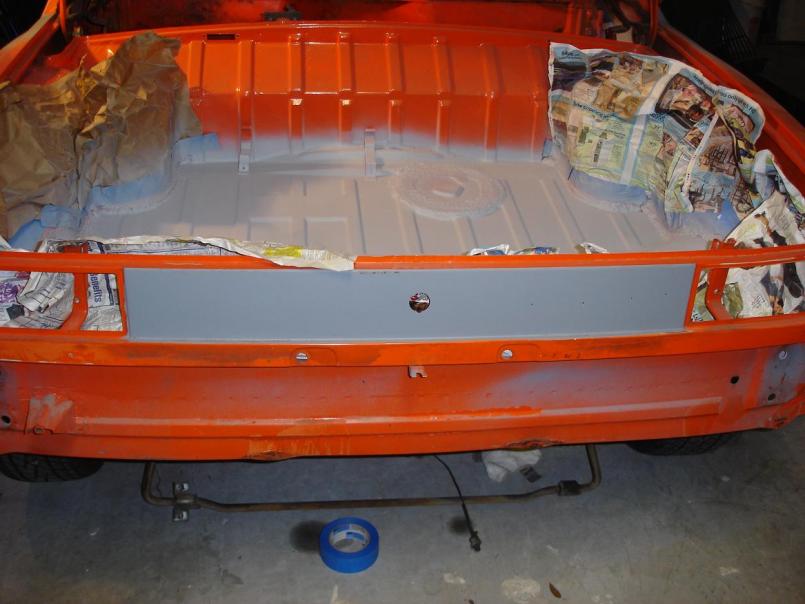 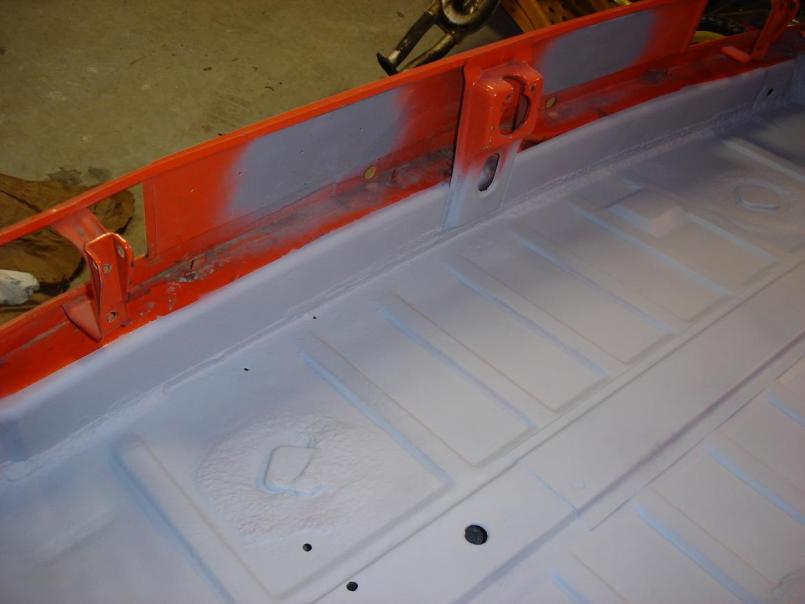 |
   |

 
|
| McMark |
Jul 11 2007, 11:21 AM
Post
#2
|
|
914 Freak! Group: Retired Admin Posts: 20,180 Joined: 13-March 03 From: Grand Rapids, MI Member No.: 419 Region Association: None |
If that is rattle can primer, be careful of an interaction between the paints that can cause lifting, wrinkling, and fish eyes. (IMG:style_emoticons/default/wink.gif)
Good luck, you can do it. I would start in the engine bay. |
|
|
|
| Bogaat |
Jul 11 2007, 11:24 AM
Post
#3
|
|
Member Group: Members Posts: 195 Joined: 8-January 07 From: Charleston, SC Member No.: 7,436 |
QUOTE(McMark @ Jul 11 2007, 01:21 PM)  If that is rattle can primer, be careful of an interaction between the paints that can cause lifting, wrinkling, and fish eyes. (IMG:style_emoticons/default/wink.gif) Good luck, you can do it. I would start in the engine bay. It is canned Por 15 etching primer in the trunk and engine. Otherwise, everything on the body is sprayed. I think I can...I think I can... ok, so I enjoy reading my daughter children's books. I will not comment on the TV shows she makes me watch (IMG:style_emoticons/default/rolleyes.gif) |
|
|
|
| sww914 |
Jul 11 2007, 11:32 AM
Post
#4
|
|
Advanced Member Group: Members Posts: 2,439 Joined: 4-June 06 Member No.: 6,146 Region Association: None |
Get an old fender at a junkyard and some mismatched single stage paint at an autobody supply store and practice on the fender first. Spray that thing several times until you get it perfect. Then you're ready to paint the inside areas of your car. If those come out great, you can paint the outside.
When practicing, go through all of the steps. Sand it smooth, clean it with wax and silicone cleaner, tack rag it, blow it clean, and paint 3 shiny smooth coats. Also, buy some tape and a roll of 18" masking paper at the autobody supply. The blue tape is very expensive and doesn't work as well as the green 3M for car stuff. |
|
|
|
| Kargeek |
Jul 11 2007, 12:14 PM
Post
#5
|
|
Senior Member Group: Members Posts: 555 Joined: 14-March 03 From: Orange, CA Member No.: 430 |
If you have never painted a car before I suggest that you go by a book on the subject and read about preparation and procedures before you lay down one pint of paint.
Also, discuss with your paint supplier Preparation is key and paint is expensive to not know what you are doing. Metallics are more difficult to spray than solids so you might want to consider a solid for your first paint job. If you are going to paint the interior sections of your trunks and engine compartment, I suggest that you paint the outside of your car first. Yes, that's right as the flat sides of of the 914 body panels make it easier to mask off to protect from the over spray while doing the inside areas. Masking off the inside areas to protect them while painting the outside of the car is a pain and over spray still gets into nooks and crannies and everything. You will probably color sand and the buff the outside anyway. Another tip for perfect door, hood and headlight door alignment- especially if your car has never been apart and has perfectly aligned factory panels. Measure and drill a 1/16" hole right through the door and hood hinges and the locationg brackets on your headlight doors. If you do this properly, center the holes to make them look like they came that way, no one will notice after the car is back together. When it comes time to reassemble, just take a locating pin or drill bit to align things back together. DH |
|
|
|
| jonferns |
Jul 11 2007, 01:40 PM
Post
#6
|
|
Advanced Member Group: Members Posts: 2,081 Joined: 29-March 07 From: New Jersey Member No.: 7,631 Region Association: North East States |
I will also soon be painting my 914, this is great info.
|
|
|
|
| jaminM3 |
Jul 11 2007, 04:55 PM
Post
#7
|
|
Member Group: Members Posts: 418 Joined: 23-March 07 From: SLC, UT Member No.: 7,619 Region Association: Intermountain Region |
|
|
|
|
| thomasotten |
Jul 12 2007, 07:23 AM
Post
#8
|
|
Senior Member Group: Members Posts: 1,565 Joined: 16-November 03 From: San Antonio, Texas Member No.: 1,349 |
You guys should check out my thread, "How I painted my 914", there is a link below my signiture. I go over the order of painting, and other things...
|
|
|
|
| Borderline |
Jul 12 2007, 10:03 AM
Post
#9
|
|
Senior Member Group: Members Posts: 720 Joined: 8-February 05 From: San Juan Bautista, CA Member No.: 3,577 Region Association: Northern California |
I spent a lot of time here when preparing my 914 for paint. A lot of good info.
You car looks a lot like mine did. Are you doing a color change? I went from orange to yellow. A lot of work. You'll probably want to use an epoxy primer sealer and then a few coats of high-build surfacer followed by some block sanding. Take your time and practice on some other body panels or something. Good luck (IMG:style_emoticons/default/aktion035.gif) |
|
|
|
| Bogaat |
Jul 12 2007, 11:34 AM
Post
#10
|
|
Member Group: Members Posts: 195 Joined: 8-January 07 From: Charleston, SC Member No.: 7,436 |
QUOTE(Borderline @ Jul 12 2007, 12:03 PM) I spent a lot of time here when preparing my 914 for paint. A lot of good info. You car looks a lot like mine did. Are you doing a color change? I went from orange to yellow. A lot of work. You'll probably want to use an epoxy primer sealer and then a few coats of high-build surfacer followed by some block sanding. Take your time and practice on some other body panels or something. Good luck (IMG:style_emoticons/default/aktion035.gif) I am keeping it the same color. Phoenix Red (really orange (IMG:style_emoticons/default/biggrin.gif) ) My plan is to lightly sand and then go with my basecoats/clears. I am hoping to avoid any more primer...anyone think this is a bad idea? |
|
|
|
| pete-stevers |
Jul 12 2007, 11:45 AM
Post
#11
|
|
saved from fire! Group: Members Posts: 2,648 Joined: 10-October 04 From: Abbotsford,BC, Canada Member No.: 2,914 Region Association: Pacific Northwest |
every short cut is a possible nightmare around the corner....
it looks to me you sprayed primer on the rear trunks and engine compartment with out fully prepping the surface..... preparation is every thing in painting. and....the ommision of primer before color... not something i would choose to do i say do it right the first time or skip it all together! my two cents |
|
|
|
| Kargeek |
Jul 12 2007, 11:49 AM
Post
#12
|
|
Senior Member Group: Members Posts: 555 Joined: 14-March 03 From: Orange, CA Member No.: 430 |
Is the paint on your car origional?
If you are going to paint over your existing paint, I suggest that you apply a sealer prior to your new top coat. Otherwise, you risk problems with your old paint foundation causing problems. DH |
|
|
|
| tyler |
Jul 13 2007, 08:59 AM
Post
#13
|
|
Member Group: Members Posts: 335 Joined: 24-September 03 From: southern california Member No.: 1,192 |
Clear is pretty difficult and makes it hard to do any repair work later on and you'd definetely need a booth. Good single stage paint and color sanding is much better if you're not a professional with all the fancy equipment.
|
|
|
|
| Bogaat |
Jul 13 2007, 09:01 AM
Post
#14
|
|
Member Group: Members Posts: 195 Joined: 8-January 07 From: Charleston, SC Member No.: 7,436 |
QUOTE(tyler @ Jul 13 2007, 10:59 AM) Clear is pretty difficult and makes it hard to do any repair work later on and you'd definetely need a booth. Good single stage paint and color sanding is much better if you're not a professional with all the fancy equipment. I heard you do not want to color sand single stage? Supposedly most of what protects the paint rises to the top? I heard sanding it will make it look good, but will destroy its longevity. Bogus? |
|
|
|
| Kargeek |
Jul 13 2007, 11:02 AM
Post
#15
|
|
Senior Member Group: Members Posts: 555 Joined: 14-March 03 From: Orange, CA Member No.: 430 |
My car is a single stage paint, color sanded and buffed- done over 20 years ago. Properly maintained (and who here with nice paint wouldn't maintain their paint), holds up fine.
Yes, there is the theory that you are cutting into the "skinned" top layer however with today's catalyzed paints you still have good durability. Color sanding is the only way to achieve a perfect gloss finish and remove any small imperfections. Being this is your first paint job you can expect some. Awhile back I investigated the costs of single stage vs. two stage paint for another project and the costs for single were way more expensive. But, single stage is simpler to repair and for solid colors especially black, you can achieve additional color "depth" with single stage vs. a clear coat. Did you mention that you bought your materials? Keep in mind that the reducer for your paint is formulated for different temperatures of when you are spraying. There are fast, medium and slow drying verisons so, make sure you purchase the correct one for the conditions of the day you are spraying. Otherwise you will end up with major problems and a do over. Now, go get that book and get preparing, you have many hours of work ahead of you. An additional thought...since 95% of the work in painting is prep, do the work and ask at your paint supplier who rents a spray booth and about paying a pro to lay the paint on your car. You then take the car home and do the remainder of the work with color sanding and buffing. Might be the best few hundred $$ you spent. Attached thumbnail(s) 
|
|
|
|
| Bogaat |
Jul 13 2007, 11:34 AM
Post
#16
|
|
Member Group: Members Posts: 195 Joined: 8-January 07 From: Charleston, SC Member No.: 7,436 |
Ok, so it seems I will be laying down a sealer coat first. No need to sand the sealer coat, correct? I have not bought the paint(s) yet...
Anyone ever use UTech paints? http://www.akzonobelcarrefinishes.net/defa...395&pid=397 The guy who did the body work recommended it. That is the primer that is one the car now. He said it was inexpensive, but good quality (basically just repackaged Sikkens). Thanks for all of the input guys (IMG:style_emoticons/default/biggrin.gif) Hey, it's Friday! Looks like I will start sanding tonight (IMG:style_emoticons/default/beer3.gif) Anyone in Charleston, SC want to stop by and help sometime this weekend? I am going to cut a hole in the wall tonight for a window unit in the garage. It is damn hot/humid out there these days! |
|
|
|
| Bogaat |
Jul 16 2007, 10:56 AM
Post
#17
|
|
Member Group: Members Posts: 195 Joined: 8-January 07 From: Charleston, SC Member No.: 7,436 |
Well, I started wet sanding this weekend and cleaning the heck out of the car/paint. The front trunk paint looks so good, I am not going to bother painting it...just a little touch up.
What do you guys recommend sanding with grit wise before a sealer coat? No need to sand afterwards, right? Also, any tricks on removing the rear trunk hinges and getting them back on? I would like to clean this area up a bit before I paint. Again, all input is appreciated! (IMG:style_emoticons/default/beer3.gif) |
|
|
|
|
1 User(s) are reading this topic (1 Guests and 0 Anonymous Users)
0 Members:

|
Lo-Fi Version | Time is now: 15th July 2025 - 03:20 AM |
Invision Power Board
v9.1.4 © 2025 IPS, Inc.