|
|
|
Porsche, and the Porsche crest are registered trademarks of Dr. Ing. h.c. F. Porsche AG.
This site is not affiliated with Porsche in any way. Its only purpose is to provide an online forum for car enthusiasts. All other trademarks are property of their respective owners. |
|
|

  |

| TonyAKAVW |
 Jul 16 2007, 01:48 PM Jul 16 2007, 01:48 PM
Post
#1
|
|
That's my ride.  Group: Members Posts: 2,151 Joined: 17-January 03 From: Redondo Beach, CA Member No.: 166 Region Association: None |
I want to make a diffuser/engine pan for my car, and last night I started gluing foam sheets together to make a mold. My plan is to form the foam into the shape I want and then seal it with body filler, and then primer and polish. I have been reading up on making molds for composite work and most seem to talk about making a copmosite piece for the mold rather than what I am planning. If I make my mold as described will my composite part rip the mold apart when I seperate the two? (assuming I use a PVA mold release film).
Also, if I make the part with carbon fiber, how do I finish the edges of the piece when I'm done? I would like to vacuum bag this part because the part will be visible from the top and the bottom... Can I get away not bagging it and get a decent finish? (I'm not super concerned that it has a perfect surface really). -Tony Finished part will look something like this... With the long straight edge meeting up against the firewall and the two tunnels exiting right under the bumper. Attached image(s) 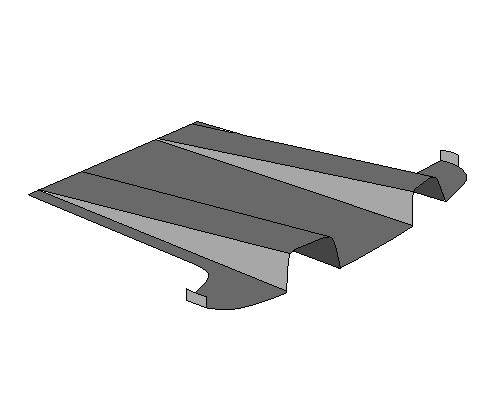
|
   |

 
|
| BahnBrenner914 |
Jul 16 2007, 01:53 PM
Post
#2
|
|
The girl is gone and all I have now is a beat-up teener Group: Members Posts: 301 Joined: 22-May 04 From: Gig Harbor and University Place, WA :: School in Angola, IN :: girlfriend in Sarasota, FL Member No.: 2,094 Region Association: None |
First of all, SWEET! (IMG:style_emoticons/default/w00t.gif) I'm an ME student and aero-junky (IMG:style_emoticons/default/thumb3d.gif) , so if you pull this off, I want one too! (IMG:style_emoticons/default/biggrin.gif)
As for the composite work, I dont know much about making it, just that it can be made in any shape the engineer (me) wants it. (IMG:style_emoticons/default/av-943.gif) |
|
|
|
| john rogers |
Jul 16 2007, 02:04 PM
Post
#3
|
|
Senior Member Group: Members Posts: 1,525 Joined: 4-March 03 From: Chula Vista CA Member No.: 391 |
A couple of questions, do the exhaust headers drop down each side or run inside the diffuser then out the back and where will the engine cooling air exit from? If you check Patrick's web site, he has a 914 vintage racer that is "canned" in the rear to smooth out the air flow underneath and I remember him telling me it was done as an experiment and the results were not worth all the work involved. Since the firewall is about the lowest part of the car I would want the diffuser to start there?
|
|
|
|
| URY914 |
Jul 16 2007, 02:06 PM
Post
#4
|
|
I built the lightest 914 in the history of mankind. Group: Members Posts: 127,304 Joined: 3-February 03 From: Jacksonville, FL Member No.: 222 Region Association: None |
Second of all:
WHY, To catch the oil? |
|
|
|
| TonyAKAVW |
Jul 16 2007, 02:21 PM
Post
#5
|
|
That's my ride. Group: Members Posts: 2,151 Joined: 17-January 03 From: Redondo Beach, CA Member No.: 166 Region Association: None |
BahnBrenner: If my mold lasts I can make another copy.
John: My exhaust sits up almost against the floor of the rear trunk. I did this knowing that I would eventually put in a set of tunnels. The exhaust will exit either through my bumper (a pair of holes, one on each side of the licenes plate) or through the gap between the lower edge of the bumper and this diffuser plate. (which will sit 6-7 inches below the bumper, with the top of the tunnels almost touching the bumper ) So my exhaust headers turn up, right after the engine, which is at the point of maximum clearance from the tunnel roof. My design has the enitre panel attach to the firewall/floorpan point. So there will be no gap between the diffuser and the floor pan. Paul: Subaru engines don't leak oil (IMG:style_emoticons/default/smile.gif) At least not much. There are a few reasons for doing this. First is an expired reason. I had planned on using this as part of my mid-mounted radiator cooling system, as a way to exhaust the air better. Since I moved the radiataor up front, that is no longer necessary. Another reason is that without a rear valence, the car looks uncomplete. I don't really want to put a rear valence on and wanted to do something different. It will actually serve to keep a little road grime out of the engien bay area too.. And lastly, I have always wanted to make something out of composites, so this being a relatively simple shape, seemed like a neat first project. I don't actually expect it will make much difference in terms of driving. First of all I don't drive fast enough, and if I did I would be worried about the front end lifting. |
|
|
|
| BahnBrenner914 |
Jul 16 2007, 02:26 PM
Post
#6
|
|
The girl is gone and all I have now is a beat-up teener Group: Members Posts: 301 Joined: 22-May 04 From: Gig Harbor and University Place, WA :: School in Angola, IN :: girlfriend in Sarasota, FL Member No.: 2,094 Region Association: None |
Well I thought you had a stock-type teener, so there's no way I could use what you have. (IMG:style_emoticons/default/sad.gif)
I still love the idea though (IMG:style_emoticons/default/clap56.gif) I'll be very interested to see what kind of aero you get with it installed. Whether it reduces/increases drag, gives you some downforce, or just sucks itself right off the bottom of the car at 100 mph! (IMG:style_emoticons/default/av-943.gif) |
|
|
|
| TonyAKAVW |
Jul 16 2007, 02:34 PM
Post
#7
|
|
That's my ride. Group: Members Posts: 2,151 Joined: 17-January 03 From: Redondo Beach, CA Member No.: 166 Region Association: None |
Here's kind of what I anticipate the fitmet to be like, although probably more clearance between the diffuser and the headers.
-Tony Attached image(s) 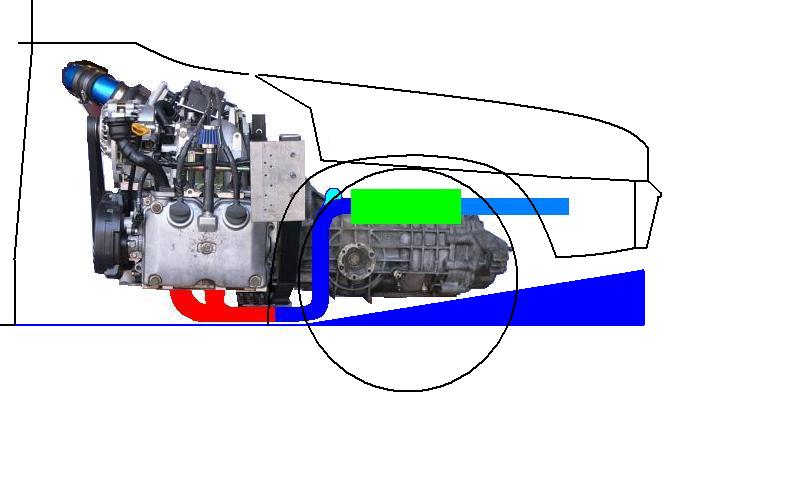
|
|
|
|
| neo914-6 |
Jul 16 2007, 02:53 PM
Post
#8
|
|
neo life Group: Members Posts: 5,086 Joined: 16-January 03 From: Willow Glen (San Jose) Member No.: 159 |
Tony,
Appears you are actually making a part with composite (sandwiched) molds for a single layer CF part. The foam should work fine, I've even seen it done with cheap house insulation blue foam. The guy used cheap wall plaster "mud" and sealed it since the resin would melt it. I would carve and form the male side, finish it and then make dams to pour liquid urethane to make the female side. You would treat it with a mold release like PVA. Finish that side and be ready to press the resin and CF cloth. The finish will depend on the amount of mold finishing. You can also lay in mylar if the surfaces aren't compound. I'm not sure but cutting the ends should be like cutting fiberglass. Kevlar is the material that's difficult to cut. |
|
|
|
| TonyAKAVW |
Jul 16 2007, 04:20 PM
Post
#9
|
|
That's my ride. Group: Members Posts: 2,151 Joined: 17-January 03 From: Redondo Beach, CA Member No.: 166 Region Association: None |
Felix: Not sure about what you mean in terms of what I'm making. The mold that I'm working on should end up looking like this:
Basically its a foam piece (with sealer and primer, etc. on the surface) and then I will layer the cloth on top of that. I will probably use some kind of mat between CF layers to reduce cost, but this large foam piece won't be part of the finished product. The whole foam piece will be glued to a 1/2 inch MDF board. Which in turn will be supoprted by 2x4s. I figure that should help during the vacuum bagging, to prevent mold warpage. -Tony Attached image(s) 
|
|
|
|
| iamchappy |
Jul 16 2007, 04:42 PM
Post
#10
|
|
It all happens so fast! Group: Members Posts: 4,893 Joined: 5-November 03 From: minnetonka, mn Member No.: 1,315 Region Association: Upper MidWest |
I might be easier to make it out of aluminum or stainless sheet metal. I just took a couple of pieces of paper and folded one up quite easily. A sheet metal fabricator could
bend one up I assume very reasonably. Something to think about. |
|
|
|
| GWN7 |
Jul 16 2007, 05:01 PM
Post
#11
|
|
King of Road Trips Group: Members Posts: 6,280 Joined: 31-December 02 From: Winnipeg, MB, Canada Member No.: 56 Region Association: Northstar Region |
Chappy's right....it would be easier to make it out of sheet metal as their are no complex curves/hidden angles. Once made out of metal you could use it as the master to make a glass one if you so desired.
|
|
|
|
| JPB |
Jul 16 2007, 05:08 PM
Post
#12
|
|
The Crimson Rocket smiles in your general direction. Group: Members Posts: 2,927 Joined: 12-November 05 From: Tapmahamock, Va. Member No.: 5,107 |
Its not to hard to do Tony. If your mould is smooth and blemish free, assuming the foam part you are using is the mould and not a plug, it will be easy to get a good finish. What I do is lay up just resin or epoxy like three times for a good build up to sand later to a glass finish. It should get some acrilic clear on it to keep them UV rays off so it will get a good grit sanding before that also. For me, the hardest thing is to get the CF as thin as possible and as strong as it needs to be. The best time to trim anything is when the stuff gets geled and not yet hardened since you can cut it with a razor knife but you can use a grinder to get the shape you want when its completely hard.
|
|
|
|
| neo914-6 |
Jul 16 2007, 05:12 PM
Post
#13
|
|
neo life Group: Members Posts: 5,086 Joined: 16-January 03 From: Willow Glen (San Jose) Member No.: 159 |
QUOTE(TonyAKAVW @ Jul 16 2007, 03:20 PM)  Felix: Not sure about what you mean in terms of what I'm making. The mold that I'm working on should end up looking like this: Basically its a foam piece (with sealer and primer, etc. on the surface) and then I will layer the cloth on top of that. I will probably use some kind of mat between CF layers to reduce cost, but this large foam piece won't be part of the finished product. The whole foam piece will be glued to a 1/2 inch MDF board. Which in turn will be supoprted by 2x4s. I figure that should help during the vacuum bagging, to prevent mold warpage. -Tony The two part mold would be similar to a die essentially replacing bagging which helps drive out all the air pockets and forms two finished sides. You can accomplish the same with laying the layers on your one piece mold and then a piece of mylar and squeeging out the air although you wouldn't control the thickness. Structurally you can probably use one layer to take advantage of the CF strength. Looks like a fun project... |
|
|
|
| Brando |
Jul 16 2007, 05:40 PM
Post
#14
|
|
BUY MY SPARE KIDNEY!!! Group: Members Posts: 3,935 Joined: 29-August 04 From: Santa Ana, CA Member No.: 2,648 Region Association: Southern California |
Get ahold of the pan/diffuser for a 964 or 993 and make it as close to that as possible. They only really work at highway speeds (60mph+).
|
|
|
|
| TonyAKAVW |
Jul 16 2007, 06:13 PM
Post
#15
|
|
That's my ride. Group: Members Posts: 2,151 Joined: 17-January 03 From: Redondo Beach, CA Member No.: 166 Region Association: None |
From the reading I've done, it seems that 10-12 degrees for the tunnel is optimum. For a 6 inch high tunnel exit that means 31 inches long. It will probably make a difference at high speed, but it will be far from optimum..
Here's a nice diffuser... (~$1100) Attached image(s) 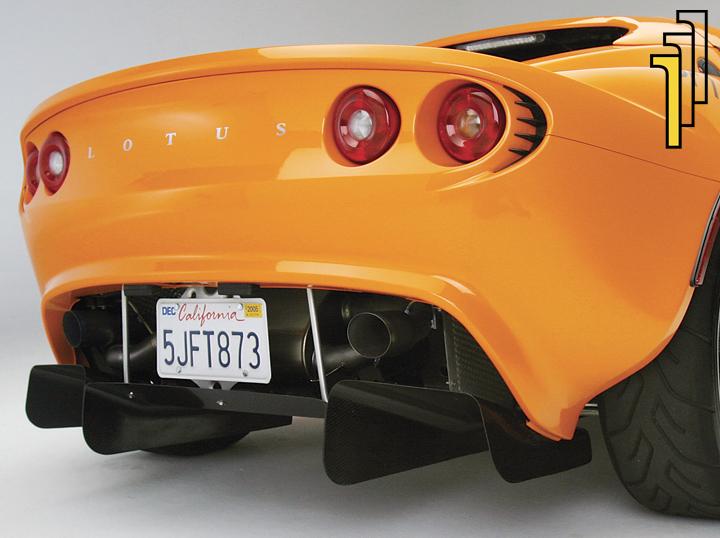
|
|
|
|
| okieflyr |
Jul 16 2007, 07:36 PM
Post
#16
|
|
9fauxteen Group: Members Posts: 816 Joined: 9-January 05 From: Phila PA Member No.: 3,426 Region Association: North East States |
My experience is vacuum bagging 60" composite model sailplane wings panels.
We use mylar for the surface finish which can come out beautiful when doing paint design transfers.(no pinholes) My suggestion is to bag ALL your individual precut pieces flat, and lay in your spars and predetermined attatchment points within your lay-up. Then you can assemble the pieces. You may have a hard time getting the bag to conform to your concave 90's and get some flooding. (not the worst place though). Blue or pink extruded foams work well with the epoxy finishing resins, and there is no sealing requirement, but it won't deal with direct heat well. Kevin QUOTE(TonyAKAVW @ Jul 16 2007, 05:20 PM) Felix: Not sure about what you mean in terms of what I'm making. The mold that I'm working on should end up looking like this: Basically its a foam piece (with sealer and primer, etc. on the surface) and then I will layer the cloth on top of that. I will probably use some kind of mat between CF layers to reduce cost, but this large foam piece won't be part of the finished product. The whole foam piece will be glued to a 1/2 inch MDF board. Which in turn will be supoprted by 2x4s. I figure that should help during the vacuum bagging, to prevent mold warpage. -Tony |
|
|
|
| Katmanken |
Jul 16 2007, 07:38 PM
Post
#17
|
|
You haven't seen me if anybody asks... Group: Members Posts: 4,738 Joined: 14-June 03 From: USA Member No.: 819 Region Association: Upper MidWest |
I've used plaster of paris before, casts smooth, and it can be as massive as you want.
Kwn |
|
|
|
| TonyAKAVW |
Jul 16 2007, 07:50 PM
Post
#18
|
|
That's my ride. Group: Members Posts: 2,151 Joined: 17-January 03 From: Redondo Beach, CA Member No.: 166 Region Association: None |
First of all, thanks for all the tips! I'm going to put this stuff in a progress thread soon.
So about heat... I am goig to be curing this inside my garage, which means I can't really take the temeprature up above say 100 degrees for maybe an hour before my propane heater runs out. Its my understanding that there are room temperature curing resins. Are they far inferior to heat cured resins or is it a matter of time? As far as a vacuum pump goes, what are the cheap options? I've seen some people using refigerator compressors.. Can I use my air compressor inlet? How much of a vacuum really needs to be pulled anyway? -Tony |
|
|
|
| Katmanken |
Jul 16 2007, 07:55 PM
Post
#19
|
|
You haven't seen me if anybody asks... Group: Members Posts: 4,738 Joined: 14-June 03 From: USA Member No.: 819 Region Association: Upper MidWest |
If you are careful (NO FIRE OR FLAMES) , a cardboard box can be heated well above 100 degrees F. That and more is quite attainable with a hot air gun venting into an enclosed box.
|
|
|
|
| URY914 |
Jul 16 2007, 08:30 PM
Post
#20
|
|
I built the lightest 914 in the history of mankind. Group: Members Posts: 127,304 Joined: 3-February 03 From: Jacksonville, FL Member No.: 222 Region Association: None |
I've been kicking around bilding one for my race car and have collected several dozen pictures. here are a few
Attached thumbnail(s) 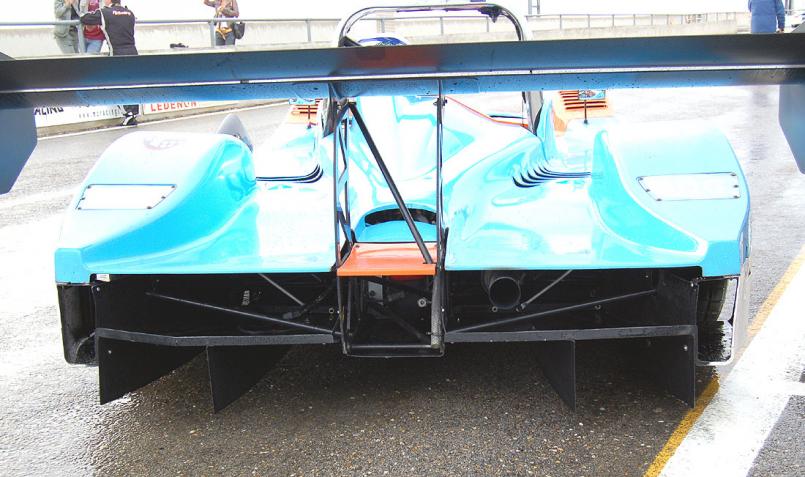 Attached image(s)  
|
|
|
|
|
1 User(s) are reading this topic (1 Guests and 0 Anonymous Users)
0 Members:

|
Lo-Fi Version | Time is now: 4th July 2025 - 06:04 PM |
Invision Power Board
v9.1.4 © 2025 IPS, Inc.