|
|
|
Porsche, and the Porsche crest are registered trademarks of Dr. Ing. h.c. F. Porsche AG.
This site is not affiliated with Porsche in any way. Its only purpose is to provide an online forum for car enthusiasts. All other trademarks are property of their respective owners. |
|
|

  |

| ahdoman |
 Feb 16 2008, 07:35 PM Feb 16 2008, 07:35 PM
Post
#1
|
|
It's phonetic...Ah-D-O-Man (Audioman)  Group: Members Posts: 667 Joined: 7-November 05 From: Santa Clarita, Ca. Member No.: 5,084 Region Association: Southern California |
Hey all,
Getting ready to put my A type calipers back together. Got a couple of questions. 1) Is this the correct orientation of the dust seal (see seal on right)? 2) Is the retaining ring in the right place and does it matter where the two ends are (blue arrow) and should there be a small (1/8") gap? 3) What is the suggested orientation of the notch in the piston (green circle)? 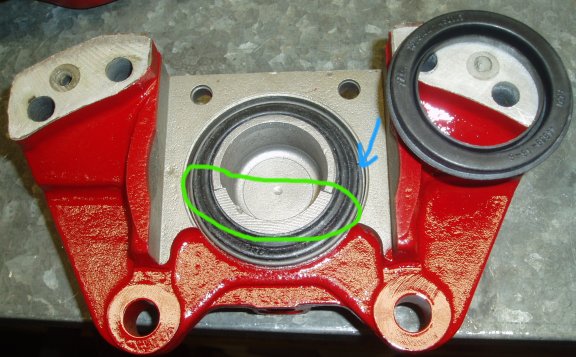 |
   |

 
|
| Eric_Shea |
Feb 16 2008, 07:42 PM
Post
#2
|
|
PMB Performance Group: Admin Posts: 19,279 Joined: 3-September 03 From: Salt Lake City, UT Member No.: 1,110 Region Association: Rocky Mountains |
1. Yes
2. Doesn't Matter and yes. 3. Not there... Hard to explain. Look for pics in the rebuild kit. The notch should face into the oncoming rotor as it slices through the groove. Actual measurement should be 20 degrees off the opposing wall (where your blue arrow emanates from or, the other side). They are directional for left and right... got to get it right or you'll get plenty-o-squeal. Let me go take a picture for you. |
|
|
|
| Eric_Shea |
Feb 16 2008, 08:01 PM
Post
#3
|
|
PMB Performance Group: Admin Posts: 19,279 Joined: 3-September 03 From: Salt Lake City, UT Member No.: 1,110 Region Association: Rocky Mountains |
OK... here's the piston orientation breakdown:
This picture shows the drivers side inner caliper 1/2. The rotor will be traveling in the direction of the arrow. Position it as such but, make sure it's the drivers side caliper 1/2. The bleeder will be at the top:  Here's the passengers side:  Understand this principle and apply it to the outer 1/2's. Then make sure you mate the proper pairs together. I see another potential problem. Nice red paint (poser) (IMG:style_emoticons/default/biggrin.gif) In all seriousness, The area where the pads sit; it looks as though you guys did a great job cleaning these up and blasting them. Is that area protected? If that is simply bare metal then it will rust overnight. This is where your pads will sit. They will eventually rust in place, stick and squeal. That area needs to "really" be protected if it's not. I say really because it can get hot in there. Paint will flake etc... |
|
|
|
| ahdoman |
Feb 16 2008, 08:38 PM
Post
#4
|
|
It's phonetic...Ah-D-O-Man (Audioman) Group: Members Posts: 667 Joined: 7-November 05 From: Santa Clarita, Ca. Member No.: 5,084 Region Association: Southern California |
Thanks for the info Eric. In regards to the area where the pad will sit; How did they finish these from the factory? These were rusty and the pads were stuck in that gap. It's no big deal to media blast the paint back off (so far only the rear sides have been painted). If I get these zinc plated do I also do the pistons?
|
|
|
|
| Eric_Shea |
Feb 17 2008, 01:36 AM
Post
#5
|
|
PMB Performance Group: Admin Posts: 19,279 Joined: 3-September 03 From: Salt Lake City, UT Member No.: 1,110 Region Association: Rocky Mountains |
QUOTE How did they finish these from the factory? It was cadnium plated at the factory. Cad is now almost verboden here in the States... especially Kalifornia. Zinc is the proper replacement and it will look almost identical when finished. Keep in mind, the factory finish on those may be 30 years old. Don't plate the pistons. Polish their sides on a wheel and then use a heat paint (as the calipers will get hot etc.) such as POR15 Exhaust Manifold Grey or some of the muffler paints available. |
|
|
|
| AgPete139 |
Feb 19 2008, 12:37 PM
Post
#6
|
|
AgPete139 Group: Members Posts: 90 Joined: 12-February 08 From: Houston, TX Member No.: 8,701 Region Association: South East States |
QUOTE(Eric_Shea @ Feb 17 2008, 01:36 AM)  QUOTE How did they finish these from the factory? Don't plate the pistons. Polish their sides on a wheel and then use a heat paint (as the calipers will get hot etc.) such as POR15 Exhaust Manifold Grey or some of the muffler paints available. You are saying to paint the piston walls? Or the backside to to pistons? |
|
|
|
| Eric_Shea |
Feb 19 2008, 03:02 PM
Post
#7
|
|
PMB Performance Group: Admin Posts: 19,279 Joined: 3-September 03 From: Salt Lake City, UT Member No.: 1,110 Region Association: Rocky Mountains |
Sorry... that was very unclear.
Polish the sides and paint the tops. You can see the top of the piston in the picture is painted. "No" paint whatsoever inside the bore where the fluid will come in contact with it. |
|
|
|
|
1 User(s) are reading this topic (1 Guests and 0 Anonymous Users)
0 Members:

|
Lo-Fi Version | Time is now: 16th June 2024 - 01:37 PM |
Invision Power Board
v9.1.4 © 2024 IPS, Inc.