|
|
|
Porsche, and the Porsche crest are registered trademarks of Dr. Ing. h.c. F. Porsche AG.
This site is not affiliated with Porsche in any way. Its only purpose is to provide an online forum for car enthusiasts. All other trademarks are property of their respective owners. |
|
|

  |

| kenshapiro2002 |
 Aug 12 2009, 07:15 AM Aug 12 2009, 07:15 AM
Post
#1
|
|
Senior Member  Group: Members Posts: 1,441 Joined: 23-July 09 From: Bawlmer, MD Member No.: 10,598 Region Association: MidAtlantic Region |
Can a "shade tree" mechanic like myself do this without a major cluster F*#k? I know how to label, sort and be meticulous, and how to do one at a time. On a scale of 1-10 (1 being an oil change and 10 being clutch replacement in an XKE!) whattaya think?
Ken P.S. Bought the car after it had sat for years. Rode it home from CT to MD and it ran fine for about 150 miles. Then it began to act fuel starved under any load...up hills, accelerating, etc. It gets worse day by day. I've changed fuel filter (pretty clean actually), plugs and wireset. Should I clean idle jets first...before attempting this? Any chnace I'll get the thing running again if I do this? |
   |

 
|
| carr914 |
Aug 12 2009, 07:48 AM
Post
#2
|
|
Racer from Birth Group: Members Posts: 119,045 Joined: 2-February 04 From: Tampa,FL Member No.: 1,623 Region Association: South East States |
First, if they 911 six cylinder carbs, get yourself a Weber book and a syncronizer.
I would star with cleaning the idle jets, as that will only take a few minutes. However, the symptom of clogged idle jets is back-firing when off-throttle. Next with syncro tool make mixture adjustments. If the carbs need to be rebuilt, my opinion is this is not a shade-tree deal. They typically have worn-out shafts that need to be replaced. They also need to have new brass shaft bushings installed. This is best left to a Weber expert vs. a shop. The best guy in the business is Harry Bieker http://www.biekerengineering.com/ Good Luck, T.C. 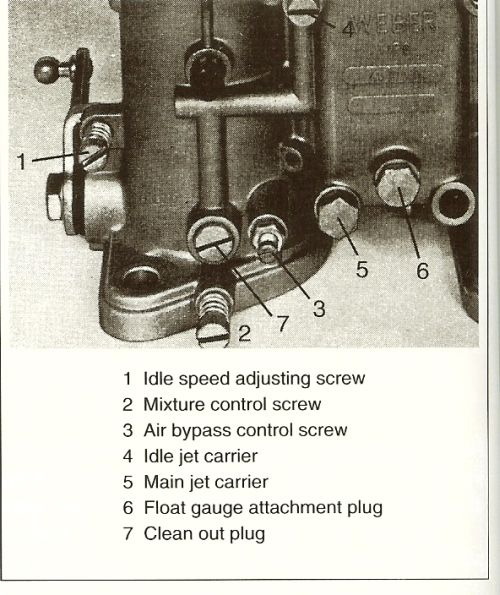 |
|
|
|
| tat2dphreak |
Aug 12 2009, 08:01 AM
Post
#3
|
|
stoya, stoya, stoya Group: Benefactors Posts: 8,797 Joined: 6-June 03 From: Wylie, TX Member No.: 792 Region Association: Southwest Region |
I agree with TC on the -6 carbs, but I'm suspecting these are -4s
a basic rebuild you can do yourself, if the bearings are bad, tho... you may need help. I assume you just mean a weber rebuild kit like you can get from aircooled.net... you can do that in a day. |
|
|
|
| r_towle |
Aug 12 2009, 08:07 AM
Post
#4
|
|
Custom Member Group: Members Posts: 24,591 Joined: 9-January 03 From: Taxachusetts Member No.: 124 Region Association: North East States |
Yes you can do it.
I wont say it easy, but it really is. The nice thing is that the screws only fit in one place...same with the jets etc.... What I would suggest is that you only do ONE carb at a time...leave the other carb alone and on the bench so you can see where things go. Get a gallon of Berrymans Parts/Carb cleaner....it comes in a gallon can made for you to dunk the whole carb body into it. Read the directions on the can...aluminum needs to be timed....20 minutes per dunking...then wash it off with water to stop the cleaning action...(wear gloves) I disassemble everything.. Put all the jets and floats in a box. Dunk the body and get it perfectly clean....sometimes you need to dunk it two or three or four times to get all the lacquer out....get it clean. blow all the passeges out with air....then dunk again. When you can eat from the bowl...then its clean. Dont bother doing it half assed. Then dunk all the jets, nuts, bolts ....everything together. I do not dunk the floats..they are plastic. While you are waiting, fill a coffee can up halfway with fuel. Hold each float underwater (fuel) to check for air bubbles which means you have a leaky float that needs to be replaced. Prior to putting the top cover back on, set the proper float height. I have yet to open a 40mm IDF carbs that was setup correctly. All the floats seem to be different, and you want both carbs to have the same exact float height. Get the weber book. I like this one http://www.amazon.com/Weber-Zenith-Strombe...2887&sr=1-2 RIch |
|
|
|
| kenshapiro2002 |
Aug 12 2009, 08:47 AM
Post
#5
|
|
Senior Member Group: Members Posts: 1,441 Joined: 23-July 09 From: Bawlmer, MD Member No.: 10,598 Region Association: MidAtlantic Region |
Thanks...just ordered the book. Now a syncro tool and some rebuild kits...feeling brave. The car is a 4 (big bore 2.0 kit on a 1.7) Are there any "turns" I need to measure (lingage or carb screws) as I disassemble in order to have a decent baseline from which to get the car running again when I go to start her up after this process?
QUOTE(r_towle @ Aug 12 2009, 10:07 AM)  Yes you can do it. I wont say it easy, but it really is. The nice thing is that the screws only fit in one place...same with the jets etc.... What I would suggest is that you only do ONE carb at a time...leave the other carb alone and on the bench so you can see where things go. Get a gallon of Berrymans Parts/Carb cleaner....it comes in a gallon can made for you to dunk the whole carb body into it. Read the directions on the can...aluminum needs to be timed....20 minutes per dunking...then wash it off with water to stop the cleaning action...(wear gloves) I disassemble everything.. Put all the jets and floats in a box. Dunk the body and get it perfectly clean....sometimes you need to dunk it two or three or four times to get all the lacquer out....get it clean. blow all the passeges out with air....then dunk again. When you can eat from the bowl...then its clean. Dont bother doing it half assed. Then dunk all the jets, nuts, bolts ....everything together. I do not dunk the floats..they are plastic. While you are waiting, fill a coffee can up halfway with fuel. Hold each float underwater (fuel) to check for air bubbles which means you have a leaky float that needs to be replaced. Prior to putting the top cover back on, set the proper float height. I have yet to open a 40mm IDF carbs that was setup correctly. All the floats seem to be different, and you want both carbs to have the same exact float height. Get the weber book. I like this one http://www.amazon.com/Weber-Zenith-Strombe...2887&sr=1-2 RIch |
|
|
|
| kenshapiro2002 |
Aug 12 2009, 08:49 AM
Post
#6
|
|
Senior Member Group: Members Posts: 1,441 Joined: 23-July 09 From: Bawlmer, MD Member No.: 10,598 Region Association: MidAtlantic Region |
Bearings and all should be good. The car was "built" like this in around 1989, driven very little (health issues with PO) and then sat for twenty years. It was put up well, fuel preservatives added, run once in awhile, etc. I still suspect some gumming or varnishing in there.
QUOTE(tat2dphreak @ Aug 12 2009, 10:01 AM) I agree with TC on the -6 carbs, but I'm suspecting these are -4s a basic rebuild you can do yourself, if the bearings are bad, tho... you may need help. I assume you just mean a weber rebuild kit like you can get from aircooled.net... you can do that in a day. |
|
|
|
| jmill |
Aug 12 2009, 09:14 AM
Post
#7
|
|
Green Hornet Group: Members Posts: 2,449 Joined: 9-May 08 From: Racine, Wisconsin Member No.: 9,038 Region Association: Upper MidWest |
You can do it. The book will tell you how to set your mixture screws for easy start-up and tune. I like 2 1/2 to 3 turns out and then turn in to best tune. Get the size of your idle jet and main jet, ET and venturi when you take it apart and post it here. We can see if they're sized correctly.
What you might have going on is water in the float bowl. Water in the air condenses in there and sinks. It then corrodes the aluminum in the bowl. You'll have to scrape that gunk out of there. The same will happen in the accel pump. Clean all that stuff out and soak it. Your floats should be fine. I've never seen a sunk IDF float. I think they are real light solid plastic that floats. I've never cracked one open to check if it's hollow so don't quote me on that. |
|
|
|
| aircooledtechguy |
Aug 12 2009, 09:25 AM
Post
#8
|
|
The Aircooledtech Guy Group: Members Posts: 1,966 Joined: 8-November 08 From: Anacortes, WA Member No.: 9,730 Region Association: Pacific Northwest |
Of course you can do a basic cleaning and rebuild. TC is right about needing a professional machine shop if the shafts are worn, but short of that you should be able to do it all.
If you are concerned about messing up putting them back together, simply do one at a time. Then you have a complete example if you get stuck or forget where something goes. Also prior to removing the mixture screws, gently bottom them in the holders to count the # of turns so you can get them back to their original settings which can make starting the car easier later as it helps to have a starting point for tuning. I use carb cleaner in the spray cans to get any big stuff off. Then I soda blast everything to get it all clean without having to worry about getting media stuck in the small passages. Soak everything for a few minutes in warm water, blow it out with air and they will look brand new and be completely clean. Re-assemble in reverse order (IMG:style_emoticons/default/biggrin.gif) You definitely need to invest in a carb syncrometer in order to get them dialed-in correctly. I would rate this job (without shaft replacement) at around a 3-4. TOTALLY do-able. |
|
|
|
| MDG |
Aug 12 2009, 09:50 AM
Post
#9
|
|
Wolf in wolf's clothing. Group: Members Posts: 8,652 Joined: 3-February 09 From: Toronto Member No.: 10,018 Region Association: None |
Yes you can, Ken. I did my 40 IDA 3C's over the winter on my -6. What a difference!
Rich's post is spot on as usual. I have that book too as well as a couple of others. READ them before you start - you'll have a lot more confidence once you take away the mystery and you'll do a better job. As a side bonus, after you read the books, take apart and hold these little parts in your hand - then put it all back together again, you will have a much greater understanding of how these things work. I bet you have an easier time in the future when you go to tune them too. One important note: you're dealing with small brass parts - do not over-torque these. It doesn't take much to twist a head right off, bugger the threads or cause distortion to the internal passageways. good luck! |
|
|
|
| jmill |
Aug 12 2009, 09:57 AM
Post
#10
|
|
Green Hornet Group: Members Posts: 2,449 Joined: 9-May 08 From: Racine, Wisconsin Member No.: 9,038 Region Association: Upper MidWest |
Bought this book 20 years ago. Hasn't failed me yet.
http://www.amazon.com/gp/offer-listing/B00...9412&sr=1-1 |
|
|
|
| kenshapiro2002 |
Aug 12 2009, 10:01 AM
Post
#11
|
|
Senior Member Group: Members Posts: 1,441 Joined: 23-July 09 From: Bawlmer, MD Member No.: 10,598 Region Association: MidAtlantic Region |
Thanks guys...your help is invaluable!
Ken |
|
|
|
| kenshapiro2002 |
Aug 12 2009, 10:07 AM
Post
#12
|
|
Senior Member Group: Members Posts: 1,441 Joined: 23-July 09 From: Bawlmer, MD Member No.: 10,598 Region Association: MidAtlantic Region |
BTW...how can I be 100% sure these are Weber 40S (before I order rebuild kits)? I'm assuming they are, but I see no labeling outside of the "WEBER" logo.
|
|
|
|
| jmill |
Aug 12 2009, 10:18 AM
Post
#13
|
|
Green Hornet Group: Members Posts: 2,449 Joined: 9-May 08 From: Racine, Wisconsin Member No.: 9,038 Region Association: Upper MidWest |
You can use 40 Weber gaskets on a 44. You just have to trim open the throat gasket with a razor. All the rest of the parts are the same.
|
|
|
|
| tat2dphreak |
Aug 12 2009, 10:20 AM
Post
#14
|
|
stoya, stoya, stoya Group: Benefactors Posts: 8,797 Joined: 6-June 03 From: Wylie, TX Member No.: 792 Region Association: Southwest Region |
QUOTE(jmill @ Aug 12 2009, 11:18 AM) You can use 40 Weber gaskets on a 44. You just have to trim open the throat gasket with a razor. All the rest of the parts are the same. (IMG:style_emoticons/default/agree.gif) IIRC the kit I bought was the same for 40 or 44, with a extra set of the gasket you would have to cut. |
|
|
|
| kenshapiro2002 |
Aug 12 2009, 10:25 AM
Post
#15
|
|
Senior Member Group: Members Posts: 1,441 Joined: 23-July 09 From: Bawlmer, MD Member No.: 10,598 Region Association: MidAtlantic Region |
Very helpful...thanks.
QUOTE(jmill @ Aug 12 2009, 12:18 PM) You can use 40 Weber gaskets on a 44. You just have to trim open the throat gasket with a razor. All the rest of the parts are the same. |
|
|
|
| jmill |
Aug 12 2009, 10:40 AM
Post
#16
|
|
Green Hornet Group: Members Posts: 2,449 Joined: 9-May 08 From: Racine, Wisconsin Member No.: 9,038 Region Association: Upper MidWest |
The 40 and 44 have the same carb body. The only difference is the throat size. You can use a 40 kit on a 44 but you can't use a 44 kit on a 40 because the hole in the gasket for the carb throat is too big. I want to say the last kit I bought for a set of 44's was a combo kit that had both gasket sizes and an assortment of pump diaphragms. Ask the retailer you buy it from if his kit can handle both the 40 and 44.
|
|
|
|
| tat2dphreak |
Aug 12 2009, 11:14 AM
Post
#17
|
|
stoya, stoya, stoya Group: Benefactors Posts: 8,797 Joined: 6-June 03 From: Wylie, TX Member No.: 792 Region Association: Southwest Region |
|
|
|
|
| r_towle |
Aug 12 2009, 04:31 PM
Post
#18
|
|
Custom Member Group: Members Posts: 24,591 Joined: 9-January 03 From: Taxachusetts Member No.: 124 Region Association: North East States |
QUOTE(kenshapiro2002 @ Aug 12 2009, 12:07 PM) BTW...how can I be 100% sure these are Weber 40S (before I order rebuild kits)? I'm assuming they are, but I see no labeling outside of the "WEBER" logo. It says 40 on the carb body on the back... Some have a 40 on the square part right under the fuel inlet. Some have the 40 down low on the side of one of the barrels. Rich |
|
|
|
| neil30076 |
Aug 12 2009, 04:49 PM
Post
#19
|
|
Recovering dismantler! Group: Members Posts: 397 Joined: 12-September 06 From: San Diego ( RB) CA Member No.: 6,826 Region Association: Southwest Region |
QUOTE(r_towle @ Aug 12 2009, 03:31 PM) QUOTE(kenshapiro2002 @ Aug 12 2009, 12:07 PM) BTW...how can I be 100% sure these are Weber 40S (before I order rebuild kits)? I'm assuming they are, but I see no labeling outside of the "WEBER" logo. It says 40 on the carb body on the back... Some have a 40 on the square part right under the fuel inlet. Some have the 40 down low on the side of one of the barrels. Rich The attached diagram might help identify further, plus instructions on how to get the top gasket to fit!  Rebuild_Instructions.pdf ( 468.96k )
Number of downloads: 292
Rebuild_Instructions.pdf ( 468.96k )
Number of downloads: 292 |
|
|
|
| kenshapiro2002 |
Aug 12 2009, 04:59 PM
Post
#20
|
|
Senior Member Group: Members Posts: 1,441 Joined: 23-July 09 From: Bawlmer, MD Member No.: 10,598 Region Association: MidAtlantic Region |
FINALLY...found it...very low on on of the barrel fronts and VERY small:
40 IDF 60 5A QUOTE(r_towle @ Aug 12 2009, 06:31 PM) QUOTE(kenshapiro2002 @ Aug 12 2009, 12:07 PM) BTW...how can I be 100% sure these are Weber 40S (before I order rebuild kits)? I'm assuming they are, but I see no labeling outside of the "WEBER" logo. It says 40 on the carb body on the back... Some have a 40 on the square part right under the fuel inlet. Some have the 40 down low on the side of one of the barrels. Rich |
|
|
|
|
1 User(s) are reading this topic (1 Guests and 0 Anonymous Users)
0 Members:

|
Lo-Fi Version | Time is now: 11th June 2024 - 11:23 AM |
Invision Power Board
v9.1.4 © 2024 IPS, Inc.