|
|
|
Porsche, and the Porsche crest are registered trademarks of Dr. Ing. h.c. F. Porsche AG.
This site is not affiliated with Porsche in any way. Its only purpose is to provide an online forum for car enthusiasts. All other trademarks are property of their respective owners. |
|
|


| ghuff |
 Feb 10 2010, 08:13 PM Feb 10 2010, 08:13 PM
Post
#1
|
|
This is certainly not what I expected down here.  Group: Members Posts: 849 Joined: 21-May 09 From: Bodymore Murderland Member No.: 10,389 Region Association: MidAtlantic Region |
My eyecrometer tells me the floors of my 914 are 20 gauge. Same for the longs. But it has a 50% accuracy rate. For instance it failed welding the u shaped cuts in the drivers side pan, but I got through that. I would rather start with a better baseline and tweak the welder settings from there.
Unfortunately I was unable to order a sheetmetal gauge from eastwood before the 5 feet of snow. Once i have the cross support and center tunnel out I could compare them to the chart on my welder unless you guys know? My setup is .24 wire, 25% CO2 75% Argon. I practiced on some scrap 16 gauge from the engman kit and managed to lay a good clean bead with proper penetration and no dripping or nastiness out of the back. Need the gauge of: Longs Floorpans Center tunnel/Support Rear firewall where the hood release cable is. Also, I have been searching and looking around for a good thread on seam welding here, but have found some bits here and there. I already know I am removing my motor and cutting into the back panel to seam the shock tower to the long, and will be seaming the trunk and shock tower sheet metal together in the actual trunk. I had the thought of grinding an angle onto the longs to increase the surface area and seaming them together slowly, which I read in another thread as well here. But that is all I have seen. A few pictures by JP of the yellow car and that was in a thread by Andrewy I think which was abandoned, and not too heavy on content. Can you guys share your experiences? I went through digging into hell and a lot of other restoration type threads, but my car is still very solid so I mostly need to be seam welding, and fabricating smaller patches then covering in por-15. The car is going to be beaten on, tracked and have an LS1 in it with very sticky tires. I am currently removing the center tunnel and cross brace to clean rust out inside of there, seal it all back up and install the engman kit, then move on to the rest of the chassis. |
   |

 
|
  |
Replies(1 - 17)
| rick 918-S |
Feb 10 2010, 09:06 PM
Post
#2
|
|
Hey nice rack! -Celette Group: Members Posts: 21,258 Joined: 30-December 02 From: Now in Superior WI Member No.: 43 Region Association: Northstar Region |
No point in Beveling sheet metal to increase the weld. Even the smallest mig bead is larger in ga than body sheet. Here's a tip for Seam welding. If you have two body panels that are already spot welded and you want to seam weld it to help with chassis flex issues, use the back step method. This reduces the stress in the chassis. I used to weld crane turn tables with this method. Start at the right and move left, start at the right and move left, etc...
Sorry for the crude sketch. (IMG:style_emoticons/default/screwy.gif) Attached thumbnail(s) 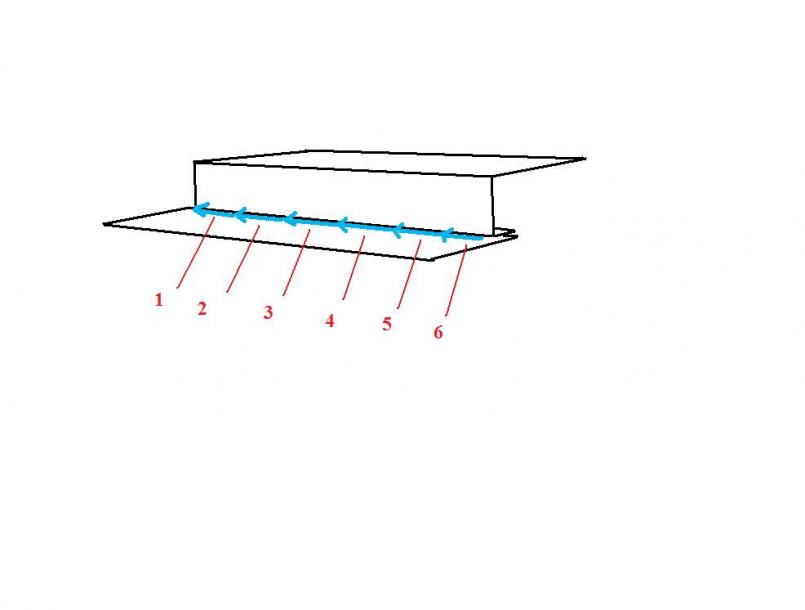
|
 |
|
| ghuff |
Feb 10 2010, 09:22 PM
Post
#3
|
|
This is certainly not what I expected down here. Group: Members Posts: 849 Joined: 21-May 09 From: Bodymore Murderland Member No.: 10,389 Region Association: MidAtlantic Region |
QUOTE(rick 918-S @ Feb 10 2010, 07:06 PM)  No point in Beveling sheet metal to increase the weld. Even the smallest mig bead is larger in ga than body sheet. Here's a tip for Seam welding. If you have two body panels that are already spot welded and you want to seam weld it to help with chassis flex issues, use the back step method. This reduces the stress in the chassis. I used to weld crane turn tables with this method. Start at the right and move left, start at the right and move left, etc... Sorry for the crude sketch. (IMG:style_emoticons/default/screwy.gif) The sketch is not bad, but I do not understand the logic. Do you go back to lets 6 to 5, then back inbetween at the blue point to go back over to 5 again laying a second bead over? Then repeat? (IMG:style_emoticons/default/confused24.gif) |
|
|
|
| VaccaRabite |
Feb 10 2010, 09:35 PM
Post
#4
|
|
En Garde! Group: Admin Posts: 13,856 Joined: 15-December 03 From: Dallastown, PA Member No.: 1,435 Region Association: MidAtlantic Region |
Start at 1. From the right arrow to the end. Then move to two, from the right arrow to where you started for section 1. Then move to 3, from the right arrow to where you started at section 2. Continue till you are done.
Zach |
|
|
|
| ghuff |
Feb 10 2010, 10:07 PM
Post
#5
|
|
This is certainly not what I expected down here. Group: Members Posts: 849 Joined: 21-May 09 From: Bodymore Murderland Member No.: 10,389 Region Association: MidAtlantic Region |
Oh ok. That makes sense. That gives the metal a chance to cool, instead of laying a continuous bead.
What about areas to seam weld? Pretty much everything in sight? (IMG:style_emoticons/default/smile.gif) |
|
|
|
| rick 918-S |
Feb 10 2010, 10:26 PM
Post
#6
|
|
Hey nice rack! -Celette Group: Members Posts: 21,258 Joined: 30-December 02 From: Now in Superior WI Member No.: 43 Region Association: Northstar Region |
QUOTE(ghuff @ Feb 10 2010, 08:07 PM) Oh ok. That makes sense. That gives the metal a chance to cool, instead of laying a continuous bead. What about areas to seam weld? Pretty much everything in sight? (IMG:style_emoticons/default/smile.gif) Best to ask in the paddock or maybe one of the racers will chime in for ya. |
|
|
|
| sean_v8_914 |
Feb 11 2010, 08:05 AM
Post
#7
|
|
Chingon 601 Group: Members Posts: 4,011 Joined: 1-February 05 From: San Diego Member No.: 3,541 |
seam welding a tub is a bit tricky. when you stiffen one area, the stresses have to travel to something else.
hell hole wheel house to horizontal plane of long box under car shock towers to bottom of long inside trunk vert wall support from shock tower to trans cross ... someone needs to come down here with a video cam. we could just point to it all and post it on youtube |
|
|
|
| sean_v8_914 |
Feb 11 2010, 08:28 AM
Post
#8
|
|
Chingon 601 Group: Members Posts: 4,011 Joined: 1-February 05 From: San Diego Member No.: 3,541 |
careful!!! you can really tweek the fuch out of your chassis. much patience is required. I split a car in quadrants and only do about 5 stitches per quad and NEVER 2 adjascent stitches.
MORE PRACTICE: dont waste your time praciticing welds on flat steel. too easy, wont learn much beyond basic name writing. try different gauges at right angles and add some curves. your car will challenge your welding skills. slightest WELD CONTAMINATION will pop, sputter and blow your fresh laid molten chassis onto your nylon sneaker mesh. CUT SOME OLD SHEET METAL OFF A JUNKER CAR and weld that together. welding is 5%, the prep work is 95% we just switched to Goodyear slicks so Ill be doin some welding on the 10Jereen chassis soon...n post pics |
|
|
|
| rick 918-S |
Feb 11 2010, 11:01 AM
Post
#9
|
|
Hey nice rack! -Celette Group: Members Posts: 21,258 Joined: 30-December 02 From: Now in Superior WI Member No.: 43 Region Association: Northstar Region |
Sean knows what he is talking about. Some areas of the chassis may only need intermediate stitching others are better suited to full welding.
This is not a 10-12 ga. Corvette frame from the 70's. Some real thought and planning needs to go into a uni-body car |
|
|
|
| charliew |
Feb 11 2010, 11:37 AM
Post
#10
|
|
Advanced Member Group: Members Posts: 2,363 Joined: 31-July 07 From: Crawford, TX. Member No.: 7,958 |
My biggest problem is the contamination of the metals with the coatings that were put on them before they were spotwelded. They were spotwelded to keep the heat down and preserve as much of the rust prohibiting coating as possible. The heat from welding will make it all rust much faster on the inside where it's very hard to retreat with rust proofing. It would be hard to make look good but actually drilling and riveting would probably be the best way to increase strength without hurting the original rust proofing that may still be left in the seams. The thickness ga you are asking is ok to ask but each welder will need to be fine tuned to each weld such as overhead, flat and verticle and of course the two gauges of metal. Always try to start on the coldest, thickest piece and maybe start out in front and drag it back to the starting point once the arc is established so the real bead starts hot and has penetration to begin with and isn't just laying on the surface till it gets the base metal molten. I hope you don't put more problems on a straight body trying to make it stronger than it might need to be. Remember it's a light car and nomatter how much tire it has it still will break them loose, course a stiff suspension will twist it more than the rubber on the ground. I could hear the rear window moving in my j200 jeep truck when it twisted just going over rough pasture roads on the deer lease with stiff suspension.
|
|
|
|
| ClayPerrine |
Feb 11 2010, 07:38 PM
Post
#11
|
|
Life's been good to me so far..... Group: Admin Posts: 16,542 Joined: 11-September 03 From: Hurst, TX. Member No.: 1,143 Region Association: NineFourteenerVille |
If this is a street car, please don't weld the seams with a continuous bead.
The biggest reason for them not being a continuous bead is what is called a "crumple zone". If (god forbid) you get into a wreck, the energy is dissipated by the chassis sections crumpling in a predictable fashion. Mercedes Benz invented this in the late 60s, and it has been on all cars since (Mercedes still holds the patent, but they refuse to enforce it). They get better at it every year, and injuries go down. If you weld up the seams, the car cannot crumple as designed. So all that energy is transmitted to the people inside, making their injuries more severe. For a street car, the chassis stiffness is not as important as your life. |
|
|
|
| sean_v8_914 |
Feb 12 2010, 03:07 AM
Post
#12
|
|
Chingon 601 Group: Members Posts: 4,011 Joined: 1-February 05 From: San Diego Member No.: 3,541 |
oh thats good stuff. ya. however...
materials science has come a long way in teh last 5 years. there are new materials and techniques that have been described in threads here. these materials now enable treatment of remote or fairly well consealed areas. they also allow to treat in between lapped joints |
|
|
|
| J P Stein |
Feb 12 2010, 08:50 AM
Post
#13
|
|
Irrelevant old fart Group: Members Posts: 8,797 Joined: 30-December 02 From: Vancouver, WA Member No.: 45 Region Association: None |
I seam welded the shitbox...front to back..mostly continuous, but a few intermittent areas and had no distortion problems. As Charliew said, the biggest issue was getting the seams clean enough to weld. I used an .023 wire called "Easy Grind" on low heat & feed settings......damn close to the ones recommended on the 110volt Miller machine. Once you get it right, you can do the whole freaking a on that setting. The chassis got the crap beat out of it on our God awful AX venue prior to getting real serious about stiffening it and I had no serious cracking....none of the "stiffening kits" were used.
I have no meaningful data on the "danger" of doing this to a street car.....a WAG would seem to discount this premise. |
|
|
|
| ghuff |
Feb 17 2010, 06:09 PM
Post
#14
|
|
This is certainly not what I expected down here. Group: Members Posts: 849 Joined: 21-May 09 From: Bodymore Murderland Member No.: 10,389 Region Association: MidAtlantic Region |
Should I brace the chassis somehow when I install the engman kit and do the seam welding?
Or just put it on jackstands, remove engine and heavy stuff then let it rip, but of course not being stupid and warping things...... First of course, I am going to go through the measurements here on 914world and measure everything to make sure my body is within spec. If this were a real rotbox, I probably would not worry as much I just do not want to fuck up a clean good shell or ruin it :| Call me paranoid, but better safe and proper than sorry. |
|
|
|
| J P Stein |
Feb 17 2010, 06:46 PM
Post
#15
|
|
Irrelevant old fart Group: Members Posts: 8,797 Joined: 30-December 02 From: Vancouver, WA Member No.: 45 Region Association: None |
The only time I had shrinkage problems is when I originally put in the cage.
I got carried away ( my first run through with car welding) when I put in backing plates for the tubes.....1/4 inch plates, full fillets & plug welds. Too much welding, too much heat too quickly.....shrunk the door opening on the pass side. That made for some rework.. (IMG:style_emoticons/default/dry.gif) Fixed it and learned from it. I can show pics of what/where I seam welded. I went after the areas that break/ crack most commonly ( to the best of my knowledge, at the time). The date on the pic is right for once. Attached thumbnail(s) 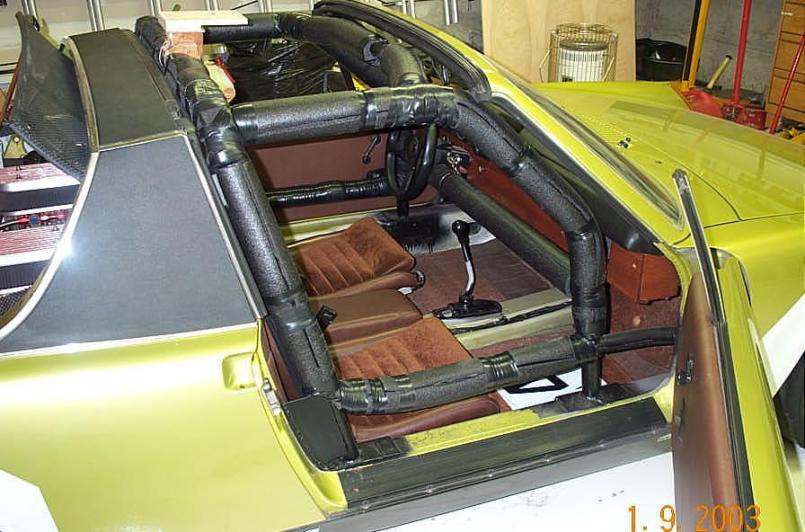
|
|
|
|
| ghuff |
Feb 17 2010, 06:59 PM
Post
#16
|
|
This is certainly not what I expected down here. Group: Members Posts: 849 Joined: 21-May 09 From: Bodymore Murderland Member No.: 10,389 Region Association: MidAtlantic Region |
QUOTE(J P Stein @ Feb 17 2010, 04:46 PM) The only time I had shrinkage problems is when I originally put in the cage. I got carried away ( my first run through with car welding) when I put in backing plates for the tubes.....1/4 inch plates, full fillets & plug welds. Too much welding, too much heat too quickly.....shrunk the door opening on the pass side. That made for some rework.. (IMG:style_emoticons/default/dry.gif) Fixed it and learned from it. I can show pics of what/where I seam welded. I went after the areas that break/ crack most commonly ( to the best of my knowledge, at the time). The date on the pic is right for once. More please. Post away! Flood the thread if you will (IMG:style_emoticons/default/smile.gif) Oh btw, the trans tools are still hanging out on my work bench. I will have to ADD over into using them soon (IMG:style_emoticons/default/biggrin.gif) |
|
|
|
| J P Stein |
Feb 17 2010, 08:22 PM
Post
#17
|
|
Irrelevant old fart Group: Members Posts: 8,797 Joined: 30-December 02 From: Vancouver, WA Member No.: 45 Region Association: None |
Here's a couple that will keep ya busy.
The first is the pinch seam that runs the length of the long. I welded the sucker together where the 2 halves come together.....from the front firewall just past the trans mount. Grind the 2 halves even....oft times they are not and ya need them clean anyhow + about 1/4 inch up, then do a simple overhead weld without lighting yourself on fire more than is survivable. Lightly grind the the resultant fillet smooth to eliminate kerfs (stress points). Since you're there, go all around the inner ear using the same method. The arch over the axle & the inner ear are both failure areas. Hitting the small land (bout 3/32 wide) is quite an exercise in puddle conrol.....not too hot (molten globs down your shirt to your belt......BTDT......AAUUGH) & not too cold (no penetration). If ya get good here, you can weld anywhere. (IMG:style_emoticons/default/biggrin.gif) Attached thumbnail(s)  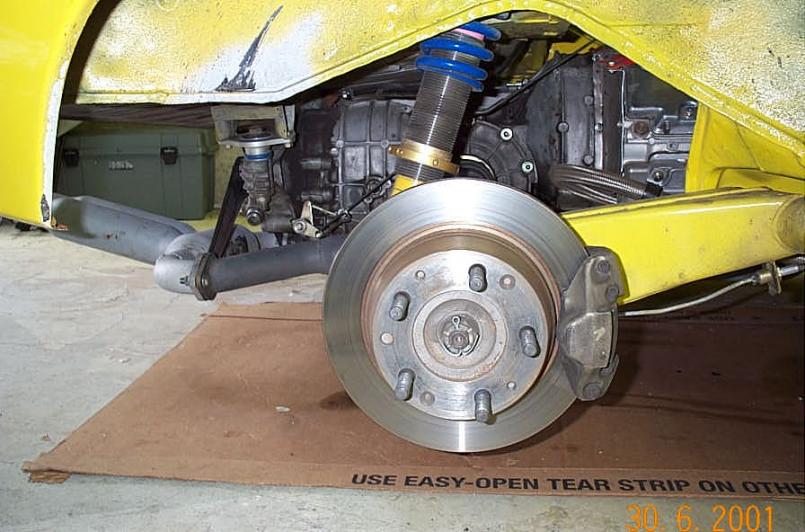
|
|
|
|
| J P Stein |
Feb 19 2010, 09:50 AM
Post
#18
|
|
Irrelevant old fart Group: Members Posts: 8,797 Joined: 30-December 02 From: Vancouver, WA Member No.: 45 Region Association: None |
Easier stuff in the engine room, front & rear trunks......practice,practice, practice. (IMG:style_emoticons/default/biggrin.gif) The inner ears are reinforced. The car is built stout and has held up to 10 years of autocrossing on very rough venues.....still going strong, I might add. IMO, you can't make the flexi-flier too strong.
Attached thumbnail(s) 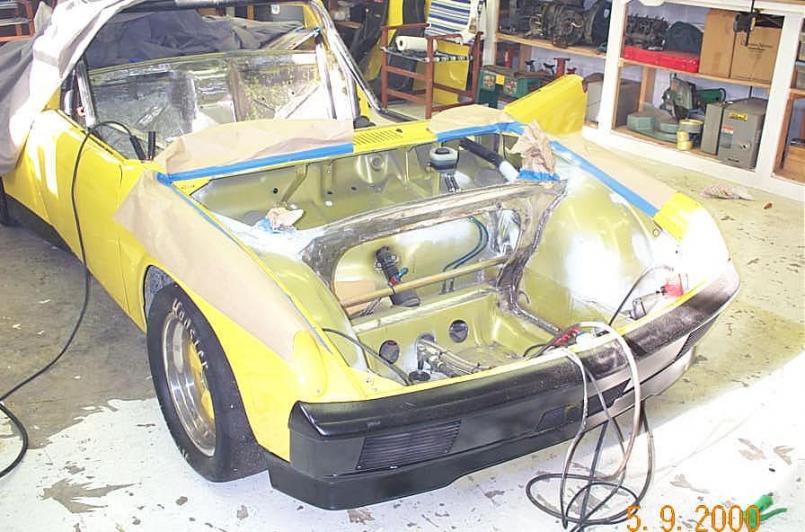 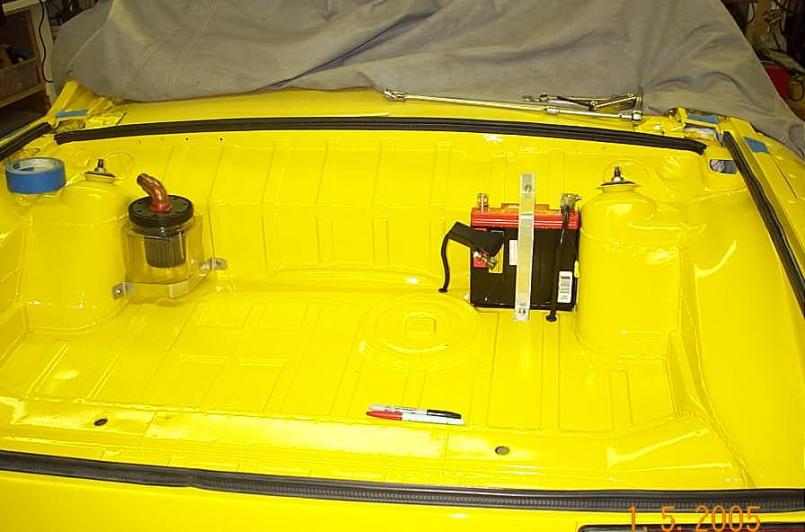 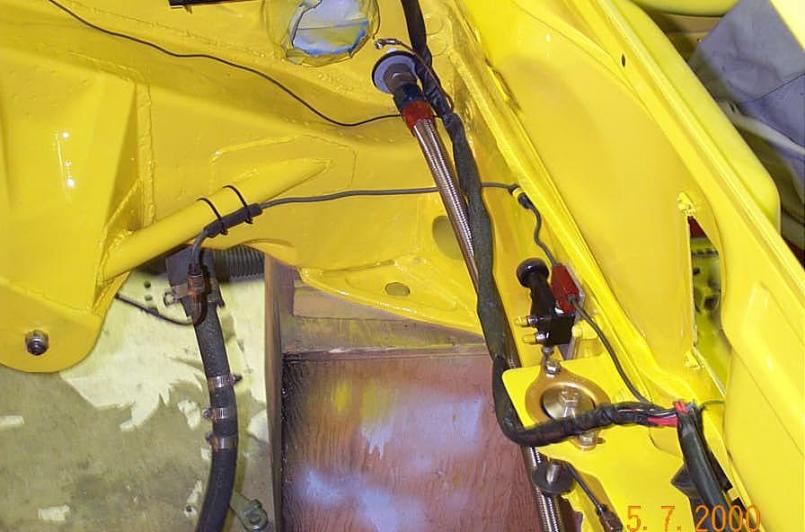
|
|
|
|
|
1 User(s) are reading this topic (1 Guests and 0 Anonymous Users)
0 Members:

|
Lo-Fi Version | Time is now: 1st May 2026 - 12:25 PM |
Invision Power Board
v9.1.4 © 2026 IPS, Inc.