|
|
|
Porsche, and the Porsche crest are registered trademarks of Dr. Ing. h.c. F. Porsche AG.
This site is not affiliated with Porsche in any way. Its only purpose is to provide an online forum for car enthusiasts. All other trademarks are property of their respective owners. |
|
|


| Pat Garvey |
 Apr 11 2010, 06:45 PM Apr 11 2010, 06:45 PM
Post
#1
|
|
Do I or don't I...........?  Group: Members Posts: 5,899 Joined: 24-March 06 From: SE PA, near Philly Member No.: 5,765 Region Association: North East States |
I'm starting to replace my original fuel tank because it has degraded inside (badly). Have a very nice replacement, but have some issues:
1. Fuel "socks". Can these be cleaned gently? Note in the attached pic that only one is viewable. The other is stuck in the tank. Ideas? Can I just drive it out with a drift pin? 2. Though this a more than decent tank, it has a horrible "rattle can" finish. I could refinish it myself, with many hours of labor, but it also needs to be boiled out. Why? Because USPS wouldn't let the PO ship it with sealant the "smelled funny". So, he had to remove it. Now, I have surface rust on the inside. Minor, but I don't want another mega problem down the road. So, I'm looking for suggestions, preferably within my area (SE PA). Looking for a total refurbishment, to factory specs. Pat Attached image(s) 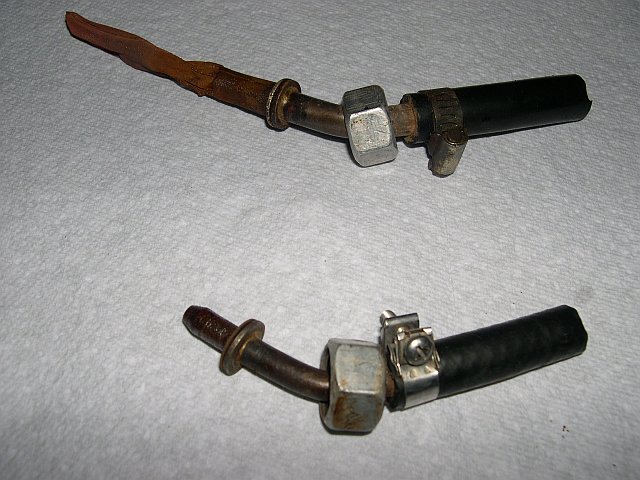
|
   |

 
|
  |
Replies(1 - 16)
| tod914 |
Apr 11 2010, 07:07 PM
Post
#2
|
|
Advanced Member Group: Members Posts: 3,755 Joined: 19-January 03 From: Lincoln Park, NJ Member No.: 170 |
Pat the socks be had from alot of sources. It's a VW part. The nipples I think George makes new ones. He offers copper gaskets, haven't tried them. I got some fiber ones from busdepot when I did mine. Not the perfect size, but seemed to work fine. You just have to make sure you align them properly before you tighten the nuts. If your having the tank stripped/boiled, should make your exterior paint prep easy (IMG:style_emoticons/default/wink.gif) My runners are due in this week. I'll get that VW grey-black out to you once I get them back. Think I have some extra nipple gaskets too. Will have to look.
|
|
|
|
| Tom_T |
Apr 11 2010, 07:27 PM
Post
#3
|
|
TMI.... Group: Members Posts: 8,318 Joined: 19-March 09 From: Orange, CA Member No.: 10,181 Region Association: Southern California |
Hey Pat,
Unless you really want to resto this tank yourself as a pet project, AA does them for $350 (your tank is $300 core). That, sock, nipples, etc. are on pg. 42-43 of the AA pdf downloadable catalog, but the link to the tank resto part no. on their website is bad (you usually can click on a blue part no. for anything in the catalog & it will open to the part on their website), so you'll probably need to call George & company. BTW Pat & Tod - I got one of George's repro plasti-chrome bumper tow hook hole caps last week & it looks pretty good as per originals - $19.50 IIRC. Tom /////// |
|
|
|
| Pat Garvey |
May 9 2010, 12:57 PM
Post
#4
|
|
Do I or don't I...........? Group: Members Posts: 5,899 Joined: 24-March 06 From: SE PA, near Philly Member No.: 5,765 Region Association: North East States |
Couple more tank related questions:
1. How much rust is too much? This tank was boiled out, a preservative added & sealed up. When the seller tried to ship it to me USPS would allow it because the preservative was deemed HAZMAT. So, he removed the preseravtive with simple green & shipped it. Of course, ambient humidity has produced a fine layer of oxide in some areas. Hard to get a decent pic of the inside but this is what I have. 2. Sender. I've disassembled the sender to check its condition. Seems OK, but wonder about the one wire (copper). Should it be this slack? Float works OK, but the copper wire doesn't stay within the slits on the float. Attached image(s)  
|
|
|
|
| McMark |
May 9 2010, 01:21 PM
Post
#5
|
|
914 Freak! Group: Retired Admin Posts: 20,179 Joined: 13-March 03 From: Grand Rapids, MI Member No.: 419 Region Association: None |
There should be three very fine wires on the sender. You can flush the tank with MetalReady to convert the rust.
Attached image(s) 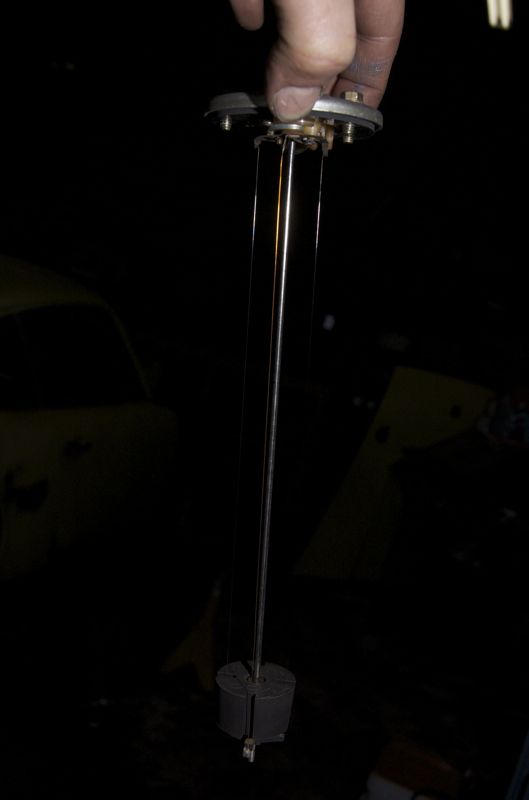
|
|
|
|
| r_towle |
May 9 2010, 04:32 PM
Post
#6
|
|
Custom Member Group: Members Posts: 24,588 Joined: 9-January 03 From: Taxachusetts Member No.: 124 Region Association: North East States |
AA has all the new piece for the bottom.
Flush it yourself like McMark said...its simple to do. For the proper paint, check with George..I think there is a Wurth product that hits the nail on the head...its the same paint for the 356's If you want to get it done for you, locate a radiator shop locally. Supply the paint for the outside. Rich |
|
|
|
| rfuerst911sc |
May 9 2010, 04:40 PM
Post
#7
|
|
Advanced Member Group: Members Posts: 2,158 Joined: 4-May 06 From: Dahlonega , Georgia Member No.: 5,980 Region Association: South East States |
In my opinion the inside of that tank looks OK. I would flush it with a gallon of paint thinner as this will leave a slight oily film which will help with flash rust until you get the tank mounted and full of gas.
|
|
|
|
| Pat Garvey |
May 9 2010, 06:16 PM
Post
#8
|
|
Do I or don't I...........? Group: Members Posts: 5,899 Joined: 24-March 06 From: SE PA, near Philly Member No.: 5,765 Region Association: North East States |
QUOTE(McMark @ May 9 2010, 01:21 PM)  There should be three very fine wires on the sender. You can flush the tank with MetalReady to convert the rust. Tell me more about MetalReady. Yes, there are 3 fine wires. The silver (? metal) are taut (sp), but the copper wire is not. Problem? Pat |
|
|
|
| 1968Cayman |
May 9 2010, 08:57 PM
Post
#9
|
|
Redacted by Irving Washington Group: Members Posts: 116 Joined: 5-February 10 From: Holly Springs, GA Member No.: 11,332 Region Association: South East States |
I had very good results using the POR 15 kit with (if I remember correctly) a 1972 Chevelle tank and have never had a problem with their products when properly following directions.
Sorry to get slightly off topic here, but I was working on my fuel tank today as well and ask if someone could be so kind as to post a pic of the mounts?? The 914 came in boxes, buckets and baskets (okay, the car was the basket . . .) |
|
|
|
| detoxcowboy |
May 10 2010, 09:01 AM
Post
#10
|
|
Senior Member Group: Members Posts: 1,294 Joined: 30-January 08 Member No.: 8,642 Region Association: Africa |
QUOTE(1968Cayman @ May 9 2010, 07:57 PM) I had very good results using the POR 15 kit with (if I remember correctly) a 1972 Chevelle tank and have never had a problem with their products when properly following directions. Sorry to get slightly off topic here, but I was working on my fuel tank today as well and ask if someone could be so kind as to post a pic of the mounts?? The 914 came in boxes, buckets and baskets (okay, the car was the basket . . .) The rubber mount/isolators? they will only fit in one way.. |
|
|
|
| 1968Cayman |
May 10 2010, 10:29 AM
Post
#11
|
|
Redacted by Irving Washington Group: Members Posts: 116 Joined: 5-February 10 From: Holly Springs, GA Member No.: 11,332 Region Association: South East States |
Not sure what they look like, though. I have buckets o'parts and my '68 911 does not use tank mounts, leaving me in unfamilar territory.
|
|
|
|
| realred914 |
May 10 2010, 10:31 AM
Post
#12
|
|
Senior Member Group: Retired Members Posts: 1,086 Joined: 1-April 10 From: california Member No.: 11,541 Region Association: None |
QUOTE(r_towle @ May 9 2010, 03:32 PM) AA has all the new piece for the bottom. Flush it yourself like McMark said...its simple to do. For the proper paint, check with George..I think there is a Wurth product that hits the nail on the head...its the same paint for the 356's If you want to get it done for you, locate a radiator shop locally. Supply the paint for the outside. Rich There are at least Two distinct shades of black paint used on the 914 gas tanks. I believe it is somewhat year model dependant, but I do not have the dates. one color is a very black semigloss, the other is a lighter black, a very dark dark grey. I have seen these two varaitions enough to be convinced they are two different factory colors. so if you want originality, I suggest some research into what your year model (or serial number sequence) should have. paint for a 356 gas tank may not be right, there is more than one variation of that color too. as these cars become more valuable and classics, more folks will pay attention to the small thing like the correct shade of black for the gas tank, and one day there will be concours guys telling you you got the wrong color based on your build date or some other detail. if you want it right, you need some research. one size does NOT fit all for 914 gas tank colors. you have to ask your self, is this supposed to be the black tank or the dark gray tank? time for some research!!!! (IMG:style_emoticons/default/driving.gif) (IMG:style_emoticons/default/driving.gif) (IMG:style_emoticons/default/driving.gif) (IMG:style_emoticons/default/driving.gif) |
|
|
|
| avidfanjpl |
May 10 2010, 10:42 AM
Post
#13
|
|
914 Hemophiliac Group: Members Posts: 720 Joined: 6-April 10 From: Bear, Delaware Member No.: 11,566 Region Association: MidAtlantic Region |
You are right behind me. I just finished my tank with the POR15 kit.
It worked astoundlingly, but you must do all 3 steps in order (marine clean, metal ready(stinky and be careful! and the por15 paint, even stinkier), and dry the first two steps with air. Then in all cases, tape the tank shut and roll it around to make sure ALL surfaces get covered. The POR15 silver paint worked stunningly. POUR OUT ALL EXCESS POR15 PAINT, and I even dabbed the slight excess still left with paper towels to get the little puddle out with a clever grabber tool. I am in cure mode and reinstall it midweek. The finish of the paint inside is stellar! I used Krylon satin black on the outside. Covered perfectly. New screen on the feed nipple, and I am throwing teflon tape on the threads just for grins. A lot of tape, I think. Good luck, and roll that tank till your arms ache each time, observing the timing for each product use. John |
|
|
|
| realred914 |
May 10 2010, 11:30 AM
Post
#14
|
|
Senior Member Group: Retired Members Posts: 1,086 Joined: 1-April 10 From: california Member No.: 11,541 Region Association: None |
QUOTE(avidfanjpl @ May 10 2010, 09:42 AM) You are right behind me. I just finished my tank with the POR15 kit. It worked astoundlingly, but you must do all 3 steps in order (marine clean, metal ready(stinky and be careful! and the por15 paint, even stinkier), and dry the first two steps with air. Then in all cases, tape the tank shut and roll it around to make sure ALL surfaces get covered. The POR15 silver paint worked stunningly. POUR OUT ALL EXCESS POR15 PAINT, and I even dabbed the slight excess still left with paper towels to get the little puddle out with a clever grabber tool. I am in cure mode and reinstall it midweek. The finish of the paint inside is stellar! I used Krylon satin black on the outside. Covered perfectly. New screen on the feed nipple, and I am throwing teflon tape on the threads just for grins. A lot of tape, I think. Good luck, and roll that tank till your arms ache each time, observing the timing for each product use. John teflon tape wont help any leaks on the threads, the seal is with the gasket, not the threads. might make them easier to lossen later however, but anit-sieze is made for that function. I'd anti-sieze the threads rather than teflon tape them. the key to a leak free fitting is in the gasket and having correct tightness of the nut to make the gasket seal. these are not pipe threads, so the tape is really not appropreiate here. |
|
|
|
| Pat Garvey |
May 13 2010, 05:01 PM
Post
#15
|
|
Do I or don't I...........? Group: Members Posts: 5,899 Joined: 24-March 06 From: SE PA, near Philly Member No.: 5,765 Region Association: North East States |
QUOTE(McMark @ May 9 2010, 01:21 PM) There should be three very fine wires on the sender. You can flush the tank with MetalReady to convert the rust. Still waiting to hear about metal ready. All I have is a very thin coating of oxidation (I can wipe it off with my finger). Don't want to re-boil if not necessary. Pat |
|
|
|
| Pat Garvey |
May 13 2010, 05:08 PM
Post
#16
|
|
Do I or don't I...........? Group: Members Posts: 5,899 Joined: 24-March 06 From: SE PA, near Philly Member No.: 5,765 Region Association: North East States |
There are at least Two distinct shades of black paint used on the 914 gas tanks. I believe it is somewhat year model dependant, but I do not have the dates. one color is a very black semigloss, the other is a lighter black, a very dark dark grey. I have seen these two varaitions enough to be convinced they are two different factory colors. so if you want originality, I suggest some research into what your year model (or serial number sequence) should have. paint for a 356 gas tank may not be right, there is more than one variation of that color too. as these cars become more valuable and classics, more folks will pay attention to the small thing like the correct shade of black for the gas tank, and one day there will be concours guys telling you you got the wrong color based on your build date or some other detail. if you want it right, you need some research. one size does NOT fit all for 914 gas tank colors. you have to ask your self, is this supposed to be the black tank or the dark gray tank? time for some research!!!! (IMG:style_emoticons/default/driving.gif) (IMG:style_emoticons/default/driving.gif) (IMG:style_emoticons/default/driving.gif) (IMG:style_emoticons/default/driving.gif) [/quote] I'm very much aware that there are differences in the gas tank color, afte nearly 40 years of 914 ownership. In fact, there are THREE different shades. The third has a hin of brown to it. Mine is the gray/black derivitive, si I'll be painting the new tank to that spec. Believe me, I'm ready for any concours "judge" to tell me something isn't correct for my 914. In fact, I dare them! Pat |
|
|
|
| tod914 |
May 13 2010, 05:50 PM
Post
#17
|
|
Advanced Member Group: Members Posts: 3,755 Joined: 19-January 03 From: Lincoln Park, NJ Member No.: 170 |
Pat the Metal Ready will get rid of the flash rust and leave a zinc coating. Probally not necessary, but you could do the Marine clean prior to the Metal Ready. Doesn't look like you need a liner in it. You should flush it with cold water after sloshing it around with the Metal Ready. Looks like a very good tank. Every tank will flash rust after it's boiled out. Not a big deal. The Bill Hirsch kit works well. Had that done on my 1975 car. It forms a rubbery bladder inside the tank. Won't have to worry about it chipping off at some point.
|
|
|
|
|
1 User(s) are reading this topic (1 Guests and 0 Anonymous Users)
0 Members:

|
Lo-Fi Version | Time is now: 9th June 2024 - 03:00 AM |
Invision Power Board
v9.1.4 © 2024 IPS, Inc.