|
|
|
Porsche, and the Porsche crest are registered trademarks of Dr. Ing. h.c. F. Porsche AG.
This site is not affiliated with Porsche in any way. Its only purpose is to provide an online forum for car enthusiasts. All other trademarks are property of their respective owners. |
|
|


| ripper911 |
 Aug 27 2011, 12:03 PM Aug 27 2011, 12:03 PM
Post
#1
|
|
corde pulsum tangite  Group: Members Posts: 2,920 Joined: 25-April 10 From: Powder Springs, GA Member No.: 11,654 Region Association: South East States |
This next weekend I'm planning on painting my trunk lids black, and probably applying positive side stripes.
What would be a good method for filling in the holes in the rear trunk lid where the bolts for the luggage rack now reside? |
   |

 
|
  |
Replies(1 - 19)
| tod914 |
Aug 27 2011, 12:46 PM
Post
#2
|
|
Advanced Member Group: Members Posts: 3,755 Joined: 19-January 03 From: Lincoln Park, NJ Member No.: 170 |
Rear lids are fairly cheap.. get one without holes?
|
|
|
|
| underthetire |
Aug 27 2011, 12:59 PM
Post
#3
|
|
914 Guru Group: Members Posts: 5,062 Joined: 7-October 08 From: Brentwood Member No.: 9,623 Region Association: Northern California |
I agree with a replacement, but if not available, I recommend welding then glazing. A trunk lid gets flexed when opening and closing, would probably crack filler without something solid.
|
|
|
|
| SirAndy |
Aug 27 2011, 01:08 PM
Post
#4
|
|
Resident German Group: Admin Posts: 42,469 Joined: 21-January 03 From: Oakland, Kalifornia Member No.: 179 Region Association: Northern California |
QUOTE(ripper911 @ Aug 27 2011, 11:03 AM)  What would be a good method for filling in the holes in the rear trunk lid where the bolts for the luggage rack now reside? (IMG:style_emoticons/default/welder.gif) |
|
|
|
| r_towle |
Aug 27 2011, 01:11 PM
Post
#5
|
|
Custom Member Group: Members Posts: 24,705 Joined: 9-January 03 From: Taxachusetts Member No.: 124 Region Association: North East States |
I know you are cheap, and I cant remember if welding is on the menu for you.
One option is to go to Home Depot and get the little stainless steel caps that are used for random holes in sinks....just snap those in and move on...if you ever want to put the luggage rack back on, you can. You could also find some stainless nut certs....its a standoff threaded bung that you can bolt into the hole...again its for future luggage rack usage...and they also come with snap in plugs to keep the threads clean. Rich |
|
|
|
| ripper911 |
Aug 27 2011, 02:23 PM
Post
#6
|
|
corde pulsum tangite Group: Members Posts: 2,920 Joined: 25-April 10 From: Powder Springs, GA Member No.: 11,654 Region Association: South East States |
I was considering just buying a replacement, but if I can just fill in the holes easily while the lids are off I figured that would be the way to go.
No, I don't weld, maybe JB weld... |
|
|
|
| GeorgeRud |
Aug 27 2011, 04:18 PM
Post
#7
|
|
Advanced Member Group: Members Posts: 3,725 Joined: 27-July 05 From: Chicagoland Member No.: 4,482 Region Association: Upper MidWest |
The JB Weld will probably crack out as the sheet metal flexes.
Well nuts may not be that bad of an idea if you can't find a good lid. |
|
|
|
| 904svo |
Aug 27 2011, 04:30 PM
Post
#8
|
|
904SVO Group: Members Posts: 1,129 Joined: 17-November 05 From: Woodstock,Georgia Member No.: 5,146 |
Call Al, I think he has some. If not call Al ( to set up a time and place) and I can weld up the holes for you.
|
|
|
|
| ripper911 |
Aug 27 2011, 06:41 PM
Post
#9
|
|
corde pulsum tangite Group: Members Posts: 2,920 Joined: 25-April 10 From: Powder Springs, GA Member No.: 11,654 Region Association: South East States |
QUOTE(904svo @ Aug 27 2011, 06:30 PM) Call Al, I think he has some. If not call Al ( to set up a time and place) and I can weld up the holes for you. Yeah, I was going to call him to see. |
|
|
|
| Andyrew |
Aug 27 2011, 06:43 PM
Post
#10
|
|
Spooling.... Please wait Group: Members Posts: 13,380 Joined: 20-January 03 From: Riverbank, Ca Member No.: 172 Region Association: Northern California |
Make friends with a welder. Filling those holes takes all of 5 minutes.. Assuming you grind the area first to metal so they have something TO weld.
|
|
|
|
| dion9146 |
Aug 27 2011, 08:06 PM
Post
#11
|
|
Member Group: Members Posts: 469 Joined: 16-May 04 From: Buckner, KY Member No.: 2,071 Region Association: MidAtlantic Region |
I did this a long time ago on my first 914. It was quickly becoming an autocross weapon, so I just filled them with fiberglass patches, filler and sanded smooth. Held up great for 3 years with no cracking. Not the prettiest underneath because I didn't care, but it worked fine for me at the time. i still have the lid in my spare parts pile.
I'd weld them now. Dion |
|
|
|
| Eric_Shea |
Aug 27 2011, 11:22 PM
Post
#12
|
|
PMB Performance Group: Admin Posts: 19,304 Joined: 3-September 03 From: Salt Lake City, UT Member No.: 1,110 Region Association: Rocky Mountains |
If you can't find a friend with a welder. Get a new lid. Not easy to weld because of the flex in the metal from the heat.
I remember a cool trick from the old VW days. A trim delete was a cool option back in the 70s. The way they did it to avoid flex was to form a donut of clay around the hole to absorb the heat from the weld. |
|
|
|
| pcar916 |
Aug 28 2011, 06:48 AM
Post
#13
|
|
Is that a Lola? Group: Members Posts: 1,524 Joined: 2-June 05 From: Little Rock, AR Member No.: 4,188 Region Association: None |
I would do one of two things. Both have mentioned above.
My choice #1 (per R_Towle) I'd plug the holes with a good looking plug. Either stainless with a seal of some sort, or color-coordinated plastic ones that are self-sealing, but need to be replaced every now and then. Choice #2 is get another lid and hang yours up on the wall. You're likely going to have to paint a replacement anyway. (IMG:style_emoticons/default/beerchug.gif) |
|
|
|
| windforfun |
Aug 28 2011, 09:28 AM
Post
#14
|
|
Advanced Member Group: Members Posts: 2,097 Joined: 17-December 07 From: Blackhawk, CA Member No.: 8,476 Region Association: None |
QUOTE(pcar916 @ Aug 28 2011, 05:48 AM) I would do one of two things. Both have mentioned above. My choice #1 (per R_Towle) I'd plug the holes with a good looking plug. Either stainless with a seal of some sort, or color-coordinated plastic ones that are self-sealing, but need to be replaced every now and then. Choice #2 is get another lid and hang yours up on the wall. You're likely going to have to paint a replacement anyway. (IMG:style_emoticons/default/beerchug.gif) (IMG:style_emoticons/default/agree.gif) (IMG:style_emoticons/default/agree.gif) (IMG:style_emoticons/default/agree.gif) |
|
|
|
| rick 918-S |
Aug 28 2011, 09:30 AM
Post
#15
|
|
Hey nice rack! -Celette Group: Members Posts: 21,239 Joined: 30-December 02 From: Now in Superior WI Member No.: 43 Region Association: Northstar Region |
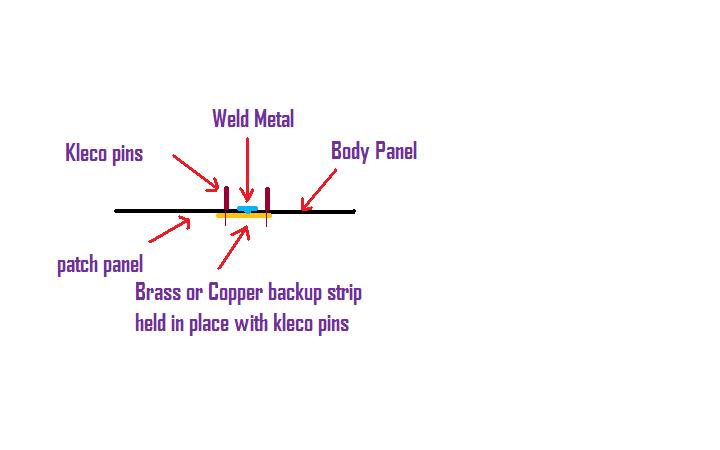
(IMG:style_emoticons/default/welder.gif) When welding holes specially in something like a trunk lid you can take a piece of copper tubing and hammer it flat. Either fasten it to the underside of the lid with cleco fasteners, sheet metal screws or clamps. The weld metal won't stick to the copper and the copper will act as a heat sink and also stiffen up the lid to reduce the possability of warping the lid. (IMG:style_emoticons/default/welder.gif)
 |
|
|
|
| VaccaRabite |
Aug 28 2011, 11:53 AM
Post
#16
|
|
En Garde! Group: Admin Posts: 13,845 Joined: 15-December 03 From: Dallastown, PA Member No.: 1,435 Region Association: MidAtlantic Region |
(IMG:style_emoticons/default/agree.gif)
I would use a magnetic clamp over Klecos so that there would not be extra holes to fill. Copper works great. I got a short length Of copper pipe from the off cut bin at Ace for pennies and cut off bits of it as needed. Zach |
|
|
|
| ripper911 |
Sep 2 2011, 05:07 PM
Post
#17
|
|
corde pulsum tangite Group: Members Posts: 2,920 Joined: 25-April 10 From: Powder Springs, GA Member No.: 11,654 Region Association: South East States |
I've started the painting process.
Went and bought a rear lid from Al, but it has holes near the rear of it, so I got a spoiler too. Bought sidestripes, engine grill lettering, and the plastic rollers for the rear trunk from AA. Gut the wrong sidestripes, so I have to go back tomorrow and get the 914 size. Pulled off the front trunk and engine lid, sanded everything and got a coat of primer on all of it today. |
|
|
|
| saigon71 |
Sep 2 2011, 05:14 PM
Post
#18
|
|
Advanced Member Group: Members Posts: 2,020 Joined: 1-June 09 From: Dillsburg, PA Member No.: 10,428 Region Association: MidAtlantic Region |
Thanks for all the info here gents...I too, have a luggage rack that needs to go!
|
|
|
|
| bigkensteele |
Sep 2 2011, 05:25 PM
Post
#19
|
|
Major Member Group: Members Posts: 2,200 Joined: 30-August 04 From: Cincinnati, OH Member No.: 2,660 Region Association: South East States |
QUOTE(rick 918-S @ Aug 28 2011, 07:30 AM) (IMG:style_emoticons/default/welder.gif) When welding holes specially in something like a trunk lid you can take a piece of copper tubing and hammer it flat. Either fasten it to the underside of the lid with cleco fasteners, sheet metal screws or clamps. The weld metal won't stick to the copper and the copper will act as a heat sink and also stiffen up the lid to reduce the possability of warping the lid. (IMG:style_emoticons/default/welder.gif) Eastwood sells a tool for this. Not cheap, but it won't break the bank either. Of course he has already bought a new lid, so it is moot now. Eastwood copper welding thingee |
|
|
|
| ripper911 |
Sep 2 2011, 05:51 PM
Post
#20
|
|
corde pulsum tangite Group: Members Posts: 2,920 Joined: 25-April 10 From: Powder Springs, GA Member No.: 11,654 Region Association: South East States |
(IMG:style_emoticons/default/thisthreadisworthlesswithoutpics.gif)
Here is the reason for doing this, a large bubble in the paint on the front. (IMG:http://www.914world.com/bbs2/uploads_offsite/i921.photobucket.com-11654-1315007515.1.jpg) I call that the hood emblem New lid (IMG:http://www.914world.com/bbs2/uploads_offsite/i921.photobucket.com-11654-1315007516.2.jpg) My dad sanding on the front lid. (IMG:http://www.914world.com/bbs2/uploads_offsite/i921.photobucket.com-11654-1315007516.3.jpg) and spraying the primer. (IMG:http://www.914world.com/bbs2/uploads_offsite/i921.photobucket.com-11654-1315007516.4.jpg) |
|
|
|
|
1 User(s) are reading this topic (1 Guests and 0 Anonymous Users)
0 Members:

|
Lo-Fi Version | Time is now: 2nd April 2026 - 11:38 AM |
Invision Power Board
v9.1.4 © 2026 IPS, Inc.