|
|
|
Porsche, and the Porsche crest are registered trademarks of Dr. Ing. h.c. F. Porsche AG.
This site is not affiliated with Porsche in any way. Its only purpose is to provide an online forum for car enthusiasts. All other trademarks are property of their respective owners. |
|
|


| watsonrx13 |
 Jul 25 2004, 07:25 PM Jul 25 2004, 07:25 PM
Post
#1
|
|
Advanced Member  Group: Members Posts: 2,735 Joined: 18-February 03 From: Plant City, FL Member No.: 312 Region Association: South East States |
Well, after all of the various discussions lately about how to remove the glue from the engine firewall, I decided I would try it today. I got about 95% finished, but let me first describe what I did to complete this project.
First off, it appears that no one has found anything that will take the glue off, without removing part of the paint. So with that in mind I decided that I would not only remove the glue, but also the paint. Along with the paint removal, I also decided to remove the tabs, that held up the engine pad, and fill in any extraneous holes. I also had a broken engine lid hinge, so I might as well replace that. OK, first I needed to remove the back pad inside the car. This would allow me to do any welding without burning the pad. First, remove the seats (everyone knows about the tab opposite the adjustment handle needs to be pressed in). Unscrew the engine lid knob. Unscrew the plate behind the knob. Unscrew the (4) screws that hold the back pad. Slightly pull the bottom of the back pad out, which will cause the tabs on the back of the pads to drop down out of the brackets. Attached image(s) 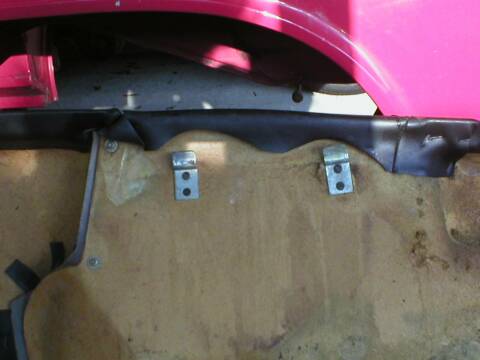
|
   |

 
|
  |
Replies(1 - 8)
| watsonrx13 |
Jul 25 2004, 07:26 PM
Post
#2
|
|
Advanced Member Group: Members Posts: 2,735 Joined: 18-February 03 From: Plant City, FL Member No.: 312 Region Association: South East States |
Remove the back pad from the car.
Attached image(s) 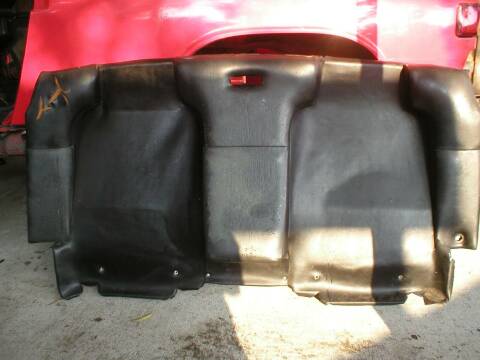
|
|
|
|
| watsonrx13 |
Jul 25 2004, 07:27 PM
Post
#3
|
|
Advanced Member Group: Members Posts: 2,735 Joined: 18-February 03 From: Plant City, FL Member No.: 312 Region Association: South East States |
There is an insulation pad that is glued to the firewall. Carefully remove this. There should only be a half dozen areas that are actually glued.
I used a scraper, with the razor removed. Attached image(s) 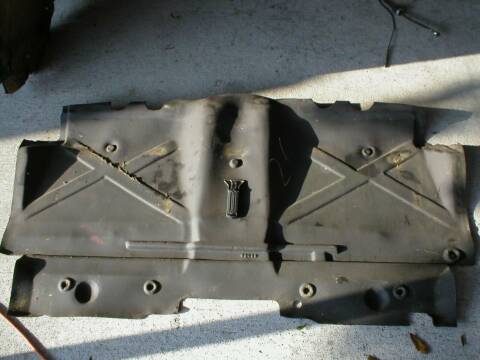
|
|
|
|
| watsonrx13 |
Jul 25 2004, 07:28 PM
Post
#4
|
|
Advanced Member Group: Members Posts: 2,735 Joined: 18-February 03 From: Plant City, FL Member No.: 312 Region Association: South East States |
Unbolt the lower bolt from the seat belt retractor.
Remove the insulation pad from the car. Since the window rattled, I decided to remove it next. First, lift the plastic covering on the coat hook and screw it. Unscrew the sheet metal screw from the inner targa piece, then remove this piece. Remove the plastic plugs from the targa center piece, then screw the sheet metal screws. I recommend removing the (5) screws that are on the bottom first, then the (7) horizontal screws. Also, start at one side and work your way to the other side. This process can take a long time, as the screws are not always pointed in a direct line, sometimes you'll need to 'fish' around for the screw. Again, take your time. Remove the center piece from the car Carefully remove the rear window. Be careful because it is made of glass. Remove from car. Now that everything is removed from the inside of the car, I can now weld in the engine compartment. There was (5) large holes and various small one. I also had (2) holes that I welded up that was associated with the A/C wiring. Weld in the engine lid bracket. I had earlier gound the tabs off. Attached image(s) 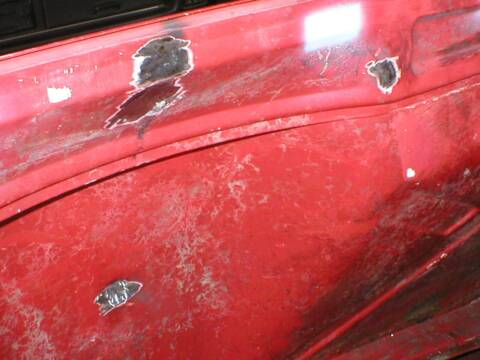
|
|
|
|
| watsonrx13 |
Jul 25 2004, 07:28 PM
Post
#5
|
|
Advanced Member Group: Members Posts: 2,735 Joined: 18-February 03 From: Plant City, FL Member No.: 312 Region Association: South East States |
I have now finally arrived at the point of this post, remove glue and paint from the engine firewall.
I begin the process using aircraft stripper. The secret to using this is to apply generously, in an area no larger then 3' x 3', and let the chemical work at least 45 minutes. This chemical will cause the paint to lift. A note, this chemical is very caustic and you will get it on you. Always have a bucket/bowl of water, with a wash cloth, immediately available. When you get it on you, wipe it off with the wet cloth. After the chemical has worked it's 'magic', use a small scraper to remove the paint. You will not get all of the paint off, but you should get the majority of it. Sometimes you'll need to make several applications. Attached image(s) 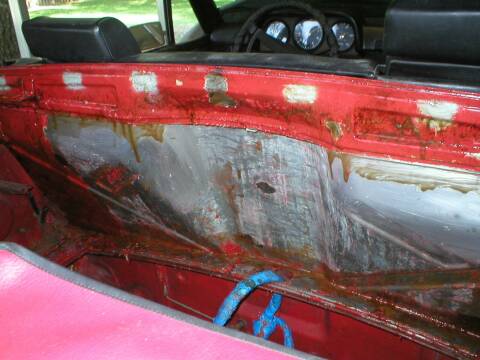
|
|
|
|
| watsonrx13 |
Jul 25 2004, 07:29 PM
Post
#6
|
|
Advanced Member Group: Members Posts: 2,735 Joined: 18-February 03 From: Plant City, FL Member No.: 312 Region Association: South East States |
Once you have gotten to a point where the application is no longer working, you'll next need to use laquer thinner. This is also a caustic chemical, so be careful. I applied the thinner in a small area. You'll need to use some 'elbow grease' to remove the final paint. After a small section has been completed, wipe down with a paper towel.
Attached image(s) 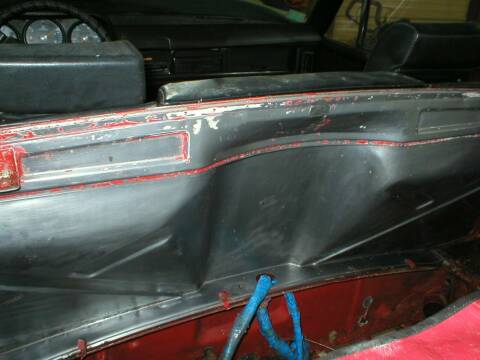
|
|
|
|
| watsonrx13 |
Jul 25 2004, 07:29 PM
Post
#7
|
|
Advanced Member Group: Members Posts: 2,735 Joined: 18-February 03 From: Plant City, FL Member No.: 312 Region Association: South East States |
After all of the paint has been removed, I wiped the bare metal with Ospho. I use a spray bottle, rub with scotch brite, then wipe down with a clean bath towel. This will protect the metal for about a month. I recommend painting with an etching primer within the month.
Anyway, I was able to almost (95%) remove the glue and paint from the engine firewall within one day. I got to my shop at 7:00 am and left at 7:00 pm. I can not stress enough that if you follow this process, be very careful using the aircraft stripper. Attached image(s) 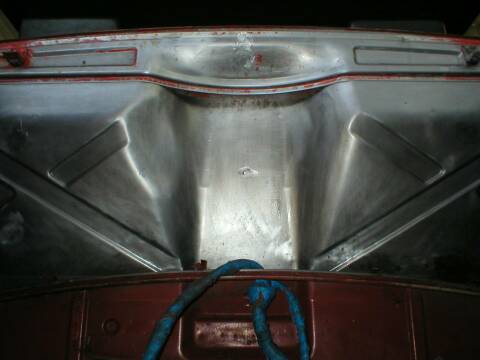
|
|
|
|
| newdeal2 |
Jul 25 2004, 09:06 PM
Post
#8
|
|
Unregistered |
How did you protect the wiring harness from the stripper?
|
|
|
|
| rhodyguy |
Jul 25 2004, 11:15 PM
Post
#9
|
|
Chimp Sanctuary NW. Check it out. Group: Members Posts: 22,249 Joined: 2-March 03 From: Orion's Bell. The BELL! Member No.: 378 Region Association: Galt's Gulch |
nice job. i found the masking tape quite the ordeal. after i finnished i saw a post where the owner wrapped the harness with aluminum foil. i bet that's much easier to remove. the aircraft stripper seems to have done its task. i used carb cleaner. it wasn't quite as fast.
kevin |
|
|
|
|
1 User(s) are reading this topic (1 Guests and 0 Anonymous Users)
0 Members:

|
Lo-Fi Version | Time is now: 8th July 2025 - 03:49 PM |
Invision Power Board
v9.1.4 © 2025 IPS, Inc.