|
|
|
Porsche, and the Porsche crest are registered trademarks of Dr. Ing. h.c. F. Porsche AG.
This site is not affiliated with Porsche in any way. Its only purpose is to provide an online forum for car enthusiasts. All other trademarks are property of their respective owners. |
|
|


| partwerks |
 Dec 3 2011, 09:12 PM Dec 3 2011, 09:12 PM
Post
#1
|
|
Senior Member  Group: Members Posts: 1,593 Joined: 7-September 06 From: Grand Island, NE Member No.: 6,787 |
While I was there I asked my mechanic if he would be interested in installing that longitudinal kit and he quoted me $750.00. Does that price sound about right or is he too high again?
I can always stop by a body shop for an estimate also, but if worse comes to worse, I would rather pay more and have it done right as opposed to cheaper and screw it up for me. |
   |

 
|
  |
Replies(1 - 19)
| carr914 |
Dec 3 2011, 09:22 PM
Post
#2
|
|
Racer from Birth Group: Members Posts: 118,899 Joined: 2-February 04 From: Tampa,FL Member No.: 1,623 Region Association: South East States |
If it's an Engman Kit it is Too Much, but then again I have friends that Weld.
And if they haven't done one before, well that is a crapshoot |
|
|
|
| partwerks |
Dec 3 2011, 09:40 PM
Post
#3
|
|
Senior Member Group: Members Posts: 1,593 Joined: 7-September 06 From: Grand Island, NE Member No.: 6,787 |
It's the Engman kit. What should be a more realistic labor charge for something of that nature?
|
|
|
|
| sean_v8_914 |
Dec 4 2011, 02:32 AM
Post
#4
|
|
Chingon 601 Group: Members Posts: 4,011 Joined: 1-February 05 From: San Diego Member No.: 3,541 |
a quick hack job with little attention to detail can be done in 5 hours. installation quality/cost can be cut deeper by deleting proper prep work, weld thru primer, seam sealer, paint, rust pasivation and pray that the longitudinal is not cracked at the E-brake near the floor board
|
|
|
|
| rfuerst911sc |
Dec 4 2011, 05:23 AM
Post
#5
|
|
Advanced Member Group: Members Posts: 2,158 Joined: 4-May 06 From: Dahlonega , Georgia Member No.: 5,980 Region Association: South East States |
How handy are you ? If you are not able to do the welding you should be able to do the prep. You can remove the passenger seat and all the carpet. You can remove the backpad. How about you do the sanding of the longs and the rear bottom portion of the passenger compartment so all the welder/installer has to do is line the parts up and weld. Lets face it the welding isn't that hard but it's the prep that takes time ( $$$ ). By doing the prep you can save some coin. Maybe ask on this forum if anyone near you could come do the welding for you.
|
|
|
|
| r_towle |
Dec 4 2011, 08:57 AM
Post
#6
|
|
Custom Member Group: Members Posts: 24,585 Joined: 9-January 03 From: Taxachusetts Member No.: 124 Region Association: North East States |
QUOTE(partwerks @ Dec 3 2011, 10:12 PM)  While I was there I asked my mechanic if he would be interested in installing that longitudinal kit and he quoted me $750.00. Does that price sound about right or is he too high again? I can always stop by a body shop for an estimate also, but if worse comes to worse, I would rather pay more and have it done right as opposed to cheaper and screw it up for me. It depends on a few things. How much of the interior is in the car right now? How much does your mechanic charge per hour. 10 hours @ $75 per hour to remove your interior, properly prep the area, prime it, clean all the loose rust away, weld in the kit, paint it, and then re-install your interior... All that work...sounds like ten hours to me. Rich |
|
|
|
| VaccaRabite |
Dec 4 2011, 09:41 AM
Post
#7
|
|
En Garde! Group: Admin Posts: 13,456 Joined: 15-December 03 From: Dallastown, PA Member No.: 1,435 Region Association: MidAtlantic Region |
And you need to make sure that your guy knows to brace the body so that he does not accidentally warp the car while welding in the kit.
Zach |
|
|
|
| nathansnathan |
Dec 4 2011, 10:09 AM
Post
#8
|
|
Senior Member Group: Members Posts: 1,052 Joined: 31-May 10 From: Laguna Beach, CA Member No.: 11,782 Region Association: None |
My Engmanm kit just came in and it's not as straight-forward as it looks.
You have to put the car on stands paced so that the door gaps are optimal it says in the instructions. Also the removal of all the seam sealer, there's some tricky bending to do it right at the back top, paint removal around all those holes, sanding, weldable primer, welding, grinding, sanding, primer, paint. I must say I'm not super impressed with these. It's going to take some work to get mine right. Some issues with the long kit: what about the bracket for the emergency brake? I really don't want to remove it, messing up the long and bracket to reattach it. Im planning to section out the rectangle and weld it around. Other problem, it seems the passenger side seat belt hole, I'll have to enlarge downward as it's not going to let let me get a bolt in where it's at. Since the bent radius at the top is too large, leaving a gap (inside at the corner), I'm thinking about tightening that up to bring the seatbelt hole down. I may just cut around the seat belt hole and move it down a quarter inch and live with the fatter radius. Also they go too low, overhanging the bottom of the long by like an inch - going to cut the bottom, so I can get seam sealer in there properly. The emergency brake cutout looks weird, too, not sure if it'll make more sense once I clearance for the parking brake bracket, or if that's some early late issue. I wonder, is the much cheaper version that is sold on ebay a better fit? |
|
|
|
| 3d914 |
Dec 4 2011, 10:34 AM
Post
#9
|
|
Senior Member Group: Members Posts: 1,275 Joined: 24-September 03 From: Benson, AZ Member No.: 1,191 Region Association: Southwest Region |
I have good factory primer and paint on my longs, so why remove all of that just to add new primer? I intend to mark and do spot removal of the paint only where welds occur. The time involved may be equivalent to the other way, but I just can't see undoing the factory paint and primer if not needed.
Also, I just welded my door support to the top of the long, so it looks like that will have to be moved to the upper door hinge once I get all the other long repairs done. 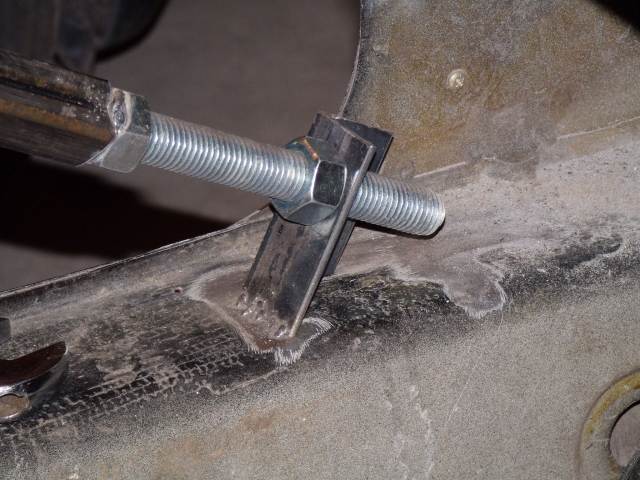 I didn't want to install the kit, then weld to the top of that for the door support. |
|
|
|
| McMark |
Dec 4 2011, 11:17 AM
Post
#10
|
|
914 Freak! Group: Retired Admin Posts: 20,179 Joined: 13-March 03 From: Grand Rapids, MI Member No.: 419 Region Association: None |
$750 is not way too much if you want it done right. You're talking about a serious installation that can result in a bent chassis if done incorrectly. Remove interior, clean and prep, careful installation, post welding cleanup and paint, reinstall interior. Definitely 10 hours of work.
I don't like installing bracing when installing these kits because I feel like it's a crutch that makes people feel like they're safe. I've installed quite a few of them. I've never used bracing, and I've never had a problem. I place a floor jack in the middle of the long and lift enough to relieve any pressure to bend. Then I weld slowly, taking time between each rosette weld. I modified two drill bits to help in prepping each weld. I have one with a step in it to clean the e-coat off just around the circle. Then I have another that I've dulled completely flat to remove the paint from the existing long. This way I have clean metal to weld, and I do this one hole at a time, in order to take up more time between welds. QUOTE I must say I'm not super impressed with these. It's going to take some work to get mine right. Then you're misunderstanding something or your car is messed up. They drop right in once you've cleaned everything correctly. You don't need to remove the E-Brake pieces. Just take 2minutes and cut out the notch you're thinking of (as long as your car is early). You need to make sure your floor pan isn't buckled upwards. MOST cars have wrinkled floor pans. Sorry if I sound defensive, but Mark (Engman) spent a lot of time getting these right and has gone through a bunch of changes from the first design. All in the name of making sure they fit cars as well as possible out of the box. All aftermarket products must be approached with an eye for what needs to be modified to make it work on your car. Some companys build better aftermarket parts than others. And you obviously haven't installed many, because Mark's stuff fits GREAT compared to most others. Once you do your job right, as the installer, you'll see how well it fits. If the top and the sides aren't sitting absolutely flat, you're doing something wrong. |
|
|
|
| mepstein |
Dec 4 2011, 11:53 AM
Post
#11
|
|
914-6 GT in waiting Group: Members Posts: 19,307 Joined: 19-September 09 From: Landenberg, PA/Wilmington, DE Member No.: 10,825 Region Association: MidAtlantic Region |
QUOTE(partwerks @ Dec 3 2011, 10:12 PM) While I was there I asked my mechanic if he would be interested in installing that longitudinal kit and he quoted me $750.00. Does that price sound about right or is he too high again? I can always stop by a body shop for an estimate also, but if worse comes to worse, I would rather pay more and have it done right as opposed to cheaper and screw it up for me. Your 2nd paragraph says it all. There is one very expensive build on this board that was done wrong and messed up the door gaps. He has still not finished the car after 5 years. Do a search and read through some past threads on installing this kit. It's a lot of prep, time and work to do it right. If you trust your mechanic to do a good job, $750 is not out of line. |
 |
|
| 3d914 |
Dec 4 2011, 11:56 AM
Post
#12
|
|
Senior Member Group: Members Posts: 1,275 Joined: 24-September 03 From: Benson, AZ Member No.: 1,191 Region Association: Southwest Region |
Mark, thanks for the tips. I hadn't decided how I was gong to get the paint/primer removed only where the holes were at (probably mark-it, remove panel, paint removal from marked spots, replace panel, start welding). I like the dull drill approach.
I don't recall if it was engman's kit or another, but I was told there no prep needed for welding. What's the e-coating that needs to be cleaned off first? |
|
|
|
| McMark |
Dec 4 2011, 12:00 PM
Post
#13
|
|
914 Freak! Group: Retired Admin Posts: 20,179 Joined: 13-March 03 From: Grand Rapids, MI Member No.: 419 Region Association: None |
It doesn't need to be cleaned off. But I figure it's easy enough, why not.
|
|
|
|
| nathansnathan |
Dec 4 2011, 12:12 PM
Post
#14
|
|
Senior Member Group: Members Posts: 1,052 Joined: 31-May 10 From: Laguna Beach, CA Member No.: 11,782 Region Association: None |
QUOTE(McMark @ Dec 4 2011, 09:17 AM) $750 is not way too much if you want it done right. You're talking about a serious installation that can result in a bent chassis if done incorrectly. Remove interior, clean and prep, careful installation, post welding cleanup and paint, reinstall interior. Definitely 10 hours of work. I don't like installing bracing when installing these kits because I feel like it's a crutch that makes people feel like they're safe. I've installed quite a few of them. I've never used bracing, and I've never had a problem. I place a floor jack in the middle of the long and lift enough to relieve any pressure to bend. Then I weld slowly, taking time between each rosette weld. I modified two drill bits to help in prepping each weld. I have one with a step in it to clean the e-coat off just around the circle. Then I have another that I've dulled completely flat to remove the paint from the existing long. This way I have clean metal to weld, and I do this one hole at a time, in order to take up more time between welds. QUOTE I must say I'm not super impressed with these. It's going to take some work to get mine right. Then you're misunderstanding something or your car is messed up. They drop right in once you've cleaned everything correctly. You don't need to remove the E-Brake pieces. Just take 2minutes and cut out the notch you're thinking of (as long as your car is early). You need to make sure your floor pan isn't buckled upwards. MOST cars have wrinkled floor pans. Sorry if I sound defensive, but Mark (Engman) spent a lot of time getting these right and has gone through a bunch of changes from the first design. All in the name of making sure they fit cars as well as possible out of the box. All aftermarket products must be approached with an eye for what needs to be modified to make it work on your car. Some companys build better aftermarket parts than others. And you obviously haven't installed many, because Mark's stuff fits GREAT compared to most others. Once you do your job right, as the installer, you'll see how well it fits. If the top and the sides aren't sitting absolutely flat, you're doing something wrong. I am not judging these by the same standards as replacement panels as they're not. Being all laser cut and flat, I'd hoped they'd be a better fit. Parking brake recess looks all wrong, maybe these should be late car only? 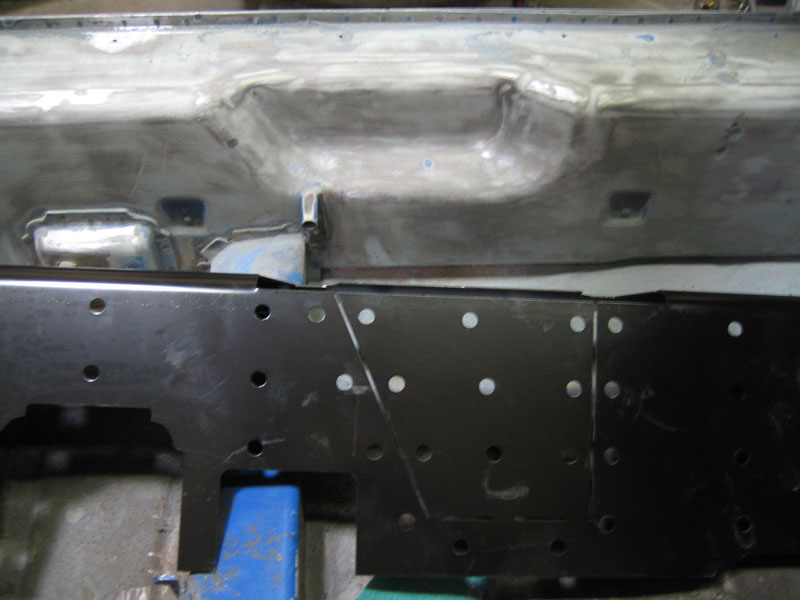 It's all the way down on top but needs a quarter inch further down on the seatbelt hole. 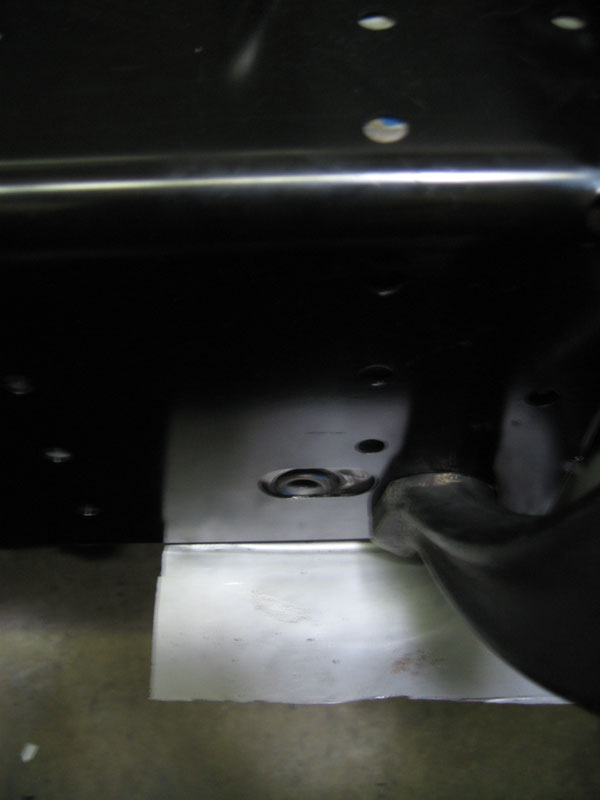 The radius, what i meant is it's too small a radius, I guess better that than too large. You can see the tricky bit to hammer down at the rear there.ddd 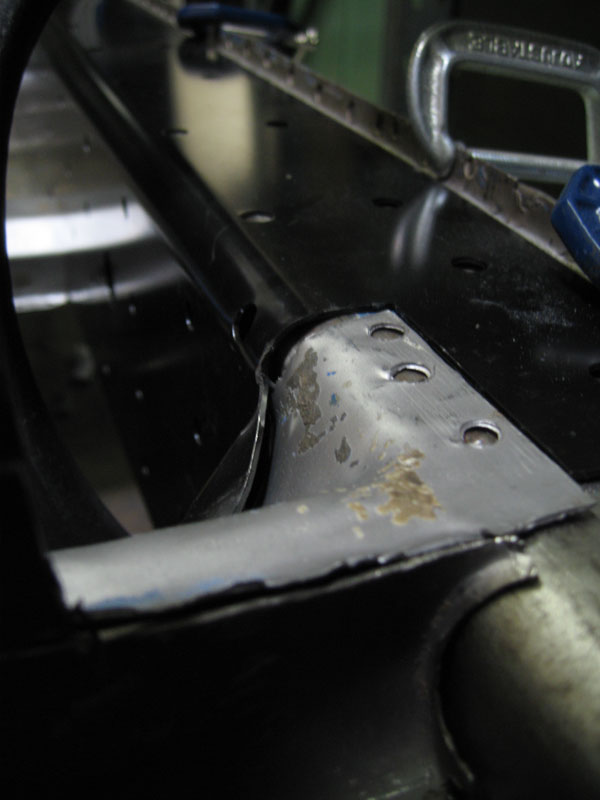 And the overhang at the bottom, seen from below outside, the floor part cut out. I don't think since that has nothing to attach to that it's going to be doing much. And it will make it difficult to apply seam sealer 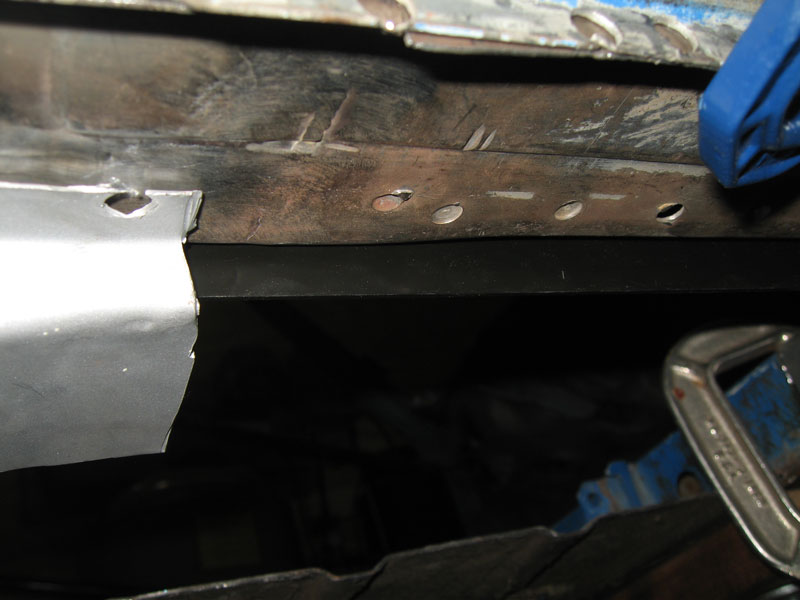 |
|
|
|
| sean_v8_914 |
Dec 4 2011, 12:17 PM
Post
#15
|
|
Chingon 601 Group: Members Posts: 4,011 Joined: 1-February 05 From: San Diego Member No.: 3,541 |
do yourself a favor and search this forum. there are several very detailed installations documented here on 914world with photos.
I an not good with the search function here. perhaps someone could find a few thread links to re-post here |
|
|
|
| sean_v8_914 |
Dec 4 2011, 12:21 PM
Post
#16
|
|
Chingon 601 Group: Members Posts: 4,011 Joined: 1-February 05 From: San Diego Member No.: 3,541 |
I have installed over a dozen Engman kits, none were black and he fixed the seat belt hole to fit the several factory locations found out there
|
|
|
|
| sean_v8_914 |
Dec 4 2011, 12:22 PM
Post
#17
|
|
Chingon 601 Group: Members Posts: 4,011 Joined: 1-February 05 From: San Diego Member No.: 3,541 |
is that a baddog kit?
|
|
|
|
| nathansnathan |
Dec 4 2011, 12:31 PM
Post
#18
|
|
Senior Member Group: Members Posts: 1,052 Joined: 31-May 10 From: Laguna Beach, CA Member No.: 11,782 Region Association: None |
I just got it through the engmann group buy here, so it should be an actual engmann kit, I would think. I will make it work, but it's going to take more than 2 minutes for the parking brake. Probably more like a week. (IMG:style_emoticons/default/smile.gif)
|
|
|
|
| Jerry75914 |
Dec 4 2011, 02:14 PM
Post
#19
|
|
Member Group: Members Posts: 124 Joined: 13-October 08 From: Half Moon Bay, CA Member No.: 9,640 Region Association: Northern California |
I installed an earlier version of the Engman kit, my first major welding job, and thanks to a lot of good advice here, went in great, no issues, a great product in my mind.
Listen to McMark. I didn't brace my doors either and had no problems. I got everything to fit, then welded the firewall section first, starting at the ends and working to the middle. That way I had the welds far away from each other, giveing them time to cool ( I also waited until I could touch them bare-handed before welding again in that area). Once that was done, I got both longitudinal pieces going at the same time, same method. That went slightly faster. I marked a spot on each door and constantly measured to see if the gap was changing. Both moved about half a mm right away, then never budged again. One suggestion about the corner radius you seem unhappy about...LEAVE IT ALONE! I also had the bright idea of hammering it tighter to the long. The result is you lose the 90 degree corner, and the edge that meets the floorpan moves away from the vertical side of the long. How fun is it to brace and weld it in place afterwards? Sucky. Overall, I love my kit, very happy to have it in the car. Get a welder, spend a lot of time doing this slowly, and you'll be fine! |
|
|
|
| hydroliftin |
Dec 5 2011, 02:33 PM
Post
#20
|
|
Member Group: Members Posts: 373 Joined: 8-November 06 From: Vallejo, CA Member No.: 7,180 Region Association: Northern California |
QUOTE(r_towle @ Dec 4 2011, 06:57 AM) It depends on a few things. How much of the interior is in the car right now? How much does your mechanic charge per hour. 10 hours @ $75 per hour to remove your interior, properly prep the area, prime it, clean all the loose rust away, weld in the kit, paint it, and then re-install your interior... All that work...sounds like ten hours to me. Rich I agree that the $750 is not out of line. I called a couple of body shops and found that they did not want this kind of project. I called a shop that specialized in roll bars and off road modifications, and they quoted about 10 hours, but they were willing to do the welding portion for about half that if I removed the interior and prepped the metal. |
|
|
|
|
1 User(s) are reading this topic (1 Guests and 0 Anonymous Users)
0 Members:

|
Lo-Fi Version | Time is now: 1st June 2024 - 02:25 PM |
Invision Power Board
v9.1.4 © 2024 IPS, Inc.