|
|
|
Porsche, and the Porsche crest are registered trademarks of Dr. Ing. h.c. F. Porsche AG.
This site is not affiliated with Porsche in any way. Its only purpose is to provide an online forum for car enthusiasts. All other trademarks are property of their respective owners. |
|
|


| rick 918-S |
 Mar 31 2012, 07:54 AM Mar 31 2012, 07:54 AM
Post
#1
|
|
Hey nice rack! -Celette  Group: Members Posts: 21,243 Joined: 30-December 02 From: Now in Superior WI Member No.: 43 Region Association: Northstar Region |
Or should I say something I don't do. I never paint over an older repaint. Here is a photo of an area I sanded showing old laquer based red oxide primer. This and the fact that the repaint could have been an older enamel without hardner is a recipe for disaster. Todays chemically activated primers and paint finishes are designed for HSLA (high strength low alloy) steel. Todays body panels are thinner and harder. Because of this the products need to chemically bond to the steel. In order the give a mechanical bond with new steel you need a 36 grit scratch to create a bond. Anyone old enough to remember the cars that came off the assembly lines in the late 80's will likely remember the paint that was peeling off in sheets. This was due to the altering of the VOC's Volatile Organic Compounds. The sealers and paints flashed too fast and couldn't lock onto the HSLA steel. So the product line was modified to include a bonding action to correct the problem.
So, as a precaustion I never use new product over old repaints. The chemicals that allow these products to lock onto the HSLA steel will eat the old soft paint finishes. 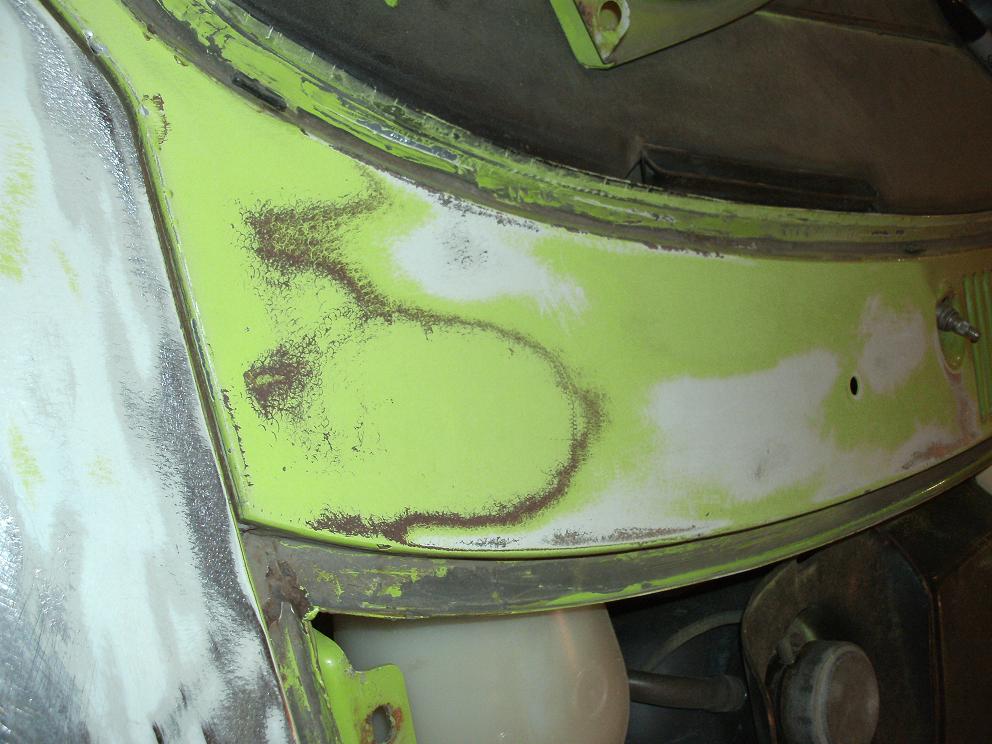 Also I always strip the cowl vent ribs. Never use a grinder on the cowl top ribs. Notice how nice and round the stamping is? It's easy to grind these things flat and thin. Don't bother using a DA or MA sander either. That just gets the flat part sanded and you end up with a funny looking flat rib. The second issue is the new paint will not stick to the unsanded and likely wax covered sides of the ribs. I use the side edge of a hardened flat blade screw driver and simply scrap the paint off to the metal. This is best done with the fresh air blower removed but you can remove the two bolts from the side brackets and push it down low enough to slip in some masking paper. It's not easy but you can do it. I still need to do the wiper pockets but you get the idea. This is an area that you just can't rush.  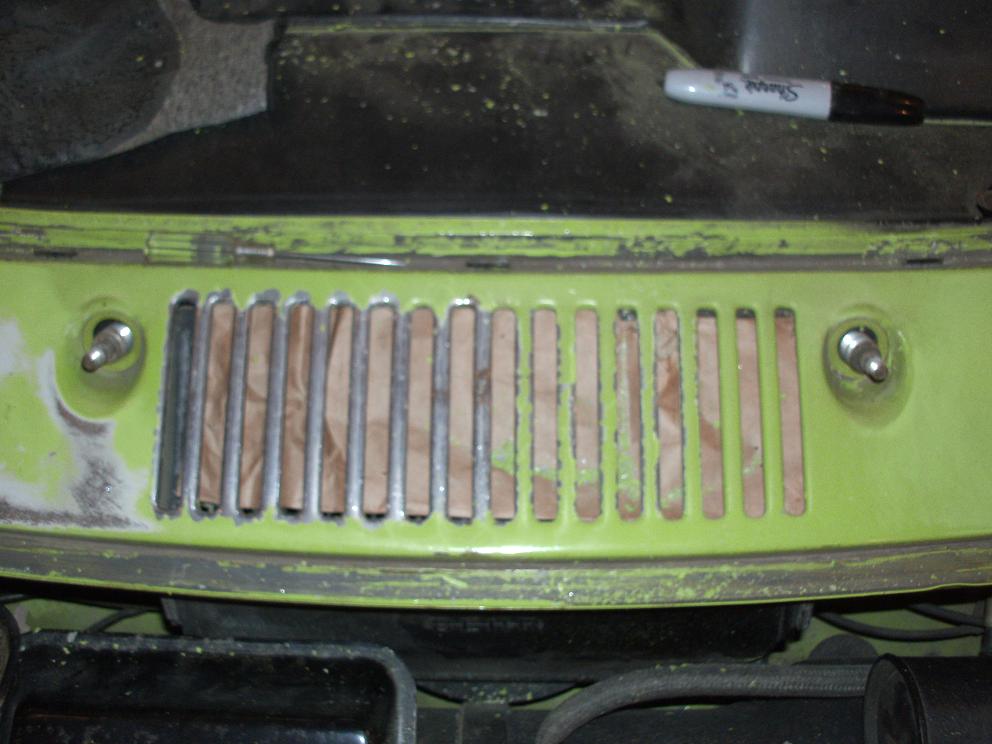 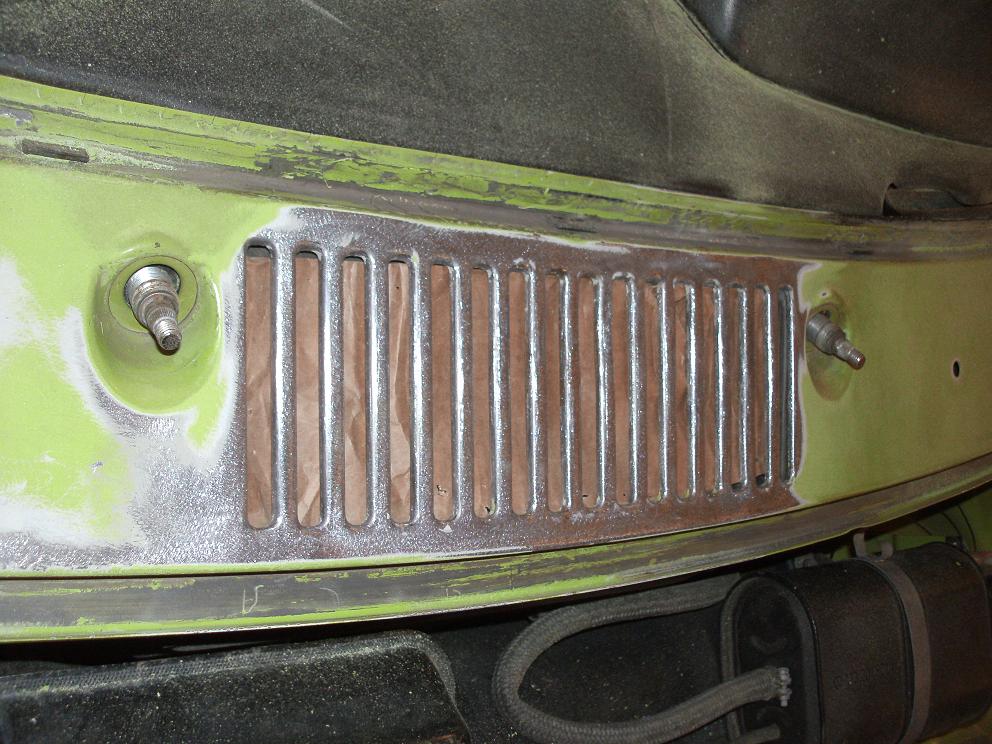 |
   |

 
|
  |
Replies(1 - 9)
| 76-914 |
Mar 31 2012, 11:45 AM
Post
#2
|
|
Repeat Offender & Resident Subaru Antagonist Group: Members Posts: 13,878 Joined: 23-January 09 From: Temecula, CA Member No.: 9,964 Region Association: Southern California |
(IMG:style_emoticons/default/poke.gif) Rick, do you keep your tools in alphabetical order, also. I wish you were my neighbor. (IMG:style_emoticons/default/pray.gif)
|
 |
|
| scotty b |
Mar 31 2012, 12:13 PM
Post
#3
|
|
rust free you say ? Group: Members Posts: 16,375 Joined: 7-January 05 From: richmond, Va. Member No.: 3,419 Region Association: None |
Not intending to highjack but this seems an appropriate thread to add this to. I just started on another 914 this week. I told the owner that these little bubbles all over the car were not a good sign. This is not a high dollar job and he didn't want to strip unless it was absolutely necessary. Once I started sanding the repaint off It became necessary to strip. In the pics you can see the progression as the bubbles got sanded flat, then I broke through to the bare metal. Under each of the bubbles was a small surface rust spot. My guess is the car had been chemically stripped before and was not properly neutralized
These are just two reasons to completely strip. You never know what is lurking under that top coat, or how many coats are lurking under it Another method for the vent grills is to use a 3" Roloc disc on a 90* pneumatic grinder. It fits really well in the grooves and makes the rounded ends easier to get at (IMG:style_emoticons/default/smile.gif) Attached image(s) 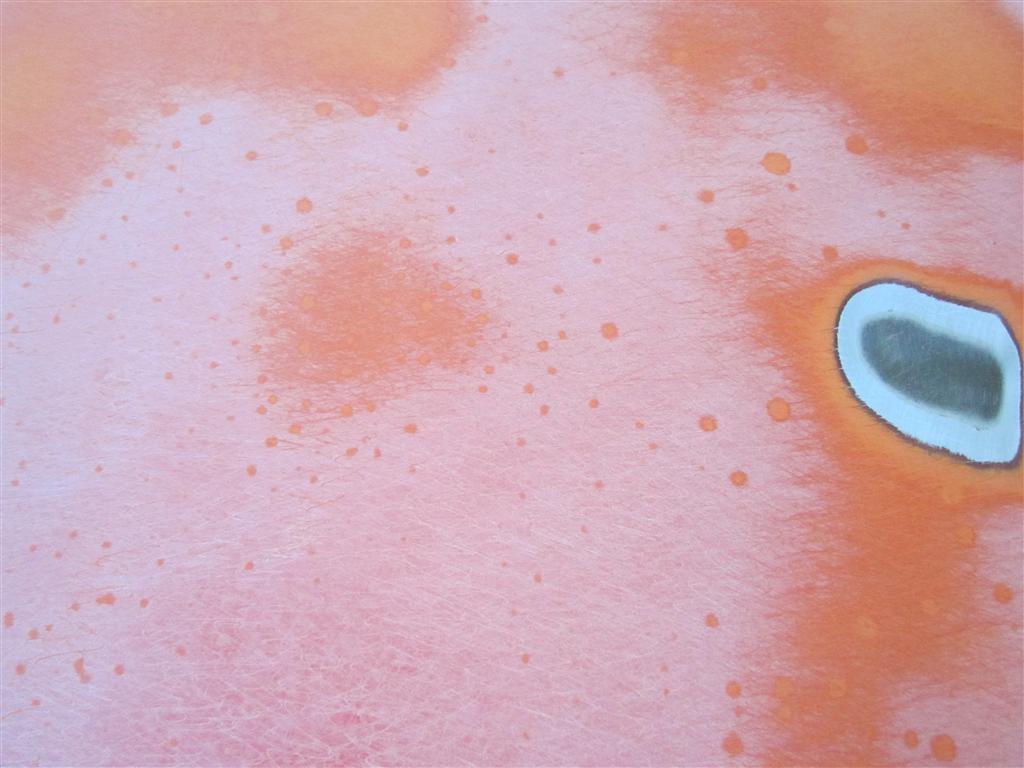 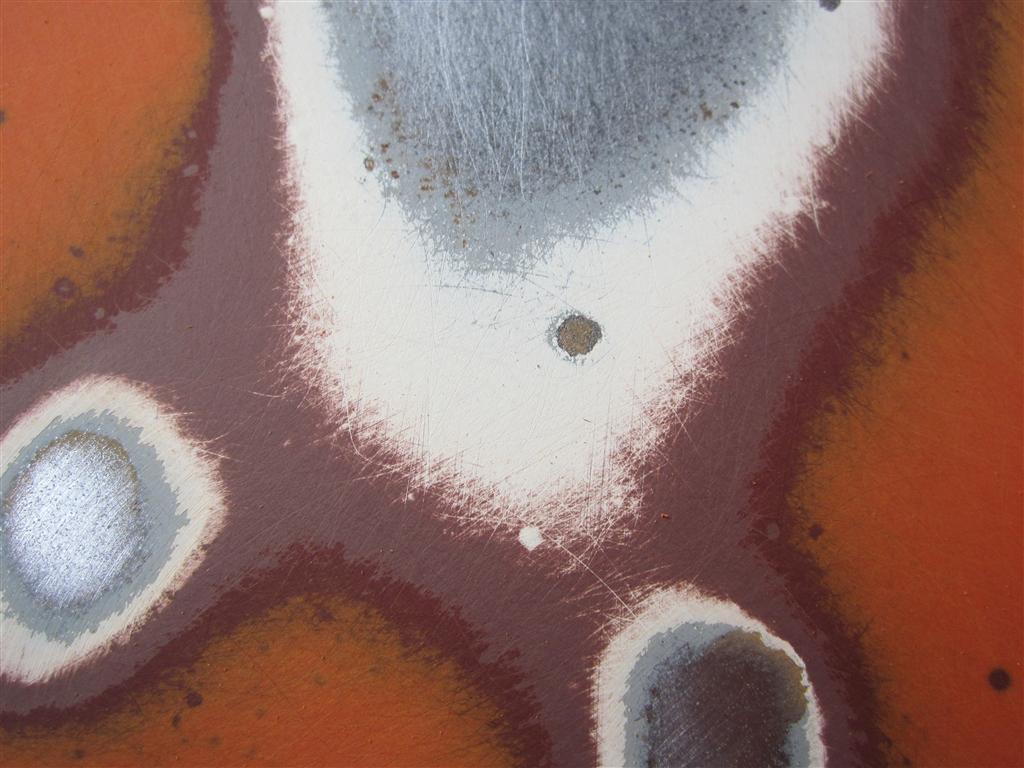 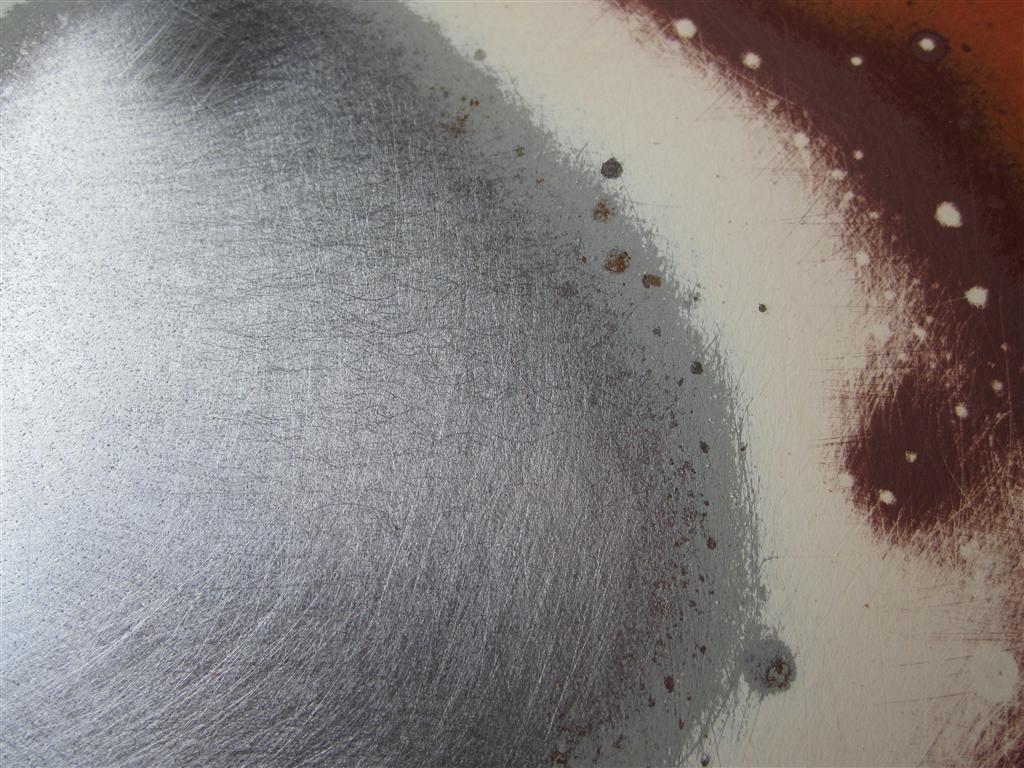
|
|
|
|
| Elliot Cannon |
Mar 31 2012, 12:33 PM
Post
#4
|
|
914 Guru Group: Retired Members Posts: 8,487 Joined: 29-December 06 From: Paso Robles Ca. (Central coast) Member No.: 7,407 Region Association: None |
Those sanding marks seem kinda deep. Does the primer fill that to make it smooth or do you sand again with finer paper and then primer or...??? (IMG:style_emoticons/default/confused24.gif)
|
|
|
|
| scotty b |
Mar 31 2012, 01:00 PM
Post
#5
|
|
rust free you say ? Group: Members Posts: 16,375 Joined: 7-January 05 From: richmond, Va. Member No.: 3,419 Region Association: None |
QUOTE(Elliot Cannon @ Mar 31 2012, 10:33 AM)  Those sanding marks seem kinda deep. Does the primer fill that to make it smooth or do you sand again with finer paper and then primer or...??? (IMG:style_emoticons/default/confused24.gif) I start at 80 grit. The etching primer, then sealer, then the high build primer will fill in most of that. |
|
|
|
| rick 918-S |
Mar 31 2012, 01:35 PM
Post
#6
|
|
Hey nice rack! -Celette Group: Members Posts: 21,243 Joined: 30-December 02 From: Now in Superior WI Member No.: 43 Region Association: Northstar Region |
QUOTE(scotty b @ Mar 31 2012, 02:00 PM) QUOTE(Elliot Cannon @ Mar 31 2012, 10:33 AM) Those sanding marks seem kinda deep. Does the primer fill that to make it smooth or do you sand again with finer paper and then primer or...??? (IMG:style_emoticons/default/confused24.gif) I start at 80 grit. The etching primer, then sealer, then the high build primer will fill in most of that. (IMG:style_emoticons/default/agree.gif) I strip with 36 grit because you can reduce your down force and cut the old finish off. Then sand again with 80 before etch primer. |
|
|
|
| jmill |
Mar 31 2012, 01:40 PM
Post
#7
|
|
Green Hornet Group: Members Posts: 2,449 Joined: 9-May 08 From: Racine, Wisconsin Member No.: 9,038 Region Association: Upper MidWest |
What size & type of sander are you guys using? Pics would be great too.
|
|
|
|
| majkos |
Mar 31 2012, 01:52 PM
Post
#8
|
|
Senior Member Group: Members Posts: 1,370 Joined: 29-February 04 From: Mile High 914 Member No.: 1,729 Region Association: Rocky Mountains |
|
|
|
|
| rick 918-S |
Mar 31 2012, 04:31 PM
Post
#9
|
|
Hey nice rack! -Celette Group: Members Posts: 21,243 Joined: 30-December 02 From: Now in Superior WI Member No.: 43 Region Association: Northstar Region |
QUOTE(jmill @ Mar 31 2012, 02:40 PM) What size & type of sander are you guys using? Pics would be great too. For fast work stripping I use an 8" sander. Some guys around here call them a mud hog. I call it a big DA. Otherwise I use a 5" MA I've had for about 25 years. |
|
|
|
| majkos |
Mar 31 2012, 06:19 PM
Post
#10
|
|
Senior Member Group: Members Posts: 1,370 Joined: 29-February 04 From: Mile High 914 Member No.: 1,729 Region Association: Rocky Mountains |
" Eight inch sander" (IMG:style_emoticons/default/new_shocked.gif)
(IMG:style_emoticons/default/biggrin.gif) Yeah THAT would do the trick! Now I need to to replace my wimpy 4 inch sander (IMG:style_emoticons/default/sad.gif) |
|
|
|
|
1 User(s) are reading this topic (1 Guests and 0 Anonymous Users)
0 Members:

|
Lo-Fi Version | Time is now: 16th April 2026 - 04:17 PM |
Invision Power Board
v9.1.4 © 2026 IPS, Inc.