|
|
|
Porsche, and the Porsche crest are registered trademarks of Dr. Ing. h.c. F. Porsche AG.
This site is not affiliated with Porsche in any way. Its only purpose is to provide an online forum for car enthusiasts. All other trademarks are property of their respective owners. |
|
|


| tumamilhem |
 Dec 27 2012, 06:23 PM Dec 27 2012, 06:23 PM
Post
#1
|
|
LUFTBRIGADE  Group: Members Posts: 1,228 Joined: 29-October 12 From: Jacksonville, FL Member No.: 15,092 Region Association: South East States |
First off, if anybody has a very good condition passenger sun visor with mirror for sale, please PM me.
So I just got another 914 and am trying to correct some parts on it so they are all in good condition. One of the items is the passenger sun visor with mirror. I have two passenger sun visors. Neither will do. Yet I am almost convinced I can make a near perfect one out of both. The first picture is the visor that came with the car I just got. The visor itself is in good condition. The foam is still soft and thick and the vinyl is in good shape. The flap covering the mirror is still attached, though there is no more Velcro to secure it (easily replaced). The problem is the mirror is broken in several pieces. And other than leaving glass fragments on the floor or passenger's lap, it is unusable. And dangerous. Pros: - good vinyl - mirror flap attached - thick, soft foam padding (matches driver side visor) Cons: - broken mirror 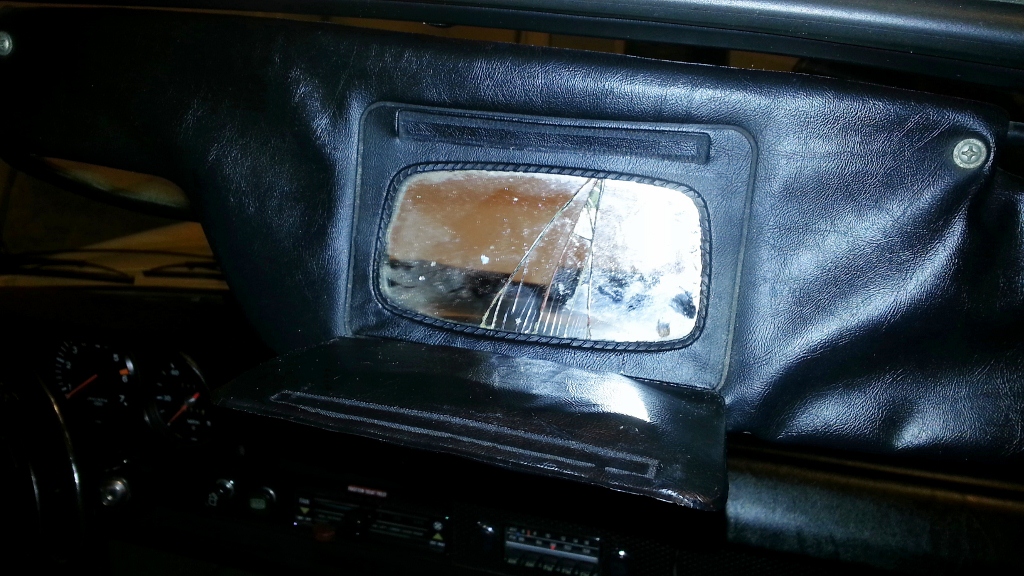 The second picture is the visor I already had. Vinyl is in good shape, mirror is in good shape, but the foam padding has disintegrated inside, breaking apart, hard and brittle and no longer thick but flat as the padding has disintegrated. There is no flap covering the mirror, not a major concern of mine but am hoping to fix. Pros: - good vinyl - good mirror Cons: - no mirror flap - disintegrated foam padding 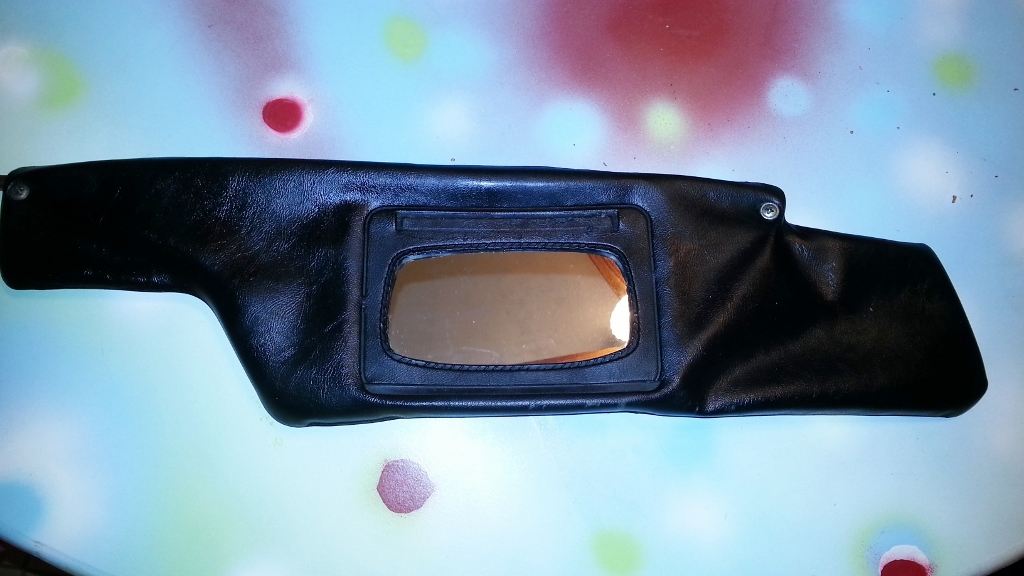 It seems the mirror cannot be removed and replaced. Otherwise I would simply remove the good mirror from one and insert it in the visor with the good padding and mirror cover. But the mirror cannot be taken out because the vinyl is "molded" around the mirror. I thought about removing the mirror cover from one visor and gorilla glue it to the one with the good mirror. It will have the flap and good mirror, though the visor is thin from disintegrated foam inside. What I am thinking is if I can cut open the seam on top of BOTH visors (the seam goes around the entire perimeter where the vinyl is molded together - you can see the seam go all the way around the visor) and REMOVE the thick, foam padding from the visor with the broken mirror and insert it into the visor with the disintegrated foam (after removing bad foam) and gorilla glue the mirror flap to it after removing it from the visor with the broken mirror. The tricky part is - how to seal the seam up again? I have seen some places sell refurbished visors. I assume they can re-seal these somehow. After all, they were two separate pieces at first to install the mirror and then presumably heat-sealed back together. Has anybody done this or know how to do this? Or any other suggestions on how to do this? Or is there a way to remove the good mirror and install it in the visor with the bad mirror? Or does anybody just have a good passenger side sun visor I can buy and not worry about imposing further ruin to two visors? |
   |

 
|
  |
Replies(1 - 19)
| ConeDodger |
Dec 27 2012, 06:41 PM
Post
#2
|
|
Apex killer! Group: Members Posts: 23,623 Joined: 31-December 04 From: Tahoe Area Member No.: 3,380 Region Association: Northern California |
You might see if 914rubber.com is still providing that service...
|
|
|
|
| scotty b |
Dec 27 2012, 06:48 PM
Post
#3
|
|
rust free you say ? Group: Members Posts: 16,375 Joined: 7-January 05 From: richmond, Va. Member No.: 3,419 Region Association: None |
Make a male + female wood mold of it.
Poke a hole in the existing visor Fill the hole with expandable foam and clamp in-between the male and female molds (IMG:style_emoticons/default/first.gif) |
|
|
|
| tumamilhem |
Dec 27 2012, 07:17 PM
Post
#4
|
|
LUFTBRIGADE Group: Members Posts: 1,228 Joined: 29-October 12 From: Jacksonville, FL Member No.: 15,092 Region Association: South East States |
QUOTE(scotty b @ Dec 27 2012, 07:48 PM)  Make a male + female wood mold of it. Poke a hole in the existing visor Fill the hole with expandable foam and clamp in-between the male and female molds (IMG:style_emoticons/default/first.gif) What would the wood mold be for? How do you mean a male and female wood mold of the visor? You lost me there. You mean a wood replica of the shape of the visor from both sides? couldn't I just use two pieces of wood that are same size or larger than the visor to clamp on either side (if that's what you're suggesting)? Where can I get expandable foam and what kind of foam? Not familiar with it. Thanks for your suggestion! And I will look into 914rubber to see if they have that service. Thank you, Rob! |
|
|
|
| wndsrfr |
Dec 27 2012, 07:17 PM
Post
#5
|
|
Senior Member Group: Members Posts: 1,430 Joined: 30-April 09 From: Rescue, Virginia Member No.: 10,318 Region Association: MidAtlantic Region |
Yes it can be done, I did it about ten years ago and have forgotten how....
Do an extensive search here and on the bird site & you should find the article with the trick. The mirror got replaced from in behind, there's a wire frame inside and I used new foam board from art store--it's sorta flexible. Actually turned out to be pretty easy, just can't recall how to seal it back up........ |
|
|
|
| tumamilhem |
Dec 27 2012, 07:25 PM
Post
#6
|
|
LUFTBRIGADE Group: Members Posts: 1,228 Joined: 29-October 12 From: Jacksonville, FL Member No.: 15,092 Region Association: South East States |
QUOTE(wndsrfr @ Dec 27 2012, 08:17 PM) Yes it can be done, I did it about ten years ago and have forgotten how.... Do an extensive search here and on the bird site & you should find the article with the trick. The mirror got replaced from in behind, there's a wire frame inside and I used new foam board from art store--it's sorta flexible. Actually turned out to be pretty easy, just can't recall how to seal it back up........ What is the bird site? I will search here, thank you so much! That would be great if I could do this! |
|
|
|
| Bob L. |
Dec 27 2012, 07:41 PM
Post
#7
|
|
Senior Member Group: Members Posts: 848 Joined: 7-August 11 From: Austin TX Member No.: 13,411 Region Association: Southwest Region |
"The bird site" is Pelican parts website. they have a chat forum and lots of great do it yourself/technical articles.
Check 'em out |
|
|
|
| euro911 |
Dec 27 2012, 07:45 PM
Post
#8
|
|
Retired & living the dream. God help me if I wake up! Group: Members Posts: 8,851 Joined: 2-December 06 From: So.Cal. & No.AZ (USA) Member No.: 7,300 Region Association: Southern California |
QUOTE(tumamilhem @ Dec 27 2012, 05:25 PM) What is the bird site? I will search here, thank you so much! That would be great if I could do this! Bird board= Pelican Parts fourm Click here |
|
|
|
| tumamilhem |
Dec 27 2012, 08:01 PM
Post
#9
|
|
LUFTBRIGADE Group: Members Posts: 1,228 Joined: 29-October 12 From: Jacksonville, FL Member No.: 15,092 Region Association: South East States |
QUOTE(wndsrfr @ Dec 27 2012, 08:17 PM) Yes it can be done, I did it about ten years ago and have forgotten how.... Do an extensive search here and on the bird site & you should find the article with the trick. The mirror got replaced from in behind, there's a wire frame inside and I used new foam board from art store--it's sorta flexible. Actually turned out to be pretty easy, just can't recall how to seal it back up........ Can't find it on here. Lots of threads on sending them off to be refurbished, but are not looking original (stitched, not seamless, no mirror, etc). Someone suggested carefully slitting the seam with an utility knife and crazy glue back together. Seems risky. |
|
|
|
| JawjaPorsche |
Dec 27 2012, 08:32 PM
Post
#10
|
|
Advanced Member Group: Members Posts: 3,463 Joined: 23-July 11 From: Clayton, Georgia Member No.: 13,351 Region Association: South East States |
Here is a company that restores our sun visors:
$75.00 Visors are sewn with an edge binding rather than heat seal. Vanity mirror cannot be reinstalled. http://www.autosunvisors.com/restoration.htm This is a picture of 911 visors but you get the idea of restoring. Attached image(s) 
|
|
|
|
| tumamilhem |
Dec 27 2012, 09:04 PM
Post
#11
|
|
LUFTBRIGADE Group: Members Posts: 1,228 Joined: 29-October 12 From: Jacksonville, FL Member No.: 15,092 Region Association: South East States |
Thank you. I'm sure that is fine for most, but I want mine to be OEM. I do want the mirror in place with the flap (I have one I can glue on if necessary) and I do want it seamless as the factory had it, not stitched.
I understand the foam filler has been tried by many without satisfactory success. I suppose to get cell foam and cut it to size, cut a slit along the seam (facing the windshield), insert and try to glue back together is the only option at the moment. Would really like to know someone or someplace that can thermal close the seam. My mother has this machine that seems to heat seal bags like potato chip bags after opening to keep in freshness. I wonder if that would work? |
|
|
|
| Mikey914 |
Dec 28 2012, 12:16 AM
Post
#12
|
|
The rubber man Group: Members Posts: 12,679 Joined: 27-December 04 From: Hillsboro, OR Member No.: 3,348 Region Association: None |
I'm checking with James to see about doing another short run of these to restore.
Yes I can do the mirrors, they are not exactly like stock, but are a good product. We were able to do a set at $99, but I'll have to see if James can do that. This was alos for about 20 pairs, I'll post a thread once I get numbers together. Mark |
|
|
|
| rfuerst911sc |
Dec 29 2012, 04:54 AM
Post
#13
|
|
Advanced Member Group: Members Posts: 2,158 Joined: 4-May 06 From: Dahlonega , Georgia Member No.: 5,980 Region Association: South East States |
QUOTE(Mikey914 @ Dec 27 2012, 10:16 PM) I'm checking with James to see about doing another short run of these to restore. Yes I can do the mirrors, they are not exactly like stock, but are a good product. We were able to do a set at $99, but I'll have to see if James can do that. This was alos for about 20 pairs, I'll post a thread once I get numbers together. Mark I have a pair of visors from the original run in my car and they look and work great. Money well spent in my opinion. |
|
|
|
| gothspeed |
Dec 29 2012, 12:10 PM
Post
#14
|
|
Senior Member Group: Members Posts: 1,539 Joined: 3-February 09 From: SoCal Member No.: 10,019 Region Association: None |
QUOTE(JawjaPorsche @ Dec 27 2012, 06:32 PM) Here is a company that restores our sun visors: $75.00 Visors are sewn with an edge binding rather than heat seal. Vanity mirror cannot be reinstalled. http://www.autosunvisors.com/restoration.htm This is a picture of 911 visors but you get the idea of restoring. I had a 914 visor set done by these guys! They did a great job (IMG:style_emoticons/default/smile.gif)!! |
|
|
|
| anderssj |
Dec 29 2012, 12:22 PM
Post
#15
|
|
Dog is my copilot... Group: Members Posts: 1,666 Joined: 28-January 03 From: VA Member No.: 207 Region Association: MidAtlantic Region |
QUOTE(tumamilhem @ Dec 27 2012, 10:01 PM) QUOTE(wndsrfr @ Dec 27 2012, 08:17 PM) Yes it can be done, I did it about ten years ago and have forgotten how.... Do an extensive search here and on the bird site & you should find the article with the trick. The mirror got replaced from in behind, there's a wire frame inside and I used new foam board from art store--it's sorta flexible. Actually turned out to be pretty easy, just can't recall how to seal it back up........ Can't find it on here. Lots of threads on sending them off to be refurbished, but are not looking original (stitched, not seamless, no mirror, etc). Someone suggested carefully slitting the seam with an utility knife and crazy glue back together. Seems risky. I think there was a tech article in PANO some years ago where John Paterak recommended using the utility knife and super glue method . . . . |
|
|
|
| tumamilhem |
Dec 29 2012, 12:36 PM
Post
#16
|
|
LUFTBRIGADE Group: Members Posts: 1,228 Joined: 29-October 12 From: Jacksonville, FL Member No.: 15,092 Region Association: South East States |
QUOTE(anderssj @ Dec 29 2012, 01:22 PM) QUOTE(tumamilhem @ Dec 27 2012, 10:01 PM) QUOTE(wndsrfr @ Dec 27 2012, 08:17 PM) Yes it can be done, I did it about ten years ago and have forgotten how.... Do an extensive search here and on the bird site & you should find the article with the trick. The mirror got replaced from in behind, there's a wire frame inside and I used new foam board from art store--it's sorta flexible. Actually turned out to be pretty easy, just can't recall how to seal it back up........ Can't find it on here. Lots of threads on sending them off to be refurbished, but are not looking original (stitched, not seamless, no mirror, etc). Someone suggested carefully slitting the seam with an utility knife and crazy glue back together. Seems risky. I think there was a tech article in PANO some years ago where John Paterak recommended using the utility knife and super glue method . . . . Yeah. I think that's how I'm going to have to chance it. The others are nice but I want to keep mine original. |
|
|
|
| nihil44 |
Jan 15 2013, 04:11 PM
Post
#17
|
|
Member Group: Members Posts: 157 Joined: 28-January 12 From: Brisbane, Australia Member No.: 14,058 Region Association: None |
Mark,
Any movement on the refurbishment of the sunvisors? I have 2 sets, both with crumbed foam and mirrors missing. I would like to have a reasonable facsimile of the original visor configuration Thanks David |
|
|
|
| scotty b |
Jan 15 2013, 08:36 PM
Post
#18
|
|
rust free you say ? Group: Members Posts: 16,375 Joined: 7-January 05 From: richmond, Va. Member No.: 3,419 Region Association: None |
QUOTE(tumamilhem @ Dec 27 2012, 05:17 PM) QUOTE(scotty b @ Dec 27 2012, 07:48 PM) Make a male + female wood mold of it. Poke a hole in the existing visor Fill the hole with expandable foam and clamp in-between the male and female molds (IMG:style_emoticons/default/first.gif) What would the wood mold be for? How do you mean a male and female wood mold of the visor? You lost me there. You mean a wood replica of the shape of the visor from both sides? couldn't I just use two pieces of wood that are same size or larger than the visor to clamp on either side (if that's what you're suggesting)? Where can I get expandable foam and what kind of foam? Not familiar with it. Thanks for your suggestion! And I will look into 914rubber to see if they have that service. Thank you, Rob! the mold/mould would be an exact copy of one half of the visor. You would need one for each side so that you could clamp the visor inbeween the two, then fill with expanding foam. The clamped mold/mould would maintain the proper shape and size. Once the foam had cured, you could release the two halves of the mold/mould and trim any excess foam off, then reseal ( glue ) the slit you cut |
|
|
|
| Mikey914 |
Jan 15 2013, 11:38 PM
Post
#19
|
|
The rubber man Group: Members Posts: 12,679 Joined: 27-December 04 From: Hillsboro, OR Member No.: 3,348 Region Association: None |
Expanding foam is no good as it breaks down pretty easily. Yes I can do these and a mold is the way to go. I need to make the internals, but it could be done even without exchanges.
I'll mull this over, but I have a few ideas that could work. Just need to make proof of concept. -MArk |
|
|
|
| RON S. |
Jan 16 2013, 05:16 PM
Post
#20
|
|
9140430841, FINALLY RUNNING Group: Members Posts: 1,212 Joined: 22-May 03 From: WALTERBORO,S.C. Member No.: 724 Region Association: South East States |
I mulled over finding a way to redo my visors, as they had aged as badly as everyone else's. I finally threw in the towel, and let Autosunvisors redo mine for about $75.00 It's not original by any means, but after 40 years of hanging in the car, I go them back in a couple of weeks, and they are good enough for my satisfaction. Attached thumbnail(s)  
|
|
|
|
|
3 User(s) are reading this topic (3 Guests and 0 Anonymous Users)
0 Members:

|
Lo-Fi Version | Time is now: 16th June 2024 - 11:21 PM |
Invision Power Board
v9.1.4 © 2024 IPS, Inc.