|
|
|
Porsche, and the Porsche crest are registered trademarks of Dr. Ing. h.c. F. Porsche AG.
This site is not affiliated with Porsche in any way. Its only purpose is to provide an online forum for car enthusiasts. All other trademarks are property of their respective owners. |
|
|


| Steve |
 Apr 14 2013, 09:44 PM Apr 14 2013, 09:44 PM
Post
#1
|
|
914 Guru  Group: Members Posts: 5,606 Joined: 14-June 03 From: Orange County, CA Member No.: 822 Region Association: Southern California |
My 914-6 GT / 916 project car started out as a stock 1975 2.0 carbureted 4 banger. I bought it in 1986, by 88 it had a 2.7 six in it with MSDS motor mount, headers and muffler. I also purchased brand new over the counter PMO 40 webers with manifolds for $1000.00. Those were the days!! I bought the tank, oil lines and tin over the counter from Porsche.
In 2000, the 2.7 started pulling head studs, so I replaced it with a 3.2 from a wrecking yard. In 2005 I sold the car and then bought it back 4 years later to the day. I later noticed that the inner wheel well had broken loose. Now starts the project of converting it from a race car back to a street car. I removed the battery tray this weekend for a better observation. It looks like battery acid caused the seam welds to rust. Which from racing caused the seam to separate. I bought the Harbor freight camera. I will try to get some internal shots next weekend to look for other rust damage. Looking at these pictures, what is the best way to repair this? This is a shot of the crack inside the wheel well. 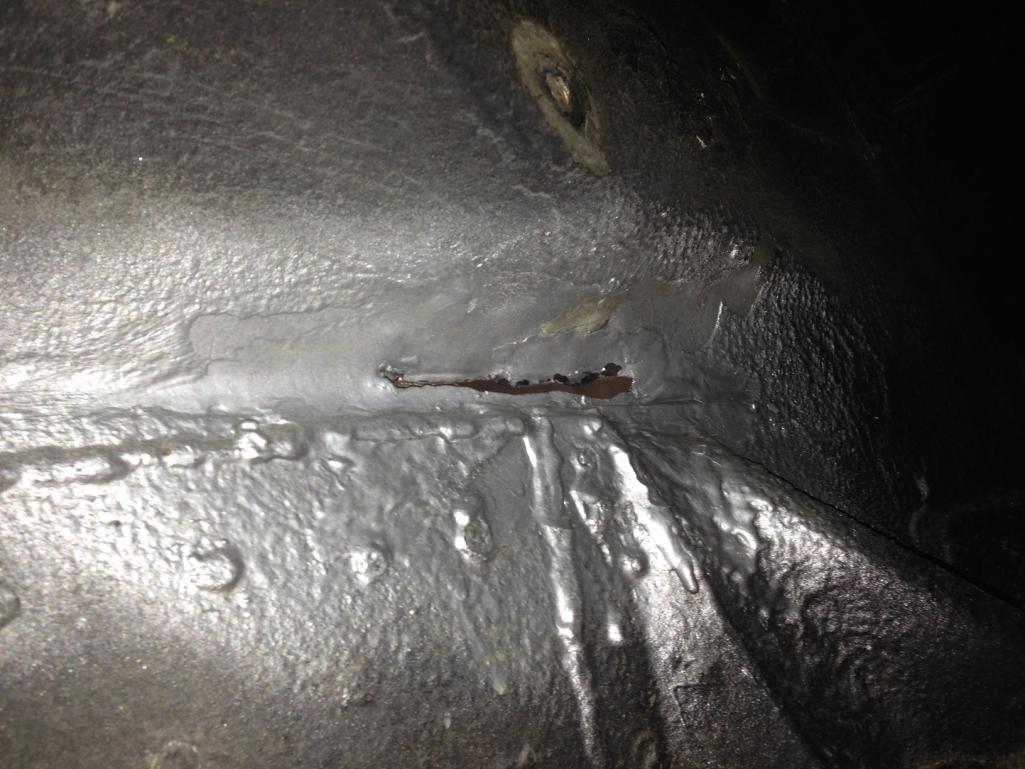 The rest of the shots are of the seam on the inside. I will also need to order an Engine shelf. This one is pretty toast. The battery tray is not that old, but was a bitch to get out. 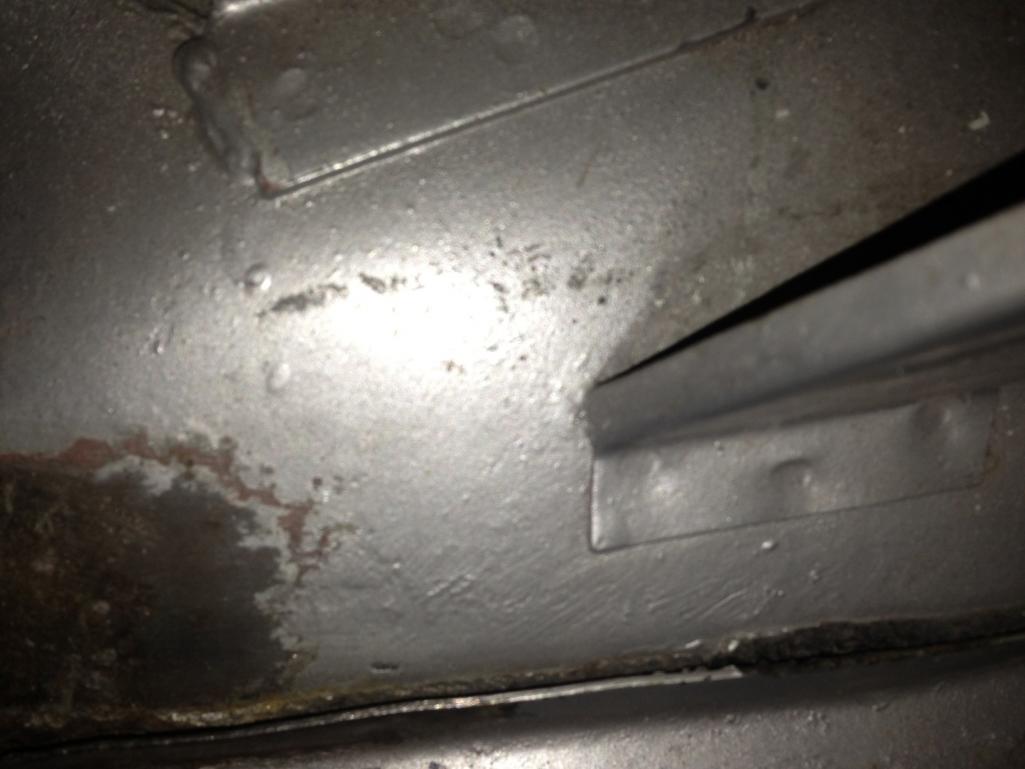 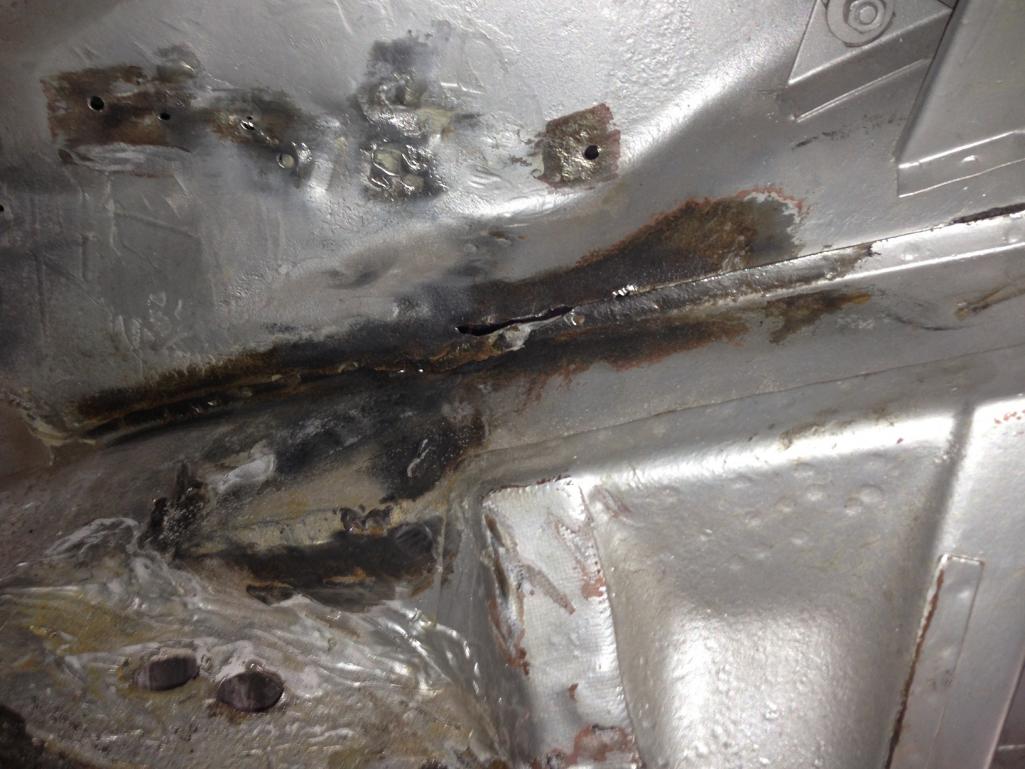 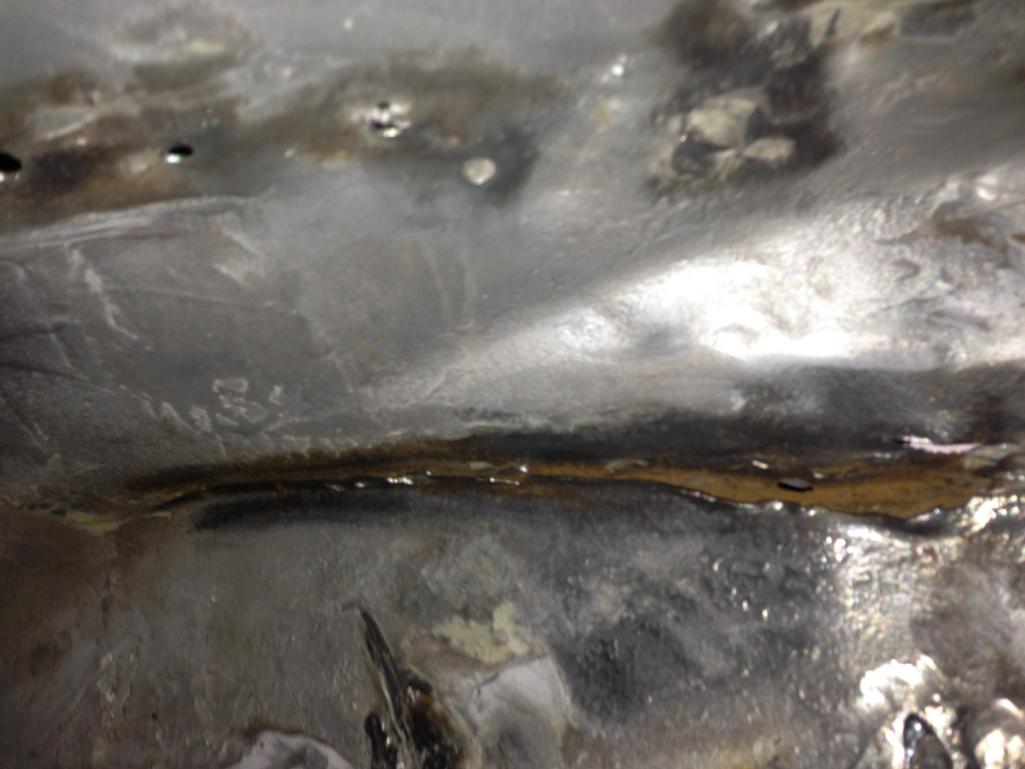 (IMG:style_emoticons/default/welder.gif) Thanks in advance for the help!!!! |
   |

 
|
  |
Replies(1 - 19)
| Mike Bellis |
Apr 14 2013, 09:58 PM
Post
#2
|
|
Resident Electrician Group: Members Posts: 8,345 Joined: 22-June 09 From: Midlothian TX Member No.: 10,496 Region Association: None |
That looks pretty good actually. Easy fix for the most part. The first picture looks suspect. Maybe some hidden treasures under that under coating.
|
|
|
|
| 76-914 |
Apr 14 2013, 10:02 PM
Post
#3
|
|
Repeat Offender & Resident Subaru Antagonist Group: Members Posts: 13,507 Joined: 23-January 09 From: Temecula, CA Member No.: 9,964 Region Association: Southern California |
(IMG:style_emoticons/default/agree.gif) Wire brush it to see what we have. Looks like some minor patches and a few holes to close.
|
|
|
|
| Steve |
Apr 14 2013, 10:23 PM
Post
#4
|
|
914 Guru Group: Members Posts: 5,606 Joined: 14-June 03 From: Orange County, CA Member No.: 822 Region Association: Southern California |
QUOTE(kg6dxn @ Apr 14 2013, 08:58 PM)  That looks pretty good actually. Easy fix for the most part. The first picture looks suspect. Maybe some hidden treasures under that under coating. Thanks!! Actually the first picture is as bad as it looks. A while back before pulling the motor and battery tray, I wired brush this part down to bare metal. There was no rust, just this crack/rip in the metal. All I did at the time was spray paint it so the bare metal wouldn't start rusting. I will have to use a smaller wire wheel, like my Dremel tool, to get between the seem on the inside. From what I can tell, I just need a new Engine Shelf and a patch where the hole/rip is at. The rest I could probably hammer back and weld back up after getting it down to bare metal. The holes in the wall were where the body shop bolted the battery tray to the wall. |
|
|
|
| euro911 |
Apr 15 2013, 12:34 AM
Post
#5
|
|
Retired & living the dream. God help me if I wake up! Group: Members Posts: 8,851 Joined: 2-December 06 From: So.Cal. & No.AZ (USA) Member No.: 7,300 Region Association: Southern California |
Steve, is the engine shelf that bad, that it needs replaced? (pix don't show the entire shelf)
|
|
|
|
| MrHyde |
Apr 15 2013, 05:59 AM
Post
#6
|
|
Senior Member Group: Members Posts: 525 Joined: 13-October 10 From: Ontario, Canada Member No.: 12,268 Region Association: None |
That coating under the paint may be hiding something. I would get that off with a wire wheel on a grinder first and then re-assess the situation. Can you get an overal picture? one that shows the battery tray, stand, engine shelf, inner fender and frame rail?
|
|
|
|
| carr914 |
Apr 15 2013, 06:21 AM
Post
#7
|
|
Racer from Birth Group: Members Posts: 118,899 Joined: 2-February 04 From: Tampa,FL Member No.: 1,623 Region Association: South East States |
"Calling on all Hell Hole experts"
This Thread may set a Record for responses with that request (IMG:style_emoticons/default/biggrin.gif) (IMG:style_emoticons/default/welder.gif) |
|
|
|
| ThePaintedMan |
Apr 15 2013, 07:11 AM
Post
#8
|
|
Advanced Member Group: Members Posts: 3,886 Joined: 6-September 11 From: St. Petersburg, FL Member No.: 13,527 Region Association: South East States |
I agree with most of the suggestions above. If I were you though, and I was looking to ensure that everything was solid here (and I wasn't going to have to do this again in a few months/years), I'd strip this whole area to bare metal. It might be easier to help diagnose if we had a bigger picture that shows the entire area.
Of particular concern is this area - it looks like a typical botched fiberglass patch: Attached thumbnail(s) 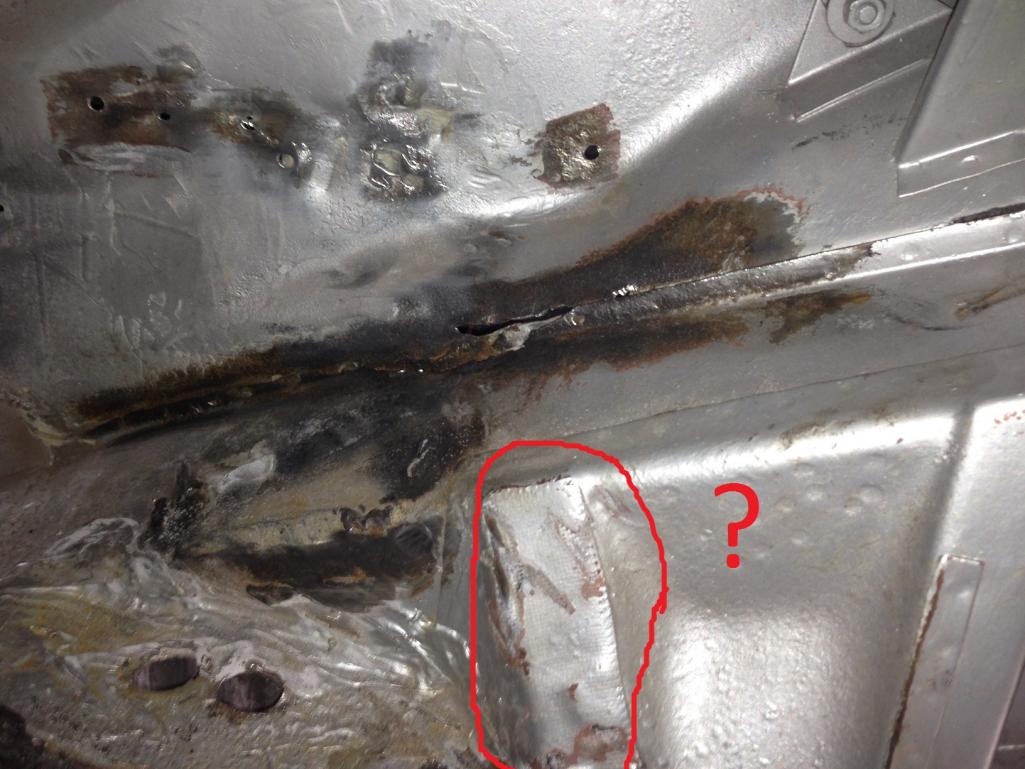
|
|
|
|
| boogie_man |
Apr 15 2013, 02:26 PM
Post
#9
|
|
Member Group: Members Posts: 308 Joined: 22-April 11 From: So Cal Member No.: 12,969 Region Association: Southern California |
(IMG:style_emoticons/default/agree.gif) Strip the area all the way, then post pix. That doesn't look too bad......
|
|
|
|
| Steve |
Apr 15 2013, 03:04 PM
Post
#10
|
|
914 Guru Group: Members Posts: 5,606 Joined: 14-June 03 From: Orange County, CA Member No.: 822 Region Association: Southern California |
Thanks everyone!! The soonest I can work on it again is this Saturday. I will strip the rest down and take some wider shots.
|
|
|
|
| r_towle |
Apr 16 2013, 12:59 AM
Post
#11
|
|
Custom Member Group: Members Posts: 24,585 Joined: 9-January 03 From: Taxachusetts Member No.: 124 Region Association: North East States |
I would spray more undercoating on it , replace the battery tray and drive it.
But, I am from the east land of rust. Rich |
|
|
|
| bare 1 |
Apr 18 2013, 12:45 PM
Post
#12
|
|
Member Group: Members Posts: 122 Joined: 27-October 04 From: Apache Junction viaWhidbey Is. Member No.: 3,019 Region Association: None |
Yes to bare metal!!! Especially that snot in the lower left corner of the pic. Just finished my hell hole repair. Some of the stuff in that area looked good until I hit it with the welder , then it just vaporized. Bare metal then go at it with an ice pick and a small ballpeen hammer Pick and tap. You'll hear and feel the difference. Rust does'nt ring! Happy trails
|
|
|
|
| Steve |
Sep 2 2013, 08:45 PM
Post
#13
|
|
914 Guru Group: Members Posts: 5,606 Joined: 14-June 03 From: Orange County, CA Member No.: 822 Region Association: Southern California |
Life keeps getting in the way, but finally worked on the beast some today.
Does anyone have some good pictures on how to prep and trim the engine shelf? I still need to trim the front of the engine shelf, from the previous repair. 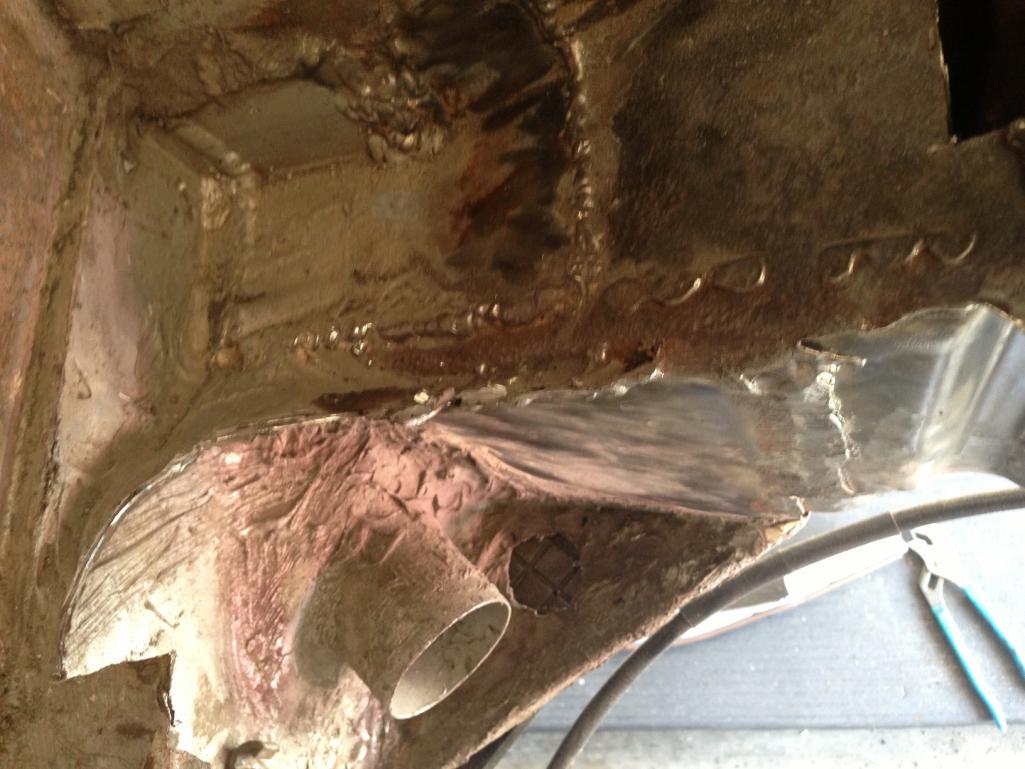 Here's some pictures of the new shelf. 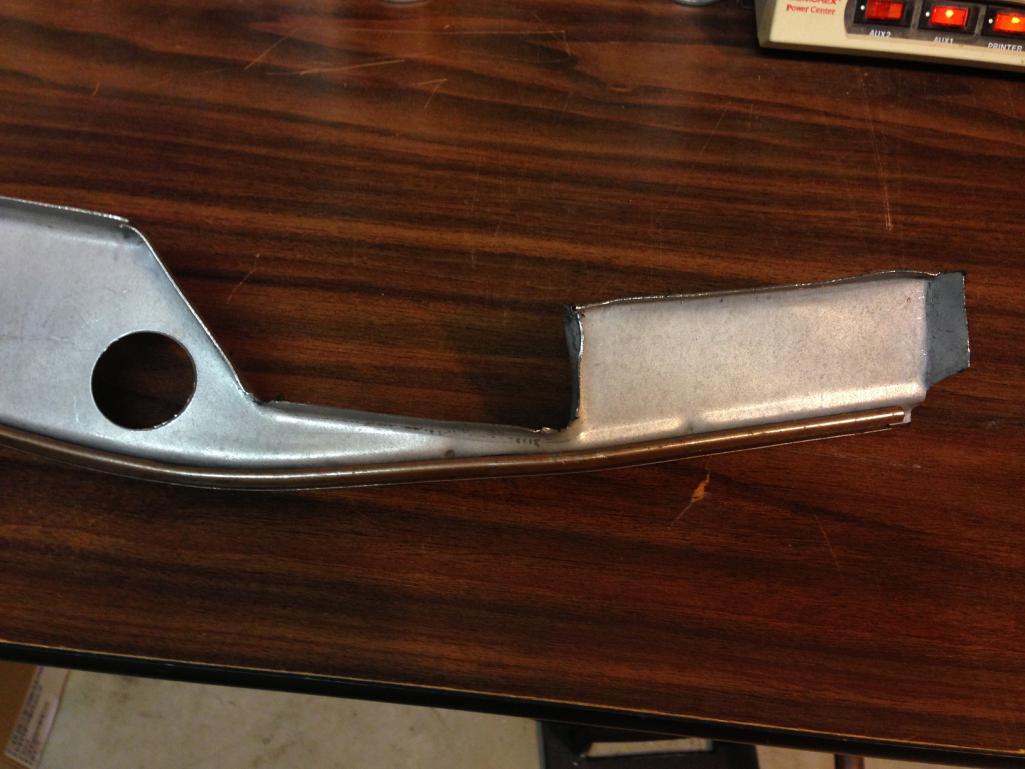 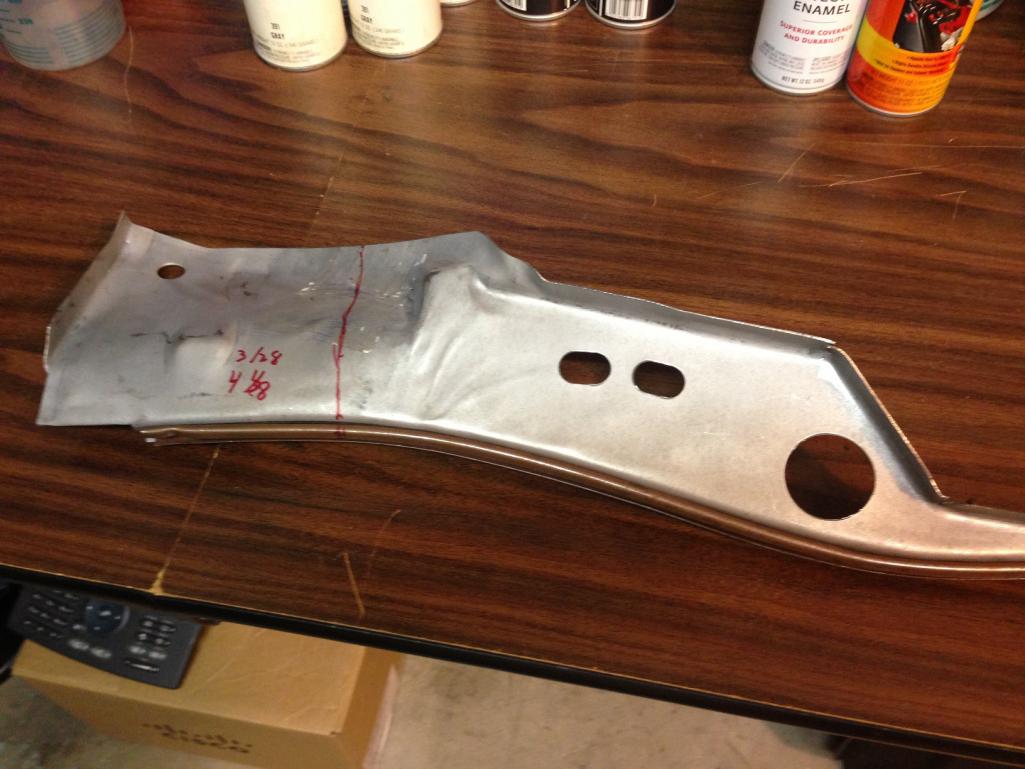 I removed all the fiberglass and cut out the rust below the battery. I now have a nice hole to spray some Eastwood rust encapsulation into. 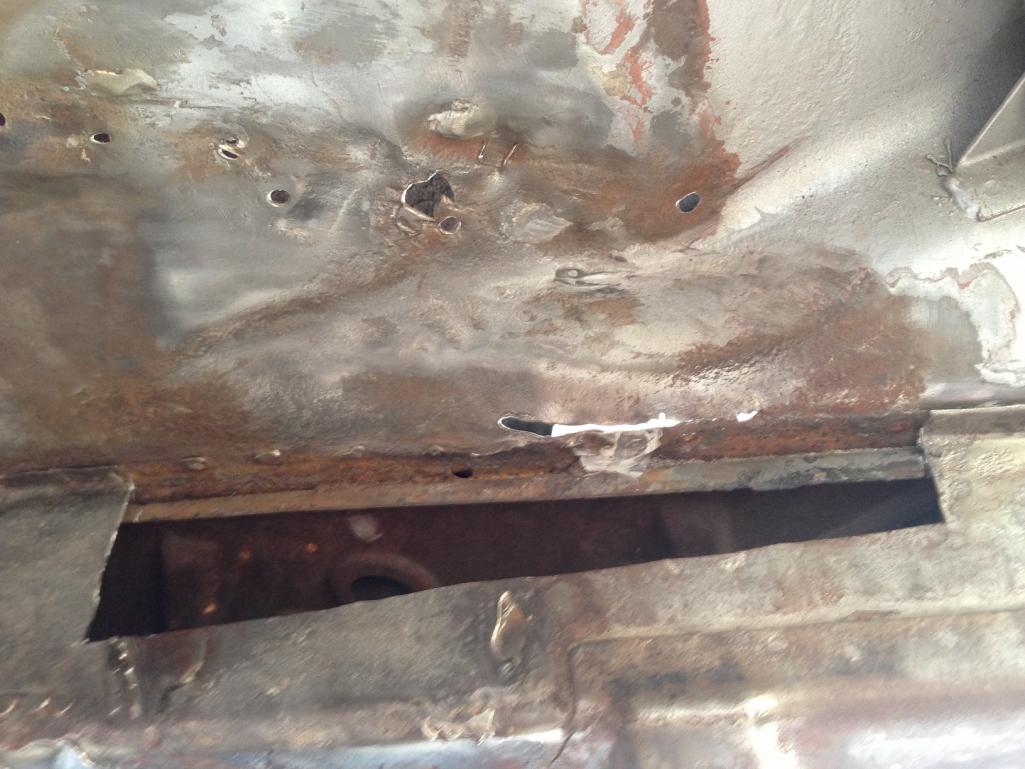 Inside of hole is just surface rust.  Here's a large picture of the mess!! 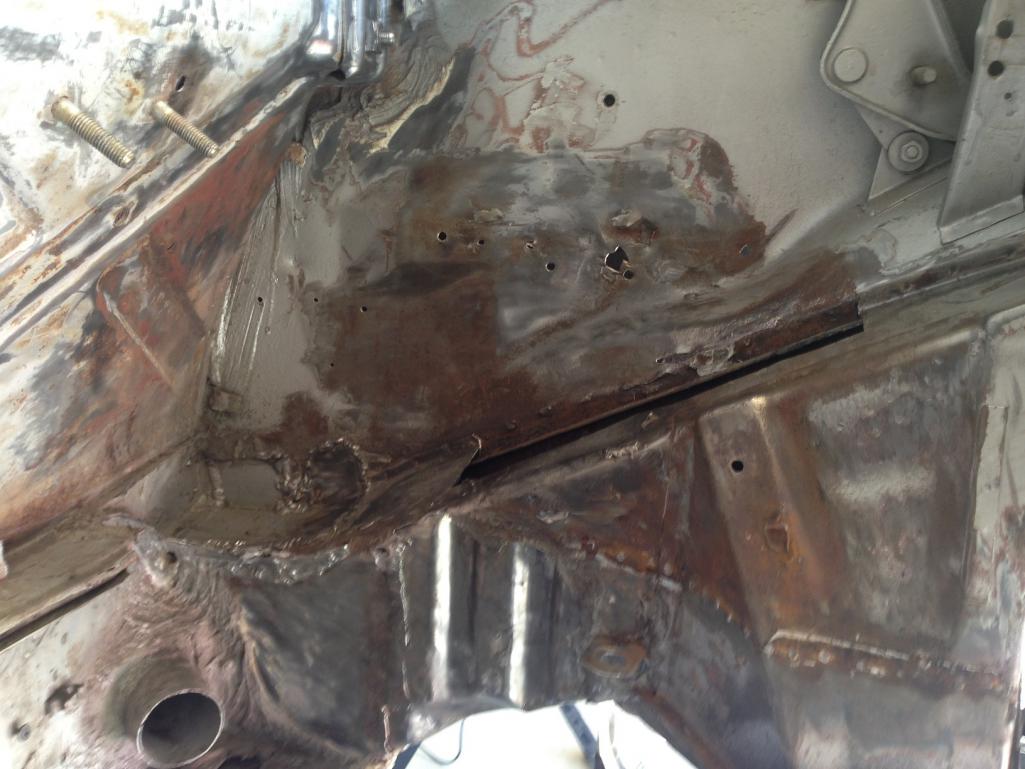 Sometimes I think I am over my head in this mess. Does anyone make house calls?? Otherwise I could put the axles back in and tow it somewhere. Thanks in advance for the help!!!! (IMG:style_emoticons/default/sawzall-smiley.gif) (IMG:style_emoticons/default/welder.gif) (IMG:style_emoticons/default/confused24.gif) (IMG:style_emoticons/default/chair.gif) (IMG:style_emoticons/default/headbang.gif) (IMG:style_emoticons/default/dry.gif) |
|
|
|
| malcolm2 |
Sep 3 2013, 09:07 AM
Post
#14
|
|
Advanced Member Group: Members Posts: 2,745 Joined: 31-May 11 From: Nashville Member No.: 13,139 Region Association: South East States |
Don't give up, you are just getting to the fun part!
|
|
|
|
| OllieG |
Sep 3 2013, 11:23 AM
Post
#15
|
|
OllieG Group: Members Posts: 212 Joined: 6-July 11 From: UK Member No.: 13,282 Region Association: England |
QUOTE(carr914 @ Apr 15 2013, 01:21 PM) "Calling on all Hell Hole experts" This Thread may set a Record for responses with that request (IMG:style_emoticons/default/biggrin.gif) (IMG:style_emoticons/default/welder.gif) (IMG:style_emoticons/default/agree.gif) If you've got a big motor and taking it racing you may want to beef up the suspension while you're at it. After lots of advice from the World that's what I did. I've just fit the kit from Tangerine which will strengthen the exact spot where you got the tear - right above the suspension console.. Stick at it..if I can do it 'you' can do it!! Good luck.. |
|
|
|
| Steve |
Sep 3 2013, 08:54 PM
Post
#16
|
|
914 Guru Group: Members Posts: 5,606 Joined: 14-June 03 From: Orange County, CA Member No.: 822 Region Association: Southern California |
Thanks for the replies!! Never give up, never surrender!! I love that line. I don't trust my welding skills. My 20th wedding anniversary is next week. I will wait a couple of weeks and see how much money I have leftover and then pay someone to weld in the shelf, battery tray and scab plate over the crack. In the mean time I can clean and primer the other sections. To me it looks like the battery acid weekend the spot welds on the inner wheel well, which caused it to separate and crack. Running 255 series racing tires probably didn't help. They were rubbing on the inside when it separated. The lower crack was due to me removing the 4 banger motor mounts 25 years ago. I can't remember back that far, but I think there was surface rust around the passenger side motor mount, so I removed the sheet metal under the mount and didn't replace it, which weekend it and made it crack. I also removed the drivers side 4 banger mount, but I left the sheet metal underneath it. Everything on the drivers side looks perfect.
|
|
|
|
| Steve |
Sep 3 2013, 09:03 PM
Post
#17
|
|
914 Guru Group: Members Posts: 5,606 Joined: 14-June 03 From: Orange County, CA Member No.: 822 Region Association: Southern California |
Here's a picture of the crack where the motor mount was. I need to drill the ends of the crack, weld it back up and then make a scab plate to cover it all.
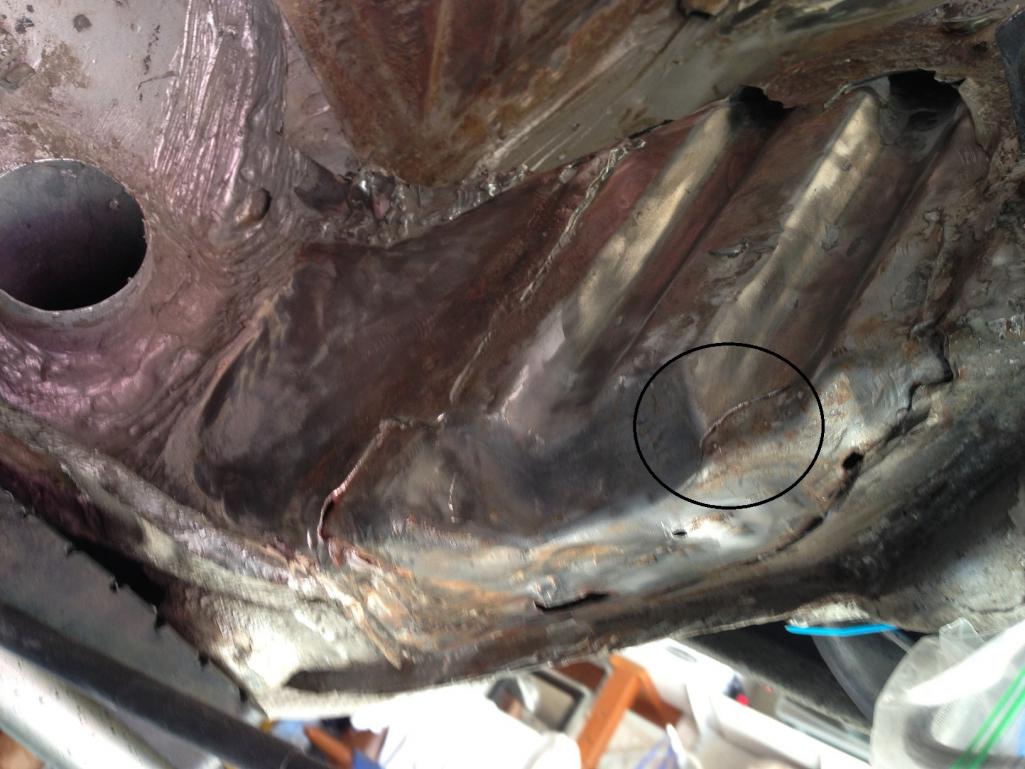 The bottom is just an extended hole where the drain used to be. |
|
|
|
| Jeff Hail |
Sep 3 2013, 10:11 PM
Post
#18
|
|
Senior Member Group: Members Posts: 1,141 Joined: 3-May 07 From: LA/ CA Member No.: 7,712 |
QUOTE(Steve @ Sep 3 2013, 07:54 PM) Thanks for the replies!! Never give up, never surrender!! I love that line. I don't trust my welding skills. My 20th wedding anniversary is next week. I will wait a couple of weeks and see how much money I have leftover and then pay someone to weld in the shelf, battery tray and scab plate over the crack. In the mean time I can clean and primer the other sections. To me it looks like the battery acid weekend the spot welds on the inner wheel well, which caused it to separate and crack. Running 255 series racing tires probably didn't help. They were rubbing on the inside when it separated. The lower crack was due to me removing the 4 banger motor mounts 25 years ago. I can't remember back that far, but I think there was surface rust around the passenger side motor mount, so I removed the sheet metal under the mount and didn't replace it, which weekend it and made it crack. I also removed the drivers side 4 banger mount, but I left the sheet metal underneath it. Everything on the drivers side looks perfect. Churchill so liked his brandy. http://www.worldgathering.net/mp3/churchill_never.mp3 |
|
|
|
| Steve |
Nov 17 2013, 07:38 PM
Post
#19
|
|
914 Guru Group: Members Posts: 5,606 Joined: 14-June 03 From: Orange County, CA Member No.: 822 Region Association: Southern California |
I finally gave up and reached out to Milt aka Zeke on the board.
Took two Saturday sessions, but Milt repaired my hell hole and gave me lots of tips along the way. 1. Cut out and grind-ed old repairs. 2. Made scab plate for bottom missing sheet metal on long under battery. (used to be the 4 cylinder motor mount). 3. Fabricated another plate below the battery and welded it in. 4. Trimmed and fitted the Restoration Design engine shelf. 5. Installed Battery Tray 6. Other rust repair and clean up. All that's left now is to grind the welds, prime, seal and paint the area. Thanks everyone for recommending Milt. I highly recommend him. He saved me tons of time. He was a pleasure to work with and I learned so much by watching him work. He taught me how to setup my welder, proper use of tools, etc. He also makes house calls if you don't live to far away. Here is a picture of the area he fixed. Sorry for the crappy iPhone shot. I still need to grind some of the welds, prime, seal and paint the area. After that I can finally put my six back in. 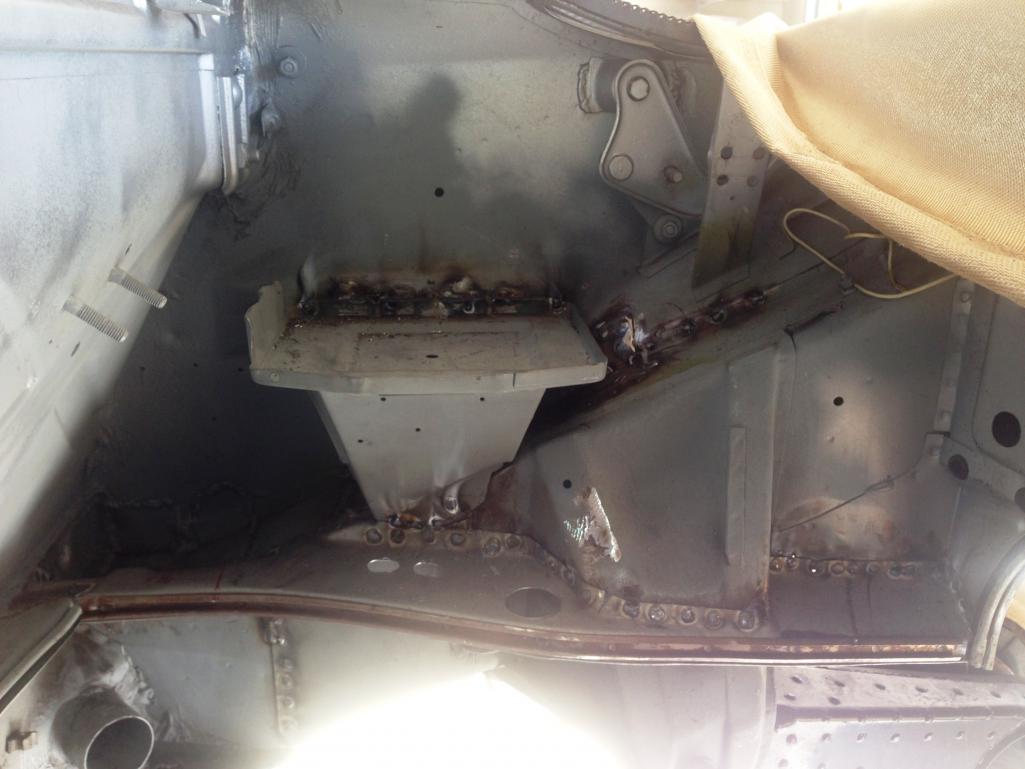 (IMG:style_emoticons/default/welder.gif) (IMG:style_emoticons/default/pray.gif) |
|
|
|
| mepstein |
Nov 18 2013, 06:52 AM
Post
#20
|
|
914-6 GT in waiting Group: Members Posts: 19,307 Joined: 19-September 09 From: Landenberg, PA/Wilmington, DE Member No.: 10,825 Region Association: MidAtlantic Region |
Congrats. Your engine will be in a happy place.
|
|
|
|
|
1 User(s) are reading this topic (1 Guests and 0 Anonymous Users)
0 Members:

|
Lo-Fi Version | Time is now: 1st June 2024 - 12:17 PM |
Invision Power Board
v9.1.4 © 2024 IPS, Inc.