|
|
|
Porsche, and the Porsche crest are registered trademarks of Dr. Ing. h.c. F. Porsche AG.
This site is not affiliated with Porsche in any way. Its only purpose is to provide an online forum for car enthusiasts. All other trademarks are property of their respective owners. |
|
|


| SpecialInt |
 Feb 4 2014, 07:22 PM Feb 4 2014, 07:22 PM
Post
#1
|
|
Newbie  Group: Members Posts: 6 Joined: 3-December 13 From: Maryland Member No.: 16,722 Region Association: None |
I have some SS heat exchangers for sale and someone asked if I had tested them for leaks. I had not. A few people chimed in with some procedures to test them. Thought I would document my test so anyone selling a set could easily check for leaks.
Needed. 1 valve stem. Long for alloy wheels. 1 one x six or similar 6 bolt 12 washers 6 nuts Some gasket material/ pond liner/ vinyl or similar You can get rubber plugs from Home Depot or make the with the items below. Home made plugs 4 lg fender washers 4 med fender washer smaller than exhaust tube at head. 4 small rubber washers 4 lg o rings 3 bolts/nuts Some basic tools. Cut some gasket material to fit the muffler end of the exchangers. Place it against the flange and mark the holes. Punch out the holes Place the 1x6 against the exchanger flanges. Mark the holes Drill the holes where marked Bolt the exchangers to the wood Fill the exchangers with water. Make sure you lift the head ends up where you fill the so they are full or close to full of water. Insert the plugs. If you made some like I did you will need an air gun to tighten them since you can't hold the nut. Insert the plug made with the valve stem. Lay them flat on the floor. Use about 20 PSI at the valve stem. The flanges started leaking at the gaskets but the heated air ducts showed no signs of leakage Attached thumbnail(s) 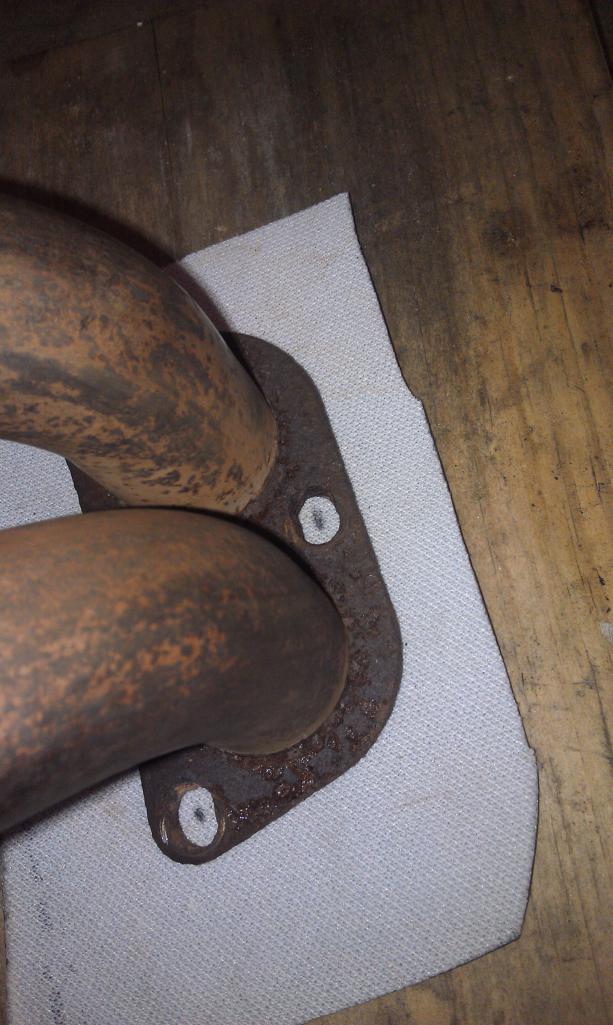 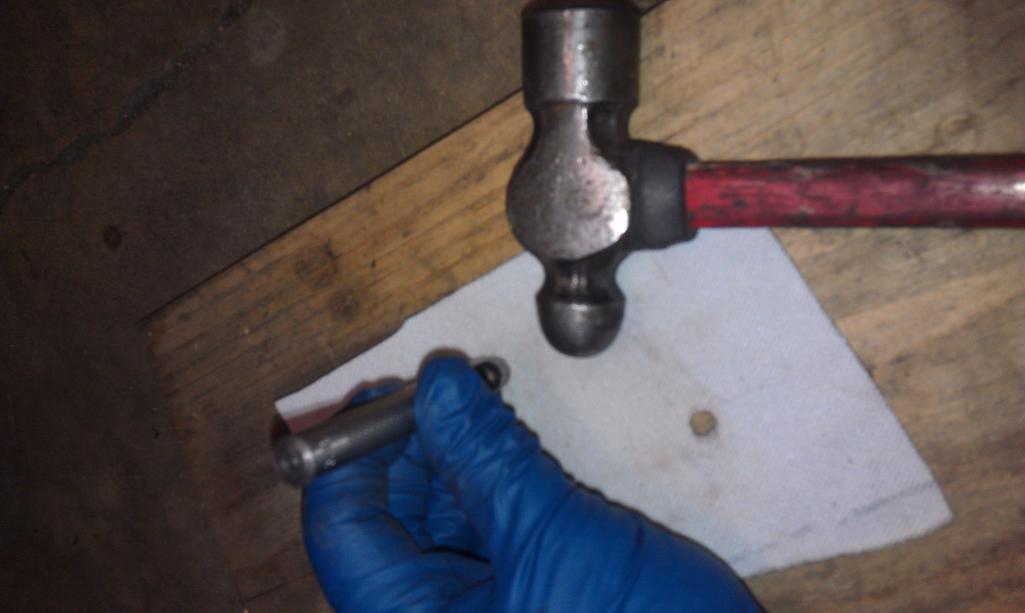
|
   |

 
|
  |
Replies(1 - 13)
| SpecialInt |
Feb 4 2014, 07:24 PM
Post
#2
|
|
Newbie Group: Members Posts: 6 Joined: 3-December 13 From: Maryland Member No.: 16,722 Region Association: None |
QUOTE(SpecialInt @ Feb 4 2014, 05:22 PM)  I have some SS heat exchangers for sale and someone asked if I had tested them for leaks. I had not. A few people chimed in with some procedures to test them. Thought I would document my test so anyone selling a set could easily check for leaks. Needed. 1 valve stem. Long for alloy wheels. 1 one x six or similar 6 bolt 12 washers 6 nuts Some gasket material/ pond liner/ vinyl or similar You can get rubber plugs from Home Depot or make the with the items below. Home made plugs 4 lg fender washers 4 med fender washer smaller than exhaust tube at head. 4 lg o rings 3 bolts/nuts Some basic tools. Cut some gasket material to fit the muffler end of the exchangers. Place it against the flange and mark the holes. Punch out the holes Place the 1x6 against the exchanger flanges. Mark the holes Drill the holes where marked Bolt the exchangers to the wood Fill the exchangers with water. Make sure you lift the head ends up where you fill the so they are full or close to full of water. Insert the plugs. If you made some like I did you will need an air gun to tighten them since you can't hold the nut. Insert the plug made with the valve stem. Lay them flat on the floor. Use about 20 PSI at the valve stem. The flanges started leaking at the gaskets but the heated air ducts showed no signs of leakage Attached thumbnail(s)  
|
|
|
|
| SpecialInt |
Feb 4 2014, 07:27 PM
Post
#3
|
|
Newbie Group: Members Posts: 6 Joined: 3-December 13 From: Maryland Member No.: 16,722 Region Association: None |
More pics
Attached thumbnail(s)  
|
|
|
|
| SpecialInt |
Feb 4 2014, 07:30 PM
Post
#4
|
|
Newbie Group: Members Posts: 6 Joined: 3-December 13 From: Maryland Member No.: 16,722 Region Association: None |
More
Attached thumbnail(s) 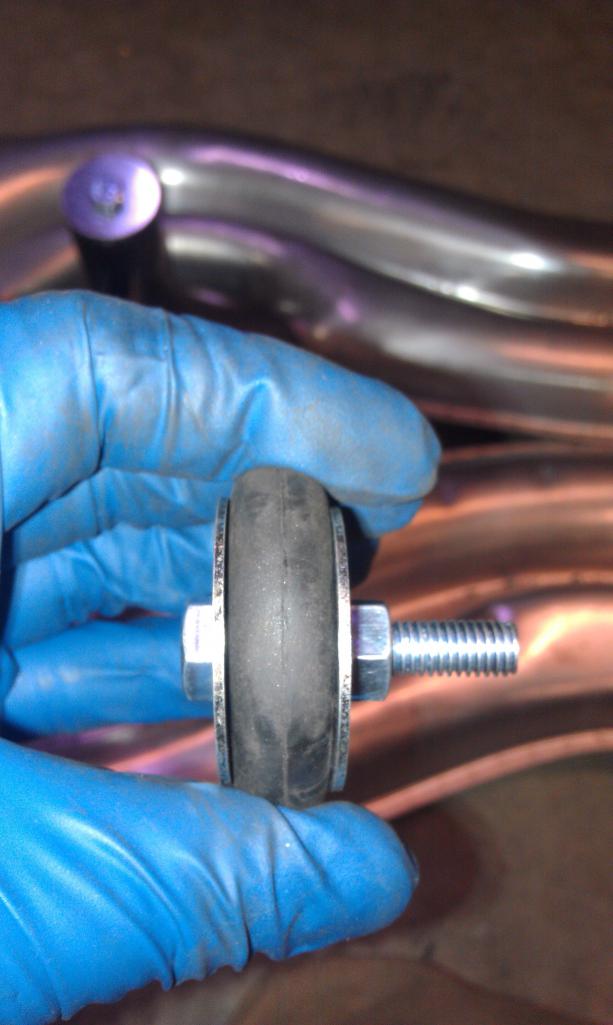 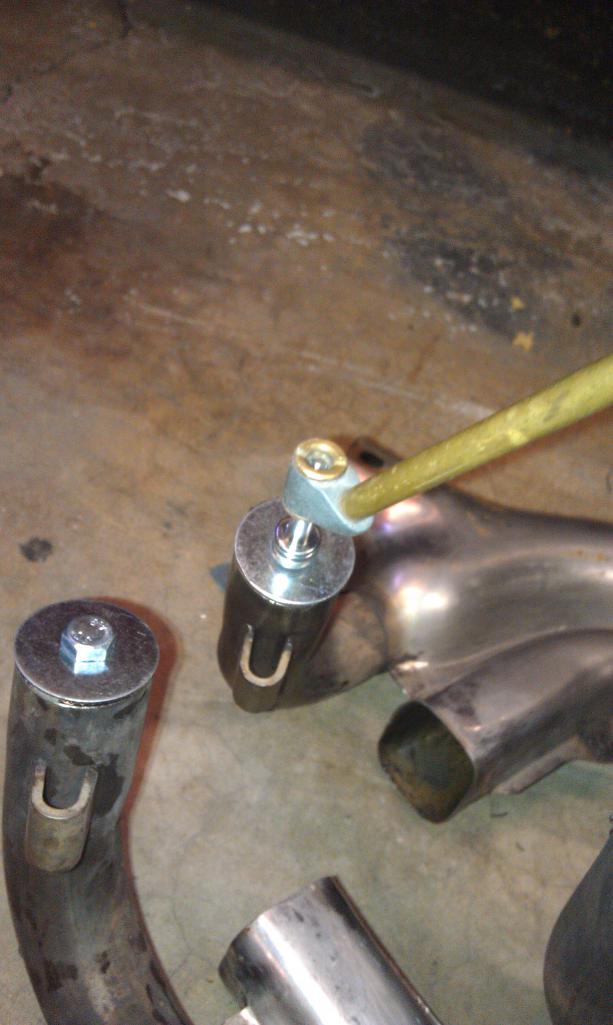
|
|
|
|
| SpecialInt |
Feb 4 2014, 07:31 PM
Post
#5
|
|
Newbie Group: Members Posts: 6 Joined: 3-December 13 From: Maryland Member No.: 16,722 Region Association: None |
More
Attached thumbnail(s) 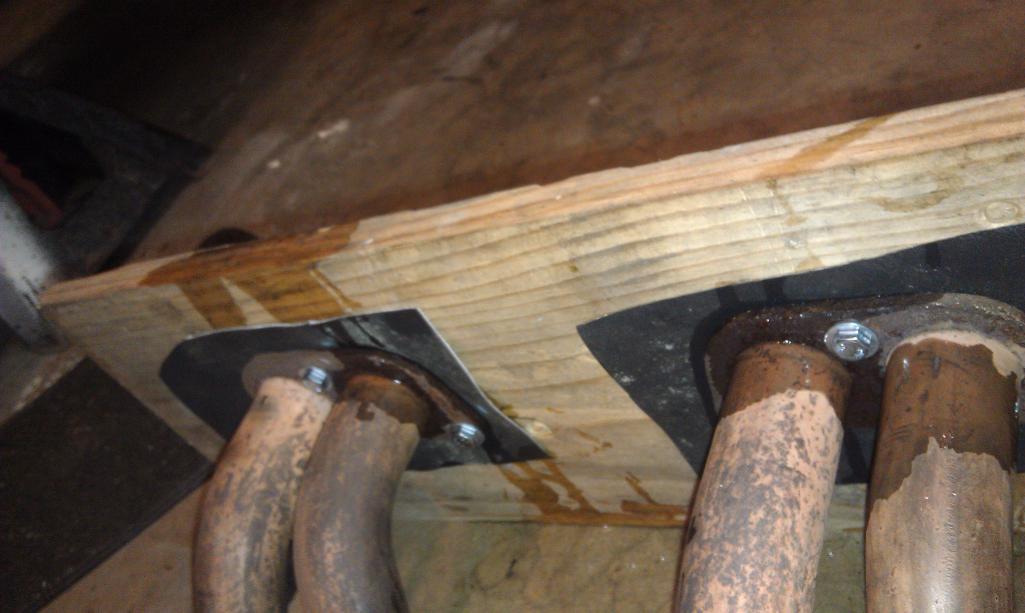 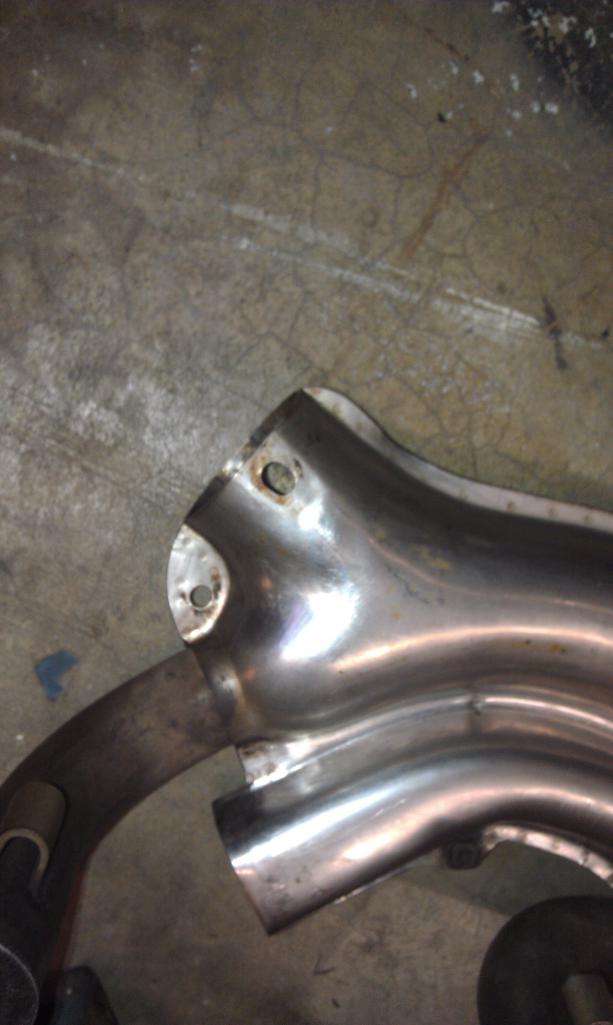
|
|
|
|
| jimkelly |
Feb 5 2014, 09:39 AM
Post
#6
|
|
Delaware USA Group: Members Posts: 4,969 Joined: 5-August 04 From: Delaware, USA Member No.: 2,460 Region Association: MidAtlantic Region |
(IMG:style_emoticons/default/icon_bump.gif)
certainly more than one way to skin a cat (IMG:style_emoticons/default/biggrin.gif) I used pool plugs on muffler end and mouth pressure (IMG:style_emoticons/default/dry.gif) on head end, and found this was sufficient to detect a hairline fissure. thanks to brad for making us aware of the need for testing these prior to sale. |
|
|
|
| RFoulds |
Feb 6 2014, 05:23 PM
Post
#7
|
|
Green Teen 66 Group: Members Posts: 837 Joined: 10-August 09 From: La Quinta, CA Member No.: 10,656 Region Association: Southwest Region |
I bought these because of how thorough he tested them. Great method using stuff I have in garage.
I have two sets (non-SSI) here I will be testing now too! |
|
|
|
| r_towle |
Feb 6 2014, 06:29 PM
Post
#8
|
|
Custom Member Group: Members Posts: 24,588 Joined: 9-January 03 From: Taxachusetts Member No.: 124 Region Association: North East States |
Amazing idea, not something I would have gone through to sell a part....
Good man. Rich |
|
|
|
| barefoot |
Feb 6 2014, 07:48 PM
Post
#9
|
|
Senior Member Group: Members Posts: 1,280 Joined: 19-March 13 From: Charleston SC Member No.: 15,673 Region Association: South East States |
I did a simpler test, corked the outlet ends with large cap plugs (and sone grease), then filled the pipes with water with the H/E's angled such that the inlet ends were higher than the outlets, (At about 30 degree angle to horizontal) but level, so both inlets on one H/E were on same plane. Then filled with water up to full level and let sit for a day, then checked to see if water level had gone down, they checked OK, no change in level.
|
|
|
|
| McMark |
Feb 6 2014, 08:31 PM
Post
#10
|
|
914 Freak! Group: Retired Admin Posts: 20,179 Joined: 13-March 03 From: Grand Rapids, MI Member No.: 419 Region Association: None |
I don't think the sitting water is a great test. The surface tension of water will keep it from wicking out of some hairline fractures. I think a pressure test is needed.
|
|
|
|
| SpecialInt |
Feb 7 2014, 09:53 PM
Post
#11
|
|
Newbie Group: Members Posts: 6 Joined: 3-December 13 From: Maryland Member No.: 16,722 Region Association: None |
To be fair to those who deserve credit (as Jim Kelly pointed out) this was not my idea.
It was brought to my attention by the person whom ultimately purchased them in the form of a question concerning whether I had tested them. I replied with a request for a procedure, and as the result of several responses, came up with the above method. Thanks for the dawn of the 914 Clean Air Act! |
|
|
|
| Cap'n Krusty |
Feb 7 2014, 11:36 PM
Post
#12
|
|
Cap'n Krusty Group: Members Posts: 10,794 Joined: 24-June 04 From: Santa Maria, CA Member No.: 2,246 Region Association: Central California |
I've worked on literally hundreds, maybe even as many as a couple thousand, 914s over the last 40 years. While I've seen many cracked late model HEs, always in the small section that bolts to the head, I've never seen an early version crack. Lest I forget, I HAVE seen some SSIs where the muffler flange broke off, but that's way downstream of the HE portion and CO in the heater wouldn't have been an issue.
The Cap'n |
|
|
|
| 930cabman |
Dec 12 2021, 05:15 PM
Post
#13
|
|
Advanced Member Group: Members Posts: 3,144 Joined: 12-November 20 From: Buffalo Member No.: 24,877 Region Association: North East States |
QUOTE(Cap'n Krusty @ Feb 8 2014, 12:36 AM) I've worked on literally hundreds, maybe even as many as a couple thousand, 914s over the last 40 years. While I've seen many cracked late model HEs, always in the small section that bolts to the head, I've never seen an early version crack. Lest I forget, I HAVE seen some SSIs where the muffler flange broke off, but that's way downstream of the HE portion and CO in the heater wouldn't have been an issue. The Cap'n The small section that bolts to the heads possibly suffer from heat stress (hot/cold cycles) Is a cold pressure test sufficient? $2.k is a tall dollar for replacements |
|
|
|
| Mark Henry |
Dec 12 2021, 07:08 PM
Post
#14
|
|
that's what I do! Group: Members Posts: 20,065 Joined: 27-December 02 From: Port Hope, Ontario Member No.: 26 Region Association: Canada |
Holy necro thread batman! (IMG:style_emoticons/default/blink.gif)
I use a coolant Airlift and a compressor, it can suck -27" of vacuum and it has the right size adapter for the muffler flange tube end. Then I just hold a thick chunk of rubber conveyor belt on the head pipe end and apply vacuum. If you have a crack you can see results instantly with the gauge needle falling fast, for a big hole you won't be able to pull vacuum. Once I have vacuum I shut the valve, I don't have hold the rubber belt pieces, good seal and the losses will be very slow. If I'm still at -25 to-26" over a minute to me it's a pass, at 5 minutes -24 to-25 is still a good pass. The loose rubber piece will fall off in 15-25 minutes just from seal losses, which is normal and is still a pass. There's more to it of course, you have to make a stand to hold the exchanger upright securely (important), flap wheel the insides of the flange tubes for a good tool seal, do all 4 tubes, plus all the other work that goes into fixing up an exchanger. Tool isn't cheap and you always have to take care not to knock the gauge end. About $140 for the one I have, UView Airlift Kit 550000 Cooling System Refiller, which is the best of the cheaper units. I have it to work on the 996 and many other WC projects. |
|
|
|
|
1 User(s) are reading this topic (1 Guests and 0 Anonymous Users)
0 Members:

|
Lo-Fi Version | Time is now: 7th June 2024 - 01:28 AM |
Invision Power Board
v9.1.4 © 2024 IPS, Inc.