|
|
|
Porsche, and the Porsche crest are registered trademarks of Dr. Ing. h.c. F. Porsche AG.
This site is not affiliated with Porsche in any way. Its only purpose is to provide an online forum for car enthusiasts. All other trademarks are property of their respective owners. |
|
|


| sixaddict |
 Aug 8 2014, 04:32 PM Aug 8 2014, 04:32 PM
Post
#1
|
|
Senior Member  Group: Members Posts: 971 Joined: 22-January 09 From: Panama City Beach, FL Member No.: 9,961 Region Association: South East States |
Brain fade so need help.
Installing new battery tray/support ......But trying to figure how I get paint everywhere as once in it blocks the surfaces in several places. Do I paint it then repaint or what. I know this is simple but evading me. Thanks Terry |
   |

 
|
  |
Replies(1 - 11)
| seareef228 |
Aug 8 2014, 05:49 PM
Post
#2
|
|
Newbie Group: Members Posts: 32 Joined: 13-May 14 From: so cal Member No.: 17,347 Region Association: None |
QUOTE(sixaddict @ Aug 8 2014, 03:32 PM)  Brain fade so need help. Installing new battery tray/support ......But trying to figure how I get paint everywhere as once in it blocks the surfaces in several places. Do I paint it then repaint or what. I know this is simple but evading me. Thanks Terry I doubt that is true , meaning first off your part should be finished in an powder coated finish or an epoxy sealer like dp50 by ppg or Valspar direct to metal is also a good one or a rust barrier paint ( por 15) then you weld it in ,recoat with por 15 if chosen, after its in any part you can see can be painted by a good painter . and the way I would paint is this way once its ready to spray it can be done 2 ways it can be sprayed wet on wet meaning you seal it with dp or Valspar then 1/2 later with no sanding you paint with a good urethane done... and if you prep right looks awesome( new car quality) or spray a direct to metal primer like Valspar reduced a different way so its a primer block it reprime and spray urethane ( show quality) just my 2 cents |
|
|
|
| Elliot Cannon |
Aug 8 2014, 06:21 PM
Post
#3
|
|
914 Guru Group: Retired Members Posts: 8,487 Joined: 29-December 06 From: Paso Robles Ca. (Central coast) Member No.: 7,407 Region Association: None |
Or, you could just mount it up front were it belongs. (IMG:style_emoticons/default/laugh.gif)
Attached image(s) 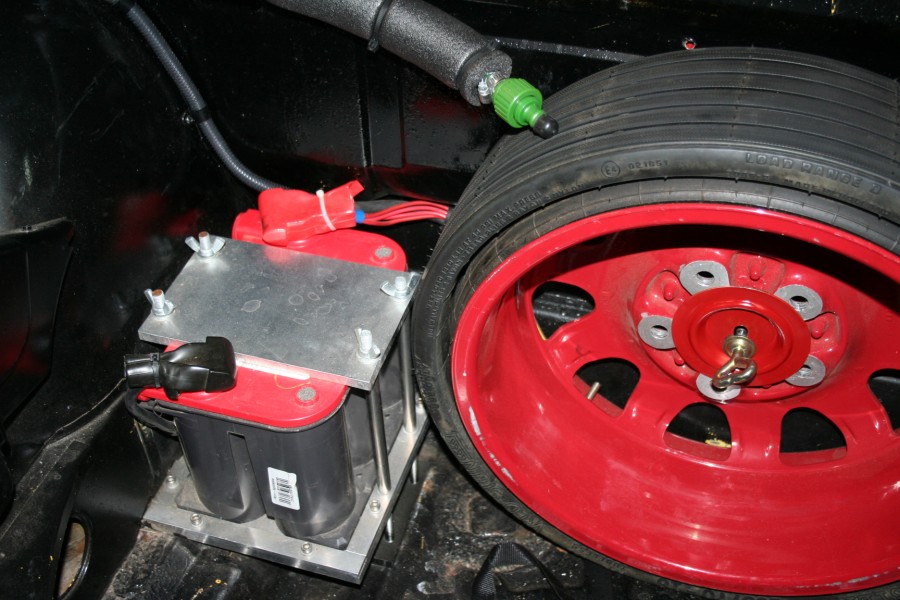
|
|
|
|
| sixaddict |
Aug 9 2014, 11:18 AM
Post
#4
|
|
Senior Member Group: Members Posts: 971 Joined: 22-January 09 From: Panama City Beach, FL Member No.: 9,961 Region Association: South East States |
Sorry but not sure I follow.
I want this body color and once installed I can't see how you get back side of panels and the body itself. The tray and support block the space under it . Not meaning to be blockhead but seem to be getting to that point. Thanks for input QUOTE(seareef228 @ Aug 8 2014, 03:49 PM) QUOTE(sixaddict @ Aug 8 2014, 03:32 PM) Brain fade so need help. Installing new battery tray/support ......But trying to figure how I get paint everywhere as once in it blocks the surfaces in several places. Do I paint it then repaint or what. I know this is simple but evading me. Thanks Terry I doubt that is true , meaning first off your part should be finished in an powder coated finish or an epoxy sealer like dp50 by ppg or Valspar direct to metal is also a good one or a rust barrier paint ( por 15) then you weld it in ,recoat with por 15 if chosen, after its in any part you can see can be painted by a good painter . and the way I would paint is this way once its ready to spray it can be done 2 ways it can be sprayed wet on wet meaning you seal it with dp or Valspar then 1/2 later with no sanding you paint with a good urethane done... and if you prep right looks awesome( new car quality) or spray a direct to metal primer like Valspar reduced a different way so its a primer block it reprime and spray urethane ( show quality) just my 2 cents |
|
|
|
| r_towle |
Aug 9 2014, 11:59 AM
Post
#5
|
|
Custom Member Group: Members Posts: 24,705 Joined: 9-January 03 From: Taxachusetts Member No.: 124 Region Association: North East States |
It's spot welded around the base.
Paint, grind areas just for the spot welds. Weld, then spray those welds with paint. |
|
|
|
| scotty b |
Aug 9 2014, 12:09 PM
Post
#6
|
|
rust free you say ? Group: Members Posts: 16,375 Joined: 7-January 05 From: richmond, Va. Member No.: 3,419 Region Association: None |
weld through prime everything
weld the support in. Tape off the top flanges of the support. The top side is still open so you can paint inside the support. Set the tray on top and line up the bolt hole. Scribe the outer edge of the support flanges onto the tray. Remove tray and using 1/2 masking tape, mask off from the scribe line inward on the tray. Paint the tray bottom. Place tray on support and spot weld around the edges. Clean up welds and paint outer edges and top of tray |
|
|
|
| toolguy |
Aug 9 2014, 12:25 PM
Post
#7
|
|
Senior Member Group: Members Posts: 1,276 Joined: 2-April 11 From: San Diego / El Cajon Member No.: 12,889 Region Association: Southern California |
Having had the same concerns, here's what I did. . fit the stand in the correct location on the body. . drill small holes[ you only need a couple and use cleco clamps or tiny bolts like a 4-40 or so to temporarily fixture it in. . place the battery tray on top, align, clamp and drill small holes to fixture it in place. .
Remove the base, weld the tray to base, now paint the inside where you won't be able to get to when it's all installed. . now place that assembly back in the body and clamp or bolt. . and weld. Paint as needed for the top and outside. . any part inside the framework that the first coat of inside paints burns off when welding, use a long brush and dab paint to protect. . For welding, I drilled 1/4 inch holes thru the top metal and filled them with welds to the base rather than welding all around the perimeter.. looks a lot cleaner and holds fine. |
|
|
|
| seareef228 |
Aug 9 2014, 03:38 PM
Post
#8
|
|
Newbie Group: Members Posts: 32 Joined: 13-May 14 From: so cal Member No.: 17,347 Region Association: None |
if you are concerned about that then you can paint it first then weld it in and repaint welds
|
|
|
|
| sixaddict |
Aug 9 2014, 06:13 PM
Post
#9
|
|
Senior Member Group: Members Posts: 971 Joined: 22-January 09 From: Panama City Beach, FL Member No.: 9,961 Region Association: South East States |
Bingo! I appreciate the help.
|
|
|
|
| Triaddave |
Aug 9 2014, 08:04 PM
Post
#10
|
|
Member Group: Members Posts: 244 Joined: 31-December 03 From: olympia,wa Member No.: 1,478 |
My upper tray is removeable. Two bolt through the wheel well and when removed the hell hole and under the tray are easy to clean or paint.
|
|
|
|
| rgalla9146 |
Aug 10 2014, 09:44 AM
Post
#11
|
|
Advanced Member Group: Members Posts: 4,806 Joined: 23-November 05 From: Paramus NJ Member No.: 5,176 Region Association: None |
My whole support and tray is removable as a single part.
I welded two bolts through the fender edge of the tray. Two fender washers,two lock washers and two nuts in the inner fender attach it there. The support is attached with two bolts through the bottom flange into two nuts welded into the long below the battery. I'll post pictures later. |
 |
|
| Steve73 |
Nov 9 2014, 03:00 PM
Post
#12
|
|
Photographer/Shade Tree Mechanic Group: Members Posts: 125 Joined: 2-July 11 From: Nashville Member No.: 13,269 Region Association: South East States |
(IMG:http://www.914world.com/bbs2/uploads_offsite/www.crushable.com-13269-1415566847.1.gif)
About to install the new tray, interested in seeing a finished removable tray before I start my project. Thanks! Stephen QUOTE(rgalla9146 @ Aug 10 2014, 09:44 AM) My whole support and tray is removable as a single part. I welded two bolts through the fender edge of the tray. Two fender washers,two lock washers and two nuts in the inner fender attach it there. The support is attached with two bolts through the bottom flange into two nuts welded into the long below the battery. I'll post pictures later. |
|
|
|
|
1 User(s) are reading this topic (1 Guests and 0 Anonymous Users)
0 Members:

|
Lo-Fi Version | Time is now: 19th September 2025 - 01:24 PM |
Invision Power Board
v9.1.4 © 2025 IPS, Inc.